
Legal Notice
©
Cloudera Inc. 2024. All rights reserved.
The documentation is and contains Cloudera proprietary information protected by copyright and other intellectual property
rights. No license under copyright or any other intellectual property right is granted herein.
Unless otherwise noted, scripts and sample code are licensed under the Apache License, Version 2.0.
Copyright information for Cloudera software may be found within the documentation accompanying each component in a
particular release.
Cloudera software includes software from various open source or other third party projects, and may be released under the
Apache Software License 2.0 (“ASLv2”), the Affero General Public License version 3 (AGPLv3), or other license terms.
Other software included may be released under the terms of alternative open source licenses. Please review the license and
notice files accompanying the software for additional licensing information.
Please visit the Cloudera software product page for more information on Cloudera software. For more information on
Cloudera support services, please visit either the Support or Sales page. Feel free to contact us directly to discuss your
specific needs.
Cloudera reserves the right to change any products at any time, and without notice. Cloudera assumes no responsibility nor
liability arising from the use of products, except as expressly agreed to in writing by Cloudera.
Cloudera, Cloudera Altus, HUE, Impala, Cloudera Impala, and other Cloudera marks are registered or unregistered
trademarks in the United States and other countries. All other trademarks are the property of their respective owners.
Disclaimer: EXCEPT AS EXPRESSLY PROVIDED IN A WRITTEN AGREEMENT WITH CLOUDERA,
CLOUDERA DOES NOT MAKE NOR GIVE ANY REPRESENTATION, WARRANTY, NOR COVENANT OF
ANY KIND, WHETHER EXPRESS OR IMPLIED, IN CONNECTION WITH CLOUDERA TECHNOLOGY OR
RELATED SUPPORT PROVIDED IN CONNECTION THEREWITH. CLOUDERA DOES NOT WARRANT THAT
CLOUDERA PRODUCTS NOR SOFTWARE WILL OPERATE UNINTERRUPTED NOR THAT IT WILL BE
FREE FROM DEFECTS NOR ERRORS, THAT IT WILL PROTECT YOUR DATA FROM LOSS, CORRUPTION
NOR UNAVAILABILITY, NOR THAT IT WILL MEET ALL OF CUSTOMER’S BUSINESS REQUIREMENTS.
WITHOUT LIMITING THE FOREGOING, AND TO THE MAXIMUM EXTENT PERMITTED BY APPLICABLE
LAW, CLOUDERA EXPRESSLY DISCLAIMS ANY AND ALL IMPLIED WARRANTIES, INCLUDING, BUT NOT
LIMITED TO IMPLIED WARRANTIES OF MERCHANTABILITY, QUALITY, NON-INFRINGEMENT, TITLE, AND
FITNESS FOR A PARTICULAR PURPOSE AND ANY REPRESENTATION, WARRANTY, OR COVENANT BASED
ON COURSE OF DEALING OR USAGE IN TRADE.
Cloudera Runtime | Contents | iii
Contents
Upgrading Ozone overview..................................................................................... 6
Backing up Ozone................................................................................................................................................ 6
Upgrading Ozone parcels..................................................................................................................................... 6
Ozone S3 Multitenancy overview (Technical Preview).........................................7
Prerequisites to enable S3 Multitenancy..............................................................................................................7
Enabling S3 Multi-Tenancy................................................................................................................................. 7
Tenant Commands................................................................................................................................................8
Multi Protocol Aware System overview.................................................................9
Upgrading this feature from older Ozone version to 7.1.8..................................................................................9
Files and Objects together..................................................................................................................................10
Bucket Layout.....................................................................................................................................................10
Ozone FS namespace optimization with prefix..................................................................................... 12
OBS as Pure Object Store......................................................................................................................15
Configuration to create bucket with default layout........................................................................................... 15
Performing Bucket Layout operations in Apache Ozone using CLI.................................................................16
FSO operations....................................................................................................................................... 16
Object Store operations using AWS client............................................................................................ 17
Object Store operations using Ozone shell command........................................................................... 18
Ozone Ranger policy..........................................................................................................................................18
Ozone Ranger Integration..................................................................................... 18
Configuring a resource-based policy using Ranger...........................................................................................19
Erasure Coding overview.......................................................................................21
Enabling EC replication configuration cluster-wide..........................................................................................21
Enabling EC replication configuration on bucket..............................................................................................22
Enabling EC replication configuration on keys or files.................................................................................... 22
Container Balancer overview................................................................................ 23
Container balancer CLI commands....................................................................................................................23
Configuring container balancer service..............................................................................................................23
Activating container balancer using Cloudera Manager....................................................................................24
Managing storage elements by using the command-line interface.................... 25
Commands for managing volumes.....................................................................................................................25
Assigning administrator privileges to users...........................................................................................27
Commands for managing buckets......................................................................................................................28
Commands for managing keys...........................................................................................................................29
Using Ozone S3 Gateway to work with storage elements...................................31
Cloudera Runtime | Contents | iv
Configuration to expose buckets under non-default volumes............................................................................31
REST endpoints supported on Ozone S3 Gateway........................................................................................... 31
Configuring Ozone to work as a pure object store............................................................................................32
Access Ozone S3 Gateway using the S3A filesystem.......................................................................................32
Accessing Ozone S3 using S3A FileSystem..........................................................................................33
Examples of using the S3A filesystem with Ozone S3 Gateway..........................................................36
Configuring Spark access for S3A.........................................................................................................36
Configuring Hive access for S3A.......................................................................................................... 38
Configuring Impala access for S3A.......................................................................................................39
Using the AWS CLI with Ozone S3 Gateway.................................................................................................. 40
Configuring an https endpoint in Ozone S3 Gateway to work with AWS CLI.....................................40
Examples of using the AWS CLI for Ozone S3 Gateway.................................................................... 41
Accessing Ozone object store with Amazon Boto3 client................................... 43
Obtaining resources to Ozone............................................................................................................................43
Obtaining client to Ozone through session........................................................................................................43
List of APIs verified...........................................................................................................................................44
Create a bucket....................................................................................................................................... 44
List buckets.............................................................................................................................................44
Head a bucket......................................................................................................................................... 44
Delete a bucket....................................................................................................................................... 44
Upload a file...........................................................................................................................................45
Download a file...................................................................................................................................... 45
Head an object........................................................................................................................................45
Delete Objects.........................................................................................................................................45
Multipart upload......................................................................................................................................45
Working with Ozone File System (ofs).................................................................46
Setting up ofs......................................................................................................................................................46
Volume and bucket management using ofs.......................................................................................................47
Key management using ofs................................................................................................................................48
Working with Ozone File System (o3fs)...............................................................49
Setting up o3fs....................................................................................................................................................49
Ozone configuration options to work with CDP components............................ 50
Configuration options for Spark to work with Ozone File System (ofs)...........................................................50
Configuration options to store Hive managed tables on Ozone........................................................................ 50
Overview of the Ozone Manager in High Availability....................................... 51
Considerations for configuring High Availability on the Ozone Manager........................................................51
Ozone Manager nodes in High Availability...................................................................................................... 51
Read and write requests with Ozone Manager in High Availability.....................................................51
Overview of Storage Container Manager in High Availability..........................52
Considerations for configuring High Availability on Storage Container Manager........................................... 52
Storage Container Manager operations in High Availability............................................................................ 53
Offloading Application Logs to Ozone.................................................................53
Cloudera Runtime | Contents | v
Removing Ozone DataNodes from the cluster.....................................................54
Decommissioning Ozone DataNodes.................................................................................................................54
Placing Ozone DataNodes in offline mode........................................................................................................55
Configuring the number of storage container copies for a DataNode...............................................................55
Recommissioning an Ozone DataNode..............................................................................................................56
Handling datanode disk failure.......................................................................................................................... 56
Multi-Raft configuration for efficient write performances................................ 56
Working with the Recon web user interface....................................................... 57
Access the Recon web user interface................................................................................................................ 57
Elements of the Recon web user interface........................................................................................................ 58
Overview page........................................................................................................................................58
DataNodes page......................................................................................................................................58
Pipelines page......................................................................................................................................... 59
Missing Containers page........................................................................................................................ 60
Configuring Ozone to work with Prometheus.....................................................61
Ozone trash overview.............................................................................................62
Configuring the Ozone trash checkpoint values..................................................62

Cloudera Runtime Upgrading Ozone overview
Upgrading Ozone overview
You must understand the overview of the upgrade feature. By upgrading the CDP Runtime parcels using Cloudera
Manager, Ozone is also upgraded. This Ozone upgrade provides you with new features that are made available with
the 7.1.8 release.
This feature helps you upgrade or downgrade Ozone. Ozone upgrade from Cloudera Manager is managed by
upgrading the CDP parcels. Before upgrading the CDP parcels, as a pre-upgrade step, you must take a backup of OM
metadata and SCM metadata. Ozone will be brought to a read-only state before the upgrade and this helps the OMs to
synchronize before the upgrade. The upgrade is completely managed by Cloudera Manager.
When the new version of Ozone starts, new features are not yet available. This allows you to downgrade to an older
version. In case you wish to downgrade, then the older version of Ozone is restored. However, data written in the
newer version is still readable by the older version of Ozone.
If you wish to finalize the upgrade and enable the new features, you must run the Finalize Upgrade command. This
updates the metadata layout of Ozone services, persists the changes required for the new version, and enables the new
features.
Note: After running the Finalize Upgrade command, it is not possible to downgrade.
Backing up Ozone
You must shutdown the cluster and take the backup of OM and SCM metadata.
About this task
Note: To locate the hostnames required to backup OM and SCM, open the Cloudera Manager Admin
Console, go to the Ozone service, and click the Instances tab.
Procedure
1.
On each OM, copy the directories indicated by the ozone.om.db.dirs and ozone.om.ratis.storage.dir config keys to
the backup location by running the command cp -r <config_directory> <backup_directory>.
2.
On each SCM, copy the directories indicated by the ozone.scm.db.dirs and ozone.scm.ha.ratis.storage.dir
config keys to the backup location by running the command cp -r <config_directory>
<backup_directory>.
Note: You must take a backup of ozone.scm.ha.ratis.storage.dir only if ozone.scm.ratis.enable is set to
true.
Upgrading Ozone parcels
You must upgrade the CDP Runtime parcels which in turn updates Ozone. To complete the upgrade of Ozone
services, you must finalize the upgrade. This allows you to access the latest features available for this release.
Procedure
1.
Using Cloudera Manager, upgrade the CDP parcels. This upgrades Ozone as well.
2.
Click the Finish Upgrade option. In this state you can read and write to ensure that the Ozone cluster is working as
expected. At this stage, you can decide to finalize the upgrade or downgrade to the previous version.
6

Cloudera Runtime Ozone S3 Multitenancy overview (Technical Preview)
3.
Click the Finalize Upgrade option. At this stage, the cluster will be in the read-only state. After sufficient
DataNodes finalize to serve writes, the cluster will leave the read-only state.
Note: After running the Finalize Upgrade command, it is not possible to downgrade.
Ozone S3 Multitenancy overview (Technical Preview)
Apache Ozone now supports the multi-tenancy feature. This feature enables Ozone to compartmentalize the resources
and create multiple tenants.
Technical Preview: This is a technical preview feature and considered under development. Do not use this in your
production systems. To share your feedback, contact Support by logging a case on our Cloudera Support Portal.
Technical preview features are not guaranteed troubleshooting guidance and fixes.
You can access multiple S3-accessible Ozone volumes available over AWS S3 using CLI or APIs. You can control
each of these volumes with Ozone administrator privileges or tenant administrator privileges. You can use Apache
Ranger to control the volume, bucket and key access.
Each tenant by default has a volume assigned. An administrator can provide the volume access to a user. An Access
ID & Secret Key pair is generated for every user to access the volume. An Ozone administrator can then assign one
or more tenant users with the tenant administrator privilege in a tenant, so these tenant administrators can assign and
revoke users from the tenant without involving the Ozone administrators.
Prerequisites to enable S3 Multitenancy
Before you proceed to enabling the feature, you must understand the prerequisites that is required mandatorily.
• To have a secure cluster, you must enable Kerberos Authentication. For more information, see Securing the
cluster using Kerberos.
• You must perform a one-time configuration change in Ranger UserSync to add an om user or short username that
Ozone Manager is using for Kerberos authentication to the ranger.usersync.whitelist.users.role.assignment.rules
configuration.
Note: This would no longer be necessary once Ranger allows service admin users to create, update, and
delete Ranger roles.
• You must have a minimum of one S3 Gateway setup in order to access the tenant buckets with S3 API. For more
information, see Using Ozone S3 gateway.
• You can create additional Ozone policies using Ranger, For more information, see Configure a resource-based
policy.
Enabling S3 Multi-Tenancy
You must perform the following steps to enable the S3 multi-tenancy feature.
Procedure
1.
Log in to Cloudera Manager UI
2.
Navigate to Clusters
3.
Select the Ozone service
4.
Go to Configurations
5.
Search for Enable Ozone S3 Multi-Tenancy and select the checkbox
6.
Click Save Changes
7

Cloudera Runtime Ozone S3 Multitenancy overview (Technical Preview)
7.
Restart the Ozone service
Tenant Commands
After setting up the S3 Multi-Tenancy feature, you can create and list tenants, assign users to tenants and also assign
admin privileges, revoke admin access or even delete a tenant and so on.
The following commands assume that the cluster is Kerberized and Ranger enabled.
Note: If you have enabled Ozone Manager HA on the Ozone service, then you must append --om-
service-id= to the commands.
Creating a tenant
To create a new tenant in the Ozone cluster, you must have cluster admin privileges defined in ozone.administrators
configuration. When you create a tenant, a volume with the same name will be created. However, tenant name and
volume name must be the same and tenant volume cannot be changed after the tenant is created.
To create a new tenant, execute the following command: ozone tenant [--verbose] create <TENANT_NAME>
Listing a tenant
To list all tenants in an Ozone cluster, execute the following command: ozone tenant list [--json]
Assiging a user to a tenant
Only an Ozone cluster administrator can assign the first user to a tenant. After the first user gets admin privileges, the
first user can create and assign new users. A user can be assigned multiple tenants.
To assign a user to a tenant, execute the following command: ozone tenant [--verbose] user assign <USER_NAME>
--tenant=<TENANT_NAME>
Assigning a user as a tenant admin
Only an Ozone cluster administrator can assign the first user to a tenant along with access key ID/secret pair. After
the first user gets admin privileges, the first user can create and assign new users. A user can be assigned multiple
tenants.
Both delegated and non-delegated tenant admins can assign and revoke tenant users from their tenant. However, only
a delegated admin can assign and revoke the tenant admins from a tenant.
You can be a tenant admin in multiple tenants. However, you will be assigned different access IDs under each tenant.
To assign a user as a tenant admin (the current logged-in user must have Ozone cluster administrator or tenant
delegated administrator privilege), execute the following command:
ozone tenant user assignadmin <ACCESS_ID> [-d|--delegated]
--tenant=<TENANT_NAME>
Listing users in a tenant
To list users in a tenant, execute the following command: ozone tenant user list [--json] <TENANT_NAME>
Getting tenant user info
To get tenant user’s information, execute the following command: ozone tenant user info [--json] <USER_NAME>
8

Cloudera Runtime Multi Protocol Aware System overview
Revoking a tenant admin
To revoke a tenant admin, execute the following command: ozone tenant [--verbose] user revokeadmin <ACCESS_
ID>
Revoking user access from a tenant
To revoke the user access from a tenant, execute the following command:
ozone tenant [--verbose] user revoke <ACCESS_ID>
Deleting a tenant
The tenant must be empty and all admin user access revoked before deleting a tenant. This is a safety design to ensure
that even if a tenant is deleted, the volume created for the tenant is intact.
To delete a tenant, execute the following command: ozone tenant [--verbose] delete <TENANT_NAME>
Note: After a successful tenant delete command, the tenant information is removed from the Ozone Manager
database and default tenant policies are removed from Ranger, but the volume itself along with its data is not
removed. An admin can delete a volume manually using CLI.
Multi Protocol Aware System overview
The overview helps you to understand Ozone file system support, differences between flat namespace and
hierarchical namespace, different bucket layouts, and their use cases.
Ozone natively provides Amazon S3 and Hadoop Filesystem compatible endpoints and is designed to work
seamlessly with enterprise scale Data Warehousing, Batch Analytics, Machine Learning, Streaming Workloads, and
so on. The prominent use cases based on the integration with storage service are mentioned below:
• Ozone as a pure S3 object store semantics
• Ozone as a replacement filesystem for HDFS to solve the scalability issues
• Ozone as a Hadoop Compatible File System (HCFS) with limited S3 compatibility. For example, for key paths
with “/” in it, intermediate directories will be created.
• Multiprotocol access - Interoperability of the same data for various workloads.
Upgrading this feature from older Ozone version to 7.1.8
You must first upgrade Ozone and perform the pre and post finalization steps to use this feature.
Procedure
1.
Pre-Finalization Phase: You can only create buckets with a LEGACY layout. If any client (old or new) tries to
create a new bucket with OBJECT_STORE or FILE_SYSTEM_OPTIMIZED layout, this request is blocked.
2.
Post-Finalization Phase:
a) New Clients: Full Bucket Layout feature is available.
b) Old Clients: You cannot interact with any buckets that are not in LEGACY layout. This means they cannot
talk to FSO or OBS buckets. Ozone displays the UNSUPPORTED_OPERATION exception in all such cases.
For example, attempts to create directories and keys, list status, read bucket info, and so on will also display an
UNSUPPORTED_OPERATION exception
9

Cloudera Runtime Multi Protocol Aware System overview
Files and Objects together
Bucket Layout concept is now introduced in Ozone that helps you with the unified design representing files,
directories, and objects stored in a single system.
A single unified design represents files, directories, and objects stored in a single system. Ozone performs this by
introducing the bucket layout concept in the metadata namespace server. With this, a single Ozone cluster with the
capabilities of both Hadoop Compatible File System (HCFS) and Object Store (like Amazon S3) features by storing
files, directories, objects and buckets efficiently. Also, the same data can be accessed using various protocols.
Bucket Layout
Apache Ozone now supports bucket layout feature. This helps you in categorising different Ozone buckets like FSO,
OBS, and Legacy.
Apache Ozone object store now supports a multi-protocol aware Bucket Layout. The purpose is to categorize Ozone
Bucket based on the prominent use cases:
• FILE_SYSTEM_OPTIMIZED (FSO) Bucket
• Hierarchical FileSystem namespace view with directories and files similar to HDFS.
• Provides high performance namespace metadata operations similar to HDFS.
• Provides capabilities to read/write using Amazon S3.
• OBJECT_STORE (OBS) Bucket - Provides a flat namespace (key-value) similar to Amazon S3.
• LEGACY Bucket - Represents existing pre-created buckets for smooth upgrades from previous Ozone version to
the new Ozone version
10

Cloudera Runtime Multi Protocol Aware System overview
You can create FSO/OBS/LEGACY buckets using following shell commands. You can specify the bucket type in the
layout parameter.
• $ ozone sh bucket create --layout FILE_SYSTEM_OPTIMIZED /s3v/fso-bucket
• $ ozone sh bucket create --layout OBJECT_STORE /s3v/obs-bucket
• $ ozone sh bucket create --layout LEGACY /s3v/bucket
This table explains the differences between Bucket Type and Client Interface
Bucket Type S3 Compatible Interface ofs o3fs (Deprecated, not
recommended)
URL Scheme: http://
bucket.host:9878/
URL Scheme: ofs://om-id/
volume/bucket/key
URL Scheme: o3fs://
bucket.volume.om-id/key
FSO Supports Read, Write, and
Delete operations
Supports Read, Write, and
Delete operations
Supports Read, Write, and
Delete operations
OBS Supports Read, Write, and
Delete operations
Unsupported Unsupported
11

Cloudera Runtime Multi Protocol Aware System overview
Note: FSO and OBS are accessible only on CDP Private Cloud 7.1.8 onwards.
Ozone FS namespace optimization with prefix
Ozone now supports FS namespace optimization with prefix that provides atomicity and consistency in renaming
and deleting files and subdirectories under a directory. Ozone now handles partial failures and performance is now
deterministic.
FSO feature helps in performing the rename or delete metadata operations for the directories which have large
sub-trees or sub-paths. With this feature, Ozone handles partial failures and provides atomicity and consistency in
renaming and deleting each and every file and subdirectory under a directory. Performance is deterministic now and
is similar to HDFS, especially for the delete and rename metadata operations, and if you are running the Spark or
Hive like big data queries.
Highlights of this feature:
• Provide an efficient Hierarchical FileSystem Namespace view with intermediate directories similar to HDFS.
• Support for Atomic Rename and Deletes. This helps Hive, Impala, and Spark for job and task commits.
• Strong consistency guarantees without any partial results in case of directory rename or delete failures.
• Rename, move, and recursive directory delete operations should have deterministic performance numbers
irrespective of the large set of subpaths (directories/files) contained within it.
Changes you can observe by using this feature:
• Apache Hive drop table query, recursive directory deletion, and directory moving operations becomes faster and
consistent without any partial results in case of any failure.
• Dropping a managed Impala table should be efficient without requiring O(n) RPC calls where n is the number of
file system objects for the table.
• Job Committers of Hive, Impala, and Spark often rename their temporary output files to a final output location
at the end of the job. The performance of the job is directly impacted by how quickly the rename operation is
completed.
• ACL support through Apache Ranger.
• For more information on understanding the performance capabilities between Apache Ozone and S3 API and how
to natively integrate workloads, see High Performance Object Store for CDP Private Cloud and High Performance
Object Store for CDP Private Cloud.
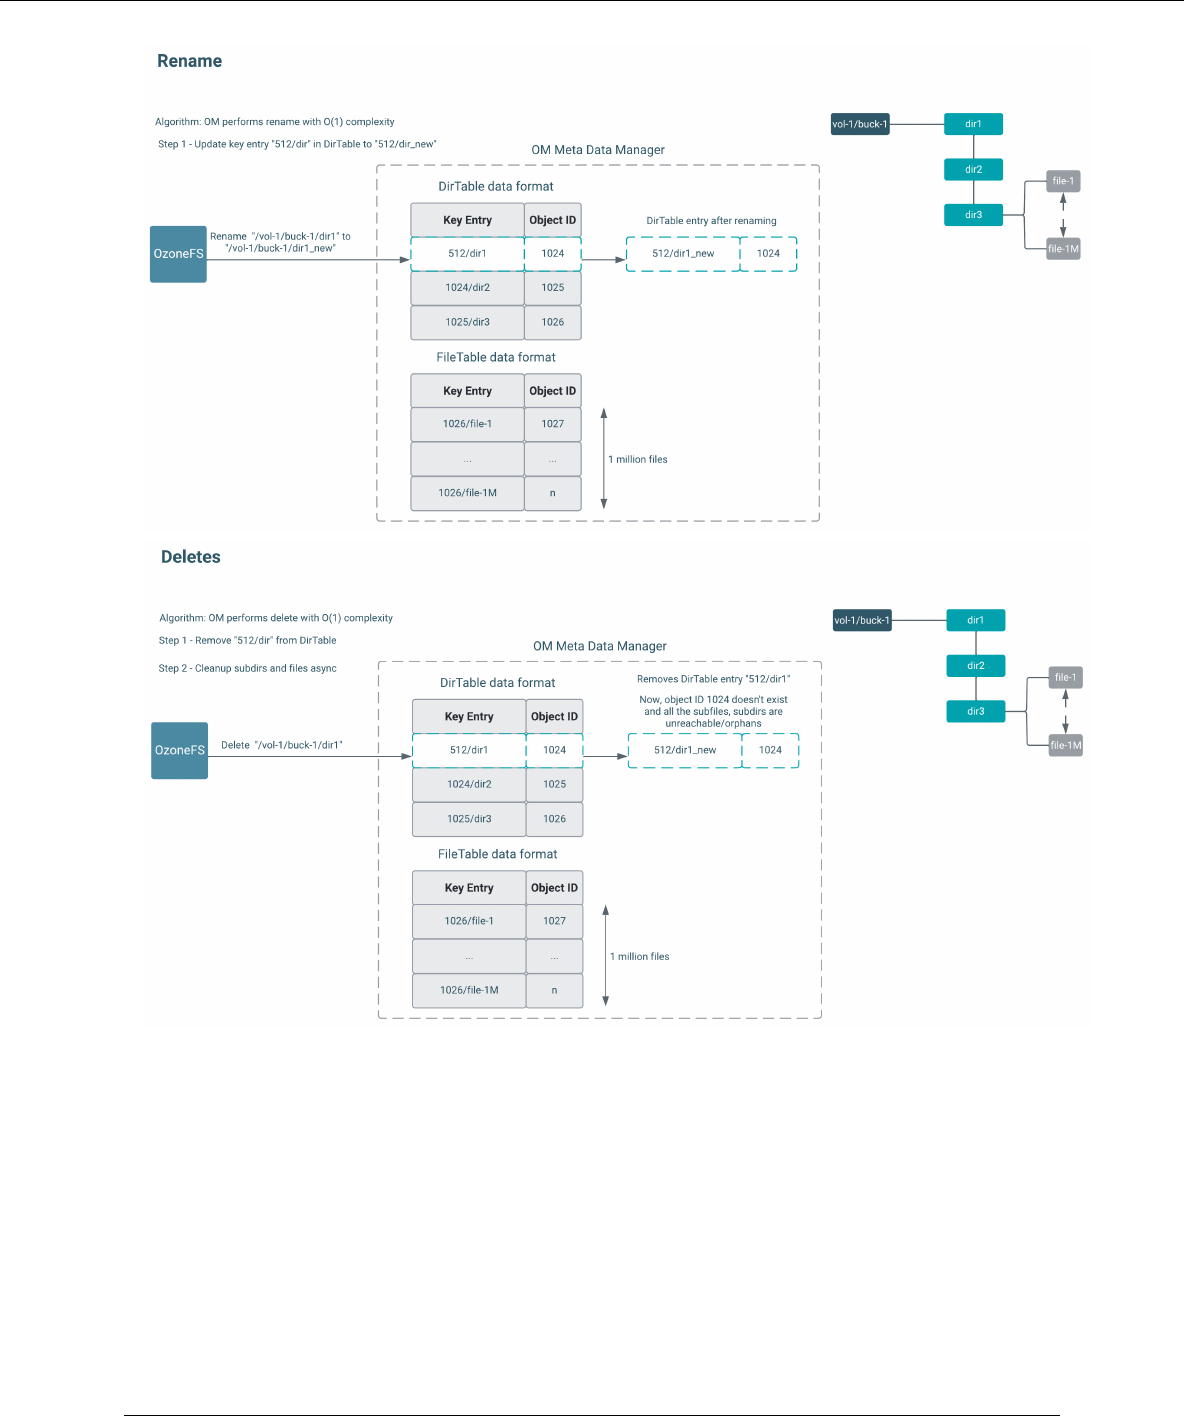
Metadata layout format
In the File System Optimized (FSO) buckets, OM metadata format stores intermediate directories into DirectoryTable
and files into FileTable as shown in the below picture. The key to the table is the name of a directory or a file prefixed
by the unique identifier of its parent directory <parent unique-id>/<filename>
12

Cloudera Runtime Multi Protocol Aware System overview
Delete and Rename Operation
Currently, in the Legacy Ozone file system to delete or rename dir 1, you have to delete or rename dir 1 in all the
rows. This is expensive, time consuming, and not scalable.
Now, there is an object ID allocated for every path created. Deleting or renaming dir 1 now updates all rows based on
the Object ID. The images below explain how rename and delete operations work.
13
Cloudera Runtime Multi Protocol Aware System overview
Interoperability Between S3 and FS APIs
FSO Bucket Layout supports interoperability of data for various use cases. For example, You can create an FSO
Bucket type and ingest data into Apache Ozone using FileSystem API. The same data can be accessed through the
Ozone S3 API (Amazon S3 implementation of the S3 API protocol) and vice versa.
Multi-protocol client access - read/write operations using Ozone S3 and Ozone FS client.
14

Cloudera Runtime Multi Protocol Aware System overview
OBS as Pure Object Store
OBS is the existing Ozone Manager metadata format which stores key entries with full path names, where the
common prefix paths will be duplicated for keys like shown in the below diagram.
Configuration to create bucket with default layout
You must set the following configuration in Cloudera Manager to create a bucket with default layout.
About this task
In Cloudera Manager, you must configure ozone-site.xml to define the default value for bucket layout during
bucket creation if the client has not specified the bucket layout argument. Supported values are OBJECT_STORE,
FILE_SYSTEM_OPTIMIZED, and LEGACY.
By default, this config value is empty. Ozone will default to LEGACY bucket layout if it finds an empty config value.
You must add the below property and provide the value.
15

Cloudera Runtime Multi Protocol Aware System overview
Procedure
1.
Log in to Cloudera Manager UI
2.
Navigate to Clusters
3.
Select the Ozone service
4.
Go to Configurations
5.
Search for Ozone Manager Advanced Configuration Snippet (Safety Valve) for ozone-conf/ozone-site.xml
a) Click Add
b) Click View as XML
c) Copy and paste: <property> <name>ozone.default.bucket.layout</name> <value/> </property>
d) Click View Editor. You must provide the values for the properties.
Property name Value
ozone.default.bucket.layout
Name of the property. By default, Legacy is the
bucket type.
Value Supported values are OBJECT_STORE or
FILE_SYSTEM_OPTIMIZED or LEGACY
Description Enter the Description for the property
e) Click Save Changes
f) Restart the Ozone service
Performing Bucket Layout operations in Apache Ozone using CLI
Run the below commands to get an understanding of the basic operations like create, list, move, read, write, and
delete
Procedure
1.
Creating FSO and OBS buckets using Ozone Shell:
a) ozone sh bucket create --layout FILE_SYSTEM_OPTIMIZED /s3v/fso-bucket
b) ozone sh bucket create --layout OBJECT_STORE /s3v/obs-bucket
2.
Bucket Info:
a) ozone sh bucket info /s3v/fso-bucket
b) ozone sh bucket info /s3v/obs-bucket
FSO operations
You can run the following commands for performing FSO operations.
Procedure
1.
Creating directories inside FSO buckets:
a) ozone fs -mkdir -p o3fs://fso-bucket.s3v.ozone1/dir1/dir2/dir3/
b) ozone fs -mkdir -p o3fs://fso-bucket.s3v.ozone1//aa///bb//cc///
In FSO, bucket paths will be normalized
2.
Listing FSO bucket ozone fs -ls -R o3fs://fso-bucket.s3v.ozone1/
3.
Creating some files inside FSO buckets
a) ozone fs -touch o3fs://fso-bucket.s3v.ozone1/dir1/dir2/dir3/file1
b) ozone fs -touch o3fs://fso-bucket.s3v.ozone1/dir1/dir2/dir3/file2
c) ozone fs -touch o3fs://fso-bucket.s3v.ozone1/aa/bb/cc/abc_file3
16

Cloudera Runtime Multi Protocol Aware System overview
4.
Listing FSO bucket ozone fs -ls -R o3fs://fso-bucket.s3v.ozone1/
5.
Move Command on a file, which internally does a renaming operation ozone fs -mv o3fs://fso-
bucket.s3v.ozone1/dir1/dir2/dir3/file2 o3fs://fso-bucket.s3v.ozone1/dir1/
dir2/
6.
Move Command on a directory, which internally does a renaming operation ozone fs -mv o3fs://fso-
bucket.s3v.ozone1/aa/ o3fs://fso-bucket.s3v.ozone1/new_aa
7.
Listing FSO bucket ozone fs -ls -R o3fs://fso-bucket.s3v.ozone1/
Multi Protocol Access operations using AWS Client
You can run the following commands to run multi protocol access operations using the AWS client.
Procedure
1.
Writing a new file to FSO bucket
a) aws s3 cp --endpoint-url http://0.0.0.0:9878 ozone.txt s3://fso-bucket/
dir1/dir2/dir3/awsfile1
b) aws s3 cp --endpoint-url http://0.0.0.0:9878 ozone.txt s3://fso-bucket/
dir1/dir2/dir3/awsfile2
2.
Reading from Ozone Bucket
a) aws s3api --endpoint http://0.0.0.0:9878 get-object --bucket fso-bucket --
key /dir1/dir2/dir3/awsfile1 ./ozone_doc
b) cat ./ozone_doc
3.
Listing Bucket Objects aws s3api --endpoint-url http://0.0.0.0:9878 list-objects --
bucket fso-bucket
4.
Deleting a file aws s3 rm --endpoint-url http://0.0.0.0:9878 s3://fso-bucket/dir1/
dir2/dir3/awsfile1
5.
Following operations using Ozone FS commands
a) Listing directory ozone fs -ls -R ofs://ozone1/s3v/fso-bucket/
b) Displaying the content of file ozone fs -cat ofs://ozone1/s3v/fso-bucket/dir1/dir2/
dir3/awsfile2
6.
Following operations using Ozone Shell commands
a) Listing Keys ozone sh key list /s3v/fso-bucket/
7.
Following operations using Ozone FS commands
a) Deleting a file ozone fs -rm -skipTrash ofs://ozone1/s3v/fso-bucket/dir1/dir2/
dir3/awsfile2
b) Deleting a directory ozone fs -rm -R -skipTrash ofs://ozone1/s3v/fso-bucket/dir1/
c) Listing directories (dir1 should not exist) ozone fs -ls -R ofs://ozone1/s3v/fso-bucket/
Object Store operations using AWS client
You can run the following commands for performing OBS operations using AWS Client.
Procedure
1.
Creating a bucket aws s3api --endpoint-url http://0.0.0.0:9878 create-bucket --
bucket=obs-s3bucket
2.
Bucket Info ozone sh bucket info /s3v/obs-s3bucket
3.
Writing a file to bucket
a) aws s3 cp --endpoint-url http://0.0.0.0:9878 ozone.txt s3://obs-s3bucket/
dir1/dir2/dir3/##awsfile1
b) aws s3 cp --endpoint-url http://0.0.0.0:9878 ozone.txt s3://obs-s3bucket/
dir1/dir2/dir3/##awsfile2
17

Cloudera Runtime Ozone Ranger Integration
4.
Reading the above file from bucket
a) rm -rf /tmp/sample.txt
b) ozone sh key get /s3v/obs-s3bucket/dir1/dir2/dir3/##awsfile1 /tmp/
sample.txt
c) cat /tmp/sample.txt
5.
Listing bucket object aws s3api --endpoint-url http://0.0.0.0:9878 list-objects --
bucket obs-s3bucket
6.
Deleting a key aws s3 rm --endpoint-url http://0.0.0.0:9878 s3://obs-s3bucket/
dir1/dir2/dir3/awsfile1
Object Store operations using Ozone shell command
You can run the following commands for performing OBS operations using Ozone shell command.
Procedure
1.
Writing a key to bucket ozone sh key put /s3v/obs-s3bucket/bb/cc/dd/file.txt
ozone.txt
2.
Reading key from bucket
a) rm -rf /tmp/sample.txt
b) ozone sh key get /s3v/obs-s3bucket/bb/cc/dd/file.txt /tmp/sample.txt
c) cat /tmp/sample.txt
3.
Deleting a key ozone sh key delete /s3v/obs-s3bucket/bb/cc/dd/file.txt
4.
Listing a key ozone sh key list /s3v/obs-s3bucket/
Ozone Ranger policy
Using the Ozone Ranger policy integration, you can set new Ozone Ranger policies.
Procedure
1.
Ranger permissions for OBJECT_STORE buckets
a) You must configure policy on a resource key path
b) Wild-Card: Keys starting with key path keyRoot/key*
2.
Ranger permissions for FILE_SYSTEM_OPTIMIZED buckets
a) Configure policy on resource path, which can be at the level of a specific file or directory path component.
b) Wild Cards: You can configure a policy for all sub-directories or sub-files using wildcards. For example, /root/
app*. For more information, refer performance optimized authorization approach for rename and recursive
delete operations in the Ranger Ozone plugin.
Note: For more information on setting Ozone Ranger policies, see Ranger Ozone Integration.
Ozone Ranger Integration
Set up policies in Ranger for the users to have the right access permissions to the various Ozone objects such as
buckets and volumes.
When using Ranger to provide a particular user with read/write permissions to a specific bucket, you must configure a
separate policy for the user to have read access to the volume in addition to policies configured for the bucket.
18

Cloudera Runtime Ozone Ranger Integration
Configuring a resource-based policy using Ranger
Using Ranger, you can setup new Ozone policies that will help you to set right access permissions to various Ozone
objects like volumes and buckets.
About this task
Through configuration, Apache Ranger enables both Ranger policies and Ozone permissions to be checked for a
user request. When the Ozone Manager receives a user request, the Ranger plugin checks for policies set through the
Ranger Service Manager. If there are no policies, the Ranger plugin checks for permissions set in Ozone.
Cloudera recommends you to create permissions at the Ranger Service Manager, and to have restrictive permissions
at the Ozone level.
Procedure
1.
On the Service Manager page, select an existing Ozone service. The List of Policies page appears.
2.
Click Add New Policy. The Create Policy page appears.
3.
Complete the Create Policy page as follows:
Field Description
Policy Name
Enter a unique name for this policy. The name cannot
be duplicated anywhere in the system.
Normal or Override
Enables you to specify an override policy. When
override is selected, the access permissions in the
policy override the access permissions in existing
policies. This feature can be used with Add Validity
Period to create temporary access policies that override
existing policies.
Add Validity Period
Specify a start and end time for the policy.
Policy Label
(Optional) Specify a label for this policy. You can
search reports and filter policies based on these labels.
Ozone Volume
Specify volumes that can be accessed. Ensure that the
Ozone volume key is set to Include.
19

Cloudera Runtime Ozone Ranger Integration
Field Description
If you want to deny access at the volume level, then
disable this option by turning off using the Ozone
Volume key to Exclude.
Bucket
Specify buckets that can be accessed. Ensure that the
Ozone Bucket key is set to Include.
If you want to deny access at the bucket level, then
disable this option by turning off using the bucket key.
Or, select None from the Bucket drop-down.
Key
Provide the Key
Recursive or Non Recursive
Recursive or Non recursive function
Description
(Optional) Describe the purpose of the policy.
Audit Logging
Specify whether this policy is audited. To disable
auditing, turn off the Audit Logging key.
4.
Allow Conditions
Label Description
Select Role
Specify the roles to which this policy applies.
To designate a role as an Administrator, select the
Delegate Admin check box. Administrators can edit
or delete the policy, and can also create child policies
based on the original policy.
Select Group
Specify the groups to which this policy applies.
To designate a group as an Administrator, select the
Delegate Admin check box. Administrators can edit
or delete the policy, and can also create child policies
based on the original policy.
The public group contains all users, so granting access
to the public group grants access to all users.
Select User
Specify the users to which this policy applies.
To designate a user as an Administrator, select the
Delegate Admin check box. Administrators can edit
or delete the policy, and can also create child policies
based on the original policy.
Policy Conditions
Provide the IP address range
Permissions
Add or edit permissions: All, Read, Write,, Create,
List, Delete, Read_ACL, Write_ACL, Select/Deselect
All.
Delegate Admin
You can use Delegate Admin to assign administrator
privileges to the roles, groups, or users specified in the
policy. Administrators can edit or delete the policy,
20

Cloudera Runtime Erasure Coding overview
Label Description
and can also create child policies based on the original
policy.
Note: You can use the Plus (+) symbol to add additional conditions. Conditions are evaluated in the order
listed in the policy. The condition at the top of the list is applied first, then the second, then the third,
and so on. Similarly, you can also exclude certain Allow Conditions by adding them to the Exclude from
Allow Conditions list.
5.
You can use the Deny All Other Accesses toggle key to deny access to all other users, groups, and roles other than
those specified in the allow conditions for the policy.
6.
If you wish to deny access to a few or specific users, groups, or roles, then use must set Deny Conditions.
You can use the Plus (+) symbol to add deny conditions. Conditions are evaluated in the order listed in the policy.
The condition at the top of the list is applied first, then the second, then the third, and so on. Similarly, you can
also exclude certain Deny Conditions by adding them to the Exclude from Deny Conditions list.
7.
Click Add.
Erasure Coding overview
The Ozone Erasure Coding feature provides data durability and fault-tolerance along with reduced storage space and
ensures data durability similar to Ratis THREE replication approach.
The Ozone default replication scheme Ratis THREE has 200% overhead storage space including other resources.
Using EC in place of replication helps in reducing storage cost as the overhead storage space is only 50%. For
example, if you replicate 6 blocks of data, you need 18 blocks of disk space in Ratis. However, if you use EC with
Ozone, you need 6 blocks plus 3 parity totalling to 9 blocks of disk space.
Write and read using EC
When a client requests write, OM allocates a block group (data and parity) number of nodes from the pipeline to the
client. Client writes d number of chunks to d number of nodes. Parity chunks(p) are created and transferred to the
remaining p number of nodes. After this process is completed, the client can request for a new block group after the
writing of the current block group is finished.
For reads, OM provides the node location information. If the key is erasure coded, the client reads the data in the EC
way.
Note:
• Cloudera recommends you to use the Erasure Coding feature at the bucket level so that EC is applied on
all the keys created in a bucket. However, you can configure EC at key level as well.
• If you do not want EC to be configured for specific keys, you can explicitly specify the replication
configuration for those keys.
• If replication configuration is not defined specifically for both buckets and keys, then cluster-wide or
global default configuration is applied.
Enabling EC replication configuration cluster-wide
You can set cluster-wide default Replication configuration with EC by using the configuration keys
ozone.server.default.replication.type and ozone.server.default.replication.
Procedure
1.
Log in to Cloudera Manager UI
2.
Navigate to Clusters
21

Cloudera Runtime Erasure Coding overview
3.
Select the Ozone service
4.
Go to Configurations
5.
Search for ozone.server.default.replication and ozone.server.default.replication.type
a) Click Add
b) Click View as XML
c) For ozone.server.default.replication property, copy and paste: <property> <name>ozone.server.default.re
plication</name> <value>RS-X-Y-1024k</value> </property>
Note: RS-X-Y-1024k is an example where RS is the codec type, X is the number of data blocks, Y is
the parity and 1024k is the size of the EC chunk size. For example, if you have 6 data blocks of 1024k
size and you need 3 parity blocks, this is the value RS-6-3-1024k
d) For ozone.server.default.replication.type property, copy and paste: <property> <name>ozone.server.de
fault.replication.type</name> <value>EC</value> </property>
e) Click View Editor. You must provide the values for the properties
Property Value
ozone.server.default.replication
Supported EC options are RS-3-2-1024K,
RS-6-3-1024K, and RS-10-4-1024K
ozone.server.default.replication.type EC
f) Click Save Changes
g) Restart the Ozone service
Enabling EC replication configuration on bucket
You can enable EC replication configuration at bucket level.
Procedure
1.
You can set the bucket level EC Replication configuration through CLI by executing the command ozone sh
bucket create <bucket path> --type EC --replication rs-6-3-1024k
2.
To reset the EC Replication configuration, execute the following command ozone sh bucket set-
replication-config <bucket path> --type EC --replication rs-3-2-1024k
Note:
• The new configuration applies only to the keys created after resetting the EC Replication
configuration. Keys created before resetting the EC Replication configuration will have the older
configuration.
• If you set EC Replication configuration on RATIS (while writing at a bucket level) and you are using
Ozone File System (ofs/o3fs), there is a timeout of 10 minutes where you will continue to write on
RATIS as a caching process in place at the bucket level. For fresh buckets, if you set EC Replication
configuration on RATIS, the new configuration is immediately available for the bucket. However, for
ofs/o3fs/s3 you can only use bucket level settings as you cannot allow EC setting on key creation.
Enabling EC replication configuration on keys or files
You can enable EC configuration replication at key level.
Procedure
You can set the key level EC Replication configuration command through CLI while creating the keys irrespective of
bucket Replication configuration ozone sh key put <Ozone Key Object Path> <Local File> --
type EC --replication rs-6-3-1024k
22

Cloudera Runtime Container Balancer overview
Note: If you have already configured the default EC Replication configuration for a bucket, you do not have
to configure the EC Replication configuration while creating a key.
Container Balancer overview
Container balancer is a service in Storage Container Manager that balances the utilization of datanodes in an Ozone
cluster.
A cluster is considered balanced if for each datanode, the utilization of the datanode (used space to capacity ratio)
differs from the utilization of the cluster (used space to capacity ratio of the entire cluster) no more than the threshold.
This service balances the cluster by moving containers among over-utilized and under-utilized datanodes.
Note:
1.
Container balancer has a command line interface for administrators. You can run the ozone admin
containerbalancer -h help command for commands related to Container Balancer.
2.
Container balancer supports only closed Ratis containers. Erasure Coded containers are not supported yet.
Container balancer CLI commands
You can run the following commands in the cluster.
• To start the service, run the following command ozone admin containerbalancer start
• To stop the service, run the following command ozone admin containerbalancer stop
• To check the status of the service, run the following command ozone admin containerbalancer
status
Configuring container balancer service
To use container balancer using Cloudera Manager, perform the following steps.
Procedure
1.
Log in to Cloudera Manager UI
2.
Navigate to Clusters
3.
Select the Ozone service
4.
Go to Configurations
23

Cloudera Runtime Container Balancer overview
5.
You can filter configurations for Container Balancer by selecting the Scope as Storage Container Manager or
search for hdds.container.balancer
6.
You can now set the values for the Container Balancer configurations.
Activating container balancer using Cloudera Manager
You can activate and deactivate container balancer feature using Cloudera Manager. Perform the following steps to
activate or deactivate the feature.
24

Cloudera Runtime Managing storage elements by using the command-line interface
Activating container balancer through Cloudera Manager
1.
Log in to Cloudera Manager UI
2.
Navigate to Clusters
3.
Select the Ozone service
4.
Click Actions
5.
Click Activate Container Balancer
Deactivating container balancer through Cloudera Manager
1.
Log in to Cloudera Manager UI
2.
Navigate to Clusters
3.
Select the Ozone service
4.
Click Actions
5.
Click Deactivate Container Balancer
Managing storage elements by using the command-line
interface
The Ozone shell is the primary command line interface for managing storage elements such as volumes, buckets, and
keys.
Note: Ensure that the valid length for bucket or volume name is 3-63 characters.
For more information about the various Ozone command-line tools and the Ozone shell, see https://
hadoop.apache.org/ozone/docs/1.0.0/interface/cli.html.
Commands for managing volumes
Depending on whether you are an administrator or an individual user, the Ozone shell commands enable you to
create, delete, view, list, and update volumes. Before running these commands, you must have configured the Ozone
Service ID for your cluster from the Configuration tab of the Ozone service on Cloudera Manager.
Creating a volume
Only an administrator can create a volume and assign it to a user. You must assign administrator privileges to users
before they can create volumes. For more information, see Assigning administrator privileges to users.
Command Syntax
ozone sh volume create --quota=<volu
mecapacity> --user=<username> URI
Purpose Creates a volume and assigns it to a user.
25

Cloudera Runtime Managing storage elements by using the command-line interface
Arguments
• -q, quota: Specifies the maximum size the volume can occupy in
the cluster. This is an optional parameter.
• -u, user: The name of the user who can use the volume. The
designated user can create buckets and keys inside the particular
volume. This is a mandatory parameter.
• URI: The name of the volume to create in the <prefix>://<Service
ID>/<volumename> format.
Example
ozone sh volume create --quota=2TB -
-user=usr1 o3://ozone1/vol1
This command creates a 2-TB volume named vol1 for user usr1. Here,
ozone1 is the Ozone Service ID.
Deleting a volume
Command Syntax
ozone sh volume delete URI
Purpose Deletes the specified volume, which must be empty.
Arguments URI: The name of the volume to delete in the <prefix>://<Service ID>/
<volumename> format.
Example
ozone sh volume delete o3://ozone1/v
ol2
This command deletes the empty volume vol2. Here, ozone1 is the
Ozone Service ID.
Viewing volume information
Command Syntax
ozone sh volume info URI
Purpose Provides information about the specified volume.
Arguments URI: The name of the volume whose details you want to view, in the
<prefix>://<Service ID>/<volumename> format.
Example
ozone sh volume info o3://ozone1/
vol3
This command provides information about the volume vol3. Here,
ozone1 is the Ozone Service ID.
Listing volumes
Command Syntax
ozone sh volume list --user <usernam
e> URI
Purpose Lists all the volumes owned by the specified user.
26

Cloudera Runtime Managing storage elements by using the command-line interface
Arguments
• -u, user: The name of the user whose volumes you want to list.
• URI: The Service ID of the cluster in the <prefix>://<Service ID>/
format.
Example
ozone sh volume list --user usr2 o3:
//ozone1/
This command lists the volumes owned by user usr2. Here, ozone1 is
the Ozone Service ID.
Updating a volume
Command Syntax
ozone sh volume setquota --namespace
-quota <namespacecapacity> --space-q
uota <volumecapacity> URI
Purpose Updates the quota of the specific volume.
Arguments
• --namespace-quota <namespacecapacity>: Specifies the maximum
number of buckets this volume can have.
• --space-quota <volumecapacity>: Specifies the maximum size the
volume can occupy in the cluster.
• URI: The name of the volume to update in the <prefix>://<Service
ID>/<volumename> format.
Example
ozone sh volume setquota --namespace
-quota 1000 --space-quota 10GB /volu
me1
This command sets volume1 namespace quota to 1000 and space quota
to 10GB.
Assigning administrator privileges to users
You must assign administrator privileges to users before they can create Ozone volumes. You can use Cloudera
Manager to assign the administrative privileges.
About this task
Procedure
1.
On Cloudera Manager, go to the Ozone service.
2.
Click the Configuration tab.
3.
Search for the Ozone Service Advanced Configuration Snippet (Safety Valve) for ozone-conf/ozone-site.xml
property.
Specify values for the selected properties as follows:
• Name: Enter ozone.administrators.
• Value: Enter the ID of the user that you want as an administrator. In case of multiple users, specify a comma-
separated list of users.
• Description: Specify a description for the property. This is an optional value.
4.
Enter a Reason for Change, and then click Save Changes to commit the change.
27

Cloudera Runtime Managing storage elements by using the command-line interface
Commands for managing buckets
The Ozone shell commands enable you to create, delete, view, and list buckets. Before running these commands,
you must have configured the Ozone Service ID for your cluster from the Configuration tab of the Ozone service on
Cloudera Manager.
Note: Ensure that the valid length for bucket or volume name is 3-63 characters.
Creating a bucket
Command Syntax
ozone sh bucket create URI
Purpose Creates a bucket in the specified volume.
Arguments URI: The name of the bucket to create in the <prefix>://<Service ID>/
<volumename>/<bucketname> format.
Example
ozone sh bucket create o3://ozone1/v
ol1/buck1
This command creates a bucket buck1 in the volume vol1. Here,
ozone1 is the Ozone Service ID.
Deleting a bucket
Command Syntax
ozone sh bucket delete URI
Purpose Deletes the specified bucket, which must be empty.
Arguments URI: The name of the bucket to delete in the <prefix>://<Service ID>/
<volumename>/<bucketname> format.
Example
ozone sh bucket create o3://ozone1/v
ol1/buck2
This command deletes the empty bucket buck2. Here, ozone1 is the
Ozone Service ID.
Viewing bucket information
Command Syntax
ozone sh bucket info URI
Purpose Provides information about the specified bucket.
Arguments URI: The name of the bucket whose details you want to view, in the
<prefix>://<Service ID>/<volumename>/<bucketname> format.
Example
ozone sh bucket info o3://ozone1/vol
1/buck3
This command provides information about bucket buck3. Here, ozone1
is the Ozone Service ID.
28

Cloudera Runtime Managing storage elements by using the command-line interface
Listing buckets
Command Syntax
ozone sh bucket list URI --length=<n
umber_of_buckets> --prefix=<bucket_p
refix> --start=<starting_bucket>
Purpose Lists all the buckets in a specified volume.
Arguments
• -l, length: Specifies the maximum number of results to return. The
default is 100.
• -p, prefix: Lists bucket names that match the specified prefix.
• -s, start: Returns results starting with the bucket after the specified
value.
• URI: The name of the volume whose buckets you want to list, in
the <prefix>://<Service ID>/<volumename>/ format.
Example
ozone sh bucket list o3://ozone1/vol
2 --length=100 --prefix=buck --start
=buck
This command lists 100 buckets belonging to volume vol2 and names
starting with the prefix buck. Here, ozone1 is the Ozone Service ID.
Commands for managing keys
The Ozone shell commands enable you to upload, download, view, delete, and list keys. Before running these
commands, you must have configured the Ozone Service ID for your cluster from the Configuration tab of the Ozone
service on Cloudera Manager.
Downloading a key from a bucket
Command Syntax
ozone sh key get URI <local_file
name>
Purpose Downloads the specified key from a bucket in the Ozone cluster to the
local file system.
Arguments
• URI: The name of the key to download in the <prefix>://<Service
ID>/<volumename>/<bucketname>/<keyname> format.
• filename: The name of the file to which you want to write the key.
Example
ozone sh key get o3://ozone1/hive/ju
n/sales.orc sales_jun.orc
This command downloads the sales.orc file from the /hive/jun bucket
and writes to the sales_jun.orc file present in the local file system.
Here, ozone1 is the Ozone Service ID.
Uploading a key to a bucket
Command Syntax
ozone sh key put URI <filename>
Purpose Uploads a file from the local file system to the specified bucket in the
Ozone cluster.
29

Cloudera Runtime Managing storage elements by using the command-line interface
Arguments
• URI: The name of the key to upload in the <prefix>://<Service
ID>/<volumename>/<bucketname>/<keyname> format.
• filename: The name of the local file that you want to upload.
• -r, --replication: The number of copies of the file that you want to
upload.
Example
ozone sh key put o3://ozone1/hive/ye
ar/sales.orc sales_corrected.orc
This command adds the sales_corrected.orc file from the local file
system as key to /hive/year/sales.orc on the Ozone cluster. Here,
ozone1 is the Ozone Service ID.
Deleting a key
Command Syntax
ozone sh key delete URI
Purpose Deletes the specified key from the Ozone cluster.
Arguments URI: The name of the key to delete in the <prefix>://<Service ID>/
<volumename>/<bucketname>/<keyname> format.
Example
ozone sh key delete o3://ozone1/hive
/jun/sales_duplicate.orc
This command deletes the sales_duplicate.orc key. Here, ozone1 is the
Ozone Service ID.
Viewing key information
Command Syntax
ozone sh key info URI
Purpose Provides information about the specified key.
Arguments URI: The name of the key whose details you want to view, in the
<prefix>://<Service ID>/<volumename>/<bucketname>/<keyname>
format.
Example
ozone sh key info o3://ozone1/hive/j
un/sales_jun.orc
This command provides information about the sales_jun.orc key. Here,
ozone1 is the Ozone Service ID.
Listing keys
Command Syntax
ozone sh key list URI --length=<numb
er_of_keys> --prefix=<key_prefix> --
start=<starting_key>
Purpose Lists the keys in a specified bucket.
30

Cloudera Runtime Using Ozone S3 Gateway to work with storage elements
Arguments
• -l, length: Specifies the maximum number of results to return. The
default is 100.
• -p, prefix: Returns keys that match the specified prefix.
• -s, start: Returns results starting with the key after the specified
value.
• URI: The name of the bucket whose keys you want to list, in the
<prefix>://<Service ID>/<volumename>/<bucketname>/ format.
Example
ozone sh key list o3://ozone1/hive/y
ear/ --length=100 --prefix=<key_pref
ix> --start=day1
This command lists 100 keys belonging to the volume /hive/year/ and
names starting with the prefix day, but listed after the value day1. Here,
ozone1 is the Ozone Service ID.
Using Ozone S3 Gateway to work with storage elements
Ozone provides S3 Gateway, a REST interface that is compatible with the Amazon S3 API. You can use S3 Gateway
to work with the Ozone storage elements.
In addition, you can use the Amazon Web Services CLI to use S3 Gateway.
After starting Ozone S3 Gateway, you can access it from the following link:
http://localhost:9878
Note: For the users or client applications that use S3 Gateway to access Ozone buckets on a secure cluster,
Ozone provides the AWS access key ID and AWS secret key. See the Ozone security documentation for more
information.
Configuration to expose buckets under non-default volumes
Ozone S3 Gateway allows access to all the buckets under the default /s3v volume. To access the buckets under a non-
default volume, you must create a symbolic link to that bucket.
Consider a non-default volume /vol1 that has a bucket /bucket1 in the following example:
ozone sh volume create /s3v
ozone sh volume create /vol1
ozone sh bucket create /vol1/bucket1
ozone sh bucket link /vol1/bucket1 /s3v/common-bucket
As shown in the example, you can expose /bucket1 as an s3-compatible /common-bucket bucket through the Ozone
S3 Gateway.
REST endpoints supported on Ozone S3 Gateway
In addition to the GET service operation, Ozone S3 Gateway supports various bucket and object operations that the
Amazon S3 API provides.
The following table lists the supported Amazon S3 operations:
Operations on S3 Gateway
• GET service
31

Cloudera Runtime Using Ozone S3 Gateway to work with storage elements
Bucket operations
• GET Bucket (List Objects) Version 2
• HEAD Bucket
• DELETE Bucket
• PUT Bucket
• Delete multiple objects (POST)
Object operations
• PUT Object
• COPY Object
• GET Object
• DELETE Object
• HEAD Object
• Multipart Upload
Configuring Ozone to work as a pure object store
Depending on your requirement, you can configure Ozone to use the Amazon S3 APIs and perform the various
volume and bucket operations.
About this task
You must modify the ozone.om.enable.filesystem.paths property in ozone-site.xml by using Cloudera Manager to
configure Ozone as an object store.
Procedure
1.
Open the Cloudera Manager Admin Console.
2.
Go to the Ozone service.
3.
Click the Configuration tab.
4.
Select Category > Advanced.
5.
Configure the Ozone Service Advanced Configuration Snippet (Safety Valve) for ozone-conf/ozone-site.xml
property as specified.
• Name: ozone.om.enable.filesystem.paths
• Value: False
6.
Enter a Reason for Change and then click Save Changes.
7.
Restart the Ozone service.
What to do next
You must also configure the client applications accessing Ozone to reflect the Ozone configuration changes. If you
have applications in Spark, Hive or other services interacting with Ozone through the S3A interface, then you must
make specific configuration changes in the applications.
Access Ozone S3 Gateway using the S3A filesystem
If you want to run Ozone S3 Gateway from the S3A filesystem, you must import the required CA certificate into the
default Java truststore location on all the client nodes for running shell commands or jobs. This is a prerequisite when
the S3 Gateway is configured with TLS.
32

Cloudera Runtime Using Ozone S3 Gateway to work with storage elements
About this task
S3A relies on the hadoop-aws connector, which uses the built-in Java truststore ($JAVA_HOME/jre/lib/security/cace
rts). To override this truststore, you must create another truststore named jssecacerts in the same folder as cacerts on
all the cluster nodes. When using Ozone S3 Gateway, you can import the CA certificate used to set up TLS into cace
rts or jssecacerts on all the client nodes for running shell commands or jobs. Importing the certificate is important
because the CA certificate used to set up TLS is not available in the default Java truststore, while the hadoop-aws
connector library trusts only those certificates that are present in the built-in Java truststore.
Note:
• Ozone S3 Gateway currently does not support ETags and versioning. Therefore, you must disable any
configuration related to them when using S3A with Ozone S3 Gateway.
• S3A is not supported when the File System Optimization (FSO) ozone.om.enable.filesystem.paths is
enabled for Ozone Managers. Note that FSO is enabled by default. Therefore, to use S3A, you must
override or set the ozone.om.enable.filesystem.paths property to false in the Cloudera Manager Clusters
Ozone service Configuration Ozone Service Advanced Configuration Snippet (Safety Valve) for ozone-
conf/ozone-site.xml property. After you save the configuration, restart all Ozone Managers for the
configuration to take affect.
Important: It is recommended that you use ofs:// to denote the Ozone storage path instead of s3a:// wherever
applicable. For example, use ofs://ozone1/vol1/bucket1/dir1/key1 instead of s3a://bucket1/dir1/key1.
Procedure
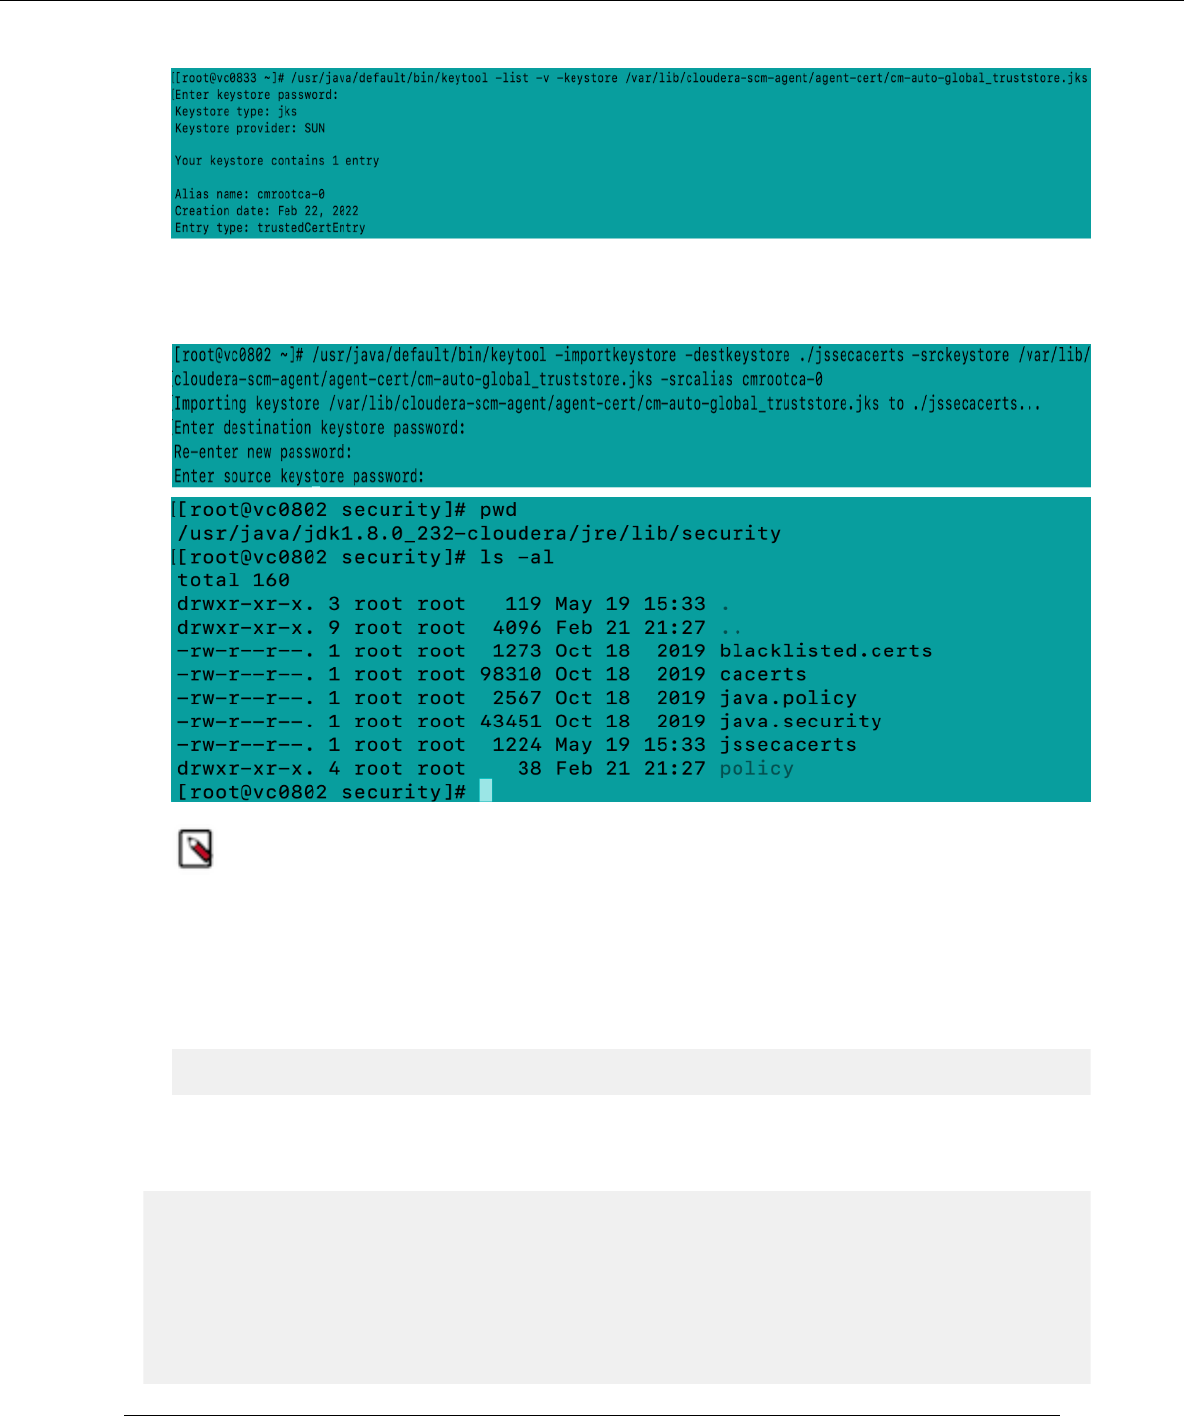
• Create a truststore named jssecacerts at $JAVA_HOME/jre/lib/security/ on all the cluster nodes configured for S3
Gateway, as specified.
a) Run keytool to view the associated CA certificate and determine the srcalias from the output of the command.
/usr/java/default/bin/keytool -list -v -keys
tore [***ssl.client.truststore.location***]
b) Import the CA certificate to all the hosts configured for S3 Gateway.
/usr/java/default/bin/keytool -importkeystore -destk
eystore $JAVA_HOME/jre/lib/security/jssecacerts -srckeys
tore [***ssl.client.truststore.location***] -srcalias [***alias***]
Accessing Ozone S3 using S3A FileSystem
If the Ozone S3 gateway is configured with TLS (HTTPs), you must import the CA certificate to Java truststore. This
is because the CA certificate that is used to set up TLS is not available in the default Java truststore; however, the
hadoop-aws connector library only trusts the built-in Java truststore certificates.
To override the default Java truststore, create a truststore named jssecacerts in the same directory ($JAVA_HOME/
jre/lib/security/jssecacerts) on all cluster nodes where the user intends to run jobs or shell commands against
Ozone S3. You can find the Ozone S3 gateway truststore location from the ozone-site.xml file which is
normally located in the /etc/ozone/conf.cloudera.OZONE-1 directory. From the ozone-site.xml file, you can find
ssl.client.truststore.location and ssl.client.truststore.password.
List entries in the store
33
Cloudera Runtime Using Ozone S3 Gateway to work with storage elements
• /usr/java/default/bin/keytool -list -v -keystore <<ssl.client.truststore.location>>
From the command output, you can find out the srcalias value which is shown as “Alias name”. In this example,
the “Alias name” is cmrootca-0. Import the CA certificate (In this example, the certificate is imported to
jssecacerts truststore). /usr/java/default/bin/keytool -importkeystore -destkeystore $JAVA_HOME/jre/lib/security/
jssecacerts -srckeystore <<ssl.client.truststore.location>> -srcalias <<alias>>
Note: Depending on the installed JAVA version on your cluster, the jssecacerts truststore directory path
might be different from what the command line and screenshot show.
• Enter the destination password as “changeit” and the source password as it is configured in the cluster.
Ozone S3 currently does not support Etags and versioning because the configuration related to them needs to be
disabled when using S3A filesystem with Ozone S3. You can either pass the Ozone S3 configurations from the
command line or store them in the cluster-wide safety valve in the core-site.xml file.
• Obtain awsAccessKey and awsSecret using the ozone s3 getsecret command
ozone s3 getsecret --om-service-id=<<ozone service id>>
• Ozone S3 properties need to be either passed in from command line or stored as cluster-wide Safety Valve in
core-site.xml file. To do this is, add the Safety Valve to core-site.xml through HDFS configuration from Cloudera
Manager.
fs.s3a.impl org.apache.hadoop.fs.s3a.S3AFileSystem
fs.s3a.access.key <<accessKey>>
fs.s3a.secret.key <<secret>>
fs.s3a.endpoint <<Ozone S3 endpoint Url>>
fs.s3a.bucket.probe 0
fs.s3a.change.detection.version.required false
fs.s3a.change.detection.mode none
fs.s3a.path.style.access true
34

Cloudera Runtime Using Ozone S3 Gateway to work with storage elements
In the configurations, replace <<accessKey>> and <<secret>> with awsAccessKey and awsSecret obtained using the
Ozone S3 getsecret command accordingly and <<Ozone S3 endpoint URL>> with Ozone S3 gateway URL from the
cluster.
If you do not store the Ozone S3 properties as cluster-wide Safety Valve in core-site.xml file, you can pass the
following in from command line:
Create a directory “dir1/dir2” in testbucket:
hadoop fs -Dfs.s3a.bucket.probe=0 -Dfs.s3a.change.detection.version.require
d=false -Dfs.s3a.change.detection.mode=none -Dfs.s3a.access.key=<<accesskey>
> -Dfs.s3a.secret.key=<<secret>> -Dfs.s3a.endpoint=<<s3 endpoint url>> -Dfs.
s3a.path.style.access=true -Dfs.s3a.impl=org.apache.hadoop.fs.s3a.S3AFileSys
tem -mkdir -p s3a://testbucket/dir1/dir2
S3 properties are stored as safety valves in the HDFS core-site.xml file in the following sample shell commands:
• Create a directory “dir1/dir2” in testbucket.
hadoop fs -mkdir -p s3a://testbucket/dir1/dir2
• Place a file named key1 in the “dir1/dir2” directory in testbucket
hadoop fs -put /tmp/key1 s3a://testbucket/dir1/dir2/key1
35

Cloudera Runtime Using Ozone S3 Gateway to work with storage elements
• List files/directories under testbucket
Examples of using the S3A filesystem with Ozone S3 Gateway
You can use the S3A filesystem with Ozone S3 Gateway to perform different Ozone operations.
The following examples show how you can use the S3A filesystem with Ozone.
Note: In the following examples, replace the values of access key and secret from the output of the ozone s3
getsecret --om-service-id=<ozone service id> command and replace the Ozone S3 endpoint URL with the
S3 Gateway URL of the Ozone cluster.
Creating a directory in a bucket
The following example shows how you can create a directory /dir1/dir2 within a bucket named testbucket:
hadoop fs -Dfs.s3a.bucket.probe=0 -Dfs.s3a.change.detection.version.require
d=false -Dfs.s3a.change.detection.mode=none -Dfs.s3a.access.key=<accesskey>
-Dfs.s3a.secret.key=<secret> -Dfs.s3a.endpoint=<s3 endpoint url> -Dfs.s3
a.path.style.access=true -Dfs.s3a.impl=org.apache.hadoop.fs.s3a.S3AFileSyste
m -mkdir -p s3a://testbucket/dir1/dir2
Adding a key to a directory
The following example shows how you can add a key to the dir2 directory created in the previous example:
hadoop fs -Dfs.s3a.bucket.probe=0 -Dfs.s3a.change.detection.version.require
d=false -Dfs.s3a.change.detection.mode=none -Dfs.s3a.access.key=<accesskey>
-Dfs.s3a.secret.key=<secret> -Dfs.s3a.endpoint=<s3 endpoint url> -Dfs.s3
a.path.style.access=true -Dfs.s3a.impl=org.apache.hadoop.fs.s3a.S3AFileSyste
m -put /tmp/key1 s3a://testbucket/dir1/dir2/key1
Listing files or directories in a bucket
The following example shows how you can list the contents of a bucket namedtestbucket:
hadoop fs -Dfs.s3a.bucket.probe=0 -Dfs.s3a.change.detection.version.require
d=false -Dfs.s3a.change.detection.mode=none Dfs.s3a.access.key=<accesskey> -
Dfs.s3a.secret.key=<secret> -Dfs.s3a.endpoint=<s3 endpoint url> -Dfs.s3a.pa
th.style.access=true -Dfs.s3a.impl=org.apache.hadoop.fs.s3a.S3AFileSystem -l
s -R s3a://testbucket/
Configuring Spark access for S3A
You must configure specific properties for client applications such as Spark to access the Ozone data store using S3A.
Before you begin
• You must import the CA certificate to run Ozone S3 Gateway from the S3A filesystem.
36

Cloudera Runtime Using Ozone S3 Gateway to work with storage elements
• You must create an ozone-s3.properties file with the following configuration to run the Spark word count
program:
spark.hadoop.fs.s3a.impl = org.apache.hadoop.fs.s3a.S3AFileSystem
spark.hadoop.fs.s3a.access.key = <access key>
spark.hadoop.fs.s3a.secret.key = <secret>
spark.hadoop.fs.s3a.endpoint = <Ozone S3 endpoint url>
spark.hadoop.fs.s3a.bucket.probe = 0
spark.hadoop.fs.s3a.change.detection.version.required = false
spark.hadoop.fs.s3a.change.detection.mode = none
spark.hadoop.fs.s3a.path.style.access = true
Note: In the list of configurations, replace the values of access key and secret from the output of ozon
e s3 getsecret --om-service-id=<ozone service id> and replace the Ozone S3 endpoint URL with the S3
Gateway URL of the Ozone cluster.
About this task
The following procedure explains how you can configure Spark access to Ozone using S3A and run a word count
program from the Spark shell.
Procedure
1.
Create an Ozone bucket.
The following example shows how you can create a bucket named sparkbucket:
ozone sh bucket create /s3v/sparkbucket
2.
Add data to the bucket.
The following example shows how you can add data to the sparkbucket bucket:
hadoop fs -Dfs.s3a.bucket.probe=0 -Dfs.s3a.change.detection.version
.required=false -Dfs.s3a.change.detection.mode=none -Dfs.s3a.access.
key=<accesskey> -Dfs.s3a.secret.key=<secret> -Dfs.s3a.endpoint=<s3
endpoint url> -Dfs.s3a.path.style.access=true -Dfs.s3a.impl=org.apache.ha
doop.fs.s3a.S3AFileSystem -mkdir -p s3a://sparkbucket/input
hadoop fs -Dfs.s3a.bucket.probe=0 -Dfs.s3a.change.detection.version
.required=false -Dfs.s3a.change.detection.mode=none -Dfs.s3a.access.
key=<accesskey> -Dfs.s3a.secret.key=<secret> -Dfs.s3a.endpoint=<s3
endpoint url> -Dfs.s3a.path.style.access=true -Dfs.s3a.impl=org.apache.ha
doop.fs.s3a.S3AFileSystem -put /tmp/key1 s3a://sparkbucket/input/key1
3.
Start the Spark shell and wait for the prompt to appear.
spark-shell --properties-file <ozone-s3.properties>
4.
Create a Resilient Distributed Dataset (RDD) from an Ozone file and enter the specified command on the Spark
shell.
var lines = sc.textFile("s3a://sparkbucket/input/key1")
5.
Convert each record in the file to a word.
var words = lines.flatMap(_.split(" "))
6.
Convert each word to a key-value pair.
var wordsKv = words.map((_, 1))
37

Cloudera Runtime Using Ozone S3 Gateway to work with storage elements
7.
Group each key-value pair by key and perform aggregation on each key.
var wordCounts = wordsKv.reduceByKey(_ + _ )
8.
Save the results of the grouping and aggregation operations to Ozone.
wordCounts.saveAsTextFile("s3a://sparkbucket/output")
9.
Exit the spark shell and view the results through S3A.
hadoop fs -Dfs.s3a.bucket.probe=0 -Dfs.s3a.change.detection.version
.required=false -Dfs.s3a.change.detection.mode=none -Dfs.s3a.access.
key=<accesskey> -Dfs.s3a.secret.key=<secret> -Dfs.s3a.endpoint=<ozone s3
endpoint url> -Dfs.s3a.path.style.access=true -Dfs.s3a.impl=org.apache.ha
doop.fs.s3a.S3AFileSystem -ls -R s3a://sparkbucket/
hadoop fs -Dfs.s3a.bucket.probe=0 -Dfs.s3a.change.detection.version
.required=false -Dfs.s3a.change.detection.mode=none -Dfs.s3a.access.
key=<accesskey> -Dfs.s3a.secret.key=<secret> -Dfs.s3a.endpoint=<ozone s3
endpoint url> -Dfs.s3a.path.style.access=true -Dfs.s3a.impl=org.apache.ha
doop.fs.s3a.S3AFileSystem -cat s3a://sparkbucket/output/part-00000
Configuring Hive access for S3A
You must configure specific properties for client applications such as Hive to access the Ozone data store using S3A.
Before you begin
• You must import the CA certificate to run Ozone S3 Gateway from the S3A filesystem.
• You must configure the following Hive properties using the Cluster-wide Advanced Configuration Snippet
(Safety Valve) for core-site.xml:
fs.s3a.bucket.<<bucketname>>.access.key = <accesskey>
fs.s3a.bucket.<<bucketname>>.secret.key = <secret>
fs.s3a.endpoint = <Ozone S3 endpoint url>
fs.s3a.bucket.probe = 0
fs.s3a.change.detection.version.required = false
fs.s3a.path.style.access = true
fs.s3a.change.detection.mode = none
Note: In the list of configurations, replace the values of access key and secret from the output of ozon
e s3 getsecret --om-service-id=<ozone service id> and replace the Ozone S3 endpoint URL with the S3
Gateway URL of the Ozone cluster.
• You must provide the required permissions in Ranger to the user running the queries. Consider the following
example of providing a user with all permissions. You can change the permissions based on your requirements.
• Assign the user with all permissions to the Database, table/udf, and URL resources in a HadoopSQL resource-
based policy.
• Assign the user with S3_VOLUME_POLICY in an Ozone policy.
About this task
The following procedure explains how you can log on to the Hive shell, create a Hive table using S3A, add data to the
table, and view the added data. You can perform the same procedure by logging on to Hue using the Hive or Beeline
shell.
38

Cloudera Runtime Using Ozone S3 Gateway to work with storage elements
Procedure
1.
Create an Ozone bucket.
The following example shows how you can create a bucket named s3hive:
ozone sh bucket create /s3v/s3hive
2.
Log on to the Hive shell and perform the specified steps.
a) Create a table on Ozone using S3A.
jdbc:hive2://bv-hoz-1.bv-hoz.abc.site> create external table mytable1(ke
y string, value int) location 's3a://s3hive/mytable1';
b) Add data to the table.
jdbc:hive2://bv-hoz-1.bv-hoz.abc.site> insert into mytable1 values("cldr
",1);
jdbc:hive2://bv-hoz-1.bv-hoz.abc.site> insert into mytable1 values("cl
dr-cdp",1);
c) View the data added to the table.
jdbc:hive2://bv-hoz-1.bv-hoz.abc.site> select * from mytable1;
Configuring Impala access for S3A
You must configure specific properties for client applications such as Impala to access the Ozone data store using
S3A.
Before you begin
• You must import the CA certificate to run Ozone S3 Gateway from the S3A filesystem.
• You must configure the following Impala properties using the Cluster-wide Advanced Configuration Snippet
(Safety Valve) for core-site.xml:
fs.s3a.bucket.<<bucketname>>.access.key = <accesskey>
fs.s3a.bucket.<<bucketname>>.secret.key = <secret>
fs.s3a.endpoint = <Ozone S3 endpoint url>
fs.s3a.bucket.probe = 0
fs.s3a.change.detection.version.required = false
fs.s3a.path.style.access = true
fs.s3a.change.detection.mode = none
Note: In the list of configurations, replace the values of access key and secret from the output of ozon
e s3 getsecret --om-service-id=<ozone service id> and replace the Ozone S3 endpoint URL with the S3
Gateway URL of the Ozone cluster.
• You must provide the required permissions in Ranger to the user running the queries. Consider the following
example of providing a user with all permissions. You can change the permissions based on your requirements.
• Assign the user with all permissions to the Database, table/udf, and URL resources in a HadoopSQL resource-
based policy.
• Assign the user with S3_VOLUME_POLICY in an Ozone policy.
Procedure
1.
Create an Ozone bucket.
The following example shows how you can create a bucket named s3impala:
ozone sh bucket create /s3v/s3impala
39

Cloudera Runtime Using Ozone S3 Gateway to work with storage elements
2.
Log on to the Impala shell and perform the specified steps.
a) Create a table on Ozone using S3A.
bv-hoz-1.bv-hoz.abc.site:25003> create external table mytable2(key strin
g, value int) location 's3a://s3impala/mytable1';
b) Add data to the table.
bv-hoz-1.bv-hoz.abc.site:25003> insert into mytable2 values("cldr",1);
bv-hoz-1.bv-hoz.abc.site:25003> insert into mytable2 values("cldr-cdp
",1);
c) View the data added to the table.
bv-hoz-1.bv-hoz.abc.site:25003> select * from mytable2;
Using the AWS CLI with Ozone S3 Gateway
You can use the Amazon Web Services (AWS) command-line interface (CLI) to interact with S3 Gateway and work
with various Ozone storage elements.
Configuring an https endpoint in Ozone S3 Gateway to work with AWS CLI
For Ozone S3 Gateway to work with Amazon Web Services (AWS) command-line interface (CLI), you must perform
specific configurations, especially if the S3 Gateway has https endpoints.
About this task
You must export the CA certificate required on all the client nodes for running the shell commands, and convert the
certificate to PEM format because the Python SSL supported with AWS CLI honors certificates in the PEM format.
Procedure
1.
Run keytool to view the associated CA certificate and determine the srcalias from the output of the command.
/usr/java/default/bin/keytool -list -v -keys
tore <ssl.client.truststore.location>
2.
Export the CA certificate to PEM format.
keytool -export -alias <alias> -file <s3g-ca.crt> -keysto
re <ssl.client.truststore.location>
openssl x509 -inform DER -outform PEM -in <s3g-ca.crt> -out /tmp/s3gca.pem
3.
Run the ozone s3 getsecret command for the values of the access key and secret key.
ozone s3 getsecret --om-service-id=<ozone service id>
4.
Run the aws configure command to configure the access key and the secret key.
aws configure accesskey/secret
40

Cloudera Runtime Using Ozone S3 Gateway to work with storage elements
What to do next
You can pass the certificate in PEM file format to the aws s3api command and perform various tasks, such as
managing buckets, keys, and so on. The following example shows how you can create a bucket using the aws s3api
command:
aws s3api --endpoint https://bv-hoz-1.bv-hoz.abc.site:9879 --ca-bundle "/tmp
/s3gca.pem" create-bucket --bucket=wordcount
Examples of using the AWS CLI for Ozone S3 Gateway
You can use the Amazon Web Services (AWS) command-line interface (CLI) to interact with S3 Gateway and work
with various Ozone storage elements.
Defining an alias for the S3 Gateway endpoint
Defining an alias for the S3 Gateway endpoint helps you in using a simplified form of the AWS CLI. The following
examples show how you can define an alias for the S3 Gateway endpoint URL:
alias ozones3api='aws s3api --ca-bundle --endpoint https://localhost:9879'
alias ozones3api='aws s3api --ca-bundle --endpoint http://localhost:9878'
41

Cloudera Runtime Using Ozone S3 Gateway to work with storage elements
Examples of using the AWS CLI to work with the Ozone storage elements
The following examples show how you can use the AWS CLI to perform various operations on the Ozone storage
elements. All the examples specify the alias ozones3api:
Operations Examples
Creating a bucket
ozones3api create-bucket --bucket bu
ck1
This command creates a bucket buck1.
Adding objects to a bucket
ozones3api put-object --bucket buck1
--key Doc1 --body ./Doc1.md
This command adds the key Doc1 containing data from Doc1.md to the
bucket buck1.
Listing objects in a bucket
ozones3api list-objects --bucket buc
k1
This command lists the objects in the bucket buck1. An example output
of the command is as follows:
{
"Contents": [
{
"LastModified": "2018-
11-02T21:57:40.875Z",
"ETag": "154119586087
5",
"StorageClass": "STANDA
RD",
"Key": "Doc1",
"Size": 2845
},
{
"LastModified": "2018-1
1-02T22:36:23.358Z",
"ETag": "1541198183358
",
"StorageClass": "STANDAR
D",
"Key": "Doc2",
"Size": 5615
},
{
"LastModified": "2018-11
-02T21:56:47.370Z",
"ETag": "1541195807370"
,
"StorageClass": "STAN
DARD",
"Key": "Doc3",
"Size": 1780
}
]
}
Downloading an object from a bucket
ozones3api get-object --bucket buck1
--key Doc1 ./Dpc1
This command downloads the key Doc1 from the bucket buck1 as a
file Dpc1. An example output of the command is as follows:
{
"ContentType": "application/oc
tet-stream",
"ContentLength": 2845,
"Expires": "Fri, 02 Nov 2018 2
2:39:00 GMT",
"CacheControl": "no-cache",
"Metadata": {}
}
Verifying access to a bucket
ozones3api head-bucket --bucket
buck1
This command verifies whether the bucket buck1 exists and whether
the current user has access to buck1. If both the requirements are
satisfied, the command returns no output. Otherwise, it displays an
error message.
Returning object metadata
ozones3api head-object --bucket buck
1 --key Doc1
This command returns the metadata of key Doc1 present in bucket
buck1. An example output of the command is as follows:
{
"ContentType": "binary/octet-s
tream",
"LastModified": "Fri, 2 Nov 2018
21:57:40 GMT",
"ContentLength": 2845,
"Expires": "Fri, 02 Nov 2018 2
2:41:55 GMT",
"ETag": "1541195860875",
"CacheControl": "no-cache",
"Metadata": {}
}
Copy a key from one bucket to another
ozones3api copy-object --bucket buck
2 --key Doc1 --copy-source buck1/Doc
1
This command copies the key Doc1 from bucket buck1 to buck2. The
following example shows the result of a copy operation:
{
"CopyObjectResult": {
"LastModified": "2018-11-02T
22:49:20.061Z",
"ETag": "21df0aee-26a9-464c
-9a81-620f7cd1fc13"
}
}
To verify whether the specified object is copied, you can run the list-
object command on the destination bucket.
Deleting an object from a bucket
ozones3api delete-object --bucket bu
ck1 --key Doc1
This command deletes the key Doc1 from bucket buck1.
Deleting multiple objects from a bucket
ozones3api delete-objects --bucket b
uck1 --delete 'Objects=[{Key=Doc1},{
Key=Doc2},{Key=Doc3}]
This command deletes the keys Doc1, Doc2, and Doc3 from bucket
buck1.
42

Cloudera Runtime Accessing Ozone object store with Amazon Boto3 client
Accessing Ozone object store with Amazon Boto3 client
Boto3 is an AWS SDK for Python. It provides object-oriented API services and low-level services to the AWS
services. It allows users to create, and manage AWS services such as EC2 and S3. Understand how to access the
Ozone object store with Amazon Boto3 client.
Note: In the Cloudera environment only S3 is supported.
Prerequisites
Ensure you have installed a higher version of Python3 for your Boto3 client, as Boto3 installation requirement
indicates at here: https://boto3.amazonaws.com/v1/documentation/api/latest/index.html
Obtaining resources to Ozone
Understand the avaialble documentation to create the required S3 resources.
See Amazon Boto3 documentation to create the required S3 resources: https://boto3.amazonaws.com/v1/
documentation/api/latest/guide/resources.html
s3 = boto3.resource('s3',
endpoint_url='http://localhost:9878',
aws_access_key_id='testuser/[email protected]',
aws_secret_access_key='c261b6ecabf7d37d5f9ded654b1c724
adac9bd9f13e247a235e567e8296d2999'
)
'endpoint_url' is pointing to Ozone s3 endpoint.
Obtaining client to Ozone through session
See Amazon Boto3 documentation to create a session. https://boto3.amazonaws.com/v1/documentation/api/latest/
reference/core/session.html
Create a session
session = boto3.session.Session()
Obtain s3 client to Ozone via session:
s3_client = session.client(
service_name='s3',
aws_access_key_id='testuser/[email protected]',
aws_secret_access_key='c261b6ecabf7d37d5f9ded654b1c724adac9bd9f13e2
47a235e567e8296d2999',
endpoint_url='http://localhost:9878',
)
'endpoint_url' is pointing to Ozone s3 endpoint.
In our code sample below, we're demonstrating the usage of both s3 and s3_c
lient.
There are multiple ways to configure Boto3 client credentials if you’re connecting to a secured cluster. In these cases,
the above lines of passing ‘aws_access_key_id’ and ‘aws_secret_access_key’ when creating Ozone s3 client shall be
skipped.
See Boto3 documentation for more information:
43

Cloudera Runtime Accessing Ozone object store with Amazon Boto3 client
https://boto3.amazonaws.com/v1/documentation/api/latest/guide/credentials.html
List of APIs verified
Understand the list of APIs that were verified.
Following APIs were verified:
• Create bucket
• List bucket
• Head bucket
• Delete bucket
• Upload file
• Download file
• Delete objects(keys)
• Head object
• Multipart upload
Note: Ensure that the valid length for bucket or volume name is 3-63 characters.
Create a bucket
Use the following code snippet to create a bucket.
response = s3_client.create_bucket(Bucket='bucket1')
print(response)
This will create a bucket ‘bucket1’ in Ozone volume ‘s3v’.
List buckets
Use the following code snippet to list buckets.
response = s3_client.list_buckets()
print('Existing buckets:')
for bucket in response['Buckets']:
print(f' {bucket["Name"]}')
This will list all buckets in Ozone volume ‘s3v’.
Head a bucket
Use the following code snippet to head a bucket.
response = s3_client.head_bucket(Bucket='bucket1')
print(response)
This will head bucket ‘bucket1’ in Ozone volume ‘s3v’.
Delete a bucket
Use the following code snippet to delete a bucket.
response = s3_client.delete_bucket(Bucket='bucket1')
print(response)
This will delete the bucket ‘bucket1’ from Ozone volume ‘s3v’.
44

Cloudera Runtime Accessing Ozone object store with Amazon Boto3 client
Upload a file
Use the following code snippet to upload a bucket.
response = s3.Bucket('bucket1').upload_file('./README.md','README.md')
print(response)
This will upload ‘README.md’ to Ozone creates a key ‘README.md’ in volume ‘s3v’.
Download a file
Use the following code snippet to download a file.
response = s3.Bucket('bucket1').download_file('README.md', 'download.md')
print(response)
This will download ‘README.md’ from Ozone volume ‘s3v’ to local and create a file with name ‘download.md’.
Head an object
Use the following code snippet to head an object.
response = s3_client.head_object(Bucket='bucket1', Key='README.md')
print(response)
This will head object ‘README.md’ from Ozone volume ‘s3v’ in the bucket ‘bucket1’.
Delete Objects
Use the following code snippet to delete objects.
response = s3_client.delete_objects(
Bucket='bucket1',
Delete={
'Objects': [
{
'Key': 'README4.md',
},
{
'Key': 'README3.md',
},
],
'Quiet': False,
},
)
This will delete objects ‘README3.md’ and ‘README4.md’ from Ozone volume ‘s3v’ in bucket ‘bucket1’.
Multipart upload
Use the following code snippet to use ‘maven.gz’ and ‘maven1.gz’ as copy source from Ozone volume ‘s3v’ and to
create a new object ‘key1’ in Ozone volume ‘s3v’.
response = s3_client.create_multipart_upload(Bucket='bucket1', Key='key1')
print(response)
uid=response['UploadId']
print(uid)
response = s3_client.upload_part_copy(
Bucket='bucket1',
CopySource='/bucket1/maven.gz',
Key='key1',
PartNumber=1,
45

Cloudera Runtime Working with Ozone File System (ofs)
UploadId=str(uid)
)
print(response)
etag1=response.get('CopyPartResult').get('ETag')
print(etag1)
response = s3_client.upload_part_copy(
Bucket='bucket1',
CopySource='/bucket1/maven1.gz',
Key='key1',
PartNumber=2,
UploadId=str(uid)
)
print(response)
etag2=response.get('CopyPartResult').get('ETag')
print(etag2)
response = s3_client.complete_multipart_upload(
Bucket='bucket1',
Key='key1',
MultipartUpload={
'Parts': [
{
'ETag': str(etag1),
'PartNumber': 1,
},
{
'ETag': str(etag2),
'PartNumber': 2,
},
],
},
UploadId=str(uid),
)
print(response)
Note: 'ETag’s is required and important for the call.
Working with Ozone File System (ofs)
The ofs file system is a flat layout file system that allows Ozone clients to access all the volumes and buckets under
a single root. Client applications such as Hive, Spark, YARN, and MapReduce run natively on ofs without any
modifications.
Setting up ofs
Select the Ozone bucket to configure ofs.
Procedure
1.
Select the Ozone bucket on which you want ofs to reside.
If you do not have a designated volume or bucket for ofs, create them using the required commands:
ozone sh volume create /volume
46

Cloudera Runtime Working with Ozone File System (ofs)
ozone sh bucket create /volume/bucket
Note: Cloudera Manager currently does not support Ozone as the default file system.
2.
The ofs file system implementation classpath is added to CDP services by default. But if an application is unable
to instantiate the ofs file system class, add the ozone-filesystem-hadoop3.jar to the classpath.
export HADOOP_CLASSPATH=/opt/ozone/share/ozonefs/lib/hadoop-ozone-filesy
stem-hadoop3-*.jar:$HADOOP_CLASSPATH
3.
After setting up ofs, you can run HDFS dfs CLI commands such as the following on Ozone FS: (Assuming Ozone
Service ID is “omservice1”)
hdfs dfs -ls ofs://omservice1/volume/bucket and hdfs dfs -mkdir ofs://
omservice1/volume/bucket/users
Now, applications such as Hive and Spark can run on this file system after some basic configuration changes.
Note: Any keys that are created or deleted in the bucket using methods other than ofs are displayed as
directories and files in o3fs.
Related Information
Configuration options for Spark to work with Ozone File System (ofs)
Volume and bucket management using ofs
When using ofs, Ozone administrators and users can perform various volume and bucket operations with the help of
the Hadoop shell commands such as creating volumes and buckets and using ACLs on the volumes and buckets.
Creating volumes and buckets
Ozone administrators can create directories under the root and first-level directories using the Hadoop shell. Creating
a directory under the root is equivalent to creating an Ozone volume. Creating a directory under a first-level directory
is equivalent to creating a bucket. In addition, Ozone users can create buckets under volumes to which they have the
write access.
In the following example, you create a volume named volume1 using the -mkdir command of the Hadoop shell:
ozone fs -mkdir ofs://ozservice1/volume1/
The equivalent Ozone command to create a volume is as follows:
ozone sh volume create o3://ozservice1/volume1/
Similarly, the Hadoop shell command for creating a bucket is as follows:
ozone fs -mkdir ofs://ozservice1/volume1/bucket1/
Note: If you use the -mkdir -p command to create volumes and buckets that do not exist, Ozone creates the
specified volumes and buckets.
Using the /tmp directory
The ofs root contains a special tmp volume mount for backward compatibility with legacy Hadoop applications that
use the /tmp/ directory. To use the volume mount, the Ozone administrator must first create a tmp volume and set its
Access Control List (ACL) to ALL. This administrator needs to perform this process once for every cluster.
47

Cloudera Runtime Working with Ozone File System (ofs)
The following example shows how to create the tmp volume and assign it the required ACLs:
ozone sh volume create tmp
ozone sh volume setacl tmp -al world::a
After the administrator has created the tmp volume, each user must initialize their respective tmp bucket once. The
following example shows how to initialize the tmp bucket.
ozone fs -mkdir ofs://ozservice1/tmp/
The user can then write to the /tmp/ bucket just as they would to a regular bucket.
Using ACLs on volumes and buckets
You must consider the following when setting Access Control Lists (ACLs) on Ozone volumes and buckets:
• Setting ACLs on a first-level directory except /tmp/ is the same as setting ACLs on a volume.
• Setting ACLs on a second-level directory is the same as setting ACLs on a bucket.
• The ACLs on the /tmp/ directory are the same as those on the bucket from which the /tmp/ directory is mapped.
For example, if you map ofs:///tmp/ from ofs:///tmp/<tmp-bucket-for-current-user>/, the ACLs on ofs:///tmp/<
tmp-bucket-for-current-user>/ are the same as those on ofs:///tmp/bucket1/.
Note: By default, the name of a user's temp bucket under the /tmp/ volume is the MD5 hash of the
username.
• You cannot set ACLs on the root (/) because it is only a logical root.
Renaming volumes and buckets
The ofs file system does not support renaming of volumes and buckets. Any attempt to rename a volume or a bucket
results in an exception. You can only rename directories inside a bucket.
For example, ofs supports renaming of ofs:///volume1/bucket1/dir1 to ofs:///volume1/bucket1/dir2.
Key management using ofs
When using ofs, Ozone administrators and users can perform various operations on Ozone keys with the help of the
Hadoop shell commands such as creating keys, recursively listing keys, and renaming keys in a bucket.
Creating keys
You must consider the following when creating Ozone keys using ofs:
• You cannot create files (keys) under the root or the first-level directory (volume) except in the /tmp/ directory.
• You can add keys to the second-level directory (bucket) or lower-level directories.
Recursively listing keys
You must consider the following when using the ls -R command to recursively list Ozone keys under volumes and
buckets:
Running the ls -R command... Recursively lists the following...
For a bucket All the keys that belong to the particular bucket
For a volume All the buckets that belong to the specified volume and the keys
that belong to each bucket
48

Cloudera Runtime Working with Ozone File System (o3fs)
Running the ls -R command... Recursively lists the following...
At the root All the volumes under the root, all the buckets that belong to
each volume, and all the keys that belong to each bucket
Renaming keys
You can rename only the keys that belong to a bucket. The ofs file system does not allow you to rename the keys
across volumes or buckets.
For example, ofs allows renaming of the key ofs:///volume1/bucket1/key1.txt to ofs:///volume1/bucket1/key2.txt.
However, ofs:///volume1/bucket1/key1.txt cannot be renamed to ofs:///volume1/bucket2/key11.txt.
Working with Ozone File System (o3fs)
The Ozone File System (o3fs) is a Hadoop-compatible file system. Applications such as Hive, Spark, YARN, and
MapReduce run natively on o3fs without any modifications.
The Ozone File System resides on a bucket in the Ozone cluster. All the files created through o3fs are stored as keys
in that bucket. Any keys created in the particular bucket without using the file system commands are shown as files or
directories on o3fs.
Note: o3fs is deprecated. It is recommended to use ofs instead. See Working with Ozone File System (ofs).
Setting up o3fs
Select the Ozone bucket to configure o3fs.
Procedure
1.
Select the Ozone bucket on which you want o3fs to reside.
If you do not have a designated volume or bucket for o3fs, create them using the required commands:
ozone sh volume create /volume
ozone sh bucket create /volume/bucket
Note: Cloudera Manager currently does not support Ozone as the default file system.
2.
The o3fs file system implementation classpath is added to CDP services by default. But if an application is unable
to instantiate the o3fs file system class, add the ozone-filesystem-hadoop3.jar to the classpath.
export HADOOP_CLASSPATH=/opt/ozone/share/ozonefs/lib/hadoop-ozone-filesy
stem-hadoop3-*.jar:$HADOOP_CLASSPATH
49

Cloudera Runtime Ozone configuration options to work with CDP components
3.
After setting up o3fs, you can run HDFS commands such as the following on Ozone: (Assuming Ozone Service
ID is “ozone”)
hdfs dfs -ls o3fs://bucket.volume.ozone/ and hdfs dfs -mkdir o3fs://
bucket.volume.ozone/users
Now, applications such as Hive and Spark can run on this file system after some basic configuration changes.
Note: Any keys that are created or deleted in the bucket using methods other than o3fs are displayed as
directories and files in o3fs.
Note: o3fs is deprecated. It is recommended to use ofs instead. See Setting up ofs.
Ozone configuration options to work with CDP
components
There are specific options that you must configure to ensure that other CDP components such as Spark and Hive work
with Ozone.
In the case of Spark, you must update a specific configuration property to run Spark jobs with o3fs on a secure
Kerberos-enabled cluster. Similarly, for Hive, you must configure the values of specific properties to store Hive
managed tables on Ozone.
Configuration options for Spark to work with Ozone File System (ofs)
After setting up ofs, you can make configuration updates specific to components such as Spark to ensure that they
work with Ozone.
To run Spark jobs with ofs on a secure Kerberos-enabled cluster, ensure that you assign a valid URI by setting the
value of the Spark Client Advanced Configuration Snippet (Safety Valve) property for the spark.conf or the spark-de
faults.conf file through the Cloudera Manager web UI.
For example:
spark.yarn.access.hadoopFileSystems=ofs://service1/vol1/bucket1/
Related Information
Setting up ofs
Configuration options to store Hive managed tables on Ozone
If you want to store Hive managed tables with ACID properties on Ozone, you must configure specific properties in
hive-site.xml.
You can consider either of the following options to store Hive managed tables with ACID support on Ozone:
• Set the value of the hive.metastore.warehouse.dir property to point to the path of the Ozone directory where you
want to store the Hive tables.
• Set the value of the metastore.warehouse.tenant.colocation property to true. You can then set the MANAGEDL
OCATION of your Hive database to point to an Ozone directory so that the Hive tables can reside at the specified
location.
50

Cloudera Runtime Overview of the Ozone Manager in High Availability
Note: Dynamic partitioning in Hive with the default settings can generate an unexpected load on the
filesystem when bulk loading data into tables because Hive creates a number of files for every partition.
To avoid this issue, consider updating the following properties and tuning them further based on your
requirements: hive.optimize.sort.dynamic.partition and hive.optimize.sort.dynamic.partition.threshold.
From a filesystem perspective, the recommended values are as follows:
• hive.optimize.sort.dynamic.partition = true
• hive.optimize.sort.dynamic.partition.threshold = 0
If you notice that some queries are taking a longer time to complete or failing entirely (usually noticed in
large clusters), you can choose to revert the value of hive.optimize.sort.dynamic.partition.threshold to "-1".
The performance issue is related to HIVE-26283.
Overview of the Ozone Manager in High Availability
Configuring High Availability (HA) for the Ozone Manager (OM) enables you to run redundant Ozone Managers
on your Ozone cluster and prevents the occurrence of a single point of failure in the cluster from the perspective of
namespace management. In addition, Ozone Manager HA ensures continued interactions with the client applications
for read and write operations.
Ozone Manager HA involves a leader OM that handles read and write requests from the client applications, and at
least two follower OMs, one of which can take over as the leader in situations such as the following:
• Unplanned events such as a crash involving the node that contains the leader OM.
• Planned events such as a hardware or software upgrade on the node that contains the leader OM.
Considerations for configuring High Availability on the Ozone Manager
There are various factors that you must consider when configuring High Availability (HA) for the Ozone Manager
(OM).
• OM HA is automatically enabled when you set up Ozone on a CDP cluster with at least three nodes as OM hosts.
• You must define the OM on at least three nodes so that one OM node is the leader and the remaining nodes are the
followers. The OM nodes automatically elect a leader.
The following command lists the OM leader node and the follower nodes:
ozone admin om getserviceroles -id=<ozone service id>
Ozone Manager nodes in High Availability
A High Availability (HA) configuration of the Ozone Manager (OM) involves one leader OM node and two or more
follower nodes. The leader node services read and write requests from the client. The follower nodes closely keep
track of the updates made by the leader so that in the event of a failure, one of the follower nodes can take over the
operations of the leader.
The leader commits a transaction only after at least one of the followers acknowledges to have received the
transaction.
Read and write requests with Ozone Manager in High Availability
Read requests from the client applications are directed to the leader Ozone Manager (OM) node. After receiving an
acknowledgement to its request, the client caches the details of the leader OM node, and routes subsequent requests to
this node.
51

Cloudera Runtime Overview of Storage Container Manager in High Availability
If repeated requests to the designated leader OM node start failing or fail with a NonLeaderException, it could mean
that the particular node is no longer the leader. In this situation, the client must identify the correct leader OM node
and reroute the requests accordingly.
The following command lists the OM leader node and the follower nodes:
ozone admin om getserviceroles -id=<ozone service id>
In the case of write requests from clients, the OM leader services the request after receiving a quorum of
acknowledgements from the follower.
Note: The read and write requests from clients could fail in situations such as a failover event or network
failure. In such situations, the client can retry the requests.
Overview of Storage Container Manager in High
Availability
Configuring High Availability (HA) for the Storage Container Manager (SCM) prevents the occurrence of a
single point of failure in an Ozone cluster to manage the various types of storage metadata, and ensures continued
interactions of the SCM with the Ozone Manager (OM) and the DataNodes.
SCM HA involves the following:
• A leader SCM that interacts with the OM for block allocations, and works with the DataNodes to maintain the
replication levels required by the Ozone cluster.
• At least two follower SCMs that closely keep track of the updates made by the leader so that in the event of a
failure, one of the follower nodes can take over the operations from the leader.
Considerations for configuring High Availability on Storage Container
Manager
Similar to configuring High Availability (HA) for the Ozone Manager (OM), there are various factors that you must
consider when configuring HA for the Storage Container Manager (SCM).
• SCM HA is supported only on new CDP cluster deployments starting with CDP 7.1.7. You can configure SCM
HA when adding Ozone as a service through Cloudera Manager.
Note: For information about adding and deleting services using Cloudera Manager, see the following:
• Adding a service
• Deleting services
• To configure SCM HA, you require at least three nodes as SCM hosts so that one SCM node is the leader and the
remaining nodes are the followers. The SCM nodes automatically elect a leader.
Note: The ozone admin scm roles command lists the leader and follower SCM nodes in an Ozone cluster.
• A primordial SCM node generates the cluster ID and distributes it across Ozone Manager and DataNodes in
an Ozone cluster. A primordial SCM must be running for other SCMs in SCM HA setup to bootstrap initially.
If there is an existing SCM instance running and you want to add a new SCM instance, the primordial node
configuration needs to be the existing SCM instance only.
Note: If the primordial SCM is not chosen correctly, the Ozone cluster can encounter issues from OMs
and DNs can crash into SCMs.
• You must specify one of the three SCM host names as the primordial node using the ozone.scm.primordial.node.id
property. In addition, you must specify the SCM service ID using the ozone.scm.service.id property.
52

Cloudera Runtime Offloading Application Logs to Ozone
• If a primordial SCM node is inaccessible, new SCM nodes cannot join an HA configuration.
Note:
• You can now configure Ozone Service ID through the Cloudera Manager setup wizard. However, you
must not change the Ozone Service ID after the setup is complete. If you change the Ozone Service ID,
Ozone Manager fails to start up.
• You can also configure primordial ID in Cloudera Manager while setting up Ozone as a service.
• Currently, Cloudera Manager does not have an option to disable parameters that can be configured
after the setup.
• After you have configured the HA cluster, ensure that you do not change the SCM Ratis port number (9894).
Note: For information about the various Ozone ports, see Ports Used by Cloudera Runtime Components.
Storage Container Manager operations in High Availability
When an Ozone cluster has Storage Container Manager (SCM) High Availability (HA) configured, the important
SCM operations; for example, managing client requests such as allocating containers, local operations such as
destroying pipelines, and processing DataNode updates, are handled differently from a non-HA Ozone cluster.
Client request management
SCM clients are the different Ozone elements that interact with the SCM such as DataNodes, the Ozone Manager
(OM) and so on.
On receiving client requests such as allocating a container or a pipeline, the leader SCM performs all the required
operations. The leader also performs metadata changes that result from executing the client request, and accordingly
updates Ratis. The changes are replicated to the followers through Ratis.
Performing operations local to the SCM
SCM performs local operations such as destroying pipelines, deleting stale DataNodes, and so on, when it stops
receiving heartbeats or reports from DataNodes. The followers log the occurrences of these operations and their
results. The leader performs any metadata changes that result from these local operations, and accordingly updates
Ratis. The changes are replicated to the followers through Ratis.
Processing DataNode updates
The DataNodes send heartbeats and reports to all the SCMs so that they maintain consistent information about the
health of the DataNodes. If the SCMs require to interact with the DataNodes, only the leader sends the required
information while the followers update their states accordingly.
Note: Because newer heartbeats and reports can overwrite the existing information, the SCMs are eventually
consistent with the DataNode heartbeats and reports.
Offloading Application Logs to Ozone
In order to offload logs from HDFS to Ozone, a small Ozone cluster can be deployed through Cloudera Manager and
then by configuring Remote App Log Directory in YARN configs, customers can offload logs from HDFS to Ozone.
This will help in freeing up space in HDFS metadata for more user data. After changing the configuration, logs for all
YARN, Hive on Tez and Spark on Yarn are automatically redirected to Ozone.
Note: This does not require any changes in the application.
53

Cloudera Runtime Removing Ozone DataNodes from the cluster
HDFS is used as the primary storage engine by most of the Big Data applications like Hive, YARN, Spark, and so on.
Currently, it stores both the important data like Hive and Spark tables and logs generated by these applications.
The YARN Log Aggregation feature enables you to move local log files of any application onto HDFS or Apache
Ozone depending on the cluster configuration. Fore more information, see YARN Log Aggregation Overview
Changing configuration
• In Cloudera Manager, select the service.
• Click the Configuration tab. Search for “remote app log”.
• In the Filters pane, under Scope, select NodeManager.
• In the Remote App Log Directory (yarn.nodemanager.remote-app-log-dir) field, add the following:
ofs://ozone1/logvol/logbuck/temp_log_dir
Removing Ozone DataNodes from the cluster
You can remove Ozone DataNodes from the CDP cluster in a controlled manner using Cloudera Manager for
performing maintenance operations. If you want to remove the DataNodes permanently or for an unknown duration,
you can decommission them. If you want to make the DataNodes unavailable for a short period of time, such as, for a
few days or hours, you can place them in offline mode.
When you initiate the process of decommissioning a DataNode, Ozone automatically ensures that all the storage
containers on that DataNode have an additional copy created on another DataNode before the decommission
completes. Similarly, when you initiate the process of placing a DataNode in offline mode, Ozone ensures that at least
two copies of the DataNode's storage containers are present on other nodes before the particular DataNode enters
offline mode.
Note:
• Before a DataNode enters offline mode, you can reduce the minimum number of online copies of the
storage container from two to one. This process reduces the time to complete the offline mode operation.
However, the process increases the risk of data becoming temporarily unavailable if another DataNode
fails.
For details on how to reduce the minimum number of storage container copies, see Configuring the
number of storage container copies for a DataNode.
• Ozone does not specify any upper limit on the number of DataNodes you can simultaneously
decommission or place in offline mode. However, there must be enough space on the cluster to hold the
additional storage containers. Otherwise, the DataNodes cannot complete the decommissioning or offline
mode processes.
You can also recommission a DataNode that is already decommissioned or placed in offline mode. When
you recommission such a DataNode, Ozone automatically removes any excess containers created during the
decommission or offline process.
Decommissioning Ozone DataNodes
You can remove Ozone DataNodes from the cluster by decommissioning the DataNode instances using Cloudera
Manager.
Before you begin
Ensure that the cluster has sufficient space to hold the additional storage containers of the DataNodes that you are
decommissioning.
54

Cloudera Runtime Removing Ozone DataNodes from the cluster
Procedure
1.
In Cloudera Manager, go to the Ozone service.
2.
Click Instances.
3.
Select the DataNode instances that you want to decommission.
4.
Select Actions for Selected>Decommission.
5.
Click Decommission to confirm.
Ozone initiates decommissioning of the selected DataNodes. The process takes time depending on the number of
storage containers to replicate. After the process is complete, the Instances page shows the Commissioned State of
the selected DataNodes as Decommissioned.
Placing Ozone DataNodes in offline mode
You can temporarily remove Ozone DataNodes from the cluster by placing the DataNode instances in offline mode
using Cloudera Manager.
Before you begin
Ensure that the cluster has sufficient space to hold the additional storage container copies belonging to the DataNode
that you are placing in offline mode.
Procedure
1.
In Cloudera Manager, go to the Ozone service.
2.
Click Instances.
3.
Select the DataNode instances that you want to place in offline mode.
4.
Select Actions for Selected>Enter Offline mode.
5.
Click Enter Offline mode to confirm.
Ozone starts preparing the selected DataNodes for offline mode. The process takes time depending on the number
of storage containers to replicate. After the process is complete, the DataNode is stopped, and the Instances page
shows the Commissioned State of the selected DataNodes as Offlined.
Configuring the number of storage container copies for a DataNode
By default, Ozone ensures that at least two copies of any container stored on a DataNode entering the offline mode
are available on other nodes in the cluster. To reduce the time for nodes to enter offline mode, you can reduce the
number of copies to one.
Procedure
1.
In Cloudera Manager, go to the Ozone service.
2.
Click Configuration.
3.
Search for the Storage Container Manager Advanced Configuration Snippet (Safety Valve) for ozone-conf/ozone-
site.xml property, and specify the following values:
• Name: hdds.scm.replication.maintenance.replica.minimum
• Value: 1
4.
Click Save.
5.
Restart the Storage Container Manager (SCM) instances from the Instances page.
55

Cloudera Runtime Multi-Raft configuration for efficient write performances
Recommissioning an Ozone DataNode
You can add an Ozone DataNode that is already decommissioned or in offline mode back to the cluster using
Cloudera Manager.
About this task
After decommissioning and deleting a DataNode instance, if you try adding the DataNode instance to the same host
as before, Cloudera Manager considers the newly added DataNode instance as Commissioned. However, the Storage
Container Manager recognizes the DataNode ID and treats the newly added DataNode as Decommissioned. To
address this discrepancy, you must recommission the DataNode.
Procedure
1.
In Cloudera Manager, go to the Ozone service.
2.
Click Instances.
3.
Select the DataNode instances that you want to recommission.
4.
Select Actions for Selected>Recommission and Start.
5.
Click Recommission and Start to confirm.
The selected DataNodes rejoin the cluster and Instances page shows the Commissioned State of the DataNodes as
Commissioned.
Handling datanode disk failure
If there is a disk failure on a datanode, you must place the node in offline mode, stop the node, replace the disk, start
the node, and recommission the node to remove it from offline mode. Perform the following steps:
Procedure
1.
Log in to Cloudera Manager UI
2.
Navigate to Clusters.
3.
Select the Ozone service
4.
Place the datanode in offline mode. See Placing Ozone DataNodes in offline mode.
5.
Stop the node.
6.
Replace the failed disk(s). If the new disk is mounted to a different location than the old disk, you will need to
update the configurations accordingly.
a) Go to Configurations
b) To update the path to a Ratis storage disk, update the corresponding entry in
dfs.container.ratis.datanode.storage.dir to point to the new disk’s mount point.
c) To update the path to a data storage disk, update the corresponding entry in hdds.datanode.dir to point to the
new disk’s mount point.
7.
Restart the node.
8.
Recommission the Datanode to remove it from offline mode. See Recommissioning an Ozone DataNode.
Note: In the event of complete node failure, you must decommission the node. For more information on
decommissioning the node, see Decommissioning Ozone DataNodes.
Multi-Raft configuration for efficient write performances
Multi-Raft configuration improves write performances in Ozone by including DataNodes in multiple pipelines.
56

Cloudera Runtime Working with the Recon web user interface
Ozone uses the Raft protocol for replicating data across the cluster and providing consistent write performances
among the DataNodes. Ozone stores data in a number of containers throughout the cluster and each container
allocates data blocks on DataNodes. In addition, Ozone creates pipelines, as logic groups, to assemble containers
from several DataNodes for redundancy purposes. Each pipeline consists of DataNodes in a Raft group such that
there are three DataNodes with one of them being the leader. Through the pipeline, data is written to the leader, which
replicates the same to the followers. A pipeline uses RaftLog to spread the write load on disks.
In a single-Raft configuration, a DataNode can join only one pipeline. This can slow down the write performance
to the DataNodes and impact the efficiency with which disks are used on various DataNodes. Starting with CDP
7.1.6, a multi-Raft configuration is available on Ozone by default. A multi-Raft configuration is beneficial because it
increases the write efficiency by providing for more containers and pipelines without increasing the number of nodes
or disks. Further, multi-Raft configuration also leads to more efficient use of DataNodes and disks in spreading the
writes throughout the cluster.
Configuration properties for pipeline limits
To configure the pipeline limits for a multi-Raft configuration, you can set up certain properties as advanced
configuration snippets using the Ozone Service Advanced Configuration Snippet (Safety Valve) for ozone-conf/
ozone-site.xml property.
Property Description Default value
ozone.scm.datanode.pipeline.limit Limit for the number of 3-node pipelines that a
DataNode can join.
2
If you want to increase the number of
pipelines based on the number of RaftLog
disks, then you can set this value to 0.
ozone.scm.pipeline.per.metadata.disk Number of pipelines to create for a Raft-log
disk.
2
Working with the Recon web user interface
Recon is a centralized monitoring and management service within an Ozone cluster that provides information about
the metadata maintained by different Ozone components such as the Ozone Manager (OM) and the Storage Container
Manager (SCM).
Recon keeps track of the metadata as the cluster is operational, and displays the relevant information through a
dashboard and different views on the Recon web user interface. This information helps in understanding the overall
state of the Ozone cluster.
The metadata that components such as the OM and the SCM maintain are quite different from one another. For
example, the OM maintains the mapping between keys and containers in an Ozone cluster while the SCM maintains
information about containers, DataNodes, and pipelines. The Recon web user interface provides a consolidated view
of all these elements.
Access the Recon web user interface
You can launch the Recon web user interface from Cloudera Manager. Recon starts its HTTP server over port 9888
by default. The default port is 9889 when auto-TLS is enabled.
Procedure
1.
Go to the Ozone service.
57

Cloudera Runtime Working with the Recon web user interface
2.
Click Recon Web UI.
The Recon web user interface loads in a new browser window.
Elements of the Recon web user interface
The Recon web user interface displays information about the Ozone cluster on the following pages: Overview,
DataNodes, and Pipelines. In addition, a separate page displays information about any missing storage containers.
Overview page
The Overview page displays information about different elements on the Ozone cluster in the form of a consolidated
dashboard. This page loads by default when you launch the Recon web user interface.
Note: Recon interacts with the Storage Container Manager (SCM), the DataNodes, and the Ozone Manager
(OM) at specific intervals to update its databases and reflect the state of the Ozone cluster, and then populates
the Overview page. Therefore, the information displayed on the Overview page might occasionally not be in
synchronization with the current state of the Ozone cluster because of a time lag. However, Recon ensures
that the information is eventually consistent with that of the cluster.
Recon displays the following information from the SCM and the DataNodes on the Overview page in the form of
cards:
• Health of the DataNodes in the cluster. Clicking this card loads the DataNodes page.
• Number of pipelines involved in data replication. Clicking this card loads the Pipelines page.
• Capacity of the cluster. The capacity includes the amount of storage used by Ozone, by services other than Ozone,
and any remaining storage capacity of the cluster.
• Number of storage containers in the SCM. If there are any missing containers reported, the Containers card is
highlighted with a red border. You can then click the card to view more information about the missing containers
on a separate page.
Recon displays following information from the Ozone Manager (OM) on the Overview page:
• Number of volumes in the cluster
• Total number of buckets for all the volumes in the cluster
• Total number of keys for all the buckets in the cluster
DataNodes page
The DataNodes page displays information about the state of the DataNodes in a tabular format. You can load this
page either by clicking the DataNodes tab on the left pane or the DataNodes card on the Overview page.
58

Cloudera Runtime Working with the Recon web user interface
The following columns of the table provide details of the DataNodes:
• Status: The health status of the particular DataNode. The status can be either of the following:
• HEALTHY: Indicates a normal functional DataNode.
• STALE: Indicates that the SCM has not received a heartbeat from the DataNode for a certain period of time
after the previous heartbeat.
• DEAD: Indicates that the SCM has not received a heartbeat beyond a certain period of time since receiving the
previous heartbeat. The time period beyond which the DataNode can be categorized as DEAD is configurable.
The default value is five minutes. Until this threshold is reached, the DataNode is in a STALE state.
• DECOMMISSIONING: Indicates that the DataNode is being decommissioned.
• Hostname: The cluster host that contains the particular DataNode.
• Storage Capacity: The storage capacity of the particular DataNode. The capacity information includes the amount
of storage used by Ozone, by services other than Ozone, and any remaining storage capacity of the host.
Hovering your mouse pointer over a particular entry displays the detailed capacity information as a tool tip.
• Last Heartbeat: The timestamp of the last heartbeat sent by the particular DataNode to the SCM.
• Pipeline ID(s): The IDs of the pipelines to which the particular DataNode belongs.
• Containers: The number of storage containers inside the particular DataNode.
Pipelines page
The Pipelines page displays information about active pipelines including their IDs, the corresponding replication
factors and the associated DataNodes. The page does not display any inactive pipelines.
An active pipeline is one that continues to participate in the replication process. In contrast, an inactive pipeline
contains DataNodes that are dead or inaccessible, leading to the removal of its metadata from the Recon database, and
eventually the destruction of the pipeline itself.
59

Cloudera Runtime Working with the Recon web user interface
The page displays Pipeline information in a tabular format. The following columns provide the required information:
• Pipeline ID(s): The ID of a particular pipeline.
• Replication Type & Factor: The type of replication and the corresponding replication factor associated with a
particular pipeline. The replication types are Standalone and Ratis. Accordingly, the default replication factor is
three for Ratis and one for Standalone.
• Status: Specifies whether the particular pipeline is open or closed.
• DataNodes: The DataNodes that are a part of the particular pipeline.
• Leader: The DataNode that is elected as the Ratis leader for the write operations associated with the particular
pipeline.
• Lifetime: The period of time for which the particular pipeline is open.
• Last Leader Election: The timestamp of the last election of the leader DataNode associated with this pipeline.
Note: This field does not show any data for the current release.
• No. of Elections: The number of times the DataNodes associated with the pipeline have elected a leader.
Note: This field does not show any data for the current release.
Missing Containers page
There can be situations when a storage container or its replicas are not reported in any of the DataNode reports to
the SCM. Such containers are flagged as missing containers to Recon. Ozone clients cannot read any blocks that are
present in a missing container.
The Containers card on the Overview page of the Recon web user interface is highlighted with a red border in the
case of missing containers. Clicking the card loads the Missing Containers page.
60

Cloudera Runtime Configuring Ozone to work with Prometheus
The page displays information about missing containers in a tabular format. The following columns provide the
required information:
• Container ID: The ID of the storage container that is reported as missing due to the unavailability of the container
and its replicas. Expanding the + sign next to a Container ID displays the following additional information:
• Volume: The name of the volume to which the particular key belongs.
• Bucket: The name of the bucket to which the particular key belongs.
• Key: The name of the key.
• Size: The size of the key.
• Date Created: The date of creation of the key.
• Date Modified: The date of modification of the key.
• No of Keys: The number of keys that were a part of the particular missing container.
• DataNodes: A list of DataNodes that had a replica of the missing storage container. Hovering your mouse pointer
on the information icon shows a tool tip with the timestamp when the container replica was first and last reported
on the DataNode.
Configuring Ozone to work with Prometheus
You can configure your Ozone cluster to enable Prometheus for real time monitoring of the cluster.
61

Cloudera Runtime Ozone trash overview
About this task
To enable Prometheus to work on your Ozone cluster, use Cloudera Manager to add the Ozone Prometheus role
instance.
Note: The Prometheus binary is not available in CDP Private Cloud Base 7.1.8 for the Ubuntu operating
system, you can install Prometheus separately and specify the path to the parent directory, for example /usr/
bin, in the prometheus.location parameter in Ozone.
Procedure
1.
In Cloudera Manager, go to the Ozone service.
2.
Add the Ozone Prometheus role instance to the Ozone service.
For more information about adding role instances using Cloudera Manager, see Adding a role instance.
Note: If you do not see Ozone Prometheus in the list of role instances to configure, it means that the role
instance is not configured correctly. In this situation, the Prometheus logs (/var/log/hadoop-ozone/ozone-
prometheus.log) on the Prometheus instance host show a FileNotFound error.
3.
Start the Ozone Prometheus role instance.
For information about starting role instances using Cloudera Manager, see Starting, stopping, and restarting role
instances.
After starting the role instance, the Prometheus Web UI quick link is added to the Ozone Prometheus page on
Cloudera Manager.
4.
Click the Prometheus Web UI quick link to launch the web user interface on a separate browser window.
The metrics drop-down list displays various metrics from the Ozone daemons.
5.
Select any metric from the drop-down list or enter the name of a metric and click Execute.
Click the Graph or Console tab to view further details.
Ozone trash overview
The Ozone trash feature helps prevent accidental deletion of files and directories.
When you delete a file in Ozone, the file is not immediately removed from Ozone. The deleted files are first moved
to the /user/<username>/.Trash/Current directory, with their original filesystem path being preserved. After a user-
configurable period of time (fs.trash.interval), a process known as trash checkpointing renames the Current directory
to the current timestamp, that is, /user/<username>/.Trash/<timestamp>. The checkpointing process also checks the
rest of the .Trash directory for any existing timestamp directories and removes them from Ozone permanently. You
can restore files and directories in the trash simply by moving them to a location outside the .Trash directory.
Configuring the Ozone trash checkpoint values
You can use Cloudera Manager to configure the time period after which an Ozone trash checkpoint directory is
deleted and the time interval between the creation of trash checkpoint directories.
Before you begin
You must ensure that you have set the Filesystem Trash Interval property. For details, see Setting the trash interval.
Procedure
1.
In Cloudera Manager, go to the Ozone service.
2.
Click Configuration.
62

Cloudera Runtime Configuring the Ozone trash checkpoint values
3.
Search for the Ozone Filesystem Trash Interval property and set its value.
This property specifies the time period after which an Ozone trash checkpoint directory is deleted. The default
value is 1 day. Setting the value to 0 disables the trash feature.
4.
Search for the Ozone Filesystem Trash Checkpoint Interval property and set its value.
This specifies the time period between trash checkpoints, and its value must be less than the value of the Ozone
Filesystem Trash Interval property. Setting the value to 0 implies that the value of Ozone Filesystem Trash
Interval is used to determine the interval between trash checkpoints.
63
