
PureConnect®PureConnect®
2022 R32022 R3
Generated:
18-October-2022
Content last updated:
27-April-2020
See Change Log for summary of
changes.
Interaction ConferenceInteraction Conference
Administrator's GuideAdministrator's Guide
AbstractAbstract
This document contains the content for Interaction Conference
Administrator's Guide.
For the latest version of this document, see the PureConnect
Documentation Library at: http://help.genesys.com/pureconnect.
For copyright and trademark information, see
https://help.genesys.com/pureconnect/desktop/copyright_and_trademark_information.htm.
1

2
3
4
6
6
6
7
7
7
9
9
10
10
11
11
11
11
11
17
17
18
18
18
20
21
21
22
23
24
24
24
24
25
25
25
25
26
26
26
26
27
27
27
27
27
29
30
32
32
34
34
35
Table of ContentsTable of Contents
Table of Contents
Standard Features
Architecture and System Requirements
Installation Tasks
To install Interaction Conference:
To install and configure Interaction Conference, complete the following tasks. The installation tasks are:
Install Interaction Conference Web Server
On the IIS Web Server:
Optionally install Interaction Conference Web Server using command-line parameters
Install Interaction Conference Plugins for CIC Server
To install the Interaction Conference plugins and related components on the CIC server:
Results of the Interaction Conference Plugins Install on the CIC Server
Apply the Interaction Conference License
Optionally install Session Manager IConference plugins on Off-Server Session Manager servers
From each Off-Server Session Manager Server:
Install Interaction Conference Outlook Plugin
Prerequisites for Installing Interaction Conference Outlook Plugin
Installing the Outlook Plugin using a Group Policy
Define Servers and Server Options
To define servers and server options:
Administration Procedures
Assign rights to configure global Interaction Conference settings
To assign rights to configure global settings:
Assign rights to manage individual conference rooms
Restrict rights to use conference rooms
To restrict access to a conference room:
Assign rights to create and modify conferences
To assign rights to create conference calls and to create and modify conferences:
Establish general configuration settings
Enable call control for all conferences
Require account codes for all conferences
Conference Access Type
Conference Resource Limit
Enforce resource limit when joining a conference
Default notification sender address
Set default conference options
Lock
Host Required to Start
Enforce End
Allow Mute
Record
Announce Entry
Announce Exit
Announce Number of Attendees
Define conference rooms
Configuring Interaction Conference Phone Numbers and Stations
Interaction Conference Stations
Define Email Templates
To create an email template:
Change the default time for unused conferences
Change the default to display only my conferences in the Conference List page
Change Log
2

Standard FeaturesStandard Features
Conferences are created using a central browser-based application.
Conference support for single-event and recurring schedules (weekly, monthly, and so on).
Recurring conferences are modeled from Microsoft Outlook Appointment Recurrence screens.
Conferences support open and PIN access modes.
Conference creators can opt to mute any caller.
Multiple muting options to set per conference for attendees – enter muted, enter unmuted, or muting is not allowed.
Notifications for upcoming conferences can be sent using email.
Conference creators can designate that callers are announced by recording their names. This requirement can include both an
entry and exit announcement.
A user (an individual who can schedule conferences) has variable access to conferences based on a configured profile.
Integrated Windows Authentication for user access is available.
Users logging on using their domain account can also include their Outlook Personal Contacts.
Resources are dynamically allocated to allow a conference to extend past its scheduled time. The system sees that the end
time of the conference is approaching and if there are available resources that are not reserved; the conference is allowed to
continue.
If resources are scheduled for another conference, the active conference is required to end at its scheduled time, and the
conference is dropped at the end time.
Standard reports show conference usage. Reports are broken down to show usage across different groupings.
Hosts can monitor the conference to see when participants have joined, the current call status, and remote caller information.
The monitor page also includes call controls for the conference. Call controls include: Mute, Hold, Drop, Unmute, and Pickup.
Conference calls can be recorded and the recordings emailed.
Interaction Conference purges open conferences that have not had calls for the previous 365 days.
3

Architecture and System RequirementsArchitecture and System Requirements
The Interaction Conference system consists of several components installed on one or more servers within your network. These servers and components include:
IIS Web ServerIIS Web Server
An Internet Information Services (IIS) that hosts the
Interaction Conference Web Administrator
application, which is a set of ASP.NET webpages that allow administrators to
schedule and manage conference calls. The web application is all inclusive in terms of conference administration, monitoring, and call control. The IIS server must meet the
following requirements, which the installation program checks:
Microsoft Windows Server 2012 R2, Microsoft Windows Server 2016, or Microsoft Windows Server 2019
Internet Information Server (IIS) 8.5 or later
The Role Services for ASP.NET and Static Content Compression must be installed and enabled
Microsoft .NET Framework 4.0 (extended)
Database ServerDatabase Server
The Database Server serves as the repository for conference scheduling and historical data. This database is also the IC Report Database where all CIC servers record call data.
The Interaction Conference plugin install that runs on the CIC server starts IC Setup Assistant to apply a script to the existing CIC database. This use of Setup Assistant requires
the CIC database administrator credentials.
For detailed requirements about the CIC database, see CIC System Requirements in the
PureConnect Installation and Configuration Guide
at
https://help.genesys.com/cic/mergedProjects/wh_tr/mergedProjects/wh_tr_installation_and_configuration/desktop/system_requirements.htm
4

Custo mer Custo mer Interaction C enter ServerInteraction Center Server
The CIC server provides the telephony foundation on which the conference system is based. The server uses an Interaction Conference subsystem to host and manage the
conference calls. The architecture supports one or more CIC servers.
The CIC server must have CIC 4.0 SU2 or later installed and the initial run of IC Setup Assistant must have successfully completed the initial CIC database creation. This
requirement enables the Interaction Conference Plugins Install to add its tables to the CIC database.
Co nference Resource Co nference Resource U tilizationUtilization
Interaction Conference uses audio processing and recording resources on an Interaction Media Server associated with the host CIC server. The current release of Interaction
Conference is limited to 300 unmuted participants in a conference. This temporary limit is intended to prevent large conferences of unmuted participants from consuming all of the
resources on a CIC site's media servers.
License RequirementsLicense Requirements
Interaction Conference requires a feature license on the main Customer Interaction Center license. The required license key is I3_FE ATURE_INTE RAC TION _CON FE RENCEI3_FEATURE _INTERACTION_CONFE RE NCE .
If the features license is not present, Interaction Conference server does not start. As a result, a user cannot schedule a conference from Interaction Conference Web Server or
Outlook. Also, attendees cannot connect to a conference room.
Client Work stationsClient Work stations
Interaction Conference provides a client plugin component for Microsoft Outlook that enables users to schedule conferences from an Outlook Appointment Request. This plugin
can be installed on any computer that has Microsoft Outlook 2010, Microsoft Outlook 2013, or Microsoft Outlook 2016 installed. See Install Interaction Conference Outlook Plugin
for more details.
Co nference Recordi ngsCo nference Recordi ngs
You can optionally configure a conference to record the call and send the recording to the hosts or to all invitees as an attachment to an email message. Interaction Conference
does not require Interaction Recorder.
5

Installation TasksInstallation Tasks
To install Interaction Conference:To install Interaction Conference:
1. If you have not done so already, follow the procedure in the
PureConnect Installation and Configuration Guide
to download and copy the ICON .iso file:
https://help.genesys.com/cic/mergedProjects/wh_tr/mergedProjects/wh_tr_installation_and_configuration/desktop/chapter_11_cic_server_installation.htm
2. On the desired computer, access the share and run Install.exe from the \Installs directory.
3. Select the check box for the wanted components, then click InstallInstall .
Note:Note: Use the install program to install the individual components listed in the table. Do not run the .msi files individually. The only exceptions are
components that an administrator or user installs on a client workstation.
There are five different installation programs available with Interaction Conference.
Installation Pro gramInstallation Pro gram RequiredRequired
oror
OptionalOptional
Client Client oror
ServerServer
DescriptionDescription
InteractionConferenceWebServer_20xx_Rx.msi Required Web
Server
Installs the Interaction Conference web application used to
schedule conferences.
ICServer_IConferencePlugins_20xx_Rx.msi Required CIC Server Installs the Interaction Conference plugin for Interaction Administrator,
sets a server parameter, copies other installs to shares, and prepares the
CIC Server for Interaction Conference.
MSOutlook_IConferencePlugins_20xx_Rx.msi Optional Client Installs the Interaction Conference plugin on workstations with
Microsoft Outlook
ICServerManagerApps_IConferencePlugins_20xx_Rx.msiOptional Client Run on workstations where Interaction Administrator is installed and
administrators configure Interaction Conference.
SessionManager_IConferencePlugins_20xx_Rx.msi Optional Off-Server
Session
Manager
Installs a separate Session Manager plugin on Off-Server Session
Manager (OSSM) servers for sites with over 2000 users and large
numbers of conferences.
To install and configure Interaction Conference, complete the following To install and configure Interaction Conference, complete the following tasks. Thetasks. The
installation tasks are:installation tasks are:
1. Install the Interaction Conference Web Server application on an IIS web server.
InteractionConferenceWebServer_20xx_Rx.msiInteractionConferenceWebServer_20xx_Rx.msi installs the web application used to schedule conferences. Select this on a server that has Internet
Information Server (IIS) installed. You can optionally run the Interaction Conference Web Server install on a web server hosting other applications,
including PureConnect applications and features
The Interaction Conference Web Server (.msi) installation program is included in the Interaction Conference .iso download files available on the
PureConnect Product Downloads page: https://help.genesys.com/pureconnect/secure/Downloads.aspx
2. Install Interaction Conference Plugins on CIC servers.
ICServer_IConferencePlugins_20xx_Rx.msiICServer_IConferencePlugins_20xx_Rx.msi enhances Interaction Administrator by adding the Interaction Conference container, which manages
general configuration settings and details about conference rooms, including virtual conference rooms. The installation adds a required server parameter,
creates an Outlook Plugin install share for users, and starts the IConference subsystem.
3. Optionally install Interaction Conference plugins on Off-Server Session Manager servers.
SessionManager_IConferencePlugins_20xx_Rx.msiSessionManager_IConferencePlugins_20xx_Rx.msi is for large CIC sites that have more than 2000 users, who have elected to run one or more Off-
Server Session Manager Servers. Do not select this unless you run Session Manager on dedicated servers. Do not select this on CIC servers.
4. Install the Interaction Conference Outlook plugin on client PCs that have Outlook installed.
Installation of Interaction Conference components on CIC places MSOutlo o k _IConferencePlugins_20xx_Rx.msiMSOutlook_IConferencePlugins_20xx_Rx.msi in a share that users can access to
install the Interaction Conference Outlook plugin. The Outlook plugin makes it possible for Outlook users to schedule a conference within an Outlook
Appointment. Administrators can notify users that the install program in this share is available. Administrators can also set up a group policy to install
this component.
5. If you run Interaction Administrator on a workstation (not the CIC server), select ICServerManagerApps _ICo nferencePlugins_20xx_Rx.msiICServerManagerApps_IC o nferencePlugins_20xx_Rx.msi to update
Interaction Administrator for compatibility with Interaction Conference. Installation does not require configuration decisions. Running the .msi on a client
workstation is a fast process. Before a user can configure or edit Interaction Conference resources in Interaction Administrator, that user must have the
appropriate Admin Access and Security Rights.
Related TopicsRelated Topics
Administration Procedures
6

Install Interaction Conference Web ServerInstall Interaction Conference Web Server
This procedure explains how to install the Interaction Conference web server components, including the Web Administrator application – a set of .NET
webpages that allow administrators to schedule and manage conference calls. This procedure assumes that the web server is operational as a prerequisite.
This section explains the typical wizard-based installation procedure, which we recommend. You can optionally install the Interaction Conference Web
Administrator using command-line parameters that specify the website name, application name, and application pool name. To run the install that way, see
Optionally install Interaction Conference Web Server using command-line parameters.
Note:Note: If you intend to use a unique or dedicated website name for Interaction Conference (rather than the default site name), define that site in IIS before you
start the installation.
1. Run InteractionConferenceWebServer_20xx_Rx.msiInteractio nConferenceWebServer_20xx_Rx.msi .
The Interaction Conference Web Server (.msi) installation program is included in the Interaction Conference .iso download files available on the
PureConnect Product Downloads page: https://help.genesys.com/pureconnect/secure/Downloads.aspx
2. If you are prompted to grant the program permission to run, click RunRun.
3. Click NextNext to proceed past the welcome page of the installation wizard.
If setup has been run before, you are given the option to Change, Repair, or Remove files. These options do not appear on a first-time install.
4. To change the folder in which the setup program installs Interaction Conference:
Click BrowseBro wse in the Custom Setup page.
Browse to the target folder and click OKOK to select it.
Click NextNext .
N o te:No te: To accept the default folder (recommended), click N extNext.
5. On the Website Information page, select the website to use with Interaction Conference:
If you have configured more than one website, choose a site from the WebSite N ameWebSite Name drop-down list.
Use the default or type your own Application NameApplicatio n Name and Applicatio n Po o l N ameApplicatio n Pool N ame. The install creates an application and an application pool with
the specified names.
Click NextNext .
6. From the CIC Server Name page, enter the name of the primary CIC server that Interaction Conference connects to.
7. To complete the installation, click InstallInstall.
8. The final page of the wizard appears when installation is complete. Click Finis hFinish to close the wizard.
The installation adds a desktop icon that starts Interaction Conference Web Administrator. You can use this desktop shortcut, or you can browse to
http://{IIS_Server_Name}\interactionconference
. Log on using the appropriate administrator account on the IIS server.
Installation also adds icons for printable versions of documentation to the desktop. Documentation is provided in PDF and HTML Help formats, in the
following folder:
C:\Program Files (x86)\Interactive Intelligence\Interaction Conference Web Server
Publicatio n TitlePublicatio n Title FilesFiles
Interaction Conference Administrator's GuideConference_AG.pdf Conference_AG.chm
Interaction Conference User's Guide Conference_UG.pdf Conference_UG.chm
Related TopicsRelated Topics
Installation Tasks
Administration Procedures
This procedure explains how to run the InteractionConferenceWebServer_20xx_Rx.msi using command-line parameters. The method of running the installation
is faster than using the wizard, and it can be useful when installing on multiple web servers, but the result is the same.
Before you install from Before you install from the command line:the command line:
Open the Internet Information Services (IIS) Manager and create a site name for Interaction Conference, unless you want to use the default site or have
already created another site.
You can optionally create an Application Name and Application Pool Name associated with the site in IIS. Alternatively, you can specify the Application
Name and Application Pool Name in the command-line parameters and the installation will add them to the specified site.
Determine the values of the command-line parameters before you begin. The Interaction Conference Web Server installation takes four parameters.
On the IIS Web Server:On the IIS Web Server:
Optionally install Interaction Conference Web Server using command-line Optionally install Interaction Conference Web Server using command-line parametersparameters
7

ParameterParameter DescriptionDescription
WEBSITE_NAME Optional. The name of the Interaction Conference site previously created in IIS. The default name is "Default Web Site"
WEBAPP_NAME Optional. The Application Name associated with the Interaction Conference website. The default name is "InteractionConference".
WEBAPPPOOL_NAMEOptional. The Application Pool Name associated with the Interaction Conference website. The default name is "InteractionConference".
ICSERVERNAME Required. The name of the CIC server this web server and Interaction Conference connects to.
Determine the command-line options you intend to use.
OptionOption DescriptionDescription
/l*vx
<pathtologfile>
This option allows you to specify the path and file name for the install to record its detailed steps in a log file. Without this parameter, the
install uses its default logging file/location.
/qb This option omits the installation wizard screens and just shows a progress bar and notification when the installation is complete.
/qn This option requires full Administrator permissions and completely hides all visual indicators of the installation running. Check the log file
output to determine the completion and success of the installation.
Ensure that you have access to the InteractionConferenceWebServer_20xx_Rx.msi file, either locally on the web server or on a shared directory on the
network.
Running Running the command-line installation:the command-line installation:
1. On the IIS server hosting Interaction Conference, open a Command Prompt window as an administrator and navigate to the drive where you want to run the
installation.
2. Run the msiexec command with the appropriate parameters, values, and command-line options, in the following fashion:
c:/ msiexec /i "<pathToIConWebInstall>\InteractionConferenceWebServer_20xx_Rx.msi" /l*vx "
<PathToLogfile\LogfileName>" [/qb | /qn] WEBSITE_NAME="<Icon Site name>" WEBAPP_NAME="<Icon App Name>"
WEBAPPPOOL_NAME="<Icon App Pool Name>" ICSERVERNAME="<ICServerName>"
N o te:No te: Use quotes around all file paths and values that include spaces; you can optionally use quotes even if no spaces are included.
3. Depending on the options you specified, the installation runs with full, minimal, or no visual interface and the results are recorded in an installation log file.
ExampleExample
In this example, the InteractionConferenceWebServer_20xx_Rx.msi file is in a local directory on the web server, and the installation uses the following
parameters and options.
ParameterParameter DescriptionDescription
WEBSITE_NAME "I3 Conferences", previously defined in IIS. See image.
WEBAPP_NAME Use the default "InteractionConference" and omit this parameter.
WEBAPPPOOL_NAMEUse the default "InteractionConference" and omit this parameter.
ICSERVERNAME "HQCommServer"
OptionOption DescriptionDescription
/l*vx <pathtologfile>Create the installation log file: "C:\Installs\IConferenceWebInstall.log"
/qb Run the install in minimized mode.
8

Right-click and open a Command Prompt window with administrator permissions (if that is not the default).
The following command line reflects the example parameters and options:
C:\>msiexec /i "C:\Installs\InteractionConferenceWebServer_20xx_Rx.msi" /qb /l*vx
"C:\Installs\IConferenceWebInstall.log" WEBSITE_NAME="I3 Conferences" ICSERVERNAME="HQCommServer"
NoteNote : There is a space between each option and parameter/value pair, but there is no space around the equal (=) sign within a parameter/value pair.
Install Interaction Conference Plugins for CIC ServerInstall Interaction Conference Plugins for CIC Server
The installation program named ICServer_IConferencePlugins_20xx_Rx.msiICServer_IConferencePlugins_20xx_Rx.msi installs Interaction Conference components on the CIC server and enhances
Interaction Administrator by adding the Interaction Conference container. You use the Interaction Conference configuration containers to manage general
configuration setting and details about conference rooms, including virtual conference rooms. For more information about what the IC Server IConference
Plugin install does, see Results of the Interaction Conference plugins Install on the CIC Server.
Switcho ver Consideratio nsSwitcho ver Consideratio ns
Special considerations apply if you are installing this software in a switchover environment. The upgrade process makes changes to Directory Services
during the install. If a switchover server is active during the install, changes made by installation are lost.
To avoid this problem, make sure the servers in the switchover environment are not in a valid switchover state. Then install this update on both the
primary and secondary servers. That step prevents the switchover system from wiping Directory Services entries before they are installed on the other
machine.
Note:Note: Before you run this installation program, be sure you you have completed the initial run of IC Setup Assistant on your CIC server. This ensures the
CIC database properly exists and that the Interaction Conference plugins install can update the database when it runs.
1. Run ICServer_IConferencePlugins_20xx_Rx.msiIC Server_IConferencePlugins_20xx_Rx.msi on the CIC server.
2. When the Welcome page appears, click NextNext.
3. Review the Switchover considerations. When you are ready to proceed, click InstallInstall .
4. The installation program starts IC Setup Assistant to apply a required database update. The subsequent dialogs require you log on to your SQL or Oracle
database server to apply the update. From the Database Configuration page, click ProceedProceed to continue.
5. IC Setup Assistant detects the database platform your CIC system is using and selects it. Click NextNext to continue.
6. Use your CIC database credentials to log on and allow Setup Assistant to apply the needed script to prepare for Interaction Conference. Click NextNext to
continue.
IC Setup Assistant applies the database script and continues to install the rest of the Interaction Conference plugin and client installs.
7. When installation ends:
To install the Interaction Conference plugins and related components To install the Interaction Conference plugins and related components on the CIC server:on the CIC server:
9

Read the "Important Note" in the Completed dialog box.
Click FinishFinish to close the setup program.
Restart the CIC server to pick up the changes.
Impo rtant N o te:Impo rtant N o te: To activate the changes, restart the CIC server. Interaction Conference does not work until the server is restarted. Restarting is necessary
only the first time you run the install. You do not need to restart following an update install.
In addition to the database script update, the following changes occur on the CIC server after running the ICServer_IConferencePlugins_20xx_Rx.msiICServer_IConferencePlugins_20xx_Rx.msi
install.
Server ParameterServer Parameter
Installation adds an CIC server parameter named "Interaction Conference Support," with a value of "1." This parameter tells Interaction Administrator to display
the Interaction Conference container. Do not modify this server parameter.
Client Install ShareClient Install Share
The Interaction Conference Plugins install creates a folder that CIC users can access to install the Interaction Conference Outlook plugin. The Outlook plugin
makes it possible for Outlook users to schedule a conference within an Outlook Appointment.
The install creates a directory <
drive
>\I3\IC\Install\InteractionConferenceMSOutlookPlugin and creates a shared directory with all users having Read and
Execute permissions on the share. The shared directory is \\<
CICServerName
>\IC_InteractionConferenceMSOutlookPlugin and it contains the
MSOutlook_ICPlugins.msi installation program.
The
Interaction Conference User's Guide
provides users with instructions for using the plugin.
New Subsystem in IC System ManagerNew Subsystem in IC System Manager
Installation adds an "IConference" subsystem to CIC, which you can manage using
IC System Manager
. Specifically it adds a process named
IConU.exe. Installation also creates keys in Directory Services that CIC uses to detect the existence of the Interaction Conference plugin for Interaction
Administrator. If you run IC System Manager on the CIC server, it displays the status of the IConference subsystem, as shown. The install starts this system
automatically.
Related TopicsRelated Topics
Installation Tasks
Administration Procedures
Interaction Conference requires a feature license on the main Customer Interaction Center license. The required license key is
I3_FE ATURE _INTE RACTION_CONFERENCEI3_FE ATURE _INTERACTION_CONFE RE N CE .
If the features license is not present, Interaction Conference server does not start. As a result, a user cannot schedule a conference from Interaction
Conference Web Server or Outlook. Also, attendees cannot connect to a conference room.
See the
License Configuration
topic in the Interaction Administrator help for instructions about applying licenses.
Results of the Interaction Conference Plugins Results of the Interaction Conference Plugins Install on the CIC ServerInstall on the CIC Server
Apply the Interaction Conference LicenseApply the Interaction Conference License
10

Optionally install Session Manager IConference plugins on Off-Server Optionally install Session Manager IConference plugins on Off-Server Session ManagerSession Manager
serversservers
Interaction Conference includes an optional install program that is required only when a site uses the Off-Server Session Manager server. Large CIC sites with
more than 2000 users can choose to run Session Manager on stand-alone servers. Most sites do not require this level of performance, but for large sites that
do, Interaction Conference requires you to install an additional component on each dedicated Session Manager server.
This install deploys a single component (ININ.SMExtIcon.dll) that provides an application layer between Interaction Conference and the Off-Server Session
Manager. An Off-Server Session Manager must be installed as a prerequisite to running this install.
1. Run SessionManager_ICo nferencePlugins.msiSessionManager_IConferencePlugins.msi from the distribution media.
2. Wait for the install to finish. A message appears when installation is complete. Dismiss this message to close the installer application.
3. Restart the Off-Server Session Manager server to apply the changes. If you do not restart now, Interaction Conference will not be functional until the next
time the server is restarted. The restart requirement is necessary only the first time the install is run. There is no need to restart following an update
install.
Install Interaction Conference Outlook PluginInstall Interaction Conference Outlook Plugin
This procedure explains how to install Interaction Conference Outlook plugin for Microsoft Outlook. This plugin enables you to schedule conferences within
Microsoft Outlook 2010, Microsoft Outlook 2013, or Microsoft Outlook 2016. Run this installation on each workstation where a CIC user needs schedule
conference calls. The MSOutlook_IConferencePlugins_20xx_Rx.msi is located in the IC_InteractionConferenceMSOutlookPlugin shared directory on the CIC
server.
The MSOutlook_IConferencePlugins_20xx_Rx.msi installation program checks for the following requirements and does not continue until the prerequisites are
met.
Micro soft Outlook 2010, Microsoft Outlook 2013, o r Micro s o ft Micro soft Outlook 2010, Microsoft Outlook 2013, o r Micro s o ft Outlo o k 2016 Outlo o k 2016
The Interaction Conference Outlook Plugin requires a 32-bit installation of Microsoft Outlook. The 64-bit versions of Microsoft Outlook are not supported.
Micro soft .NET Framework 4 (Full)Micro soft .NET Framework 4 (Full). The install looks for version 4.0.3031 or later.
If you do not have this version of the .NET Framework installed, use the dotNetFx40_Full_x86_x64.exe installation program on the IC_WorkstationPreReqs
shared directory on your CIC server. For example, \\CICServer\IC_WorkstationPreReqs, where CICServer is the actual name of your CIC server.
Visual Studio Tools fo r Office version 4.0Visual Studio Tools fo r Office version 4.0. The install looks for version 10.0.31119 or newer.
If you do not have these tools installed, use the VSTOR40_x64.msi or VSTOR40_x86 installation program on the IC_WorkstationPreReqs shared directory
on your CIC server version 4.0 SU3 or newer. For example, \\CICServer\IC_WorkstationPreReqs, where CICServer is the actual name of your CIC server.
2010 Primary Interop Assemblies for Microsoft Outlook 2010, 2010 Primary Interop Assemblies for Microsoft Outlook 2010, Microso ft Outlook 2013, or Micro soft Outlook 2016Micro soft Outlook 2013, o r Micro soft Outlo o k 2016
The primary interop assemblies are installed with certain features in Microsoft Office, but if those features are not installed, you must install them
separately. For example with Microsoft Outlook 2010, use the o2010pia.msi installation program on the IC_WorkstationPreReqs shared directory on your
CIC server version 4.0 SU3 or newer. For example, \\CICServer\IC_WorkstationPreReqs, where CICServer is the actual name of your CIC server.
The plugin supports both the 32-bit and the 64-bit version of Interaction Client.
Note: if you have Interaction Conference 3.0 Outlook plugin installed, uninstall it first before running the 4.0 install.
To install the Interaction Conference 4.0 Outlook plugin on a workstation:
1. Start Windows Explorer (for example, open Computer or your Documents folder).
2. Type \\CICServerN ame\IC_Interactio nConferenceMSOutlookPlugin\\C ICServerName\IC_Interactio nConferenceMSOutlo o k Plugin in the address field, replacing
CICServerName
with the name of your CIC
server. Press E nterEnter. If this folder does not exist, contact your network administrator. It is created when Interaction Conference components are installed
on the CIC server.
3. Run (double-click) MSOutlo o k_ICo nferencePlugins_20xx_Rx.msiMSOutlo o k _IConferencePlugins_20xx_Rx.msi from the folder on the CIC server. If your workstation does not have one or more of
the prerequisites installed, you see a message telling you to install it first. See the Prerequisites for Installing Interaction Conference Outlook Plugin for
instructions. Otherwise, click YesYes when prompted to allow the program to run.
4. Wait for the install to finish. A message appears when installation is complete. Click OKOK to close the installer application.
5. If Outlook was running when you ran the install, close and restart Outlook before proceeding. The Interaction Conference plugin does not appear until
Outlook is restarted.
Related TopicsRelated Topics
Installing the Interaction Conference Outlook Plugin using a Group Policy
Network administrators can optionally distribute the Interaction Conference Outlook Plugin installation file to client workstations instead of performing
individual client workstation installations. A silent installation can provide this functionality. This topic explains how to distribute the .msi installation file
across many workstations using a Visual Basic script in a network policy.
For more information about installing CIC workstation applications via group policy, see
Group Policy Deployment for CIC Applications Technical Reference
in
the PureConnect Documentation Library.
A group policy script references the prerequisite installs and the Interaction Conference Outlook Plugin install, both of which must be accessible on a shared
directory that all client workstations can access. If the workstation does not meet the requirements for the Interaction Conference Outlook plugin, the script
From each Off-Server Session Manager Server:From each Off-Server Session Manager Server:
Prerequisites for Installing Prerequisites for Installing Interaction Conference Outlook PluginInteraction Conference Outlook Plugin
Installing the Outlook Plugin using a Group PolicyInstalling the Outlook Plugin using a Group Policy
11

can apply the installs to meet those requirements before proceeding to the Outlook Plugin install itself. Record the \\Server\InstallShareName information for
both the prerequisite and primary installation programs. These server/share names are needed in the group policy script.
In the following sample script, it looks for the three essential requirements:
Micro soft Outlook (32-bit vers ion o nly)Micro soft Outlook (32-bit vers ion o nly) – If not found, the script and installation program does not run.
Visual Studio Tools fo r Office version 4.0Visual Studio Tools fo r Office version 4.0 - The install looks for version 10.0.31119 or newer. If you do not have CIC 4.0 SU3 installed, search the
Microsoft website and download vstor_redist.exe to get the required installation program.
Micro soft Office 2010 Primary Intero p AssembliesMicro soft Office 2010 Primary Intero p Assemblies – Installs with o2010pia.msi
1. Create a Visual Basic script for the group policy to use. You can use the following script as a template or starting point, but you must customize it to
fit your environment. You can copy and paste this script into Notepad as a starting point. Then edit the <PathToOutlookAddInShare> and
<PathToWorkStationPreReqShare> placeholders and replace them with your local \\Servername\InstallShare names on your network.
'script to install version 4.x Interaction Conference plugins for Microsoft Outlook and pre-reqs
pluginShare="<PathToOutlookAddInShare>"
preReqShare="<PathToWorkStationPreReqShare>"
clientGUID="{0E65D294-C977-4420-B84E-D6CE2C850574}"
clientApp="MSOutlook_IConferencePlugins_20xx_Rx.msi"
interopProductCode="{90140000-1146-0000-0000-0000000FF1CE}"
interopInstall="o2010pia.msi"
officeRuntimeAgnosticInstall="vstor_redist.exe"
officeRuntime64Install="vstor40_x64.exe"
officeRuntime32Install="vstor40_x86.exe"
minVersion="10.0.31119"
Dim installer : Set installer = Nothing
Set installer = Wscript.CreateObject("WindowsInstaller.Installer")
Set WShell = Wscript.CreateObject("Wscript.Shell")
Set objShell = CreateObject("Shell.Application")
Const msiInstallStateLocal = 3
Const msiInstallStateDefault = 5
Const FILEVER_RC_F1_EQUAL_F2 = 0
Const FILEVER_RC_F1_LESS_THAN_F2 = -1
Const FILEVER_RC_F1_GREATER_THAN_F2 = 1
'creates a timestamp to make log name unique
timestamp=Year(Now) & Month(Now) & Day(Now) & Hour(Now) & Minute(Now) & Second(Now)
'sets defaultTempDir to user temp directory
strTempDir = WShell.ExpandEnvironmentStrings("%temp%") & "\"
Set fso = CreateObject("Scripting.FileSystemObject")
Set objTextFile = fso.OpenTextFile(strTempDir & "\IConferencePluginsMSOutlook_script.log", 8, True)
logit("Script started " & Now())
numBits = GetBitness()
outlookInstalled=checkOutlook(numBits)
if outlookInstalled=true then
'checks pre-reqs
interopPreReqInstalled=checkPreReq(interopProductCode)
officeRuntimePreReqInstalled=checkVSTO(numBits)
12

agnosticOfficeRuntimeFound=fso.FileExists(preReqShare & "\" & officeRuntimeAgnosticInstall)
'Installs pre-reqs if needed
if interopPreReqInstalled=false then
logit("Microsoft Office 2010 Primary Interop Assemblies is not installed and is a pre-req. Installing Microsoft Office 2010 Primary Interop
Assemblies")
InstallPath=preReqShare & "\" & interopInstall
commandline="msiexec /i " & InstallPath & " /l*vx %temp%\" & replace(interopInstall,".msi","_install_" & timestamp & ".log") & " /q REBOOT=R"
logit("Executing " & commandline)
r=wshell.run(commandline,0,true)
end if
'Installs VSTOR. Since the newer VSTOR is architecture agnostic, checks to see if that VSTOR is available and installs it.
'If the agnostic VSTOR is not available, then relies on the bitness of the system to install the correct VSTOR.
if officeRuntimePreReqInstalled=false then
logit("Microsoft Visual Studio 2010 Tools for Office Runtime is not installed and is a pre-req.")
if agnosticOfficeRuntimeFound=true then
logit("Universal Microsoft Visual Studio 2010 Tools for Office Runtime found. Installing Microsoft Visual Studio 2010 Tools for Office
Runtime")
InstallPath=preReqShare & "\" & officeRuntimeAgnosticInstall
commandline=InstallPath & " /l*vx %temp%\" & replace(officeRuntimeAgnosticInstall,".exe","_install_" & timestamp & ".log") & " /q
REBOOT=R"
logit("Executing " & commandline)
r=wshell.run(commandline,1,true)
elseif numBits="32" then
logit("Installing Microsoft Visual Studio 2010 Tools for Office Runtime (x86)")
InstallPath=preReqShare & "\" & officeRuntime32Install
commandline=InstallPath & " /l*vx %temp%\" & replace(officeRuntime32Install,".exe","_install_" & timestamp & ".log") & " /q REBOOT=R"
logit("Executing " & commandline)
r=wshell.run(commandline,1,true)
elseif numBits="64" then
logit("Installing Microsoft Visual Studio 2010 Tools for Office Runtime (x64)")
InstallPath=preReqShare & "\" & officeRuntime64Install
commandline=InstallPath & " /l*vx %temp%\" & replace(officeRuntime64Install,".exe","_install_" & timestamp & ".log") & " /q REBOOT=R"
logit("Executing " & commandline)
r=wshell.run(commandline,1,true)
end if
end if
'installs clientApp
InstallPath=pluginShare & "\" & clientApp
commandline="msiexec /i " & InstallPath & " /l*vx %temp%\" & replace(clientApp,".msi","_install_" & timestamp & ".log") & " /q"
logit("Executing " & commandline)
r=wshell.run(commandline,1,true)
end if
logit("Script completed" & vbcrlf & vbcrlf)
objTextFile.close
'writes message to logfile.
Function logit(strMessage)
13

objTextFile.Writeline FormatDateTime(Now(),vbLongTime) & vbtab & strMessage
End Function
function checkPreReq(productGUID)
If installer.ProductState(productGUID)=msiInstallStateLocal Or installer.ProductState(productGUID)=msiInstallStateDefault Then
checkPreReq=true
Else
checkPreReq=false
end if
End Function
'checks to see if Outlook is installed
Function checkOutlook(bitness)
Set oShellreg = CreateObject("WScript.Shell")
If bitness="32" Then sRegKey = "HKLM\SOFTWARE\Microsoft\Office\14.0\Outlook\InstallRoot\"
If bitness="64" Then sRegKey = "HKLM\SOFTWARE\Wow6432Node\Microsoft\Office\14.0\Outlook\InstallRoot\"
sRegValue = "" ' init value in case value does not exist
On Error Resume Next
sRegValue = oShellreg.RegRead(sRegKey & "Path")
On Error Goto 0
If sRegValue <> "" Then
checkOutlook=True
logit("Microsoft Outlook 2010 32-bit is installed.")
Else
checkOutlook=False
logit("Microsoft Outlook 2010 32-bit is not installed.")
End If
set oShellreg=nothing
End Function
'checks to see if VSTO is installed
Function checkVSTO(bitness)
Set oShellreg = CreateObject("WScript.Shell")
If bitness="32" Then sRegKey = "HKLM\SOFTWARE\Microsoft\VSTO Runtime Setup\v4R\"
If bitness="64" Then sRegKey = "HKLM\SOFTWARE\Wow6432Node\Microsoft\VSTO Runtime Setup\v4R\"
sRegValue = "" ' init value in case value does not exist
On Error Resume Next
sRegValue = oShellreg.RegRead(sRegKey & "Version")
On Error Goto 0
'compare retrieved value versus teh minimum required value
compResult=CompareFileVersions(sRegValue,minVersion)
If compResult=1 Or compResult=0 Then
checkVSTO=True
logit("VSTO version " & sRegValue & " meets requirement")
Else
checkVSTO=False
14

logit("VSTO version " & sRegValue & " does not meet requirement and will be installed.")
End If
set oShellreg=nothing
End Function
function CompareFileVersions(VerF1, VerF2)
'WScript.Echo "CompareFileVersions() """ & VerF1 & """ with """ & VerF2 & """"
' logit("CompareFileVersions() """ & VerF1 & """ with """ & VerF2 & """")
on error resume next
CompareFileVersions = FILEVER_RC_F1_EQUAL_F2
'-------- Split up the version numbers ------------------------------
dim VerBitsF1 : VerBitsF1 = split(VerF1, ".")
dim VerBitsF2 : VerBitsF2 = split(VerF2, ".")
'-------- How many "bits" are there (use largest of the two) --------
dim LastIndex : LastIndex = ubound(VerBitsF1)
if ubound(VerBitsF2) > LastIndex then
LastIndex = ubound(VerBitsF2)
end if
'-------- Work through each of the bits (probably 4) ----------------
dim i
for i = 0 to LastIndex
'--- Work out the 2 "bits" to compare (use "0" on shorter versions) ---
dim BitF1, BitF2
if i <= ubound(VerBitsF1) then BitF1 = VerBitsF1(i) else BitF1 = ""
if i <= ubound(VerBitsF2) then BitF2 = VerBitsF2(i) else BitF2 = ""
if BitF1 = "" then BitF1 = "0"
if BitF2 = "" then BitF2 = "0"
'-------- Compare the values (exit when mismatch found) ---------
' wscript.echo "Comparing level #" & i+1 & """: " & BitF1 & """ with """ & BitF2 & """"
if cint(BitF1) > cint(BitF2) then
' wscript.echo """" & BitF1 & """ is greater than """ & BitF2 & """"
CompareFileVersions = FILEVER_RC_F1_GREATER_THAN_F2
else
if cint(BitF1) < cint(BitF2) then
' wscript.echo """" & BitF1 & """ is less than """ & BitF2 & """"
CompareFileVersions = FILEVER_RC_F1_LESS_THAN_F2
end if
end if
if CompareFileVersions <> FILEVER_RC_F1_EQUAL_F2 then exit for
next
' wscript.echo "Compare answer is " & CompareFileVersions
end function
Function GetBitness()
Set WshShell = CreateObject("WScript.Shell")
Set WshProcEnv = WshShell.Environment("Process")
15

process_architecture= WshProcEnv("PROCESSOR_ARCHITECTURE")
If process_architecture = "x86" Then
system_architecture= WshProcEnv("PROCESSOR_ARCHITEW6432")
If system_architecture = "" Then
GetBitness="32"
logit("32-bit Operating System detected.")
End if
Else
GetBitness="64"
logit("64-bit Operating System detected.")
End If
End Function
2. The script must be configured to run as a machine policy with local administrator rights.
3. After the script is finished, you can check the installation log files in the user's %temp% folder on the workstation, to see the results of the installation.
Important: Always test this procedure for one or two client workstations before attempting to distribute the install to many workstations.
16

Define Servers and Server OptionsDefine Servers and Server Options
Interaction Conference uses one or more servers to host conferences. If the primary CIC server that the Interaction Conference web server references
changes, or if you add new CIC servers to your system, edit an XML file called Configuratio n.xmlConfiguration.xml to reflect the change. This file is in the Interaction
Conference folder on the web server. You do not need XML expertise to define your servers in this file, but you must carefully edit the file.
1. Locate the XML file C onfiguration.xmlConfiguration.xml in your Interaction Conference folder on the web server. For example: C:\Program Files (x86)\Interactive
Intelligence\Interaction Conference Web Server
2. Open the file in Windows Notepad or an XML editor. The file contains this XML code:
<?xml version="1.0" encoding="utf-8" ?>
<Config>
<Servers>
<Server>
<Host>YourCICServerName</Host>
<DisplayName>YourCICServerName</DisplayName>
</Server>
</Servers>
<AutoSelectServer>false</AutoSelectServer>
</Config>
3. The red text with YourCICServerName contains the name of the CIC server you entered as part of the Interaction Conference Web Administrator
installation. If your CIC server changes, edit the Host and DisplayName fields.
a. Between < H o st><Ho st> and </Host></Host>, type the name of the CIC server hosting Interaction Conference.
b. Between <DisplayName><DisplayName> and </DisplayName></DisplayName> , type a user-friendly CIC server name to display.
4. If needed, add more servers:
a. Copy the text from <Server><Server> to </Server></Server> and paste to the line just above </Servers>.
b. Repeat steps 3(a) and 3(b) to edit the server information.
Note: Do not add switchover (backup) servers here. This Configuration.xml file is only for the primary CIC server names.
5. Set the AutoSelect option:
a. To make Interaction Conference log on to all the servers you have defined, type truetrue between <AutoSelectServer><AutoSelectServer> and </Auto SelectServer>< /AutoSelectServer> . The
line looks like the following:
<AutoSelectServer>true</AutoSelectServer>
b. To require the conference creator to select the server on the logon page, type falsefalse between <AutoSelectServer><AutoSelectServer> and </Auto SelectServer>< /AutoSelectServer> . The
line looks like the following:
<AutoSelectServer>false</AutoSelectServer>
6. Save and close the XML file.
To define servers and server options:To define servers and server options:
17

Administration ProceduresAdministration Procedures
A user can use the Interaction Conference plugin for Microsoft Outlook or the Web interface to schedule calls. Administrators use
containers in Interaction Administrator and the ASP.Net web application to manage settings and conferences.
Assign right to configure global settings.
Once this right is assigned, a user can configure global Interaction Conference settings, using the Interaction Conference
Container in Interaction Administrator.
Assign right to manage individual conference rooms.
Users with this right can modify the configuration of specific conference rooms, or all conference rooms if *[All] is granted.
Assign right to create and modify conferences.
Users with this right can create and modify the conferences they created, or optionally manage all conferences.
Establish general configuration settings.
This procedure explains how to use the Interaction Conference container in Interaction Administrator to configure settings that
apply to all conferences. These settings are configured in the Interaction Conference Container and the Conference Rooms
node. This procedure must be performed once before Interaction Conference can be used. The right to configure global
settings must have been previously granted at the default user, user, role, or workgroup level.
Define conference rooms.
When Interaction Conference components are installed on a CIC or EIC server, a new
Interaction Conference
container is added
to Interaction Administrator, the primary application used to administer CIC servers. Define at least one conference room
before scheduling an Interaction Conference. Additional conference rooms can be defined at any time.
Configure Interaction Conference phone numbers and stations.
Before or after you define a conference room, create a phone number for external parties and an internal station with an
extension and link them together, so internal (CIC users) and external guests are in the same room.
Define email templates.
This procedure shows how the administrator can create email message templates for meeting invitations and cancellations.
Related TopicsRelated Topics
Installation Tasks
Assign rights to configure global Interaction Conference settingsAssign rights to configure global Interaction Conference settings
To configure Interaction Conference settings, a user must have the Interaction Conference administrative access rights. You can
set access at the default user, user, role, and workgroup level. With these access rights, a user can configure global Interaction
Conference settings, using the Interaction Conference Container in Interaction Administrator.
1. Start Interaction Administrator.
2. Open the tab for an individual user, role, or workgroup.
3. Select the SecuritySecurity tab and then click Administrator Administrator AccessAccess .
Note: If an administrator account has Master Administrator rights, the Administrator Access button is not available, and
that account automatically has all administrator rights.
To assign rights to configure global settings:To assign rights to configure global settings:
18

4. On the Administrato r AccessAdministrator Access dialog, in the Catego ryCatego ry drop down list, select ConferenceConference to display the Interaction
Conference Administrator Access options.
5. Select the Interactio n Co nferenceInteraction Conference check box to give this user, role, or workgroup members administrator access to the
Interaction Conference configuration container in Interaction Administrator.
6. If this user, role, or workgroup also needs access to control all Interaction Conference Rooms, select the *[All]*[All] check box.
Later, after configuring individual conference rooms, you can use the same dialog to grant individual users, roles, or
workgroups access rights to manage specific conference rooms.
19

7. Click Clo seClose to exit the Administrator Administrator AccessAccess dialog, and click ApplyApply on the SecuritySecurity page to commit the changes.
Related TopicsRelated Topics
Administration Procedures
Installation Tasks
Assign rights to manage individual conference roomsAssign rights to manage individual conference rooms
To configure one or more Interaction Conference Room settings, a user must have the Interaction Conference Room administrative
access rights. You can set access at the default user, user, roles, and workgroup level. With these access rights, a user can
configure individual Interaction Conference Room settings, under the Interaction Conference Container in Interaction Administrator.
To assign rights to configure individual conference room settings:
1. Start Interaction Administrator.
2. Open the property sheet for an individual user, role, or workgroup.
3. Select the SecuritySecurity tab and then click Administrator Administrator AccessAccess .
Note: If an Administrator account has Master Administrator rights, the Administrator Access button is not available,
and that account automatically has all Administrator rights.
20

4. On the Administrato r AccessAdministrator Access dialog, in the Catego ryCatego ry drop down list, select ConferenceConference to display the Interaction
Conference Administrator Access options.
5. Select the *[All]*[All] check box to give this user, role, or workgroup members administrator rights to configure all Interaction
Conference rooms in Interaction Administrator. You can optionally select individual rooms for each user, role, or workgroup
member to control.
6. Click Clo seClose to exit the Administrator AccessAdministrator Access dialog, and click ApplyApply on the SecuritySecurity page to commit the changes.
Related TopicsRelated Topics
Administration Procedures
Installation Tasks
For more information about using these pages in Interaction Administrator, see the Interaction Administrator help topic for
Administrator Access.
Restrict rights to use conference roomsRestrict rights to use conference rooms
By default, users have access to all conference rooms. The administrator can block users, roles, or workgroups from having access
to specific conference rooms.
1. Start Interaction Administrator.
2. Open the property sheet for an individual user, role, or workgroup.
3. Select the SecuritySecurity tab and then click Access Contro lAccess Control .
To restrict access to a conference room:To restrict access to a conference room:
21

4. On the Access Contro lAccess Control dialog, in the CategoryCatego ry drop down list, select Interaction ConferenceInteraction Conference to display the Conference
Rooms previously defined.
5. Select the check box in the RestrictRestrict column beside one or more conference rooms that this user, role, or workgroup does not
have access rights.
6. Click Clo seClose to exit the Access Co ntrolAccess Control dialog, and click ApplyApply on the SecuritySecurity page to commit the changes.
Note: Note: You can also set this restriction at the role or workgroup level for users to inherit. To inherit this restriction from a role
or workgroup, set the:
• Conf Room Restrict Role server parameter to True to enable the role restriction inheritance.
• Conf Room Restrict Workgroup server parameter to True to enable the workgroup restriction inheritance.
Restart the IConference subsystem after you set either of the server parameters in order for the change to take effect.
Related TopicsRelated Topics
Administration Procedures
Installation Tasks
For more information about using these pages in Interaction Administrator, see the Interaction Administrator help topic for
Access Control.
Assign rights to create and modify conferencesAssign rights to create and modify conferences
There are separate rights that enable users to create conference calls from Interaction Client, and other rights that enable users to
create and modify conferences in Interaction Conference. These rights are controlled in the Security RightsSecurity Rights dialog in Interaction
Administrator.
22

1. Start Interaction Administrator.
2. Open the property sheet for a user, default user, role, or workgroup.
3. Select the SecuritySecurity tab and then click Security RightsSecurity Rights .
4. On the Security RightsSecurity Rights dialog, the default Category is <All>, to display all security rights. To filter this list down to rights
associated with Interaction Conference, in the SearchSearch field, start to type "
conference
". The list is trimmed down to ClientClient
RightsRights (at the UserUser level) and Interaction Interaction Conference Po licyConference Policy (at the Applicatio nApplication level). You can optionally display one
category at a time in the CategoryCategory drop-down list.
5. To give the user the rights to place conference calls, select the check box beside Co nference CallsCo nference Calls .
To give the user rights to create and modify all conferences in Interaction Conference, regardless of who created it, select the
Create and Create and Modify All ConferencesMo dify All Conferences check box.
To give the user rights to create and modify conferences that this user created (even as a member of a role or workgroup),
select the Create and Modify Co nferencesCreate and Modify Conferences check box.
6. Click Clo seClose to exit the Security RightsSecurity Rights dialog, and click ApplyApply on the SecuritySecurity page to commit the changes.
Related TopicsRelated Topics
Administration Procedures
Installation Tasks
For more information about using these pages in Interaction Administrator, see the Interaction Administrator help topic for
Security Rights.
To assign rights to create conference calls and to create and modify To assign rights to create conference calls and to create and modify conferences:conferences:
23

Establish general configuration settingsEstablish general configuration settings
This procedure explains how to use the Interaction Conference container in Interaction Administrator to configure settings that
apply to all conferences. Configure these settings using the Interaction Conference Container and the Conference Rooms node. Set
the relevant configuration options before using Interaction Conference. This procedure requires the right to configure global
settings granted at the default user, user, role, or workgroup level.
1. Start Interaction Administrator on the CIC server.
2. Select the Interaction Conference Container.
3. Double-click the
Configuration
entry. The Interactio n Interaction Conference Configuratio nConference Configuration dialog appears. The settings on these
pages set defaults that apply to all conferences.
Enable call control for all conferencesEnable call control for all conferences
Select this check box to add call control options (mute, disconnect, and so on) next to names of conference attendees in the
Interaction Conference web application. By default, this option is not enabled.
Require account codes for all conferencesRequire account codes for all conferences
Select this check box to associate specific account codes (as defined in the Account Codes container) to conferences. By default,
this option is not enabled.
Conference Access TypeConference Access Type
The settings in this drop list determine whether conference attendees are required to supply a personal identification number (PIN).
You can specify PIN numbers to be required, not required, or optionally required by individual conferences. When PINs are used,
Conference attendees are granted a system-generated PIN number when notification emails are sent. The options are:
Disallow PIN— This option sets the default for all conferences not to allow PIN usage.
PIN Optional— This option sets PIN usage as optional, meaning that conferences may or may not require them. Select this
option if you want the option to use PINs on a case-by-case basis, using the web administration conference interface.
Require PIN— (Default) This option sets PIN usage as a requirement, meaning that all conferences require a PIN by default.
24

Conference Resource LimitConference Resource Limit
This setting determines the maximum number of conference resources that Interaction Conference can use on the available
Interaction Media Servers. Typically, the resources available for all CIC users to participate in ad-hoc conference calls combined
with Interaction Conference calls is large and restricted only by the capacity of the Interaction Media Servers. This Co nferenceConference
Resource LimitResource Limit setting specifies the maximum number of Interaction Conference users on the CIC system that can be actively
using conferences at the same time. If you are unsure how to set this limit, leave this field blank.
As a rule of thumb, one conference resource is required for each conference invitee, but more conference resources are used for
recording calls.
Enforce resource limit when joining a conferenceEnforce resource limit when joining a conference
When an Interaction Conference user creates a conference, that person can optionally specify the number of conference resources
to use for that conference. The default value is 10, but it can be set to any number (up to the Conference Resource Limit). Select
this check box to enforce the limit set in the Resources field on the New Conference configuration page.
Default notification sender addressDefault notification sender address
If a conference host does not have a valid email address, Interaction Conference uses the Default notificatio n sender addressDefault notification sender address
specified in this field to send notifications when a conference is created, updated, or deleted. Examples include a CIC administrator
or a department manager's email address to use as a fallback for notifications.
The
Custom Attributes
and
History
tabs are common to dialog boxes in Interaction Administrator. For information about these
tabs, refer to the Interaction Administrator help system.
Related TopicsRelated Topics
Administration Procedures
Installation Tasks
Set default conference optionsSet default conference options
In Interaction Administrator, you can set default options for conferences. You can also either allow conference organizers to
change the options or prevent them from doing so by using the Lock check box.
To set default conference options:
1. In Interaction Administrator, select the Interaction Conference container.
2. Double-click the
Configuration
entry.
The Interaction Conference Configuratio nInteraction Conference Co nfiguration dialog appears.
3. Click the Default Conference OptionsDefault Co nference Options tab.
Interaction Administrator displays the tab (see figure).
25

4. Select the wanted options:
LockLock
Select the Lock check box to prevent conference organizers from changing the setting beside the Lock check box. These
options appear in the selected state dimmed so the conference organizer cannot change them in the Interaction Conference
Web Administrator interface, as shown
Host Required to StartHost Required to Start
Select this check box to delay starting a conference until a host attendee has joined.
Enforce EndEnforce End
Select this check box to stop a conference call automatically at the specified ending time. If the ending is enforced,
Interaction Conference automatically plays a warning message 2 minutes before the end of the conference.
Allow MuteAllow Mute
Select one of the options to determine the default audio behavior for guests joining the conference and the level of control
hosts have on muting.
Start MutedStart Muted – Select this option to mute all guests by default; hosts are not muted by default. Conference guests enter the
conference muted, but the conference host can unmute individual participants. Use this option if you plan to have more than
20 participants in the conference. The host can selectively unmute up to 20 participants to speak.
ManualManual – Select this option to give the host manual control over muting individual guests in the conference. In this case,
hosts and guests join the conference unmuted. If there are more than 300 participants, only the first 300 to join the
conference are audible. The 301
st
participant who is a guest (and other guests after) hear a prompt that they are joining the
26

conference muted. If the conference host unmutes a host or guest, and there are 300 audible participants, Interaction
Conference automatically mutes an audible guest who has been unmuted the longest to stay within the 300-audible-caller
limit.
Hosts (the names listed in the Hosts:Hosts: section of the New Conference dialog in the Interaction Conference web application)
automatically enter the conference unmuted, unless there are 20 Hosts already audible in the conference.
NoNo – Select this option to prevent hosts from muting any guests in the conference.
RecordRecord
Select one of the options to determine the default call recording behavior for conferences.
Yes, send to allYes, send to all – Select this option to have CIC record the conferences and send the recording to all of the hosts and
guests listed on the conference.
Yes, send to hostsYes, send to hosts – Select this option to have CIC record the conference and send the recording to all of the hosts
listed on the conference.
NoNo – Select this option if you do not want to record conferences by default.
Announce EntryAnnounce Entry
Select one of the options to determine the default announcement behavior when a guest or host joins a conference. By
default, CIC plays a tone as each person joins a conference.
NoneNo ne – Select this option if you do not want any audio alert or notification when someone joins a conference.
ToneTone – (Default) Select this option if you want CIC to play a tone when someone joins a conference.
NameName – Select this option if you want to prompt guests and hosts to say their name before joining the conference.
Interaction Conference then plays that name for the rest of the conference participants to hear as they join.
Announce ExitAnnounce Exit
Select one of the options to determine the default behavior when a guest or host exits a conference. By default, CIC plays a
tone as each person exits a conference.
NoneNo ne – Select this option if you do not want any audio alert or notification when someone exits a conference.
ToneTone – (Default) Select this option if you want CIC to play a tone when someone exits a conference.
NameName – Select this option if you want to hear the name of the guests and hosts as they exit the conference.
Announce Number of AttendeesAnnounce Number of Attendees
Select one of the options to determine the default behavior if Interaction Conference announces (by playing a prompt) the
number of attendees in the conference.
NoneNo ne – (Default) Select this option if you do not want CIC to play an announcement of the number of attendees on a call.
To Ho stsTo Ho sts – Select this option if you want CIC to announce the number of attendees only to the hosts on the call.
To AllTo All – Select this option if you want CIC to announce the number of attendees to all guests and hosts on the call
5. Click OKOK to save the changes.
Define conference roomsDefine conference rooms
When Interaction Conference components are installed on a CIC server, a new
Interaction Conference
container is added to
Interaction Administrator, the primary application used to administer CIC servers. Define at least one conference room before
scheduling an Interaction Conference. Additional conference rooms can be defined at any time.
To define a conference room:
1. Run Interaction Administrator from a workstation or on your CIC server.
2. Expand the Interaction ConferenceInteractio n Co nference container. Then click the Conference RoomsConference Rooms container. This container lists
27

conference rooms that have been defined.
To edit an existing container, double-click the name of a conference room.
To add a conference room, click the Add Add NewNew (Ctrl+N) icon, or right-click and then select New…New… and enter a descriptive
name for the new conference room. Click OKOK.
The
Conference Rooms Configuration
property sheet appears:
3. Enter a name in the Display Display N ameName field. This is the name that appears in notification emails sent to attendees later, when a
conference is scheduled to use this room.
4. If the General Configuration Settings allow PIN numbers to be defined, you may optionally check Req uire a PIN for theseRequire a PIN for these
conferencesconferences . When checked, attendees must specify a personal identification number when joining a conference held in this
room. Selecting this check box also allows more than one conference to occur at the same time in the room, because the PIN
routes each caller to the correct conference.
5. Conference rooms can be physical (a room with a station phone on your premises) or virtual, meaning that the conference is
associated with a telephone number. When you select PhysicalPhysical, the StationStatio n drop list is enabled. When you select V irtualVirtual ,
you can specify a telephone number. The telephone number associated with a conference room must be configured in your
telephony hardware (in a gateway, for example) to route calls to the CIC server running Interaction Conference.
28

To add one or more phone numbers to the Phone Numbers text box, type the number in the second text box under Phone
Numbers, then click AddAdd. You can remove a number by selecting it in the list and clicking RemoveRemove. You can determine the
order which phone numbers are used by moving a phone number up or down in the list by selecting it in the list and clicking
Mo ve UpMo ve Up or Move Move Do wnDown.
N ote:No te: The first number at the top of the list is the one that the default email notification includes. We recommend
moving the number given to external invitees to the top of the list and a station extension for internal invitees after
under it.
Special Considerations for To ll-Free N umbersSpecial Considerations for To ll-Free N umbers
Special considerations apply to the use of toll-free numbers in Interaction Conference.
Due to the limitation of call routing in CIC, callers cannot directly reach a physical room using a toll free number. However,
a physical station can call into a virtual room that is configured to be reachable by a toll free number.
Use toll free numbers with virtual rooms so guests can call directly to that conference room.
6. To limit the resources available for the room (by default, resources are unlimited up to the limit set in general configuration
settings):
a. Select the Specify Resource LimitSpecify Resource Limit radio button.
b. In the corresponding text box, type the maximum number of resources to allow.
7. If necessary, you can select the Disable this roomDisable this room option to prevent the conference room from appearing in the list of
available rooms, but without deleting the configuration.
8. Click OKOK to save changes.
The
Custom Attributes
and
History
tabs are common to property pages in Interaction Administrator. For information about
these tabs, refer to the Interaction Administrator help system.
Related TopicsRelated Topics
Administration Procedures
Installation Tasks
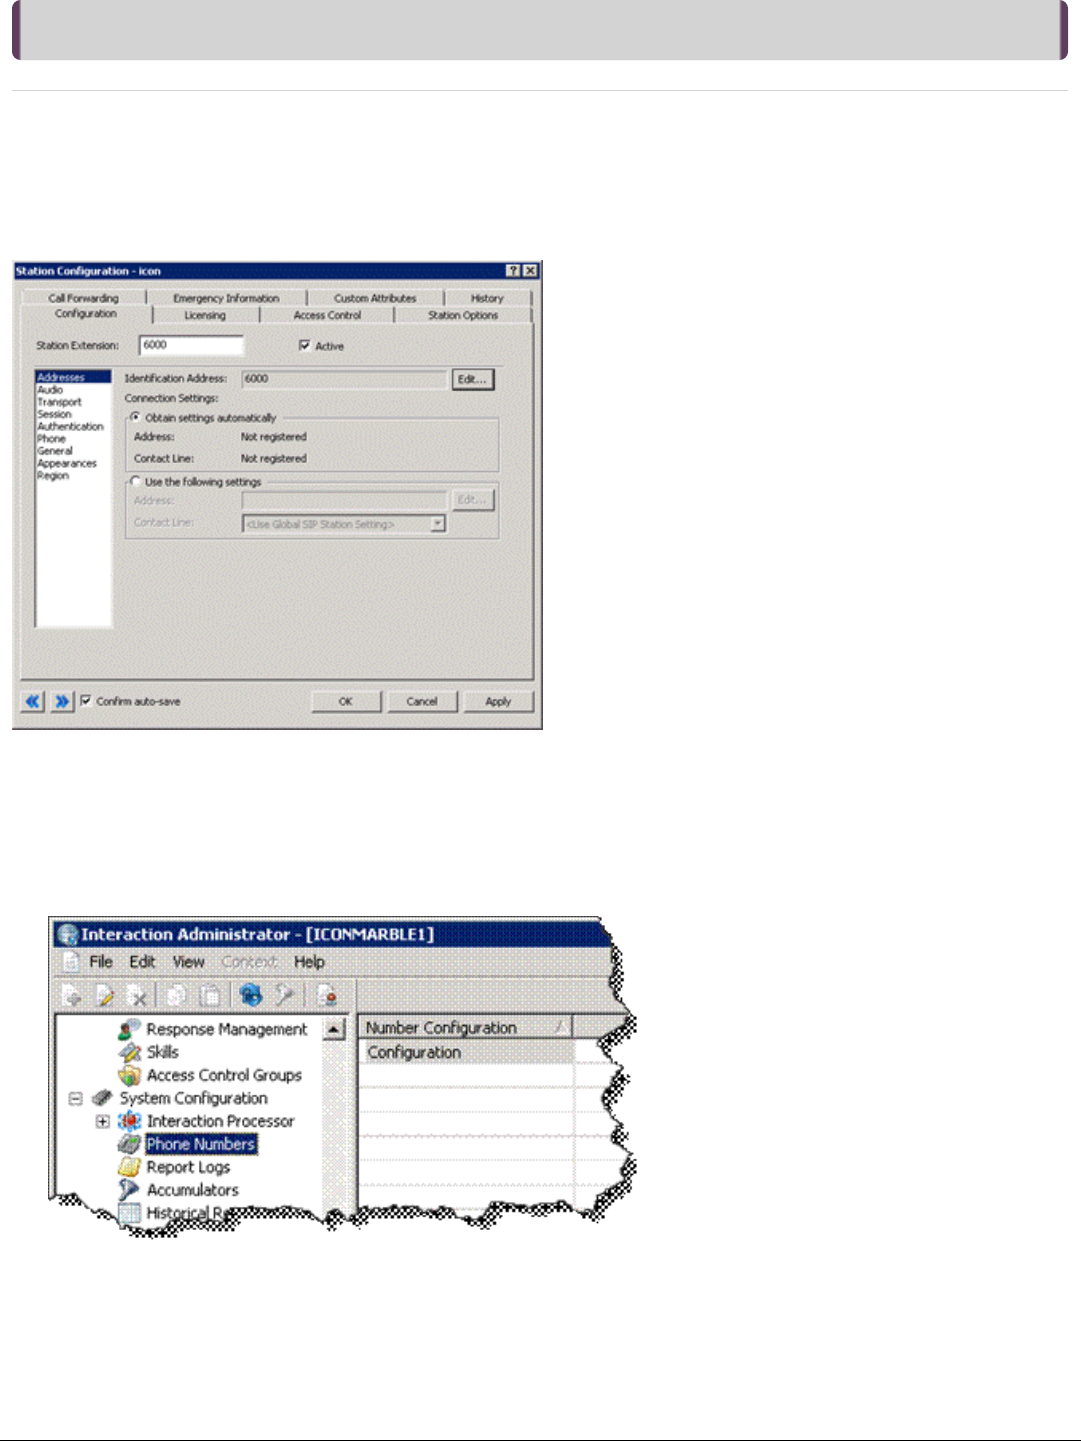
Configuring Interaction Conference Phone Numbers and StationsConfiguring Interaction Conference Phone Numbers and Stations
If you are using an Interaction Conference virtual room, CIC identifies Interaction Conference calls based on the phone numbers
defined in the Phone NumbersPhone Numbers list on the Co nference Ro om Co nfigurationConference Room Configuration page.
Conference calls that include external (non-CIC users) and internal (CIC user) invitees require two phone numbers, one for each
group. The internal invitees call a local station extension, and external guests call the full phone number. Configure the station to
map to the external number.
29
Note:Note: The first number at the top of the list is the one that the default email notification includes. We recommend moving the
number given to external invitees to the top of the list and a station extension for internal invitees after under it.
If calls to Interaction Conference originate from the CIC server (for example, internal calls by CIC users), then create a stand-alone
station for an Interaction Conference virtual room with the same extension as one of the phone numbers for the room. WithoutWithout
this relationship, calls loo p out and back into this relationship, calls loo p out and back into the system using unnecessary resources (trombo ning calls).the system using unnecessary resources (tromboning calls). The
station requires the Basic Station license.
To configure Interaction Conference external and station number pairs:
Use dial plan entries to resolve external or internal phone numbers to the Interaction Conference room phone number. This
configuration is useful when matching groups of numbers for a single conference.
1. In Interaction Administrator, select the Phone Numbers container and then double-click the Configuration entry.
2. On the Regional Dial PlanRegional Dial Plan page, click the Dial Plan…Dial Plan… button.
Interaction Interaction Conference StationsConference Stations
30

3. On the Regional Dial PlanRegional Dial Plan page, click AddAdd to add a phone number for a conference room. If an existing number exists,
double-click that entry to edit it.
Enter the external number as the Input PatternInput Pattern and the internal station number as the Standardized NumberStandardized Number. In the
Classificatio nClassificatio n drop list, select Interco mIntercom .
4. Create an entry for each variation of the external number, or use an Input PatternInput Pattern that precisely represents all variations of the
conference room phone number that maps to the same station number.
31

Define Email TemplatesDefine Email Templates
Interaction Conference allows the administrator to define email templates for meeting invitations and cancellations. Features
include:
The ability to create separate templates for invitations, updates, and cancellations.
The ability to create separate templates (of all three types) for use by hosts and guests.
1. In Interaction Administrator, scroll to the Interaction Conference container and double-click Co nfigurationConfiguration.
Interaction Administrator displays the Interaction Conference Configuration dialog.
2. Click the Email Templates tab.
Interaction Administrator displays the Email Templates tab.
To create an email template:To create an email template:
32

3. Click AddAdd.
Interaction Administrator displays the New Template dialog.
4. Design the template:
a. In the NameName text box (1), type a name for the template.
b. In the SubjectSubject text box (2), type a default subject for the email message (for example, "Meeting invitation").
c. In the BodyBody text box (3), type the default text of the email message, inserting macros (4) as needed:
Additio nal numbers:Additio nal numbers: Phone numbers, other than the main conference number, on which attendees can call into the
conference.
Date:Date: The date of the conference.
Host:Host: The host of the conference.
Invitee:Invitee: The name of the invitee (the recipient of the email message).
Invitees:Invitees: The names of the invitees (the recipients of the email message).
Notes:Notes: Any explanatory notes about the conference.
Phone:Pho ne: The main (or only) phone number that attendees use to call into the conference.
PIN:PIN: The PIN number attendees use to gain access to the conference.
Room:Room: The room identifier for the conference.
Time:Time: The time at which the conference is scheduled.
Title:Title: The title of the conference.
d. Click OKOK.
Interaction Administrator creates the template and lists it on the Email Templates tab of the Interaction Conference
Configuration dialog.
33

5. In the Selected Templates area, use the list boxes to assign the template to a message type.
Change the default time for unused conferencesChange the default time for unused conferences
Interaction Conference purges open conferences that have not had calls for the previous 365 days. To change the default number
of days, use the Windows Run menu choice to start
DSEditu
, then change the value in this DS key: Production | Interaction
Conference | Open Conference Inactivity Days.
Change the default to display only my conferences in the Conference Change the default to display only my conferences in the Conference ListList
pagepage
In the Conference List page, a user can select the Display only my conferences check box at the top of the conference list to
display only their conferences. By default the Display only my conferences check box is not selected so that all conferences appear
in the list. You can change the default of the Display only my conferences check box so that only the conferences of the user
appear in the list. To change the default, change the value of the <DefaultDisplayOnlyMyConferences> element from false to true in
the configuration.xml.
Example:
34

Change LogChange Log
Change Change Log DateLog Date Changes MadeChanges Made
05-December-2012 Updated for Interaction Conference 4.0: Outlook 2010 plug-in support, announce number of attendees,
iCalendar attachments, migration to Interaction Conference 4.0.
08-February-2013 Updated screen images and instructions for Interaction Administrator, updated installation instructions,
updated instructions for editing the Configuration.xml file, change Conference Resource Limits, and
Enforce Resource Limits configuration descriptions, and added instructions for configuring stations and
phone numbers to join internal and external callers in the same virtual room.
20-February-2013 Applied edits, cleaned up text, clarified configuration options, and added a note about the requirement to
complete the initial run of CIC Setup Assistant before running the Interaction Conference plug-ins install
on the IC server.
28-August-2015
Updated documentation to reflect changes required in the transition from version 4.0 SU# to CIC 2015 R1,
such as updates to product version numbers, system requirements, installation procedures, references to
Interactive Intelligence Product Information site URLs, and copyright and trademark information.
11-April-2016 Updated copyright and trademark information. Updated 20 participant limit to 300 for audible conference
participants for ICONF-827. Updated to include support for Microsoft Outlook 2013.
19-May-2016
Updates for ICONF-853.
26-April-2017
Updated Microsoft Outlook requirement section in the Install Interaction Conference Outlook Plugin topic
to indicate 64-bit versions not supported. Updated copyright and trademark information.
03-October-2017
Updated license requirements to explain if the features license is not present, Interaction Conference
server does not start. As a result a user cannot schedule a conference from Interaction Conference Web
Server or Outlook. Also, attendees cannot connect to a conference room.
Updated Requirements to include Windows Server 2016.
24-October-2017
Rebranding terminology, screen captures, copyright.
26-June-2018
Updated requirements to include Microsoft Outlook 2016. Miscellaneous corrections.
31-July-2018
Updated Restrict rights to use conference room topic to include note about inheriting restriction from role
or workgroup.
26-February-2019
Updated Configuring Interaction Conference Phone Numbers and Stations topic to indicate the Basic
Station license is needed in terms of licensing for Interaction Conference Stations.
07-March-2019
Change log modified to include correct date format.
12-July-2019
Updated Install Interaction Conference Web Server and Installation Tasks topics to include link to
download page for WebServer msi.
24-September-2019
Added "Change the default to display only my conferences in the Conference List page" topic under
Administration Procedures.
04-March-2020
Updated requirements to include Windows Server 2019.
27-April-2020
Updated links from my.inin.com to new locations.
35
