

Table of Contents
1
Table of Contents
Table of Contents
1
Before You Begin
9
Related Documentation
9
Getting Started
10
Hardware Overview
10
CP965 Hardware
11
Mute Touch Key LED Indicators
12
Screen and Icons
12
Control Center
12
Idle Screen
14
The Dsskey Screen
14
Calls Screen
15
Icons in the Status Bar
16
Line Key Icons
16
Navigating Menus and Fields
17
Entering Information
18
Using the Onscreen Keyboard
18
English (UK) Input Method
19
Google Pinyin Input Method
21
Using the Dial Pad
22
Call Features
23
Placing Calls
23
Placing a Call from the Dialer
23
Placing Multiple Calls
23
Placing a Call with a Speed Dial Key
24
Placing a Call Back to the Last Incoming Number
24
Redialing a Number
24
Dialing a Hotline Number
25
Placing a Call from the Call History
25
Placing a Call from the Directory
25
Placing an Anonymous Call
25
Answering Calls
26
Answering a Call
27
Answering a Call When in a Call
27
Answering a Call Automatically
27
Disabling Call Waiting
28
Silencing or Rejecting Incoming Calls
28
Silencing a Call
28
Rejecting a Call Manually
29
Rejecting Anonymous Calls
29

Yealink CP965 User Guide
2
Rejecting Calls with Do Not Disturb (DND)
29
Enabling DND
29
Disabling DND
30
Ending Calls
30
Redialing a Call Automatically
30
Call Muting and Unmuting
31
Keep Mute
31
Holding and Resuming Calls
32
Holding a Call
32
Resuming a Held Call
33
Redirecting Incoming Calls
33
Forwarding All Incoming Calls to a Contact
33
Deactivating Call Forward
34
Forwarding an Incoming Call Manually
34
Forwarding Incoming Calls with a Forward Key
34
Diverting Calls to a Contact
34
Transferring Calls
35
Performing a Blind Transfer
35
Performing a Semi-Attended/Attended Transfer
35
Conference Calls
36
Local Conference
36
Initiating a Conference by Dialing Multiple Numbers
36
Initiating a Conference by Inviting Participants
36
Merging Multiple Calls into a Conference Call
37
Creating a Hybrid UC Conference
37
Holding/Resuming a Conference Call
37
Muting/Unmuting a Conference Call
37
Splitting a Conference Call
38
Managing the Conference Participants
38
Enabling/Disabling the DND Mode for a Conference Call
38
Network Conference
38
Setting Up a Network Conference
38
Call Recording
39
Recording a Call
39
Recording a Conference
39
Setting a Mark When Recording a Call
39
Stopping a Recording
40
Checking Storage Space
40
Multicast Paging
40
Sending Multicast Paging
41
Setting a Multicast Paging Key
41
Sending a Paging by a Multicast Paging Key
41
Setting a Paging List Key
42
Setting a Paging Group
42

Table of Contents
3
Sending Pages by a Paging List Key
43
Deleting a Paging Group
43
Receiving Multicast Paging
43
Managing a Paging Call
43
Advanced Call Features
45
Using Call Completion
45
Call Pickup
45
Picking up a Call Directly
45
Picking up a Group Call Directly
46
Picking up a Call with a Pick Up Key
46
Picking up a Call with a Group Pickup Key
47
Call Park
47
Configuring a Call Park Key
47
Using Call Park Feature
48
Busy Lamp Field (BLF)
48
State Indicator of Remote Line by BLF Key
48
Audio Alert for BLF Pickup
49
Visual Alert for BLF Pickup
49
Setting a BLF Key
49
Picking up a Remote Call by BLF Key
49
Transferring a Call by BLF Key
50
Performing a Blind Transfer
50
Performing a Semi-attended/Attended Transfer
50
BLF List
50
State Indicator of Remote Line by BLF List Key
51
Audio Alert for BLF Pickup
51
Visual Alert for BLF Pickup
51
Visual Alert for BLF Parked Call Monitor
51
Picking up a Remote Call by BLF List Key
52
Transferring a Call by BLF List Key
52
Performing a Blind Transfer
52
Performing a Semi-attended/Attended Transfer
52
Parking a Call by a BLF List Key
52
Retrieving a Call by a BLF List Key
53
Barging in an Active Call by BLF List Key
53
Shared Line
53
State Indicator of Shared Line
53
Placing Calls on a Shared Line
54
Answering Calls on a Shared Line
54
Placing a Call on Public Hold
54
Placing a Call on Private Hold
54
Retrieving a Held Call on a Shared Line
55
Barging in an Active Call on a Shared Line
55
Pulling a Shared Call on a Shared Line
55

Yealink CP965 User Guide
4
Intercom
55
Placing an Intercom Call
56
Picking up an Incoming Call of the Target Extension
56
Answering an Intercom Call
57
Voice Mail
57
Setting the Voice Mail Code
58
Leaving Voice Mails
58
Listening to Voice Mails
58
Using the Hot Desking
58
Directory
60
Local Directory
60
Managing the Local Directory Groups
60
Adding Contact Groups
60
Editing Contact Groups
60
Deleting Contact Groups
61
Managing the Local Directory Contacts
61
Adding Contacts
61
Viewing Contacts
61
Editing Contacts
61
Deleting a Contact
62
Deleting All Contacts
62
Moving a Local Directory Contact to Blocklist
62
Searching for Contacts
62
Blocklist
63
Adding a Blocklist Contact
63
Viewing Blocklist Contacts
63
Editing a Blocklist Contact
64
Deleting Blocklist Contacts
64
Deleting a Blocklist Contact
64
Deleting All Blocklist Contacts
64
Moving a Blocklist Contact to the Local Directory
64
Remote Phone Book
65
Searching for Remote Phone Book Contacts
65
Viewing Remote Phone Book Contacts
65
Saving a Remote Phone Book Contact to the Local Directory
65
Saving a Remote Phone Book Contact to the Blocklist
66
Call History
67
Call History Icons
67
Viewing History Records
67
Saving a History Record to Local Directory
67
Saving a History Record to Blocklist
67
Deleting History Records
68
Deleting a Call Record
68

Table of Contents
5
Deleting All Call Records
68
Disabling History Record
68
System Applications
69
Recorder
69
Recording Audio
69
Playing a Recorded Call
69
Pause/Resuming a Playback
70
Fast Forwarding/Rewinding a Playback
70
Stopping a Playback
70
Copying Recorded Audio to USB Flash Drive
70
Copying All Recorded Audio to USB Flash Drive
71
Renaming the Recording
71
Uploading a Recording to Server
71
Deleting a Recording
71
Deleting All Recordings
72
Checking Storage Space
72
Browser
72
Browsing a Web Page
73
Managing Bookmarks
73
Adding a Web Page to the Bookmarks Library
73
Accessing a Web Page from the Bookmarks Library
74
Editing a Bookmark
74
Deleting a Bookmark
75
Setting a Home Page
75
Clearing the Navigation History
75
Modifying the Browser Settings
76
Clock
76
Customizing Your Phone
77
Changing the Administrator Password
77
Wallpaper
77
Changing Wallpaper on Idle Screen
77
Screen Saver
78
Changing the Waiting Time for Screen Saver
78
Setting the Screen Saver Type
78
Changing the Screen Backlight and Time
78
Changing the Language
79
Changing the Input Method
79
Time & Date
80
Setting the Time and Date Manually
80
Changing the Time and Date Format
80
Phone Lock
80
Setting the Phone Lock
81
Setting a Phone Lock Key
81

Yealink CP965 User Guide
6
Locking Your Phone Manually
81
Unlocking Your Phone
82
Changing Your Phone Unlock PIN
82
Line Keys
82
Assigning Functionality to a Line Key
82
Changing the Locations of the Line Keys
83
Deleting a Line Key
83
Audio Settings
84
Adjusting the Volume
84
Setting the Ring Tone
84
Setting a Ring Tone for the Phone
84
Setting a Ring Tone for an Account
84
Setting a Ring Tone for a Group
85
Setting a Ring Tone for a Contact
85
Disabling the Key Tone
85
Enabling Touch Tone
85
Configuring Notification Sound
85
Enabling Silent Mode
86
Using Your Phone with PC
87
Connecting the PC to the Phone
87
Setting the Phone as PC Audio Device
88
Setting the Phone as PC Audio Device via Softphone
88
Setting the Phone as PC Audio Device via PC
89
Holding/Resuming the PC Audio
89
Muting or Unmuting the Microphone
89
Using the CP Wireless Microphone CPW25/CPW65 (Coming Soon)
90
CPW25/CPW65 LED Instructions
90
Charging the CPW25/CPW65
91
Turning the CPW25/CPW65 On or Off
91
Registering the CPW25/CPW65
91
Registering the CPW25/CPW65 with another Phone
92
Unregistering the CPW25/CPW65
92
Muting or Unmuting the CPW25/CPW65
92
Viewing CPW25/CPW65 Information
93
Finding the CPW25/CPW65
93
Using Star Connection Feature
94
State Indicator of CP965 Star Connection
94
Configuring the Primary Phone
94
Setting Up a Star Connection Group
94
Sending Broadcast from Primary Phone
95
Removing a Subsidiary Phone
95
Dissolving a Star Connection Group
95

Table of Contents
7
Finding a Subsidiary Phone
95
Stop Finding a Subsidiary Phone
96
Configuring the Subsidiary Phone
96
Joining a Star Connection Group
96
Quitting a Star Connection Group
96
Finding a Primary Phone
97
Stop Finding a Primary Phone
97
Connecting a Mobile Phone Using Bluetooth
98
Activating the Bluetooth Mode
98
Pairing and Connecting the Bluetooth-enabled Mobile Phone
98
Syncing the Mobile Contacts to the Phone
99
Enabling the Mobile Contacts Sync Feature
99
Viewing Your Mobile Contacts
99
Handling a Mobile Phone Call on the Phone
100
Configuring the Phone Audio Feature
100
Configuring the Media Audio Feature
100
Renaming the Paired Bluetooth-enabled Mobile Phone
101
Disabling Bluetooth Device Discovery
101
Changing Your Phone's Bluetooth Name
101
Unpairing the Mobile Phone
102
Disconnecting the Bluetooth-enabled Mobile Phone
102
Deactivating the Bluetooth Mode
102
Wireless Network
103
Activating the Wi-Fi Mode
103
Connecting to the Wireless Network
103
Connecting to an Available Wireless Network Manually
103
Adding a Wireless Network Manually
104
Viewing the Wireless Network Information
104
Disconnect from a Wireless Network
104
Deactivating the Wi-Fi Mode
105
Using Your Phone with PSTN Account
106
Connecting the Expansion PSTN Box CPN10
106
Configuring the PSTN Account
106
Selecting the Country for PSTN Use
106
Configuring the Flash Time
107
Basic Call Features
107
Conference
107
Recording Using a USB Flash Drive
108
Unavailable Features for PSTN
108
Maintaining Your Phone
109
Investigating Warnings
109
Clearing Warning Icon
109


Before You Begin
9
Before You Begin
This guide provides information you need to quickly use your new phone.
Firstly, verify with your system administrator that the IP network is ready for phone configuration. Also, be sure to
read the Quick Start Guide which can be found in your phone package before you set up and use the phone. As
you read this guide, keep in mind that some features are only configurable by your system administrator or determ-
ined by your phone environment. As a result, some features may not be enabled or may be operated differently on
your phone. Additionally, the examples and graphics in this guide may not directly reflect what is displayed or is
available on your phone screen.
Related Documentation
You can view more types of documents to make the phone to perform more functions.
The following types of related documents are available on each support page on Yealink support page:
l Release Notes, which details bug fixes and feature enhancements when an update is released.
l Quick Start Guide, which describes how to assemble your phone.
l Administrator Guide, which provides detailed information on how to configure phone features for the system
administrator.
You can also view other user documents which provide descriptions and examples for phone settings and features
on the Yealink support page.

Getting Started
10
Getting Started
Before you use your phone, take some time to get familiar with its features and user interface.
Topics
Hardware Overview
Screen and Icons
Navigating Menus and Fields
Entering Information
Hardware Overview
Understanding the phone hardware helps you easily use the phone's features.
Topics
CP965 Hardware
Mute Touch Key LED Indicators

Yealink CP965 User Guide
11
CP965 Hardware
No. Item Description
1
Mute Key
•Toggles mute feature.
•Indicate phone and call statuses.
2
Touch Screen Shows information about calls, soft keys, time, date, and other relevant data.
3
Volume(-) Touch Key Lowers the volume of the speaker, ringer, or media.
4
Volume(+) Touch Key Increases the volume of the speaker, ringer, or media.
5
Home Touch Key Returns to the idle screen.
6
USB Type-A Port
• Allows you to connect a USB flash drive (optional) to your phone so you can
record calls/conferences and play back recorded files.
• Allows you to connect expansion PSTN box(es) (optional) to experience calls
in PSTN. Up to two cascaded expansion PSTN boxes can be connected, so you
can experience the local five-way conference conveniently in excellent speech
quality with PSTN.
• Allows you to charge the Bluetooth Wireless Microphone CPW25 or DECT
Wireless Microphone CPW65.

Getting Started
12
No. Item Description
7
Security Slot
Allows you to connect a universal security cable to your phone so you can lock
down your phone. The phone will not be removed after locked.
8
USB Type-C Port
Allows you to connect a PC and turn CP965 into an external speaker and micro-
phone for your PC.
Mute Touch Key LED Indicators
The Mute touch key LED indicators indicate the call and phone status.
LED Status Description
Solid red
The phone is initializing.
The phone is muted.
Flashing red The phone is ringing.
Solid green
The phone is placing a call.
There is an active call on the phone.
Off
The phone is powered off.
The phone is idle.
Screen and Icons
The user screens and icon indicators can help you navigate and understand the important information on the
phone's status.
Topics
Control Center
Idle Screen
The Dsskey Screen
Control Center
Idle Screen
The Dsskey Screen
Calls Screen
Icons in the Status Bar
Line Key Icons
Control Center
Control center allows you to access common features quickly or enter the menu screen.
Procedure
1. Swipe down from the top of the screen or tap More on the idle screen.

Yealink CP965 User Guide
13
No. Name Description
1 Control Center
Backlight Slider Drag the slider to adjust the screen brightness quickly.
Wi-Fi
l Tap to turn Wi-Fi on or off quickly.
l Long tap to enter Wi-Fi setting screen.
Bluetooth
l Tap to turn Bluetooth on or off quickly.
l Long tap to enter the Bluetooth setting screen.
Mute Tap to turn mute on or off quickly.
DND Tap to turn DND on or off quickly.
Auto Answer Tap to turn auto answer on or off quickly.
Silent Tap to turn silent mode on or off quickly.
2 Menu
Settings Tap to enter the Settings menu.
Browser Tap to browse web pages.
Message Tap to enter the Message setting menu.
MIC (coming soon) Tap to enter the MIC setting menu.
Recorder
Tap to use the Recorder to record audio and manage the recording.
Notification Tap to view the desired notification message.

Getting Started
14
Swipe up from the bottom of the screen or tap the Home touch key to exit this screen.
Idle Screen
The idle screen mainly displays the registered account, time and date, and programmable keys. You can access
the Dsskey screen and the control center.
No. Name Description
1 Status Bar Displays the label of the current account and icons.
2 Icons Icons are displayed on the left of the status bar.
3 Current Account
Displays the current registered account.
If there is no account registered on the phone, No Service appears.
4 Digital Clock Widget Displays the phone’s time and date.
5 Programmable Keys
Dial Tap to enter the dialing screen.
Bluetooth Tap to enter the Bluetooth settings screen.
History Tap to enter the History screen and view history records.
Directory Tap to enter the Directory screen and view contacts.
6 Dsskey Tap to enter the Dsskey screen.
7 More Tap to enter the control center.
The Dsskey Screen
The Dsskey screen displays phone’s line keys.

Yealink CP965 User Guide
15
No. Application Description
1 Tap to add a line key.
2 Line Key List Shows the line key labels. You can customize the line keys.
3 Page Keys Tap to turn to the corresponding page.
Calls Screen
All of your active and held calls are displayed on the calls screen.
When there is an active call and a held call, the calls screen is shown below:

Getting Started
16
You can tap the Previous/Next to switch between multiple calls.
Icons in the Status Bar
The icons in the status bar help you easily get the current phone status, such as call and message status.
Icons Description Icons Description
Wired network is unavailable Phone Warning
Wired Network is unreachable Keep Mute
Auto Answer Voice Mail
Registered successfully Phone Lock
Do Not Disturb (DND) Ringer volume is 0
Always Forward Busy Forward
No Answer Forward Missed Calls
USB flash drive is detected PSTN box is detected
Wi-Fi enabled Wi-Fi connection is unreachable
Bluetooth enabled
Bluetooth-enabled mobile phone paired and con-
nected
Line Key Icons
By viewing the line key icons, you can easily get the function of the line key.
Icon indicator (associated with line key features):
Icons Description Icons Description
Hold DND
Voice Mail Forward
DPickup Group Pick Up
SpeedDial Recall
Record Recording in process (Record)
Multicast Paging
Paging List
Hot Desking

Yealink CP965 User Guide
17
Icons Description Icons Description
Phone Lock Directory
Icon indicator (associated with line)
Icons Description Icons Description
Registered private line Register failed
(Flashing)
Registering Registered shared line
DND is enabled on this line
Call forward is enabled on this
line
Icon indicator (associated with the mobile account)
Icons Description Icons Description
Mobile Account (Bluetooth-enabled
mobile phone is both paired and con-
nected)
Mobile Account (Bluetooth-
enabled mobile phone fails to con-
nect)
(Flashing)
Mobile Account (Bluetooth-enabled
mobile phone is connecting)
Icon indicator (associated with Intercom)
Icons Description Icons Description
Intercom idle state Intercom ringing state
Callout
Intercom callout state
Talking
Intercom talking state
Intercom failed state
Navigating Menus and Fields
You can use different gestures on the touch screen to perform various operations.
Procedure
1.
To operate your phone using gestures, follow these tips:
Gesture Action
Tap Touch an item on the screen with your finger, and then lift your finger.
Long Tap
Touch an item for about 2 seconds without lifting your finger from the screen till an action
occurs.

Getting Started
18
Gesture Action
Swipe
Touch and move. When you want to scroll quickly, swipe your finger across the screen, either
up, down, left or right.
Drag Touch and hold, then move. To stop scrolling, stop the dragging motion.
Pinch
Open
Touch the screen with two or more fingers, and then move the fingers away from each other
(stretch).
Pinch
Close
Touch the screen with two or more fingers, and then move the fingers towards each other
(pinch).
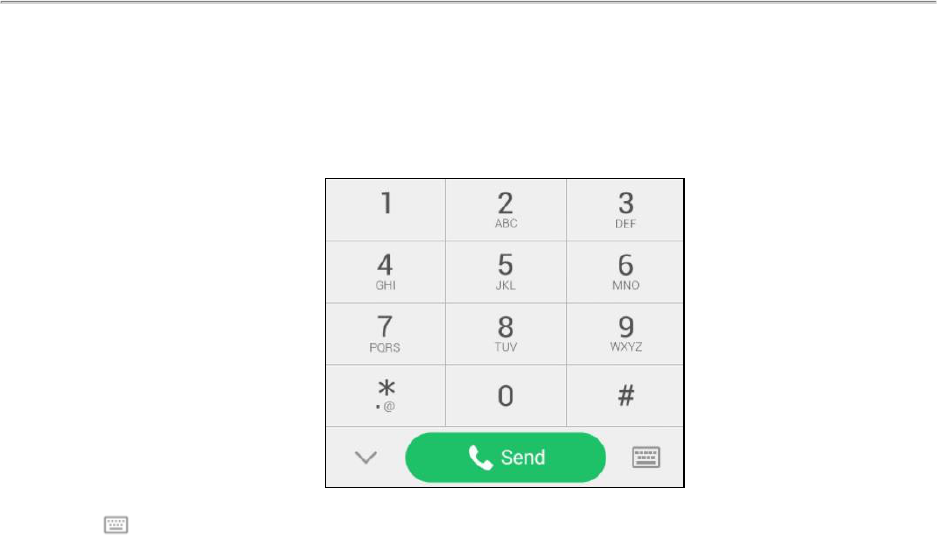
Entering Information
The phone provides onscreen keyboard and dial pad to enter data. The dial pad provides a standard key layout,
which enables you to use existing or familiar key positions.
Topics
Using the Onscreen Keyboard
Using the Dial Pad
Using the Onscreen Keyboard
The phone supports two kinds of input methods: English (UK) and Google Pinyin for the onscreen keyboard. You
can enter information into text fields using the touch screen.
When you use the onscreen keyboard, the following things you need to know:
If you want to Action
Position the cursor. Tap to the position.
Select all characters.
1.
Long tap the entered character(s).
2.
Do one of the following:
• Tap on the top of the phone screen.
• Drag / to select all characters.
Cut/Copy characters.
1.
Long tap the entered character(s).
2.
Drag / to select the characters you want to cut/copy.
3.
Tap / on the top of the phone screen.
4.
Long tap the desired field.
5. Tap PASTE.
Delete more characters at a time.
• Long tap the entered character(s).
Drag / to select the characters you want to delete.
Tap .
• Long tap .

Yealink CP965 User Guide
19
If you want to Action
Replace characters.
1.
Drag your finger to highlight the characters you want to replace.
2.
Tap the desired character.
Related Topic
Changing the Input Method
Topics
English (UK) Input Method
Google Pinyin Input Method
English (UK) Input Method
No. Item Description
1 26 English Letters
• Tap to enter letters.
• Long tap a key then slide to choose one of the options to
enter an alternate character.
2 Delete Key
• Tap to delete the entered characters one by one.
• Long tap to delete two or more characters.
3
Label automatically to identify the
context-sensitive features.
Next Key Tap to go to the next field.
Done
Key
Tap to confirm the settings.
Send
Key
Tap to dial out the number.
Go Key Tap to browse the web page.
4 Two Special Characters
• Tap to enter special characters.
• Long tap point key (.) then slide to choose one of the options
to enter an alternate character.
5 Space Key
• Tap to enter spaces.
• Long tap to change the input method.
6 Tap to switch to the numeric&symbolic input mode.
7 Tap to switch to the uppercase input mode.
Tap to switch to the numeric&symbolic input mode as shown below:

Getting Started
20
No. Item Description
1 Numbers
• Tap to enter numbers.
• Long tap a key then slide to choose one of the options to
enter an alternate character.
2 Special Characters
• Tap to enter special characters.
• Long tap a key then slide to choose one of the options to
enter an alternate character.
3 Delete Key
• Tap to delete the entered characters one by one.
• Long tap to delete two or more characters.
4
Label automatically to identify the con-
text-sensitive features.
Next
Key
Tap to go to the next field.
Done
Key
Tap to confirm the settings.
Send
Key
Tap to dial out the number.
Go
Key
Tap to browse the web page.
5 Space Key
• Tap to enter spaces.
• Long tap to change the input method.
6 Tap to switch to the lowercase input mode.
7 Tap to switch to the symbolic input mode.
Tap to switch to the symbolic input mode.

Yealink CP965 User Guide
21
No. Item Description
1 Special Characters
• Tap to enter special characters.
• Long tap a key then slide to choose one of the options to enter an altern-
ate character.
2 Delete Key
• Tap to delete the entered characters one by one.
• Long tap to delete two or more characters.
3
Label auto-
matically to
identify the con-
text-sensitive fea-
tures.
Next Key Tap to go to the next field.
Done Key Tap to confirm the settings.
Send Key Tap to dial out the number.
Go Key Tap to browse the web page.
4 Space Key
• Tap to enter spaces.
• Long tap to change the input method.
5 Tap to switch to the lowercase input mode.
6 Tap to switch to the numeric&symbolic input mode.
Google Pinyin Input Method
You can use Google Pinyin input method (谷歌拼音输入法) to enter Chinese characters.
When you change the input method to Google Pinyin, the onscreen keyboard displays the English input mode as
shown below by default:
Long tap to select Chinese input mode as shown below:
Related Topic

Call Features
23
Call Features
You can use the phone to place and answer calls, ignore incoming calls, transfer a call to someone else, conduct a
conference call and perform other basic call features.
Topics
Placing Calls
Answering Calls
Disabling Call Waiting
Silencing or Rejecting Incoming Calls
Ending Calls
Redialing a Call Automatically
Call Muting and Unmuting
Keep Mute
Holding and Resuming Calls
Redirecting Incoming Calls
Transferring Calls
Conference Calls
Call Recording
Multicast Paging
Placing Calls
You can use your phone like a regular phone to place calls in many ways easily.
Topics
Placing a Call from the Dialer
Placing Multiple Calls
Placing a Call with a Speed Dial Key
Placing a Call Back to the Last Incoming Number
Redialing a Number
Dialing a Hotline Number
Placing a Call from the Call History
Placing a Call from the Directory
Placing an Anonymous Call
Placing a Call from the Dialer
The Dialer enables you to enter a number to place a call, and it displays a list of previously placed calls or contacts
in your directory.
You can also select the desired contact from the search list, the placed call list or Directory.
Note: Your system administrator can configure the source list for searching and disable to display the placed call records.
Procedure
1.
Tap .
2.
Enter a number.
3. Select Send ( ).
Note: Your system administrator can enable live dialpad feature, which enables your phone to automatically dial out the
phone number after a period of time without selecting Send.
Placing Multiple Calls
When you are in a call, you can hold your current call and place a new call.

Yealink CP965 User Guide
24
Procedure
1.
Do one of the following:
l
Select > New Call. The active call is placed on hold.
l
Select Hold to place the original call on hold.
Select > New Call.
2.
Enter the desired number or select a contact.
3. Select Send ( ).
Placing a Call with a Speed Dial Key
You can quickly dial a number by using a Speed Dial key.
Procedure
1.
1.
Tap Dsskey.
2. Drag the desired line key to the Edit field.
3. Select SpeedDial from the Type field.
4. Select the desired line from the Account ID field.
5.
Do one of the following:
l
(Optional.) Enter the string that will appear on the phone screen in the Label field.
Enter the contact number you want to dial out directly in the Value field.
You can also enter the contact number with the DTMF sequence that you want to send in the Value field. The
contact number and DTMF sequence are separated by commas. One comma stands for 500 milliseconds.
For example, 1234,,123# means the phone dials out the number 1234 first, then after the call is set up for 1
second, it sends the DTMF sequence 123# to the remote party.
l
Select and select the desired contact.
6.
Select .
Placing a Call Back to the Last Incoming Number
You can redial the last incoming number quickly by using a Recall key.
Procedure
1.
1.
Tap Dsskey.
2. Drag the desired line key to the Edit field.
3. Select Key Event from the Type field.
4. Select Recall from the Key Type field.
5. (Optional.) Enter the string that will appear on the phone screen in the Label field.
6.
Select .
When the phone is idle, tap the Recall key to quickly redial the last incoming number.
Redialing a Number
The phone keeps a record of all the placed calls. You can recall the contact you recently called.
Procedure
1.
Tap .
The phone screen displays the placed calls list.
2.
Tap the desired record.

Call Features
25
Dialing a Hotline Number
When the phone is off-hook, it will dial out the hotline number automatically after the designated delay time.
Procedure
1. Go to More > Settings > Features > Hot Line.
2.
Do one of the following:
l
Enter the desired number in the Number field.
l
Select and select the desired contact.
3. Enter the desired delay time (0-10 seconds) in the Hotline Delay field.
4.
Select .
Placing a Call from the Call History
You can place calls to contacts from the History list, which contains the calls that were recently placed, answered,
missed, or forwarded.
Procedure
1.
Tap .
The phone screen displays all call records.
2. Tap Local Calls andselect the desired history list.
3.
Tap the desired entry.
Placing a Call from the Directory
You can place a call to a contact directly from your directory.
Procedure
1.
Tap .
2. If the contact was added to a specified contact group, you can tap Local Directory to select the desired contact
group.
3.
Tap .
If the selected contact has multiple numbers, tap the desired number to dial out.
Related Topic
Searching for Contacts
Placing an Anonymous Call
You can hide your name and number when you place a call. As a result, the callee receives an anonymous call
without caller identity.
Before You Begin
Contact your system administrator to find out if this feature is available on your phone, and to get the anonymous
call on code or off code if required.
Procedure
1. Go to More > Settings > Features > Anonymous.
2.
Select the desired line.
3. Turn on Local Anonymous.

Yealink CP965 User Guide
26
4. (Optional.) Turn on Send Anonymous Code.
5.
(Optional.) Enter the anonymous call on code and off code respectively.
6.
Select .
7.
Place a call.
The callee is prompted with an incoming call from anonymity.
If the callee enables anonymous rejection feature, you may be prompted that the callee does not accept calls
from an anonymous number.
Related Topic
Rejecting Anonymous Calls
Answering Calls
When you receive a call, you can choose to answer it manually or automatically.
Topics

Call Features
27
Answering a Call
Answering a Call When in a Call
Answering a Call Automatically
Answering a Call
When you receive an incoming call, the phone rings and the screen displays the information of the incoming call.
You can choose to answer the incoming call.
Procedure
1. Select Answer.
Answering a Call When in a Call
You can answer a call when there is already an active call on your phone.
When you are in an active call and an incoming call arrives on the phone, a call waiting tone beeps, and the incom-
ing call information is displayed.
Procedure
1.
Select Answer ( ).
The active call is placed on hold, and the incoming call becomes active.
Note: You can disable the call waiting feature to reject the incoming call automatically during a call.
Related Topic
Disabling Call Waiting
Answering a Call Automatically
Auto answer enables you to automatically answer an incoming call in speakerphone (hands-free) mode when your
phone is idle.
You can also enable auto answer mute to mute the local microphone when an incoming call is answered auto-
matically.
Procedure
1. Go to More > Settings > Features > Auto Answer.
2. Turn on Auto Answer.
3. Turn on Auto Answer Mute.
4.
Select .
If the auto answer feature is enabled, the auto answer icon appears on the phone screen.

Yealink CP965 User Guide
28
Disabling Call Waiting
If the call waiting feature is disabled, when there is already a call, the new incoming call will be rejected auto-
matically.
Before You Begin
Check with your system administrator if the call waiting off code is required. If required, get it from your system
administrator.
Procedure
1. Go to More > Settings > Features > Call Waiting.
2. Turn off Call Waiting.
3. (Optional.) Enter the call waiting off code in the Off Code field.
4.
Select .
Silencing or Rejecting Incoming Calls
When you receive an incoming call, you can choose to silence or reject the call instead of answering.
Topics
Silencing a Call
Rejecting a Call Manually
Rejecting Anonymous Calls
Rejecting Calls with Do Not Disturb (DND)
Silencing a Call
You can silence a call to stop your phone from ringing. Even if you silence the call, the incoming call notification con-
tinues to be displayed on your phone.
Procedure
1.
Select .

Call Features
29
Rejecting a Call Manually
You can reject a call manually, and the call may be sent to voice mail. The rejected calls are displayed in the
Received Calls list in your History list.
Procedure
1. Select Reject.
Rejecting Anonymous Calls
You can reject incoming calls from the callers who have hidden their identities. As a result, your phone will not ring
and you will not be notified of an attempted call.
Before You Begin
Check with your system administrator if the anonymous call rejection on code or off code is required. If required, get
it from your system administrator.
Procedure
1. Go to More > Settings > Features > Anonymous.
2.
Select the desired line.
3. Turn on Local Anonymous Rejection (Anonymous Rejection).
4. (Optional.) Turn on Send Anonymous Rejection Code.
5. Enter the anonymous call rejection on code and off code respectively in the On Code and Off Code field
beneath the Send Anonymous Rejection Code field.
6.
Select .
Related Topic
Placing an Anonymous Call
Rejecting Calls with Do Not Disturb (DND)
You can enable DND to reject all incoming calls automatically when you do not want to be interrupted.
If you want to receive incoming calls from the specific numbers when DND is enabled, you can ask your system
administrator to set DND Authorized Numbers.
Note: Check with your system administrator to find out if the DND feature is available on your phone.
Topics
Enabling DND
Disabling DND
Enabling DND
You need to enable DND feature first if you want the phone to reject all incoming calls automatically.
Procedure
1.
Do one of the following:
l
Swipe down from the top of the screen to enter the control center and toggle DND on.
l
Go to More > Settings > Features > DND.
Turn on DND Status.
Select .
l
Select DND during a call.

Yealink CP965 User Guide
30
When DND is enabled, the phone prompts “DND mode is enabled” and the DND icon appears in the status
bar.
Incoming calls will be rejected automatically and "n New Missed Call(s)" ("n" indicates the number of missed calls.
For example, 1 New Missed Call(s)) will appear on the phone screen.
Note: When DND and busy forward are enabled, all incoming calls will be forwarded to the configured destination number.
For more information on busy forward, refer to Forwarding All Incoming Calls to a Contact.
Disabling DND
You can deactivate DND when you are ready to resume receiving calls again.
Procedure
1.
Do one of the following:
l
Select Exit DND mode. from the idle screen.
l
Swipe down from the top of the screen to enter the control center and toggle DND off.
l
Go to More > Settings > Features > DND, turn off DND Status and then select .
Ending Calls
You can end the current call at any time.
Procedure
1.
Select .
Redialing a Call Automatically
You can set the phone to redial a phone number automatically when you call a contact and the contact’s line is
unavailable.
Procedure
1. Go to More > Settings > Features > Auto Redial.
2. Turn on Auto Redial.
3. Enter the desired time (between 1 and 300 seconds) in the Redial Interval field.
4. Enter the desired times (between 1 and 300) in the Redial Times field.
5.
Select .
When you dial a number but fail to establish a call, the phone prompts the failure reason and then prompts whether
to auto redial the contact, select OK to activate auto redial.

Call Features
31
The phone screen displays the redial times and interval. The phone will retry as many times as configured until the
callee answers the call.
Call Muting and Unmuting
You can mute the microphone during an active call so that the other party cannot hear you.
Procedure
1. During a call, tap the Mute touch key or select Mute.
2. Tap the Mute touch key or select Mute again to unmute the microphone.
Note: Contact your system administrator, if you can only mute the microphone during an active call or the mute feature is
deactivated when the active call ends.
Keep Mute
In a meeting room, if incoming calls are answered automatically on your phone, callers may hear your discussion
with your colleagues. You can keep the phone in mute to prevent this unintended situation.

Yealink CP965 User Guide
32
The mute state of your phone persists across calls. The phone stays in the mute state until you unmute the micro-
phone manually or until the phone restarts.
Procedure
1.
Tap the Mute touch key when the phone is idle.
The mute key LED glows red, and the mute icon appears on the idle screen.
2.
Tap the Mute touch key again to deactivate the mute state.
Holding and Resuming Calls
You can place an active call on hold and resume the call when you are ready. When you place a call on hold, the
held party may hear the music played by its sever.
Topics
Holding a Call
Resuming a Held Call
Holding a Call
You can place an active call on hold on your phone.
Procedure
1. Select Hold during a call.

Call Features
33
Note: When you have multiple calls on the phone and the current call is held, you can select Previous/Next to swap to the
active call.
Resuming a Held Call
You can view and resume a held call on the phone.
Procedure
1. Select Resume.
If multiple calls are placed on hold, select the desired call first.
Note: When you have multiple calls on the phone and the current call is active, you can select Previous/Next to swap to
the held call.
Redirecting Incoming Calls
When you are not available to answer calls on your phone, you can forward the calls to another phone.
Topics
Forwarding All Incoming Calls to a Contact
Deactivating Call Forward
Forwarding an Incoming Call Manually
Diverting Calls to a Contact
Forwarding All Incoming Calls to a Contact
You can set up the phone to forward all incoming calls to a contact.
Procedure
1. Go to More > Settings > Features > Call Forward.
2.
Select the desired forwarding type.
l
Always Forward: Forwards all incoming calls.
l
Busy Forward: Forwards incoming calls when you’re in a call.
l
No Answer Forward: Forwards all unanswered incoming calls.
3.
Turn on the desired forwarding type.

Yealink CP965 User Guide
34
4.
Do one of the following:
l
Enter the number you want to forward to in the Forward to field.
l
Select and select the desired contact.
5. If you select No Answer Forward, select the desired ring time to wait before forwarding in the After Ring Time
field.
6.
Select .
Note: You can also enter the SIP URI or IP address in the Forward to field.
Deactivating Call Forward
You can deactivate call forward when you no longer want to forward your calls.
Procedure
1. Go to More > Settings > Features > Call Forward.
2.
Tap the desired forwarding type.
3.
Turn off the desired forwarding type.
4.
Tap .
Forwarding an Incoming Call Manually
You can manually forward the call to another contact while your phone rings.
Procedure
1.
When the phone is ringing, tap .
2.
Enter the number you want to forward the incoming call to.
3. Select Forward.
The phone prompts a call forward message.
Forwarding Incoming Calls with a Forward Key
When the phone receives an incoming call, you can easily tap the Forward key to forward the incoming call to a spe-
cific contact.
Procedure
1.
1.
Tap Dsskey.
2. Drag the desired line key to the Edit field.
3. Select Key Event from the Type field.
4. Select Forward from the Key Type field.
5. If your system administrator has set the forward mode to Custom, select the desired line.
6.
Do one of the following:
l
(Optional.) Enter the string that will display on the phone screen in the Label field.
Enter the contact number you want to forward the incoming calls to in the Value field.
l
Select and select the desired contact.
7.
Select .
When the phone is ringing, tap the forward key to quickly forward the call to the specific contact.
Diverting Calls to a Contact
You can divert all incoming calls from a particular contact to another contact. Auto divert has precedence over call forward.

Call Features
35
Procedure
1.
Tap .
2.
Tap the desired contact and select .
3.
Edit the contact information.
4. Enter a contact’s number you want to divert the call to in the Auto Divert field.
5. Select Done.
Transferring Calls
During a call, you can transfer the call to another contact.
You can use one of three ways:
l
Blind Transfer: Transfer a call directly to the third party without consulting.
l
Semi-Attended Transfer: Transfer a call when receiving ringback.
l
Attended Transfer (Consultative Transfer): Transfer a call with prior consulting.
Topics
Performing a Blind Transfer
Performing a Semi-Attended/Attended Transfer
Performing a Blind Transfer
You can enter the number, or select a contact from directory or history to perform a blind transfer.
Procedure
1.
Select > Transfer during a call.
2.
Do one of the following:
l
Enter the number you want to transfer the call to, and select Transfer.
Select Transfer to complete the transfer. (The call will automatically dial out in about 5 seconds if you do not
select Transfer.)
l
Select ( ), and select the desired contact to complete the transfer.
l
Select ( ), and select the desired list. Select the desired entry to complete the transfer.
Performing a Semi-Attended/Attended Transfer
You can transfer calls to other contacts immediately when receiving ringback or after consulting with them first.
Procedure
1.
Select > Transfer during a call.
2.
Do one of the following:
l Enter the number you want to transfer the call to.
Select Transfer > Send to dial out.
l
Select ( ), and select the desired contact to dial out.
l
Select ( ), and select the desired entry to dial out.
3.
Do one of the following:
l
When you hear the ringback tone, select Transfer to finish the semi-attended transfer.
l
After the contact answers the call, select Transfer to finish the attended transfer (consultative transfer).

Yealink CP965 User Guide
36
Conference Calls
The phone supports creating local conference and network conference.
During the conference, follow these tips:
l Mute your microphone when you are not speaking, especially in noisy environments.
l Avoid tapping or rustling papers near the microphone.
l Speak in your normal voice without shouting.
Topics
Local Conference
Network Conference
Local Conference
The phone supports up to ten parties (including yourself) in a conference call.
There are three ways to create a conference:
l Initiating a conference by dialing multiple numbers.
l Initiating a conference by inviting participants.
l Merging multiple calls into a conference.
If you connect a mobile phone and PC to your IP phones, you can also create a hybrid UC conference.
Topics
Initiating a Conference by Dialing Multiple Numbers
Initiating a Conference by Inviting Participants
Merging Multiple Calls into a Conference Call
Creating a Hybrid UC Conference
Holding/Resuming a Conference Call
Muting/Unmuting a Conference Call
Splitting a Conference Call
Managing the Conference Participants
Enabling/Disabling the DND Mode for a Conference Call
Initiating a Conference by Dialing Multiple Numbers
You can initiate a conference by dialing multiple numbers, this is a convenient way to set up a local conference.
Procedure
1.
Select .
2. Select Call multiple members? Click here >>.
3. Enter the number of the first party then select Add Members or select a contact.
The avatar of the first party appears on the top of phone screen. You can tap the avatar to cancel the addition.
4.
Repeat the step 3 until you add all intended parties.
5.
Select to call all intended parties at the same time.
The conference is set up after the intended parties answer the call.
Note: The value under the icon indicates the number of parties you have added and the maximum number of the parties
you can add. For example, indicates you can add up to 4 parties and you have added 1 party.
Initiating a Conference by Inviting Participants
You can invite one or multiple members at a time to join the conference.
Procedure

Call Features
37
1.
Place a call to the first party.
2. After the first party answers the call, select Invite.
3.
Do one of the following:
l
Enter the number of the second party, and select Invite.
Repeat the step above until you add all intended parties.
l
Select , select the desired contact to dial out.
l
Select , select the desired history record to dial out.
l
Select Call multiple members? Click here >>.
Enter the number or select the contact, and then select Add Members to add multiple members.
Tap to call all intended parties at the same time.
Merging Multiple Calls into a Conference Call
During the multiple calls, you can merge them into a conference call.
Procedure
1.
Tap > Merge.
The calls are merged into a conference call.
Creating a Hybrid UC Conference
You can merge the calls on your IP phones, the PC and connected mobile phone into a hybrid UC conference.
There are many ways to create a hybrid UC conference, the following shows an example.
Before You Begin
Make sure you have an active PC audio and connected a mobile phone to your phone.
Procedure
1. Select Invite.
2.
Do the following to place a mobile call over Bluetooth on the phone.
a.
Enter the desired number and then select Invite.
b. Select the connected mobile phone in the pop-up dialog box.
3. Select Invite.
4.
Do the following to place an IP call.
a.
Enter the desired number and then select Invite.
b. Select the registered account.
Holding/Resuming a Conference Call
When you place a conference call on hold, both other participants are placed on hold. Other participants cannot
hear each other until you resume the held conference call.
Procedure
1. Select Hold to place the conference call on hold.
2. Select Resume to resume the held conference call.
Muting/Unmuting a Conference Call
You can mute the local microphone during a conference call so that the other participants can hear each other
except you.
Procedure

Yealink CP965 User Guide
38
1. Select Mute to mute the conference call.
2. Select Mute again to unmute the conference.
Splitting a Conference Call
You can split the conference call into individual calls. After you split a conference call, the conference call ends, and
other parties are held. You can resume the hold calls.
Procedure
1.
Select > Split to split the conference call into individual calls on hold.
Managing the Conference Participants
During the conference, you can manage the participants to make the conference more flexible.
You can manage conference participants in the following ways:
l Mute a participant.
l Hold a participant
l Remove a participant from the conference
l Split the participant from the conference
l View the participant information
Procedure
1.
Tap the avatar of desired participant, you can do the following:
l
Select Far Mute to mute the participant. The muted participant can hear everyone, but no one can hear the
muted participant.
l
Select Remove to remove the participant from the conference.
l
Select Split to split the participant from the conference.
l
Select Hold to hold the participant.
l
Select Cancel to return to the conference screen.
Enabling/Disabling the DND Mode for a Conference Call
You can enable the DND mode for a conference call, as a result, the conference call will not be disturbed by the
incoming calls.
Procedure
1.
Select > DND to enable the DND mode.
2.
Select > DND again to disable the DND mode.
Network Conference
If your system administrator has set a network conference feature on your phone, you can initiate a conference with
two or more contacts.
Topic
Setting Up a Network Conference
Setting Up a Network Conference
You can set up a network conference with multiple parties.
Procedure
1.
Place a call to the first party.
2. When the first party answers the call, select Invite.
3.
Do one of the following:

Call Features
39
l
Enter the number of the second party, and then select Invite.
l
Select Call multiple members? Click here >>, enter the number of the new party, and then select Add Mem-
bers.
Repeat the step above until you add all intended parties.
Select to call all intended parties at the same time.
The conference is set up after the intended parties answer the call.
Note: The Procedures for setting up a network conference call on specific servers may be different from the introduction
above. Contact your system administrator for more information.
Call Recording
You can record up to 12 hours in one file. By default, the recorded files are saved in the internal SD card.
You can connect a USB flash drive to your phone, and save the recorded audio to the connected USB flash drive.
Recording using a USB flash drive is not available by default. Contact your system administrator for enabling this
feature for you.
Topics
Recording a Call
Recording a Conference
Setting a Mark When Recording a Call
Stopping a Recording
Checking Storage Space
Recording a Call
You can record the important parts during an active call.
Important: Before call recording, especially those involving PSTN, it is necessary to know about the rules and restrictions of
call recording in the country where you are.
It is also very important to inform all the call parties that you are recording and ask for their consent before recording the con-
versation.
Procedure
1.
During a call, select > Record.
2.
If a USB flash drive is connected, select where to save your recording.
Recording a Conference
You can record conference calls in the same way as other calls. All conference participants are recorded while
recording.
The following lists exceptions:
l If one of the participants holds the conference call, only that participant is recorded. When a conference call is
placed on hold, recording of the conference is paused. You can place or answer other calls, which will be recor-
ded in the same file. When the conference call is resumed, recording of the conference resumes.
l If one of the participants mutes the conference call, only that participant is not recorded.
Related Topics
Recording a Call
Setting a Mark When Recording a Call
You can set a mark when recording a call to mark the special moment. And there will be a red flag on this moment
when playing the recorded file so that you can drag to the moment quickly.

Yealink CP965 User Guide
40
Procedure
1.
Select .
The icon changes to , the number will increase if you set more marks.
Stopping a Recording
You can stop recording a call before the call ends. The recording also stops when the active call ends. The record-
ing will be saved as a "*.aac" file in the internal SD card or the USB flash drive automatically.
Procedure
1.
Do one of the following:
l
Select > Stop.
The recording icon and recording duration disappears. The screen prompts a message that the call is recor-
ded successfully.
l
Select .
The recording icon and recording duration disappears, and the phone returns to the idle screen. The screen
prompts a message that the call is recorded successfully.
Checking Storage Space
You can check the total space or available space of the phone or connected USB flash drive.
Procedure
1. Select More > Recorder to launch the Recorder application.
2. If you want to check the storage space of the USB flash drive, select USB.
Multicast Paging
Multicast Paging allows you to broadcast instant audio announcements to users who are listening to a specific mul-
ticast group on a specific channel.
The phone supports the following 31 channels:
l
0: Broadcasts are sent to channel 0. Note that the Yealink IP phones running old firmware version (old paging
mechanism) can be regarded as listening to channel 0. It is the default channel.

Call Features
41
l
1 to 25: Broadcasts are sent to channel 1 to 25. We recommend that you specify these channels when broad-
casting with Polycom IP phones which have 25 channels you can listen to.
l
26 to 30: Broadcasts are sent to channel 26 to 30. We recommend that you specify these channels when broad-
casting with Yealink IP phones running new firmware version (new paging mechanism).
Note: All IP phones in the multicast paging group must be deployed in the same subnet since a broadcast is used. The phone
can only send/receive broadcasts to/from the listened channels. Other channels’ broadcasts will be ignored automatically by
the IP phone.
Topics
Sending Multicast Paging
Receiving Multicast Paging
Managing a Paging Call
Sending Multicast Paging
Your phone supports up to 31 groups for paging. You can assign a label to each group to identify the phones in the
group, such as All, Sales, or HR.
You can set a line key as Multicast Paging key or Paging List key on the phone, which allows you to send
announcements to the phones with pre-configured multicast address(es) on specific channel(s).
Note: Multicast RTP is one way only from the sender to the multicast address(es) (receiver). For outgoing RTP multicasts,
all other existing calls on the phone will be placed on hold.
Topics
Setting a Multicast Paging Key
Sending a Paging by a Multicast Paging Key
Setting a Paging List Key
Setting a Paging Group
Sending Pages by a Paging List Key
Deleting a Paging Group
Setting a Multicast Paging Key
You can set a Multicast Paging key for a paging group, which allows you to send announcements quickly on the
idle screen.
Before You Begin
Get the multicast IP address and port number from your system administrator.
Procedure
1.
1.
Tap Dsskey.
2. Drag the desired line key to the Edit field.
3. Select Key Event from the Type field.
4. Select Multicast Paging (Paging) from the Key Type field.
5. (Optional.) Enter the paging group name in the Label field.
6. Enter the multicast IP address and port number (for example, 224.5.6.20:10008) in the Value field.
7. Enter the desired channel between 0 and 30 in the Channel field.
8.
Select .
Sending a Paging by a Multicast Paging Key
You can send a paging by using the Multicast Paging key when the phone is idle.
Before You Begin

Yealink CP965 User Guide
42
You need to set a Multicast Paging key in advance.
Procedure
1.
Tap the Multicast Paging key when the phone is idle.
Both your phone and receiver’s phone play a warning tone and the multicast RTP session will be automatically
answered on the receiver’s phone in the speakerphone (hands-free) mode.
The following figure shows a multicast RTP session on the phone:
Related Topic
Setting a Multicast Paging Key
Setting a Paging List Key
You can set a Paging List key to easily access the paging groups on the idle screen.
Procedure
1.
1.
Tap Dsskey.
2. Drag the desired line key to the Edit field.
3. Select Key Event from the Type field.
4. Select Paging List from the Key Type field.
5. (Optional.) Enter the string that will display on the phone screen in the Label field.
6.
Select .
Setting a Paging Group
You can edit the information of the paging group.
Before You Begin
A Paging List key is set in advance. Get the multicast IP address and port number from your system administrator.
Procedure
1.
Tap the Paging List key when the phone is idle.
2.
Select after the desired paging group.
The default tag is Empty if it is not configured before.

Call Features
43
3. Enter the multicast IP address and port number (for example, 224.5.6.20:10008) in the Address field.
4. Enter the string that will display on the phone screen in the Label field.
5. Enter the desired channel between 0 and 30 in the Channel field.
6.
Select .
7.
To set more paging groups, repeat steps 2 to 6.
Sending Pages by a Paging List Key
You can send a paging by using the Paging List key when the phone is idle.
Before You Begin
You need to set a Paging List key in advance.
Procedure
1.
Tap the Paging List key when the phone is idle.
2.
Select the desired paging group.
Both your phone and receiver’s phone play a warning tone and the multicast RTP session will be automatically
answered on the receiver’s phone in the speakerphone (hands-free) mode.
Related Topic
Setting a Paging List Key
Deleting a Paging Group
You can delete any group from the paging group list.
Procedure
1.
Tap the Paging List key when the phone is idle.
Go to More > Settings > Features > Paging List.
If the Paging List key is not configured, you can also go to Settings > Features > Paging List to configure the
paging list.
2.
Select after the desired paging group.
3. Select Delete.
The phone prompts you to delete the paging group or not.
4. Select OK.
If you want to delete all paging groups, you can tap on the top-right of the phone screen.
Receiving Multicast Paging
Your system administrator has set a listening paging group for you, you can automatically receive a paging call
when the phone is idle.
When there is a voice call or a paging call in progress, the phone handles the new paging call differently according
to the multicast listening settings configured by your system administrator.
Managing a Paging Call
During a paging call, you can manage it manually at any time.
Procedure
l
Select Hold to place the current paging call on hold.
The paging call is placed on hold and the receiver releases the session.
l
Select Resume to resume the held paging call.

Yealink CP965 User Guide
44
The multicast RTP session is re-established.
l
Select DND to enable or disable DND mode.
l
Select Mute to mute the multicast RTP session.
l
Select > Record to record a call.
l
Select End Call to end the paging call.

Advanced Call Features
45
Advanced Call Features
You can perform some server-dependent tasks on the phone. Contact your system administrator to find out if your
phone supports these advanced call features.
Topics
Using Call Completion
Call Pickup
Call Park
Busy Lamp Field (BLF)
BLF List
Shared Line
Intercom
Voice Mail
Using the Hot Desking
Using Call Completion
When you call someone who is temporarily unavailable to answer the call, you can monitor the busy party and
establish a call after the busy party becomes available to receive a call.
Note: Call completion is not available on all servers. For more information, contact your system administrator.
Procedure
1. Go to More > Settings > Features > Call Completion.
2. Turn on Call Completion.
3.
Select .
When you place a call and the callee is temporarily unavailable to answer the call, the phone prompts whether to
wait for the callee, select OK to activate the call completion feature.
When the callee becomes idle, the phone prompts whether to dial the number, select OK to dial the number.
Call Pickup
You can use call pickup to answer someone else’s incoming call on your phone.
The phone supports the following two call pickup features:
l
Directed Call Pickup: allows you to pick up incoming calls to another phone.
l
Group Call Pickup: allows you to pick up incoming calls to any phone within a predefined group.
Check with your system administrator to find out if this feature is available on your phone.
Topics
Picking up a Call Directly
Picking up a Group Call Directly
Picking up a Call with a Pick Up Key
Picking up a Call with a Group Pickup Key
Picking up a Call Directly
You can answer a call that rings on another phone.
Before You Begin

Yealink CP965 User Guide
46
The target phone receives an incoming call. Your system administrator has enabled the directed call pickup and set
the directed call pickup code.
Procedure
1.
Select .
The DPickup (Pick Up) appears on the phone screen.
2. Select DPickup (Pick Up) on your phone.
3.
Enter the phone number which is receiving an incoming call.
4. Select DPickup (Pick Up) again.
The call is answered on your phone.
Tip: When the phone is idle, you can use a Directed Pickup or BLF/BLF List key to pick up a call to a specific contact dir-
ectly.
Related Topics
Picking up a Call with a Pick Up Key
Picking up a Remote Call by BLF Key
Picking up a Remote Call by BLF List Key
Picking up a Group Call Directly
When any phone within a predefined group receives an incoming call, you can pick up that call on your phone.
If there are multiple incoming calls on the group at the same time, you can only pick up the first incoming call.
Before You Begin
Your system administrator has enabled the group call pickup and set the group call pickup code.
Procedure
1.
Select .
The GPickup appears on the phone screen.
2. SelectGPickup on your phone when any phone in the group receives an incoming call.
The call is answered on your phone.
Related Topic
Picking up a Call with a Group Pickup Key
Picking up a Call with a Pick Up Key
You can easily use a Pick Up key to pick up a call to a specific contact’s phone.
Before You Begin
Ask your system administrator for the directed call pickup code.
Procedure
1.
1.
Tap Dsskey.
2. Drag the desired line key to the Edit field.
3. Select Key Event from the Type field.
4. Select Pick Up from the Key Type field.
5. Select the desired line from the Account ID field.
6.
Do one of the following:
l
(Optional.) Enter the string that will display on the phone screen in the Label field.

Advanced Call Features
47
Enter the directed call pickup code followed by the specific extension in the Value field.
l
Select and select the desired contact.
7.
Select .
When the target phone receives an incoming call, you can press the Pick Up key, and the call is answered on your
phone.
Picking up a Call with a Group Pickup Key
You can easily select a Group Pickup key to pick up a group call.
Before You Begin
Check with your system administrator if the group call pickup code is required for this key. If required, get the group
call pickup code from your system administrator.
Procedure
1.
1.
Tap Dsskey.
2. Drag the desired line key to the Edit field.
3. Select Key Event from the Type field.
4. Select Group Pick Up from the Key Type field.
5. Select the desired line from the Account ID field.
6.
Do one of the following:
l
(Optional.) Enter the string that will appear on the phone screen in the Label field.
Enter group call pickup code in the Value field.
l
Select and select the desired contact.
7.
Select .
When any phone within a predefined group of phones receives an incoming call, you can tap the Group Pickup key,
and the call is answered on your phone.
Call Park
You can use call park to place a call on hold, and then retrieve the call from another phone in the system (for
example, a phone in another office or conference room).
Note: Call park is not available on all servers. Contact your system administrator for more information.
Topics
Configuring a Call Park Key
Using Call Park Feature
Configuring a Call Park Key
You need to set a call park key to park an active call.
Before You Begin
You should get the call park code from your system administrator.
Procedure
1.
1.
Tap Dsskey.
2. Drag the desired line key to the Edit field.
3. Select Key Event from the Type field.

Yealink CP965 User Guide
48
4. Select Call Park from the Key Type field.
5. Select the desired line from the Account ID field.
6.
Do one of the following:
l
(Optional.) Enter the string that will appear on the phone screen in the Label field.
Enter the park extension number or the shared parking lot you want to park the call to in the Value field.
l
Select and select the desired contact.
7.
Select .
Using Call Park Feature
You can park an active call by tapping the pre-configured call park key on the phone, and dial the call park retrieve
code to retrieve the parked call.
Before You Begin
Make sure you have configured a Call Park Key. Contact your system administrator for the call park retrieve code.
Procedure
1.
During a call, select > Dsskey.
2.
Select the call park key.
3.
If you want to retrieve the parked call, dial the call park retrieve code.
If the parked call is not retrieved within a period of time assigned by the system, the phone performing call park will
receive a call back.
Related Topic
Configuring a Call Park Key
Busy Lamp Field (BLF)
You can monitor a specific remote line using a BLF key for status changes on the phone.
Topics
State Indicator of Remote Line by BLF Key
Audio Alert for BLF Pickup
Visual Alert for BLF Pickup
Setting a BLF Key
Picking up a Remote Call by BLF Key
Transferring a Call by BLF Key
State Indicator of Remote Line by BLF Key
You can get the monitored line's status by viewing the icon indicator of the BLF key.
Icons Description Icons Description
The monitored line is idle The monitored line is ringing.
The monitored line is dialing The monitored line is busy or in a call.
The monitored line places a call on
hold
A call is parked to the monitored line.
The monitored line fails to register or
does not exist.

Advanced Call Features
49
Audio Alert for BLF Pickup
The Audio Alert for BLF Pickup feature allows your phone to play a tone when the specified monitored line receives
an incoming call.
Visual Alert for BLF Pickup
Your system administrator can configure your phone to display the call information when the specified monitored
line receives an incoming call.
You can select to pick up the call to the monitored line, place a call to the monitored line, place a new call or go
back to the idle screen.
Setting a BLF Key
You can set a BLF key to monitor a specific line for status changes on the phone.
Procedure
1.
1.
Tap Dsskey.
2. Drag the desired line key to the Edit field.
3. Select BLF from the Type field.
4. Select the desired line from the Account ID field.
5.
Do one of the following:
l
(Optional.) Enter the string that will appear on the phone screen in the Label field.
Enter the phone number or the extension you want to monitor in the Value field.
l
Select and select the desired contact.
6. (Optional.) Enter the directed call pickup code in the Extension field.
7.
Select .
Picking up a Remote Call by BLF Key
When the monitored users are not at their desks and someone rings their lines, you can pick up the desired call
simply by tapping the flashing BLF key.
If your system administrator sets the directed call pickup code in advance, you can use the BLF key to pick up the
call directly. If not or if you want to set a pickup code for a specific BLF line, you can set a pickup code for the BLF
key manually.

Yealink CP965 User Guide
50
Before You Begin
You have edited the BLF key's Extension field with the directed call pickup code from your system administrator.
Procedure
1.
When the monitored line receives an incoming call, you can tap the BLF key to pick up the call for the monitored
line directly.
Related Topic
Setting a BLF Key
Transferring a Call by BLF Key
When there is already an active call on the IP phones, you can transfer the active call to the monitored line by tap-
ping the BLF key.
The phone transfers the active call differently depending on the Transfer Mode via Dsskey feature configured by
your system administrator.
Topics
Performing a Blind Transfer
Performing a Semi-attended/Attended Transfer
Performing a Blind Transfer
During a call, you can transfer the call to the monitored contact in a blind-transfer way.
Before You Begin
Check with your system administrator if the Transfer Mode via Dsskey is set to Blind Transfer.
Procedure
1.
During a call, select > Dsskey.
2.
Tap the BLF key of the monitored user which you want to transfer this call to.
Performing a Semi-attended/Attended Transfer
During a call, you can transfer the call to the monitored contact in the semi-attended/attended-transfer way.
Before You Begin
Check with your system administrator if the Transfer Mode via Dsskey is set to Attended Transfer.
Procedure
1.
During a call, select > Dsskey.
2.
Tap the BLF key of the monitored user which you want to transfer this call to. The phone will dial out the number
of the monitored line.
3.
Tap the BLF key of the monitored user again to complete the transfer when the monitored user receives ring-
back or after the monitored user answers the call.
BLF List
BLF List feature enables you to monitor a list of users defined by your system administrator, and the respective
icons will either flash or glow depending on the status of monitored lines.
Check with your system administrator to find out if this feature is available on your phone.
Topics
State Indicator of Remote Line by BLF List Key

Advanced Call Features
51
Audio Alert for BLF Pickup
Visual Alert for BLF Pickup
Visual Alert for BLF Parked Call Monitor
Picking up a Remote Call by BLF List Key
Transferring a Call by BLF List Key
Parking a Call by a BLF List Key
Retrieving a Call by a BLF List Key
Barging in an Active Call by BLF List Key
State Indicator of Remote Line by BLF List Key
You can get the monitored line's status by viewing the icon indicator of the BLF List key.
Icons Description Icons Description
The monitored line is idle The monitored line is ringing.
The monitored line is dialing The monitored line is busy or in a call.
The monitored line places a call on
hold
A call is parked to the monitored line.
The monitored line fails to register or
does not exist.
Audio Alert for BLF Pickup
The Audio Alert for BLF Pickup feature allows your phone to play a tone when the specified monitored line receives
an incoming call.
Visual Alert for BLF Pickup
Your system administrator can configure your phone to display the call information when the specified monitored
line receives an incoming call.
You can select to pick up the call to the monitored line, place a call to the monitored line, place a new call or go
back to the idle screen.
Visual Alert for BLF Parked Call Monitor
Your system administrator can configure your phone to display the call information when the specified monitored
line receives an incoming call.

Yealink CP965 User Guide
52
You can select to retrieve the call parked to the monitored line, place a call to the monitored line, place a new call or
go back to the idle screen.
Picking up a Remote Call by BLF List Key
When the monitor user is not at his/her desk and someone rings his/her line, you can pick up the call simply by tap-
ping the flashing BLF List key.
Before You Begin
Check with your system administrator to find out if this feature is available on your phone.
Procedure
1.
Tap the BLF List key to pick up the call for the monitored line directly.
Transferring a Call by BLF List Key
When there is already an active call on the IP phones, you can transfer the active call to the monitored user by tap-
ping the BLF List key.
The phone transfers (Blind Transfer or Attended Transfer) the active call differently depending on the Transfer Mode
via Dsskey feature configured by your system administrator.
Topics
Performing a Blind Transfer
Performing a Semi-attended/Attended Transfer
Performing a Blind Transfer
During a call, you can use the BLF List key to perform a blind transfer to the monitored line.
Before You Begin
Check with your system administrator to make sure that the Transfer Mode via Dsskey is set to Blind Transfer.
Procedure
1.
During a call, select > Dsskey.
2.
Tap the BLF List key of the monitored user which you want to transfer this call to.
Performing a Semi-attended/Attended Transfer
During a call, you can use the BLF List key to perform a semi-attended/attended transfer to the monitored line.
Before You Begin
Check with your system administrator if the Transfer Mode via Dsskey is set to Attended Transfer.
Procedure
1.
During a call, select > Dsskey.
2.
Tap the BLF List key of the monitored user which you want to transfer this call to. The phone will dial out the
number of the monitored line.
3.
Tap the BLF List key of the monitored user again to complete the transfer when the monitored user receives ring-
back or after the monitored user answers the call.
Parking a Call by a BLF List Key
You can use the BLF List key to park a call to the monitored user who is idle.
Before You Begin
Check with your system administrator to find out if this feature is available on your phone.

Advanced Call Features
53
Procedure
1.
During a call, press the desired BLF List key.
Retrieving a Call by a BLF List Key
You can use the BLF List key to retrieve a call that is parked to the monitored line.
Before You Begin
Check with your system administrator to find out if this feature is available on your phone.
Procedure
1.
Tap the desired BLF List key to retrieve a call that is parked to the monitored line.
Barging in an Active Call by BLF List Key
You can use the BLF List key to barge in a conversation and set up a conference call.
Before You Begin
Check with your system administrator to find out if this feature is available on your phone.
Procedure
1.
Tap the BLF List key.
The phone dials out the barge-in code followed by the monitored line, and then you can join the call. Each of
the three parties can hear the other two parties.
Shared Line
Yealink phone supports using Shared Call Appearance (SCA) to share a line. So that this line can be registered on
more than one phone at the same time.
Your system administrator can set your phone to use the shared line.
Topics
State Indicator of Shared Line
Placing Calls on a Shared Line
Answering Calls on a Shared Line
Placing a Call on Public Hold
Placing a Call on Private Hold
Retrieving a Held Call on a Shared Line
Barging in an Active Call on a Shared Line
Pulling a Shared Call on a Shared Line
State Indicator of Shared Line
You can get the shared line's status by viewing the icon indicator of the shared line key.
The following table shows all kinds of icon indicator associated with the shared line and the corresponding descrip-
tions:
Icons Description Icons Description
The shared line is idle.
(Monitoring SCA Phone)
The shared line is seized.
(Flashing)
The shared line receives an
incoming call.
(Flashing)
The shared line is dialing.
The shared line is busy or is in The call on the shared line is

Yealink CP965 User Guide
54
Icons Description Icons Description
a call. placed on public hold.
The call on the shared line is
barged in by the other shared
line user.
(Local SCA Phone)
(Other Phone)
The call on the shared line is
placed on private hold.
In a multi-party call, place the
call on hold locally.
Placing Calls on a Shared Line
You can place one or multiple calls on a shared line.
The phone places a call on the first shared line key automatically. You can select the desired shared line key first
and place a call using this key.
Related Topic
Placing Calls
Answering Calls on a Shared Line
You can answer one or more calls on the shared line.
When an incoming call arrives on the shared line, all the registered phones will ring simultaneously, and the call
can be answered on any one of the phones. Incoming calls will be distributed evenly among the available shared
line keys.
Note: If the number of incoming calls is greater than the configured line keys, the line keys will be used by sequence cir-
culation. Contact your system administrator for more information.
Related Topic
Answering Calls
Placing a Call on Public Hold
You can place a call on public hold that any shared line phone can retrieve the held call.
Procedure
1. During a call, select Hold.
Placing a Call on Private Hold
In the SCA scenario, you can place a call on private hold that only you can retrieve the held call.
The PriHold soft key can be preset by your system administrator, you can also set a line key as the private hold key
manually if the PriHold soft key is not available on your phone. You need to configure a private hold key before you
place the call on private hold.
Procedure
1.
1.
Tap Dsskey.
2. Drag the desired line key to the Edit field.
3. Select Key Event from the Type field.
4. Select Private Hold from the Key Type field.

Advanced Call Features
55
5. (Optional.) Enter the string that will display on the phone screen in the Label field.
6.
Select .
During an SCA call, select > Dsskey, and then tap private hold key on the phone. Then the call is held on your
phone, and the other phones registered with a shared line show the call is in the busy state on the shared line key.
Other users on the shared line cannot resume your held call.
Retrieving a Held Call on a Shared Line
If you place a call on hold on a shared line, you can resume this call at any time.
Before You Begin
There is at least one call placed on public hold on the shared line.
Procedure
1.
Do one of the following:
l
Select .
l Long tap the desired line key.
Select > Retrieve to retrieve the call.
Barging in an Active Call on a Shared Line
In the SCA scenario, you can barge into an active call on the shared line. After you barge into a call, the call turns
into a three-party conference.
Note: Only one user can barge into an active call on the shared line at a time.
Before You Begin
There is at least one active call on the shared line.
Procedure
1.
Long tap the desired line key.
2.
Select > Barge In to interrupt the active call.
Pulling a Shared Call on a Shared Line
In SCA scenario, both you and other users can pull an existing call from another shared phone that is an active or
hold state.
Check with your system administrator to find out if this feature is available for your phone.
Before You Begin
There is an active or held call on the shared line.
Procedure
1.
Long tap the shared line key.
2. Select CallPull to pull the call.
Intercom
Intercom is a useful feature in an office environment to quickly connect with the operator or the secretary.

Yealink CP965 User Guide
56
Intercom enables you to place an intercom call that is answered automatically on the contact's phone as long as the
contact is not in an active call.
Note: Intercom is not available on all servers. Contact your system administrator for more information.
Topics
Placing an Intercom Call
Picking up an Incoming Call of the Target Extension
Answering an Intercom Call
Placing an Intercom Call
You can place an intercom call to quickly relay a message to a contact.
The target phone plays a warning tone and automatically answers the call in speakerphone (hands-free) mode by
default. When the target phone has an active call, the intercom call is answered automatically after the active call
ends.
Procedure
1.
1.
Tap Dsskey.
2. Drag the desired line key to the Edit field.
3. Select Intercom from the Type field.
4. Select the desired line from the Account ID field.
5.
Do one of the following:
l
(Optional.) Enter the string that will appear on the phone screen in the Label field.
Enter the target extension number in the Value field.
l
Select and select the desired contact.
6.
Select .
7.
Tap the Intercom key to place an intercom call.
Related Topic
Setting a BLF Key
Picking up an Incoming Call of the Target Extension
You can pick up the target extension's incoming call by pressing the Intercom key.
Before picking up an incoming call, make sure that the directed call pickup code has been configured either for an
Intercom key or for Call Pickup feature in advance.
Check with your system administrator to find out if this feature is available on your phone.
Note: If the directed call pickup code is not set, the phone will place a call to the target extension instead of picking up an
incoming call of the target extension when you tap the Intercom key.
Before You Begin
Get the directed call pickup code from your system administrator.
Procedure
1.
1.
Tap Dsskey.
2. Drag the Intercom key to the Edit field.

Advanced Call Features
57
3. Enter the directed call pickup code in the Extension field.
4.
Select .
When the target extension receives an incoming call, the Intercom key icon of the target extension will change to
. Tap the Intercom key to pick up the incoming call directly.
Answering an Intercom Call
By default, when there is an incoming intercom call, the phone plays a warning tone and automatically answer the
incoming call.
If your phone is set to answer intercom calls with your microphone muted, you need to tap the Mute key to unmute
your microphone before responding to the call.
You can configure the following behaviors when receiving an intercom call.
Intercom Allow
Intercom Allow feature allows the phone to automatically answer an incoming intercom call. If you disable this fea-
ture, the phone will reject incoming intercom calls and send a busy message to the caller.
Note: Your system administrator can set a period of delay time before the phone automatically answers intercom calls.
Intercom Mute
Intercom Mute feature allows the phone to mute the microphone when incoming intercom calls are answered auto-
matically.
Intercom Tone
Intercom Tone feature allows the phone to play a warning tone before answering an intercom call automatically.
Intercom Barge
Intercom Barge allows the phone to automatically answer an incoming intercom call while an active call is in pro-
gress. The active call will be placed on hold. If you disable this feature, the phone will handle an incoming intercom
call like a normal incoming call while there is already an active call on the phone.
Note: To enable the phone to receive a new incoming call when it already has an active call, make sure that the call waiting
feature is enabled on the phone in advance.
Procedure
1. Go to More > Settings > Features > Intercom.
2.
Make the desired changes.
3.
Select .
Related Topics
Muting or Unmuting the Microphone
Answering a Call When in a Call
Voice Mail
Voice mail feature allows you to leave voice mails for someone or listen to your voice mail messages on your
phone. This feature is set up on the server side and not all servers support this feature.
Topics
Setting the Voice Mail Code
Leaving Voice Mails
Yealink CP965 User Guide
58
Listening to Voice Mails
Setting the Voice Mail Code
If you want to connect your phone to the message center, you need to set the voice mail code on your phone.
Before You Begin
Get the voice mail code from your system administrator.
Procedure
1. Go to More > Message.
2. Select Set Voice Mail Code.
3.
Enter the voice mail code (for example, *4) in the desired account field.
4.
Select .
Leaving Voice Mails
You can leave a voice mail to someone who is busy or inconvenient to answer the call.
Procedure
1.
Follow the voice prompts to leave a voice mail.
2.
Hang up to complete the voice mail.
Listening to Voice Mails
You can listen to your voice mails on the phone, to obtain a voice information sent by a contact.
Before You Begin
You need to set the voice mail code in advance.
Procedure
1. Go to More > Message.
2. Select View Voice Mail.
The phone screen displays the amount of new and old voice mails. You can tap the account to listen to voice
mails.
Tip: When The phone prompts that the phone receives a new voice mail, you can select Connect to dial out the voice mail
access code directly.
Related Topic
Setting the Voice Mail Code
Using the Hot Desking
You can use hot desking to log out from the current account and then log in to a new account. So many users can
share one phone resource at different times.
Note: Hot desking is not available on all servers. Contact your system administrator for more information.
Before You Begin
Your system administrator has set a Hot Desking key for you to use this feature. Get the login account information
from your system administrator.
Procedure

Advanced Call Features
59
1.
Tap the hot desking key from the Dsskey screen.
The phone prompts you to clear the account configuration or not.
2. Select OK.
Registration configurations of all accounts on the phone will be cleared immediately.
The login wizard will be displayed.
3.
Enter the login information.
4.
Select .

Directory
60
Directory
The phone provides several types of phone directories, which can be customized by your system administrator.
Topics
Local Directory
Blocklist
Remote Phone Book
Local Directory
You can store up to 1000 contacts and 48 groups in your local directory, you can search, add, edit and delete a con-
tact.
Topics
Managing the Local Directory Groups
Managing the Local Directory Contacts
Moving a Local Directory Contact to Blocklist
Searching for Contacts
Managing the Local Directory Groups
You can manage the Local Directory groups when the phone is idle.
Topics
Adding Contact Groups
Editing Contact Groups
Deleting Contact Groups
Adding Contact Groups
To organize your contacts and make them easier to find, you can add additional groups in the Local Directory.
Procedure
1.
Go to > Local Directory.
2.
Select after Custom Group.
3.
Enter the desired group name.
4. Select OK.
Editing Contact Groups
You can change or add the group's information.
Procedure
1.
Go to > Local Directory.
2.
Select after the desired group and then select Rename.
3.
Edit the group name.
4. Select OK.

Yealink CP965 User Guide
61
Deleting Contact Groups
When you delete a contact group, the contacts in the group will not be deleted. You can view the contacts in All
Contacts (Local Directory) list.
Procedure
1.
Go to > Local Directory.
2.
Select after the desired group and then select Delete.
The phone prompts you to delete the group or not.
3. Select OK.
Managing the Local Directory Contacts
You can manage the Local Directory contacts when the phone is idle.
Topics
Adding Contacts
Viewing Contacts
Editing Contacts
Deleting a Contact
Deleting All Contacts
Adding Contacts
When you add a contact to your Local Directory, you can choose how much information you want to enter for your
contact. You are required to enter a contact name at least for each new contact.
Procedure
1.
Select .
2. If you want to add a contact to the specified contact group, select Local Directory to select the desired contact
group.
3.
Select .
4.
Enter your contact's information.
5. Select the desired account from the Account field.
6. Select the desired photo from the Photo field.
7.
Select .
Viewing Contacts
You can view the local contacts from the Local Directory on your phone.
Procedure
1.
Select .
2. If you want to view a contact to the specified contact group, select Local Directory to select the desired contact
group.
The contact names are displayed in alphabetical order.
Editing Contacts
You can update your contacts' information.
Procedure

Directory
62
1.
Select .
2. If you want to view a contact to the specified contact group, select Local Directory to select the desired contact
group.
3.
Tap the desired contact and select .
4.
Edit the contact information.
5.
Select .
Deleting a Contact
You can delete any contact from the Local Directory.
Procedure
1.
Select .
2. If you want to delete a contact from the specified contact group, select Local Directory to select the desired con-
tact group.
3.
Tap the desired contact.
4. Select Delete.
The phone prompts you to delete the contact or not.
5. Select OK.
Deleting All Contacts
You can delete all contacts from the Local Directory.
Procedure
1.
Select .
2.
Long tap a contact.
3.
Tap the radio box in the top right of the screen.
4.
Select > Delete.
The phone prompts you to delete all contacts or not.
5. Select OK.
Moving a Local Directory Contact to Blocklist
You can move a contact in the Local Directory to blocklist. Incoming calls from this contact will be rejected auto-
matically.
Procedure
1.
Select .
2. If you want to select a contact to the specified contact group, select Local Directory to select the desired contact
group.
3.
Tap the desired contact.
4. Select Blocklist.
The phone prompts you to move this contact to the blocklist or not.
5. Select OK.
Searching for Contacts
In the Local Directory, you can enter search criteria to find your desired contact quickly.
Procedure

Yealink CP965 User Guide
63
1.
Select .
2.
Do one of the following:
l
Select .
Enter your search criteria in the search field.
l Select the desired letter (for example, T) along the right side to jump to contacts whose names start with T or t.
Blocklist
Incoming calls from the Blocklist are rejected automatically. You can store up to 30 contacts in the blocklist to block
unwanted callers.
Topics
Adding a Blocklist Contact
Viewing Blocklist Contacts
Editing a Blocklist Contact
Deleting a Blocklist Contact
Moving a Blocklist Contact to the Local Directory
Adding a Blocklist Contact
You can add a blocklist contact on the phone to prevent someone from calling you.
Procedure
1.
Go to > Local Directory > Blocklist.
2.
Select .
3.
Enter the blocklist contact’s information.
4.
Select .
Viewing Blocklist Contacts
You can view the blocklist contacts from the Blocklist on your phone.
Procedure

Directory
64
1.
Go to > Local Directory > Blocklist.
Editing a Blocklist Contact
You can update your blocklist contacts' information.
Procedure
1.
Go to > Local Directory > Blocklist.
2.
Tap the desired blocklist contact and select .
3.
Edit the blocklist contact information.
4.
Select .
Deleting Blocklist Contacts
You can delete one or all blocklist contacts. If a contact is removed from the blocklist, you can answer the call from
the contact normally.
Topics
Deleting a Blocklist Contact
Deleting All Blocklist Contacts
Deleting a Blocklist Contact
If you want to answer a call from a specific contact, you need to remove it from the Blocklist.
Procedure
1.
Go to > Local Directory > Blocklist.
2.
Tap the desired blocklist contact.
3. Select Delete.
The phone prompts you to delete the contact or not.
4. Select OK.
Deleting All Blocklist Contacts
You can delete all contacts from the Blocklist when you are ready to answer calls from them again.
Procedure
1.
Go to > Local Directory > Blocklist.
2.
Long tap a contact.
3.
Tap the radio box on the top-right of the screen.
4.
Select > Delete.
The phone prompts you to delete all contacts or not.
5. Select OK.
Moving a Blocklist Contact to the Local Directory
You can move a blocklist contact to a Local Directory. Incoming calls from this contact will not be rejected auto-
matically.
Procedure

Yealink CP965 User Guide
65
1.
Go to > Local Directory > Blocklist.
2.
Tap the desired blocklist contact and select .
3. Select Local Directory from the Group field.
4.
Select .
Remote Phone Book
If the Remote Phone Book feature has been enabled by your system administrator, you can access your corporate
directory directly from your phone.
Topics
Searching for Remote Phone Book Contacts
Viewing Remote Phone Book Contacts
Saving a Remote Phone Book Contact to the Local Directory
Saving a Remote Phone Book Contact to the Blocklist
Searching for Remote Phone Book Contacts
In the Remote Phone Book, you can enter search criteria to find your desired contact quickly.
Procedure
1.
Select > Local Directory > Remote Phone Book.
2.
Select the desired remote phone book.
3.
Do one of the following:
l
Select .
Enter your search criteria in the search field.
l Select the desired letter (for example, T) along the right side to jump to contacts whose names start with T or t.
Viewing Remote Phone Book Contacts
You can view the contact list of the remote phone book on your phone.
Procedure
1.
Select > Local Directory > Remote Phone Book.
Saving a Remote Phone Book Contact to the Local Directory
You can save any remote phone book contact to the Local Directory, to conveniently call this contact when you can-
not access the remote phone book.
Procedure
1.
Select > Local Directory > Remote Phone Book.
2.
Select the desired remote phone book.
3.
Tap the desired contact and select .
4. Select Add.
5. Select Local Directory from the Group field.
6.
Select .

Directory
66
Saving a Remote Phone Book Contact to the Blocklist
You can save any remote phone book contact to the Blocklist on the phone, to prevent this contact from calling you.
Procedure
1.
Select > Local Directory > Remote Phone Book.
2.
Select the desired remote phone book.
3.
Tap the desired contact and select .
4. Select Add.
5. Select Blocklist from the Group field.
6.
Select .

Call History
67
Call History
The call history list includes Missed Calls, Placed Calls, Received Calls and Forwarded Calls, and each list holds
100 entries.
Topics
Call History Icons
Viewing History Records
Saving a History Record to Local Directory
Saving a History Record to Blocklist
Deleting History Records
Disabling History Record
Call History Icons
Each icon in the Call History indicates the corresponding call history status.
Icons Description Icons Description
Received Call Missed Call
Placed Call Forwarded Call
Viewing History Records
The history record saves the call information such as the caller's name and number, local line and call duration.
Procedure
1.
Tap .
2. Tap Local Calls to select the desired list.
3.
Select after the desired entry.
Saving a History Record to Local Directory
To identify someone's call the next time, you can save a history record to the Local Directory.
Procedure
1.
Select .
2. Tap Local Calls to select the desired list.
3. Select > > Add.
4.
Edit the contact information.
5.
Select .
Saving a History Record to Blocklist
You can prevent someone from calling you again by saving a history record to Blocklist.
Procedure
1.
Tap .
2. Tap Local Calls to select the desired list.

Yealink CP965 User Guide
68
3. Select > Blocklist.
4.
Edit the contact information.
5.
Select .
Deleting History Records
You can delete one or all call records from the call history list.
Topics
Deleting a Call Record
Deleting All Call Records
Deleting a Call Record
You can delete any call record from the call history list.
Procedure
1.
Tap .
2. Tap Local Calls to select the desired list.
3. Select after the desired entry, and then tap Delete.
The phone prompts you to delete the record or not.
4. Select OK.
Deleting All Call Records
You can delete all call records from the call history list.
Procedure
1.
Select .
2. Select Local Calls to select the desired list.
3.
Long tap a contact.
4.
Tap the radio box on the top-right of the screen.
5. Select > Delete.
The phone prompts you to delete all the records or not.
6. Select OK.
Disabling History Record
If you disable history record, you cannot save any call log on the phone.
Procedure
1. Go to More > Settings > Features > History Record.
2. Turn off History Record.
3.
Select .

System Applications
69
System Applications
The system applications are pre-installed on your phone and they cannot be uninstalled.
Topics
Recorder
Browser
Clock
Recorder
You can use the Recorder to record audio and manage the recording.
During recording, you can mark specific moments so that you can quickly find and listen to them later. You can
record up to 12 hours in one file. The recording is saved in "*.amr" format with the name consisting of a prefix
“record@” and date & time stamp.
Topics
Recording Audio
Playing a Recorded Call
Pause/Resuming a Playback
Fast Forwarding/Rewinding a Playback
Stopping a Playback
Copying Recorded Audio to USB Flash Drive
Recording Audio
Renaming the Recording
Uploading a Recording to Server
Deleting a Recording
Deleting All Recordings
Checking Storage Space
Recording Audio
By default, the recorded audio is saved in the internal SD card. You can connect a USB flash drive to your phone,
and save the recorded audio to it.
Note: For more information on how to attach a USB flash drive, please refer to the Quick Start Guide for your phone on
Yealink Support.
Procedure
1. Go to More > Recorder.
2. If you have inserted a USB flash drive, tap USB to save the recorded audio to USB flash drive.
3.
Tap to start recording.
4.
Do one of the following:
l
Tap to pause the recording.
l
Tap to set a mark.
The icon changes to , the number will increase if you set more marks.
And there is a red flag on this moment when playing.
5.
Tap to end the recording and save the recording.
The recorded audio will be displayed on the right list automatically.
Playing a Recorded Call
You can browse and play back the recordings on your phone.

Yealink CP965 User Guide
70
The recorded calls saved in "*.aac" format and include a date & time stamp and the other party’s number/IP
address/name (or the first person’s number/IP address/name you called), for example, 20170515-1452-Tom was
created on May 15, 2017, at 14:52 and you have a call with Tom.
Tip: You can also play back the recorded calls on the phone or on a computer using an application compatible of playing
“.aac” files.
Procedure
1. Go to More > Recorder.
2. If you want to play the recorded audio saved in USB flash drive, tap USB.
3.
Tap before the desired recorded call to play the recorded call.
The length of the recording and a progress bar are displayed as the recording plays.
You can tap the Volume key to adjust the volume of audio output.
Pause/Resuming a Playback
When you receive an incoming call while playing a recording, the recording is paused automatically. You can
resume the playback after handling the call. You can also pause the recording manually at any time.
Procedure
1.
Tap to pause playing the recording. The icon appears on the phone screen.
2.
Tap to resume the playback.
Fast Forwarding/Rewinding a Playback
While a recorded file plays, you can fast forward or rewind the playback at any time.
Procedure
1.
Drag the slider to skip forward the playing or rewind the playing.
If you have set marks for the recorded audio, you can drag the slider to the position with a red flag to listen to the
marked moments.
Stopping a Playback
While a recording plays, you can stop playing it at any time.
Procedure
1.
Tap to stop the playing.
Copying Recorded Audio to USB Flash Drive
You can copy any recorded audio stored in Recorder application to your USB flash drive, as a result, you can view
it on PC or other devices.
Before You Begin
Before copying recorded audio to USB flash drive, you should connect a USB flash drive first.
Procedure
1. Go to More > Recorder.
2.
Tap after the desired recorded audio.
3. Tap Copy to USB.
If the recorded audio is copied successfully, the phone screen will prompt “Copy successfully”.

System Applications
71
The prompt “XX Copied” (XX indicates the date when the recorded audio is copied to the USB flash drive)
appears under the corresponding recorded audio.
Copying All Recorded Audio to USB Flash Drive
You can copy all recorded audio to your USB flash drive, as a result, you can view them on PC or other devices.
Before You Begin
Before copying recorded audio to USB flash drive, you should connect a USB flash drive first.
Procedure
1. Go to More > Recorder.
2. Tap Edit.
3.
Check the radio box on the top-left of the screen to select all recordings.
4. Tap Copy to USB.
The prompt “XX Copied” (XX indicates the date when the recorded audio is copied to the USB flash drive)
appears under the corresponding recorded audio.
Renaming the Recording
You can rename the recording for better recognition.
Procedure
1. Go to More > Recorder.
2. If you want to rename the recorded audio saved in USB flash drive, tap USB.
3.
Tap after the desired recording.
4. Tap Rename.
5.
Enter the desired file name.
6. Tap OK.
Uploading a Recording to Server
You can upload the local recording file to the server designated by the administrator.
Before You Begin
Your system administrator has enabled the recording upload feature for you.
Procedure
1. Go to More > Recorder.
2. If you want to delete the recorded audio saved in USB flash drive, tap USB.
3.
Tap after the desired recorded audio.
4. Tap Upload.
The file is uploaded to the server successfully with a prompt.
Deleting a Recording
You can delete local recordings or call recordings from Recorder. The local recording is named with a prefix
“record@” and date & time stamp, while the call recordings are named with the date & time stamp.
Procedure
1. Go to More > Recorder.

Yealink CP965 User Guide
72
2. If you want to delete the recorded audio saved in USB flash drive, tap USB.
3.
Tap after the desired recorded audio.
4. Tap Delete.
The phone prompts you whether to delete the audio.
5. Tap OK.
Deleting All Recordings
You can delete all the recording when you need additional space.
Procedure
1. Go to More > Recorder.
2. If you want to delete the recorded audio saved in USB flash drive, tap USB.
3. Tap Edit.
4.
Check the radio box on the top-left of the screen to select all recordings.
5.
Tap .
The phone prompts you whether to delete all the audio files.
6. Tap OK.
Checking Storage Space
You can check the total space or available space of the phone or connected USB flash drive.
Procedure
1. Select More > Recorder to launch the Recorder application.
2. If you want to check the storage space of the USB flash drive, select USB.
Browser
The use of Browser is similar to PC's web browser, which allows you to browse web pages, set bookmarks, set
home pages, clear history records, and so on.
Topics
Browsing a Web Page
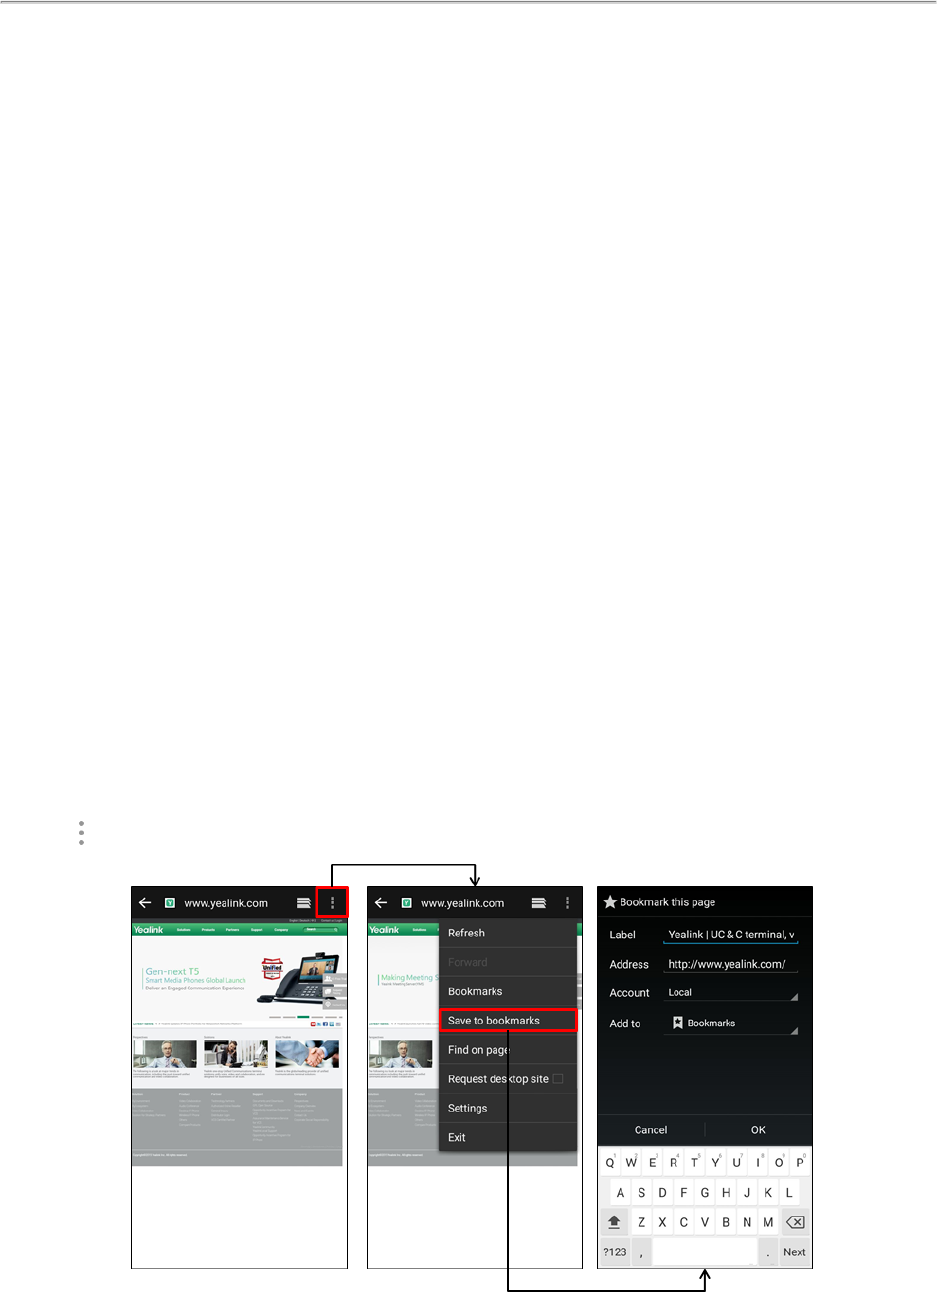
System Applications
73
Managing Bookmarks
Setting a Home Page
Clearing the Navigation History
Modifying the Browser Settings
Browsing a Web Page
You can use the Browser just like normal browsers to browse websites.
Procedure
1. Go to More > Browser.
2.
Enter a part of URL in the address input field of the browser.
The phone will automatically retrieve and list similar websites.
3. Tap the website you want to visit, or enter the full URL then tap Go on the onscreen keyboard to browse the web
page.
Managing Bookmarks
You can bookmark the web pages that you frequently visit.
Topics
Adding a Web Page to the Bookmarks Library
Accessing a Web Page from the Bookmarks Library
Editing a Bookmark
Deleting a Bookmark
Adding a Web Page to the Bookmarks Library
You can bookmark a web page so you can access it from the Bookmarks Library directly.
Procedure
1. Go to More > Browser.
2.
Access the web page you want to bookmark.
3.
Tap > Save to bookmarks.
4.
Edit the details of your bookmark.
5. Tap OK.

Yealink CP965 User Guide
74
The web page is added to the BOOKMARKS Library.
Accessing a Web Page from the Bookmarks Library
You can quickly visit the web page from the Bookmarks Library.
Procedure
1. Go to More > Browser.
2.
Tap > to access the BOOKMARKS list.
A list of web pages that you've bookmarked will appear.
3.
Tap the web page you want to visit.
Editing a Bookmark
You can edit the details of your bookmark for better recognition.
Procedure
1. Go to More > Browser.
2.
Tap > to access the BOOKMARKS list.
A list of web pages that you've bookmarked will appear.
3.
Long tap the bookmark you want to edit.
4. Tap Edit bookmark in the pop-up dialog box.
5.
Edit the bookmark.

System Applications
75
6. Tap OK.
Deleting a Bookmark
When you do not need the bookmark any more, you can delete it.
Procedure
1. Go to More > Browser.
2.
Tap > to access the BOOKMARKS list.
All pre-configured bookmarks are in the list.
3.
Long tap the bookmark you want to delete.
4. Tap Delete bookmark in the pop-up dialog box.
5. Tap OK.
Setting a Home Page
You can set the web page you visit most frequently as the home page. This web page opens automatically each
time you open the browser.
Procedure
1. Go to More > Browser.
2.
Tap > Settings > General > Set homepage.
3.
Tap the web page you want to set as the home page in the pop-up dialog box.
Tip: You can also long tap a web page in BOOKMARKS list and then tap Set as homepage.
Clearing the Navigation History
You can periodically clear your navigation history to protect your privacy and prevent information disclosure.
Procedure
1. Go to More > Browser.
2.
Go to > Settings > Privacy & security > Clear history.
The phone screen prompts you to delete the browser navigation history or not.
3. Tap OK.

Yealink CP965 User Guide
76
Modifying the Browser Settings
You can modify the browser settings to customize your Browser.
Procedure
1. Go to More > Browser.
2.
Tap > Settings.
3.
Customize the browser style you prefer.
Clock
You can use the Clock to check the time of other cities in the world.
Procedure
1.
Tap the digital clock from the Home screen.
2.
Tap .
3.
Drag up and down to scroll through the cities.
4.
Select the check box before the desired city.
5.
Tap to return to the clock screen.
The added clock of the desired city displays on the phone screen.

Customizing Your Phone
77
Customizing Your Phone
You can make your phone more personalized by customizing various settings.
Topics
Changing the Administrator Password
Wallpaper
Screen Saver
Changing the Screen Backlight and Time
Changing the Language
Changing the Input Method
Time & Date
Phone Lock
Line Keys
Changing the Administrator Password
By default, you require an administrator password to access the Advanced/Advanced Settings menu. The default
password is “admin”. For security reasons, you should change the default password as soon as possible.
Note: If you do not change the default password, the phone displays a warning icon in the status bar.
Procedure
1. Go to More > Settings > Advanced > Set Password.
2.
Enter your old and new password information.
3.
Select .
Related Topic
Investigating Warnings
Wallpaper
You can change the background picture that is displayed on your phone.
The phone comes with a default background picture, you can change it to another built-in picture. You can also use
a custom picture uploaded by your system administrator as the wallpaper.
Topic
Changing Wallpaper on Idle Screen
Changing Wallpaper on Idle Screen
You can set one of your pictures as the background image on your phone's idle screen.
Procedure
1. Go to More > Settings > Basic > Display > Wallpaper.
2.
Select the desired image.
3. Select Set wallpaper.

Yealink CP965 User Guide
78
Screen Saver
The screen saver starts automatically when your phone has been idle for the preset waiting time. You can stop the
screen saver by touching the screen or tapping any key.
Topics
Changing the Waiting Time for Screen Saver
Setting the Screen Saver Type
Changing the Waiting Time for Screen Saver
You can set the waiting time after no activity before displaying the screen saver.
Procedure
1. Go to More > Settings > Basic > Display > Screen Saver.
2. Select the desired waiting time from the Screensaver Waiting Time field.
3.
Select .
Setting the Screen Saver Type
The screen saver can start with different types and you can set it manually.
Your phone supports four screen saver types: Clock, Colours, Photo Frame and Photo Table.
Procedure
1. Go to More > Settings > Basic > Display > Screen Saver.
2.
Select the desired screen saver type.
3.
Select .
Changing the Screen Backlight and Time
You can change the brightness of the phone screen during phone activity and inactivity.
Active Level: The intensity of the phone screen when the phone is active.
Backlight Time: The delay time to change the brightness of the phone screen when the phone is inactive. Backlight
time includes the following settings:
l
Always On: Backlight is on permanently.
l
30min, 1h, 2h,4h, 6h, 8h or 12h: Backlight is changed when the phone is inactive after the designated time.

Customizing Your Phone
79
Procedure
1.
Swipe down from the top of the screen.
2.
Do one of the following:
l Drag the backlight slider.
When dragging the slider, the control center (except the backlight slider) and notification center will be hid-
den. You can view the intensity changes of the phone screen in real-time.
If you lift your finger, the control center and notification center will be shown again.
Tip: You can only change the screen intensity during phone activity on the control center. To change the backlight time, go to
More > Settings > Basic > Display > Backlight.
Changing the Language
Your phone supports several languages that you can choose to use on the phone.
Contact your system administrator to find out exactly which languages are supported on your phone.
Procedure
1. Go to More > Settings > Basic > Language & Input > Language.
2.
Select the desired language.
3.
Select .
The phone language is changed to the selected one.
Changing the Input Method
The phone supports two kinds of input methods: English (UK) and 谷歌拼音输入法. The default input method is
English (UK). You can change the currently used input method.
Procedure
1. Go to More > Settings > Basic > Language & Input > Current Input.
2.
Select the desired input method.
You can also long tap the space key on the onscreen keyboard to change the input method.

Yealink CP965 User Guide
80
Time & Date
You can set the time and date manually. The time and date formats are also variable.
Topics
Setting the Time and Date Manually
Changing the Time and Date Format
Setting the Time and Date Manually
If your phone cannot obtain the time and date automatically, you can set it manually.
Procedure
1. Go to More > Settings > Basic > Time & Date > General.
2.
Edit the date and time.
3.
Select .
The time and date set on the phone will be changed accordingly.
Note: After the phone reboots, it will be forcibly switched to obtain the time and date from the NTP server.
Changing the Time and Date Format
You can set the phone to display the time in 12-hour format or 24-hour format. You can also change the date format,
including the options to display the day (D), month (M), and year (Y).
Note: Your system administrator can customize the date format.
Procedure
1. Go to More > Settings > Basic > Time & Date > Time & Date Format.
2.
Select the desired time format or date format.
3.
Select .
Phone Lock
Phone lock helps you protect your phone from unauthorized use.
Topics

Customizing Your Phone
81
Setting the Phone Lock
Setting a Phone Lock Key
Locking Your Phone Manually
Unlocking Your Phone
Changing Your Phone Unlock PIN
Setting the Phone Lock
You can manually lock the phone or wait a specified time to automatically lock the phone.
When your phone is locked, you can:
l Dial emergency numbers.
l Reject incoming calls.
l Answer incoming calls.
l End the call.
Procedure
1. Go to More > Settings > Advanced (default password: admin) > Phone Lock.
2. Enter the desired PIN (default PIN: 123) in the Unlock PIN field.
3.
Select .
4. Select Enabled from the Lock Enable field.
5. Enter the desired interval (0 - 3600 seconds) in the Auto Lock field.
6.
Select .
Note: Ask your system administrator for the password if you cannot access Advanced/Advanced Settings menu.
Setting a Phone Lock Key
You have to set a phone lock key manually to lock your phone.
Procedure
1. Tap Dsskey.
2. Drag the desired line key to the Edit field.
3. Select Key Event from the Type field.
4. Select Phone Lock from the Key Type field.
5. (Optional.) Enter the string that will display on the phone screen in the Label field.
6.
Select .
Locking Your Phone Manually
You can lock the phone manually before the phone is automatically locked.
Before You Begin
Make sure that the phone lock is set and you have set a phone lock key.
Procedure
1.
Tap the phone lock key.
The lock icon appears on the phone screen.
Related Topics
Setting the Phone Lock
Setting a Phone Lock Key

Yealink CP965 User Guide
82
Unlocking Your Phone
You can use an unlock PIN to unlock the phone.
If you forget the unlock PIN, you can enter the administrator password to unlock your phone, and then automatically
access the PIN change screen.
Procedure
1.
Tap the screen or tap the Mute touch key, the phone prompts you to enter an unlock PIN.
2. Enter the desired PIN (default: 123) in the Unlock PIN field.
3. Select OK.
The lock icon disappears from the phone screen.
Changing Your Phone Unlock PIN
The default unlock PIN is “123”. For security reasons, you should change the default unlock PIN as soon as pos-
sible.
Procedure
1. Go to More > Settings > Basic > Change PIN.
2.
Enter your old and new unlock PIN respectively.
The unlock PIN length must be within 15 digits.
3.
Select .
Line Keys
Line keys allow you to quickly access features such as recall and speed dial. The line key can indicate the mon-
itored status when the line keys are assigned with particular features, such as BLF.
You can assign predefined functions to line keys. You can also define a label for a line key feature which will
appear on the phone screen.
Topics
Assigning Functionality to a Line Key
Changing the Locations of the Line Keys
Deleting a Line Key
Assigning Functionality to a Line Key
You can assign functions to a line key, as a result, you can access this function quickly by tapping this line key.
Procedure
1.
Do one of the following:
l
Tap on the top-right of the line key list.

Customizing Your Phone
83
l
Go to More > Settings > Features > Dsskey.
Tap the desired line key.
2. Select the desired key type from the Type field.
3.
Configure the settings for the corresponding key type.
4.
Select .
Changing the Locations of the Line Keys
You can change the order in which your line keys display on the phone screen.
Procedure
1.
Tap the desired page key if required.
2.
Drag a line key to the desired location at which another line key locates.
For example, exchange the locations of line key 1 and line key 2:
Deleting a Line Key
You can delete a line key when you no longer need the corresponding function.
Procedure
1. Drag the desired line key to the Delete field.
The phone prompts you to delete the DSS key or not.
2. Select OK.

Audio Settings
84
Audio Settings
You can change the basic audio settings on your phone.
Topics
Adjusting the Volume
Setting the Ring Tone
Disabling the Key Tone
Enabling Touch Tone
Configuring Notification Sound
Enabling Silent Mode
Adjusting the Volume
You can adjust the volume of the ringer, media, and audio during a call.
Procedure
1.
Press the Volume touch key.
Setting the Ring Tone
You can set distinctive ring tones for groups or contacts in your Local Directory so that you can identify the caller
when your phone rings.
The ring tones are used according to this priority: Contact ring tone>Group ring tone>Account ring tone >Phone ring
tone.
Topics
Setting a Ring Tone for the Phone
Setting a Ring Tone for an Account
Setting a Ring Tone for a Group
Setting a Ring Tone for a Contact
Setting a Ring Tone for the Phone
You can choose a ring tone for all incoming calls.
Procedure
1. Go to More > Settings > Basic > Sound > Ring Tones > Common.
2.
Select the desired ring tone.
3.
Select .
Setting a Ring Tone for an Account
You can select a unique ring tone for an individual account.
Procedure
1. Go to More > Settings > Basic > Sound > Ring Tones > Common.
2.
Select the desired account.
3.
Select the desired ring tone.
If Common is selected, this account will use the ring tone selected for the phone.
4.
Select .

Yealink CP965 User Guide
85
Setting a Ring Tone for a Group
You can select a unique ring tone for various groups in your Local Directory.
Note: You can only set a ring tone for a group that is added manually.
Procedure
1.
Select > Local Directory.
2.
Select after the desired group, and then select Ring.
3.
Select the desired ring tone.
If Auto is selected, this group uses the ring tone according to the default priority.
If a specific ring tone is selected, this group uses the ring tone according to the priority: Contact ring tone>Group
ring tone.
4. Select OK.
Setting a Ring Tone for a Contact
You can select a unique ring tone for various contacts in your Local Directory. This helps you quickly identify callers
according to the ring tones.
Procedure
1.
Select .
2. Select Local Directory to select the desired contact group.
3.
Tap the desired contact and select .
4. Select the desired ring tone from the Ring field.
If Auto is selected, the contact uses the ring tone according to the default priority.
5.
Select .
Disabling the Key Tone
If you disable the key tone, the phone will not produce a sound when tapping the keypad keys.
Procedure
1. Go to More > Settings > Basic > Sound > Key Tone.
2. Turn off Key Tone.
3.
Select .
Enabling Touch Tone
If you enable touch tone, the phone will produce a sound when you tap an option on the phone screen.
Procedure
1. Go to More > Settings > Basic > Sound > Touch Tone.
2. Turn on Touch Tone.
3.
Select .
Configuring Notification Sound
The phone will produce a notification sound when receiving a notification (for example, incoming email notification).

Audio Settings
86
Procedure
1. Go to More > Settings > Basic > Sound.
2. Tap the desired notification sound from the Notification Sound field.
3. Select OK.
4.
Select .
Enabling Silent Mode
If you turn on the silent mode, your phone won't produce a ring tone/key tone/touch sound/notification sound from
phone's speaker.
Procedure
1.
Do one of the following:
l
Go to More > Settings > Basic > Sound.
Turn on Silent Mode and then select .
l Long tap the left Volume touch key to decrease the ringer volume to the minimum.
l
Swipe down from the top of the screen and toggle Silent on.
Note: You may have no permission to turn on the silent mode. Contact your system administrator for more information.

Using Your Phone with PC
87
Using Your Phone with PC
When connected to the PC, the phone acts as a speaker and microphone during calls.
From your phone, you can do the following:
l Manage the audio from calls or media played on your PC.
l Merge phone calls, the PC and connected mobile phone into a hybrid UC conference. For more information,
refer to Creating a Hybrid UC Conference.
l Answer calls from the softphone.
Topics
Connecting the PC to the Phone
Setting the Phone as PC Audio Device
Holding/Resuming the PC Audio
Muting or Unmuting the Microphone
Connecting the PC to the Phone
You can connect the PC to the phone for playing the PC audio.
Procedure
1.
Connect the phone to a PC using a Type C USB cable.
l When your phone is idle, the phone screen is shown below:
You can select Enter mixed-conference mode to enter the hydride mode, as shown below:

Yealink CP965 User Guide
88
l When there is a call or conference call on your phone, the original call or conference call is placed on hold.
Setting the Phone as PC Audio Device
By default, the PC automatically selects the connected phone as the audio device. If not, you may have to set the
phone as PC audio device via softphone or PC.
Topics
Setting the Phone as PC Audio Device via Softphone
Setting the Phone as PC Audio Device via PC
Setting the Phone as PC Audio Device via Softphone
When your PC is connected to the phone, you can set the phone as PC audio input and output device via the soft-
phone.
Procedure

Using Your Phone with PC
89
1.
In the top-left corner of the window, click the avatar icon to enter the settings window.
2. Click Device.
3. Select your phone from the drop-down menu of Speaker.
4. Select your phone from the drop-down menu of Microphone.
5. (Optional) Click Test to test the microphone or the speaker.
Setting the Phone as PC Audio Device via PC
When your PC is connected to the phone, you can set the phone as the PC default audio device via PC.
Procedure
1. Click Start > Control Panel > Sound.
2. Click Echo Cancelling Speakerphone and click Set as Default Device.
3. Click Microphone and click Set as Default Device.
4. Click OK.
Holding/Resuming the PC Audio
When you place the PC audio on hold, you cannot hear any audio on your phone.
Procedure
1. Select Hold.
2. Select Resume to resume the PC audio.
Muting or Unmuting the Microphone
When you mute the microphone during a call, the other party cannot hear you but you can hear other parties.
Procedure
1. Select Mute or tap the Mute touch key.
The mute touch key LED indicators glow red. The phone screen indicates that the audio is muted.
2. Select Mute or tap the Mute touch key again to unmute the microphone.

Yealink CP965 User Guide
90
Using the CP Wireless Microphone CPW25/CPW65
(Coming Soon)
The Yealink CPW25/CPW65 is a CP Wireless Expansion Mic which works as an audio input device for CP965
phone. It features superior audio technology and supports 360-degree voice pickup range at a radius of up to 10
feet (3 meters) without any wiring troubles.
Topics
CPW25/CPW65 LED Instructions
Charging the CPW25/CPW65
Turning the CPW25/CPW65 On or Off
Registering the CPW25/CPW65
Registering the CPW25/CPW65 with another Phone
Unregistering the CPW25/CPW65
Muting or Unmuting the CPW25/CPW65
Viewing CPW25/CPW65 Information
Finding the CPW25/CPW65
CPW25/CPW65 LED Instructions
The CPW25/CPW65 LED indicator indicates the call, register, and battery’s system status.
Mute button LED indicator on the wireless expansion microphone CPW25/CPW65:
LED Status Description
Solid green
The phone enters the dialing screen.
The phone is in a call and unmuted.
Fast flashing red The phone is receiving an incoming call.
Solid red The phone is muted.
Fast flashing yellow The CPW25/CPW65 is in the registration mode.
Slowly flashing yellow
The CPW25/CPW65 has registered with the phone, but the CPW25/CPW65 is out of
range.
The CPW25/CPW65 has registered with the phone, but the phone is turned off.
Flashing red and
green alternately
The phone is searching for the CPW25/CPW65 which has registered with it.
Off The CPW25/CPW65 is in the idle mode.
Battery LED indicator on the wireless expansion microphone CPW25/CPW65:
LED Status Description
Solid green for one second
and then off
The CPW25/CPW65 is turned on.
Solid green for 3 seconds
and then off
The CPW25/CPW65 is in the idle mode.
Solid green The CPW25/CPW65 is fully charged.
Solid red The CPW25/CPW65 is being charged.
Fast flashing red 3 times and
then off
The battery capacity is too low to turn on the CPW25/CPW65.
Slowly flashing red The battery capacity is less than 10%.

Using the CP Wireless Microphone CPW25/CPW65 (Coming Soon)
91
LED Status Description
Off
If you tap the mute button, the battery LED indicator on the CPW25/CPW65 is still off,
it means the CPW25/CPW65 is turned off.
Charging the CPW25/CPW65
The phone can power to the USB port, so you can directly charge the CPW25/CPW65 on the phone.
If it is the first time you use the CPW25/CPW65, you need to fully charge the CPW25/CPW65 for normal use. If the
CPW25/CPW65 is not in use, we recommend you charge the CPW25/CPW65 even when the battery is full.
Procedure
1.
Put the CPW25/CPW65 on the charging cradle.
2.
Connect the charging cradle to the USB port on the phone using a USB cable.
During charging, the battery LED indicator on the CPW25/CPW65 glows solid red. When the battery capacity
reaches 100%, the battery LED indicator on the CPW25/CPW65 will glow solid green.
Note: If your system administrator disables the USB port of the phone, the phone cannot power to the USB port.
Turning the CPW25/CPW65 On or Off
To use the CPW25/CPW65 as the external audio input device, you need to turn the CPW25/CPW65 on first.
Procedure
1.
You can do the following to turn on the CPW25/CPW65:
l Put the CPW25/CPW65 on a charging cradle or connect to the charging cable, the CPW25/CPW65 starts up
automatically.
l
If you do not charge the CPW25/CPW65, long tap on the CPW25/CPW65 for 3 seconds.
The battery LED indicator glows green for one second and then goes out.
2.
To turn off the CPW25/CPW65, long tap on the CPW25/CPW65 until the battery LED indicator glows red for
3 seconds and then goes out.
Note: When the battery is below 10%, the battery LED indicator flashes red, and it will automatically shut down after 10
minutes of standby; when the low battery reaches 0%, it will automatically shut down.
Registering the CPW25/CPW65
To ensure good voice quality of the calls on the phones, you can register CPW25/CPW65 with the phone to use the
CPW25/CPW65 as the external audio input device.
Note: If you buy CP965-WirelessMic, the CPW65 is registered with the phone by default.
Procedure
1. Go to More > MIC.
2. Select OK when the phone prompts you that turning on the Bluetooth microphone will turn off Bluetooth.
3.
Select to search for CPW25/CPW65.
4.
Turn on the CPW25/CPW65.
The CPW25/CPW65 will enter the registration mode automatically. And the mute LED indicator on the
CPW25/CPW65 fast flashes yellow.
The CPW25/CPW65 registers with the phone automatically. If the registration is successful, the mute LED indic-
ator on the CPW25/CPW65 goes out and phone screen prompts the CPW25/CPW65 information: battery, work
time and standby time.

Yealink CP965 User Guide
92
Registering the CPW25/CPW65 with another Phone
When you no longer want to register with the current phone, you can register the CPW25/CPW65 with another
phone.
CPW25/CPW65 can only be registered with one phone at a time, if you register the CPW25/CPW65 to another
phone, the CPW25/CPW65 will deregister from the previous phone automatically.
Procedure
1. Go to More > MIC.
2. Turn on Bluetooth MIC.
3. Select OK when the phone prompts you that turning on the Bluetooth microphone will turn off Bluetooth.
4.
Select to search for CPW25/CPW65.
5.
Put the CPW25/CPW65 on the charging cradle or connect to the charging cable and make sure it is charging.
6.
Long tapthe on the CPW25/CPW65 for 5 seconds.
The CPW25/CPW65 enters the registration mode. And the mute LED indicator on the CPW25/CPW65 fast
flashes yellow.
The CPW25/CPW65 registers with the phone automatically.
Unregistering the CPW25/CPW65
When you no longer need the CPW25/CPW65 as the external audio input device, you can unregister it.
Procedure
1. Go to More > MIC.
2. Select the desired microphone and then select Detail.
3. Select Unbind.
Muting or Unmuting the CPW25/CPW65
During the call, you can mute or unmute the CPW25/CPW65 at any time.
Procedure

Using the CP Wireless Microphone CPW25/CPW65 (Coming Soon)
93
1.
Tap to mute the call.
The mute LED indicator glows red. And the icon appears in the status bar of the phone.
2.
Tap again to unmute the call.
The mute LED indicator glows green. And the icon disappears from the status bar of the phone.
Viewing CPW25/CPW65 Information
When the CPW25/CPW65 is registered with the phones, you can view CPW25/CPW65 status on the phone.
Available information of CPW25/CPW65 includes:
l Register status
l MIC Model
l MICPOD MAC
l Battery
l Standby Time
l Work Time
Procedure
1. Go to More > MIC.
2. Select Detail from the desired microphone block.
Finding the CPW25/CPW65
You can find the CPW25/CPW65 which has registered with the phone.
Procedure
1. Go to More > MIC.
2. Select Find from the desired microphone block.
The mute key LED indicator on the registered CPW25/CPW65 flashes red and green alternately.

Using Star Connection Feature
94
Using Star Connection Feature
You can deploy up to four CP965 phones in a star layout. In the star connection group, one phone acts as a primary
phone, while other phones act as the subsidiary phones.
The primary phone keeps all features, while the subsidiary phones only sync some key features of the primary
phone, such as DND and call mute. After connecting, the subsidiary phones are mainly used to work as speakers or
microphones.
Before You Begin
Make sure all the phones are deployed in the same subnet. And all the phones are running the same firmware ver-
sions. You cannot activate Wi-Fi when using star connection feature.
Topics
State Indicator of CP965 Star Connection
Configuring the Primary Phone
Configuring the Subsidiary Phone
State Indicator of CP965 Star Connection
The state indicator indicates the current status of the CP965 star connection.
Icons Description
The subsidiary phone is disconnected from the primary phone.
The star connection group is set up, but there are no subsidiary phones in the
star connection group.
n
The number of the subsidiary phones connected successfully is less than the
maximum number of subsidiary phones in a star connection group. "n" indic-
ates the number of connected subsidiary phones.
n
All the subsidiary phones in the star connection group are connected suc-
cessfully. "n" indicates the number of connected subsidiary phones.
Configuring the Primary Phone
You can set up a star connection group, remove any subsidiary phone, and dissolve a star connection group. You
can also quickly find a subsidiary phone.
Topics
Setting Up a Star Connection Group
Sending Broadcast from Primary Phone
Removing a Subsidiary Phone
Dissolving a Star Connection Group
Finding a Subsidiary Phone
Stop Finding a Subsidiary Phone
Setting Up a Star Connection Group
If your system administrator has not specified your phone as a primary phone, you need to manually create a star
connection group on your phone.
Procedure
1. Go to More > Settings > Advanced (default password: admin) > CP Star Connection > Create Group.
The phone automatically generates a four-digit PIN number and sends the broadcast.
After the subsidiary phones join the star connection group, a star connection icon appears in the status bar.

Yealink CP965 User Guide
95
Related Topic
Sending Broadcast from Primary Phone
Sending Broadcast from Primary Phone
You can make the primary phone send broadcast for waiting for other subsidiary phones to join the star connection
group.
Procedure
1. Go to More>Settings > Advanced (default password: admin) > CP Star Connection > Start Broadcast.
The phone automatically generates a four-digit PIN number and sends the broadcast.
Related Topic
Setting Up a Star Connection Group
Removing a Subsidiary Phone
You can remove a subsidiary phone from the star connection group.
Procedure
1. Go to More > Settings > Advanced (default password: admin) > CP Star Connection.
2.
Select the desired subsidiary phone.
3. Select Remove.
The phone prompts you to remove the subsidiary phone or not.
4. Select OK.
The subsidiary phone is removed from the star connection group successfully.
Dissolving a Star Connection Group
You can dissolve a star connection group when the phone no longer needs the connection.
Procedure
1. Go to More > Settings > Advanced (default password: admin) > CP Star Connection.
2.
Tap the primary phone icon.
3. Select Dissolve Group.
The phone prompts you to dissolve the star connection group or not.
4. Select OK.
The phone dissolves the star connection group successfully.
Finding a Subsidiary Phone
You can find which subsidiary phones join the star connection group on the primary phone.
Procedure
1. Go to More > Settings > Advanced (default password: admin) > CP Star Connection.
2.
Tap the desired subsidiary phone.
3. Select Find.
The primary phone will automatically find the subsidiary phone in your area.
The subsidiary phone will play the ring tone, and the mute key LED indicators on the phone flash green and red
alternately.
Related Topics
Setting Up a Star Connection Group

Using Star Connection Feature
96
Joining a Star Connection Group
Stop Finding a Subsidiary Phone
Stop Finding a Subsidiary Phone
If you find your subsidiary phone, you can manually stop finding the subsidiary phone on the primary phone.
Procedure
1. Select Exit on the primary phone.
The subsidiary phone will stop ringing.
Tip: You can also stop finding a subsidiary phone by tapping any touch key on the subsidiary phone.
Configuring the Subsidiary Phone
You can join a star connection group and quit the star connection group on the subsidiary phone. You can also
quickly find a primary phone.
Topics
Joining a Star Connection Group
Quitting a Star Connection Group
Finding a Primary Phone
Stop Finding a Primary Phone
Joining a Star Connection Group
You can join your phone to a star connection group as a subsidiary phone.
Before You Begin
The primary phone has set up a star connection group and is in broadcast status.
Procedure
1. Go to More > Settings > Advanced (default password: admin) > CP Star Connection > Search Group.
The phone will automatically search for broadcasts sent by the primary phone in your area.
2. Select Join.
3.
Enter the PIN number displayed on the primary phone.
After reboot, the phone joins the star connection group successfully.
The star connection name (for example, CP965-S1) is displayed on the idle screen, and a star connection icon
appears in the status bar.
Note: One CP965 phone can only join one star connection group.
Related Topics
Setting Up a Star Connection Group
Sending Broadcast from Primary Phone
Quitting a Star Connection Group
When you need use your phone as a normal conference phone, you can quit a star connection group.
Procedure
1. Go to More > Settings > Advanced (default password: admin) > CP Star Connection.
2.
Tap the desired subsidiary phone.
3. Select Quite Group.
The phone prompts you to quit the star connection group or not.

Yealink CP965 User Guide
97
4. Select OK.
After reboot, the phone quits the star connection group successfully.
Finding a Primary Phone
You can confirm the actual location of the primary phone on any subsidiary phone.
Procedure
1. Select Find Primary.
The subsidiary phone will automatically find the primary phone in your area.
The primary phone will play the ring tone, and the mute key LED indicators on the phone flash green and red
alternately.
Related Topics
Joining a Star Connection Group
Stop Finding a Primary Phone
Stop Finding a Primary Phone
If you find your primary phone, you can manually stop finding at any time.
Procedure
1. Select Exit on the subsidiary phone.
The primary phone will stop ringing.
Tip: You can also stop finding a primary phone by tapping any touch key on the primary phone.

Connecting a Mobile Phone Using Bluetooth
98
Connecting a Mobile Phone Using Bluetooth
Bluetooth enables low-bandwidth wireless connections within a range of 10 meters (32 feet). The best performance
is in the 1 to 2 meters (3 to 6 feet) range.
You can pair and connect the Bluetooth-enabled mobile phone with your phone. After connection, you can do the
following:
l Make and receive mobile calls on the phone
l Use the phone as a Bluetooth speaker for music played on your mobile phone.
l Merge the calls on your phone, the PC and connected mobile phone into a hybrid UC conference (refer to Creat-
ing a Hybrid UC Conference).
Note: Not all mobile phones support this feature. Contact your system administrator for more information.。
Tip: You can also connect a PC (operation system: macOS and Window10) via Bluetooth. After connection, you can
place/answer a call via a softphone installed on PC using the phone.
Topics
Activating the Bluetooth Mode
Pairing and Connecting the Bluetooth-enabled Mobile Phone
Syncing the Mobile Contacts to the Phone
Handling a Mobile Phone Call on the Phone
Configuring the Phone Audio Feature
Configuring the Media Audio Feature
Renaming the Paired Bluetooth-enabled Mobile Phone
Disabling Bluetooth Device Discovery
Changing Your Phone's Bluetooth Name
Unpairing the Mobile Phone
Disconnecting the Bluetooth-enabled Mobile Phone
Deactivating the Bluetooth Mode
Activating the Bluetooth Mode
You should activate the Bluetooth mode first when you need to connect the Bluetooth device to your phone.
Procedure
1.
Do one of the following:
l Swipe down from the top of the screen.
l
Select .
l
Go to More > Settings > Basic > Bluetooth.
2.
Turn on the Bluetooth.
The phone automatically scans the available Bluetooth devices in your area.
The Bluetooth icon appears in the status bar.
Pairing and Connecting the Bluetooth-enabled Mobile Phone
You can pair up with countless mobile phones with your phone but only one mobile phone can be connected at a
time.
After connection, the phone will automatically find an available line key and assign the line key for Mobile Account.
The Mobile Account key’s default label is “My Mobile”. If there is no available line key, you can assign it manually.
Before You Begin
Make sure that the Bluetooth-enabled mobile phone is discoverable.

Yealink CP965 User Guide
99
Procedure
1. Go to More > Settings > Basic > Bluetooth.
2.
Select to search for the mobile phone.
3.
Tap the desired Bluetooth-enabled mobile phone.
4. Select Pair on both mobile phone and phone.
The connection will be completed successfully with a prompt appears under the Bluetooth-enabled mobile
phone name.
And the phone automatically assigns a Mobile Account key.
Related Topic
Activating the Bluetooth Mode
Syncing the Mobile Contacts to the Phone
You can sync mobile contacts to your phone. Then you can view a contact without accessing your mobile phone.
Note: Not all mobile phones support syncing the mobile contacts to phone. For more information, contact your system admin-
istrator.
Topics
Enabling the Mobile Contacts Sync Feature
Viewing Your Mobile Contacts
Enabling the Mobile Contacts Sync Feature
You can choose to enable the phone to sync the mobile contacts.
Before You Begin
Make sure that the Bluetooth-enabled mobile phone is paired and connected to your phone and the phone audio
feature is enabled.
Procedure
1. Go to More > Settings > Basic > Bluetooth.
2.
Tap after the desired Bluetooth-enabled mobile phone name.
3. Select Mobile Contacts Sync.
You need to authorize the phone to synchronize the contacts temporarily on the mobile phone first, and then the
mobile contacts directory will appear in the phone directory list.
Related Topics
Pairing and Connecting the Bluetooth-enabled Mobile Phone
Configuring the Phone Audio Feature
Viewing Your Mobile Contacts
You can view a list of mobile contacts on the phone.
Before You Begin
Make sure that the mobile contact sync feature is enabled.
Procedure
1.
Go to > Mobile Contacts.

Connecting a Mobile Phone Using Bluetooth
100
Related Topic
Enabling the Mobile Contacts Sync Feature
Handling a Mobile Phone Call on the Phone
You can handle a mobile phone call on your phone, the phone acts as a hands-free device for your mobile phone.
The call information appears on both your phone and mobile phone screen. You can control the call’s audio to go
through the mobile phone or phone on your mobile phone. If you choose Bluetooth, the audio will go through the
phone; if you choose Handset earpiece or Speaker, the audio will go through the mobile phone.
Before You Begin
Make sure that the Bluetooth-enabled mobile phone is paired and connected to your phone, and the phone audio
feature is enabled.
Procedure
1.
Do the following on the phone:
l
Place a call. Tap the Mobile Account line key first, and then place a call or multiple calls to the mobile con-
tacts.
l Answer a call. An incoming call to your mobile phone is also shown on the phones, you can answer the call
on the phone. The phone will firstly match the contacts in the mobile contacts directory to present the caller
identity.
l During the call, you can hold/resume, mute/unmute or end the call on the phone.
Related Topics
Pairing and Connecting the Bluetooth-enabled Mobile Phone
Configuring the Phone Audio Feature
Configuring the Phone Audio Feature
After connecting your Bluetooth-enabled mobile phone, the phone acts as a hands-free device for your mobile
phone. The call is made through your mobile phone, but the audio is present and the call control is done by the
phone.
Procedure
1. Go to More > Settings > Basic > Bluetooth.
2.
Select after the desired Bluetooth-enabled mobile phone name.
3. Turn on Phone audio.
4.
Select .
Related Topics
Pairing and Connecting the Bluetooth-enabled Mobile Phone
Handling a Mobile Phone Call on the Phone
Configuring the Media Audio Feature
After connecting your Bluetooth-enabled mobile phone, you can enable the media audio feature to stream
Bluetooth-enabled mobile phone audio to SIP phone. Then the SIP phone acts as the Bluetooth-enabled mobile
phone player.
Procedure

Yealink CP965 User Guide
101
1. Go to More > Settings > Basic > Bluetooth.
2.
Select after the connected Bluetooth-enabled mobile phone name.
3. Turn on Media audio.
4.
Select .
Related Topic
Pairing and Connecting the Bluetooth-enabled Mobile Phone
Renaming the Paired Bluetooth-enabled Mobile Phone
You can rename the paired Bluetooth-enabled mobile phone, so that you can easily recognize it.
Procedure
1. Go to More > Settings > Basic > Bluetooth.
2.
Select after the connected mobile phone name.
3. Enter the desired device name in the Rename field.
4.
Select .
The configured mobile phone name will display in the Paired devices list on your phone. The mobile phone
name displayed in the scanning list of other devices will not be changed.
Related Topic
Pairing and Connecting the Bluetooth-enabled Mobile Phone
Disabling Bluetooth Device Discovery
After the Bluetooth is activated, the phone is automatically placed in Open Discover mode to make it visible to other
Bluetooth devices.
You can choose to disable this feature to not allow your phone to show as an available device on other Bluetooth
devices.
Procedure
1. Go to More > Settings > Basic > Bluetooth > Edit My Device Information.
2. Turn on Open Discover.
3.
Select .
Related Topic
Activating the Bluetooth Mode
Changing Your Phone's Bluetooth Name
You can change the Bluetooth name for your phone to identify your phone to other Bluetooth devices.
By default, the phone is identified as Yealink-CP965 by other Bluetooth devices.
Before You Begin
Make sure that the Bluetooth mode is activated.
Procedure
1. Go to More > Settings > Basic > Bluetooth > Edit My Device Information.
2. Enter the desired name in the Device Name field.

Connecting a Mobile Phone Using Bluetooth
102
3.
Select .
Related Topics
Activating the Bluetooth Mode
Disabling Bluetooth Device Discovery
Unpairing the Mobile Phone
When you unpair the mobile phone, the mobile phone information disappears from the Paired devices list. To con-
nect the mobile phone to your phone again, tap the desired mobile phone in the Available devices list.
Procedure
1.
Do one of the following:
l
Select .
l
Swipe down from the top of the screen, then long tap Bluetooth.
l
Go to More > Settings > Basic > Bluetooth.
The phone screen shows the paired and connected Bluetooth device.
2.
Select after the connected mobile phone name.
3. Select Unpair.
Disconnecting the Bluetooth-enabled Mobile Phone
You can disconnect your Bluetooth-enabled mobile Phone from your phone and still keep it paired. When you disconnect a
Bluetooth device, it remains paired so that you can reconnect it to your phone.
Procedure
1.
Do one of the following:
l
Select .
l
Swipe down from the top of the screen, and long tap Bluetooth.
l
Go to More > Settings > Basic > Bluetooth.
2.
Tap the connected mobile phone.
3. Select OK.
Deactivating the Bluetooth Mode
You can deactivate the Bluetooth mode when you no longer use a Bluetooth device.
Procedure
1.
Do one of the following:
l Swipe down from the top of the screen.
l
Select .
l
From the home screen, go to More > Settings > Basic > Bluetooth.
2.
Turn off the Bluetooth.
The Bluetooth icon disappears from the status bar.

Wireless Network
103
Wireless Network
The phone can be connected to the wireless network if Wi-Fi is available within the area.
Note: Enabling Bluetooth may degrade your wireless network connection. For improved wireless network performance, you
should disable Bluetooth when it is not in use.
Topics
Activating the Wi-Fi Mode
Connecting to the Wireless Network
Viewing the Wireless Network Information
Disconnect from a Wireless Network
Deactivating the Wi-Fi Mode
Related Topic
Deactivating the Bluetooth Mode
Activating the Wi-Fi Mode
You can activate the Wi-Fi mode to connect your phone to an available wireless network.
Procedure
1.
Do one of the following:
l Swipe down from the top of the screen.
l
Go to More > Settings > Basic > Wi-Fi.
2.
Turn on the Wi-Fi.
The phone automatically scans the available wireless networks in your area.
The Wi-Fi icon appears in the status bar.
Connecting to the Wireless Network
After you have activated the Wi-Fi mode, you can connect the phone to the wireless network.
When the phone is connected to a wireless network, the Wi-Fi icon will display in the status bar.
Topics
Connecting to an Available Wireless Network Manually
Adding a Wireless Network Manually
Connecting to an Available Wireless Network Manually
You can use the password provided by your system administrator to connect the phone to a secured wireless net-
work.
Before You Begin
Make sure that the Wi-Fi mode is activated.
Procedure
1. Go to More > Settings > Basic > Wi-Fi.
The phone will automatically search for available wireless networks in your area.
2.
(Optional.) To research the available network, select > Scan.
3.
Tap the desired wireless network (SSID) to connect to it.

Yealink CP965 User Guide
104
4. Enter the desired password in the Password field.
5.
(Optional.) Tap to make the password visible.
6. Select Show advanced options to configure the HTTP proxy for the Browser.
7. Select Connect.
Once the connection has completed successfully, the prompt “Connected” appears under the corresponding
SSID.
Related Topic
Activating the Wi-Fi Mode
Adding a Wireless Network Manually
If your gateway/router has SSID broadcast disabled, it doesn't appear in the scanning results. Then you must manu-
ally add a wireless network.
Before You Begin
Get the available wireless network information from your system administrator. Make sure that the Wi-Fi mode is
activated.
Procedure
1. Go to More > Settings > Basic > Wi-Fi.
2.
Select > Add.
3. Enter the desired value in the Network SSID field.
4. Tap the desired value from the Security field.
l
If you select WEP or WPA/WPA2 PSK, enter the password.
l
If you select 802.1x EAP, tap the desired value from the EAP method field, and enter additional information.
5.
(Optional.) Tap to make the password visible.
6. Select Show advanced options to configure the HTTP proxy for the Browser.
7. Select Save.
Related Topic
Activating the Wi-Fi Mode
Viewing the Wireless Network Information
You can view the detailed wireless network information, such as Profile Name, SSID and Signal Strength.
Procedure
1. Go to More > Settings > Basic > Wi-Fi > Wi-Fi Status.
2.
(Optional.) Drag up and down to scroll through the list of wireless network information.
Disconnect from a Wireless Network
You can disconnect the wireless network connection from your phone.
Procedure
1. Go to More > Settings > Basic > Wi-Fi.
2.
Tap the connected SSID (the top one).
3. Select Forget.
Tip: You can also disconnect from the wireless network by deactivating the Wi-Fi mode.

Wireless Network
105
Related Topic
Deactivating the Wi-Fi Mode
Deactivating the Wi-Fi Mode
You should deactivate the Wi-Fi mode when you need to connect your phone to the wired network.
Procedure
1.
Do one of the following:
l Swipe down from the top of the screen.
l
From the home screen, go to More > Settings > Basic > Wi-Fi.
2.
Turn off the Wi-Fi.
The Wi-Fi icon disappears from the status bar.

Using Your Phone with PSTN Account
106
Using Your Phone with PSTN Account
You can connect an optional expansion PSTN box CPN10 to extend functions of the conference phone. You can
make PSTN calls.
Up to 2 cascaded PSTN Boxes can be installed to a conference phone.
Topics
Connecting the Expansion PSTN Box CPN10
Configuring the PSTN Account
Selecting the Country for PSTN Use
Configuring the Flash Time
Basic Call Features
Conference
Recording Using a USB Flash Drive
Unavailable Features for PSTN
Connecting the Expansion PSTN Box CPN10
If you want to use the functions about PSTN on the phone, you need to connect the expansion PSTN box CPN10 in
advance.
Procedure
1.
Insert the USB plug on the expansion PSTN box into the USB port on the phone.
For the information on how to connect expansion PSTN box CPN10, refer to PSTN Box CPN10 quick start guide
on Yealink Technical Support page.
Configuring the PSTN Account
If you have connected an expansion PSTN box CPN10 to the phone, a PSTN account is automatically registered on
the phone. You can disable the account.
Before You Begin
The PSTN box CPN10 is connected to the phone successfully, and the phone prompts to confirm that you want to
set the PSTN account.
Procedure
1. Select OK.
2.
Select the desired PSTN account.
3. Select the desired value from the Activation field.
4. (Optional.) Enter the string that will appear on the phone screen in the Label field.
5.
Select .
Tip: You can also configure the PSTN account at the path More > Settings >Advanced (default password: admin) >
Accounts.
Related Topic
Connecting the Expansion PSTN Box CPN10
Selecting the Country for PSTN Use
You have to select the country before using the PSTN account.
Procedure

Yealink CP965 User Guide
107
1. Go to More > Settings > Basic > Country.
2.
Select the desired country.
3.
Select .
Configuring the Flash Time
You can configure the flash time to adjust the length of time before a hook flash times out (or the call disconnects).
Flash time can be configured from the following options:
l
Auto: It depends on the country that is selected for the phone. The flash time is automatically set for that country.
l
75msec, 100msec, 300msec or 600msec: The hook flash times out after the designated time (in milliseconds).
Before You Begin
The required flash time may be different in different countries or for different gateways/PBX servers. Contact your
system administrator to find out which flash time you need to configure.
Procedure
1. Go to More > Settings > Advanced (default password: admin) > Flash Time.
2.
Select the desired value.
3.
Select .
Related Topic
Selecting the Country for PSTN Use
Basic Call Features
The phone using PSTN account can also perform some basic call features, such as placing, answering and ending
calls.
The phone supports the following basic call features when using the PSTN account:
l Placing Calls
l Answering Calls
l Ending Calls
l Auto Answer
l Auto Redial
l ReCall
l Call Mute
l Call Hold/Resume
Related Topics
Placing Calls
Answering Calls
Ending Calls
Answering a Call Automatically
Redialing a Call Automatically
Placing a Call Back to the Last Incoming Number
Call Muting and Unmuting
Holding and Resuming Calls
Conference
As one PSTN account can only support one call, you need to activate a hook flash to set up a conference.

Using Your Phone with PSTN Account
108
A hook flash is a quick off-hook/on-hook/off-hook cycle (just like picking up a handset, laying the handset down on
the handset cradle, and then picking it up again).
Then the active call will be placed on hold, you are allowed to place a new call and connect three parties in a con-
ference. You cannot view the last participant in the conference call.
You can also set up a conference with more than two parties when you have multiple accounts on the phone. You
can view and manage each participant in the conference call.
Note: The way to set up a conference call using hook flash may be different for different gateways/PBX servers.
Procedure
1.
Place a call to the first party.
2. When the first party answers the call, select Flash to activate a hook flash.
3.
Enter the number of the second party.
4. When the second party answers the call, select Flash again to join two parties in the conference.
To remove this party from the conference call, select Flash.
5. To add an additional party to the conference, select Conference (another account is needed).
6. Enter the number of the new party and select Send.
7. Select Conference when the party answers.
Recording Using a USB Flash Drive
You can use the recording feature when you have connected the PSTN box CPN10.
Related Topics
Call Recording
Connecting the Expansion PSTN Box CPN10
Unavailable Features for PSTN
You cannot use the features below when using a PSTN account:
l Call Completion
l DND
l Call Forward
l Call Transfer
l Call Waiting
l Call Park
l Call Pickup
l Anonymous Call
l Anonymous Call Rejection
l Intercom
l Multicast Paging
l Shared Line
l Messages

Maintaining Your Phone
109
Maintaining Your Phone
When your phone is unable to operate properly, you need to investigate or troubleshoot issues along with other
tasks your system administrator may ask you to perform.
Topics
Investigating Warnings
Clearing Warning Icon
Diagnosing the Network
Rebooting Your Phone
Resetting to Factory Settings
Updating the Phone Configuration
Clearing User's Personalized Configuration Settings
Investigating Warnings
The warning icon lets you know that your phone has one or more important issues.
Procedure
1. Go to More > Settings > Status > General.
The warning detail is displayed in the Warning field.
Clearing Warning Icon
You can temporarily remove the warning icon from the status bar. However, the warning message still is displayed
on the General screen until the issue is fixed.
The warning icon appears in the status bar again after reboot if the issue is not fixed.
Procedure
1. Go to More > Settings > Status > General.
2. Tap the Warning field.
The phone prompts you to clear the warning icon or not.
3. Tap OK.
The warning icon is removed from the status bar. And it is also removed from the Warning field.
Tip: You can also swipe left or right to temporarily remove the warning icon via Notification Center.
Related Topic
Control Center
Diagnosing the Network
When network problems occur on your phone, you can use the "ping" or "trace route" method to troubleshoot net-
work connectivity problems.
Procedure
1. Go to More > Settings > Features > Diagnostics > Network.
2.
Do one of the following:
l
Select Ping, then enter the desired IP address or URL in the Ping IP or URL field.
l
Select Trace Route, then enter the desired IP address or URL in the Trace Route IP or URL field.
3. Select Start.

Yealink CP965 User Guide
110
The screen displays the network status information.
Rebooting Your Phone
The improper operation may cause malfunction. If the malfunction occurs, your system administrator may ask you to
reboot your phone.
Procedure
1. Go to More > Settings > Basic > Reboot > Reboot.
The phone prompts you to reboot the phone or not.
2. Select OK.
Resetting to Factory Settings
When some issues occur on your phone and you have tried all troubleshooting suggestions but still do not solve
the problem, you can reset your phone to factory configurations.
This operation will delete all your personal configuration settings, and reset all settings to the factory defaults.
Check with your system administrator if the personalized settings are kept before resetting your phone to factory set-
tings.
Procedure
1. Go to More > Settings > Advanced (default password: admin) > Reset Config.
2. Select Reset to Factory Settings.
The phone prompts you to reset the setting or not.
3. Select OK.
The phone begins resetting.
Tip: You can also long tap the left Mute key when the phone is idle.
After reset, the screen “Initializing…”.
The phone will be reset successfully after startup.
Note: Reset of your phone may take a few minutes. Do not power off until the phone has started up successfully.
Updating the Phone Configuration
Your system administrator may ask you to update the configuration for your phone to apply any changes to system
settings, which you can do without restarting it.
Procedure
1. Go to More > Settings > Basic > Update Configuration.
2.
Enter the provision information in the corresponding field.
3.
Select .
The phone prompts you whether to provision now.
4. Select OK.
Clearing User's Personalized Configuration Settings
You can clear the personalized configuration settings manually on the phone.
Before You Begin
Your system administrator has enabled the phone to keep the user's personalized settings after auto provisioning.

Maintaining Your Phone
111
Procedure
1. Go to More > Settings > Basic > Reset Local Config> Reset local settings.
The phone prompts you to reset the local settings or not.
2. Select OK.

Appendix - Menu Structure
112
Appendix - Menu Structure
