
Guide to using Redaction in Acrobat X Pro
Topics Covered
• Redaction Workflow
• Adding, Previewing and Deleting Redaction Marks
• Changing the Appearance of Redactions
• Working with Multiple Redactions
• Applying Redactions to permanently delete content
• Using an Action to Automate the Redaction Process
Redaction Workflow – Important!
It’s critical to understand the redaction workflow in Acrobat which is:
1. Mark items to be redacted
2. Review marked items
3. Apply Redactions (Removes the information from the document)
You must Apply Redactions to Remove Information
Marking items merely indicates that you want to remove the information. You MUST Apply
Redactions to permanently remove information from the document.
Suggested Workflow

Step 1: Set Redaction Preferences
Automatically Copy Text into the Sticky Note for a Redaction (Optional)
Redactions exist as a type of annotation until you apply them which permanently removes the
information. This preference is handy during review since it copies text into the sticky note.
1. Choose Edit—> Preferences (Windows) or Acrobat—> Preferences (Mac)
2. Select the Commenting category from the list on the left:
3. Enable the check box labeled “Copy Selected Text into Highlight, Crossout, and
Underline comment pop-ups
4. Click OK
For example, let’s say you wanted to redact a date.
When you select text using the Mark for Redaction tool, the text will automatically be copied
into the sticky note:
Step 2: The Basics: Adding, Previewing and Deleting Redactions
The tool you will use for almost all of your work is the Mark for Redaction tool.
To find the Mark for Redaction tool . . .
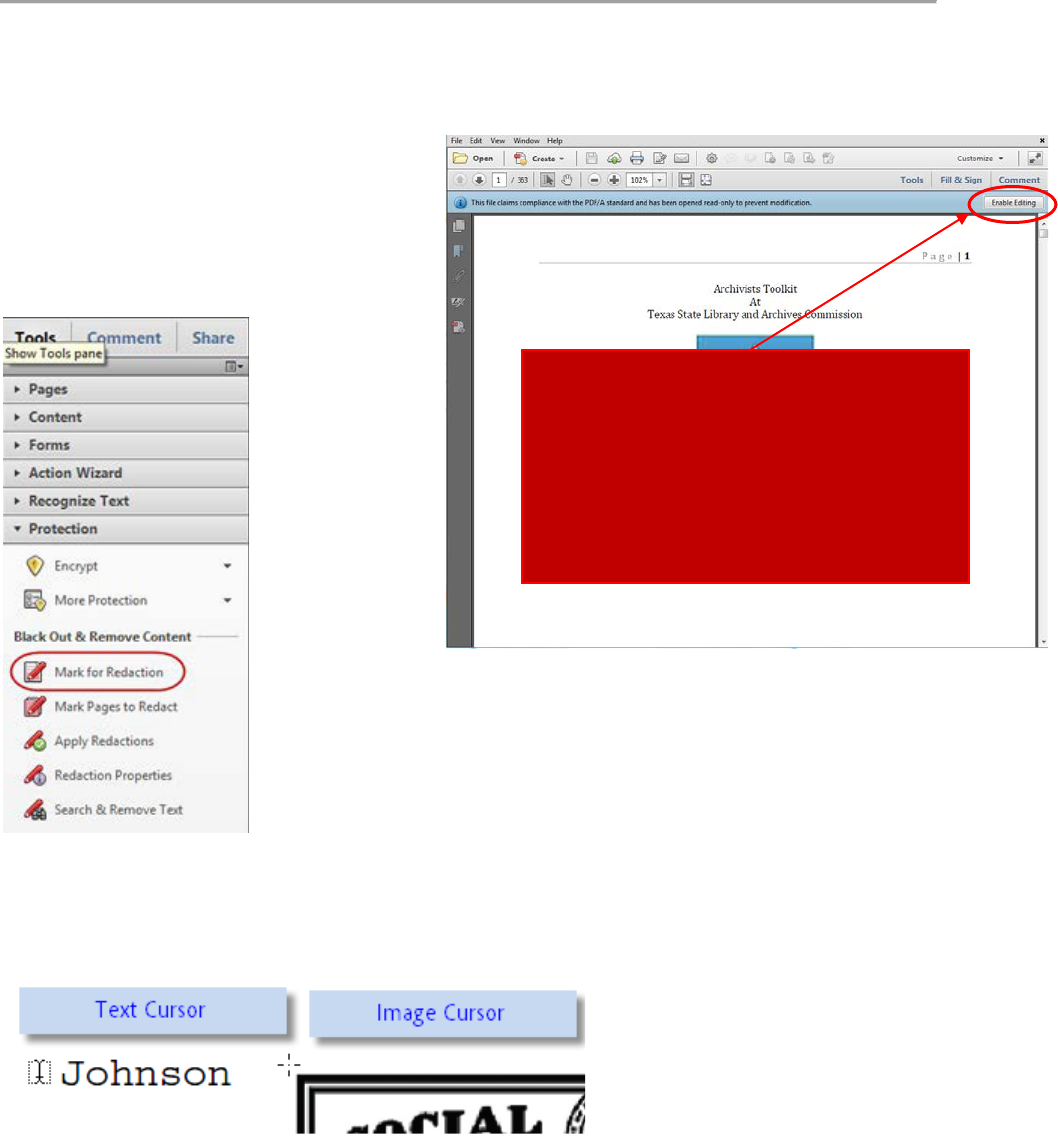
1. Open the Tools Panel
2. Twirl open the Protection section
3. Select Mark for Redaction
Context Sensitive
The Mark for Redaction Tool cursor changes depending the content to be redacted.
If the Mark for Redaction selection is
grayed out, then the document has
been locked. You will need to open
the document for editing. This should
be a gray bar across the top.

To Redact Text
1. Select the Mark for Redaction tool
2. When you hover over text, the Mark for Redaction tool becomes a text selection cursor.
Select the text to mark it for redaction.
Tip: Did you select too much?
Hit CTRL-Z to undo the redaction.
To Redact a Graphic or Image
1. Select the Mark for Redaction Tool
2. Place the cursor over an image or if no objects are present, across hair cursor (+) appears.
3. Draw a rectangular selection area to redact. Anything found within the area— images,
text, vector objects— will be “cut out” and redacted.
Force an Area Redaction
Sometimes it can be difficult to select text properly. You can force Acrobat to present the
crosshair for an area redaction by holding down the CTRL key.
Previewing a Redaction
Using the Mark for Redaction tool, you may preview the redacted item.
1. Select the Mark for Redaction tool
2. Hover over a redaction mark to preview it

Deleting a single Redaction Mark
Until you click the Apply Redactions button, the redaction marks are editable. To delete one,
hover over it and click.
You’ll see some subtle animation around the edges. Hit the DEL key to delete the redaction.
Changing the Appearance of Redactions
By default, redactions appear as solid black rectangles. The default appearance serves most folks
just fine, but may be customized:
To change the appearance of a redacted item, right-click and choose Properties. . .
You may set a number of options such as…
Redaction Color
Overlay Text
Overlay Text Color and
Repeat
To change the properties of a Redaction mark
1. Select the Mark for Redaction tool
2. Hover over the redaction mark you wish to change
3. Right-click and choose Properties
The Redaction Properties window is straightforward. Options below are referred by number:

1. Set the color of the redaction here.
This is the appearance of the redaction after it is applied. You may also choose “no color”
as an option.
2. You may have overlay text on top of the redaction.
3. Choose typeface for overlay text
4. Set font size for overlay text
5. Auto-size scales the text to fit the width of the redacted area
6. Enable to repeat overlay text on the redaction mark

7. Set alignment of overlay text
8. Type in custom text to appear on top of the redaction.
Note: Will only be available if “Use Overlay Text” is checked
9. Enable to repeat the text over the redacted area
10. This field displays Redaction Codes entered using the Code Sets below (11).
Note: You cannot type into this field
11. Redaction Codes.
Redaction codes pre-defined sets of text used to denote the reason or statute under which
the redaction was made. Acrobat Pro includes two pre-populated sets— U.S. FOIA
(Freedom of Information Act) and U.S. Privacy Act. You can also create and save your
own sets.
12. Set the Outline Color for the Redaction Mark
Sets the color of the comment mark before the redaction is applied
To change the default appearance of all redaction marks:
1. Use the Mark for Redaction tool to create a redacted item
2. Right-click and choose Properties to change the appearance. Click OK.
3. Right-click on the item and choose “Make Current Properties Default”
Working with Multiple Redactions
(Delete or change Properties)
Acrobat’s Comments Panel offers a list view of all of the Redaction marks in the document.
From the Comments Panel, you can delete or change the properties of many redaction marks at a
time.

Open the Comments Panel, then twirl
down the Comments List section
Select one or more comments, then
right-click and choose Properties
Working in the Comments Panel
You can select a comment (Redaction mark in this case) by clicking on any of the items in the
list.. Hold down the CTRL key if you need to select a discontinuous range of comments.
To select all of the redaction marks:
1. Select the first item in the list
2. Scroll to the bottom of the list
3. Press SHIFT and select the last comment.
To delete a Redaction mark:
Hit the DEL key (or choose Delete from the pop-up menu) to delete any selected comments.
To change the properties of one or more comments
Make a selection then, right-click and choose Properties.

Search and Redact
Acrobat X Pro Search and Redact feature may be used to search intelligently for:
• Single text strings
• Multiple text strings
• Patterns such as Social Security numbers
. . . in a single document or across multiple documents.
To search and redact
1. Open the Tools panel
2. Twirl down the
Protection section
3. Click Search and
Remove
Looking at the Search and Redact Window
The Search and Redact window offers a few options:
1. The Arrange Window button conveniently sizes the Search and Document windows
2. You can search in the front most (current) document or point to a whole folder of
documents.
3. Set the search scope for single or multiple words, or patterns
4. Enter text to search for (only available for Single word option)
5. Determine whether you will search for whole words or if capitalization matters

Searching for a Single Word
1. Click Search and Remove Text in the Protection Panel
2. In the Search window, click Arrange Windows if necessary
3. In the Where would you like to search area, select In the current document or to browse to
folder of files to perform cross-document search.
4. in the Search for area, choose Single Word or Phrase
5. Enter your text in the search field
6. Click Search and Redact
Working with the Results
Once the search is complete, the results window opens.

1. Clicking Check All will add a mark to all the words found
2. You can also individually check any of the results. If you click on the result, you can
preview the word in the PDF
3. Click Mark Checked Results for Redaction to mark the words found

Searching and Marking Multiple Words
Acrobat X can search for and mark multiple words simultaneously. Here’s how:
1. Click Search and Remove Text in the Protection Panel
2. In the Search window, click Arrange Windows if necessary
3. In the Where would you like to search area, select In the current document or to browse to
folder of files to perform cross-document search.
4. in the Search for area, choose Multiple Words or Phrase
5. The Words and Phrases to Search and Redact window opens
– Enter each word you wish to search for and click Add
(Optional) Import a list of words
6. Click OK Acrobat will search through the document(s) and place a redaction mark on all
words found

Using Pattern-based Redaction
Acrobat can use pattern recognition to find information that varies such as:
• Phone Numbers
• Credit Card Numbers
• Social Security Numbers
• Email Addresses
• Dates
Here’s how to use patterns to find this type of information
1. Click Search and Remove Text in the Protection Panel
2. In the Search window, click Arrange Windows if necessary
3. In the Where would you like to search area, select In the current document or to browse to
folder of files to perform cross-document search.
4. In the Search for area, choose Patterns
5. Select the type of information you want to find:
6. Click the Search and Redact button
7. The Search window displays the results:
A) Click to begin a new search if you did not find what you were looking for
B) Click to save a PDF or CSV of the search results
C) Click Check All to create a redaction mark for each pattern found
D) Click on any item in the list to review the found pattern in the document window.
D) Check any item to make a mark for selection
E) Enable to mark part of the pattern (see below)
F) Click Settings to change the marking options

G) Click Marked Checked Results for Redaction to mark them in the document
Marking Part of a Pattern
To identify individuals in a case
without breaching confidentiality,
you may wish to mask part of a
found pattern. Using the settings at
right, the first characters of a Social
Security number are masked. This
allows us to identify individual
based on the remaining digits:
Step 3: Review Redactions
It’s important to carefully review each page of your document, especially for scanned
documents.
Fortunately, redactions in Acrobat are managed using familiar commenting and annotation tools.
Thus, you can:
1. Add notes and comments to Redacted items and send them to another Acrobat
Professional user to review, reply to or change
2. Participate in a Shared Review of a document. If other users have Acrobat Pro, multiple
people, in real time, may indicate redactions.
3. Summarize comments and notes attached to redacted items as part of a review or archival
workflow
4. Approve, reject or delete items to be redacted using the Comments Panel
To add a note/comment to an item marked for redaction, do one of the following:
• Right-click on the item and choose “Open Pop-up Note”
• Double-click on the item
To view the Comment panel, choose one of these methods:
• Open the Comments Panel, then twirl down the Comments List section
Create a new Document which Summarizes Redactions
If you were headed to meeting with the other side, and you expected some challenges to your
privileged and redacted documents, you might want to create a summarized version of your
redacted documents to take with you.
This process creates a new, consolidated PDF. Redaction annotations are displayed as call-outs
on the document:

To create a summarized document:
1. Open the document containing your redaction marks.
(You need to run this step before you apply redactions.)
2. From the Comments Panel- Comments List, choose the flyout menu and choose Create
Comments Summary

3. The Summarize Options window will appear. I suggest choosing the second option:
4. Click the Create PDF Comment Summary button.
Step 4: Make Redactions Permanent (Apply Redactions)
Applying Redactions in Acrobat permanently removes the information from the document once
you save it.
To apply redactions:
1. Click the Apply Redactions button in the Protection Panel

2. A warning window appears. Click OK
3. The Redactions are applied. Next, you will see another warning message prompting you
to examine the document for metadata. Click the Yes button.
4. The Examine Document panel opens.
Examine Document finds hidden information such as metadata, hidden text, comments,
etc. that could lead to an accidental disclosure. Note that the hidden OCR text layer can
be removed, too. Click the Remove button.

5. Choose File> Save
If you set the Preferences in Step 1, Acrobat will rename your file automatically when
you go to save it:
Final Thoughts
Keep in the mind the following when taking on projects that require redaction:
1. DO NOT FORGET TO APPLY REDACTIONS!
Simply marking text and graphics does not actually remove it.
2. Search and Redact will only find text in searchable documents. OCR documents first.
Even so, since OCR is an imperfect process, carefully review scanned documents.
3. Carefully review all documents prior to submission in discovery. A two-person review
team will catch many more errors than a single person.
4. Don’t Skip the Examine Document Step
Naive users may elect to cover up information in electronic sources and mistakenly
believe it is redacted. The Examine Document function can detect and fix these issues.
