
University of Wisconsin System
SFS Business Process
9.1 Upgrade Excel File Manual
Conversion Process
Page 1 of 10
In the 2007 version of Microsoft Office, Microsoft made a number of updates to Excel, including increasing the
maximum number of rows in a worksheet from 65 thousand to over 1 million.** For regular users of nVision, it’s
important to convert nVision layouts to the new version of Microsoft Excel so they will continue to work properly
with the application in both the client and web based versions.
The files stored on the file server will be automatically converted as a part of the upgrade. This business process
will only be necessary if the files are stored locally or in a location aside from the SFS file server.
NOTE: You must have Microsoft Excel 2007 or later installed on your computer to be able to convert the files
properly.
**PS Query may still restrict number of rows returned. To avoid this error, schedule the query.
To manually convert an nVision layout from .xls file type to .xlsx:
Rename the file, changing to the old Excel file extension (*.xls)
Open the file using Excel
Convert the file, which saves the file as the new file type (*.xlsx) or (*.xlsm)
Rename the file extension back to ‘.xnv’ (*.xnv)
Step by Step Instructions:
1. Identify the file that you would like to convert. Your file should currently have an .xnv file type. If you
are unable to view the file extension (.xnv), please follow the steps below (a-. If you are already able to see
the file extension, please skip to step #2.
To change your folder settings, so you can see file extensions:

University of Wisconsin System
SFS Business Process
9.1 Upgrade Excel File Manual
Conversion Process
Page 2 of 10
a. In the lower right hand corner of your taskbar, click the Start Menu.
b. From the menu, click on Control Panel.

University of Wisconsin System
SFS Business Process
9.1 Upgrade Excel File Manual
Conversion Process
Page 3 of 10
c. On the Control Panel menu, choose Appearance and Personalization.
d. Click Folder Options.

University of Wisconsin System
SFS Business Process
9.1 Upgrade Excel File Manual
Conversion Process
Page 4 of 10
e. In the window, choose the View tab.
University of Wisconsin System
SFS Business Process
9.1 Upgrade Excel File Manual
Conversion Process
Page 5 of 10
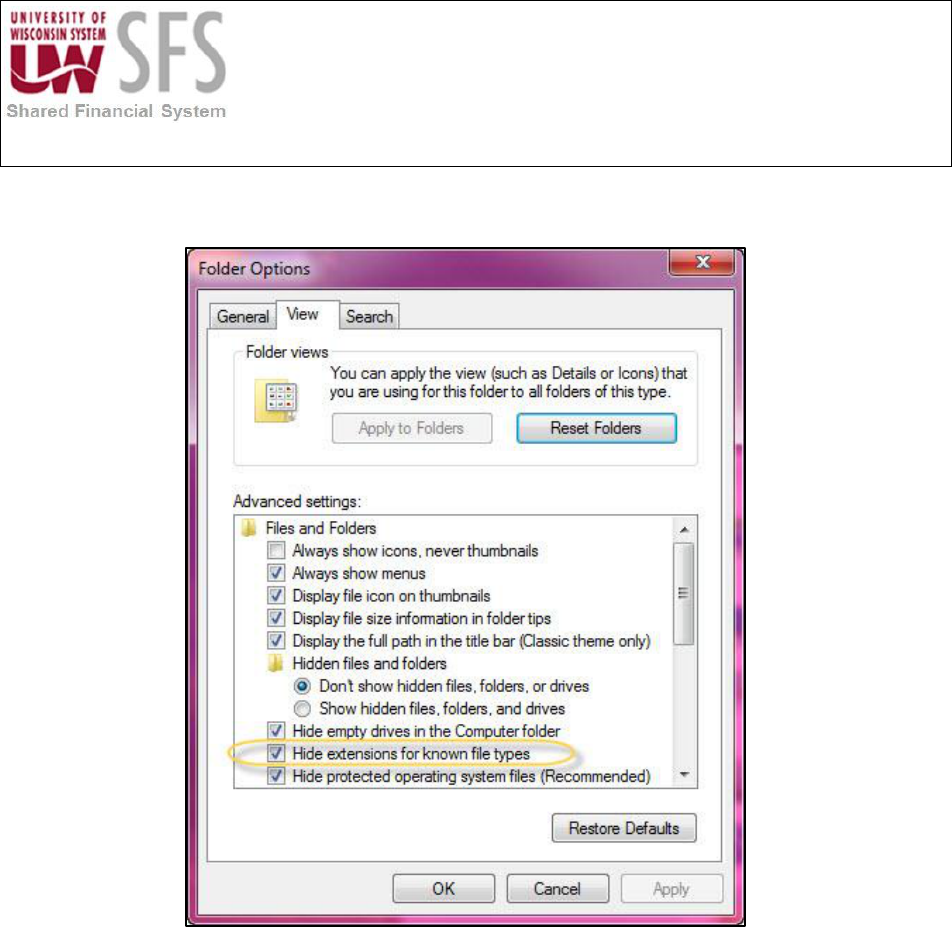
f. Uncheck the Hide extensions for known file types box.

University of Wisconsin System
SFS Business Process
9.1 Upgrade Excel File Manual
Conversion Process
Page 6 of 10
g. Click Apply and then click OK. The window should close.
h. You should be able to see the file extension now.

University of Wisconsin System
SFS Business Process
9.1 Upgrade Excel File Manual
Conversion Process
Page 7 of 10
2. On your nVision layout file, right click on the file and choose Rename from the menu.
3. Change the .xnv to .xls by typing it in.
4. When you hit ‘Enter’ or click elsewhere on the screen, the verification of change message will appear and
you can click ‘Yes’.

University of Wisconsin System
SFS Business Process
9.1 Upgrade Excel File Manual
Conversion Process
Page 8 of 10
5. You will see the file icon change to an Excel spreadsheet icon.
6. Double click the file to open it.
7. If necessary, click Enable Editing.
8. Click the ‘File’ tab.
9. Click ‘Convert’.
10. You may receive a message below that explains the conversion process. If you are converting multiple
files, it is recommended to check the “Do not ask me again about converting workbooks.” checkbox and click
OK.

University of Wisconsin System
SFS Business Process
9.1 Upgrade Excel File Manual
Conversion Process
Page 9 of 10
11. You may receive other messages regarding range references, as below. Click OK.
12. You will receive a message stating that the workbook conversion was successful. Click ‘Yes’ to activate the
features.
13. You may be asked if you would like to save the changes to your workbook. Notice the new ‘.xlsx’ file
extension. Click ‘Save’.
14. Close the workbook.

University of Wisconsin System
SFS Business Process
9.1 Upgrade Excel File Manual
Conversion Process
Page 10 of 10
15. You will notice that the Excel file on the drive now has an ‘.xlsx’ or ‘.xlmx’ file extension.
16. Right click on the file.
17. Choose ‘Rename’ from the menu (same as step 2 above).
18. Change the file extension to “.xnv” by typing it in.
19. When you hit ‘Enter’ or click elsewhere, the verification of change message will appear and you can click ‘Yes’.
20. You will see the icon and file extension change back to regular nVision file extension and icon.
Your file is converted to the latest Excel settings. It is recommended that you test run your reports. If you
experience any issues, or have questions or comments regarding this process, please contact UWSA Problem
Solvers at: uwsaprob[email protected] for assistance.
