
Zoiper 5 user guide 1 of 57
John Smith
15Jeff Groves
3
Casey Stoner
Andrea Stella
Marco Minneman
Catherin Stone
9
Multiparty Chat
Find a contact...
Contacts
All
Recent
FavoritesOnline
Hey, John! What’s up? How have you’ve been?
10:46
Hey there!
That vacation looked awesome from the pictures you posted!|
10:45
2016-03-08
John Smith
Zoiper5
Call Video call
Zoiper 5 User guide
Date of issue: July 2018
Version: 1.07

Zoiper 5 user guide 2 of 57
DOWNLOAD AND INSTALL ............................................................... 4
ACTIVATION ................................................................................................ 8
Online activation ........................................................................... 8
Oineactivation .........................................................................11
Silent Installers for mass deployments ...............................11
Activation errors .......................................................................... 12
Network access and Zoiper .........................................................13
Conguremicrophoneandspeaker .......................................16
Main Interface ...................................................................................19
Top bar ............................................................................................19
Default account ...........................................................................19
Account status .............................................................................19
Search .............................................................................................. 20
Dial pad ..........................................................................................20
Bottombar ..........................................................................................21
Presence status ............................................................................21
Voicemail ........................................................................................ 21
Audio control ...............................................................................21
Call automation settings ..........................................................22
Error messages ............................................................................22
Conversation window ....................................................................23
Top part ..........................................................................................24
Middle part ....................................................................................26
Bottom part ................................................................................... 26
Compactwindow .............................................................................27
Hang-up buttons ........................................................................27
In Call menu ..................................................................................27
SETTINGS .................................................................................................... 28
Accounts ...............................................................................................29
SIP Accounts ...............................................................................30
SIP Credentials ....................................................................30
Optional SIP Credentials .................................................30
Features .................................................................................31
Number rewriting ..............................................................32
Pre-conguredextensions .............................................32
Compatibility modes ........................................................33
Network related .................................................................. 34
Audio and Video codecs .................................................35
IAX Accounts ..............................................................................36
IAX Credentials .................................................................... 36
Features .................................................................................36
Pre-conguredextensions .............................................37
Compatibility modes ........................................................37
Network related .................................................................. 37
Tableofcontents

Zoiper 5 user guide 3 of 57
CONTACTS .................................................................................................. 38
LDAP / Active Directory ...............................................................39
Outlook/Exchange ........................................................................40
MEDIA .........................................................................................................41
Audio ......................................................................................................41
Audio device selection ..............................................................41
ExternalHeadset/Headsetintegration .............................42
Extrafeatures ................................................................................ 42
Play sounds ...................................................................................42
Video ......................................................................................................43
GUI ...........................................................................................................44
Theme ....................................................................................................44
Skin ...................................................................................................44
Language .............................................................................................. 44
LookandFeel .....................................................................................45
Behaviour .......................................................................................45
Showpop-upnoticationswhen .........................................45
FEATURES ...................................................................................................46
Calls .........................................................................................................46
Automation .........................................................................................47
General options ...........................................................................47
Integration options ....................................................................47
Call events options ..................................................................... 48
Event rules .....................................................................................48
Lockdown&Provisioning ...........................................................49
Advanced ..............................................................................................50
Help/About .................................................................................51
Tableofcontents
This User Guide is intended to demonstrate typical uses and features of the Zoiper 5 PRO application. It is up to the
user of this manual to decide whether the information herein is applicable to the IP-based network on which they
want to run the application.
SecuraxEOODandanypersoninvolvedinthecreationofthisUserGuidedonotprovideandherebyexpressly
disclaimanyrepresentations,warranties,conditions,endorsementsorguaranteesofanykind(expressofimplied),
includingwithoutlimitationforquality,performance,resultsortnessforaparticularpurpose,asregardsthe
contents and quality of this User Guide and the Zoiper 5 PRO application, and will in no case be held responsible
for any direct, incidental, indirect or other damage or loss that may result from the use thereof.

Zoiper 5 user guide 4 of 57
2. Next,gotoyourDownloadsfolderand
ndtheZoiper5installer,doubleclickto
executeit.
3. Avericationprompt
window will appear, click
“Yes” in order to run the
installer application. If an
administrator password
pop-up comes up, enter
your admin password to
authorize Windows to run
the installer.
1. After the download prompt appears, save
theleandwaitforittobedownloaded
successfully.
DownloadandInstall

Zoiper 5 user guide 5 of 57
4. The Zoiper 5 installer will
start, click “Next” on the
rstscreenoftheSetup
wizard
5. Read the license
agreement and click
“Next” after marking
“Iacceptthe
agreement”.
6. Select which components
to be included.
DownloadandInstall

Zoiper 5 user guide 6 of 57
DownloadandInstall
7. Select an installation
folder for Zoiper 5 (it is
best to keep the default
one).
8. Choose a Start Menu
folder.
9. Select which users should
be able to use the new
Zoiper 5 application.

Zoiper 5 user guide 7 of 57
DownloadandInstall
10. The Setup is now ready
to begin the installation.
Click “Next” to continue
and install Zoiper 5 on
your computer.
11. Be patient while the
Zoiper 5 installation
nishes.
12. Once you see this
screen, the installation is
complete. Click “Finish” to
launchZoiper5andexit
the Installer.

Zoiper 5 user guide 8 of 57
Activation
Onlineactivation
OnrststartofZoiper5,you’llbegreetedwithascreenandafewoptions:
• Activate your Premium license
• Learn more about Premium
• Continue as a Free user
These are all valid options, depending on
your setup and rather if you have purchased
a Zoiper 5 license or have been given a demo
onetotestitinyourspecicenvironment.

Zoiper 5 user guide 9 of 57
Let’sstartwiththe
rstoption–“Activate
your Premium
license”.
Activation
After entering your
credentials into the
respective input
elds,youcan
click “ACTIVATE
ONLINE”.
Next,Zoiper5willseamlesslytransitionyoufromtheActivationwizardtowardstheAccount
creationwizard,whereyou’llhavetosetupaSIPoranIAXaccount,whichisnecessarytouse
Zoiper5intherstplace.
Byclickingthebutton,you’llstarttheActivationwizardthat’sbuiltinintoZoiper5.
Onthenextscreenyou’llbeaskedtoenteryourActivationcredentials,theseincludea
UsernameandaPassword.PleasenotethatthesearenotyourVoIP(PBX)accountcredentials,
butrathertheoneseitherreceivedbyyoufromourautomatedsystemafteryou’vemadea
purchase, or have been manually sent to you from one of our agents for testing purposes.

Zoiper 5 user guide 10 of 57
The rest of the Account
creation wizard is straight
forward–youjusthaveto
follow the steps, there are
hints provided for each and
every step of the way on the
main screen.
Activation
Afterthewizardhasfoundtheproperprotocol(s)foryouraccount,you’llbegreetedwitha
similarscreentothefollowing:
Then you click the “NEXT”button,andtheautomatedaudio/videowizardwillstart,oncethisis
complete, you are ready to start using Zoiper 5! Congrats!
Youcanndanentirestepbystepguidefortheaudio/videocongurationwizardatpage16
of this user guide, or simply by clicking here.

Zoiper 5 user guide 11 of 57
Oineactivation
IfyourcomputerisnotconnectedtotheInternetorarewallisblockingaccesstoourlicensing
server,the“Activateoine”-buttoncanbeused.Clickingonthebuttonwillgeneratealethat
contains some details that are unique for your computer and the version of Zoiper that you are
tryingtoregister.Thelenamecontainsthenameofyourcomputer.Itwilllooklikethis:
COMPUTERNAME.certicate
ItcanbefoundintheZoiperCerticatesfolder.
IfduringtheinstallationofZoiper,youhavechosentoinstallitfor“allusers”,thecerticate
folder location will typically be C:\ProgramData\Zoiper5\
If during the installation of Zoiper, you have chosen to install it for “the current user only”, the
certicatefolderlocationwilltypicallybe%USERPROFILE%\AppData\Roaming\Zoiper5
Zoiper<ComputerName>.certicateisthelethatshouldbesentto[email protected]
Please open your mail client and press the “Compose new mail” button.
Addressthenewmailto[email protected]andattachtheCOMPUTERNAME.certicate
le.
Youwillreceiveacerticatelebymailinreturn.Pleasemakesurethatyouaresavingitnamed:
certicate
Noleextensionisneeded.
KeepinmindthatbydefaultWindowshidestheknownleextensionsandthereisahigh
possibilitythatyourWindowsautomaticallyputsaleextensiontothecerticatelewhile
saving it.
Pleaserightclickonthatleandchoose“Properties”.Youwillseethefulllenameinthe
Propertieswindow.Youmightneedtoremovetheextensiontomakeitwork.
Thisle(certicate)shouldbeplacedinthefolderyougotCOMPUTERNAME.certicatefrom.
(C:\ProgramData\Zoiper5\or%USERPROFILE%\AppData\Roaming\Zoiper5)
Restart the phone, it should now be activated.
SILENT INSTALLERS FOR MASS DEPLOYMENTS
If you would like to install Zoiper 5 without the need for user interaction, but with a progress
indicator,usethesecommandlineoptionstotheZoiper5installer.(Youwillneedtoadjustthe
namebasedontheinstalleryouareusing).
JustopencommandpromptandenterthepathofyourZoiper5downloadedinstallerleand
includethefollowingparameters:
“Zoiper5_Installer_v5.2.10.exe”--modeunattended--unattendedmodeuiminimal

Zoiper 5 user guide 12 of 57
PleaseconrmthatZoiper
can accept incoming
network connections.
Activation errors
In case the username and or password is incorrect, an error message will be shown, and the
application will prompt you about it. Please re-enter your username and password, and make
sure you are using the ones you have received initially from our automated email message, after
you’vepurchasedZoiper5.Oraskyoursystemadministratortohelpyououtwiththeactivation
and/oractivationcredentials.

Zoiper 5 user guide 13 of 57
NETWORK ACCESS AND ZOIPER
If you want to check at a later stage if Zoiper 5 is
allowed access to the network, you need to check
youroperatingsystem’srewallsettings.Youcan
dothatbyfollowingthisquicktutorial:
Click the Windows menu button on your
Activation
WINDOWS 10
Therstthingyouneedtodo
is to open Control Panel.
There are several ways how to
do it, but here we have listed
the quickest and easiest.

Zoiper 5 user guide 14 of 57
task bar or the Windows button on your keyboard. Type in Control Panel to search for it. The
application will be showed automatically, once you even start typing.
Click on it to open the Control Panel.
Once you do that, you will be presented with the Control Panel window.
Activation

Zoiper 5 user guide 15 of 57
Fromhereyoushouldndthe“AllowanapporfeaturethroughWindowsFirewall”onthetop
left of the window. Click on it to open the advanced options. Be careful with the settings, these
controlallyourapplications’networkaccess.
Once presented with this window, you can scroll all the way down, since the applications are
automaticallyorderbyname.Zoipershouldbeatthebottomofthelist:
Fromhereyoucanadjustif
Zoiper will work on Private or
Public networks, depending
on your preferences. If both
checkmarks are not ticked,
Zoiper will not work since
the network access will be
restricted by the Windows
Firewall.
Tochangethecheckboxes,
Windows will ask you for
administrator privileges. If
you do not have access, you
should contact your system
administrator to help you out.
Once the Control Panel window
is open, go to System and
Security option and open it.
You will be presented with the
SystemandSecuritysection:
Here click on Windows
Firewall.
You will be presented with the
Firewallsettingswindow:
Activation

Zoiper 5 user guide 16 of 57
Zoiper comes with a built-
in Audio wizard for easy
congurationofyour
microphone and speaker. This
wizard is displayed once you
have started Zoiper for the
rsttime.Ifyouwouldliketo
testorchangeyouraudio/
video settings later, you can
do this from the Settings
menu.
The wizard is pretty
straightforward,justfollowthe
steps one by one. Zoiper will
congureyourSpeakersrst.
Click on the
“Start test”–button.
Audio-Video wizard

Zoiper 5 user guide 17 of 57
Ifyourspeakersareconguredand
connected properly, you should hear
a ringing sound. If you do, please click
on the “Yes” button and move on to
the Microphone step.
If no ringing sound was heard,
please make sure your speakers are
connected properly and powered on
and if needed, change the selected
audio device from the drop-down
menutoadierentoneandtryagain
by clicking on the “No” button.
Click on the “Start test”
button to start the
Microphone check.
If the selected microphone is
connected properly, you should
see the volume meter move when
speaking into the microphone.
If the volume meter is not moving,
please check your cabling and make
sure the proper audio device is
selected in the Device drop-down
menu.
Once the microphone and speaker are
conguredproperly,clickonthe“Yes”
button to move on to the camera
congurationscreen.
Audio-Video wizard

Zoiper 5 user guide 18 of 57
The camera test screen will appear.
Click “Start test“ to continue with the
wizard.
Please select from the drop-down
menu the proper camera device to use.
Toconrmthatyourvideocapture
device is working, click on “Yes”. If no
video appears, please make sure that
your camera and camera drivers are
properlyinstalledandconguredin
MS Windows.
Clicking the “Yes”buttonwillconrm
and close the Audio/Video Wizard.
Audio-Video wizard

Zoiper 5 user guide 19 of 57
Interface
DEFAULT ACCOUNT
From this drop-down menu
you can choose which account
to be your default one. That
means that if you have chosen
f.ex.Account1asdefault,
all your outgoing calls and
messages will be initiated
from it.
ACCOUNT STATUS
To the left of the account
name, you can see the
Account status icon,
representing if the account
has been Registered
(checkmark),Notregistered
(dark X)orifitiscurrently
registering(animatedcircle).
Clicking to the right of the
Default account is the Settings
menu button . From it, you
will be presented with the
main Settings menu in Zoiper
5. We will get to that later in
this manual.
Zoiper 5 is designed to make communications easier and more
intuitive. It is a powerful tool that combines voice, video and
instant messaging in one.
ThescreenthatyouseethersttimewhenZoiper5isstarted.
From here you can see the most important functions in Zoiper.
TOP BAR

Zoiper 5 user guide 20 of 57
A search may be made for
phonenumbers/extensions,
digits or letters for names
ofcontacts.Forexample,
the overview image shows a
search for one name of the
contact John.
Typinginjusttherstsyllable
(i.e.‘Jo’)isenoughtoinstantly
bring all results that contain
this sequence of letters. With
each letter typed, the search
is narrowed down to the right
contact. You do not need to
typetheentirename:clickon
the chosen contact when the
resultsarelteredouttojust
afew–givethecontactacall
by clicking on the call button,
or start a chat session using
the functional buttons.
SEARCH
RightbelowtheDefaultaccount,youcannd
theSearcheld,whichlookslikethisifclicked
on(i.e.active):
TheSearcheldcouldbeusedto-diala
number,thatyouhaveenteredinthiseld;
search for a name, number, company, or any
othereldfoundinthecontactentryitself.
PleasenotethattheSearcheldcanbeused
to look for a contact through your entire
Contactslist.Thus,asearchispossiblein:
Native Zoiper contacts (added manually);
• Windowscontacts;
• Outlookcontacts;
• LDAP;
• Google;
• XML;
• CSV(imported)
DIALPAD
With the dialpad, one can enter manually digits and signs, if
needed, and dial like that. Please note that with this dialpad,
youcan’tenterDTMFtones.
To enter DTMF tones,
you should use the
keypad found in the
active call window, as
shown here.
Interface

Zoiper 5 user guide 21 of 57
Interface/Bottombar
Onthebottomofthephone,youwillndafewbuttonsforquickaccesstothePresencestatus,
Voicemail,Volumecontrols,Callsettings,aswellaserrormessagenotications.
PRESENCE STATUS
This is the indicator of the online status for
yourcurrent(default)account.Thepeoplethat
have added you in their contact lists may view
your online status as well. Choose the status
that matches your activity best.
Changingthestatuswillaectallcongured
SIP and IAX accounts with the “publish
presence” option enabled in the account
advanced settings, listed under Features. When
in an active call, the status will automatically
VOICEMAIL
The second icon, being a “mail slip” indicates
voicemail messages. When you click on the
Voicemail message icon you will be presented
withthefollowingpop-up:
Here is the list of accounts that have been
setup. Once you click on one of these, you
wouldhavetoinputanextensionnumberfor
the Voicemail messages on one of your SIP or
IAX accounts.
AUDIO CONTROL
The third icon from left to right, i.e. the
“speaker” indicates the quick Audio controls.
Pressing the button will show a pop-up
containing the volume controls for the default
selected microphone and for the default
selected audio device.
From here, you can easily change the
volume of your default audio device, or the
microphone level of reception.be changed to “On the phone”.
Thereareafewoptionsforastatus
of your presence:
• Online
• Invisible
• Away
• Busy
• Oine
• Out to lunch
• On the phone
• Be right back
Zoiper 5 supports
Presence status
over the SIP SIMPLE
protocol, which is
required from your
oce’sPBXorVoIP
provider to use it.

Zoiper 5 user guide 22 of 57
CALL AUTOMATION
SETTINGS
The fourth button to the very
right, e.g. the Call automation
settings menu opens the Call
settings in Zoiper 5. From here
you can quickly access the
followingcalloptions:
• Enable/disableincoming
call handling
• Call forwarding options
• Auto answer
• Play sound on auto answer
• Keep settings after restart
When you enable incoming call
handling, you can see clearly
thatit’senabledthroughthe
interface, since the icon will be
changed to orange:
ERROR MESSAGES
Whenthere’sanerror
message, an indicator on the
bottom bar marked with an
exclamationmarkwillappear.
Clicking it will lead you to the
Zoiper 5 Settings menu, where
you can see further details
abouttheerror(s).
Interface/Bottombar

Zoiper 5 user guide 23 of 57
Interface/Conversation window
What we call the “Conversation window” is the portion of the screen to the right hand-side of
Zoiper’smainwindow,asshownbelow:
Zoiper 5 user guide 24 of 57
Youcanndthreeiconstotheright
• Favorite
• Delete
• Edit
Theseallowyouto(youguessedthatright)–
to add the selected contact into your Favorites
list, delete either the conversation history or
the conversation history and the contact itself,
or to edit the contact.
There are threedistinctsectionsintheconversationwindow:
TOP PART
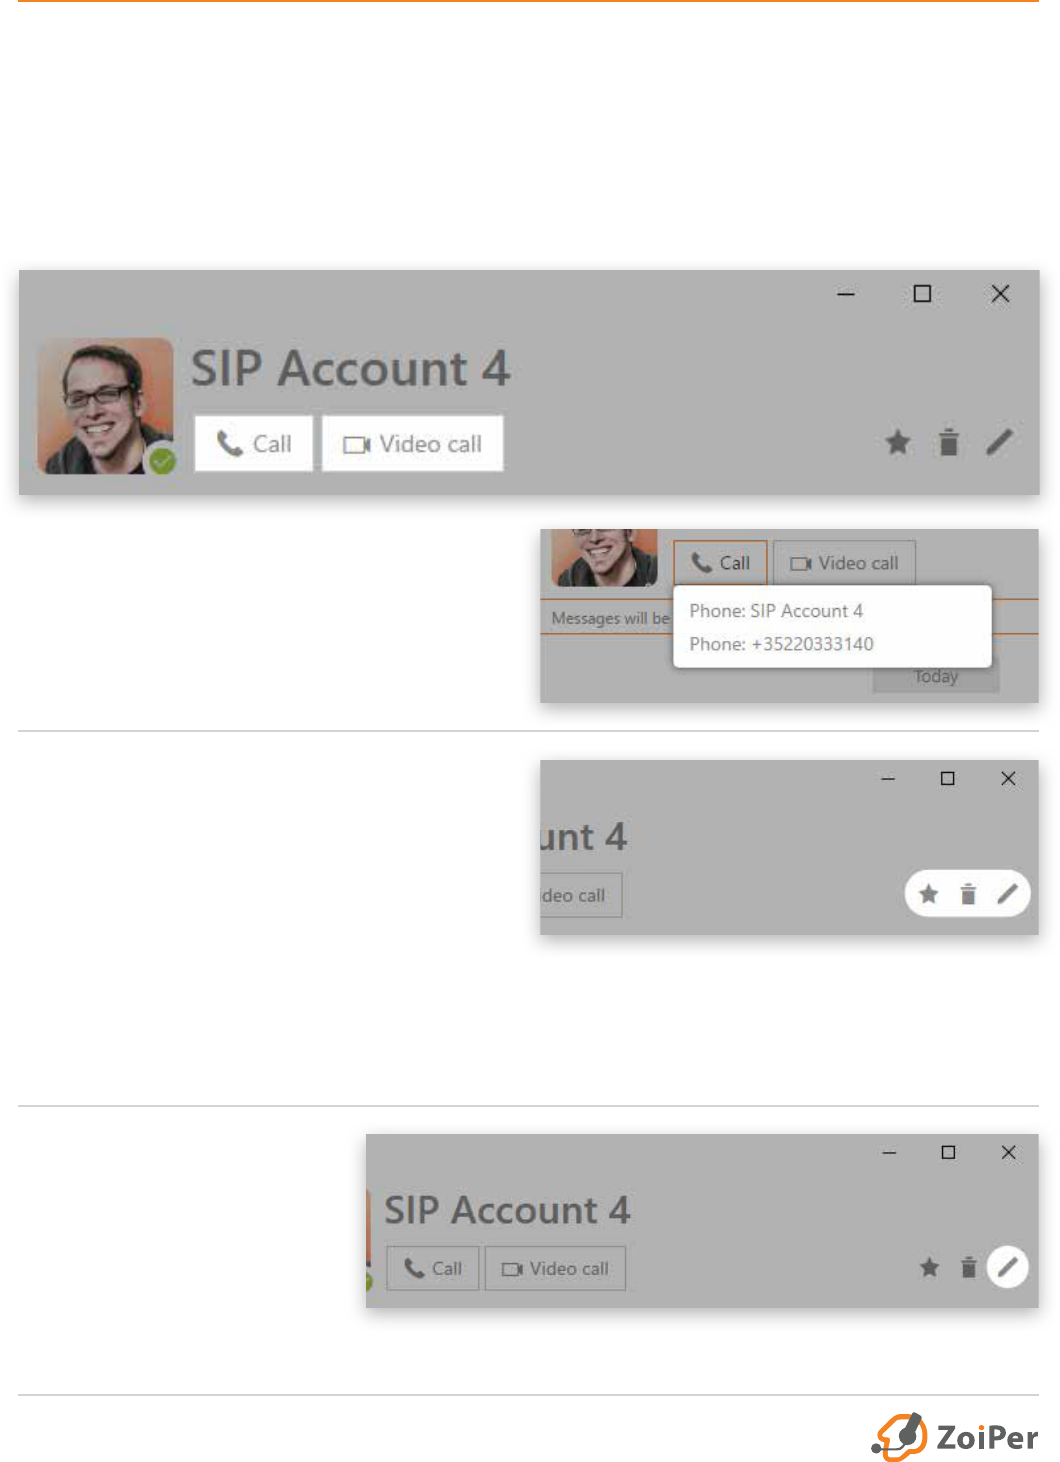
If we focus on the top part of that window, there are a few directly noticeable buttons right
away–the“Call”and“Videocall”buttons.
Interface/Conversation window
Theseareeasytoreadandunderstand,except
one–iftheselectedcontacthasafewphone
numbers associated with it, once you click
on the “Call” button a small drop-down will
appear underneath where you can choose
which number to dial out.
The most important of these is
the Edit button found on the
right side (represented by the
pen-shapedicon):

Zoiper 5 user guide 25 of 57
Hereyoucanllupallthecontactdetails
necessary for the selected contact. You can
alsoaddasmanyadditionaleldsasyou’d
like,justclickonthe“Addanadditionaleld”
at the bottom of the screen.
To save the changes you can
either click the X button on
the top right, or out of the
Edit contact screen.
Interface/Conversation window

Zoiper 5 user guide 26 of 57
MIDDLE PART
In the middle part of Conversation history window, you
could see all necessary information for a selected contact.
Thisincludes:dateandtimestamps,chatmessages,missed,
received and not answered calls. Including additional details for
theseasshownbelow:
BOTTOM PART
At the bottom part of the
Conversation history window,
you can type a message to be
send either as a chat message
via the SIP SIMPLE protocol
associated with that account,
or as an SMS towards a cellu-
lar network connected phone
number.
There is also the emoticon button allowing you to send
emotes, and the send message button as well.
Interface/Conversation window

Zoiper 5 user guide 27 of 57
COMPACT WINDOW
If you prefer a more
minimalistic phone layout,
you can disable the chat
/historyfromopeningby
default by going to Settings >
Theme, then check the “Enable
compact mode” option.
When this option is enabled,
and a contact is selected, a
small menu will appear with a
Voice call, Video call, Chat and
Edit buttons.
The phone button will initiate
a call, the camera button
will initiate a video call, the
message one will open the
conversation history for that
contact and the pen-shaped
button allows to edit the
contact. Note that only the
Call button keeps the window
in its compact mode, the
otherswillextendZoiper5to
the right as in normal mode.
When multiple telephone
numbers are available for a
contact, a popup selection
menu will appear to select
the number to dial or send a
message to.
HANG
-
UP BUTTONS
When a call is active, the
active calls section will appear
showing the list of active calls.
A hang-up button will appear
nexttoeachcall.Youcanclick
the hang-up button to end
theactivecall.Ifit’sonlyan
incoming call, and you have
not answered yet, you can still
hang-up by doing the same.
IN CALL MENU
During an active call, a menu will appear with additional
optionssuchascallmute,speaker,keypad(DTMF),showcall
statistics,turncallrecordingon/o,startavideocall,callhold,
transferoraddacall(startaconferencecall).
When you have enabled Compact mode in Settings > GUI >
Theme,thein-callmenuwillappearverticallytotheright:
Click once the mute
button to disable
your microphone,
the button becomes
orange. Click it
again to enable the
microphone.

Zoiper 5 user guide 28 of 57
Settings
InZoiper5therearetwowayshowtoaccesstheSettingsmenu:
click the settings button ()totherightofthedefaultaccountinmainwindow,andclickonthe
phone-wrench button at the bottom of the main window. Here is a view of the main Settings
windowinZoiper5:
Tonavigatearoundthesettingsmenu,youcanjustclickonthetree-optionsmenutotheleft,
whichinturnwillopenthespecicsettingsoptionsfortheselectfunctiontotheright.

Zoiper 5 user guide 29 of 57
Accounts
If you have one or more accounts, you will see these listed to the left on the Accounts window:
The accounts are grouped by protocol (SIP,
IAX).Aniconinfrontoftheaccountinforms
youofthecurrentstatus:registered,tryingto
register, not registered.
When you click on an account, settings for this
specicaccountwillopen.Whatsettingswill
be shown depends on the protocol type (SIP,
IAX).

Zoiper 5 user guide 30 of 57
Accounts/SIP Accounts
OPTIONAL SIP CREDENTIALS
Useauth.Username
Leave this one empty unless
youareexplictlyinstructedto
llthiseldforyourprovider
or PBX.
Useoutbandproxy
Thischeckboxmakessure
that Zoiper will use the
outboundproxycongured
underneath.
Outboundproxy
Leave this one empty unless
youareexplictlyinstructedto
llthiseldforyourprovider
or PBX.
Domain
This is the hostname or IP address for the
SIP registrar server. This could also be
calledProxy,Domain,IPorRegistrar;and
willtypicallylooklikesip.example.comor
10.1.1.120;Aportcanbeaddedbyadding
:portattheendofthedomain,e.g.sip.
example.com:4200
Username
This is the username to
authenticate to the SIP
registrar. This could be a
name, a telephone number,
or a number of random
letters and numbers.
SIP CREDENTIALS
Password
This is the password
to authenticate to
the SIP registrar,
this probably will be
a combination of
letters and numbers.

Zoiper 5 user guide 31 of 57
CallerIDName
This is the caller ID name that will be set for
your outgoing calls. Keep in mind that the
provider or PBX will usually ignore or override
this setting on their end.
CallerIDNumber
This is the caller ID number that will be set
for your outgoing calls. Keep in mind that the
provider or PBX will usually ignore or override
this setting on their end.
VoicemailMessageWaiting
Indicator (MWI)
This setting controls if and
when the softphone will
subscribe for Message Waiting
Indicator to the server. If the
server supports it, the phone
will inform the user of new
voicemail messages.
REGISTER ON STARTUP
When enabled, the softphone will
automatically register when the phone is
started. A registration is usually required
for incoming calls to work and in rare
congurationsalsoforoutgoingcallsto
work. Registrations can be done manually
with the Register button on the top of
this screen.
SUBSCRIBE PRESENCE
Subscribe for presence status (online,
busy,outtolunchetc.)foryourcontacts
on this server. You will need to also
congurethisserverassourcefor
presence information for the individual
contact or contact source.
PUBLISH PRESENCE
Send my presence status (online, busy,
outtolunchetc.)totheserver.
USE BLF
Enable the Busy Lamp Field if the server
supports such functionality.
USE CUSTOM RINGTONE
Selectadierenttoneforcallsthatcomeinon
this account.
DON’T PLAY RINGBACK TONES
Disable the ringback tone for outgoing calls.
(This means you will not hear the other side
ringingunlessringingissentasearlymedia)
SIP Accounts
FEATURES

Zoiper 5 user guide 32 of 57
NUMBER REWRITING
STRIP DIAL CHARACTERS
Charactersinthisinputeld
will be stripped from the
telephone number prior to
dialing.
ENABLE DEFAULT COUNTRY CODE &
INTERENATIONAL PREFIX
Withthisoptionyoucanenable/disablethedefaultcountry
codefornumbersthataresavedwithoutoneandtheprex
when dialing international numbers. You can also use it to
includeaspeciccustomprex(ifneeded)infrontofthe
numbers–forexample“9”tomakeoutgoingcallsorsomething
similarthatneedstobeusedasanoutgoingextension,etc.
PRE
-
CONFIGURED EXTENSIONS
CHECK VOICEMAIL
Theextensionthatthesoftphonewilldialon
the server to listen to voicemail messages.
Alternative-Thisistheextensionontheserver
where you can listen to your voicemails. This
extensionwillbedialedwhenyouclickonthe
voicemail icon on the main panel.
TRANSFER TO VOICEMAIL
Theextensionthatthesoftphoneshoulddial
on the server to leave a voicemail message.
Alternative-Thisistheextensiononyour
server that hosts the voicemail functionality.
This is used to forward incoming calls to
the voicemail when you click on the send to
voicemail button on the incoming call popup.
SIP Accounts

Zoiper 5 user guide 33 of 57
COMPATIBILITY MODES
DTMF MODE
This setting controls how the softphone will send DTMF digits to
the server. This is used to control IVRs (e.g. press 1 for English, 2 for
Spanish).Thissettingneedstomatchthecongurationontheserver.
SEND KPML
(Cisco Unied Communications Manager)
EnablethisoptiontouseKPMLIftheserverconrmsitsupportsit.This
is mainly used in combination with Cisco Callmanager and will replace
the other DTMF capabilities.
FORCE RFC3264 HOLD
(Cisco Unied Communications Manager)
This forces a change in the hold and unhold packets and is a
workaround for some broken implementations that do not advertise
thesupportedholdmethodsproperly.Usethiswhenexperiencing
issuesputtingacallonholdandyouconrmNATisnottoblame.
CISCO CALL FORWARDING
(Cisco Unied Communications Manager)
Used to enable the cisco server side style of call forwarding. This
optionwillonlyworkifyoucongurethephonetypeontheCisco
Callmanager as Cisco Softphone instead of the standard 3rd party SIP
softphone.
SIP Accounts
DTMF tones are sent
when browsing voice
menus. Ask your VoIP
provider which DTMF
type to use with your
account.

Zoiper 5 user guide 34 of 57
SIP Accounts
NETWORK RELATED
TRANSPORT
The protocol that will be used to send and receive SIP
packets. Try to avoid UDP as it might lead to issues with codec
negotiations due to the limited UDP packet size (calls failing
ormissingvideo).Itisalsolessreliableforincomingcallsdue
to NAT timeouts on our router. Use TLS if you want to encrypt
who you call to and what DTMF tones you send over the line
(withSIPINFO),e.g.forphonebankingorcreditcardpayments
by phone. Using TLS will not encrypt audio sent over the
network, you need to use SRTP or ZRTP to encrypt audio and
video. Please note that some PBXs do not support TCP or TLS.
REGISTRATION EXPIRY MODE
Themaximumnumberofsecondsbetweenconsecutive
registrationsontheserver.Zoiperwillregister10%earlierthan
conguredtoaccountfornetworkdelaysandretransmissions.
The registration procedure is used to inform the server of
our location to make sure incoming calls will arrive properly.
Registration is sometimes also required by the server to make
outgoing calls.
SUBSCRIPTION EXPIRY
MODE
Zoiper 5 will send a
re-subscribe request
automatically to the server
afterthesetdefaulttimesof:
60sforUDPand600sforTCP,
respectively.
KEEP ALIVE TIME
-
OUT
Makes sure that the NAT
(rewall,router)hascorrect
port mapping for TCP and
UDP connections.

Zoiper 5 user guide 35 of 57
AUDIO AND VIDEO CODECS The available codecs shows
the unselected codecs, when
you select them and click on
the right point arrow, they
will be added to the selected
codecs.
Using the up and down arrow
in the selected codecs column,
will change the priority of the
codec, the higher in the list,
the higher the priority. You
can also drag and drop the
codecs entries to move these
around.
Keep in mind that the codec
that ends up being used will
be negotiated between Zoiper
and the other end, from the
list of codecs available on
both sides.
On this screen of the Advanced settings you can select one or
more codecs to be used for this account.
USE RPORT
NAT handling based on the rport
RFC. Recommended for TCP and TLS
congurations.
USE RPORT MEDIA
Last resort for NAT related missing audio
for some broken implementations (e.g.
when the client is behind a symmetric
natincombinationwithaCUCMserver).
Use with caution and only if needed.
USE STUN
Thisdropdownlet’syouselectthestun
options. If you use the custom stun option,
youwillneedtollitinatnextinputeld.
STUN SERVER
Here you are either presented by the default
STUNserver(stun.zoiper.com),orifyouwould
liketo–entermanuallyadierentSTUNserver.
STUN PORT
Entermanuallyaspecicporttobeusedfor
STUN.Defaultoneis3478.
STUN REFRESH PERIOD
CongurehowoftentheSTUNwillbe
refreshed. The value is in seconds, with a
default entry of 30 sec.
SIP Accounts
NETWORK RELATED

Zoiper 5 user guide 36 of 57
IAX Accounts
IAX CREDENTIALS
FEATURES
CALLER ID NAME
This is the caller ID name that
will be set for your outgoing
calls. Keep in mind that the
provider or PBX will usually
ignore or override this setting
ontheirend;
CALLER ID NUMBER
This is the caller ID number
that will be set for your
outgoing calls. Keep in mind
that the provider or PBX will
usually ignore or override this
setting on their endl
REGISTER ON STARTUP
When checked this account
will automatically register
to the server, once the
applicationhasbeenstarted;
USE CUSTOM RINGTONE
Thischeckboxandtheeldunderneathletyou
activateandcongureanalternativeringtone
to be used for incoming calls on this account.
Clickingonthe”…”–buttonwillopenale
browsertoselecttheleyouwanttouse.This
leneedstobean8kHz,16-bitMonowave
le.(.wav);
DON’T PLAY RINGBACK TONES
This setting will stop local generation of ring
back tones and playback of early media when
you are dialing somebody and the call is in the
ringing state. This setting is usually used for
call centers.
SERVER HOSTNAME/IP
The Hostname or IP address
oftheVoIPserver;
USERNAME
The username needed to
authenticatetotheserver;
PASSWORD
The password associated with
this account.

Zoiper 5 user guide 37 of 57
PRE
-
CONFIGURED EXTENSIONS
CHECK VOICEMAIL
Thisistheextensiononthe
server where you can listen
to your voicemails. This
extensionwillbedialedwhen
you click on the voicemail icon
onthemainpanel;
TRANSFER TO VOICEMAIL
Thisistheextensiononyour
server that hosts the voicemail
functionality. This is used to
forward incoming calls to the
voicemail when you click on
the send to voicemail button
ontheincomingcallpopup;
COMPATIBILITY
MODES
DTMF MODE
This setting controls how the
softphone will send DTMF
digits to the server. This is
used to control IVRs (e.g.
press 1 for English, 2 for
Spanish).Thissettingneeds
tomatchthecongurationon
the server.
NETWORK RELATED
REGISTRATION EXPIRY
Themaximumnumberofsecondsbetween
consecutive registrations on the server. Zoiper will
register10%earlierthanconguredtoaccountfor
network delays and retransmissions.
The registration procedure is used to inform the
server of our location to make sure incoming calls
will arrive properly. Registration is sometimes also
required by the server to make outgoing calls.
IAX Accounts

Zoiper 5 user guide 38 of 57
TherearetwodefaultcontactsourcesintheContactssettingsfoundinZoiper5:
• Native Phone Name Contact Service
• Windows Windows Contact Service
Contacts
Andthenthere’sthe“Add contact source”
button, allowing you to add a third, fourth
andsoon(yougettheidea)contactsourceto
Zoiper 5.
• LDAP/Activedirectory
• Outlook(Windowsonly)
• Google contacts
• XML
• Mac address book
• Windows contact service

Zoiper 5 user guide 39 of 57
LDAP / ACTIVE DIRECTORY
ENABLED
checkthisboxtoenablethe
selected contact source. If the
checkboxisunselected,then
the account would not be
active.
HOSTNAME
this would be the hostname
orIPaddressforthatspecic
LDAP/ActiveDirectorysource
in order to get authenticated.
USERNAME
This is the username used for
authenticationtotheLDAP/
Active Directory. This could be
a name, a telephone number
or several random letters and
numbers.
PASSWORD
This is the password used for
authenticationtotheLDAP/
Active Directory. This probably
will be a combination of
letters and numbers.
DC
This is the Domain
Component, which refers
to each component
of the domain. For
examplewww.google.
com would be written as
DC=www,DC=google,DC=com;
LIMIT THE NUMBER OF
SEARCH RESULTS TO
here you can set a limit to the
searchresultsintheLDAP/
Active Directory. Might be
useful in order to not overload
the server.
USE THIS ACCOUNT FOR DIALING
Fromthedrop-downmenuyoucanselectafewdierent
options:“Defaultaccount”,accountofyourchoicethatyou
already have set up and “Do not use”.
USE THIS ACCOUNT FOR PRESENCE
You have the option to choose between “Default account” and
“Do not use”.
ENABLE SIMPLE AUTHENTICATION
enabling this options allows you to connect to a LDAP or an
Active Directory server, without the need of entering additional
login credentials, such as a username and a password.
FILTERS
HIDE CONTACTS WITHOUT NAME
Enabling this option will not show entries in the Contact list,
thatdoesnotcontainanameintheNameinputeld.
HIDE CONTACTS WITHOUT PHONE
Enabling this option will not show entries in the Contact list,
thatdoesnotcontainaphoneinthePhoneeld(s).
Contacts

Zoiper 5 user guide 40 of 57
OUTLOOK / EXCHANGE
OUTLOOK PROFILE
This is the name of the Outlook
prolethatyouwouldliketo
add.
ThedefaultOutlookprole
nameisjust“Outlook”andit
isprelled,asZoiper5takes
itdirectlyfromMSWindows’s
Outlookprole.(Youcancheck
yourdefaultOutlookprole
through the Control Panel >
Mail>ShowProles…)
Contacts
OUTLOOK PROFILE PASSWORD
This is the password used for authentication
totheOutlookprole.Thisprobablywillbea
combination of letters and numbers. Please note,
that this is not your actual email account pass-
word, but a password needed to authenticate
yourMSWindowsOutlookprole,thathasbeen
set up in Control Panel > Mail. It is not neces-
sarytoinputanythinginthiseld,ifyouarenot
specicallyinstructedtodosobyyoursystem
administrator.
USE THIS ACCOUNT FOR DIALING
From the drop-down menu you can select a few
dierentoptions:“Defaultaccount”,accountof
your choice that you already have set up and
“Do not use”.
USE THIS ACCOUNT FOR PRESENCE
You have the option to choose between “Default
account” and “Do not use”.
FILTERS
HIDE CONTACTS WITHOUT NAME
Enabling this option will not show entries in the
Contact list, that does not contain a name in the
Nameinputeld.
HIDE CONTACTS WITHOUT PHONE
Enabling this option will not show entries in the
Contact list, that does not contain a phone in the
Phoneeld(s).

Zoiper 5 user guide 41 of 57
Media
INPUT DEVICE
This is default microphone
device. If you have more
thanoneinput(microphone)
devices, you can select the
one you would like to use by
clicking on the drop-down
menu.
OUTPUT DEVICE
This is the default speaker
device. If you have more than
oneoutput(speaker)devices,
you can select the proper one
by clicking on the drop-down
menu.
INPUT SPEAKER DEVICE
This is a spearate audio
prole.Thedeviceyouselect
here will be treated as the
device for the microphone
when the “speaker phone”
mode is active.
OUTPUT SPEAKER DEVICE
This is a spearate audio
prole.Thedeviceyouselect
here will be treated as the
device for the microphone
when the “speaker phone”
mode is active.
RINGING DEVICE
The default device where the
softphone will ring. You can
change the device as per your
preference.
AUTOMATIC MICROPHONE SELECTION
Enable this option to allow the softphone to select
automatically your input device. This could be useful in case
you are using a portable device for a conference, then want to
plug-in a USB headset to continue or vice versa.
ECHO CANCELLATION
This will reduce or eliminate the echo that person you are
calling might hear. It is recommended to keep this functionality
enabled at all times, unless you are using a desk speaker phone
with built in echo cancellation. Please keep in mind that it is
technically impossible to stop the echo coming from the other
end. If you hear an echo when using Zoiper, the other side
needs to use better echo cancellation.
AUTOMATIC GAIN CONTROL
This will control the microphone levels automatically to make
sure your voice is always the proper volume, regardless of what
microphone you use or slight changes in the distance to the
microphone. It is recommended to leave this enabled at all
times.
NOISE SUPPRESSION
Noise suppression is used to eliminate annoying background
noise form being sent over the network.
AUDIO DEVICE SELECTION

Zoiper 5 user guide 42 of 57
EXTRA FEATURES
MUTE EARLY MEDIA
(
OUTGOING CALLS
)
This enables the muting of early media. This
includes ring back tones coming from the
network or service announcements such as but
not limited to “this number is not in use”.
RING WHEN TALKING
(
INCOMING CALLS
)
Ifyouunselectthischeckbox,thesoftphone
will no longer make a ringing sound when you
are already on the phone and a second call
comes in.
RING ALSO THROUGH
PC SPEAKERPHONE
This option is commonly used for situations
where the user is using a headset, but wants to
hear the ringing sound through the PC speaker
incasetheheadsetisnotworn,whenthere’s
an incoming call.
DISABLE DTMF SOUNDS
Activate this option if you want to stop the
phone from playing sounds when you press
thedialpadbuttons.Thishasnoeectonthe
DTMFbeingsenttotheserver,itjuststopsthe
local playback of the same tones to the user of
the softphone.
EXTERNAL HEADSET / HEADSET INTEGRATION
USE GENERIC HID
Enable this setting to use
standard all-around human
interface device, letting
you use any standard USB
headset/headphones.
USE JABRA HID
Enable this option to use the softphone with
Jabra headsets.
USE PLANTRONICS HID
Enable this option to use Zoiper 5 with
Plantronics headsets.
PLAY SOUNDS
ON NEW CHAT MESSAGE
Enable this option to receive sounds on an
incoming chat message.
Media

Zoiper 5 user guide 43 of 57
Video
VIDEO OPTIONS
CAMERA DEVICE
from the drop-down menu here, you can
choose the video capturing device. Once
chosen,thiswillbeyourdefaultvideodevice;
CAPTURE SIZE
lets you choose the camera capture size,
higher resolutions require faster internet
connection(e.g.broadbandforHigh);
CAPTURE FRAME RATE
letsyouchoosethecaptureframerate,again–
higher the frames per second, you would need
faster internet connectivity.
BIT RATE
anothercustomentrywithaninputeld.
Here you can manually enter a precise bit rate
number,dependingonyourcapturingdevice’s
capabilities.

Zoiper 5 user guide 44 of 57
GUI
THEME
SKIN
On the skin selector page you can select the
skin of your liking.
Select a skin from the drop-down menu, click
onapply(ifneeded)andZoiper5willchange
its skin automatically.
If you are using Zoiper Biz, then you are able
to take advantage of the simple, minimalistic
and always-on-top Zoiper business skin. This
skin allows you to have always-on-top, on-the-
ysettings,functions.
LANGUAGE
From this drop-down menu you can choose your preferred
language.Ifyoucan’tndyourlanguage,oryouhavefound
some spelling or grammar mistakes. You can always participate
by registering at http://zoiper.oneskyapp.com/

Zoiper 5 user guide 45 of 57
LookandFeel
Fromhereyoucanselectwhatkindofpop-upnotications
would be displayed in Zoiper 5 and when.
BEHAVIOUR
START MINIMIZED
this will make Zoiper to launch
minimized when it has been
started;
ALWAYS ON TOP
this option will bring the
Zoiper window on top of all
yourotherwindows;
MINIMIZE TO TRAY
every time when you click the
“minimize” button, Zoiper will
gotothetraybar;
MINIMIZE ON CLOSE
every time when you click the
“close” button, Zoiper will be
minimized;
COLLAPSE ON HANGUP
when the conversation
windowisexpandedtothe
right, if the call is hung-up,
Zoiper will go to collapsed
(I want to call this Compact
mode and the other one
regular)mode.
SHOW POP
-
UP NOTIFICATIONS WHEN
A CONTACT COMES ONLINE
getanoticationonceacontactfromyour
contactlistcomesonline;
A CHAT MESSAGE IS RECEIVED
getanoticationeverytimeyoureceiveachat
message;
THERE IS AN INCOMING CALL
getanoticationonanincomingcall;
THERE IS A NEW VOICEMAIL
receivenoticationsuponanewvoicemail
message;
AN AUDIO DEVICE IS
(
DIS
)
CONNECTED
getnotiedwhenanaudiodeviceis
connectedordisconnected;
A NETWORK CHANGE IS DETECTED
noticationswhenthenetworkstatusis
changed(LAN,WiFi,etc.);

Zoiper 5 user guide 46 of 57
Features
CALLS
CALL SETTINGS
fromhereyoucanenable/dis-
ableIncomingcallhandling;
CALL FORWARDING
couple options to choose
from:
• INSTANT FORWARDING
the call will be instant for-
warded to the target num-
ber/contactbelow,or:
• FORWARD AFTER
the call will be forwarded
after a certain amount of
time(1-600sec)tothesame
targetnumber/contact
below;
AUTO ANSWER
here you have the same op-
tions as above for Call for-
warding. e.g. Instant auto
answer and auto answer after
acertaintimeperiod(1-600
sec).

Zoiper 5 user guide 47 of 57
AUTOMATION
GENERAL OPTIONS
START ZOIPER WITH THE
OPERATING SYSTEM
Enabling this option will make
the Zoiper application to start
automatically with the operat-
ing system.
CHECK FOR UPDATES
if you enable this option,
Zoiper will check for updates
automatically.
AUTOMATICALLY OPEN
URLS SENT IN SIP HEADER
checkthisboxtoenable
Zoiper to automatically open
a URL when one is received
from the server.
INTEGRATION OPTIONS
REGISTER CALLTO, SIP: TEL: URI’S WITH
OPERATING SYSTEM
enable this option to allow the operating sys-
temtouseZoiper5PRO’sURIs
INTEGRATE ZOIPER5 INTO MICROSOFT
OUTLOOK
enable this option if you would like Zoiper to
be integrated in your Outlook email client.
Features

Zoiper 5 user guide 48 of 57
Features
FILES NAMES FOR THE
RECORDED CONVERSATIONS
thisinputeldlet’syoumodifywhatkindof
automaticallygeneratedlenameeachcall
recording will have. You can change the pa-
rameters as per your liking and order.
Hereisalistoftheavailableparameters:
{dnid}–Dialednumberidentier
{name}–Displaynameforcontact
{phone}–Contactphonenumber
{number}–Contactphonenumber
{account}–Accountname
{YYYY}–Dateyear
{MM}–Datemonth
{DD}–Dateday
{HH}–Datehour
{NN}–Dateminute
{SS}–Datesecond
EXAMPLE: recorded_conversation_{YYYY}-
{MM}-{DD}-{HH}_{NN}_{SS}_{account}_{num-
ber}_part{recording_part}
Onthisexamplerecordlenamewillin-
clude:year-month-day-hour_minute_second_
contact phone number_account name
CALL EVENTS
OPTIONS
ENABLE CALL RECORDING
FOR ALL CALLS
thecheckboxenablesordisa-
bles recording of all calls. You
have the option to start re-
cording a call from the active
call window at any time.
DIRECTORY TO STORE
THE RECORDER
CONVERSATIONS
from here you can choose a
default path to a folder on
your computer, where all call
recording will be saved.
EVENT
RULES
From this menu, you can set various event rules
depending on your requirements and use-case
scenarios. Zoiper 5 does not have limitation on
how many Event rules can be created.
Thereareseveraldierentoptionsto
choosefrom:
• On–CallstatuschangeorPresencechange
• CallStatechangesto–Ringing,Answered,
Rejected,Hangup
• Andcalldirectionis–BothIncomingand
Outgoing, Incoming, Outgoing
• Do action–OpenURL,Open/ExecuteAppli-
cation, REST API
• Open URL / Run–manualinputeldwith
followingparameters:
{dnid}–Dialednumberidentier
{name}–Displaynameforcontact
{phone}–Contactphonenumber
{number}–Contactphonenumber
{account}–Accountname
• Filter–useregextomakearuleexception

Zoiper 5 user guide 49 of 57
Lockdown&Provisioning
The automatic provisioning allows you to login only with a
usernameandpassword.Itcouldbeusedfor:
• Use remote provisioning and installer service to automate
thedeploymentofpre-conguredphones.
• Lock down some of the functionality to reduce the internal
support costs.

Zoiper 5 user guide 50 of 57
Advanced
The advanced panel lets you
congurearangeofprotocol
settings,congureprovisioning
and active some troubleshoot-
ing tools.
SETTINGS/ADVANCED/
GOOGLE ANALYTICS
enable/disabletheuseof
Google analytics. We would ap
-
preciate if you leave this option
on, to provide us with some
valuable data regarding use
statistics, behavior and possible
future improvements.
SETTINGS/ADVANCED/TLS OPTIONS
• Override domain name
• Loaddomaincerticate
• Use only strong ciphers
• Disablecerticateverication
• Protocolsuite–SSLv2andv3orTLS

Zoiper 5 user guide 51 of 57
Outlookintegration
HOW TO DIAL WITH
OUTLOOK WITH
ZOIPER 5 PRO
Make sure you have
selected the “Install
Microsoft Outlook add-
in” during the Zoiper 5
installation process.
Open Microsoft Outlook,
select a contact from
your Contacts list and
right click on it.
Then
select “Call with
Zoiper5” > and click
the number you wish
to dial for this contact.
Zoiper 5 will initiate
the call directly:
You have successfully
dialed a number
through Microsoft
Outlook with Zoiper 5
PRO!

Zoiper 5 user guide 52 of 57
CalltransferwithZoiper5
TRANSFER FUNCTIONALITY IS AVAILABLE ONLY IN ZOIPER 5 PRO.
ZOIPER 5 SUPPORTS BOTH ATTENDED
(
WARM
)
AND UNATTENDED
(
COLD
)
CALL TRANSFER.
ATTENDED TRANSFER
WITH ZOIPER 5
Q: What is Attended transfer?
A: Itisusedwhenyourst
need to inform the third party
about the call.
Q: How to do it?
A:Inafeweasysteps:
1. Establishtherstcall.
2. Puttherstcallonhold
manually (by clicking
theholdbutton),orjust
dial the second number.
If you directly dial the
secondnumber,therst
call will be put on hold
automatically. Here, Zoiper
5 gives you much more
versatility - you can “dial”
the second number either
by choosing it from your
Contacts list, or by typing
itintheSearcheld.
1
2

Zoiper 5 user guide 53 of 57
CalltransferwithZoiper5
3. Wait until the second call
is established. There will be
two(2)activecallsnowin
Zoiper 5.
4. Click the Transfer
button while in the
active call that you
want to transfer.
5. Click the other call
that is placed on
hold.
YOU HAVE NOW
ESTABLISHED
AN ATTENDED
TRANSFER!
3
4
5

Zoiper 5 user guide 54 of 57
CalltransferwithZoiper5
UNATTENDED TRANSFER WITH ZOIPER 5
Q: What is Unattended
transfer?
A: It is used when a call is
transferred without informing
the third party.
Q: How to do it?
A:Inafeweasysteps:
Establishtherstcall.
1. Click the Transfer button
located in the functions
bar while in an active call.
2. Typetheotherparty’s
numberintheSearcheld
and press Enter key or click
the the transfer arrow button.
3. You have now established an unattended
call transfer.
4. Zoiper 5 gives you even more
exibilitythaneverbefore.
Now you can drag and drop a
contact from your Contacts list
to make a transfer.
1
2 3
4

Zoiper 5 user guide 55 of 57
ConferencewithZoiper5
1. After establishing an active
call, you can add more
participants by clicking
the Add call button in the
conversation window.
CONFERENCE FUNCTIONALITY IS
AVAILABLE ONLY IN
ZOIPER 5 PRO.
THERE’S A FEW WAYS HOW YOU
CAN MAKE A CONFERENCE CALL.
4. Zoiper 5 gives you even more
exibilitythaneverbefore.
You can also drag and drop a
contact from your Contacts list
to make a conference.
4
1
2. YoucanalsotypeintheSearcheldthe
name of the contact or the number you
want to add to the conversation.
Or simply hover over your Contacts list and
click on a contact to create a Conference.
2
3
3. After the other party picks up your
incoming call, Zoiper 5 will have
successfullyestablishedacallconference:
Zoiper 5 user guide 56 of 57
ConferencewithZoiper5
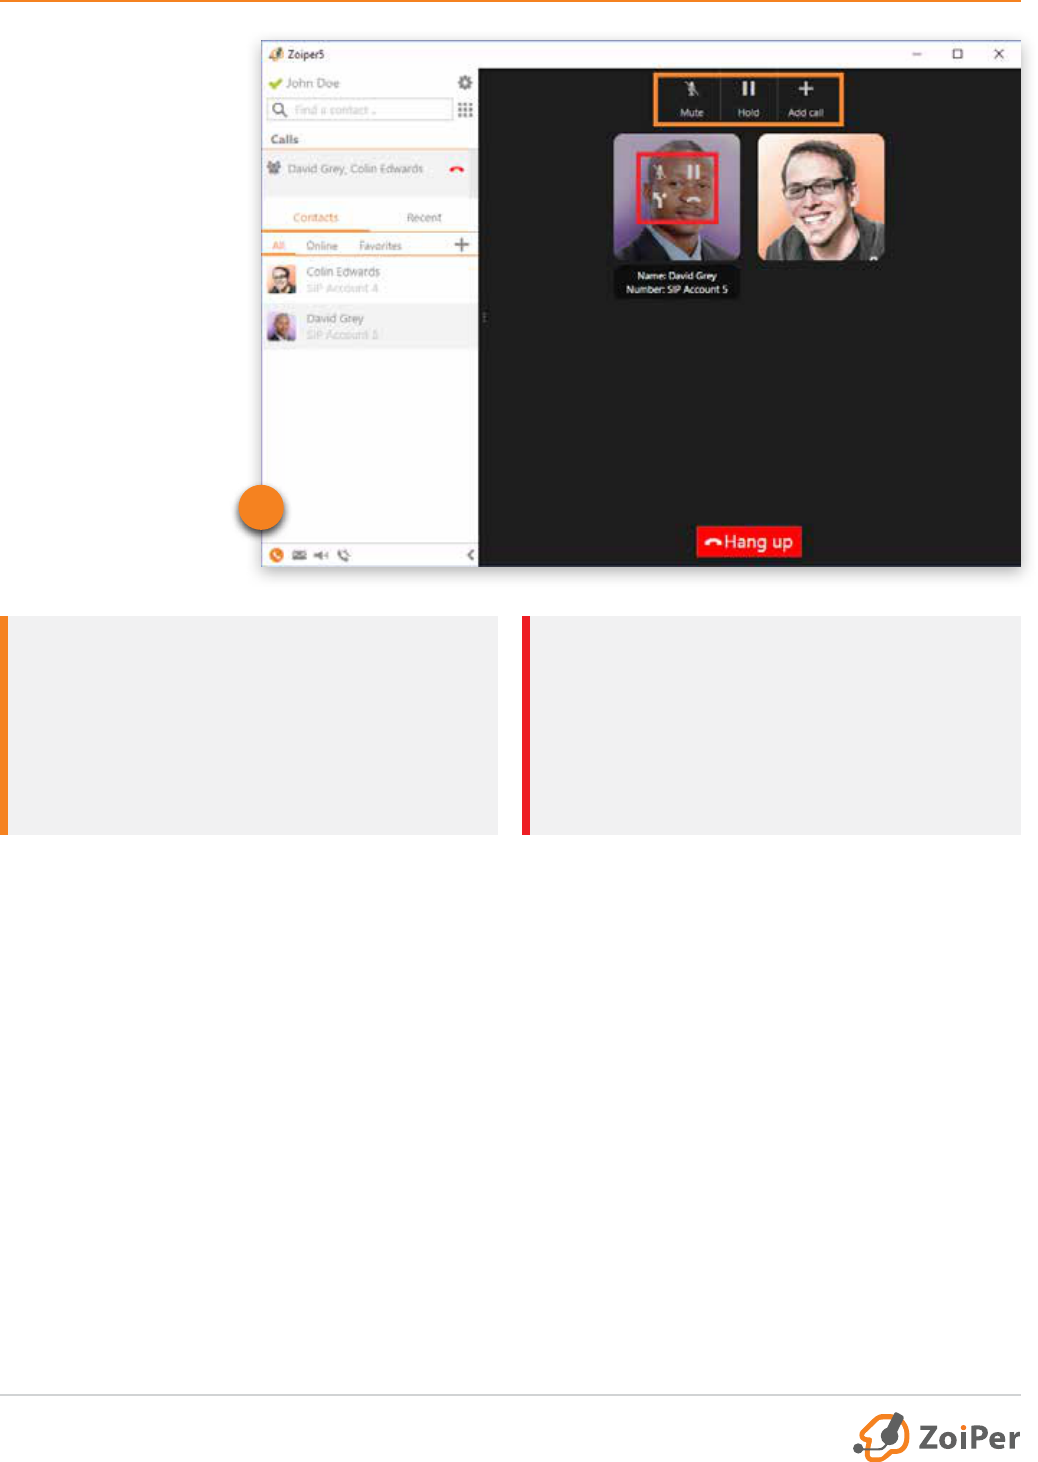
5. While in a
Conference call,
Zoiper 5 allows
you to manage the
conversation with
either global or
individual controls.
*separate - as in disjoining two or more merged participants,
essentially placing them out of the conference as individual calls
Top buttons (in orange)aectallthe
participantsinaspecicConference,so
these are the global controls. i.e. if you click
Muteallparticipants’voicewillbemuted.
Hold will put the entire conference on hold,
while Add call will give you the ability to
include an additional participant.
You can however, manage individual
participants in the conference call, simply
by hovering over each participant with the
mouse over them (in red). Then, you can
individually mute a participant, place on
hold, hang up or separate* a conference
call.
5

Zoiper 5 user guide 57 of 57
Help/About
CHECK FOR NEW VERSION
manually check if there is an
update for Zoiper 5.
DIAGNOSTIC
IfyouareexperiencinganyissueswithZoiper,this
will be a great place to start. You have the options
toenable/disablethefollowing:Enabledebug
log, Enable crash dump and to Automatically
send crash dump to our Zoiper servers for further
investigationandhelpustoxtheseissues.
VISIT OUR WEBSITE
opens http://www.zoiper.com/
in your default web browser.
REPORT A PROBLEM
A quick way to send our tech-
nicians detailed information
regarding the issues you might
beexperiencing.Justtypeitin
and click Send!
ABOUT
the usual suspects
here. Library version,
phone build version, UI
version, copyrights.
