
Amicus Outlook/Exchange Contacts & Calendar Link Guide © 2024 1
Amicus Link Guide:
Outlook/Exchange Contacts & Calendar
Applies to: Amicus Attorney
Synchronize your Amicus Attorney and Outlook contacts, appointments, and tasks.
Choose a client-side link with your local Microsoft Outlook
®
or a Server-side link with Microsoft Exchange™.
Amicus Link Guide: Outlook/Exchange Contacts & Calendar 1
About the Link 2
What you need 2
Advantages of using the Link 3
Link overview 4
Administering the Link at the Firm level 5
Amicus Administrator checklist 5
Configuring the Firm Settings 6
Controlling Firm Member access rights 11
What’s next 11
Configuring the Firm Member workstation 11
Firm Member checklist 11
Setting Firm Member Link preferences 12
OUTLOOK: Initializing the Link 22
EXCHANGE: Initializing the Link 24
Changing your Preferences 25
EXCHANGE: Managing initializations and resets by Administrators 25
Using the Link after initialization 27
Synchronization details 28
File Associations 28
Contacts 28
Events (Appointments and To Do’s/Tasks) 30
Field Mapping 32
Working with Office 365 when Multi-factor Authentication is enabled 34
Retrieving your App Password for Office 365 34
Creating an App Password 35
Using your App Password in Amicus Attorney 37
Troubleshooting 40
Outlook Link Log 40
Deletion 41
Resetting the Link 42
Other Important Information 44
Appendix A − Upgrade to Advanced Authentication (OAuth) for Office 365 45
When Office 365 and Exchange links have already been configured 54
Rebuilding Outlook Columns 55

Amicus Outlook/Exchange Contacts & Calendar Link Guide © 2024 2
NOTE: Outlook/Exchange E-mail Link is a related feature that integrates your e-mail with
your Amicus Communications. It shares firm settings with the Contacts & Calendar Link, but
has its own Firm Member preferences. For details, please see the Amicus Outlook/Exchange
E-mail Link Guide.
About the Link
The Amicus Outlook/Exchange Contacts & Calendar Link is a bi-directional synchronization feature that
aligns your Amicus Contacts, To Do’s, and Appointments with your Microsoft® Outlook® Contacts,
Tasks, and Appointments. You can configure the Link to synchronize any combination of Contacts, To
Do’s/Tasks, and Appointments in either direction or in both directions.
This Contacts & Calendar Link is an ideal vehicle for migrating your data into Amicus, or for large firms
where all members use Outlook but not all members use Amicus. Scenarios are provided in the
following section that will give you an idea of how some firms have employed the feature.
Amicus supports integration with either Outlook as a standalone client-side integration or Microsoft
Exchange which is a server-side integration.
This document provides details about how the Link handles Firm Member and People Group
assignments, File associations, and custom field synchronizations. Configuration wizards guide the
Amicus Administrator and Firm Members through the steps necessary for setting up and initializing the
Link. Information is provided on resetting the Link and ensuring that the feature runs smoothly.
What you need
The Amicus Outlook/Exchange Contacts & Calendar Link requires:
• Installed on the Amicus Application Server:
− Amicus Attorney Server (with or without Amicus Billing),
accessible from the user workstations
• Installed on the workstations of users who wish to configure and use the Link:
− Amicus Attorney Workstation
− If Firm Member selects Outlook (standalone) Link — Microsoft Outlook
• If firm selects Exchange (server-side) Link — Microsoft Exchange installed locally or used in a
hosted configuration (including Office 365)
For a list of supported Outlook and Exchange versions, see the Amicus Attorney Hardware & Software
Requirements, available from the Amicus Attorney Technical Resource Guides/Updates section of
our website.
IMPORTANT: Ensure that the Windows Time Zone and Date/Time settings on all
Workstations match those on the Amicus Application Server, Amicus Database Server (if
SQL Server is installed separately), and your Microsoft Exchange Server (if applicable). That
is, ensure that the time and date is synchronized across all these computers, typically
against an Internet-provided UTC clock service.
CAUTION: The use of third-party utilities with Outlook (such as an e-mail logger) could affect
the proper functioning of the Link and might even cause data corruption.

Amicus Outlook/Exchange Contacts & Calendar Link Guide © 2024 3
Document Conventions
• OUTLOOK Instructions for Outlook Standalone configuration
• EXCHANGE Instructions for Microsoft Exchange configuration
The following typographical conventions are used in the documentation:
• Text that you should enter exactly as printed is shown in Courier font, e.g. 7/28/2017.
• Keys that you press are shown in uppercase within angle brackets, e.g. <DELETE>.
Advantages of using the Link
Scenario 1 – The Legal Department
This feature is ideal for large organizations that use Outlook through Microsoft Exchange on a company-
wide basis and have one or more individual departments that run Amicus. For example, a large retailer
employs 350 people at their head office, 25 of whom are running Amicus in the Legal Department. The
members of the Legal Department interact daily with various other departments within the organization.
They have the advantage of utilizing the strong case-management tools provided by Amicus, while
continuing to work with the company’s Exchange environment—all without the necessity of having to
enter data twice.
Scenario 2 –The handheld device
Regardless of the handheld device used, mobile professionals can merge their Contacts, Appointments,
and Tasks with their Amicus data by employing the Link, provided that the device can synchronize with
Outlook.
Jane is a busy litigation lawyer who uses Amicus to manage her practice. She always carries her Apple
iPhone with her. While out of town meeting with a client, John Smith, Jane uses her iPhone to set up an
Appointment for them to meet again to further discuss the details of his case. She enters the name of
John’s file in the Notes section. When Jane returns to the office the next day, she synchronizes her
iPhone with Outlook. Upon launching Amicus, a sync runs automatically. Jane’s Calendar in Amicus
displays the Appointment she entered into her iPhone, and it also appears on John’s File.
Scenario 3 – Transitioning to Amicus
Those who adopt Amicus throughout their firm, and who previously relied on Microsoft Outlook for
managing their Calendar and Contacts, soon find that the practice management features in Amicus far
exceed those that are available in Outlook. Many have discovered that the Link is a valuable tool for
migrating their data over to Amicus quickly and easily.
Monahan & White is a 15-member law firm that recently deployed Amicus to all staff, having found that
they required a file-centric software solution to help run their practice. All lawyers, paralegals, and
assistants in their organization have used Microsoft Outlook with Exchange for the past three years.
They ensured that Amicus was configured and mapped similar Contact groups, Contact custom fields,
and Task priority values. After initializing the link to their accounting software, which created their Files
and Clients in Amicus, each user entered the Short File Name, where applicable, in the Notes field of
important Appointments and Tasks in their Outlook Calendar. On a rotating basis, each user enabled
the Link at their Amicus workstation.

Amicus Outlook/Exchange Contacts & Calendar Link Guide © 2024 4
Link overview
The Link synchronizes Amicus People with Outlook Contacts, Amicus Appointments with Outlook
Appointments, and Amicus To Do’s with Outlook Tasks.
Basic configuration
• If your firm uses Outlook standalone (without Microsoft Exchange), your Amicus Administrator
will configure the Link to synchronize Amicus with the Outlook client at the Firm Members’
workstations.
• If your firm uses Outlook with Microsoft Exchange, your Amicus Administrator will configure the
Link to synchronize Amicus with the Exchange Server.
Sync direction
Each Firm Member can set the direction in which records are synchronized during initialization (one
way), and also the direction(s) that new records and updates and deletions to already synchronized
records are synchronized subsequently. That is, the Link can be set to synchronize Contacts in both
directions, one direction only, or not at all. The same choices are available for Appointments and To
Do’s/Tasks.
AMICUS
Optional synchronizations
OUTLOOK
Contacts
◄──────►
Contacts
Firm Members
───────►
Contacts
Appointments
◄──────►
Appointments
To Do’s
◄──────►
Tasks
OUTLOOK: When synchronizations occur
• When you first enable the Link through your Preferences (the first sync is called initialization)
• Each time you start Amicus, if you chose this option when setting up the Link
• Automatically while you remain logged into Amicus, according to the optional sync period you
specified when setting up the Link
• When you choose Outlook > Perform Synchronization on the Tools menu in Amicus
• When you choose Outlook > Process Deletions on the Tools menu in Amicus
• When you reset the Link
If Outlook is not already running when you do a sync in Amicus, it will start automatically as a
background process (not shown in your Windows Taskbar) and your usual Outlook startup prompts, if
any, will appear. Activity during the sync or deletion process is noted in the Amicus Status Bar.
EXCHANGE: When synchronizations occur
• When the Amicus Administrator first enables the Link for you (the first sync is called initialization)
• Automatically on a regular polling interval, regardless of whether you are logged in to Amicus and
whether your local Outlook is running
• When the Amicus Administrator resets the Link for you

Amicus Outlook/Exchange Contacts & Calendar Link Guide © 2024 5
Administering the Link at the Firm level
NOTE: If you use both Microsoft Exchange and Office 365 you must Upgrade to Advanced
Authentication (OAuth) for Office 365.
Amicus Administrator checklist
1 Read this Amicus Outlook/Exchange Contacts & Calendar Link Guide.
2 Optionally, ensure that all Amicus Event Categories have a corresponding entry in the Outlook
Master Category List or in each Team Member’s Outlook Category list. (See “Event Categories” on
page 30.)
3 Optionally, ensure that all People Groups in Amicus have a corresponding entry in the Outlook
Master Category List or in each Team Member’s Outlook Category list. (See “Contacts” on page
28.)
4 OUTLOOK: Log in to Amicus at a workstation where Outlook is available.
5 In the Firm Settings view of the Office module, open the Outlook/Exchange Link – Contacts,
Calendar, and E-mail dialog. Click Configure to start the Firm Configuration wizard. Select the
appropriate Link method. (See “Specifying how your firm uses Outlook” on page 7.)
6 Map all Contact Addresses and Communication labels, and finish the Firm Configuration wizard.
IMPORTANT: From the Server, back up the Amicus database before any Firm Members start
initializing their Links.
7 Firm Members have Access rights to set up the Link by default. To remove these rights, assign
selected Firm Members to a Security Profile that excluded these rights. (See “Controlling Firm
Member access rights” on page 11.)
8 Advise Firm Members to configure the Link through their Preferences.
9 Firm Members configure their Link in Amicus.
10 OUTLOOK: Firm Members initialize and enable their Link in Amicus. For performance reasons,
Firm Members should not initialize their Links at the same time and should plan to initialize off-hours
if possible. Have a rollout plan or consider granting Access rights to Firm Members only one group
at a time. (See “Controlling Firm Member access rights” on page 11.)
EXCHANGE: Upon completing the Preferences configuration, Firm Members will trigger a Sticky to
all Administrators, requesting initialization. You’ll schedule each initialization to be run during off-
hours through the Firm Setting for Exchange Management.

Amicus Outlook/Exchange Contacts & Calendar Link Guide © 2024 6
Configuring the Firm Settings
First, ensure that all folders in Windows Explorer are set to show file extensions.
Next, to configure the Link, choose Firm Settings on the navigation list in the control panel in the
Amicus Office module. Choose Outlook/Exchange Link – Contacts, Calendar and E-mail in the Firm
Settings dialog that appears.
The Outlook/Exchange Link view appears.
Click Configure to start the Outlook/Exchange Link Firm Configuration wizard. The Welcome dialog
of the wizard appears. Complete each of the dialogs in the wizard, as described in the following
sections.
OUTLOOK: If Advanced Security for Outlook prompts appear during configuration or initialization, select
the Allow Access action and the Always Perform This Action For This File option, and click OK.

Amicus Outlook/Exchange Contacts & Calendar Link Guide © 2024 7
Specifying how your firm uses Outlook with Amicus
In the Welcome dialog, configure the Link based on the way that your firm uses Outlook.
Select Workstation Sync with local Outlook or an option under Server-side Sync
(Microsoft Exchange or Microsoft Office 365) (See “Basic configuration” on page 4.)
This setting affects both the Contacts & Calendar Link and the E-mail Link.
Effect on existing Link users
• If you switch from Outlook to Exchange for the firm, any Firm Members who have the Outlook
client-side Link enabled will continue to sync with that method.
• If you switch from Exchange to Outlook for the firm, any Firm Members who have the Exchange
Link enabled will no longer sync with that method. Their Links will no longer be enabled and the
Exchange option will be removed from preferences. Any scheduled Exchange Link initializations or
resets will be cancelled.

Amicus Outlook/Exchange Contacts & Calendar Link Guide © 2024 8
EXCHANGE: Specifying your Exchange credentials
Amicus now allows for Token-based authentication, although users can continue to connect by entering
their Exchange E-mail address and password.
Microsoft Exchange
Selecting the Microsoft Exchange radio button means your firm controls the hardware and
infrastructure. Enter your Exchange E-mail address and Password.
Then click Test Connection.
If the connection fails, providing additional information might help:
• Your network domain name
• Your user name for logging in to your computer on the firm’s network (which might be the same as
your e-mail address)
• Your Exchange Server address (e.g. “mail.firmname.com)
– if using Microsoft 365. enter "outlook.office365.com"
Then click Test Connection again.
NOTE: If you change your Exchange Provider the Test Connection will fail. You must delete
the Exchange Server URL before clicking Test Connection.

Amicus Outlook/Exchange Contacts & Calendar Link Guide © 2024 9
Microsoft Office 365
Selecting the Microsoft Office 365 radio button allows for more scalability and flexibility. Select the
appropriate radio button to indicate your Exchange is provided through a Microsoft Office 365 account
and enter Your E-mail in the field provided.
Then click Authenticate.
Select an account from the list that appears or click the plus icon to sign into another Office 365
account. You are returned to the Outlook/Exchange window. Test connection was successful displays in
the box at the bottom of the window. Click the Next button to continue the mapping process.

Amicus Outlook/Exchange Contacts & Calendar Link Guide © 2024 10
Mapping Contact Address, Phone, Fax, Email, and Web labels
To map, select an Amicus label in the list at the right, select an Outlook label in the list at the left, and
click Map. The names of the mapped labels appear in the middle list. Repeat for each mapping screen.
TIP: Click Auto button to quickly and automatically map matching items.
To clear a label mapping, select both items and click Unmap. Or, clear all of the mapping by clicking
Clear Mapping.
About Phone formats
For an Amicus Phone to sync properly with an Outlook Phone, the same format must be used.
Amicus Phone information is divided into four fields: Country Code, Area Code, Local Number, and
Extension. Outlook Phone information is in three fields: Country/Region, City/Area Code, and Local
Number.
To ensure proper matching, enter a space and an “x” before any extension number when entering
Phone information in the Local Number field in Outlook:
LocalNumber
<SPACE> xExtension

Amicus Outlook/Exchange Contacts & Calendar Link Guide © 2024 11
Controlling Firm Member access rights
Firm Members have Access rights to set up the Link by default. To remove these rights, assign selected
Firm Members to a Security Profile that exclude these rights. In order for Firm Members to set their
Contact & Calendar Link preferences and use the Link, they first need access rights to this feature. This
permission is granted by default in new Security Profiles.
OUTLOOK: For performance reasons, all Firm Members should not initialize the Link at the same time.
To help control this process, consider granting access rights to Firm Members only a few at a time.
To verify whether the Firm Members assigned to a Security Profile have been granted access rights, or
to change their rights, go to the Office module, choose Security Profiles, select the Profile, click Edit,
and in the Office > Actions section, select or clear the Outlook Link option.
What’s next
Each Firm Member must set their own Link preferences through the Link Configuration wizard (available
from the Preferences view of the Office module in Amicus).
Configuring the Firm Member workstation
Firm Member checklist
Each Firm Member should complete the following steps to initialize their Link.
1 Read this Outlook/Exchange Contacts & Calendar Link Guide.
2 Delete or archive any unnecessary Outlook records (optional).
3 To avoid duplicates, ensure that matching records have the same information in the fields used for
matching, e.g. Contact Names.
4 Set your Link preferences through the Link Wizard (available from the Preferences view of the
Office module).
5 OUTLOOK: IMPORTANT - Back up your Outlook database before initializing your Link. See your
Outlook Help or your System Administrator for details.
6 OUTLOOK: Coordinate with your Amicus Administrator as to when to start the Link initialization
(Step 4 of the Link Wizard).
EXCHANGE: From Step 4 of the Link Wizard, click the Send Sticky button to inform your Amicus
Administrator that you’re ready for Link initialization, and they’ll schedule that automatic processing
(usually off-hours for Server optimizations).

Amicus Outlook/Exchange Contacts & Calendar Link Guide © 2024 12
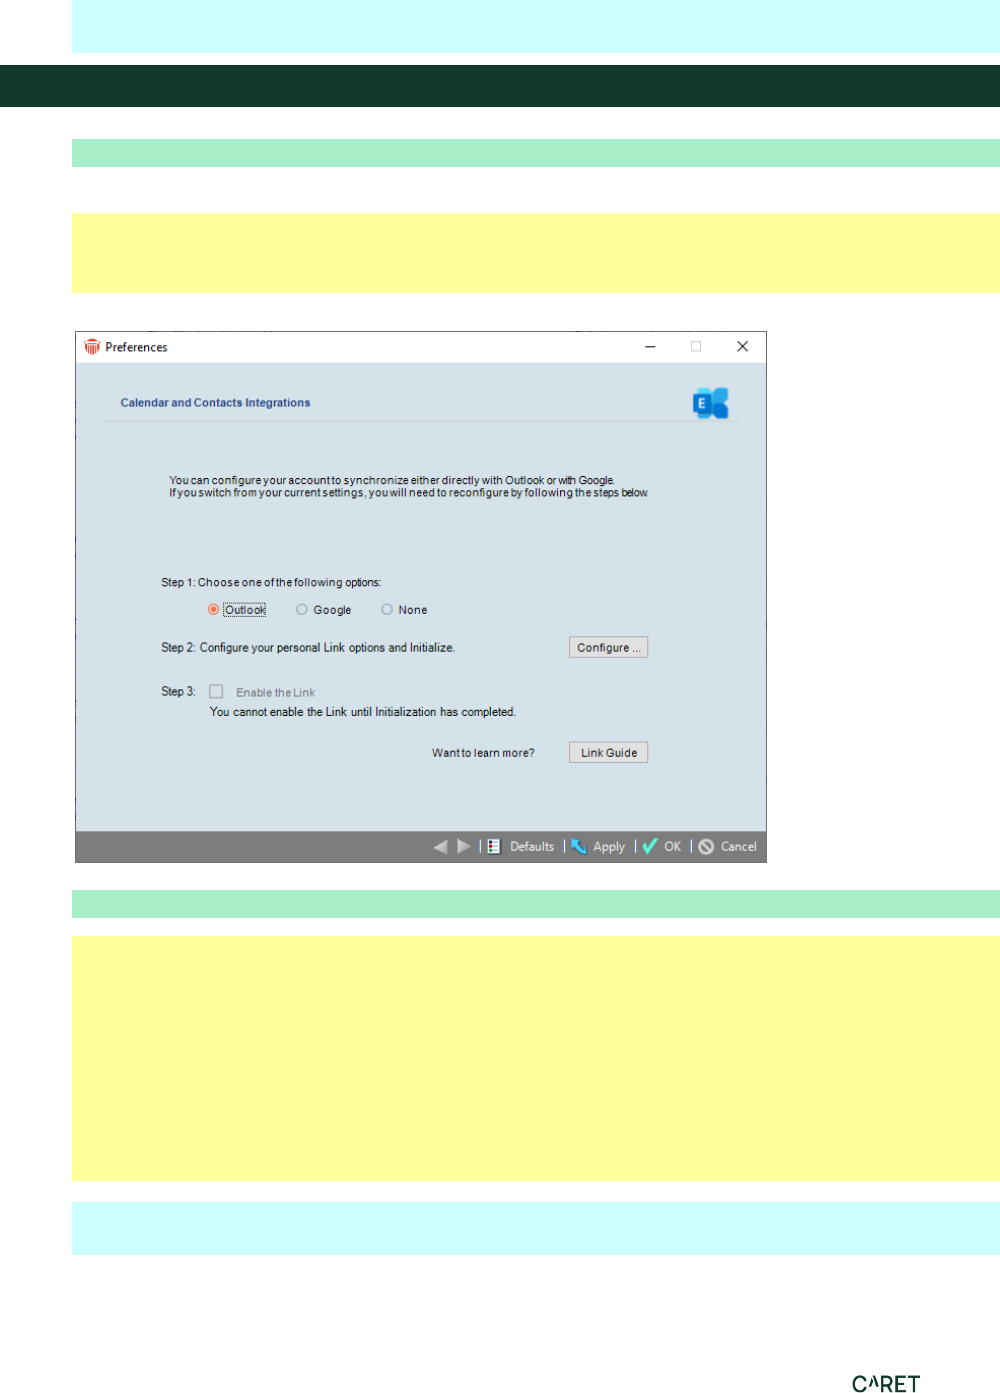
Setting Firm Member Link preferences
1 Choose Preferences on the navigation list in the control panel in the Office module.
2 Select Links > Calendar & Contacts - Outlook/Exchange/Google configuration.
3 Choose the Outlook Client-side or Exchange Server-side (or Google or None) option. Which options
are available depends on how your Amicus Administrator has configured the integration for the firm.
(For details on the Google Link, see the Google Contacts & Calendar Link Guide, available from the
Help Center in Amicus.)
− If you had the Outlook Client-side Link enabled and your Amicus Administrator has now set the
firm to Exchange Server-side, you should reconfigure your settings. You may continue using
your Link with Outlook as before but once you switch to Exchange or Google or None, your
Outlook Client-side integration will be automatically disabled and you won’t be able to choose it
again.
When ready, click Configure to proceed.

Amicus Outlook/Exchange Contacts & Calendar Link Guide © 2024 13
The current completion status of each configuration step is shown at the right.
Complete each of the steps in the configuration dialogs, as described in the following sections.

Amicus Outlook/Exchange Contacts & Calendar Link Guide © 2024 14
Step 1 - Specify your basic sync settings
OUTLOOK: Specify when you want synchronizations to occur.

Amicus Outlook/Exchange Contacts & Calendar Link Guide © 2024 15
EXCHANGE: Specify your e-mail address and password for that account, and then click Test
Connection.
If the connection fails, providing additional information might help:
• Your firm’s network domain name
• Your user name for logging in to your computer on the firm’s network
• Your Exchange Server address (e.g. “mail.firmname.com)
You might need to contact your firm’s IT administrator if you do not know the domain name.
If you previously configured your account on a mobile device such as an iPhone, the domain name will
be listed in the account settings on the phone.
Then click Test Connection again.
Exchange syncs occur frequently and automatically, regardless of whether you’re logged in to Amicus.
If your Exchange credentials change after initialization: You must update these settings in Amicus
or your Link will stop working. Simply return to this screen, enter your new password, click Test
Connection, and then click Finish.

Amicus Outlook/Exchange Contacts & Calendar Link Guide © 2024 16
If you are using Office 365, enter your E-mail Address in the field provided and click Authenticate.
Follow the prompts to allow Amicus to interact with your Office 365 account.
Your account synchronizes with Amicus, regardless of whether or not you are logged into Amicus.
If you Microsoft Office 365 credentials change after initialization: You must update these setting in
Amicus or your link will stop working. Simply return to this screen, enter your new E-mail Adress, click
Authenticate and then click the next arrow, and then click Finish.

Amicus Outlook/Exchange Contacts & Calendar Link Guide © 2024 17
Step 2a - Your conflict preference
The Link will use Amicus data when conflicts arise. A conflict occurs if, since the last sync, a linked
record has been changed in both applications or a new record has been created in both applications.

Amicus Outlook/Exchange Contacts & Calendar Link Guide © 2024 18
Step 2b - Specify your People/Contacts preferences
In the first page of the People/Contacts dialog, choose:
• Whether to include the synchronization of Amicus Contacts and Outlook Contacts.
• Whether you want your default Firm Members to be automatically assigned to new Contact records
created in Amicus through the sync.
• The direction in which changes and/or deletions are applied.
OUTLOOK: Deletions—As a precaution, if more than ten deletions are detected in Outlook, none of the
deletions will be processed in Amicus. A large number may indicate that the current state of your
Outlook records requires review. For example, changes in your default Outlook profile, or synchronizing
your Outlook with other third-party products, could otherwise result in unwanted deletions in Amicus. If
you wish to proceed with the deletions anyway, you can then choose Process Deletions From Outlook
on your Amicus Office, Files, People, and Calendar menus. (This does not apply if using the Microsoft
Exchange option.)
TIP: If changing these preferences after initialization, you might need to reset the Link. See
"Resetting the Link" on page 42.

Amicus Outlook/Exchange Contacts & Calendar Link Guide © 2024 19
Scope
In the second page of the People/Contacts dialog, choose:
• Include all Contacts, and optionally include Firm Members
• Include Contacts only in the particular Groups you select.
• Exclude your Contacts marked Inactive.
If you delete or remove yourself from an Inactive Contact in Amicus that was previously synchronized,
and you now have the Link set to exclude Inactive Contacts, the Contact will nevertheless be deleted in
Outlook.
TIP: If changing these preferences after initialization, you might need to reset the Link.
Synchronizing Firm Members
The synchronization of Firm Members is one way—from Amicus to Outlook. Firm Members cannot be
added to or edited in Amicus via the Outlook/Exchange Contacts & Calendar Link.
This option is available only if you choose to sync all Contacts.
If you sync only those in selected Groups, you may select Contact Groups and/or Firm Groups.
TIP: If after initialization you decide to include Firm Members, it’s recommended that you reset
the Link. See "Resetting the Link" on page 42.

Amicus Outlook/Exchange Contacts & Calendar Link Guide © 2024 20
Step 2c - Specify your Appointments preferences
In the Appointments dialog, choose:
• Whether to include the synchronization of Appointments.
• Whether to prevent past Appointments (on both sides) from being synchronized during initialization.
Select or enter a cut-off date in the past. This can shorten the initialization processing time and keep
old records from cluttering your new database (recommended). The past records will continue to be
excluded from synchronizations unless you later edit them in Outlook or Amicus and change their
dates to occur after the cut-off date. After initialization, changing the cut-off date has an effect only if
you then reset the link (and reinitialize).
• The direction in which changes and/or deletions are applied:
• EXCHANGE: What Reminder to set on new Appointments synchronized from Amicus.
OUTLOOK: Reminders on new Appointments are set according to your defaults set in Outlook.
OUTLOOK: Deletions—As a precaution, if more than ten deletions are detected in Outlook, none of the
deletions will be processed in Amicus. A large number may indicate that the current state of your
Outlook records requires review. For example, changes in your default Outlook profile, or synchronizing
your Outlook with other third-party products, could otherwise result in unwanted deletions in Amicus. If
you wish to proceed with the deletions anyway, you can then choose Process Deletions From Outlook
on your Amicus Office, Files, People, and Calendar menus. (This does not apply if using the Microsoft
Exchange option.)

Amicus Outlook/Exchange Contacts & Calendar Link Guide © 2024 21
TIP:
If changing these preferences after initialization, you might need to reset the Link. See
"Resetting the Link" on page 42.
Step 2d - Specify your To Do’s/Tasks preferences
In the To Do’s/Tasks dialog, choose:
• Whether to include the synchronization of To Do’s/Tasks.
• Whether or not you want to prevent old Done To Do’s (and Completed Tasks) from being
synchronized on initialization. Select or enter a cut-off date. This can shorten the initialization
processing time and keep old records from cluttering your new database (recommended). The old,
ignored records will continue to be excluded in subsequent synchronizations. After initialization,
changing the cut-off date has an effect only if you then reset the link (and reinitialize).
• The direction in which changes and deletions are applied:
OUTLOOK: For more information about deletions, see “Step 2b - Specify your People/Contacts
preferences” on page 18.
TIP: If changing these preferences after initialization, you might need to reset the Link. See
"Resetting the Link" on page 42.
When you have completed the Step 2 dialogs, click Finish.

Amicus Outlook/Exchange Contacts & Calendar Link Guide © 2024 22
Step 3 - Specify your match criteria
To set your matching criteria, click Step 3 in the Welcome dialog. Separate match criteria dialogs will
appear for Contacts, Appointments, and To Do’s/Tasks, depending on which you have chosen to sync.
In each dialog, select one or more of the fields to match on. An Amicus record will match a
corresponding Outlook record only if all of the selected fields have the same content in both records.
The more fields you select, the stricter the match.
If a record matches more than one record in the other application, the first record will be matched.
When you have completed the Step 3 dialogs, click Finish. The Welcome dialog reappears.
OUTLOOK: Initializing the Link
OUTLOOK: There are several important points to consider before choosing to Initialize:
• Initialize and run subsequent synchronizations from only one workstation, otherwise you may
experience confusing results or data loss.
• Speak with your Amicus Administrator to decide upon an appropriate date and time. There are
several reasons for this:

Amicus Outlook/Exchange Contacts & Calendar Link Guide © 2024 23
− This can be a lengthy process depending on the amount of data.
− The process is server-intensive and may affect performance for those using Amicus.
− To avoid overlap with nightly server processes (such as Daily Checks and backups).
− To avoid too many users initializing at the same time.
• Decide whether to initialize in one direction only, and if so, whether from Amicus to Outlook or vice
versa. If your data exists only on one-side, then choose accordingly.
When ready, go to Step 4 in the Wizard.
Check each item in the list, and set your preferred direction.
Select Begin Initialization. You may see an Advanced Security for Outlook prompt. Select the Allow
Access action and the Always Perform This Action For This File option.
Upon successful completion the Link Log appears (also accessible from Outlook > Show Log on the
Tools menu) showing the start and end status.
If Initialization fails, the Outlook Log will display any Errors encountered and the reasons (unsupported
characters, etc.). Correct any issues and retry again at an appropriate time.

Amicus Outlook/Exchange Contacts & Calendar Link Guide © 2024 24
EXCHANGE: Initializing the Link
EXCHANGE: When ready, go to Step 4 in the Wizard.
Check each item in the list. Decide whether to initialize in one direction only, and if so, whether from
Amicus to Outlook or vice versa. If your data exists only on one-side, then choose accordingly.
Click Send Sticky to advise your Amicus Administrators that you’re ready for initialization. Your
Administrator will schedule your initialization at an appropriate time, likely during off-hours.
You’ll be informed by Sticky when your initialization has completed, at which time your link will be
enabled and begin synchronizing on a regular polling interval (approximately every 15 minutes).
Amicus Outlook/Exchange Contacts & Calendar Link Guide © 2024 25
Changing your Preferences
After you have Initialized and regular syncs are occurring, you may decide to now include or exclude
one of your synchronization choices. For example, you are synchronizing just your appointments and
you now decide to also include your tasks. In some cases you may need to Reset the Link. Refer to the
table below.
Change
Reset Outlook Link
Reset Exchange Link
Turn off the option to synchronize either of
Contacts, Appointments, or Tasks
Not required Not required
Contacts – Change your Group selection
Required
Required
Contacts – Choose to include Firm Members
Required
Required
Choose to include an additional sync choice
(e.g. Appointments)
Not Required Required
EXCHANGE: Managing initializations and resets by Administrators
EXCHANGE: While individual Firm Members are responsible for setting their own Preferences,
initializations and resets of the Exchange Link are managed by your Amicus Administrator. The last
Preference step triggers a Sticky message to all Amicus Administrators in your Firm advising them that
this user ready for Initialization. A similar step is part of the Reset process.
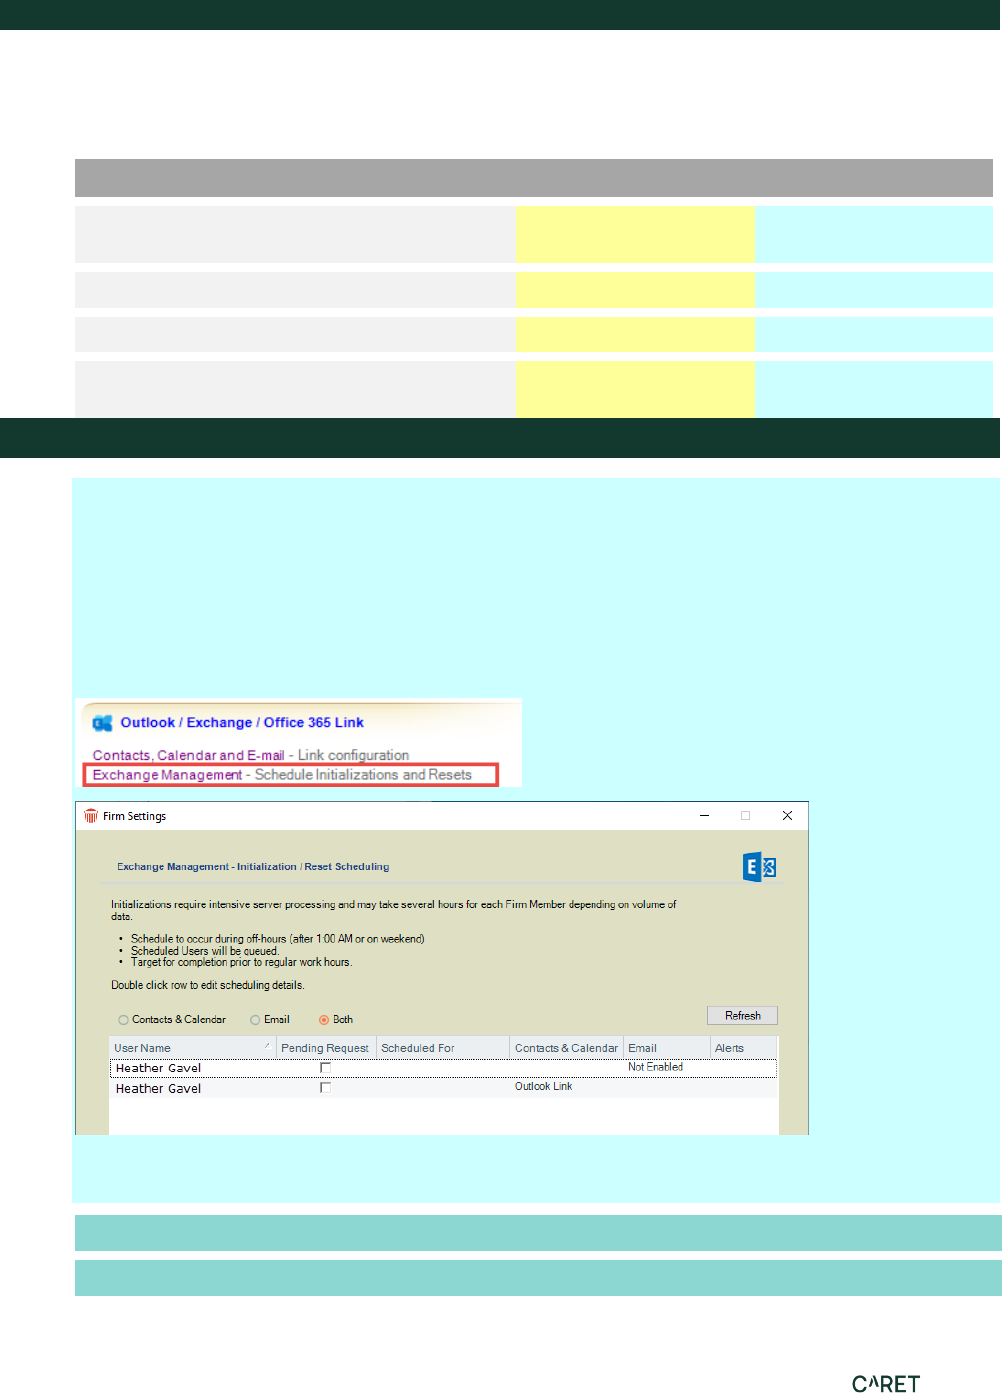
An Exchange Management view is available only to Administrators and only if the Firm is configured to
use the link with Exchange. To access this view:
In Office > Firm Settings, choose Outlook/Exchange Link – Exchange Management.
Choose the “Contacts & Calendar” or “Both” option to filter the list to active Firm Members who have
configured Contacts & Calendar synchronization. Their current status is shown:
Enabled
Configured and initialized to sync with Exchange. Regular syncs occurring.
Not Enabled
Configured for Exchange but not Enabled. No regular syncs occurring.

Amicus Outlook/Exchange Contacts & Calendar Link Guide © 2024 26
Pending
Initialization or reset has been requested but has not been scheduled.
Scheduled
Initialization or reset has been scheduled but has not yet occurred. The scheduled date/time will
appear in the Scheduled column.
Outlook Link
Configured to sync directly with local Outlook client. It’s recommended that you encourage this
user to switch to linking with Exchange.
Google Link
Configured to sync with Google Account or Google Apps Account.
Scheduling an initialization or reset
To schedule an individual whose status is Pending or Scheduled, click the desired row to open the
Exchange Status view of the Firm Member’s Administration Profile.
Schedule the date and time. The process can be lengthy depending on the amount of data, and it is
server-intensive, meaning that it may affect performance for those using Amicus. Take the following
best practice recommendations into consideration:
• Schedule processing to occur during off-hours, after 1:00 am or on a weekend.
• Processing will occur automatically one Firm Member at a time, based on their scheduled start
times—when one is completed, the next will start, even if it overlaps the next start time.
• Avoid overlap with nightly server processing (such as Amicus Daily Checks and backups)
• Target completion prior to the time that users normally login to Amicus..
• Generally avoid scheduling more than 3 or 4 users on a weeknight.
If you need to cancel the scheduling, click Cancel Pending Status in the Firm Member’s Admin Profile.
Upon completion of an individual’s Initialization or Reset, a Sticky message is sent to that Firm Member
and to all Amicus Administrators. The Firm Member’s Status is updated.
Amicus Outlook/Exchange Contacts & Calendar Link Guide © 2024 27
If an Initialization fails to complete, the Alert column in the Exchange Management will indicate this.
Check the Log file for details. See “Troubleshooting” on page 40.
Using the Link after initialization
Enabling the Link at a workstation
After initialization, the Link will be automatically enabled.
OUTLOOK: IMPORTANT - Firm Members should enable the Link at only at one workstation.
Attempting synchronization from more than one workstation, or with more than one Outlook
account, may result in confusing results and a loss of data.
Synchronizing information
OUTLOOK: You can choose to synchronize information in the following ways:
• At Login—A prompt appears whenever you log in to Amicus. (This is set to occur in the Link
Configuration wizard.)
• From the Tools menu—Choose Outlook > Perform Synchronization on the Tools menu in Amicus.
Deletions: You might receive a message that more than 10 deletions need to be done—use the
Process Deletions command to continue. Choose Outlook > Process Deletions on the Tools menu in
Amicus. Deletions are processed from Outlook and/or Amicus, as specified in your Link settings.
During the sync or deletion process, “Synchronizing with Outlook” appears in the Amicus Status Bar.
EXCHANGE: Synchronization occurs frequently and automatically, regardless of whether you’re logged
in to Amicus.

Amicus Outlook/Exchange Contacts & Calendar Link Guide © 2024 28
Disabling the Link
Each Firm Member can temporarily stop regular synchronizations from occurring for themselves by
clearing the Enable checkbox in their Preference.
Synchronization details
The following sections describe how particular types of items are handled, how records are matched,
and how fields are mapped in order to facilitate the proper supply of information to the records that are
updated or created in the other application.
OUTLOOK: Outlook record key
The Contacts, Appointments, and To Do’s/Tasks being compared and synchronized between the two
programs are linked together using unique identifiers. For all matching Outlook records, the Amicus
record ID is stored in Outlook in a user-defined field called the AmicusExternalId field, and is also stored
internally in the Amicus database. The Link uses this record linking ID to perform subsequent
synchronizations quickly and efficiently—only new records in either database then need to be matched
using the matching criteria.
File Associations
There is no equivalent to Amicus Files in Outlook. Records (Appointments and Tasks) sent from Amicus
to Outlook will assign the File Name of the associated File, if applicable, to the Notes field of Outlook
records.
The Link extends your ability to make File associations while working in Outlook. Enter the Short File
Name in the Notes section of any Appointment or Task, in order to create an association with an exact
match on a File in Amicus. The proper format is shown in the following example:
File: Smith v. Jones
The File statement must appear at the very beginning of the Notes section. If specifying multiple matter
Files, enter a line break between each statement. The information is not case sensitive. A space is
required between “File:” and the File Name.
Contacts
Scope
Each Firm Member can choose the scope of Contact synchronization by selecting to synchronize:
• All of their Contacts
• Just specified Group(s) of Contacts
• Active or Inactive Contacts
• Firm Members (not available if you choose to sync based on Groups)
Where an Outlook Contact is assigned to a Category that does not exist as a Group in Amicus, that
Category will not be added in Amicus as a new Group. (This is only permitted by Amicus Administrators
through Firm Settings.) The Contact will not be assigned to a corresponding Group in Amicus.
Wherever a Contact in Amicus is assigned to a Group that does not exist as a Category in Outlook, the
Outlook Contact will show that Category followed by the note “(Not in Master Category List)”.

Amicus Outlook/Exchange Contacts & Calendar Link Guide © 2024 29
OUTLOOK: Contact Custom Fields
To synchronize information in Outlook Contact custom fields with Amicus Custom Contact Fields,
ensure that the field names and type (e.g. Date) exactly match.
If an Amicus Contact’s Custom Field does not match the Name and Type of an Outlook Contact’s
custom field, the necessary custom field is created in Outlook and the field value is synchronized.
If the Outlook Contact’s custom field does not match the Name and Type of an Amicus Contact’s
Custom Field, a custom field is not created in Amicus (and the field value is not synchronized).
New Outlook Contact custom fields ("user-defined fields") can be configured through an Outlook
Contact’s dialog — choose the All Fields tab, click New, and specify Name and Type of the New Field.
Existing Outlook Contact custom fields that don't yet have a value can be displayed from the All Fields
tab — in the Select From dropdown, choose "user-defined fields in folder".
NOTE: Outlook Custom Field Names cannot contain underscores, square brackets, or
number signs. If an Amicus Custom Field has a Name containing any of these characters
(e.g. Date_of_Marriage), the Link will not synchronize that Field with Outlook.
Where custom field Names and Types match, values in fields of the following Field Types are
synchronized.
Amicus People
Custom Field Types
Synchronization
Direction
Outlook Contact
Custom Field Types
Text
◄──────►
Text
Checkbox
◄──────►
Yes/No
Numeric
◄──────►
Number
Currency
◄──────►
Currency
Percent
◄──────►
Percent
Date
◄──────►
Date/Time (only the Date)
Path or URL
───────►
Text
E-mail
───────►
Text
Social Security Number
───────►
Text
Social Insurance Number
───────►
Text
Addresses and Communications information
The Amicus Administrator, when setting up the Link, maps Amicus and Outlook information for
Addresses, Phones & Faxes, and E-mail & Web.

Amicus Outlook/Exchange Contacts & Calendar Link Guide © 2024 30
Events (Appointments and To Do’s/Tasks)
Repeating Events
We recommend that you always set the “Schedule It Anyway” rule for repeating Events in Amicus.
Amicus and Outlook repeating patterns correspond except for the weekend/holiday rules—Amicus has
rules for not scheduling occurrences on non-business days but Outlook does not. The “Move To Next
Business Day” and “Move To Previous Business Day” options in Amicus are not supported in Outlook.
For example, if a weekly Appointment set for Fridays falls on a vacation day one week, and you have
the Appointment set to “Move To Previous Business Day”, then that week’s instance will be scheduled
on Thursday in Amicus but will still be scheduled on Friday in Outlook. If you were to edit that
Appointment instance in Outlook, it would then change back to Friday in Amicus as well (and be
automatically reset to “Schedule It Anyway”).
Internally, Amicus and Outlook manage exceptions to repeating Events differently. For simplicity and
reliability, Appointment exceptions are synchronized between Amicus and Outlook, but To Do
exceptions are not.
Event Categories
Ensure that all Amicus Event Categories have a corresponding entry in your Outlook Master Category
List.
If you add or change an Appointment or Task with a Category that does not match an existing Amicus
Event Category, the Amicus Event will be assigned the default Event Category set in your Amicus
preferences.
Priority of a Task/To Do
The Outlook Task Priority is synchronized with the Amicus To Do Priority, based on the Priority levels
defined in Amicus.
From Amicus Priority
To Outlook Priority
Level 1, typically named Top
High
Level 2, typically named High
High
Level 3, typically named Avg
Normal
Level 4, typically named Soon
Low
Level 5, typically named Low
Low
Level 6, named Someday
Low
From Outlook Priority
To Amicus Priority
High
Level 2, typically named High
Normal
Level 3, typically named Avg
Low
Level 4, typically named Low

Amicus Outlook/Exchange Contacts & Calendar Link Guide © 2024 31
Shared Meetings and Tasks
• The synchronization of collaborative meeting and task requests is not supported.
• If you create an appointment or task in Amicus and assign yourself as well as others to it,
you are all scheduled immediately in Amicus. As each assigned user synchronizes, the
appointment or task is created in their Outlook with only them assigned, and no e-mail
requests will be sent within Outlook to confirm the appointment or task.
• If you are using an Outlook shared calendar, and another user creates an appointment or
task in your calendar, when you synchronize, that appointment or task is created in your
Amicus Calendar.
• If a new appointment or task is synchronized from Outlook to Amicus, your preference setting
for default Firm Member assignments on new Events is not applied. Only you are automatically
assigned to the new Event in Amicus.
To Do/Task Start Dates and Deadline/Due Dates
An Amicus To Do must have a start Date but does not require a Deadline.
An Outlook Task does not have to have a Start Date, but if it does, it must also have a Due Date.
• If you create a Task in Outlook without a Start Date, the Amicus To Do will be assigned the Date of
the sync.
• If you create a To Do in Amicus without a Deadline, the Outlook Task will be assigned “None” as the
Due Date.
Past Events
If a non-Completed Task in Outlook has a date before today, then when the link is initialized (or reset),
the To Do is given today’s date in both Amicus and Outlook.
Personal Events
An Amicus Personal Event (that is, an Event with no associated Files) is synchronized in the same way
as other Events.
Adjourned and current instances of Appointments
If your version of Amicus supports Adjournment tracking, you might have some Amicus Appointments
set to Show Adjournments.
When changes are made in Amicus:
• If the current instance of an Appointment flagged to track adjournments is rescheduled in Amicus,
both the current and adjourned instances will be synchronized to Outlook as appropriate. Adjourned
instances in Outlook, like in Amicus, show “[Adjourned to Date]” at the beginning of the subject.
• Any deletions of adjourned instances made in Amicus will be synchronized to Outlook as
appropriate.

Amicus Outlook/Exchange Contacts & Calendar Link Guide © 2024 32
When changes are made in Outlook:
• If the current instance of an Appointment flagged to track adjournments is rescheduled in Outlook
and then synchronized to Amicus, adjourned and current instances will appear in Amicus as
expected. The Adjournment Details will list this rescheduling with the reason “Unknown – Date
Changed in Outlook”. You can edit the Details in Amicus and change the reason. The adjourned
instance will synchronize back to Outlook, and show “[Adjourned to Date]” at the beginning of the
subject. To take full advantage of the Show Adjournments feature, reschedule Appointments in
Amicus rather than in Outlook.
• In order to ensure proper tracking, any changes or deletions of adjourned instances made in
Outlook will not be synchronized to Amicus. Similarly, deletions of current instances will not be
synchronized to Amicus. (These will be noted in the Link Log.)
• If you have made changes to adjourned instances in Outlook, resetting the Link will cause those
changes to be overwritten (because the reset synchronization is done first from Amicus to Outlook).
Field Mapping
Below are lists of the Contact, Appointment, and To Do/Task fields that are synchronized between
Amicus and Outlook.
Contacts
Amicus Contact Fields
Outlook Contact Fields
First Name
First Name
Middle Name
Middle Name
Last Name
Last Name
Prefix
Title
Suffix
Suffix
Main Note
(Body)
Company Name
Company Name
Position
Job Title
People Groups
Categories
Addresses *
Addresses *
Communications *
Communications *
Custom Fields **
Custom Fields **
* Address and Communications fields are mapped as defined by your Amicus Administrator for the firm.
** OUTLOOK only: Custom/User-Defined Fields are mapped according to field name and type.

Amicus Outlook/Exchange Contacts & Calendar Link Guide © 2024 33
Appointments
Amicus Appointment Fields
Outlook Appointment Fields
Title
Subject
(Start) Date and Time
Start (Date and) Time
To (Time)
End Time
Main Note
(Body)
Category
Categories
Location
Location
Red Letter Day
All Day Event
Repeat Type
Recurrence Type
Repeat Settings
Recurrence Settings
To Do’s/Tasks
Amicus To Do Fields
Outlook Task Fields
Title
Subject
Date
Start Date
Deadline
Due Date
Priority
Priority
Done
Status: Completed
% Complete
Completion Status
Main Note
(Body)
Category
Categories
Red Letter Day
All Day Event
Repeat Type
Recurrence Type
Repeat Settings
Recurrence Settings
Exception Date
Exception Date

Amicus Outlook/Exchange Contacts & Calendar Link Guide © 2024 34
Working with Office 365 when Multi-factor Authentication
is enabled
An App Password is required to give Amicus Attorney permission to access your Office 365 account if you have
enabled Multi-factor Authentication (MFA).
You are required to update your Firm Settings, as well as your Preferences to use the Exchange link in the
Contact & Calendar synchronization and in the Email Integration.
Multi-factor Authentication (MFA) is an authentication process that requires a user to provide a second form
of identification in addition to their password.
Retrieving your App Password for Office 365
Check whether your Office 365 Admin has turned on MFA for your account. If it is not turned on you will not see
the following options in Office 365.
1. Sign into Office 365 with your regular password, click Sign in to display this screen.
2. Click Set it up now to display the Additional security verification screen.
3. In Step 1 select your authentication method from the dropdown list and follow the prompts on
the page.
4. After you verify your alternate contact method click Next to receive an app password that you
can use with Outlook.

Amicus Outlook/Exchange Contacts & Calendar Link Guide © 2024 35
5. Click the Copy icon to copy the password to your clipboard.
Creating an App Password
You will now want to create an App Password instead of using the code from the previous screen.
1. Sign into Office 365 with your regular password, click Sign in to display this screen.
2. Select Security & privacy from the left navigation pane and Additional security verification
from the main screen.
Note: You will only see this option if your Admin has set up MFA for your firm.

Amicus Outlook/Exchange Contacts & Calendar Link Guide © 2024 36
3. Select Update my phone numbers used for account security from the dropdown list to
display the following page:
4. Select App Passwords at the top of the page and choose Create to get an app password.
5. Type a name for your App Password such as “Amicus” and click Next to display Your app
password screen.
6. Click copy password to clipboard so you don’t have to memorize the password.
7. Go to the Amicus app and enter or paste the App Password when you are prompted.

Amicus Outlook/Exchange Contacts & Calendar Link Guide © 2024 37
Using your App Password in Amicus Attorney
You will only need to do these steps once to update your Firm Settings.
1. Log into Amicus Attorney, select Office > Firm Settings from the left navigation pane.
2. Select Contacts, Calendar and E-mail under the Outlook / Exchange Link tab to display the
Outlook / Exchange Link dialog.

Amicus Outlook/Exchange Contacts & Calendar Link Guide © 2024 38
3. Click Configure to display the Welcome dialog.
4. Enter the App Password in the Password field.
Updating your Preferences in the Exchange Settings dialog.
1. To access the Exchange Settings dialog, select Office > Preferences from the left navigation
pane to display the Preferences screen.

Amicus Outlook/Exchange Contacts & Calendar Link Guide © 2024 39
2. Select Calendar & Contacts – Outlook / Exchange / Google configuration under the Links
tab to display the Calendar and Contacts Integration dialog.
3. Select the Outlook radio button under Step 1 and click Configure to display the Exchange
Settings dialog.
4. Enter the App Password in the Password field and click the Next arrow in the footer.

Amicus Outlook/Exchange Contacts & Calendar Link Guide © 2024 40
Troubleshooting
Outlook Link Log
To view a history of a Firm Member’s Link initialization and synchronization processes, including any
errors encountered, choose Outlook > Show Log on the Tools menu in Amicus at their workstation.
There are 3 views of the Log: Today, Error Log Only, and Full Log.
EXCHANGE: An additional text version of the full Log is available directly on the Amicus Server. In the
Windows Start Menu, choose Amicus > (Amicus Attorney Tools >) Server Logs. The Log’s name is
AmicusExchangeSync_Date.log.
NOTE: Linked Communications are shared records from an associated company such as contacts,
emails, phone, web addresses defined in Amicus Attorney. Linked Communications must be updated
from within Amicus Attorney as they cannot be synchronized from an outside application.
.

Amicus Outlook/Exchange Contacts & Calendar Link Guide © 2024 41
Deletion
Before deleting confirm that Amicus Attorney Outlook Add-In is enabled In the COM Add-Ins
window.

Amicus Outlook/Exchange Contacts & Calendar Link Guide © 2024 42
Resetting the Link
A Firm Member’s Amicus and Outlook records might become out of synchronization. Discrepancies may
be due to some major change that has occurred in the Amicus database or the Outlook database. Such
a situation may occur after restoring a backup in Amicus or after archiving/de-archiving your records in
Outlook.
OUTLOOK: We recommend that you first try restarting both applications and try another sync. If this
does not correct the discrepancies, then we recommend that you reset the Link.
Resetting the Link will clear the links between the records in the two applications, and re-initialize the
Link. This can be a lengthy process.
To reset the Link, choose Links - Contacts & Calendar in your Preferences. Then click Configure. The
Welcome dialog appears.
Click Reset. A strong Warning appears making it clear what is being done as some users may not
understand the ramifications of constant reinitializations. Click OK to proceed.

Amicus Outlook/Exchange Contacts & Calendar Link Guide © 2024 43
The Reset Link dialog appears.
The default option that appears in the Reset Contacts and Reset Appointments fields is “DO NOT RE-
INITIALIZE” so the user needs to choose exactly what they want to reset.
The drop-down list also contains options to reset One way Amicus-> Outlook and One way Outlook-
>Amicus for faster, more efficient processing.
Once a selection has been made click Send Sticky to notify your Administrator that you are ready to be
scheduled for a reset of your data.
NOTE: Choose a one-way reinitialization ONLY if data exists entirely in Amicus or entirely in Outlook.
Any items that exist in both applications will not be resynchronized in a one-way
reinitialization—they won’t be resynchronized until edited later.
OUTLOOK: Click Reset Now. During the reinitialization process, “Synchronizing with Outlook” appears
in the Amicus Status Bar.
EXCHANGE: Click Send Sticky, and then OK. Your Amicus Administrators will be advised to schedule
the automatic reset of your Link. Reinitialization is an off-hours process which can be quite lengthy
depending on the amount of data to be reinitialized. You’ll be advised by Sticky when it is complete.
Your Link will be disabled until completion.

Amicus Outlook/Exchange Contacts & Calendar Link Guide © 2024 44
Other Important Information
See the Amicus Product Bulletin provided in the Resources > Product Bulletins section of our website,
at http://abacusnext.com/bulletins
• Ensure that the Windows Time Zone and Date/Time settings on all Workstations match those on the
Amicus Server.
• Depending on your Microsoft Exchange settings, a sync might change the Amicus e-mail addresses
of mapped Firm Members to a non-SMTP format.
• OUTLOOK: If you have upgraded your version of Outlook (e.g. from 2007 to 2010) after the
installation of Amicus, you might encounter problems when working with the Link. (For example, you
might receive the following error message when attempting to send an e-mail from a Firm Member
workstation: “Server threw an exception.”)
Reinstall Amicus Attorney Workstation on your computer to ensure that the correct DLL files are
present to match your version of Outlook.
• OUTLOOK: In rare situations, each time you start a sync, a dialog appears, stating that “A program
is trying to access e-mail addresses that you have stored in Outlook. Do you want to allow this?”
This is a security feature in Outlook.
Activate the “Allow access for” checkbox. Select 10 minutes from the drop-down provided, the
maximum allowable time. Then click OK.
If presented with this dialog repeatedly, please call Amicus Attorney Support at 800-472-2289 or
email us at mailto:support@abacusnext.com.

Amicus Outlook/Exchange Contacts & Calendar Link Guide © 2024 45
Appendix A − Upgrade to Advanced Authentication (OAuth) for
Office 365
As of October 2022, Microsoft is retiring support for Basic Authentication for Office 365.
This could impact Amicus Attorney users synchronizing with Office 365 for Amicus Contact, Calendar
and/or Email integration capabilities if they have not made the move to Advanced Authentication.
Firms who do not use Office 365 will not have to make any changes.
To apply the Advanced settings firms must be on Amicus Attorney 20.7 or higher.
Administrators
The change must be initiated by a single Firm Administrator in the Firm Settings. Firms with multiple
administrators should only perform this action once.
1. To adjust the configuration settings, go to Firm Settings, then select Contacts, Calendar and
E-mail under the Outlook / Exchange / Office 365 Link section.

Amicus Outlook/Exchange Contacts & Calendar Link Guide © 2024 46
2. The Outlook / Exchange Link window displays.
3. Click Configure to display the Welcome screen.
4. If the Microsoft Exchange radio button is selected under Server-side Sync, select Microsoft
Office 365. The lower part of the screen changes.
Note: If the Microsoft Office 365 option is already selected, then no further action is
required.

Amicus Outlook/Exchange Contacts & Calendar Link Guide © 2024 47
5. The original Administrator’s email address will be displayed in Your E-mail field.
6. Click the Authenticate button to display the Microsoft login screen, then enter your email in
the Sign in field.

Amicus Outlook/Exchange Contacts & Calendar Link Guide © 2024 48
7. Click Next and enter your password in the field provided.
8. Click Sign in to return to the Welcome screen. A message now displays at the bottom stating
that the Test Connection was successful.

Amicus Outlook/Exchange Contacts & Calendar Link Guide © 2024 49
9. Click the Next arrow to display a new screen and click the Next arrow again to display the Next
Steps screen.
10. Click Finish to complete the process.

Amicus Outlook/Exchange Contacts & Calendar Link Guide © 2024 50
Firm Members
After an Administrator updates to Advanced Authentication a sticky appears on all firm members
screens informing them that enhanced authentication has been enabled for the firm and they can now
update their account to use this feature.
If both Email and Calendar & Contacts integration capabilities are synchronized within Amicus
individual firm members can update either option.
Email
To update the integration settings for Email:
1. Go to Preferences and select Email under the Links section to display the Outlook /
Exchange E-mail screen.
2. Ensure the Microsoft Exchange / Office 365 (Server-side) radio button is selected, then click
Step 1 Basics.

Amicus Outlook/Exchange Contacts & Calendar Link Guide © 2024 51
3. Enter your E-mail Address in the field provided in the Exchange Settings screen.
4. Click Authenticate and follow the onscreen prompts to complete the process.
Note: Steps 2 to 4 do not need to be adjusted as no other settings have changed.

Amicus Outlook/Exchange Contacts & Calendar Link Guide © 2024 52
Calendar and Contacts
To update the settings for Calendar and Contacts:
1. Go to Preferences and select Calendar & Contacts under the Links section to display the
Calendar and Contacts Integrations screen.
2. Select the Microsoft Exchange radio button in Step 1, then click Configure in Step 2.

Amicus Outlook/Exchange Contacts & Calendar Link Guide © 2024 53
3. The Exchange Calendar and Contacts Link screen displays.
4. Click Step 1 to display the Exchange Settings dialog.
5. Enter your E-mail Address in the field provided and click Authenticate.
6. Follow the onscreen prompts to complete the process.

Amicus Outlook/Exchange Contacts & Calendar Link Guide © 2024 54
Note: Steps 2 to 4 do not need to be adjusted as no other settings have changed.
When Office 365 and Exchange links have already been configured
When an Firm Administrator in a firm with multiple administrators begins the process of configuring the
Office 365 and Exchange links a strong warning will display if the link has already been configured. This
lets the Administrator know that the process has already been completed and warns them that if they
continue with the process all users in the firm will be disabled.
To view the warning message select Contacts, Calendar and Email - Link configuration under
the Outlook / Exchange / Office 365 Link in Firm Settings, then click Configure to display the
Welcome screen with a strong warning message. The Configure button is also replaced by a
Re-configure button.
If you choose to click Re-configure, a prompt displays informing you that if you continue with the
reconfiguration the link will be disabled for all users.
If you still wish to configure a new account, click Yes to proceed or No to return to the Welcome screen
without making any changes.

Amicus Outlook/Exchange Contacts & Calendar Link Guide © 2024 55
Rebuilding Outlook Columns
This new utility allows for historical data that was lost during the initialization of your Outlook/Exchange Email to
be recreated.
Click Email under the Links section in Preferences to display the Outlook / Exchange E-mail window.
Ensure that the Enable Regular Synchronizations checkbox is selected and click Step 4 Initialization / Reset.
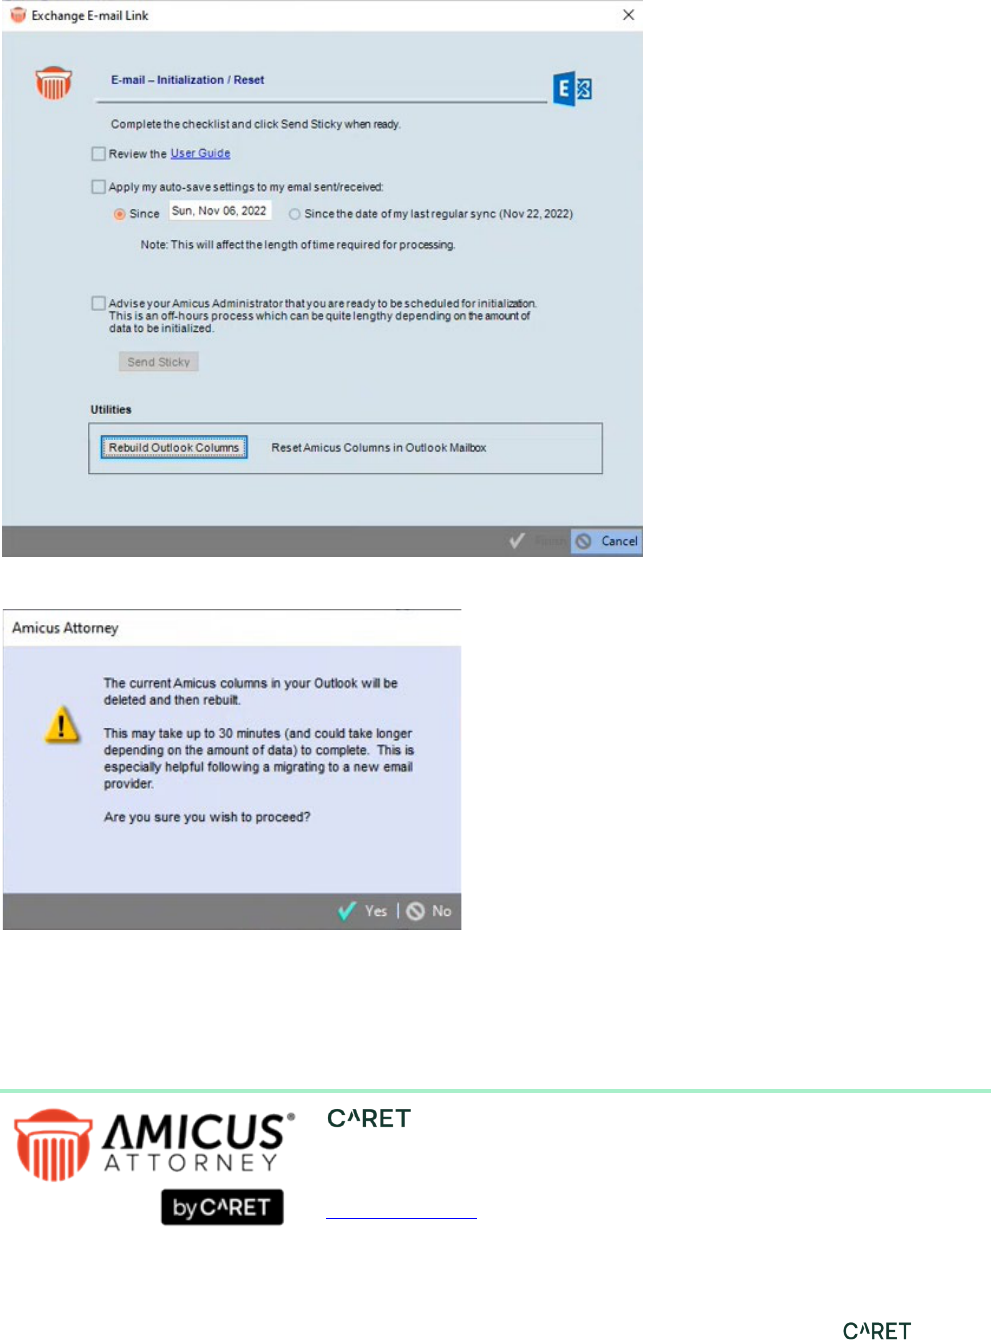
Amicus Outlook/Exchange Contacts & Calendar Link Guide © 2024 56
Click the Rebuild Outlook Columns button which only displays if regular synchronization is enabled.
A message displays informing you the current Amicus columns in your Outlook will be deleted and then rebuilt.
Click Yes to begin the process of rebuilding Outlook columns.
Historical data is recreated if it was lost during the Initialization of your Outlook/Exchange email.
Phone: 800-472-2289
416-977-6633
www.getcaret.com
Copyright © 2024 CARET
All rights reserved.
AMICUS and AMICUS ATTORNEY are registered
trademarks of CARET.
All other trademarks referenced are the property of
their respective owner. CARET. disclaims any
proprietary interest in trademarks other than its own.
April 2024
