Forms Guide
3/22/2016 Blackbaud NetCommunity 7.0 Forms US
©2016 Blackbaud, Inc. This publication, or any part thereof, may not be reproduced or transmitted in any form or
by any means, electronic, or mechanical, including photocopying, recording, storage in an information retrieval
system, or otherwise, without the prior written permission of Blackbaud, Inc.
The information in this manual has been carefully checked and is believed to be accurate. Blackbaud, Inc., assumes
no responsibility for any inaccuracies, errors, or omissions in this manual. In no event will Blackbaud, Inc., be liable
for direct, indirect, special, incidental, or consequential damages resulting from any defect or omission in this
manual, even if advised of the possibility of damages.
In the interest of continuing product development, Blackbaud, Inc., reserves the right to make improvements in
this manual and the products it describes at any time, without notice or obligation.
All Blackbaud product names appearing herein are trademarks or registered trademarks of Blackbaud, Inc.
All other products and company names mentioned herein are trademarks of their respective holder.
Forms-2016

Contents
Forms
4
Online Forms: Process Overview
5
Design Forms
6
Sample Forms
15
Manage Data from Online Forms
15
Export or Print Form Data 17
Form Payments 18
Properties of Form Elements
19
Step and Section Elements 19
Image Element 19
Text Element 20
Text Field, Text Area, and Email Elements 21
Checkbox Element 22
Radio Button List, Checkbox List, and Dropdown List Elements 23
File Attachment Element 25
Validators 26

Forms
Online Forms: Process Overview 5
Design Forms 6
Sample Forms 15
Manage Data from Online Forms 15
Export or Print Form Data 17
Form Payments 18
Properties of Form Elements 19
Step and Section Elements 19
Image Element 19
Text Element 20
Text Field, Text Area, and Email Elements 21
Checkbox Element 22
Radio Button List, Checkbox List, and Dropdown List Elements 23
File Attachment Element 25
Validators 26
With Forms, you can create and manage online forms to collect information from website users. When
you create forms, you use the Form Designer to create distinct steps and sections, insert instructional
text and images, and insert fields to collect data from website users. The available field types include
text fields, text areas, radio button lists, checkboxes, checkbox lists, dropdown lists, and a special email
field that sends confirmation email messages to users who enter email addresses. These fields on the
Common form type do not map to a database outside the program.
After you design a form, you use a Form Display part to create a landing page on the website. In Parts,
you create a Form Display part and select the forms to include on the web page. On the website, users
view the available forms, and they can click links to start, resume, delete, or print the forms.
Warning: To avoid security issues, do not use an iFrame from a third party website to direct users to
this part on a web page. We recommend you design the page to include the same look and feel as
your third party site so that users seamlessly transition to the page.
After you place forms on your website, you manage them in Forms. With the Form Designer, you can
adjust the forms as necessary, and on the Data tab, you can view summary information about the forms
and manage the data that website users submit. After users start form, you can use the Data tab to
create PDFs with their data and delete form entries.
chapter 1

Online Forms: Process Overview
To create online forms and place them on your website, you must perform several steps in different
areas of the program. For Common forms, the fields do not map to another database and the data that
website users submit remains in the program.
Step 1
To allow users to create and manage online forms, you must provide security rights. To do this, you
add the desired form-related rights to a task group. In Security Assignments, you then associate the task
group with a role or an individual user. In the task group, you can provide users with full supervisor
rights in Forms, rights to create forms but not edit or delete other users’ forms, view-only rights, or
limited view-only rights for the form data that website users submit. For more information about
security rights, see the Users & Security Guide.
Step 2
To create an online form, go to Forms and click New form. If you do not want to create a form from
scratch, you can copy an existing form, create a form based on a sample in the Samples tab, or import
an XML form. When you create the form, enter a name and select a form type to determine the
available elements. The Common form type is available to all users and includes presentation elements
and field elements that are available on all forms. The data you collect with Common forms does not
map to another database.
Tip: When you host multiple sites, you can create forms for individual sites. To do this, log in to the
site and create the form. For more information, see the Administration Guide.
Step 3
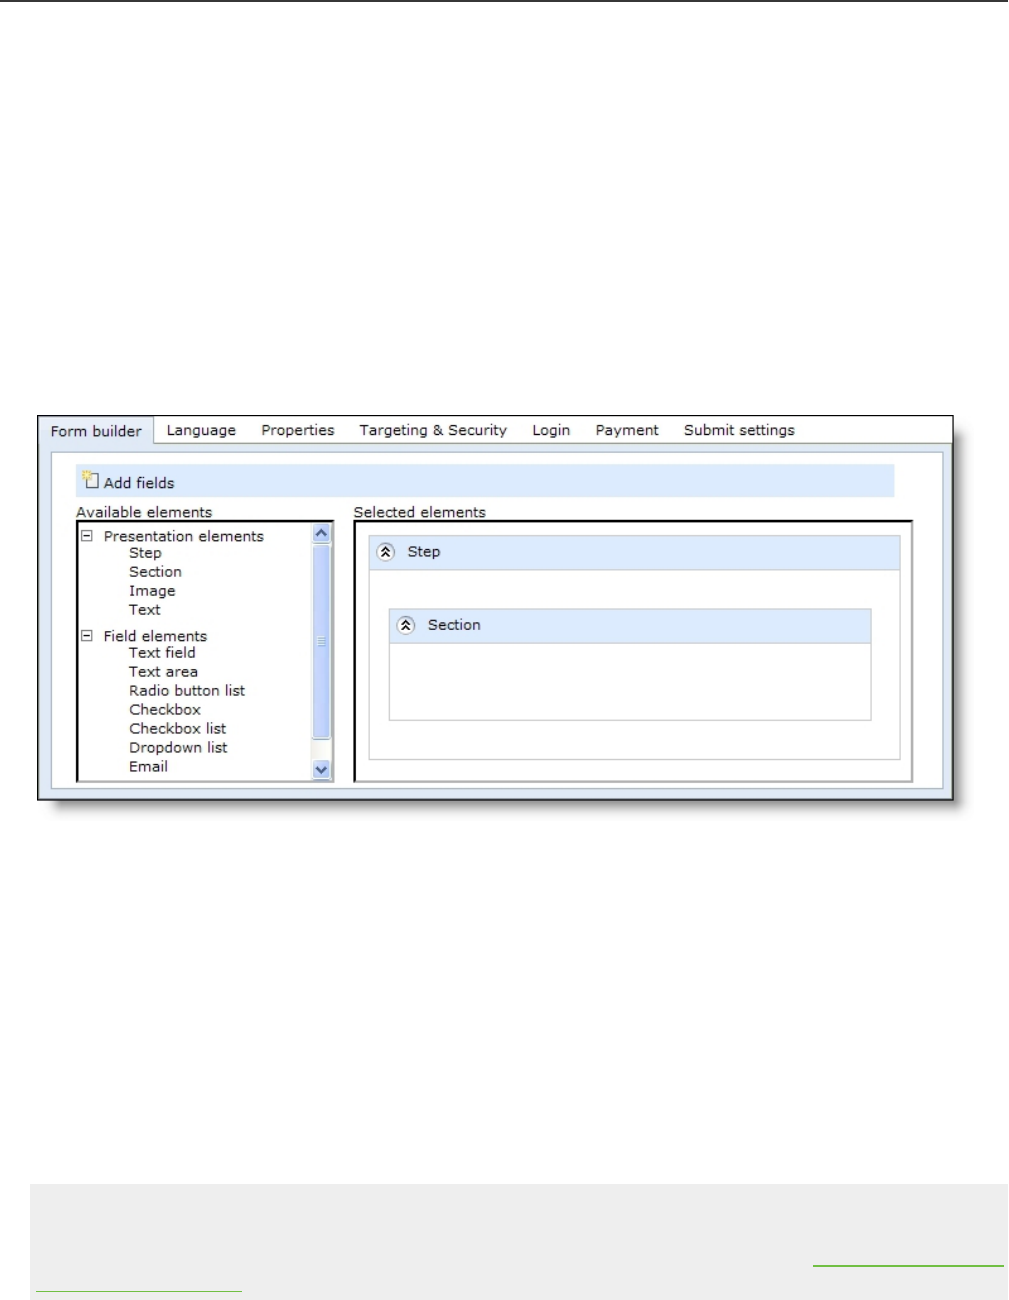
After you create a form, use the Form Designer’s Form builder tab to select the elements to include. To
place elements on the form, select them under Available elements and drag and drop them to
Selected elements. To edit properties for an element, place the cursor over the element and click Edit.
With presentation elements, you can organize the form into steps and sections and add images and
instructional text. Each form must include at least one step and one section. With field elements, you
can place fields on the form to collect data. Common fields available on all forms include text fields,
text areas, radio button lists, checkboxes, checkbox lists, dropdown lists, and a special email field that
sends confirmation email messages to the email addresses that users enter.
Step 4
After you design the form on the Form builder tab, use the Form Designer’s other tabs to enter
settings for the form. For information about the Form Designer, see Design Forms on page 6.
• On the Language tab, you can rename labels, headings, and other text for the form.
• On the Properties tab, you can change the form name and description. You can also suspend the
form to allow website users to view their statuses but not start or submit forms.
• On the Targeting &security tab, you set the view rights to target the form to specific users.
• On the Login tab, select whether to require users to log in to access the form. You can also select
whether to allow users to save and delete forms, and whether to create sign-up transactions in The
Raiser's Edge for users who register for your site through the form.
5 CHAPTER 1

• On the Payment tab, select whether to charge a fee when users submit the form.
• On the Submit settings tab, select whether to use the default confirmation screen when users
submit forms or to design your own. Click Acknowledgement email to design the email message
to send to users to confirm receipt of their form data.
Tip: In the form, the email address field is used to send the acknowledgement only if the user is not
logged in. If the user is logged in, the acknowledgment email is sent to the email address associated
with the login profile account.
Step 5
After you complete the form, you can place it on your website. To do this, you create a Form Display
part in Parts and select the forms to include on the part. When you place the part on a web page, it
acts as a landing page for users to access your online forms. On this page, a list of available forms
appears, and after website users start forms, they can view the statuses and resume, delete, and print
forms. On the Form Display part, you also enter login settings for users who access the page. For more
information about the Form Display part, see the Parts Guide.
Step 6
After you place the Form Display part on the website, you return to Forms to manage forms. On the
Data tab, you can view summary information about forms and manage the data that website users
submit. On the Summary tab, the grid displays the number of forms started and completed for each
form on the website. On the Detail tab, you can edit the data that website users enter on the forms. For
more information about the Data tab, see Manage Data from Online Forms on page 15.
Design Forms
When you create online forms for your website, you use the Form Designer to include presentation
elements and field elements. Presentation elements include steps, sections, images, and text. Forms
are organized into steps and sections, and each form requires at least one step and section before you
can add other elements. Field elements include text fields, text areas, radio button lists, checkboxes,
checkbox lists, dropdown lists, and a special email field that sends confirmation email messages to the
email addresses that users enter. These fields do not map to a database outside of the program. When
you add multiple steps to a form, website users page through the form from one step to the next. If
you charge a fee for users to submit the form, the payment information appears as an additional step.
After you complete a form, you use a Form Display part to place it on the website. On the web page
with the part, website users can access all forms that you include on the part. From the web page, users
can start forms, view their statuses, and resume, delete, and print forms.
For more information about the Form Display part, see the Parts Guide.
After you place the Form Display part on the website, you return to Forms to manage your forms. You
can use the Form Designer to adjust the forms as necessary, and on the Data tab, you can view
summary information about the forms and manage the data that website users submit. On this tab, you
can view overall statistics for each form and access the data that website users enter on the forms. You
can also create PDFs with user data.
For more information about the Data tab, see Manage Data from Online Forms on page 15.
FORM S 6

Create a form
1. From Site explorer, click Forms. Forms appears.
2. Click New form. The Form Designer appears.
If you do not want to create a form from scratch, you can copy a form or use a sample as a
starting point.
• To copy a form, locate it in the Forms gallery and click Click here to copy this form. On the
Copy Form screen, enter a name, select a folder, and click Next. The Form Designer appears,
and you can edit the form as necessary.
• To copy a sample form, locate it on the Samples tab and click Click here to copy this sample.
On the screen that appears, enter a name, select a folder, and click Next. The Form Designer
appears, and you can edit the form as necessary. For information about samples, see Sample
Forms on page 15.
• If you previously exported a form or sample in Blackbaud NetCommunity, you can import the
XML to create a copy of the form. To create the XML, you click sClick here to export this
form or Click here to export this sample in the Forms gallery. To import the XML, you click
Import form. On the Import Form screen, enter a name, select a folder, and paste the XML in
the Form XML field. Click Next. The Form Designer appears, and you can edit the form as
necessary.
Warning: You must copy and paste the XML from Notepad or another text editor. If you copy the
XML directly from an XML editor or web browser, the Form Designer cannot create the form.
7 CHAPTER 1
3. In the Form type field, select the form type. The form type determines the elements that are
available for the form.
• The Common form type only includes presentation elements and field elements that are
available on all forms. Fields on a Common form do not map to another database.
4. In the Form name and Form description fields, enter a name and description for the form.
5. In the Folder field, select a folder to store the form. By default, the program uses the Forms
root folder.
6. To prevent website users to start or submit the form, select Suspend form. This allows
website users to view the statuses of their forms but not start forms or submit data. You can
use this checkbox to enforce submission deadlines and still allow users to monitor their
statuses online.
7. To design the form, click Next. The Form builder tab appears.
8. Under Available elements, the Form Designer displays the Common presentation elements
and field elements that are available for all forms. To design the form, click and drag elements
from Available elements to Selected elements. Under Selected elements, click and drag
items to arrange the order for the website.
• Under Presentation elements, select items to organize the form. With steps, you create
distinct portions of the form for users to page through. With sections, you group elements
within each step. Each form requires at least one step, and each step requires at least one
section because you cannot place other elements directly on steps. You can also add images
and text as necessary.
• Under Field elements, select fields to collect data from website users. The Common field
elements include the text field, text area, radio button list, checkbox, checkbox list, dropdown
list, and a special email field that sends confirmation email messages to the email addresses
that users enter. These fields do not map to a database outside of the program.
Note: To edit element properties such as labels, style sheets, and validators, place the cursor over
an element in Selected elements and click Edit. An element properties screen appears. For
information about properties of presentation elements and field elements, see Properties of Form
Elements on page 19.
FORM S 8

9. To rename the labels, headings, and other text that appears on the form, select the Language
tab. For information about the Language tab, see the Website Design Guide.
10. To assign website security rights for users and roles, select the Targeting & Security tab. For
information about the Targeting & Security tab, see the Website Design Guide.
11. To select login settings for the form, go to the Login tab.
12. To require website users to log in to access the form, select Require login. Additional login
options appear.
• To allow website users to save their data on a form and return to it later, select Allow user to
save form.
• To allow website users to delete a form and not submit it, select Allow user to delete a form
in progress.
• To create constituent records in The Raiser's Edge for any users who register for your website
through this form, select Create Raiser’s Edge sign-up transactions. You enter user login
settings for the form on the Form Display part.
Note: For Common forms, Create Raiser’s Edge sign-up transactions is always selected when
you require users to log in to access the form.
• To restrict users to submit a form only one time when they are logged in to your site, select
Allow only one form submission.
9 CHAPTER 1

13. To charge a fee when users submit the form, select the Payment tab and select Charge fee
with form. Additional payment options appear.
14. Under Fee amounts, to add a fee amount, click Add form fee. The Fee amounts screen
appears.
a. Enter a name for the form fee.
b. Enter the dollar amount for the form fee.
c. In the Criteria field, select if the form fee applies to everyone or based on how a website
user answers a field on the form.
d. If you select Based on fields in the form, click Add a new rule.The New Rule screen appears.
e. Select the step, section, field, and response, that if they choose on the form, the fee is added
to the total form fee amount.For example, if a website user answers yes to participation in a
club activity, you can charge a conditional fee on only club participants.
f. Click Save.You return to the Fee amounts screen.
g. Click Save again. You return to the Form Designer screen. Add as many separate form fees as
you need.
15. Under Payment setup, select to use a Payment2.0 part or to proceed directly to payment with
your merchant account.
FORM S 10

16. If you select to use a payment part, select the payment page and then write an
acknowledgement message.
Note: If you select to use the payment part, you first need to set up your payment and merchant
information in the Payment 2.0 part before you select it in the form.
17. If you select to use your merchant account, in the Merchant account field, select a merchant
account such as your organization’s IATS account to process credit card transactions received
through the form.
a. The system supervisor sets up merchant accounts in Administration. For more information,
see the Administration Guide.
b. To display CAPTCHA text for users to enter before they proceed with the payment, select
Display reCAPTCHA.
c. CAPTCHA is an automated public turing test to tell computers and humans apart to help
prevent automated abuse of your website. You enable reCAPTCHA in Administration. For
more information, see the Administration Guide.
18. Select the payment methods available to users. Credit cards are allowed by default.
• To allow users to pay at a later time, select Bill me later.
• To allow users to waive the fee, select Allow users to waive the fee and enter a waiver code
in the field that appears.
19. To edit settings for when users submit the form, select the Submit settings tab.
20. Under Confirmation screen, select whether to use the default screen or create a custom
screen.
• To use the default, select Use default confirmation screen.
• To design the confirmation screen, select Use custom confirmation screen. The HTML editor
appears. The program’s default confirmation screen appears in the HTML editor for you to
customize according to your needs.
Edit the content for the confirmation screen. To format the appearance and layout, use the
HTML editor toolbar. To include personalized information, use merge fields. For more
information, see the Program Basics Guide.
11 CHAPTER 1

Warning: If you customize the confirmation screen and then select Use default confirmation
screen, your changes to the confirmation screen remain. To remove changes, select Use custom
confirmation screen and click Restore default content.
21. Under Email alert, select Send an email alert when a user submits a form to send an email
to staff members when a website user submits a form.
22. Under Recipients, to send the alert to individual users and users in a role, click Add users and
roles. The Select users and roles screen appears.
FORM S 12

a. In the Filter field, enter the first letter of the user or role to include.
Note: The Available box displays 30 users and roles in alphabetical order. Use the Filter field to find
additional users and roles that do not appear in the box.
b. Locate the user or role, and click Add. The user appears in the Selected box.
To select multiple users or roles, press SHIFT while you select the multiple users, and then
click Add all. The users appear in the Selected box.
c. Click OK. You return to the Submit settings tab. The users and roles appear in the Users and
roles box.
23. To send the notification to a staff member who does not have a Blackbaud NetCommunity
account, enter an email address under Email addresses.
Note: You can select to send the notification to individual users and users in roles instead of, or in
addition to, individuals who do not have a Blackbaud NetCommunity account. When you enter
multiple email addresses, separate them by a comma or semicolon.
24. Enter a subject in the Subject field and an email address in the From field for the email alert.
25. To display form data in the body of the email alert, select Include form data in the email
alert. By default, the email links to a PDF version of the form, and when you select this option,
the email also includes form data.
26. To create an acknowledgement email for website users who submit forms, click
Acknowledgement email. The Acknowledgement Email screen appears.
13 CHAPTER 1

27. Enter a name for the acknowledgment, a subject, a return address, and a name for the From
field of the email message.
Tip: In the form, the email address field is used to send the acknowledgement only if the user is
not logged in. If the user is logged in, the acknowledgment email is sent to the email address
associated with the login profile account.
28. In the box, edit the content of the acknowledgment. To format the appearance and layout, use
the HTML editor toolbar. For information about how to design an email acknowledgment, see
the Email Guide.
29. Click Save to save your progress and continue to set up the form. You can also click Save and
Close to return to Forms.
To post the form on your website, place it on a Form Display part. For information about the
part, see the Parts Guide.
After you place the form on the website, you can view summary information about the form
and manage the data that website users submit on the Data tab in Forms. For information
about the Data tab, see Manage Data from Online Forms on page 15.
FORM S 14

Sample Forms
In Forms, the Samples tab provides sample forms to use as a starting point for new forms. You cannot
edit the samples or place them directly on your website through a Form Display part. However, they
are useful to save time when you create forms. You can copy a sample form that is similar to the form
you want and edit it as necessary.
Copy a sample form to design a new form
1. From Site explorer, click Forms. Forms appears.
2. Select the Samples tab. The gallery displays the available samples.
3. To create a form based on a sample, select it and click Click here to copy this sample. The
Copy Form screen appears.
4. Enter a name, select a folder for the new form, and click Next. The Form Designer appears,
and you can edit the form as necessary. For information about how to design a form, see
Design Forms on page 6.
Note: You can also create an XML version of a sample form and use the XML to create a form. To
generate the XML, select the sample and click Click here to export this sample. To create a form
based on the XML, click Import form. On the screen that appears, enter a name, select a folder,
and paste the XML from Notepad or another text editor into the Form XML field. Click Next. On
the Form Designer, you can edit the new form as necessary.
5. Click Save. You return to Forms.
To post the form on your website, place it on a Form Display part. For information about the
part, see the Parts Guide.
After you place the form on the website, you can view summary information about the form
and manage the data that website users submit on the Data tab. For information about the
Data tab, see Manage Data from Online Forms on page 15.
Manage Data from Online Forms
After you place forms on your website, you can go to Forms to manage the data that website users
submit. On the Data tab, you can view summary information about the forms, and after users start
15 CHAPTER 1

forms, you can manage their data.
On the Summary tab, the grid displays the number of forms started and completed for each form on
the website. On the Detail tab, you can edit the data that website users enter on the forms. You can
also delete, export , and print entries. On the Export &Print tab, you can filter your forms to export a
group of form data to a .csv file or print the data. On the Payments tab, you can review and export the
payment information for each submitted form.
Manage data that website users submit in online forms
1. From Site explorer, click Forms. Forms appears.
2. To view information about the forms on your website and manage the data that website users
enter on the forms, select the Data tab.
3. On the Detail tab, entries appear for the data that website users enter. To filter the entries,
enter your search criteria and click Search. Entries that match your criteria appear.
• To search a particular site, enter the site in the Forms created on field.
• To search for data from a particular form, select it in the Form field.
• To search for data from a particular form type, select it in the Type field.
• To filter data according to whether users started or completed the form, use the Status field.
• To filter data according to when users completed the form, enter a start date in the Date
completed field and an end date in the To field.
Note: The Date completed and To fields are disabled when you select “All” or “Started” in the
Status field because you cannot search for forms that were started during a period of time.
• To filter data according to whether you created PDFs, use the Print status field.
4. On the Summary tab, statistics appear for all forms on the website. The list includes the
number of times website users started and submitted each form on your website.
5. On the Export &Print tab, you select the criteria to filter forms for print or export. For more
information, see Export or Print Form Data on page 17.
6. On the Payments tab, you can review the payment status for a form and export the payment
information to a .csv file. For more information, see Form Payments on page 18.
7. To manage the data that website users submit, select the Detail tab. Entries that match the
search criteria on the Data tab appear.
• To view a form’s data, click a user name under Name. An HTML version of the form appears in
a separate window. You can use this HTML as a preview before you perform any actions.
• To create a PDF with user data, select the checkboxes for the data to include and click Print.
The PDF appears in a separate window. You can save or print the PDF for your records.
• To create a comma-separated-values file with user data, select the checkboxes for the data to
include and click Export. The program creates a .csv file that you can edit in Microsoft Excel.
Note: You cannot create a .csv file with data from multiple forms. All the entries you select must
include data from the same form.
FORM S 16

• To delete entries, select the checkboxes and click Delete. For example, you may want to
delete entries after you process the data.
8. As website users create and submit forms, the program updates the Data tab. To manage the
data from your online forms, you will need to monitor the Data tab.
Export or Print Form Data
On the Export &Print tab, you select criteria to determine which forms you want to print or export
from Forms. If you select to export form data, you can save or open a .CSVfile. If you select to print
form data, a new window opens and your data appears as a .PDF file. You can choose to print the data
or save the Adobe Acrobat file. To print the data, from the browser window, click File, Print. Select the
name of the printer and your print options, then clickOK.
To filter the forms for export or print, select your filter criteria:
• To print or export data from one site location in your organization, click the binoculars to search
for and select the site in the Forms created on field.
• To print or export data from a particular form, select it in the Form field.
• To print or export data from a particular form type, select it in the Type field.
• To print or export data with a particular form status, select it in the Status field.
• To print or export data from a particular date or date range, select it in the Form completed field.
• To print or export data based on the print status, select the status in the Print status field.
17 CHAPTER 1

Form Payments
When you manage the data that website users submit in online forms, you can review the payment
information on the Payments tab. For each form, you can review the submitted data, a summary of the
payment information, and export the payment data to a .CSV file.
• In the Form Data grid, for each submitted form, you can review the amount, card type, cardholder
name, last 4 digits of the social security, the payment status, payment date, the reference number,
and form name.
• To review the submitted form's payment data, in the Name column, click the student's name. A
new window opens with the submitted form information.
• To export form payment data, select the payments individually or select the checkbox in the top
row to select all on the page. A link appears at the top of the page if you want to select all
payments on all pages. ClickExport. A file download screen appears. You can open or save the
.CSV file.
FORM S 18

Properties of Form Elements
After you place elements on a form in the Form Designer, you can edit the properties for the elements.
To design the form, drag and drop items from Available elements to Selected elements. To edit the
properties for an element, place the cursor over the element in Selected elements and click Edit. An
element properties screen appears. After you edit the properties, click Save. The tables in this section
describe the properties for the Common presentation elements and field elements that are available
for all forms.
Step and Section Elements
You use the step and section elements to organize the form. With steps, you create distinct portions
on your forms for users to page through. With sections, you group elements within steps. Each form
requires at least one step, and each step requires at least one section because you cannot place other
elements directly on steps.
Option Function
Label Enter a label for the step or section.
Hide label If the label is for internal purposes and should not appear on the website, select Hide label.
Custom CSS
class
To override the default Cascading Style Sheet (CSS) format of the page where the form appears,
enter a custom CSS class.
For information about style sheets, see the
Website Design Guide
.
Image Element
You use the image element to place images from Image Library on the form.
19 CHAPTER 1

Option Function
Alternative
text
Enter text to appear in place of the image if the image is unavailable for any reason.
Custom CSS
class
To override the default Cascading Style Sheet (CSS) format of the page where the form
appears, enter a custom CSS class.
For information about style sheets, see the
Website Design Guide
.
Insert
image,Remove
image
To select an image from
Image Library
, click Insert image. The Select Image From Image Library
screen appears. The image you select appears under Preview. To remove it, click Remove
image.
For information about
Image Library
, see the
Website Design Guide
.
Text Element
You use the text element to insert instructional text or additional information on the form. The text is
not associated with field elements. You can use it to guide users through the form.
FORM S 20

Option Function
Text Enter text to appear on the form. The text element displays up to 500 characters and is not
associated with a field element. You can use the text to provide step- or section-level instructions.
Custom
CSS
class
To override the default Cascading Style Sheet (CSS) format of the page where the form appears,
enter a custom CSS class.
For information about style sheets, see the
Website Design Guide
.
Text Field, Text Area, and Email Elements
With the text field, text area, and email elements, you can place fields on the form for users to enter
data. The text field and email elements are standard fields, while the text area element includes
additional space for longer responses.
Warning: The email element is a special field that sends confirmation messages to the email
addresses that users enter. To collect email addresses but not send confirmation messages, use the
text field element.
21 CHAPTER 1

Option Function
Label Enter a label for the field.
Hide label If the label is for internal purposes and should not appear on the website, select Hide label.
Required To require users to enter a value in the field before they can submit the form, select Required.
Required
message
If a field is required, enter text to appear beside it when users attempt to submit the form without
values in the field.
Hidden If a field is for internal purposes and should not appear on the website, select Hidden. You must
enter a value in the Default value field.
Inline
help
Enter instructional text or additional information about the field. A link beside the field allows
users to access the text.
Custom
CSS class
To override the default Cascading Style Sheet (CSS) format of the page where the form appears,
enter a custom CSS class.
For information about style sheets, see the
Website Design Guide
.
Validator To restrict entries to certain characters or formats, select a validator. For information about the
validators, see
Validators on page 26
.
Validation
warning
If you select a validator, a default error message appears in this field. The message appears beside
the field when users attempt to submit the form and the field entry does not meet the validator’s
requirements. You can edit the message as necessary.
Character
limit
Enter the maximum number of characters for the field.
Default
value
Enter a default value to appear in the field when users start the form.
Include in
export
To include the field when you export data that users submit on the form, select Include in export.
To exclude it when you export, clear the checkbox.
Checkbox Element
With the checkbox element, you can place a standalone checkbox on the form and select whether to
select it for users by default.
FORM S 22

Option Function
Label Enter a label for the checkbox.
Hide label This option is disabled for the checkbox element.
Required To require users to select the checkbox before they can submit the form, select Required.
Required
message
If the checkbox is required, enter text to appear beside it when users attempt to submit the form
without selecting it.
Hidden If the checkbox is for internal purposes and should not appear on the website, select Hidden. You
must select a value in the Default value field.
Inline help Enter instructional text or additional information about the checkbox. A link beside the checkbox
allows users to access the text.
Custom
CSS class
To override the default Cascading Style Sheet (CSS) format of the page where the form appears,
enter a custom CSS class.
For information about style sheets, see the
Website Design Guide
.
Default
value
Select “Yes” to select the checkbox by default or “No” to clear it.
Include in
export
To include the checkbox when you export data that users submit on the form, select Include in
export. To exclude it when you export, clear the checkbox.
Radio Button List, Checkbox List, and Dropdown List Elements
With the radio button list, checkbox list, and dropdown list elements, you can place fields on the form
for users to select responses. You can enter the options for users to select from, or you can import
code table values from The Raiser's Edge.
23 CHAPTER 1

Option Function
Label Enter a label for the list.
Hide label If the label is for internal purposes and should not appear on the website, select Hide label.
Required To require users to select a value in the list before they can submit the form, select Required.
Required
message
If the list is required, enter text to appear beside it when users attempt to submit the form
without selecting a value in the list.
Hidden If the list is for internal purposes and should not appear on the website, select Hidden. You
must select a value in the Default value field.
Inline help Enter instructional text or additional information about the list. A link beside the list allows
users to access the text.
Custom CSS
class
To override the default Cascading Style Sheet (CSS) format of the page where the form appears,
enter a custom CSS class.
For information about style sheets, see the
Website Design Guide
.
FORM S 24

Option Function
List values
(enter values
on separate
lines)
In the dropdown list, select whether to create a list or import entries from a code table. To
create a list, enter values on separate lines. To import code table entries, select the code table.
You can edit the code table entries you import, but your changes do not affect the source code
table.
Warning:
For checkbox lists, entries cannot include nonaphanumeric characters such as “<,”
“>,” and “&.” If you import a code table entry or enter a list item with such characters, no label
appears on the form for that entry’s checkbox.
List default
value
Enter a value to select by default in this list when users start the form.
Allow other To allow users to enter values not in the list, select Allow other. When users select “Other,” a
field appears on the form for these values.
Other field
character
limit
If you allow users to enter their own values, enter the maximum number of characters for the
field.
Include in
export
To include the list when you export data that users submit on the form, select Include in
export. To exclude it when you export, clear the checkbox.
File Attachment Element
With the file attachment element, you can place a file attachment upload field on the form for users to
upload documents to the form. For each file attachment element, you choose which Documents part
to use for file attachment settings. Uploaded documents appear in Forms on the Data tab.
25 CHAPTER 1

Option Function
Label Enter a label for the field.
Hide
label
If the label is for internal purposes and should not appear on the website, select Hide label.
Required To require users to select a value in the field before they can submit the form, select Required.
Required
message
If the field is required, enter text to appear beside it when users attempt to submit the form
without selecting a value in the field.
Inline
help
Enter instructional text or additional information about the field. A link beside the field allows users
to access the text.
Custom
CSS class
To override the default Cascading Style Sheet (CSS) format of the page where the form appears,
enter a custom CSS class.
For information about style sheets, see the
Website Design Guide
.
Select
document
part
To upload files, the file attachment element uses the Document part to determine how files upload.
Search for and select a document part to use. You can set up Document parts for each file
attachment element used on a form, or create one Document part for all your file attachment
needs.
For information about the Document part, see the
Parts Guide
.
Max file
size
This field displays the maximum file size allowed for document uploads. To edit the maximum file
size, you need to edit the setting on the Document part.
Allowed
file types
This field displays the MIME file types allowed for document uploads. To edit the MIME file types,
you need to edit the settings on the Document part.
Default
file name
Enter a default name for file uploads. If you do not enter a default file name, the file name as
uploaded by the user defaults.
Prefix
form
name
To prefix your file name with the name of the form, select the checkbox. When a user uploads a file,
the name will be <form name> - <default file name>
Validators
After you add text field, text area, and email elements to forms, you can edit the properties to include
validators. Several standard validators are available to ensure that user responses meet your criteria.
The following table describes the restrictions that the standard validators enforce, as well as the
default error messages that appear when users attempt to save data that does not meet the validator
criteria.
Validator Allows Default Error Message
Alpha Upper and lower case letters. Please enter letters only.
FORM S 26

Validator Allows Default Error Message
Alphanumeric
with spaces
Upper and lower case letters, numbers, and spaces. Please enter letters, numbers,
and spaces only.
Alphanumeric
without
spaces
Upper and lower case letters and numbers. Please enter letters and
numbers only.
Email Email addresses with the format youraddress@yourdomain. Please enter a valid email
address with the format
youraddress@yourdomain.
Numeric Numbers (just a string of digits). Please enter numbers only.
Numeric with
decimals
Numbers (just a string of digits) and a decimal. Please enter numbers and a
decimal only.
Social
Security
number
Numbers and hyphens with the format ###-##-####. Please enter a valid Social
Security number with the
format ###-##-####.
U.S. date Legitimate date with the MM/DD/YYYY format. Months can
take one or two digits, from 1 to 12 or 01 to 12. Days can take
one or two digits, from 1 to 31 or 01 to 31. The validator
recognizes the number of days in a given month and also
takes leap years into account.
Please enter a date with the
format MM/DD/YYYY.
U.S. phone U.S. phone number with area code. The validator requires 10
digits. It allows hyphens or periods to separate the area code
and first three digits of the phone number, and it allows
parentheses around the area code.
Please enter a 10-digit phone
number. You can use hyphens
or periods to separate
numerals, and you can put the
area code in parentheses.
Zip code 5-digit Zip code or 9-digit Zip code with a hyphen after the
first 5 digits.
Please enter a 5-digit Zip code
or a 9-digit Zip code with a
hyphen after the first 5 digits.
27 CHAPTER 1
