
IHE Request for UIC Bulk Upload Guide
Page 2 of 28
Contents
Introduction ............................................................................................ 3
Overview ................................................................................................ 4
Step 1: Prepare the student data file ......................................................... 5
Step 2: Prepare the XML file or use template prepared by CEPI ................... 15
Step 3: Upload the XML data file to MSDS ................................................ 28

IHE Request for UIC Bulk Upload Guide
Page 3 of 28
Introduction
This guide is for Institution of Higher Education authorized users of the Michigan
Student Data System. The purpose of this guide is to offer a comprehensive
overview of the process for uploading multiple requests for Unique Identification
Codes via Microsoft Excel. While your institution’s IT team can configure your
Student Information System to export files for upload to the MSDS, this guide
offers an alternative. Institutions can use Excel to create files in Extensible Markup
Language (XML) for the MSDS.
For additional guidance, users should also utilize the
IHE Request for UIC Collection
User Guide.
While the IHE Request for UIC collection does not have open and close dates, UICs
are a required data field in the Student Transcript and Academic Record Repository
Collection, which does have deadlines. Please refer to the CEPI calendar
for more
information.
CEPI application users can also subscribe to application updates at the CEPI
Newsletters web page.
Important Information on UICs
Acquiring UICs at Student Enrollment
It is best practice to acquire and assign UICs at student enrollment. Early
acquisition of UICs enables the integration of student level data across state
systems (e.g., MiSSG and STARR). This is especially important in enabling the state
to assist in completing compliance reporting requirements in support of various
college grant programs.
Ensuring Primary UIC is in Student Information System
When an entity submits a UIC into a collection or reruns resolution, the matching
process may replace it with a primary UIC in the collection. This can occur when the
submitted UIC has previously been linked and is now a secondary UIC. Please refer
to the List of Changed UICs Report, a point-in-time report, in the IHE Request for
UIC and the STARR collections to ensure the primary UIC is listed in your student
system. This report is found in the staging area under UIC Resolution Reports.
IHE Request for UIC Bulk Upload Guide
Page 4 of 28
Overview
This guide describes the process of uploading multiple students to the IHE Request
for UIC collection in one file. Student information must be converted to the
Extensible Markup Language (XML) schema used for the IHE Request for UIC
collection. This process involves the use of Microsoft Excel to produce an XML file.
Students are added to an Excel spreadsheet and then uploaded to the IHE Request
for UIC Collection. This guide breaks the bulk upload process into the necessary
steps:
1. Preparing the data file
2. Preparing the data file or using template created by CEPI
3. Uploading the XML file to the MSDS
This guide describes the bulk upload process for college and university authorized
users.

IHE Request for UIC Bulk Upload Guide
Page 5 of 28
Step 1: Prepare the student data file
This step uses Microsoft Excel to create a Spreasheet with your students’ data.
Users may also have the ability to prepare data files directly from a student
information system. Because SISs vary and data fields used differ between entities,
CEPI cannot recommend a common export method.
This method only includes the required components for this collection.
1. Open a new, blank workbook in Microsoft Excel

IHE Request for UIC Bulk Upload Guide
Page 6 of 28
2. Enter/import your students’ data into the Spreadsheet using the column
layout shown above. Enter the following column headers into the designated
cells of the Spreadsheet and consider these important rules:
a. Cell A1: Student Last Name
i. This field is required and cannot be blank.
ii. Data entered into this field may include lowercase and
uppercase letters (aBZz), apostrophes (’), commas (,), hyphens
and periods (.) but cannot include underscores (_), numbers
(0123), or special characters (ᴂ)
iii. Data Type: Names
b. Cell B1: Student First Name
i. This field is required and cannot be blank.
ii. Data entered into this field may include lowercase and
uppercase letters (aBZz), apostrophes (’), commas (,), hyphens
and periods (.) but cannot include underscores (_), numbers
(0123), or special characters (ᴂ)
iii. Data Type: Names
c. Cell C1: Student Middle Name
i. This field is optional because not all students have a middle
name. However, it is highly encouraged and may prevent
future work for you.
ii. Data entered into this field may include lowercase and
uppercase letters (aBZz), apostrophes (’), commas (,), hyphens
and periods (.) but cannot include underscores (_), numbers
(0123), or special characters (ᴂ)
iii. Data Type: Names
d. Cell D1: Student Suffix
i. This field is optional.

IHE Request for UIC Bulk Upload Guide
Page 7 of 28
ii. Data entered into this field may include lowercase and
uppercase letters (aBZz), apostrophes (’), commas (,), hyphens
and periods (.) but cannot include underscores (_), numbers
(0123), or special characters (ᴂ)
iii. Data Type: Free Form Text
e. Cell E1: Date of Birth
i. This field is required and cannot be blank.
ii. Data in this field will be formatted in a later step
iii. Data Type: Date
f. Cell F1: Multiple Birth Order
i. This field is optional.
ii. This field should be used when students are twins/triplets/etc.
Students are designated by order of birth (i.e., enter “1” for the
eldest child, “2” for the second-oldest, etc.)
iii. To accommodate some local student information systems, “0” is
accepted for students who are not part of a multiple birth.
iv. Data Type: Whole Number
g. Cell G1: Gender Code
i. This field is required.
ii. The Gender data value must be M or F. The following values are
invalid:
1. f, m, female, male, fe, or ma (lowercase or uppercase).
2. Numbers such as 0, 1, 2, or 3.
3. Blank
iii. Data Type: Value List
h. Cell H1: Student ID Number
i. This field is optional but may be needed if your institution
uses it to import UICs back into your local system (after your
file has been uploaded to the MSDS).
ii. Data in this field is text free form with a maximum of 20
characters.
iii. Data Type: Free Form Text
iv. If your Student ID Number includes leading zeros, you will need
to ensure this field is designated as a text field in your
spreadsheet.
i. Fields in each row must contain a value, except for Student Middle
Name, Student Suffix, and Multiple Birth Order (which can be
blank).To check for blank fields, use Excel’s “Filter” utility found under
the “DATA” tab.
i. Hold down the Ctrl key while clicking to select all the data
columns.
ii. Click the “DATA” tab.
iii. Click the “Filter” button.

IHE Request for UIC Bulk Upload Guide
Page 8 of 28
Click on a column arrow box to check if there are blank values in a column. (Note:
Student Suffix is allowed to be blank – it’s shown below to highlight how Excel
reports blank values. Required columns should not show a “(Blanks)” value.

IHE Request for UIC Bulk Upload Guide
Page 9 of 28
j. Date of Birth must be formatted as yyyy-mm-dd. Highlight the
column, right click, and select “Format Cells…”
i. In the text box that appears, select “Custom” from “Category:”
ii. In “Type,” enter yyyy-mm-dd.
iii. Click OK.

IHE Request for UIC Bulk Upload Guide
Page 10 of 28
The dates should now be properly formatted for the MSDS.
3. Type Submitting Entity Code into cell I1 (If submitting Student ID, it would
reside in column H). Then select the entire column by clicking “I.”
k. Right click and select “Format Cells…” to change the cells in the
column.

IHE Request for UIC Bulk Upload Guide
Page 11 of 28
l. In the window that appears, select “Text” from “Category:” (This will
prevent Excel from automatically correcting the data to remove
preceding zeroes from the entity code.)
m. Click OK.
n. Enter your five-digit entity code for each row that you have data in the
spreadsheet. To retrieve your entity code, search the
Educational
Entity Master.
i. Enter the entity code code in the first row of the “Submitting
Entity Code” column.

IHE Request for UIC Bulk Upload Guide
Page 12 of 28
ii. To copy the code across cells, move the mouse pointer to the
bottom right corner of the cell and hold down the right mouse
button.
iii. Keep the right mouse button pressed down and drag the mouse
down the screen. When you reach the last cell, release the
button. A context menu will appear. Click “Copy Cells.”
The cell in each record will now be filled with the entity code.
4. Type Submitting Entity Type Code into cell “J1”

IHE Request for UIC Bulk Upload Guide
Page 13 of 28
o. The “Submitting Entity Type Code” field will differ depending on the
entity type submitting for UICs. Characters in this field must
always be entered in uppercase.
i. College and universities with a 5-digit entity code enter: B
ii. Right click on the bottom right hand corner of cell.
iii. Holding the button down, drag down to the last of the collection
records. Then release and select “Copy Cells.”
The cells will now be filled with the character chosen, such as
“B” in the screenshot.

IHE Request for UIC Bulk Upload Guide
Page 14 of 28
5. Save the Spreadsheet in a secure area since it contains Personally
Identifiable Information.

IHE Request for UIC Bulk Upload Guide
Page 15 of 28
Step 2: Prepare the XML file or use template prepared by
CEPI
NOTE: CEPI has prepared an Excel template file that has been mapped and is ready
for users to copy their student data into. If you wish to use this template, please
download the template from the IHE Request for UIC Collection web page
(under
Technical Material). Then you may skip to Step 9 below.
To begin obtaining UICs, student data must be provided to CEPI in a particular
format. This format is the Extensible Markup Language (XML) and the template
you’ll need to use is called a schema file.
1. Go to the IHE Request for UIC Collection web page
2. Obtain the most recent schema file
a. Scroll to the bottom of the page and expand the “Technical Material”
menu.
b. Right-click on the most recent schema file. Select “Save target as” (or
“Save link as” in other browsers)
c. A window will appear. Navigate to a directory to save the schema file.
Give the file a name you will remember.
d. Click Save to finish.

IHE Request for UIC Bulk Upload Guide
Page 16 of 28
This next step will convert the Excel Spreadsheet into an XML file.
3. Open a new, blank workbook in Microsoft Excel
4. Click the “File” tab on the top menu bar

IHE Request for UIC Bulk Upload Guide
Page 17 of 28
a. Click “Options”
b. The Excel Options window will appear
i. Select “Customize Ribbon” from the left column
ii. Select “Main Tabs from “Customize the Ribbon:”
iii. Check “Developer,” as shown in the following screenshot
iv. Click OK

IHE Request for UIC Bulk Upload Guide
Page 18 of 28
c. Look back at the menu at the top of the screen, you will see the
Developer tab. Click on that tab.
5. The Developer settings will offer options to convert Spreadsheet into XML
format.
a. Click “Source,” as shown in the following screenshot
b. The XML Source pane will appear on the right-hand side of the screen.
Click on the “XML Maps…” button near the bottom.

IHE Request for UIC Bulk Upload Guide
Page 19 of 28
c. In the new window that appears, click “Add.”
d. Navigate to the schema previously saved in step 2b (page 15). Click to
highlight the XML file and then click Open.

IHE Request for UIC Bulk Upload Guide
Page 20 of 28
e. Click OK.
f. The XML Source pane will appear with a list of XML elements.

IHE Request for UIC Bulk Upload Guide
Page 21 of 28
6. The next steps involve mapping XML data elements to the worksheet.
a. Click on the folder icon labelled SubmittingEntity in the XML Source list
and drag it to cell A1, as shown in the following screenshot.
b. Cells A1 and B1 should fill in with the text SubmittingEntityTypeCode
for A1 and SubmittingEntityCode for B1. Expand the width of the
columns to see the column headings more fully.
c. Repeat these steps to drag the PersonalCore folder icon from the XML
Source list into cell C1.

IHE Request for UIC Bulk Upload Guide
Page 22 of 28
d. Cells C1, D1, E1, F1, G1, H1, I1, and J1 will fill with elements UIC,
LastName, FirstName, MiddleName, StudentSuffix, DateOfBirth,
MultipleBirthOrder, and Gender respectively.
e. Repeat these steps to drag the IHEEntityDemographics folder icon
from the XML Source list into cell K1.
7. Add information for the XML header:
a. Click on the + icon at the bottom of the page to add a worksheet.
b. Type the following information in column A, adding each item in a
separate row:
i. SchemaVersionMajor
ii. SchemaVersionMinor
iii. CollectionID
iv. CollectionName
v. SubmittingSystemVendor
vi. SubmittingSystemName
vii. SubmittingSystemVersion

IHE Request for UIC Bulk Upload Guide
Page 23 of 28
c. Click on “B” to highlight the column.
d. Right-click “B” to bring up the context menu. Select “Format Cells…”
e. Select “Text” from “Category:” and click OK.
IHE Request for UIC Bulk Upload Guide
Page 24 of 28
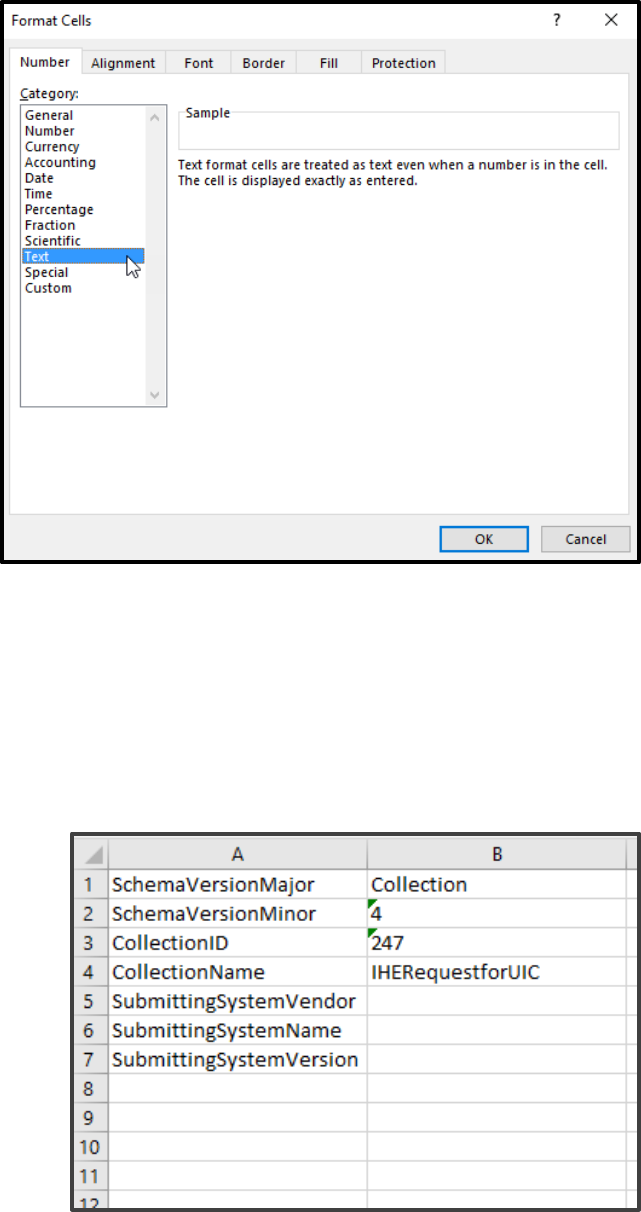
f. In column B, enter the following information:
i. For Cell B1, enter: Collection
ii. For Cell B2, enter: 4
iii. For Cell B3, enter: 247
iv. For Cell B4, enter: IHERequestforUIC
v. Leave Cell B5 blank.
vi. Leave Cell B6 blank.
vii. Leave Cell B7 blank.
8. To map XML header elements, drag XML Source items to these cells.

IHE Request for UIC Bulk Upload Guide
Page 25 of 28
a. Look for the IHERequestforUICGroup folder and drag the item
SchemaVersionMajor to cell B1 where the word “Collection” appears.
If a message box pops up and states, “The data that you are
attempting to map contains formatting that is incompatible with the
format specified in the worksheet,” click the button marked Match
element data type.
b. The next XML Source item is SchemaVersionMinor. Drag it from the
XML Source list to cell B2.
c. Notice how the XML Source items have the same names as the text in
column A.
d. Drag the remaining items: CollectionName to cell B4,
SubmittingSystemVendor to cell B5, SubmittingSystemName to cell
B6, and SubmittingSystemVersion to cell B7. Elements in column B will
have a blue outline and the elements in the XML Source list will appear
in a bold font.
9. The next job is to copy the student records from Step 1 into the mapped
spreadsheet. NOTE: CEPI has prepared an Excel template file that has been
mapped and is ready for users to copy their student data into. If you wish to
use this template, please download the template from the
IHE Request for
UIC Collection web page (under Technical Material).
a. Open the Excel spreadsheet with the student data.

IHE Request for UIC Bulk Upload Guide
Page 26 of 28
b. Highlight all the student last names in column B, but do not include
the header cell labelled “Student Last Name” with the selection.
c. Copy and paste the records into the XML data file directly below cell
D1 (marked “LastName”) on the first worksheet (into the template you
created or into the template CEPI created).

IHE Request for UIC Bulk Upload Guide
Page 27 of 28
d. Repeat this process for the remaining records. The column titled “UIC”
should be left blank. This process is meant for obtaining UICs for
students. NOTE:
i. If you do not plan to include Local Student ID and are
using the Excel template provided by CEPI, you will need
to delete that field from the template before exporting
the XML file.
ii. The SchoolFacilityNumber is the same as the
SubmittingEntityCode.
iii. If your Student ID Number includes leading zeros, please
ensure that the leading zeros have not been removed
when copying into the mapped spreadsheet.
10.The final step is to finalize the new Spreadsheet with student data as an XML
file.
a. Select the DEVELOPER tab on the Excel menu ribbon
b. Click “Export”

IHE Request for UIC Bulk Upload Guide
Page 28 of 28
c. Save the file in a secure location, as it contains Personally
Identifiable Information. Ensure the Save as type is “XML Files.”
d. Click Export.
Step 3: Upload the XML data file to MSDS
Once the XML file has been exported from Excel, it is ready to be uploaded to the
MSDS.
For detailed instructions on how to upload a file, reviewing your file’s status, etc.,
please review the IHE Request for UIC Collection User Guide
.
