
Marketing Email
Salesforce, Summer ’24
Last updated: July 24, 2024
©
Copyright 2000–2024 Salesforce, Inc. All rights reserved. Salesforce is a registered trademark of Salesforce, Inc., as are other
names and marks. Other marks appearing herein may be trademarks of their respective owners.

CONTENTS
EMAIL IN MARKETING CLOUD ENGAGEMENT . . . . . . . . . . . . . . . . . . . . . . . . . 1
Email Studio . . . . . . . . . . . . . . . . . . . . . . . . . . . . . . . . . . . . . . . . . . . . . . . . . . . . . . . . . . 1
INDEX . . . . . . . . . . . . . . . . . . . . . . . . . . . . . . . . . . . . . . . . . . . . . . . . . . . . . . . . . . 381

EMAIL IN MARKETING CLOUD ENGAGEMENT
Plan, personalize, segment, and optimize the customer journey with the email apps that are available in Marketing Cloud Engagement.
Email Studio
With Email Studio, build and send personalized email from basic newsletters to the most complex campaigns. Deliver promotional,
transactional, and triggered messages. Track and optimize to drive performance.
Email Studio
With Email Studio, build and send personalized email from basic newsletters to the most complex campaigns. Deliver promotional,
transactional, and triggered messages. Track and optimize to drive performance.
Get Started with Email Studio
Welcome to Email Studio! We’re so glad you’re here. Onboarding to Email Studio can be intimidating, even for the most experienced
Trailblazers. This guide helps you navigate the setup process and make sure that you don’t miss a thing.
Folder Management in Email Studio
Folders are a great way to keep your account organized. Easily locate and access what you need in Email Studio for Marketing Cloud
Engagement. Start creating folders to organize your lists, data extensions, emails, templates, and content.
Email Studio Navigation
Use Email Studio’s primary navigation toolbar and the navigation pane to choose from a list of available items.
Email Studio Admin
Use Email Studio admin to perform actions in your Email Studio.
Content
Create content for your emails, and send your emails use Email Studio content creation tools. Create reusable content blocks, including
text, HTML, images, buttons, dynamic content, and A/B testing, to ensure that relevant messaging reaches the right person every
time.
Subscribers
A subscriber is a person who has opted to receive communications from your organization. You must have a valid email address for
each subscriber who receives emails. For each subscriber who receives SMS messages, you must have a valid phone number. You
can track additional information about subscribers using profile and preference attributes. Use the subscriber key to identify your
subscribers in Marketing Cloud Engagement. Create lists or data extensions to store your subscribers. Store email subscriber information
in lists or data extensions, and store SMS subscriber information in data extensions only. To segment your subscribers, create as
many lists and data extensions as you need. You populate the information in the lists and data extensions when you add or import
subscribers.
Interactions
Email Studio Interactions contain the communications and data processes that build and support your relationship with customers.
A/B Testing in Email Studio
A/B Testing is a market testing method in which you send two versions of your Email Studio communication to two test audiences
from your subscriber list. Track which version receives the highest unique open rate or highest click-through rate and send that
version to all remaining subscribers.
1
Tracking in Email Studio
Tracking is an aggregated collection of data that allows you to view critical elements such as email opens, clicks, undeliverable
messages, and other metrics online. You can also capture how many emails are forwarded and how many new subscribers each
forward generates. You can create a subscriber list from tracking data to monitor subscriber and list performance. Marketing Cloud
stores your tracking data for the life of your contract.
AppExchange Deliverability Partners
Marketing Cloud Engagement offers both standard deliverability features and access to a network of partners with advanced
deliverability tools whose products can be purchased via AppExchange . AppExchange deliverability partners have developed
products and features that meet various deliverability needs.
Partner Seed Lists
With the Partner Seed Lists feature, you can see inbox results within the AppExchange Partner applications.
Return Path Platform
Marketing Cloud Engagement offers Return Path tools to help you monitor your email deliverability and reputation, test creative
renders, learn how your subscribers are viewing your email, and more. The Return Path product integration is no longer offered.
Contact your account executive regarding interest in this product.
Email Studio Resources
View resource documentation for Email Studio and Marketing Cloud Engagement.
Reseller Account Administration
As a Reseller administrator, you control the setup of your client and demo accounts. Use the Admin section to configure and manage
users of your Reseller administrator account and the initial users of your client accounts in Email Studio.
Enterprise 2.0 Shared Items
A shared item is an email, template, portfolio, data extension, or content area that you control access to. Users outside the business
unit can access the shared item with the appropriate role and permission settings. For example, user with view only permissions
can view but not change a shared item.
Get Started with Email Studio
Welcome to Email Studio! We’re so glad you’re here. Onboarding to Email Studio can be intimidating, even for the most experienced
Trailblazers. This guide helps you navigate the setup process and make sure that you don’t miss a thing.
Get Access to Marketing Cloud Engagement
On the date that your contract activates, you receive a welcome email containing login instructions.
Configure Account and Security Settings
Configure your account with the Setup Assistant for Marketing Cloud Engagement.
Configure Users and Roles in Marketing Cloud Engagement
Configure roles, permissions, and users for your Engagement account.
Configure Domain and IP Settings with Sender Authentication Package (SAP)
Customize your account branding using Sender Authentication Package (SAP), a Marketing Cloud tool.
Secure Your Domain with SSL
The Secure Sockets Layer (SSL) protocol certificate protects your customers and gives them confidence when interacting with your
content. If you purchased the SSL Certificate SKU, use one certificate per domain to secure your links, images, email content, and
CloudPages.
2
Get Started with Email StudioEmail in Marketing Cloud Engagement
Import Subscribers and Other Data
You can import a subscriber list or other data into Marketing Cloud Engagement.
Create Content in Marketing Cloud Engagement
After you’ve set up a domain and imported your subscribers, you’re ready to craft some top-notch content in Content Builder and
Email Studio.
Send Your First Email
Make sure your emails reach their destinations by adhering to deliverability guidelines.
Develop Your Marketing Strategy
Use these resources to build a compelling email marketing strategy. And don’t forget to check out the Trailblazer Community to
find more ideas from other Marketing Cloud Engagement users.
Get Access to Marketing Cloud Engagement
On the date that your contract activates, you receive a welcome email containing login instructions.
If you don’t receive a welcome email:
•
Check your spam folder and confirm that the email address [email protected] is allowlisted.
•
Check the Tenant Information in your contract. Salesforce sends the welcome email to the External Tenant Owner’s email address.
•
If you still can’t find the email, contact your account executive for help.
Configure Account and Security Settings
Configure your account with the Setup Assistant for Marketing Cloud Engagement.
•
Use the Marketing Cloud Engagement Setup Assistant
•
Configure Marketing Cloud Engagement Account Settings
•
Configure Marketing Cloud Engagement Security Settings
Configure Users and Roles in Marketing Cloud Engagement
Configure roles, permissions, and users for your Engagement account.
•
Configure Marketing Cloud Engagement Roles and Permissions
•
Configure Marketing Cloud Engagement Users
Configure Domain and IP Settings with Sender Authentication Package (SAP)
Customize your account branding using Sender Authentication Package (SAP), a Marketing Cloud tool.
SAP features include:
•
Custom account branding
•
Private domain for email sending
•
Custom domain for CloudPages
•
Dedicated IP address
•
Reply mail management
If you purchased SAP, you receive an email from [email protected] 1–2 days after your contract activates. This email
contains the Sender Authentication Package (SAP) Quick Start Guide and an individualized form to set up your SAP.
3
Get Started with Email StudioEmail in Marketing Cloud Engagement

Follow the instructions in the Quick Start Guide to complete these tasks:
•
Choose a unique domain or subdomain name
•
Decide whether to delegate or self-host
•
Decide how to manage replies
•
Review tips for successful sending
After you complete the tasks in the Quick Start Guide, complete your unique SAP form from the email. Watch these videos if you need
more help.
•
Video: How to Fill Out the Sender Authentication Package (SAP) Form
•
Video: How to Fill Out the Sender Authentication Package (SAP) Form Part 2
•
Video: Sender Authentication Package: Common Topics and FAQs
Secure Your Domain with SSL
The Secure Sockets Layer (SSL) protocol certificate protects your customers and gives them confidence when interacting with your
content. If you purchased the SSL Certificate SKU, use one certificate per domain to secure your links, images, email content, and
CloudPages.
•
Marketing Cloud Engagement SSL Certificates Overview
•
Secure a Custom Domain
Import Subscribers and Other Data
You can import a subscriber list or other data into Marketing Cloud Engagement.
•
Create a Data Extension in Contact Builder
•
Import into a Marketing Cloud Engagement Data Extension
Note: Marketing Cloud is now called Marketing Cloud Engagement. Until we finish changes across the Salesforce ecosystem, you
can expect to see some references to both names in Salesforce Help.
To import data from a third-party source or your own internal data warehouse use either Automation Studio or Marketing Cloud
Engagement APIs. To import data from Sales Cloud, Service Cloud, or an Industry Cloud, use Marketing Cloud Connect. For more
information on data management and import, check out these links.
Data Management and Automation
•
Trailhead: Marketing Cloud Engagement Data Management
•
Expert Coaching: Marketing Cloud Engagement Data and Segmentation Basics
•
Implementation Guide: Automation Studio
•
Expert Coaching: Automate Data Imports
•
Expert Coaching: Automate Email Segmentation
Importing Data from Sales Cloud, Service Cloud, or an Industry Cloud
•
Trailhead: Marketing Cloud Connect Setup
•
Implementation Guide: Marketing Cloud Connect
•
Expert Coaching: Use Marketing Cloud Connect
4
Get Started with Email StudioEmail in Marketing Cloud Engagement
Create Content in Marketing Cloud Engagement
After you’ve set up a domain and imported your subscribers, you’re ready to craft some top-notch content in Content Builder and Email
Studio.
•
Create your email. Be sure to incorporate your branding and personalize the content.
–
Trailhead: Create, Test, and Send an Email with Marketing Cloud Engagement
–
Implementation Guide: Content Builder
–
Expert Coaching: Email Personalization Basics
•
Preview and test your email. Check your images and links. Confirm that the unsubscribe link works.
–
Expert Coaching: Building, Testing, and Sending Email
Send Your First Email
Make sure your emails reach their destinations by adhering to deliverability guidelines.
•
Because your new IP address has never sent email before, you must warm your IP address to keep your emails from getting blocked
or sent to spam. Start sending email gradually to build volume over time. See IP Address Warming for Email Studio.
•
Review Email Deliverability Best Practices for Email Studio, and sign up for Expert Coaching on Deliverability.
Develop Your Marketing Strategy
Use these resources to build a compelling email marketing strategy. And don’t forget to check out the Trailblazer Community to find
more ideas from other Marketing Cloud Engagement users.
•
Trailhead: Marketing Cloud Engagement Trailblazer Community
•
Trailhead: Email Marketing Strategies
•
Trailhead: Advance Your Marketing Strategy
Folder Management in Email Studio
Folders are a great way to keep your account organized. Easily locate and access what you need in Email Studio for Marketing Cloud
Engagement. Start creating folders to organize your lists, data extensions, emails, templates, and content.
To create a folder, right-click in the appropriate folder space and select Create Folder or New Folder, as applicable. Rename, move, or
delete folders by right-clicking the folder’s name.
Email Studio Navigation
Use Email Studio’s primary navigation toolbar and the navigation pane to choose from a list of available items.
The primary navigation toolbar is at the top of the Email Studio app. Hide the navigation pane at any time by clicking the gray bar on
the right side of the pane. You can resize the pane by dragging the bar that separates the navigation pane from the workspace. The list
of available features in the primary navigation toolbar contains only those items you have permission to access.
•
Overview
•
Content
•
Subscribers
•
Interactions
5
Folder Management in Email StudioEmail in Marketing Cloud Engagement

•
Tracking
•
Admin
Work with your admin to get access to features that don’t appear in your account.
Custom Navigation
Custom navigation allows you to create your own horizontal tabs to the primary navigation. To create more tabs for your users, add the
URL of a landing page. You can build these landing pages for specific needs or a more customized user experience.
Email Studio Admin
Use Email Studio admin to perform actions in your Email Studio.
Note: Access Email Studio Settings in Setup to manage details about your Marketing Cloud Engagement Email features. Setup
also contains other helpful sources of information about Engagement.
Review these settings for additional information.
Admin Setup for Marketing Cloud Engagement Email
Use Setup Assistant to configure Marketing Cloud Engagement Email.
Auto-Suppression Lists
Assign a suppression list for use across an entire Marketing Cloud Engagement tenant or for specific business units for specific send
classifications. You can assign auto-suppression lists at different levels of your account. Suppression lists filter out email addresses
and prevent those addresses from receiving Email Studio messages. Suppression lists serve as a do-not-contact list for your email
sends. Auto-suppression lists typically include addresses with a history of spam complaints, unsubscribe lists from previous providers
or advertisers, addresses of your competitors, and canceled customers.
iOS Universal Link
The iOS Universal Link feature allows links in Email Studio messages to open directly into previously installed apps on iOS devices.
This process is also known as deep linking into an app. By default, links embedded in an email message open in a browser window.
After implementing this feature, you can specify the app and location to open on iOS devices.
Android Deep Link Setup
Follow these steps to enable Android's deep-linking in Setup.
BrandBuilder
BrandBuilder allows you to customize the color scheme used within your Email Studio account. Use BrandBuilder to select color
schemes that match your company’s logo. You can use the color scheme when you design your email template to help maintain
brand integrity. Based on the colors of the logo you upload, BrandBuilder provides you with several pre-designed color schemes.
After you choose how to privately label your account, BrandBuilder applies the color scheme, providing your users with a branded
experience.
Subject and Preheader Validation
This feature displays a notification to the user to highlight words in the Subject and Preheader of emails prior to sending. The
notification warns users and prevents accidental live sends that contain test-related words in the subject and preheader.
Create a UI Extension
Follow these steps to create a UI extension in Email Studio. The UI extension lets you create a custom tab within the user interface
that displays the content of a different page. Users can click that tab to view the page within the context of the Marketing Cloud
Engagement user interface.
6
Email Studio AdminEmail in Marketing Cloud Engagement

Create a Custom Tab
To enable a landing page of job-level tracking information, create a custom tab to display a link on your Email Studio tracking screen.
For more information about enabling this feature, contact your Marketing Cloud Engagement account representative.
Admin Setup for Marketing Cloud Engagement Email
Use Setup Assistant to configure Marketing Cloud Engagement Email.
Setup Assistant guides you to make full use of Engagement. Access Setup Assistant in the Setup menu of your Engagement account.
Purchase and Configure a Domain
Purchase and configure a Marketing Cloud Engagement domain if you don’t already have one. Purchase a domain then configure
it to point to Salesforce DNS servers for Engagement.
SEE ALSO:
Email Studio Admin
Purchase and Configure a Domain
Purchase and configure a Marketing Cloud Engagement domain if you don’t already have one. Purchase a domain then configure it to
point to Salesforce DNS servers for Engagement.
Only use a dedicated domain if you can’t support DNS delegation or DNS hosting. If applicable, you can purchase a domain for dedicated
use in Marketing Cloud Engagement. Follow our recommended best practices for naming your domain. If your company’s name is
Example and your primary domain is example.com, purchase a related domain such as example-email.com.
Note: Country, industry, or registrar issuance restrictions or limitations related to certain top-level domains (TLDs) can impact
your ability to purchase certain domains. For example, .org or .edu.
Choose the domain registrar you want to use. In this example we use Hover.com as the domain registrar.
Note: Some domain registrars have limitations regarding the types of domain names that can be purchased or have limitations
in the settings associated with your purchased domain name.
Important: Any information you provide to your domain registrar could be made public. WHOIS privacy generally protects your
information from public view, but could be subject to change in the future. You are solely responsible for the data you provide to
the third-party domain registrar.
Best Practices
•
Use the simplest, best branding to represent your company when naming your domain. For instance, your company name is Example
and your domain name is example.com. Ideally, use a subdomain under example.com for your Sender Authentication Package
domain or Authenticated Private Domain, such as em.example.com or e.example.com. If both subdomains are in use, consider using
a prefix like mail, email, mm, or info.
•
Avoid choosing a domain or subdomain that contains words or terms that don’t represent your company brand, such as Salesforce
or sf.
•
Use only top-level domain (TLD) names such as .com instead of using either .org, or newer TLDs such as .online.
•
Renew your domain name before it expires. Renewal can be annual or on a longer term use contract. Not renewing your domain
name before its expiration can result in poor email deliverability and broken images and links.
1. Purchase and Configure Your Domain Name
1. Go to the website for the domain registrar that you chose. For example, go to http://www.hover.com.
7
Email Studio AdminEmail in Marketing Cloud Engagement

2. Search to determine if your preferred domain name is available to purchase. For example, on hover.com, use the landing page search
bar to check domain availability.
3. If your domain name is available, you’re ready to go. If not, domain registrars sometimes can suggest close alternatives as hover.com
does.
4. When your preferred domain name is ready to purchase, put it in your shopping cart and head to the checkout.
Note: It’s not required to purchase additional Email options that appear at checkout, such as adding a large storage mailbox.
5. Complete checkout.
6. Open the registrar account for the domain that you want to use.
7. To name your servers, find the naming option.
On hover.com, the option is Nameservers.
8. Edit the server name. Add and rename servers until there are four that follow this naming convention.
a. ns1.exacttarget.com
b. ns2.exacttarget.com
c. ns3.exacttarget.com
d. ns4.exacttarget.com
9. Save your named servers.
Note: The configuration process can vary depending on the domain registrar that you use.
Contact Salesforce when your domain name is registered and your DNS server names are updated. If you intend to use the domain for
an SAP setup, complete the SAP form. If you intend to use the domain as a private domain for sending, reply to the private domain email.
If you’re unsure how to proceed, contact Salesforce Customer Support.
Auto-Suppression Lists
Assign a suppression list for use across an entire Marketing Cloud Engagement tenant or for specific business units for specific send
classifications. You can assign auto-suppression lists at different levels of your account. Suppression lists filter out email addresses and
prevent those addresses from receiving Email Studio messages. Suppression lists serve as a do-not-contact list for your email sends.
Auto-suppression lists typically include addresses with a history of spam complaints, unsubscribe lists from previous providers or
advertisers, addresses of your competitors, and canceled customers.
Note: Enabling this feature republishes the suppression list changes for the triggered send. Triggered send content isn’t updated.
Clear your triggered send queues before enabling. Subscribers in a triggered send queue when this feature is enabled aren’t
auto-suppressed. The auto-suppression isn’t applied to the send already in the queue.
Fields on auto-suppression lists are similar to attributes on a regular list. However, you can't use fields for personalization or segmenting.
Fields on suppression lists serve as informational data for you and other users of Marketing Cloud. When you create an auto-suppression
list, the system generates default fields.
•
Email Address
•
Date Added
Add as many fields as necessary.
Note: Auto-Suppression lists created in a child Business Unit impacts only the child BU. Auto-Suppression lists created in an
Enterprise BU impacts the whole account.
8
Email Studio AdminEmail in Marketing Cloud Engagement

Create an Auto-Suppression List
To automatically prevent sends to selected contacts, create an auto-suppression list in Email Studio.
Edit an Auto-Suppression List
Edit an existing auto-suppression list in Email Studio to change any applicable properties and update the associated triggered sends.
Enabling this feature republishes the suppression list changes for the triggered send. Triggered send content isn’t updated. Clear
your triggered send queues before enabling. Subscribers in a triggered send queue when this feature is enabled aren’t auto-suppressed.
The auto-suppression isn’t applied to the send already in the queue.
Add Subscribers to an Auto-Suppression List
To prevent extra subscribers from receiving triggered sends, add them to an auto-suppression list in Email Studio.
Turn Off Auto-Suppression Lists for an Account
To include all subscribers in triggered sends, you can turn off auto-suppression lists in Marketing Cloud Engagement.
Create an Auto-Suppression List
To automatically prevent sends to selected contacts, create an auto-suppression list in Email Studio.
Note: Enabling this feature republishes the suppression list changes for the triggered send. Triggered send content isn’t updated.
Clear your triggered send queues before enabling. Subscribers in a triggered send queue when this feature is enabled aren’t
auto-suppressed. The auto-suppression isn’t applied to the send already in the queue.
1. In Email Studio, click Admin.
2. Click Auto-Suppression Configuration under Send Management.
3. Click Create.
4. Give the list a name and description in the Properties section.
5. Complete the Attributes section.
This section displays the attributes used in your auto-suppression list. This section displays default attributes. Add other values as
necessary.
6. Complete sender profiles in the Assignment Section.
a. Click Select.
b. Select each sender profile that is assigned the auto-suppression list. Search by sender profile name or business unit name.
c. Click Select.
7. Complete a CAN-SPAM classification in the Assignment Section.
a. Select a classification type of Commercial, Transactional, or Both.
b. If you have an Enterprise account, assign the suppression list to the enterprise level and every business unit in the enterprise.
This assignment includes business units you create in the future, or to specific business units within an enterprise.
8. Click Save.
9. Enter the email address that receives a notification email. This notification email sends after all triggered sends assigned to this
auto-suppression lists update.
10. Click Update.
9
Email Studio AdminEmail in Marketing Cloud Engagement
Edit an Auto-Suppression List
Edit an existing auto-suppression list in Email Studio to change any applicable properties and update the associated triggered sends.
Enabling this feature republishes the suppression list changes for the triggered send. Triggered send content isn’t updated. Clear your
triggered send queues before enabling. Subscribers in a triggered send queue when this feature is enabled aren’t auto-suppressed. The
auto-suppression isn’t applied to the send already in the queue.
1. In Email Studio, click Admin.
2. Under Send Management, click Auto-Suppression Configuration.
3. Choose the auto-suppression list to update.
4. Click Properties.
5. Edit the auto-suppression list.
6. Click Save.
7. Enter the email address that receives a notification email after all triggered sends assigned to this auto-suppression list are updated.
8. Click Update.
Add Subscribers to an Auto-Suppression List
To prevent extra subscribers from receiving triggered sends, add them to an auto-suppression list in Email Studio.
1. In Email Studio, click Admin.
2. Click Auto-Suppression Configuration under Send Management.
3. Select the auto-suppression list for the additional subscribers.
4. Click Create.
5. Fill out these fields.
The email address of the unsubscribed subscriberEmail Address
The date the subscriber joined the listDate Added
VariesAny other custom attributes you defined for this list
6. Click Save.
To add multiple subscribers at once, use an import activity in Automation Studio.
SEE ALSO:
Import Activity in Email Studio
Turn Off Auto-Suppression Lists for an Account
To include all subscribers in triggered sends, you can turn off auto-suppression lists in Marketing Cloud Engagement.
1. In Email Studio, click Admin.
2. Click Auto-Suppression Configuration under Send Management.
3. To select all auto-suppression lists, select the header row.
4. Click Delete.
10
Email Studio AdminEmail in Marketing Cloud Engagement

5. To disable this feature for your account, contact your account executive.
iOS Universal Link
The iOS Universal Link feature allows links in Email Studio messages to open directly into previously installed apps on iOS devices. This
process is also known as deep linking into an app. By default, links embedded in an email message open in a browser window. After
implementing this feature, you can specify the app and location to open on iOS devices.
To use iOS Universal Link, implement a Sender Authentication Package with an SSL certificate for click domain in your account and
modify your iOS app to accept the links that open the correct location and track clicks.
If you use a third party for deep-linking, you can be required to host your own DNS to implement DNS records for the third-party
integration. Refer to your deep-link vendor's integration documentation for details. For a new SAP setup, choose the self-hosting DNS
option. For an existing SAP setup with a delegated domain or subdomain, take over hosting DNS for that domain. If Marketing Cloud
Engagement purchased the domain, take over ownership of the domain, and then host DNS. To initiate this process, log a case with
support to request:
•
Domain ownership transfer + zone file to host DNS: Request an authorization code for the transfer of the domain to your registrar
and to have a zone file generated with the existing DNS records that you must implement.
•
To host DNS only: Request a copy of the zone file generated with all the DNS records that you must implement.
You can’t configure DNS for third-party iOS Universal Linking or Deep Linking solutions. If you aren’t sure whether your domain is
delegated or owned by Engagement, contact Salesforce Customer Support.
Workflow
An iOS app designed to work with the iOS Universal Link feature caches an association file containing links that redirect to specific apps.
After a recipient clicks a link in an email message, the iOS Mail app contacts the specified click server, which directs the Mail app to open
either a browser window or an iOS app location, depending on your specified location. Other iOS-based mail apps perform different
behaviors, depending on the configuration of that app. For example, the Gmail app opens links first in a Gmail-based view regardless
of settings. Gmail then provides an Open in Browser option.
This example displays a sample link for a user with the click.example.com click domain in an email message:
https://click.example.com/qs=hxdwbvpwueDMUFuWaNEhguEVdMLWCPTsutky0fdC
When a recipient clicks that link, iOS gives your app an NSUserActivity object with the webpageURL property containing the proper URL.
The app communicates with the click server via an HTTP GET request to get the appropriate 302 URL redirection to open either a browser
window or app URL.
Implement an iOS Universal Link for Email Studio
Use the iOS universal link feature to allow links in Email Studio messages to open directly into previously installed apps on iOS devices.
Implementing an iOS universal link requires purchasing a Sender Authentication Package and an SSL certificate for the click domain.
The iOS universal link requires an HTTPS connection to perform correctly. The AppID and click domain pair that you use must be
unique for active applications across all business units in the enterprise.
Test iOS Universal Link in Your Account
Follow these steps to test your iOS Universal Link implementation in Email Studio.
Exclude Links from iOS Universal Links
Create a tag that prevents iOS Universal Links from opening the link in your mobile app. Instead, this tag forces your mobile device
to open the link in a browser window.
11
Email Studio AdminEmail in Marketing Cloud Engagement
Implement an iOS Universal Link for Email Studio
Use the iOS universal link feature to allow links in Email Studio messages to open directly into previously installed apps on iOS devices.
Implementing an iOS universal link requires purchasing a Sender Authentication Package and an SSL certificate for the click domain.
The iOS universal link requires an HTTPS connection to perform correctly. The AppID and click domain pair that you use must be unique
for active applications across all business units in the enterprise.
1. Modify your iOS application to accept universal link requests.
a. Add your branded click domain link entry to the com.apple.developer.associated-domains entitlement. Ensure that the entry
includes the applinks prefix.
For example, an entry for click.example.com looks like this: "applinks:click.example.com".
b. Use the webpageURL property on the NSUserActivity object provided by iOS to determine whether the click originates from the
click domain that Marketing Cloud Engagement uses.
The property appears like this wrapped URL:
https://click.example.com/?qs=hxdwbvpwueDMUFuWaNEhguEVdMLWCPTsutky0fd
c. Verify that the incoming URL is from Engagement by performing a GET call to unwrap the first URL.
d. If your emails are using Einstein Content Selection, add another GET call to unwrap the intermediate Einstein content selection
URL.
Example of an Einstein Content Selection intermediate URL:
https://ecs.us.sfmc-einstein.com/einstein/api/block/44644947...
e. After the URL is fully unwrapped, retrieve the URL’s destination.
f. To parse the logic from the unwrapped URL and navigate to the correct view in the app, call a method.
This pseudocode illustrates the steps for accepting a universal link request. This method accommodates wrapped URLs from Marketing
Cloud Engagement that can use the Einstein Content Selection app. It adds a redirect before reaching the original URL. The pseudocode
refers to a function called Networking.getUnwrapped(), which retrieves the final URL by issuing a GET request to the URL
and retrieving the value of its location header.
12
Email Studio AdminEmail in Marketing Cloud Engagement

•
public func application(_ application: UIApplication,
continue userActivity: NSUserActivity,
restorationHandler: @escaping ([Any]?) -> Void) -> Bool {
// Example: Double wrapped url
if let url = userActivity.webpageURL {
if url.absoluteString.contains("sfmc-einstein") {
Networking.getUnwrapped(url) { result in
switch result {
case .success(let singleUnwrappedURL):
// first unwrapped link; will need to be unwrapped again
Networking.getUnwrapped(singleUnwrappedURL) { result in
switch result {
case .success(let doubleUnwrappedURL):
// Final unwrapped link to be parsed by app
parseAndRedirect(with: doubleUnwrappedURL)
case .failure:
print("Failed to get 2nd unwrapped link")
}
}
case .failure:
print("Failed to get 1st unwrapped link")
}
}
}
}
return true
}
2. Configure the iOS universal link for Email Studio. These settings are used to deploy the apple-app-site-association (AASA) file to a
click domain.
a. In the Email Studio Admin section, under Deep Linking, enter your AppID. The AppID is your application’s alphanumeric teamID
followed by the bundleID.
b. To force a mobile web experience for profile and subscription centers, select Exclude Profile and Unsub Center.
c. Save the entry.
d. The order of entries affects the order of entries in the AASA file. To change the ordering, delete the entries and enter them in
the correct order.
Your first entry must be a test or staging application.
e. After it’s configured, your click domain serves an AASA file. The AASA is
https://click.{your-sap-domain}/.well-known/apple-app-site-association.
13
Email Studio AdminEmail in Marketing Cloud Engagement

•
{
"applinks": {
"apps": [],
"details": [
{
"appID": "ABC123EFG.com.staging.app",
"paths": [
"NOT /subscription_center.aspx*",
"NOT /profile_center.aspx*",
"NOT /unsub_center.aspx*",
"NOT /u/*",
"/*"
]
},
{
"appID": "HJK456LMN.com.production.app",
"paths": [
"NOT /subscription_center.aspx*",
"NOT /profile_center.aspx*",
"NOT /unsub_center.aspx*",
"NOT /u/*",
"/*"
]
}
]
}
}
SEE ALSO:
Exclude Links from iOS Universal Links
Test iOS Universal Link in Your Account
Follow these steps to test your iOS Universal Link implementation in Email Studio.
Before testing the feature, add the domain to the iOS application entitlement. Using the same click domain for development and
production versions does not allow differentiation between test data and production data.
1. To test the feature, send email messages using iOS Universal Links to development versions of your app.
2. For all versions of your app to use the feature, include all applicable AppID values in your association file. If you only use a single
AppID value, include that value only in local builds of your app for testing purposes.
3. Ensure that you use SSL certificates for all sandbox or testing accounts for the Marketing Cloud.
Exclude Links from iOS Universal Links
Create a tag that prevents iOS Universal Links from opening the link in your mobile app. Instead, this tag forces your mobile device to
open the link in a browser window.
1. Open the HTML version of the email message containing the link.
2. Add mc-deep-link="false" to the <a> tag of the link, like this example:
<a href="https://www.example.com" mc-deep-link="false">Your Link</a>
14
Email Studio AdminEmail in Marketing Cloud Engagement

3. Save the email message.
Android Deep Link Setup
Follow these steps to enable Android's deep-linking in Setup.
You can access Android asset link setup in Marketing Cloud Engagement. You can upload an assetlinks.json file to meet the Trusted
Domain requirements for Web Intent Resolution. Any URL in the email that isn't registered with a trusted domain resolves to the mobile
browser instead of the mobile app.
Note: Don't duplicate the same assetlinks.json file in Engagement that is already hosted on other domains. With Google digital
asset link specification you can reference your existing assetlinks.json file on your private domain.
1. From Setup, navigate to Platform Tools>Feature Settings>Email Studio>Deep-Linking Applications.
2. To upload your assestlinks.json file, Click Browse.
3. Save your work.
4. View your assetlinks.json file hosted at your click domain URL by visiting the Endpoint. Use the copy icon and paste the URL directly
into your browser.
5. If you make changes, use the dropdown menu to replace or delete the file.
Note: Allow 10 minutes for the file to deploy to your endpoint.
BrandBuilder
BrandBuilder allows you to customize the color scheme used within your Email Studio account. Use BrandBuilder to select color schemes
that match your company’s logo. You can use the color scheme when you design your email template to help maintain brand integrity.
Based on the colors of the logo you upload, BrandBuilder provides you with several pre-designed color schemes. After you choose how
to privately label your account, BrandBuilder applies the color scheme, providing your users with a branded experience.
Note: This page provides information about BrandBuilder in Email Studio. To change brands associated with Marketing Cloud
Engagement, follow the Marketing Cloud Engagement BrandBuilder documentation.
Prerequisites
Salesforce must enable this feature and create a brand for your account, including every business unit in an Enterprise 2.0 account.
Contact your Engagement account representative to accomplish these tasks before following these directions.
•
Upload a logo in JPG or GIF format.
•
Logos must measure 550 pixels wide by 60 pixels high.
•
Follow the same steps whether you’re creating a brand or modifying an existing brand. When you modify an existing brand, you
overwrite it with new color data. If you created a custom color scheme for the brand, the custom scheme doesn’t appear as an option
when you set up BrandBuilder for Email Studio.
BrandBuilder
The color scheme you choose applies to these elements.
•
Logo and header background color on every screen
•
Primary navigation buttons
•
The appearance of the login screen
15
Email Studio AdminEmail in Marketing Cloud Engagement
•
Survey landing page
•
Forward to a Friend landing page
•
Profile Center and Subscription Center pages
Scenario
Northern Trail Outfitters wants to create a color scheme based on their logo. They open the BrandBuilder page by clicking Admin and
selecting BrandBuilder.
They click start now and upload a logo.
They click Next, and the application auto-generates seven different branding schemes.
Northern Trail Outfitters chooses the color scheme they prefer and clicks Next. The BrandBuilder workspace displays the chosen colors
and a preview of what a page would look like using that color scheme.
Northern Trail Outfitters adjusts these colors by clicking the color box and choosing a new color in the color palette. After they select
their color scheme, they click Next. BrandBuilder displays previews of the Application Screen and the Logon Screen. They click Next
again.
The BrandBuilder generates the new color scheme while the status is displayed in a dialog box. After the dialog box disappears, Northern
Trail Outfitters clicks Finish and applies the brand to the application.
Create a New Brand
Create a BrandBuilder brand for Email Studio in Marketing Cloud Engagement.
Upload Your Logo
Follow these steps to upload a logo for BrandBuilder in Email Studio.
Choose Your Brand Color Scheme
Select a color scheme for BrandBuilder in Email Studio that displays within your Marketing Cloud Engagement account.
Preview Your Brand
The Preview Your Brand page in BrandBuilder shows your Marketing Cloud Engagement app and login page side-by-side. To preview
your brand, follow these steps in Email Studio.
Associate Your Brand
The Associate Your Brand page in BrandBuilder lists the subaccounts associated with your Marketing Cloud Engagement administrative
account. To associate your brand, follow these steps in Email Studio after you create a brand.
Rename a Brand
Your brand name appears as the browser tab name when you're using Marketing Cloud Engagement. You can change that name
in Email Studio.
Revert Your Brand to the Default
When you create a brand in Email Studio for BrandBuilder, you can revert to the default at any time. Contact your account executive
to begin the process.
SEE ALSO:
Profile Center for Marketing Cloud Engagement
Preview the Subscription Center
16
Email Studio AdminEmail in Marketing Cloud Engagement
Create a New Brand
Create a BrandBuilder brand for Email Studio in Marketing Cloud Engagement.
1. In Marketing Cloud Engagement Setup, in the Quick Find box, enter BrandBuilder, and then select BrandBuilder.
2. Click New Brand.
3. Enter a brand name, and save your changes.
Upload Your Logo
Follow these steps to upload a logo for BrandBuilder in Email Studio.
Create a new brand before following these steps.
1. Click Choose File.
2. Use the file selection dialog box to locate the logo for this brand on your computer.
3. Click Upload Logo.
4. Click Next.
The Choose Your Color Scheme page appears in the workspace.
Choose Your Brand Color Scheme
Select a color scheme for BrandBuilder in Email Studio that displays within your Marketing Cloud Engagement account.
Engagement uses the color of the top-left pixel in your logo and displays it in the Header Color field. BrandBuilder uses this color to build
seven color scheme choices. Follow these steps to change the header color and build a new set of color schemes.
1. To bring up the color picker, click the Header Color text box.
If you know the hex code for the color, enter that code in the Header Color text box and click Get Schemes to rebuild the available
color schemes.
2. Click a color from the palette on Web Palette.
3. Click a color from the palette on Named Colors, which displays the name of the color that you pick.
4. Click the Custom Colors tab and manually adjust the Red, Green, and Blue values of the color until you build the color you want.
5. Click OK in the Color Picker dialog box.
6. To rebuild the available color schemes, click Get Schemes.
7. Select a color scheme.
To design your own color scheme, click Build Your Own to highlight it.
8. Click Next.
9. Adjust colors as desired.
You can enter either the hex code for the color or click the color button next to the element and choose from the palette.
10. To update the preview, click Regenerate Preview.
11. To preview how your changes affect the displayed screen, click Application Screen and Logon Screen under Preview.
12. After you complete your changes, click Next.
17
Email Studio AdminEmail in Marketing Cloud Engagement
Preview Your Brand
The Preview Your Brand page in BrandBuilder shows your Marketing Cloud Engagement app and login page side-by-side. To preview
your brand, follow these steps in Email Studio.
1. To see a full-screen preview of your brand, click Preview Brand.
2. Click OK in the countdown dialog box to return to BrandBuilder.
3. When satisfied with your brand, click Next.
The application now builds your brand. When done, it displays the Associate Your Brand page.
Associate Your Brand
The Associate Your Brand page in BrandBuilder lists the subaccounts associated with your Marketing Cloud Engagement administrative
account. To associate your brand, follow these steps in Email Studio after you create a brand.
1. Select each account to which you want to apply this brand.
2. Click Finish.
When users log in to the accounts associated with this brand, they see the new color scheme. The first time users log in, they see
the standard Engagement login page unless they go directly to your branded URL. However, when they log in, they see the branded
application page. The next time they log in from the same machine, they see the branded login page.
Rename a Brand
Your brand name appears as the browser tab name when you're using Marketing Cloud Engagement. You can change that name in
Email Studio.
1. In the navigation pane, click Admin.
2. Click the BrandBuilder folder to expand it and view your private labels.
3. Right-click the brand that you want to rename and choose Rename.
4. Type the new name over the previous name and press Enter.
Revert Your Brand to the Default
When you create a brand in Email Studio for BrandBuilder, you can revert to the default at any time. Contact your account executive to
begin the process.
Subject and Preheader Validation
This feature displays a notification to the user to highlight words in the Subject and Preheader of emails prior to sending. The notification
warns users and prevents accidental live sends that contain test-related words in the subject and preheader.
The notification displays when sending an email during creation, using Send Flow to send an existing email and in the Send Email Activity
in Automation Studio. The default validation list includes the words Test, Draft, and Proof. You can configure the list for your situation
or language.
Dynamic subject and dynamic preheader is also validated prior to sending.
If your account is provisioned with Approvals, the subject and preheader of the email will not be editable when sending. These fields
need to be updated when the email is in draft status.
18
Email Studio AdminEmail in Marketing Cloud Engagement

The administrator must have the Subject/Preheader Validation permission under Send Management in the Admin section of Email
enabled to update the validation list. The maximum character limit is 4,000 and non-ASCII characters are unsupported. A warning displays
to the user if validation words are surrounded by these characters in their subject or preheader:
•
-
•
]
•
(
•
)
•
.
•
!
•
?
•
:
•
;
•
-
•
.
Users are not warned if validation words are surrounded by these characters in the subject or preheader of the email:
•
,
•
=
•
{
•
}
We recommend users use Subject Prefix in the Test Send step, which appends [Test]: to the beginning of the subject of the email at the
time of the test send. This function eliminates the need to include this directly in the subject of the email. You can customize the Subject
Prefix field can be customized.
Example: A Northern Trail Outfitters administrator wants to prevent marketers from sending emails with their test-related words
in the subject and preheader of emails. Marketers can use the Subject Prefix field in the Preview and Test step so they do not
modify the subject during testing. However, the administrator understands that marketers may also update the subject or preheader
as well so they want to add more prevention measures. Northern Trail Outfitters frequently use the word “Test” in their actual
subject lines, so they do not want the warnings to display for that word. In Setup, search Subject/Preheader Validation.
They click the trash can icon next to the Test field, and click Add to enter Pending as a new word in the list. They click Save.
A Northern Trail Outfitters marketer plans to send their monthly email newsletter. During the testing process, the marketer adds
Pending to the subject of the email, so the internal team can differentiate the test emails with the live emails. The marketer finalizes
the content of the email and now it is time to send the email. From the Preview and Test step in Create Email, the marketer selects
Save and Send. A pop-up notification displays to let them know they have a word “Pending” that is listed in the Validation list. If
the marketer chooses to ignore this warning and proceeds to send the email, from the Define Properties step to the Select Audience
step, another warning displays.
The marketer chooses to ignore this warning again and clicks Continue Send in the notification. In the final Review and Send
step, an icon displays in the preview to warn the marketer that the subject or preheader contains a word on the validation list. The
marketer had three opportunities to update the subject or preheader to ensure that live sends are not sent with test-related words.
In any of these scenarios, the marketer can update the subject to remove Pending from the subject line, and they can proceed
through the process without receiving a warning.
SEE ALSO:
Subscriber Preview and Test Send
19
Email Studio AdminEmail in Marketing Cloud Engagement

Create a UI Extension
Follow these steps to create a UI extension in Email Studio. The UI extension lets you create a custom tab within the user interface that
displays the content of a different page. Users can click that tab to view the page within the context of the Marketing Cloud Engagement
user interface.
Note: For information about enabling this feature for your account, contact your Engagement account executive.
1. Click Admin > UI Extension > Custom Tab > Create.
2. Fill out the name, external key, description, and URL fields.
•
Name: The name of the tab. This name appears on the tab in the user interface.
•
External Key: An identifier for the tab you're creating. For example, if the tab's name is Policy, an appropriate external key would
be policy.
•
Description: A short description of the information that the tab displays.
•
URL: The URL of the landing page or website to view tracking for.
3. Click Save.
A new tab displays when you access the user interface.
Create a Custom Tab
To enable a landing page of job-level tracking information, create a custom tab to display a link on your Email Studio tracking screen.
For more information about enabling this feature, contact your Marketing Cloud Engagement account representative.
1. Click Admin.
2. Click Tracking Configuration.
3. Click Custom Tab.
4. Click Create.
5. Enter a name, external key, description, and URL.
•
Name: The name of the tab. This name appears on the tab in my tracking.
•
External Key: An identifier for the tab you're creating. For example, if the tab's name is Additional Opens, an appropriate
external key is additional_opens.
•
Description: A short description of what the tab displays
•
URL: The URL of the landing page or website to view tracking for
6. Click Save. The next time you log in, a new tab shows tracking data for an email send.
Content
Create content for your emails, and send your emails use Email Studio content creation tools. Create reusable content blocks, including
text, HTML, images, buttons, dynamic content, and A/B testing, to ensure that relevant messaging reaches the right person every time.
Design for the mobile inbox with mobile-optimized email templates. Preview what your email looks like on a mobile device or desktop
with instant rendering tools.
Manage and Edit Messages
Manage and edit content for the Content Builder messages you create in Marketing Cloud Engagement.
20
ContentEmail in Marketing Cloud Engagement
Send an Email
Send an email from Email Studio using the most applicable method for your use case.
Personalization Strings in Marketing Cloud Engagement
A personalization string lets you insert subscriber attributes, such as subscriber name, into your emails. Personalization strings can
appear in the subject line, preheader, or in the content of the email. You may hear personalization strings referred to as merge fields
or substitution strings.
Content Detective
Content Detective is an Email Studio tool that helps you identify spam triggers in your email content. This feature mirrors the logic
used by spam-filtering software to identify words, phrases, and patterns that are likely to trigger filters and then recommends a
resolution to each identified problem. After running Content Detective, edit the triggers identified in the email using the recommend
resolutions.
Content Syndication
Use Email Studio content syndication to bypass typing in the email and include content in your emails directly from an outside
source.
Headers and Footers
Marketing Cloud Engagement can add text and images to the beginning and end of your email messages that ensures compliance
with CAN-SPAM regulations.
Social Forward
Social Forward in Email Studio enables email recipients to share content from emails with other users via their preferred social
network. Choose the sections of the email to enable with Social Forward and the networks represented by links and images in the
email. Social Forward also tracks any clicks from an email to a social network and the resulting page views from the URL shared by
the email recipient.
Email Attachments
Use Email Studio to send email attachments that aren’t included in the main body of an email. The recipient can open and save the
attachment independently of the email message.
Classic Content Retirement
Email Studio Classic Content was retired during the Marketing Cloud Engagement Spring ’23 release. To create and edit emails and
templates, use Content Builder, which includes functionality not available in Classic Content. Content Builder tools are also more
secure and flexible.
Manage and Edit Messages
Manage and edit content for the Content Builder messages you create in Marketing Cloud Engagement.
Content Builder
Use Content Builder to consolidate images, documents, and content in a single location for use in Marketing Cloud Engagement.
Content Builder includes the content repository (CMS) and API, the content management application (formerly referred to as Content
Canvas), and the new HTML content editor (formerly referred to as Content Builder).
Content Builder
Use Content Builder to consolidate images, documents, and content in a single location for use in Marketing Cloud Engagement. Content
Builder includes the content repository (CMS) and API, the content management application (formerly referred to as Content Canvas),
and the new HTML content editor (formerly referred to as Content Builder).
•
Get Started with Content Builder
21
ContentEmail in Marketing Cloud Engagement

•
Editor Best Practices and Tips
•
Upload Files
•
Create Emails
•
Create Templates
•
Create Mobile Messages
•
Create Content Blocks
•
Create a Code Snippet
•
Share Content
•
Duplicate Content
•
Content Builder Approvals
•
Content Builder Tags
•
Sitecore Content
Send an Email
Send an email from Email Studio using the most applicable method for your use case.
DescriptionSending Method
Send Flow replaces Guided Send for Content Builder emails. Send
Flow guides you through the necessary steps to send your email.
Send Flow
Subscriber Preview is a rendering of an email as it’s viewed by a
recipient. After the initial subscriber preview, you can proceed
Subscriber Preview and Test Send
through the rest of the recipients to see previews for each
subscriber and send a test.
Send Preview is a rendering of an email as it’s sent to a recipient.
After the initial preview, you can proceed through the rest of the
recipients on the list to see the preview for each.
Perform Send Preview
Simple Send is a quick way to send your email with limited sending
options.
Perform a Simple Send
User-Initiated Send to send your email as part of an Automation
Studio automation.
Send a User Initiated Email Interaction
Triggered Send sends an email in response to a subscribers action.Triggered Emails in Email Studio
What Happens When You Click Send
Learn about the series of processes that take place before your email reaches your subscriber's inbox.
Do Not Track Email Opens and Clicks
At send time, in accounts without Do Not Track, Marketing Cloud Engagement tracking IDs are applied while rendering subscriber
messages. The Do Not Track functionality adds a send-time check that honors a subscriber’s preference. For subscribers who don’t
want to be tracked, the check suppresses Engagement tracking IDs from being applied to the rendered message. So, open and click
events aren’t known.
22
ContentEmail in Marketing Cloud Engagement
Send Flow
Send Flow replaces Guided Send for Content Builder emails in Email Studio. Send Flow allows you to see what you are sending to
reduce errors, and consolidates all major sending functionality into a simple, highly visual interface.
Use Subscriber Preview
To preview a microsite landing page as a subscriber in Email Studio, open the landing page and use Subscriber Preview.
Subscriber Preview and Test Send
Subscriber Preview and Test in Email Studio is a rendering of an email as viewed by a recipient. After the initial subscriber preview,
consider proceeding through the rest of the recipients to see previews for each subscriber. The preview feature doesn’t display in a
particular operating system or email client.
Perform a Simple Send
Follow these steps to perform a simple send in Email Studio.
Perform Send Preview
Perform a send preview in Email Studio to generate a preview of the email and send a test.
Email Delivery Checklist
Before you send an email in Email Studio, follow this checklist to ensure that the email meets your standards before it arrives in
subscribers' inbox.
Subscriber De-Duplication on Sends
De-duplication is a process Email Studio uses to remove duplicate instances of the same subscriber on a send. Our system does
removal either automatically or requires configuration from the user, depending on the audience type used in the sent.
Configure Send Throttling
Send sends emails every day during the hours that you specify starting the day that you send the email until all emails are sent. Use
send throttling to limit the number of emails sent to a particular domain or to control inbound website traffic caused by increased
interest. High inbound traffic can result in server crashes due to too many people visiting.
Considerations for Send Throttling
Keep in mind these advantages and limitations when you use send throttling.
Pending Sends and Past Sends
Use Pending Sends in Email Studio to view scheduled and in-progress email sends. Use Past Sends to view email send history.
What Happens When You Click Send
Learn about the series of processes that take place before your email reaches your subscriber's inbox.
When you send an email, a series of processes takes place behind the scenes before your email reaches your subscriber's inbox. The
send process usually happens in a matter of seconds, but sometimes, depending on the size of the send, it can take minutes to hours.
This guide briefly describes the Outbound Mail Management (OMM) process. Though you cannot control OMM, knowing what occurs
can help you understand why your send executes immediately or takes longer than normal.
The process described here is the typical scenario and can vary depending on the type of send you perform. The system handles thousands,
sometimes millions, of sends at any given time. This process describes the send experience for one email send.
23
ContentEmail in Marketing Cloud Engagement

You Click Send
You can use a guided, simple, test, or triggered send.
OMM Analyzes the Email
First, OMM recognizes a send is coming and prepares databases for the job. OMM analyzes the job by determining if the email is
template-based or HTML-paste. Then OMM determines the subscriber source (a list, group, or data extension), and whether the send
contains personalization or dynamic content. This stage does not create the email but only prepares the databases.
OMM Builds the Email Structure
OMM now builds the structure of the email. The structure usually involves a header, footer, and body. If the email is template-based, the
template is included in this step. Then OMM retrieves the subject line, the body content, any AMPscript in the email, and interprets the
AMPscript and retrieves images.
OMM Analyzes the Subscribers
At this point, the email structure is in place, but OMM runs the content against the subscriber list. If your email send contains personalization
or dynamic content, it is during this process that OMM determines the appropriate content for each subscriber. This process only serves
as a placeholder until OMM builds the email in the next step.
OMM Builds and Sends the Email
By this stage, OMM has set the plans for the entire send. It knows all the subscribers associated with the send, the content being sent,
and which subscribers are receiving which pieces of content. Now OMM begins bundling the emails in batches of 500 and sending
them to the subscribers' inboxes. This stage can take longer than a few seconds. Sends containing thousands or millions of subscribers
with complex dynamic content rules can experience delays before arriving in your subscribers' inboxes.
Do Not Track Email Opens and Clicks
At send time, in accounts without Do Not Track, Marketing Cloud Engagement tracking IDs are applied while rendering subscriber
messages. The Do Not Track functionality adds a send-time check that honors a subscriber’s preference. For subscribers who don’t want
to be tracked, the check suppresses Engagement tracking IDs from being applied to the rendered message. So, open and click events
aren’t known.
Enable Do Not Track by selecting the DoNotTrack subscriber preference on the subscriber’s properties in Email Studio. In Contact Builder,
change the contact attribute to False in Email Demographics on the contact’s properties.
24
ContentEmail in Marketing Cloud Engagement

Note: Subscriber messages sent before Do Not Track is enabled have tracking IDs. Open and click events are processed and
logged. Also, existing open and click data can still be used in reporting and extracts.
Configuration
•
Add a Do Not Track attribute on page 26 with a default value.
•
Enable the attribute on each subscriber who doesn’t want to be tracked by modifying the subscriber’s data on page 99 or importing
the subscriber data on page 94. After the attribute is set, you can't overwrite a subscriber’s DoNotTrack settings with an import. You
can only update the setting through the application, preference center, and API calls. When importing, set the DoNotTrack value to
1 or true to indicate that the subscriber doesn’t want to be tracked. Set the value to null, 0, or false to indicate they’re tracked.
•
Modify triggered send requests and sendable audiences. A subscriber who passes through a triggered send request is created as a
new subscriber. A subscriber who is found in a sendable data extension is also created as a new subscriber. In these cases, the
DoNotTrack preference is honored, if provided. To support this functionality for new subscribers in your sendable sources:
–
Add a DoNotTrack column to your sendable data extensions. And set each subscriber row with a value of 1 or true to indicate
that they don’t want to be tracked. A value of null, 0, or false indicates they’re tracked. Any new subscriber found at send time
is added, and the DoNotTrack value is added to the subscriber’s properties.
–
Add a DoNotTrack attribute to the subscriber in your triggered sends. Republish all related triggered sends. While processing
the request, all new subscribers found are added to the system and the DoNotTrack value persists to the subscriber’s properties.
Note: Enabling or disabling Do Not Track is managed on the subscriber’s properties, not through a sendable data extension
or triggered send request.
Example:
<Objects xsi:type="TriggeredSend">
<PartnerKey xsi:nil="true"/>
<ObjectID xsi:nil="true"/>
<TriggeredSendDefinition>
<PartnerKey xsi:nil="true"/>
<ObjectID xsi:nil="true"/>
<CustomerKey>MyTriggeredSend</CustomerKey>
</TriggeredSendDefinition>
<Subscribers>
<PartnerKey xsi:nil="true"/>
<ObjectID xsi:nil="true"/>
<EmailAddress>[email protected]</EmailAddress>
<SubscriberKey>[email protected]</SubscriberKey>
<Attributes>
25
ContentEmail in Marketing Cloud Engagement

<Name>DoNotTrack</Name>
<Value>true</Value>
</Attributes>
</Subscribers>
</Objects>
Configure a Preference Attribute for Do Not Track Email Opens and Clicks
Configure a DoNotTrack preference attribute to store subscriber’s preferences to not track email opens and clicks.
Configure a Preference Attribute for Do Not Track Email Opens and Clicks
Configure a DoNotTrack preference attribute to store subscriber’s preferences to not track email opens and clicks.
1. Click Subscribers.
2. Click Preference Management.
3. Click Create.
4. Name the new preference attribute DoNotTrack.
Make sure that you follow the naming convention of initial caps and no spaces for the attribute name.
5. Define the properties for this attribute.
When the default value is set to No, email opens and clicks are tracked by default. To suppress email tracking opens and clicks for
subscribers, set the default value to Yes.
6. Click OK.
SEE ALSO:
Profile and Preference Attributes in Email Studio
Attribute Properties in Marketing Cloud
Send Flow
Send Flow replaces Guided Send for Content Builder emails in Email Studio. Send Flow allows you to see what you are sending to reduce
errors, and consolidates all major sending functionality into a simple, highly visual interface.
Launch Send Flow
Use Send Flow to send Content Builder emails in Email Studio.
Define Properties
Define Properties in Email Studio’s Send Flow allows you to preview the email you selected.
26
ContentEmail in Marketing Cloud Engagement
Select Audience
The Email Studio root subscriber folders represent different audience types such as lists, groups, and more. Select a folder to view
the individual audience items. There are rules governing the types of audiences that can be targeted, excluded, and suppressed in
email sends. At least one audience must be targeted before you can proceed. Advanced Options allows you to include exclusion
scripts, domain exclusions, and more advanced options.
Configure Delivery
In Email Studio Send Flow, use Configure Delivery to set the timing of your sends and configure delivery options. Some options may
not be enabled in your account.
Review Send
Review and Send in Email Studio’s Send Flow allows you to see configurations previously made and confirm that all information is
correct and ready to send.
Audience Rules
When you add audiences in Email Studio’s Send Flow to the targeted, excluded, and suppressed areas, not all combinations are
valid, and you receive an error message if there’s a conflict with one or more audience types. These rules describe which combinations
are permitted and which are invalid.
Launch Send Flow
Use Send Flow to send Content Builder emails in Email Studio.
1. Click Send from the Content Builder grid.
2. Click Send from an email.
3. Click Save and Send in the Send Flow.
Define Properties
Define Properties in Email Studio’s Send Flow allows you to preview the email you selected.
By default, the Subject and Preheader are inherited and saved from the selected email. The addition of or edits made to the subject or
preheader here only applies for this send. To update what is displayed by default, edit the email. The subject and preheader can’t be
edited when Approvals is enabled. To update the field, edit the actual email. The subject and preheader of shared Content Builder emails
can’t be edited.
The From Options are defaulted to the Default Commercial Send Classification for the account. However, you can select from either
saved verified send classifications or use account-related From and Reply names.
The maximum length of a subject line is 200 characters and is required. A Preheader isn’t required.
Select Audience
The Email Studio root subscriber folders represent different audience types such as lists, groups, and more. Select a folder to view the
individual audience items. There are rules governing the types of audiences that can be targeted, excluded, and suppressed in email
sends. At least one audience must be targeted before you can proceed. Advanced Options allows you to include exclusion scripts, domain
exclusions, and more advanced options.
Audiences
The audience types displayed in your account can be different depending on the features enabled.
27
ContentEmail in Marketing Cloud Engagement

Note: To view Audience Builder audiences, you must have permission to view audiences. You can only send emails to data
extensions that were created in Audience Builder. Data extensions created elsewhere can’t be mixed with Audience Builder data
extensions.
Marketing Cloud Connect: Send to Sales and Service Cloud Reports, Campaigns, and Data Extensions
Marketing Cloud Connect users can send to Sales and Service Cloud campaigns, reports, and data extensions using the same interface.
These audiences appear in their own category of folders in Select Audience. The audiences from other clouds don’t display.
Send to Multiple Data Extensions
When enabled in your account, this feature allows you to send to multiple data extensions. Contact your relationship manager to enable
this feature.
Send to All Subscribers
When enabled in your account, this feature allows you to send to all subscribers.
CC and BCC
When enabled in your account, carbon copy or blind carbon copy recipients to an email send who aren’t members of the targeted
audience. You’re charged for each CC and BCC email sent.
Enter plain text email addresses, personalization strings, or AMPscript for CC and BCC. This feature works differently based on the type
of CC or BCC value you enter:
•
If you enter plain text email addresses, each email address copies to every email sent to the targeted audience. For example, if you
send to a targeted audience that contains 1,000 subscribers, 1,000 emails are sent to each CC and BCC recipient, in addition to the
1,000 emails sent to the targeted subscribers. For example, if a send goes out to 1,000 subscribers, with 1 CCed email address, 2,000
emails of your subscription would be used.
•
If you enter personalization strings or AMPscript, email addresses are copied on emails to subscribers to which the personalization
strings or AMPscript resolves. For example, if your CC value is %%AccountOwnerEmail%% then the email address found in the
AccountOwnerEmail field for each targeted subscriber are copied to that subscriber's email. If no value is found for the targeted
subscriber, then the email isn’t CCed for that subscriber.
Using personalization strings or AMPscript impacts sending speed. Sends require more time to process when personalization strings or
AMPscript is used. The length of the delay increases with the number and complexity of AMPscript functions and personalization strings
used for CC and BCC.
The email sent to a CC or BCC email address is identical in every way to the email sent to the targeted subscriber. CCed and BCCed
recipients receive the exact same email that the associated subscriber receives.
The system doesn’t create a subscriber for CC or BCC email addresses. All tracking activity performed by a CC or BCC recipient relates
back to the targeted subscriber. Emails sent to CC and BCC recipients aren’t included in Total Sent or Total Delivered numbers in tracking.
Opens and clicks track back to the subscriber key of the targeted subscriber. For example, if I send to [email protected], and CC
[email protected] and the email is opened by [email protected], tracking shows an open for the [email protected] subscriber.
There isn’t a note of the [email protected] subscriber.
Note: If CC or BCC recipients unsubscribe, it unsubscribes the actual subscriber.
28
ContentEmail in Marketing Cloud Engagement

Audience Counts
The counts for total targeted, total excluded, and total suppressed represent the total number of rows found within the selected
audiences in Email Studio.
SEE ALSO:
Publication Lists in Email Studio
Audience Counts
The counts for total targeted, total excluded, and total suppressed represent the total number of rows found within the selected audiences
in Email Studio.
The counts don’t match exclusions or suppressions against the targeted audience. These counts also don’t take subscriber statuses, such
as unsubscribed, held, and bounced, into consideration. Finally, the counts don’t check auto-suppressions, exclusions scripts, domain
suppressions, or domain exclusion lists. Counts for data filters, Salesforce Campaigns, Salesforce Reports, and Salesforce Data Extensions
can’t be retrieved.
Configure Delivery
In Email Studio Send Flow, use Configure Delivery to set the timing of your sends and configure delivery options. Some options may not
be enabled in your account.
Send Timing
Email sends immediately after you review the email.Send Immediately
Email sends on the selected date and time. The system uses the
time zone configured for the user scheduling the send. For example,
Schedule
if you schedule a send for 7:30 AM and your time zone is configured
for PST, the send deploys at 7:30 AM PST.
Send Throttling
Use Send Throttling to set an hourly throttle limit without a window, a throttle window without an hourly limit, or an hourly limit with
a time window.
Note: When a send throttle window is configured before a daylight savings change, the throttle window can start or stop one
hour later than intended.
Select a range of hours when you want to send an email and a
start and end time.
Delivery Window
You can specify how many emails an hour you want to send during
that time. Select a threshold between 500 and 5,000,000.
Hourly Threshold
Tracking
Track Clicks
29
ContentEmail in Marketing Cloud Engagement

Select to suppress tracking data from reports and Email Studio
Overview. Send results are sent to the Test Send Emails folder in
Email Studio Tracking.
Suppress From Send Report
Set to My Tracking by default.Tracking Destination Folder
Select to enable send logging for this send.Send Logging
Send the results of your email sends in Marketing Cloud
Engagement to Sales Cloud.
Send Tracking Results to Sales Cloud
Use Additional Info to include email-level data for Web Analytics
in the links of the email.
Additional Info
Advanced Options
The system sends HTML and text versions, including the text version
you created. The version accepted by the subscriber’s email client
is delivered.
Multipart MME
Select to include Inbox Monitor deliverability seed list in this send.
The Send to Deliverability Seed List is available to accounts using
Inbox Tool through the Return Path integration.
Send to Deliverability Seed List
Prebuild Burst Sending
When enabled in your account, Prebuild Burst Sending allows you to send emails fast. The audience is locked down and the emails
are built when the schedule send time is set. Use this feature for flash sales or emergency messaging.
Prebuild Burst Sending
When enabled in your account, Prebuild Burst Sending allows you to send emails fast. The audience is locked down and the emails are
built when the schedule send time is set. Use this feature for flash sales or emergency messaging.
Example: On Wednesday, you set the scheduled send time to send a flash sale email on Friday morning at 9 AM. The system
immediately begins building the emails for the audience and stores the emails until send time. Then, on Friday morning at 9 AM
the emails are sent fast because the system built the email and compiled the audience on Wednesday.
Review Send
Review and Send in Email Studio’s Send Flow allows you to see configurations previously made and confirm that all information is correct
and ready to send.
1. Hover over any blue text to view more information.
2. Review the email configuration and accept the confirmation message.
3. To send the email immediately, click Send. To send the email based on your send configuration, click Schedule.
30
ContentEmail in Marketing Cloud Engagement
Audience Rules
When you add audiences in Email Studio’s Send Flow to the targeted, excluded, and suppressed areas, not all combinations are valid,
and you receive an error message if there’s a conflict with one or more audience types. These rules describe which combinations are
permitted and which are invalid.
Targeted
•
Lists and Groups
–
Any number of lists and groups can be targeted.
–
Lists and groups can be targeted together.
•
Data Extensions
–
Any number of data extensions can be targeted.
–
If data extensions are targeted, they’re the only audience type that can be targeted. You can't also target a list, group, filter, or
other audience type.
•
Data Filters
–
Only one data filter can be targeted.
–
The data filter can’t be combined with another audience.
•
Suppression Lists
–
Suppression Lists can’t be targeted.
•
Audience Builder Audiences and Shared Audience Builder Audiences
–
Any number of audiences can be targeted.
–
Shared and non-shared audiences can be combined.
–
If Audience Builder audiences are targeted, they’re the only audience type that can be targeted. You can't also target a list, group,
filter, or other audience type.
•
Salesforce Data Extension
–
Only one Salesforce Data Extension can be targeted.
–
If one Salesforce Data Extension is targeted, it can’t be combined with any other audience.
•
Salesforce Campaign
–
Only one Salesforce Campaign can be targeted.
–
If one Salesforce Campaign is targeted, it can’t be combined with any other audience, except for a Salesforce Report.
•
Salesforce Report
–
Any number of Salesforce Reports can be targeted.
–
If a Salesforce Report is targeted, one Salesforce Campaign can also be targeted.
–
A Salesforce Report can’t be targeted with any other audience type, except a Salesforce Campaign.
–
The same rules apply for shared versions of each audience type, such as Shared Data Extensions.
Excluded
•
Any number of any audience type can be excluded, except Data Filters and Suppression Lists.
31
ContentEmail in Marketing Cloud Engagement
•
Data Filters can’t be used as an exclusion.
•
Subscribers that appear in both the Target and the Excluded areas are excluded from the send.
Suppressed
•
Only Suppression Lists and Shared Suppression Lists can be suppressed.
•
Only one Suppression List or Shared Suppression List can be suppressed per send.
•
Subscribers that appear in both the target and the suppressed are excluded from the send.
Difference Between Excluded and Suppressed
At the time of send, exclusions and suppressions are treated the same, they’re removed from the final audience receiving the email. The
difference is how they’re treated in the user interface.
•
Suppression Lists are their own entity in Marketing Cloud Engagement, with Suppression List and Shared Suppression List categories.
•
Exclusions can be any audience type except Data Filters.
This distinction creates a sense of permanence with suppression lists. If a subscriber is on a suppression list, that list only ever excludes
that subscriber from the send, whereas a subscriber can be a part of an audience for targeting or exclusion.
Use Subscriber Preview
To preview a microsite landing page as a subscriber in Email Studio, open the landing page and use Subscriber Preview.
1. Open the landing page to preview.
2. Click Subscriber Preview.
3. Select a list, group, or select Do not use subscriber data.
If you select a list or group, the subscribers in the list or group appear in the Select a Recipient field. If no recipients appear for a list
or group, the list or group is empty. If you select the checkbox, you can skip the next step.
4. Select a subscriber for which to preview the landing page.
5. Click Generate Preview.
Click the arrow buttons beside the recipient name to see the preview for the previous or next subscribers on the list. After you generate
the send preview, you can generate the Inbox Preview.
Subscriber Preview and Test Send
Subscriber Preview and Test in Email Studio is a rendering of an email as viewed by a recipient. After the initial subscriber preview,
consider proceeding through the rest of the recipients to see previews for each subscriber. The preview feature doesn’t display in a
particular operating system or email client.
To preview recipients for a data extension, the data extension must meet one of these criteria:
•
Contains an email address field type
•
Is linked to the subscriber table via the Subscriber ID
•
Is linked to the subscriber table via the Subscriber Key
After you select a subscriber, you can use Test Send to send the email. For example, send the email to your own inbox to view how the
email appears in your email client.
If you change the subscriber attributes in subscriber preview, unsubscribe from a test email that you send, or access the subscriber's
profile center and make changes, those changes permanently apply to that subscriber.
32
ContentEmail in Marketing Cloud Engagement

Tip: Create a test subscriber whose properties you can change as needed for previewing and testing links.
A test send counts as a send in the application and against the threshold you purchased. If the subscriber you select for the preview has
a status of unsubscribed, bounced, or held the generated preview doesn’t deliver any test send. If sending to a data extension, you don’t
see the status of that subscriber as that is kept at the All Subscribers level. The preview and test send appears to send, if that subscriber
is unsubscribed, bounced, or held at the All Subscribers level the send doesn’t occur. The All Subscribers level contains the default status
for data extensions. To see if the subscriber you chose is unsubscribed, search for the subscriber.
Perform a Subscriber Preview and Test Send
Follow these steps to perform a subscriber preview and test send in Email Studio.
Litmus Email Previews in Content Builder
When you use Content Builder in Marketing Cloud Engagement, you can preview emails across 90+ browsers, devices, and clients.
Configure in Litmus which browsers, devices, and clients you want to preview. Access Litmus on the Preview and Test screen of the
Content Builder editor.
Perform a Subscriber Preview and Test Send
Follow these steps to perform a subscriber preview and test send in Email Studio.
Before you begin this procedure, your account must contain these items:
•
The email to preview
•
A subscriber with attributes or a data extension with subscriber data
Note: Content Builder test sends aren’t recorded on the Send Log data extension.
1. Select Preview and Test.
2. To view the email with AMPscript and personalization strings rendered select a list, group, data extension, or audience then select
a subscriber.
3. To ensure personalization displays correctly, review the email. The subscriber’s attributes are listed next to the preview.
4.
Click .
Note: To view the email without AMPscript and personalization strings rendered, complete the Test Send section without
selecting a subscriber in the Subscriber Preview tab. To view an email with AMPscript and personalization strings rendered,
complete the Subscriber Preview section before completing the Test Send section.
5. Enter up to five email addresses to send a test email to in Recipient. If needed, select a test data extension and send a test email to
all subscribers within the data extension.
Note: When subscribers are selected in Subscriber Preview and Attributes, and multiple recipients are entered in the Test
Send step, the first recipient is added as the To Address and the remaining recipient addresses are BCCed. The To Address
listed in the email delivered to the remaining recipients is the first recipient's email address.
6. If needed, click Change to select a different personalization option and how recipients receive each version of the email. Complete
the Subscriber Preview step before using some of these features:
•
Based on <subscriber> - The test email renders personalization based on the single subscriber selected in the Subscriber Preview
step. One test send goes out to your recipient with the selected subscriber's personalization.
33
ContentEmail in Marketing Cloud Engagement
•
Based on <list or data extension> - The test email renders personalization based on the entire list or data extension selected in
the Subscriber Preview step. For example, if your list contains 20 subscribers then 20 personalized email versions are sent to
each recipient.
•
Based on <recipient test data extension> - The test email sends to each subscriber in the selected recipient test data extension.
The email renders based on the recipient's data.
7. Complete the From Options section.
8. Click Send Test.
9. Review the Test Send Summary to ensure the correct recipients receive the emails message and the correct number of emails send:
•
Warning Threshold - A notification displays when a test send exceeds the recommended test send threshold. To perform the
test send, click the check box.
•
Maximum Threshold - A notification displays when a test send exceeds the maximum test send threshold. You can’t bypass this
notification to perform the test send. Select different recipients or a different personalization send option.
10. Click Confirm and Send.
Litmus Email Previews in Content Builder
When you use Content Builder in Marketing Cloud Engagement, you can preview emails across 90+ browsers, devices, and clients.
Configure in Litmus which browsers, devices, and clients you want to preview. Access Litmus on the Preview and Test screen of the
Content Builder editor.
Litmus’ Instant API is used to display previews within the email creation flow. With this integration, you can easily create, preview, and
test Content Builder emails across multiple email clients.
Access Litmus Email Previews in Content Builder
To preview Marketing Cloud Engagement emails with Litmus, you must have a Litmus Pro or Enterprise account and Advanced
Preview permissions.
Litmus Email Previews Frequently Asked Questions
Review frequently asked questions about Litmus Email Previews for Content Builder.
Access Litmus Email Previews in Content Builder
To preview Marketing Cloud Engagement emails with Litmus, you must have a Litmus Pro or Enterprise account and Advanced Preview
permissions.
1. From an email, go to the Preview and Test tab.
2. Click the Litmus icon, and sign in to Litmus.
If you don’t have a Litmus account, you can sign up for a free trial.
3. To display the default header and footer in an email, select a subscriber to preview the message as that recipient.
4. To view the email rendered in a different inbox, click a preview thumbnail.
After you authenticate the connection between Email Studio and Litmus, you retain access until one of the following occurs.
•
You clear your Engagement cache.
•
You sign out of the Litmus account.
•
You remove the Engagement integration from your Litmus account.
34
ContentEmail in Marketing Cloud Engagement
Litmus Email Previews Frequently Asked Questions
Review frequently asked questions about Litmus Email Previews for Content Builder.
What Litmus Plan Is Required to Access the Integration?
Only Litmus Enterprise accounts can access this integration. Free Litmus Demo accounts do not work with this feature. If you don’t
have a Litmus account, sign up for a Litmus Enterprise free trial access for seven days through the integration.
How Does This Work with Different Users?
Litmus authenticates each user’s Litmus credentials. Multiple users using a shared Litmus account can’t view the previews unless
they sign in with their Litmus user credentials.
What If a Preview Takes a Long Time to Load or Displays an Error?
Previews can take anywhere from 2-10 seconds to load and a thumbnail spinner is displayed. When a specific client preview takes
a long time to load, refresh the page or try again later.
What If I Have Multiple Business Units?
Switching between business units in Marketing Cloud Engagement doesn’t require logging in multiple times. Your authenticated
credentials are remembered and previews are displayed.
Can I Preview Email Personalization in Litmus?
Yes. Select a subscriber in Subscriber Preview and then select Litmus to preview how the selected subscriber’s personalization
renders across multiple clients. Only previews emailed to your Litmus address display in your Litmus account.
Can I Use Litmus Email Previews in Content Builder?
Yes. Litmus Email Previews are available everywhere that you use the Content Builder editor for emails.
What Litmus Plan Is Required to Access the Integration?
Only Litmus Enterprise accounts can access this integration. Free Litmus Demo accounts do not work with this feature. If you don’t have
a Litmus account, sign up for a Litmus Enterprise free trial access for seven days through the integration.
How Does This Work with Different Users?
Litmus authenticates each user’s Litmus credentials. Multiple users using a shared Litmus account can’t view the previews unless they
sign in with their Litmus user credentials.
What If a Preview Takes a Long Time to Load or Displays an Error?
Previews can take anywhere from 2-10 seconds to load and a thumbnail spinner is displayed. When a specific client preview takes a long
time to load, refresh the page or try again later.
What If I Have Multiple Business Units?
Switching between business units in Marketing Cloud Engagement doesn’t require logging in multiple times. Your authenticated
credentials are remembered and previews are displayed.
Can I Preview Email Personalization in Litmus?
Yes. Select a subscriber in Subscriber Preview and then select Litmus to preview how the selected subscriber’s personalization renders
across multiple clients. Only previews emailed to your Litmus address display in your Litmus account.
Can I Use Litmus Email Previews in Content Builder?
Yes. Litmus Email Previews are available everywhere that you use the Content Builder editor for emails.
35
ContentEmail in Marketing Cloud Engagement

Perform a Simple Send
Follow these steps to perform a simple send in Email Studio.
1. Choose the checkbox next to the email to send.
2. Click Send.
3. Click Simple Send.
4. Fill out the form.
Note: Only verified email addresses display for accounts with domain verification send restrictions on.
5. Click Send.
6. To send the email, click Confirm Send.
To return to the form, click Cancel.
Perform Send Preview
Perform a send preview in Email Studio to generate a preview of the email and send a test.
Before you begin this procedure:
•
Create a subscriber with the desired attributes for which to preview the email
•
Have permission to send or to view tracking
If the subscriber you select for the preview has a status of Unsubscribed, the generated preview doesn’t deliver any test send. If the
subscriber you select for the preview has a status of Bounced or Held, you receive an error when trying to perform the test send.
If sending to a data extension, you don’t see the status of that subscriber as that is kept at the All Subscribers level. The send preview
test send appears to send, but the send doesn’t occur when the subscriber is unsubscribed at the All Subscribers level. That location
contains a data extension’s status by default. To see if the subscriber you chose is unsubscribed, search for the subscriber.
If a dynamic subject or dynamic preheader is set in the email, the text version sets the subject or preheader display in send preview.
1. Choose the checkbox next to the name of the email or click the name of the email.
2. Click Send Preview.
3. To preview the email, choose the subscriber.
4. Select a From Name.
5. Complete the header and footer section.
6. Click Generate Preview.
7. For Preview Mode, click Desktop View and Mobile View to view what the content looks like on a mobile or desktop device for
each subscriber.
8. Click Send Test Email.
9. Complete Preview Email. Enter one email address in the To field. If you have Cc functionality enabled in your account, you can copy
up to four email addresses. The Send button is only active when the email addresses are in the correct email address format. Every
email address receives the same email and is able to view the header.
10. Click Send.
SEE ALSO:
Search for a Subscriber
36
ContentEmail in Marketing Cloud Engagement

Email Delivery Checklist
Before you send an email in Email Studio, follow this checklist to ensure that the email meets your standards before it arrives in subscribers'
inbox.
•
Review Email Deliverability to see strategies to ensure that your email reaches as many subscribers as possible.
•
Use Content Detective on page 45 on your email.
•
Preview and Modify Text Versions of your email.
•
Perform a Subscriber Preview and Test on your email.
Subscriber De-Duplication on Sends
De-duplication is a process Email Studio uses to remove duplicate instances of the same subscriber on a send. Our system does removal
either automatically or requires configuration from the user, depending on the audience type used in the sent.
Lists, groups, and data filters created from a list are always de-duplicated at the time of send by SubscriberID.
Data Extensions are de-duplicated by email address. By checking the appropriate box, the system removes the duplicate email address
from the send. If this option isn’t checked, the system tries to send an email for every row in targeted data extensions and data extension
data filter.
Note: Triggered email sends don’t have a de-duplication mechanism.
Configure Send Throttling
Send sends emails every day during the hours that you specify starting the day that you send the email until all emails are sent. Use send
throttling to limit the number of emails sent to a particular domain or to control inbound website traffic caused by increased interest.
High inbound traffic can result in server crashes due to too many people visiting.
1. In the app switcher, hover over your name, and then click Setup.
2. In the Quick Find box, enter Email Studio, and then select Email Optional Features.
3. Turn on send throttling.
Your email send job starts at the time you specify, but the send isn’t spread evenly between the start and end times. Instead, the email
is sent during the specified time range until the send is complete or your specified end time is reached. If the end time is reached before
the send is complete, the send continues the next day at the same start time and runs until the send is complete.
SEE ALSO:
Send Flow
Enable Email Optional Features
Considerations for Send Throttling
Keep in mind these advantages and limitations when you use send throttling.
•
When you republish and restart a triggered send, a new job is created with a fresh send throttle. For example, you have an hourly
rate of 10,000 sends. You republish and restart the triggered send after 10,000 sends, so another 10,000 are sent in that hour when
the new job starts.
•
The sending pauses if the hourly limit or the time window closes and schedules the job to resume when the throttle opens again.
•
Setting a throttle for a job doesn’t ensure that a certain number of emails are sent during a particular time period. A throttle is an
approximate target, not a guarantee of how many emails send during a time period. The actual number of sends can exceed or fall
37
ContentEmail in Marketing Cloud Engagement
below the hourly throttle limit by a few thousand based on factors such as system load, message complexity, and deliverability
issues.
•
When send definitions with a send throttle window that was configured before a daylight savings change are started after the time
change, the throttle window is scheduled to start and stop one hour later than intended.
•
If an email is queued for more than 72 hours, it doesn’t send.
Pending Sends and Past Sends
Use Pending Sends in Email Studio to view scheduled and in-progress email sends. Use Past Sends to view email send history.
Contact your relationship manager for information on enabling these features.
Pending Sends
Use Pending Sends to view your scheduled and in-progress sends and to cancel sends that haven't completed sending. The status
column displays the status for each scheduled or in-progress send.
If you cancel an in-progress send, the application shows you the number of subscribers sent to. If you would like to send to the remaining
subscribers, create an exclusion list of subscribers already sent to. The exclusion list can be used in a send to exclude subscribers who
have already received the email.
If you need to change an email in a scheduled send, cancel the send. A scheduled send is a snapshot of the email at the time of scheduling.
If you delete an email that is scheduled to send, the send still goes out on schedule. To see all pending sends, including scheduled sends
to a delete email, click Pending Sends without selecting an email. However, you can select a specific email by clicking Pending Sends
to view the scheduled and in-progress sends for that email.
Past Sends
Use past sends to view your send job history. Select an email then click Past Sends.
Content Builder Email Sends
For Content Builder emails, use the Pending tab on the Email Overview Sends section. From there, you can cancel the send.
Update a Job Link
Update Job Links allows you to edit links in completed or canceled sends in Email Studio Past Sends.
Pause and Resume a Send in Tracking
Pause a Content Builder email send in Email Studio Tracking to stop the system from processing and sending any further email
messages.
SEE ALSO:
Marketing Cloud Sends to Campaigns or Reports
Update a Job Link
Update Job Links allows you to edit links in completed or canceled sends in Email Studio Past Sends.
1. Click Content.
2. Click Emails.
3. Select the checkbox next to the email name.
38
ContentEmail in Marketing Cloud Engagement

4. Click Past Sends.
5. Select the job ID for the send to update.
6. Click the Job Links tab.
7. To edit the link, click the URL ID.
8. Complete the URL field and preview the URL.
Note: In the URL field, enter the full URL path that includes https://. For example, if the link in your email is
https://cl.exct.net/?utm_medium=NorthernTrail, the URL is https://cl.exct.net//.
9. Complete the URL Parameters field and preview the URL.
Note: In the URL Parameters field, enter the value pairs that occur after the base URL. For example, if the link in your email is
https://cl.exct.net/?utm_medium=NorthernTrail, the parameter is utm_medium=NorthernTrail. Add and remove query string
parameters to the URL as needed, but you must edit each parameter separately.
10. To add a field and value pair, click Add Parameter.
11. Click Save.
12. Confirm by clicking Change Link. If validation errors occur, fix them and continue again at Step 7.
Pause and Resume a Send in Tracking
Pause a Content Builder email send in Email Studio Tracking to stop the system from processing and sending any further email messages.
A paused email stops the system from processing and sending any further email messages until you resume the send. Resume the send
at any time, or cancel the send to end the send process entirely and prevent any further emails from sending. You can’t change any
content for the email message when paused. This function only prevents additional sends from occurring until you resume the send.
Contact your relationship manager for information on enabling this feature.
1. Click Tracking.
2. Select Sends.
3. Click the checkbox next to the send or sends to pause.
4. Click Pause Send.
To restart a paused send, click the checkbox next to the appropriate sends and click Resume Sends.
SEE ALSO:
Tracking Workspace
Personalization Strings in Marketing Cloud Engagement
A personalization string lets you insert subscriber attributes, such as subscriber name, into your emails. Personalization strings can appear
in the subject line, preheader, or in the content of the email. You may hear personalization strings referred to as merge fields or substitution
strings.
In addition to the subscriber attributes, you can insert system data personalization strings. Addition system personalization strings are
available when building AMPscript expressions.
You can type personalization string into the HTML of your email body if you're creating an HTML paste email, or you can type them into
the text editor when you create or modify text content.
•
All personalization strings are case-insensitive.
39
ContentEmail in Marketing Cloud Engagement

•
Include the two sets of double percent symbols (two percent symbols on both sides of the personalization string).
•
If you're inserting a personalization string into a line with other data, include a space before and after the personalization string.
•
If you insert a personalization string, and the subscriber attribute isn't populated, the string will appear blank in the email. Define a
default value for every attribute you intend to use with a personalization string. For example, use this string to include default
attributes for First_Name: %%[IF Empty(First_Name) == "False" THEN SET @FN = First_Name ELSE
SET @FN = "Customer" ENDIF]%%Hi %%=v(@FN)=%%
•
Do not include personally identifiable information, such as email address, in email links.
Personalization Strings in Email Studio
These tables include available personalization strings for use in Email Studio.
Insert Personalization Strings
Insert personalization strings in Email Studio content or content from other apps.
SEE ALSO:
Profile and Preference Attributes in Email Studio
Personalization Strings in Email Studio
These tables include available personalization strings for use in Email Studio.
Important: Don’t use a personalization string as a column name in a sendable data extension or profile attributes.
Email Data
If you include a date personalization string in your email, it appears in the email in US format. You can use AMPscript to change the
format as necessary.
DescriptionPersonalization String
Full name of the month in which the email is sent%%xtmonth%%
Current month as a number%%xtmonthnumeric%%
Current date of the month when the email was sent (for example,
22)
%%xtday%%
Current day of the week when the email was sent (for example,
Thursday)
%%xtdayofweek%%
Current year when the email was sent%%xtyear%%
Current date when the email was sent in short format. For example,
12/13/2010
%%xtshortdate%%
Current date when the email was sent in long format. For example,
Monday, December 13, 2010
%%xtlongdate%%
Descriptive name of a hyperlink, known as the link alias. This string
populates with the value of the link's alias or the complete URL if
%%linkname%%
no alias is specified at the link level. This personalization string is
40
ContentEmail in Marketing Cloud Engagement

only available in use with the web analytics connector. This string
allows a web analytic programs to identify web activity that initiated
from an individual link within the email. Link alias values generated
via personalization strings, AMPscript, or SSJS don’t reflect in the
%%linkname%% value.
Internal name of the email%%emailname_%%
Context in which the customer views the email. Resolves to these
values:
%%_messagecontext%%
•
SEND - Display the rendered final message for sending to
subscriber
•
PREVIEW - Display the send preview options available within
editor
•
VAWP - Display content
•
VIEWSENT - Display the non-subscriber link to preview content
•
FTAF - Display the rendered Forward To a Friend message
•
LANDINGPAGE - Display a landing page or microsite
•
VALIDATION - Display information corresponding to the
validate option in Marketing Cloud
•
LINKRESOLUTION - Display resolved dynamic script at click
time
•
SMS - Display SMS message content
•
SOCIAL - Display Social Forward content
•
SITE - Display CloudPages content
Resolves to Text or HTML according to the subscriber's email type
preference
%%_MessageTypePreference%%
The body of the email you sent. This personalization string is used
in triggered sends to place the body of an email into a reply email
%%_replycontent%%
Resolves to True if the email job is marked as a Test Send.
%%_IsTestSend%%
%%[
if _isTestSend == false then
... // this code doesn’t run for test sends
endif
]%%
Email send ID (the unique identifier associated with the send of
the email, for tracking data purposes)
%%jobid%%
41
ContentEmail in Marketing Cloud Engagement

Any content with the assigned value for the Preheader attribute
of the email message
Assign the Preheader as a variable -
%%[
%%_PreHeader%%
set @preheader = [_preheader]
]%%
and then use it in the Preheader field -
%%=v(@preheader)=%%
Populates the preheader in an email from the brand tags.%%Email_Preheader%%
Inserts the double opt-in link in an email.%%double_opt_in_url%%
Data About the Recipient
Note: Don’t include personally identifiable information, such as email address, in email links.
DescriptionPersonalization String
Subscriber's email address%%emailaddr%%
Value for the subscriber's full name as entered in the profile
attribute Full Name.
%%fullname_%% or %%fullname%%
Value for the subscriber's first name as entered in the profile
attribute Full Name. This string pulls the value before the space.
%%firstname_%% or %%firstname%%
Value for the subscriber's last named as entered in the profile
attribute Full Name. This string pulls the value after the space.
%%lastname_%% or %%lastname%%
Value of the user-defined profile attribute for this subscriber%%comment_%% or %%comment%%
Subscriber ID (the unique identifier for this subscriber)%%subscriberid%%
The unique identifier for the subscriber, if you use the subscriber
key feature
%%_subscriberkey%%
Unique LINE-generated user ID. These IDs vary by provider.%%line_address_id%%
Unique job ID number for the LINE send event%%line_job_id%%
Unique identifier representing a subscriber for that particular LINE
Channel
%%line_subscriber_id%%
List ID%%listid%%
List ID followed by the type of email (HTML or text). For example:
11955_HTML
%%list_%%
The identification number associated with this subscriber's
membership on this particular list (This data is rarely used)
%%listsubid%%
The subscriber's text or HTML preference. Resolves to text or to
HTML.
%%_messagetypepreference%%
42
ContentEmail in Marketing Cloud Engagement

DescriptionPersonalization String
Mobile number of the subscriber used as part of an SMS Interaction%%mobile_number%%
Short code associated with the response as part of an SMS
Interaction
%%short_code%%
The name the user gives to the list.%%_listname%%
The email ID assigned by the system.%%_emailid%%
The BatchID for the Batch containing the Subscriber who received
the send.
%%_JobSubscriberBatchID%%
This value captures any audience object sent to. This covers lists,
data extensions, groups, and filters.
%%_DataSourceName%%
Returns the active region ID or 0 if none is active.%%_ImpressionRegionID%%
Resolves to the currently active impression region or evaluates to
an empty string if no impression region has been set.
%%_ImpressionRegionName%%
Data About the Sender
DescriptionPersonalization String
Your reply name, as defined in your account settings%%replyname%%
Your reply email address%%replyemailaddress%%
Your account ID (MID)%%memberid%%
The data entered in the Address in Email Footer fields located in
your Account Information workspace.
%%member_busname%%
%%member_addr%%
If you're creating an email based on a standard template, this data
is included by default in the email footer.
%%member_city%%
%%member_state%%
%%member_postalcode%%
%%member_country%%
Standard Links
DescriptionPersonalization String
If you're creating an email based on a standard template, this link
is included by default in the email header.
%%view_email_url%%
Usually, you want to insert the Forward to a Friend graphic from
your Forward to a Friend folder rather than use this personalization
string.
%%ftaf_url%%
43
ContentEmail in Marketing Cloud Engagement

DescriptionPersonalization String
If you're creating an email based on a standard template, this link
is included by default in the email footer.
%%subscription_center_url%%
If you're creating an email based on a standard template, this link
is included by default in the email footer.
%%profile_center_url%%
If you're creating an email based on a standard template, this link
is included by default in this email footer.
%%unsub_center_url%%
Microsites
DescriptionPersonalization String
You can enter this string value to reference a landing page. Replace
PageID with the ID value for the landing page.
%%microsite_base_url[default]PageID[/default]%%
Analytics
The areas to enter these strings in the application are only available if you have web analytics functionality enabled in your account. To
enable web analytics, contact your representative.
DescriptionPersonalization String
You can enter this string value in the Send Wizard as part of a
Guided Send when the analytic connector is enabled.
%%AdditionalInfo_%%
These values are set in the property of the email when the analytic
connector is enabled.
%%__AdditionalEmailAttribute1%%
%%__AdditionalEmailAttribute2%%
You can have up to five AdditionalEmailAttribute fields to enter
values.
%%__AdditionalEmailAttribute3%%
%%__AdditionalEmailAttribute4%%
These attributes aren’t available in emails created before enabling
more email attributes. Resave these emails to use these additional
attributes.
%%__AdditionalEmailAttribute5%%
Note: Existing email before AEM feature is enabled must be resaved to ensure addition email properties can be used.
Note: To ensure more email properties can be used, resave existing emails that use more email attributes
Insert Personalization Strings
Insert personalization strings in Email Studio content or content from other apps.
1. Open the content you want to insert a personalization string.
2. Place your cursor where you want the personalization string to appear.
3. Enter the personalization string using the toolbar or type in the personalization string.
44
ContentEmail in Marketing Cloud Engagement
Content Detective
Content Detective is an Email Studio tool that helps you identify spam triggers in your email content. This feature mirrors the logic used
by spam-filtering software to identify words, phrases, and patterns that are likely to trigger filters and then recommends a resolution to
each identified problem. After running Content Detective, edit the triggers identified in the email using the recommend resolutions.
Including just one potential trigger word or phrase will not greatly affect your email's deliverability. If Content Detective finds two or
more potential triggers, remove them to improve your subscribers' chances of receiving your email.
Trigger Words
This list includes trigger words that prompt a warning from Content Detective in Email Studio. This list is not complete and may
change without notice.
Run Content Detective on New Creation Tools
Follow these steps to run Content Detective on the new creation tools in Email Studio.
Trigger Words
This list includes trigger words that prompt a warning from Content Detective in Email Studio. This list is not complete and may change
without notice.
•
!!!
•
$$$
•
100% Free
•
4U
•
Absolutely Free
•
Accept Credit Cards
•
act now! don't hesitate!
•
addresses on CD
•
Adult
•
all natural
•
amazing stuff
•
as seen on
•
avoid bankruptcy
•
bargain
•
big bucks
•
billion dollars
•
breakthrough
•
Bulk
•
buy direct
•
call free
•
call now
•
cancel at any time
•
cannot be considered spam
•
cash bonus
45
ContentEmail in Marketing Cloud Engagement
•
Casino
•
click here
•
closeout
•
collect child support
•
compare rates
•
confidentially on all orders
•
Contest
•
contest
•
credit bureaus
•
Credit card
•
dear friend
•
dear somebody
•
Debt
•
dig up dirt on friends
•
direct marketing
•
Earn $
•
Earn Cash
•
enlarge
•
falling interest
•
Financial Freedom
•
font size=5
•
font size=6
•
font size=7
•
free consultation
•
Free Gift
•
free investment
•
free leads
•
Free Offer
•
free preview
•
free quote
•
free sample
•
free trial
•
free!
•
full refund
•
get paid
•
guarantee
•
H.R. 3113
•
Hardcore
•
hidden assets
•
Home Based
46
ContentEmail in Marketing Cloud Engagement
•
Home Business
•
home refinancing
•
impotence
•
in accordance with laws
•
Increase Sales
•
Incredible Deal
•
inventory reduction
•
join millions of americans
•
last chance
•
limited time only
•
long distance
•
lose weight
•
low prices
•
lower interest
•
lower monthly payment
•
lowest prices
•
Make $
•
Million email addresses
•
Money at home
•
money back
•
Money fast
•
money making
•
mortgage network
•
Mortgage Rate
•
multi level marketing
•
Naughty
•
no cost
•
no experience needed
•
no gimmick
•
no investment
•
no obligation
•
no selling
•
no strings attached
•
Nude
•
off shore
•
once in a lifetime
•
one hundred percent free
•
one time mailing
•
online biz opportunity
•
online business opportunity
47
ContentEmail in Marketing Cloud Engagement
•
opt-out
•
order
•
order a report
•
order online
•
penis enlargement
•
pennies a day
•
percent off
•
please read
•
Porn
•
Pornography
•
Potential Earnings
•
promise you
•
purchase order
•
purchase today
•
pure profit
•
Read this twice
•
Read Twice
•
Reduce your interest rate
•
Refinance today
•
refinance your home
•
reverses aging
•
risk free
•
save
•
Save $
•
save an extra
•
save up to
•
score with babes
•
search engine listings
•
section 301
•
sent in compliance
•
serious cash
•
serious only
•
Sex
•
Slut
•
spam
•
stock alert
•
stock disclaimer statement
•
stock pick
•
stop snoring
•
this email was not sent unsolicited
48
ContentEmail in Marketing Cloud Engagement
•
this is an advertisement
•
this is not spam
•
to be removed from this list
•
toll free
•
UCE-Mail Act
•
university diploma
•
viagra
•
we honor all
•
we strongly oppose the use of spam email
•
while supplies last
•
while you sleep
•
why pay more?
•
you are a winner
•
you're a winner
Run Content Detective on New Creation Tools
Follow these steps to run Content Detective on the new creation tools in Email Studio.
Contact your account administrator if you would like access to this feature.
1. Click Content.
2. Select Content Detective next to the email to scan.
Content Detective scans your email and then displays a list of the potential triggers. If you made separate changes to the text version
of the email, Content Detective displays the text version results separately on this page. Buttons display at the bottom of the Content
Detective box when potential triggers are found:
•
Print: Print using the standard print dialog box.
•
Save: Save the results to a text file using the standard file download dialog box with the option to open or save the file.
3. Click Content to exit.
Content Syndication
Use Email Studio content syndication to bypass typing in the email and include content in your emails directly from an outside source.
You specify a path to the content in place of the content itself. The system gets the content at that path and includes it in your email.
For example, you can include the latest entry in your company blog in your email by specifying the path to the latest entry. The system
uses the path you entered to get the latest entry at the time of the email send and include it in your email.
Content syndication is designed to help you integrate your CMS or CRM system with emails. You can use content syndication to get
content from any web site or your CMS into the body of your emails. Also, you can use the content syndication features to notify your
system that an activity has completed. You can use content syndication through the application or by using the calls in the API. AMP
Web Services currently does not support content syndication.
49
ContentEmail in Marketing Cloud Engagement

Path Specification with a URL
You specify the path with a URL. The URL can be anything you can access with a web browser, such as a text file, HTML code, or CGI
script. As a result, you can call a function in the message’s middle and insert whatever the function returns into the message at the point
it was called.
You can make the URL subscriber specific by inserting a substitution string in the URL to act as a placeholder for the subscriber's attribute
value. You insert the attribute substitution string into the URL in square brackets, for example: [First Name], to indicate to replace the
substitution string with the subscriber attribute value. You can use this functionality to present different content based on the subscriber
attribute.
Best Practices with Content Syndication
For best results, encode internationalized web pages being retrieved using the HTTPGet functionality in the same character set as the
content type of the internationalized email.
Create Content Syndication
Learn to create content syndication in Email Studio.
System Performance Preservation
The process of pulling content from another system into an email involves HTTP calls from Marketing Cloud Engagement to your
content management system or web site.
Content Syndication in the API
Reference for information regarding Email Studio content syndication in the API.
Internationalized Web Pages
Content syndication in Email Studio can get content from web pages that use any of a broad range of character encoding, including
double-byte characters.
Create Content Syndication
Learn to create content syndication in Email Studio.
1. Select External Content from the Insert menu on the text editing screen. The Insert External Content window appears.
2. Enter the URL, including http://, of the external content that you want to populate in the content area. You can link to anything that
you could normally access via HTTP. You can click the personalization button to use personalization as part of the URL.
Note: Do not include personally identifiable information, such as email address, in email links.
3. Click when to retrieve the content:
•
Retrieve content immediately gets the content from the path you provided when you click OK. Use this feature to get the content
as it appears at the path right now. If you select this option, you cannot include personalization in the URL. You can edit and
preview the syndicated content in the regular HTML and text preview.
•
Retrieve content when email is sent retrieves the content at the time the email for sending is processed. Use this feature to get
the latest content at the path at the time the email is sent. If you choose this option, you can include personalization in the URL.
You cannot edit the content, but you can preview the content for a test subscriber.
4. If you select Retrieve content when email is sent, you must choose a Retrieval Option:
•
Subscriber level evaluates the content to include for each subscriber. If the content is cached, the system uses the cached content;
otherwise the system accesses the URL. Use this option if the path in the URL field contains a personalization string or if it triggers
a function that changes the content for different subscribers.
50
ContentEmail in Marketing Cloud Engagement
•
Email level accesses the URL once at the beginning of the email send and includes the content for each email. Use this option
to save processing time if the path in the URL field returns the same content for every email sent.
•
After (post-send) level accesses the URL after the email has been sent. This option does not include content in your email. Use
this option if the accessing the URL raises an event to perform a one-time programmatic action, such as logging the completion
of the send.
5. If you select Subscriber Level or Email Level, indicate what to do if the call returns empty content:
•
Continue allows the system to proceed as normal.
•
Stop the email send prevents the system from processing any more emails in the send and puts the send in an error status.
•
Skip the subscriber and continue email send is available only if you select Subscriber Level Retrieval. This option skips the
subscriber and proceeds to process the rest of the send as normal.
6. Click OK.
System Performance Preservation
The process of pulling content from another system into an email involves HTTP calls from Marketing Cloud Engagement to your content
management system or web site.
The send speed, response time, and overall reliability of the process depend on the state of several pieces of equipment involved in the
internet connection between Engagement and the content source. Consider these guidelines to preserve your system performance:
•
Make no more than three content syndication requests in an email.
•
Refrain from using personalization in the URL. Create variables for holding the values, reference these variables within the URL, and
use script to populate the variables. For example, https://example.com?n=%%=v(@personalizedParameter)=%%
•
If the syndicated content is the same for all subscribers in the campaign, save processing time by requesting the system get the
content at the beginning of the send (Before;HTTPGet) instead of separately for each subscriber. If the syndicated content is the
same for all subscribers in the campaign, the system caches the syndicated content it gets from the URL so it can be used again
without accessing the URL.
•
Save processing time by use HTTPGet to not track the URL.
•
Send to smaller lists or subsets of lists if you do have performance issue. Try to keep list sizes below 1,000 subscribers. For large lists,
contact your sales representative to identify a custom process that meets your needs.
Content Syndication in the API
Reference for information regarding Email Studio content syndication in the API.
HTTPGet Command
Purpose
Include in the body of the email to pull content at the specified URL into the email at the time the email is sent. If the content is cached,
the system includes the cached copy; otherwise, the system accesses the URL. Use this command to include subscriber-specific content
in each email in the campaign.
If the syndicated content is not specific to the subscriber, use the Before;HTTPGet command.
Syntax
%%httpget "URL"%%
Arguments
51
ContentEmail in Marketing Cloud Engagement

URL
Example: Calling a Script with HTTPGet
You have multiple ads on your web server, and you have a script that picks one randomly, so that each subscriber gets a randomly
selected ad.
The web site address is https://www.example.com. The filename of the script you've written to generate custom web pages is
getdata.pl, which uses the Email Studio attribute labeled Email Address to determine which page to display. You enter this code
in the email body at the point where the web page content appears:
%%httpget "https://www.example.com/cgi-bin/getdata.pl?id=[Email Address]"%%
When the email is generated, the application substitutes the subscriber's email address into the URL (for example:
https://www.example.com/cgibin/getdat...heirDomain.com). The content that appears in that location of the email body is the
web page specific to that subscriber's email address.
Although the HTTPGet merge tag doesn’t require specific output from the URL, we recommend including a standard HTTP/1.0
200 OK status line, a Content-Type: text/plain or Content-Type: text/html line followed by an empty line, and then the content of
the text to be inserted. For example, a Perl script would include code similar to the following:
print "HTTP/1.0 200 OK\r\n";
print "Content-Type: text/plain\r\n";
print "\r\n";
print "Welcome to the Northern Trail newsletter!";
This function works with HTTP on port 80 and HTTPS on port 443. Non-standard port assignments cause this function to fail.
HTTPGetWrap Command
Purpose
Include in the <a> tags of links in the syndicated content to track the links that appear in the content pulled into your emails with
HTTPGet or the TreatAsContent() AMPscript function.
Note: Only subscriber-level content syndication emails require the use of this command. All other emails using content syndication
automatically include the code necessary to track the links.
Syntax
<a href="httpgetwrap|URL">Click here</a>
Arguments
URL
Before;HTTPGet Command
Purpose
Include in the body of the email to pull content from the specified URL one time at the beginning of an email send to include in each
email in the campaign. Use this command to save time over HTTPGet when you don't need the content pulled separately for each
instance of the email. You can also use this command to obtain notification that an email send has begun. If the syndicated content is
specific to the subscriber, use the HTTPGet command instead of this command.
Syntax
%%before;httpget "URL"%%
52
ContentEmail in Marketing Cloud Engagement

Arguments
URL
Example: Including the Same Ad in Each Email
You have multiple ads on your web server, but you want every subscriber in a particular email send to see the same ad. The web
site address is https://www.example.com, and the filename of the script that pulls the ad is getmailad.pl. Enter this code in the
email body at the point where the ad appears:
%%before;httpget "https://www.example.com/cgi-bin/getmailad.pl"%%
Example: Requesting Notification that an Email Send has Begun
You've written a script that records the start time of the email send. The web site address where the script is located is
https://www.example.com, and the filename of the script is recordevent.pl. You enter this code at the top of the email body:
%%before;httpget "https://www.example.com/cgi-bin/recordevent.pl"%%
The system runs your script at the time the email send is processed. This command does not cause content to be added to the
email body. The before;httpget command is processed outside of the subscriber context because it retrieves
content that is used in the email for all subscribers. Therefore, the only personalization that is valid in the URL query string is the
JobID substitution. For example:
%%before;httpget "https://www.example.com/cgibin/record....pl?id=[jobid]"%%
After;HTTPGet Command
Purpose
Include at the end of an email definition to perform an action one time at the end of an email campaign. This command does not include
content in the body of the email. Use this command to provide notification to your CRM or CMS system that the email send completed.
Note: This call cannot be used with triggered emails sends because the triggered email send job does not end after the message
is sent.
Syntax
%%after;httpget "URL"%%
Arguments
URL
Example: Requesting Notification that an Email Send has Completed
You've written a script that logs that an email send has been completed.
The web site address where the script is located is https://www.example.com and the filename of the script is logsentmessage.pl.
You enter the following code at the end of the email body:
%%after;httpget "https://www.example.com/cgi-bin/logsentmessage.pl"%%
The system runs your script at the conclusion of the email send. This command does not cause content to be added to the email
body.
The after;httpget command is processed outside of the subscriber context because it is invoked one time after the send to all
subscribers is complete. Therefore, the only personalization that is valid in the URL query string is the JobID substitution. For
example:
%%after;httpget "https://www.example.com/cgi-bin/logse...pl?jid=[jobid]"%%
53
ContentEmail in Marketing Cloud Engagement

Empty Return Handling Options
The HTTPGET call can succeed without an error but return no content. By default, the system assumes that there is no syndicated content
relevant to the context of the email and continues the email send. You can override this default behavior with an optional flag.
Syntax
%%httpget[;EmptyReturnHandlingOption] "URL"%%
Or
%%before;httpget[;EmptyReturnHandlingOption] "URL"%%
Valid Values
•
0 (or none) - continue normal processing
•
1 - stop processing and set job status to error
•
2 (for a subscriber-level call) - skip the subscriber and continue the send
•
2 (for a before-level call) - stop the send and set job status to error
This flag is ignored for the After;HTTPGet command.
Example: You have multiple ads on your web server, and you have a script that picks one randomly, so that each subscriber gets
a randomly selected ad. If the script does not return an ad, you want the system to skip that subscriber and continue with the rest
of the send.
The web site address is https://www.example.com, and the filename of the script is ad.pl, which is located in the cgi-binfolder.
You enter the following code in the email body at the point where the ad appears:
%%httpget ; 2 "https://www.example.com/cgi-bin/ad.pl"%%
Error Handling
The best defense against content syndication errors is a good offense. Using AMPscript, you can prevalidate values being used for content
syndication. If your page requires a query string value and errors if it doesn't receive it, you can check the value before the call occurring.
Potentially Dangerous
%%httpget "http://adomain.com/newsletter/album?...umId=[albumid]"%%
In this content syndication call, albumid is required to return any content. If it isn't part of the request, it returns a server error.
A Better Approach
%%[ if length(albumid) > 0 then ]%% %%httpget
"http://adomain.com/newsletter/album?...umId=[albumid]"%% %%[ endif ]%%
This approach uses Manuscript to validate the data before executing the content syndication call. It doesn’t prevent rogue web server
errors, but prevents data-related issues.
Internationalized Web Pages
Content syndication in Email Studio can get content from web pages that use any of a broad range of character encoding, including
double-byte characters.
For best results, use the same character encoding as the email that contains the content web sites from which you syndicate content.
If you selected the option to Retrieve content immediately, the email preview displays the content from the URL you specified. You can
edit this content within the email.
54
ContentEmail in Marketing Cloud Engagement

If you selected to Retrieve content when email is sent, the email preview displays the command that gets the content from the URL you
specified. For example, if you specified the URL https://www.example.com/cgi-bin/getmailad.pl, you see this content area in your email
preview:
Note: If you syndicate content from a microsite or landing page that contains AMPscript, that AMPscript does not execute and
does not appear properly within the email.
Headers and Footers
Marketing Cloud Engagement can add text and images to the beginning and end of your email messages that ensures compliance with
CAN-SPAM regulations.
Set this information as part of the send classification or customize how those headers and footers appear at an account level. Select
whether email messages sent from this account include your choice of header and footer:
•
System-default header and footer
•
Custom header and footer specifically for that account
•
No header and footer at all
New customers with branded accounts use custom headers and footers without any system default information. Existing customers
can contact Salesforce Customer Support for assistance with configuring this setting.
Any email you send must include the following information, as represented by the following personalization strings:
Table 1: Headers and Footers Personalization Strings
Personalization StringElement
%%profile_center_url%%A link to any available profile center
%%unsub_center_url%%A link to any available unsubscription service
%%Member_Busname%%The name of your business
%%Member_Addr%%The physical street address of your business
%%Member_City%%The city location for your business
%%Member_State%%The state location for your business
%%Member_PostalCode%%The ZIP code for your business
%%Member_Country%%The country location for your business
Standard headers and footers already include this information. You can add this information to any custom headers you create. Manually
add this information to text-only email messages.
55
ContentEmail in Marketing Cloud Engagement

To display headers and footers for custom templates, add <custom type="header" /> where you want the header to display
and <custom type="footer" /> where you want the footer to display.
You can configure your account to ignore this validation, but you remain responsible for including all legally required information in
your email messages. Use more personalization strings in your headers as necessary.
Enterprise, Enterprise 2.0, and Agency accounts must contact their account executive to enable this functionality for the account. Users
of the Salesforce Marketing Cloud Engagement Connector v2 can’t use the %%subscription_center_url%% personalization tag.
Using a custom version of header or footers overrides any locale preferences for the default headers and footers.
Accounts using integrations, such as Marketing Cloud Connect or Microsoft Dynamics CRM, returns to the system default header and
footer code when that account removes or upgrades its integration. This default occurs even when an account specifically overrides the
header and footer code. Ensure that you copy all relevant header and footer code and replace it in your account following the change
in integration.
Implement Header and Footer Rules
To use standard header and footer content with the content you create in Marketing Cloud Engagement, enable header and footer
rules.
Implement Header and Footer Rules
To use standard header and footer content with the content you create in Marketing Cloud Engagement, enable header and footer rules.
1. To insert standard header and footer information, including all legal requirements for a marketing email send, click System Default.
2. To insert header and footer information specific to that account, click Custom:
a. Insert HTML or text in the fields for Header and Footer.
b. To insert header and footer information specified by your account settings, click Insert Recommended Header.
3. To remove header and footer information for email messages sent from the account, click None.
4. Click Save.
Social Forward
Social Forward in Email Studio enables email recipients to share content from emails with other users via their preferred social network.
Choose the sections of the email to enable with Social Forward and the networks represented by links and images in the email. Social
Forward also tracks any clicks from an email to a social network and the resulting page views from the URL shared by the email recipient.
Social Forward creates a streamlined process for your subscribers to share content with their friends and contacts via social networks.
Determine the shared content and how that content appears in the social networks, allowing you to preserve your branding and promote
your message. Social Forward also allows you to specifically target certain social networks that better receive your message or information.
Social Forward supports direct linking to a specific social network or the use of a third-party service like ShareThis. Social Forward also
supports international networks. Images representing the social networks are stored in your Portfolio folder under a Social sub-folder.
These pictures can be altered or changed to your specifications.
Social Forward and Portfolio must be enabled on your account to use Social Forward. In addition, Social Forward uses AMPscript to
create the links used to share content with Social Forward.
The application creates the AMPscript for you, or you can manually add the AMPscript yourself. Therefore, be familiar with AMPscript to
manually add these links to your email. Contact your account executive for more information.
Note: The Facebook sharing functionality currently has image restrictions that may cause images to not load as intended. Facebook
recommends that the thumbnail's width and height must be at least 50 pixels and shouldn't exceed 130x110 pixels. The ratio of
56
ContentEmail in Marketing Cloud Engagement

both height divided by width and width divided by height (w/h, h/w) cannot exceed 3.0. For example, an image of 126x39 pixels
does not display, as the ratio of width divided by height is greater than 3.0 (126/39 = 3.23). Any image included in the shared
content that meets those requirements is likely to be pulled in as a sharable option. For more information, see Facebook's developer
page.
Note: The LinkedIn sharing functionality currently has image restrictions similar to Facebook's. For more information, see LinkedIn's
developer forum.
Social Forward uses links in the email to share predefined content areas, and you can use this function in different situations:
•
Sharing a Direct Link - Click an enclosed link in an email to share content with your contacts on your individual social networking
account. The social network requires you to log in and view a preview of the form to be shared on that network. You add any
comments or changes you want to make and submit the item, which posts it on your wall, bookmark list, or other shared forum.
•
Sharing a Content Listing - Click an enclosed link in an email to share content with your contacts on your individual social networking
account. On an intermediary page, you choose the link. The social network requires you to log in and view a preview of the form to
be shared on that network. You add any comments or changes you want to make and submit the item, which posts it on your wall,
bookmark list, or other shared forum.
•
Sharing Content via ShareThis - Click an enclosed link in an email to share content on ShareThis. Choose the social network from a
ShareThis widget on an intermediary page. ShareThis requires you to log in and view a preview of the form to be shared on that
network. You add any comments or changes you want to make and submit the item, which posts it on your wall, bookmark list, or
other shared forum.
Note: Using Social Forward with ShareThis requires some additional configuration.
•
Once the Content is Shared - After the content is shared on a social network, the content can be shared from contact to contact.
You can also provide the option for others to sign up for your email newsletter or add content to their accounts.
The application wraps shared content in tags that indicate which sections of the email are shared to social networks. Tags also designate
the link used to share the content to those social networks.
Social Forward Tags
Email Studio wraps shared content in tags that indicate which sections of the email are shared to social networks. Tags also designate
the link used to share the content to those social networks.
Share a Content Area using the Editor
Follow these steps to share a content area using Social Forward in Email Studio via the Editor.
Content Area Sharing using Paste HTML, AMPscript, and Social Markup
The HTML code in this example shares a dynamic piece of content from an Email Studio email to Facebook. The first commented
part of the pasted HTML names the content area Shared content Region 1, and the second commented part of the pasted HTML
contains the Social Markup link using the GetSocialPublishURLByName() AMPscript function.
Content Area Sharing using Paste HTML and Social Markup
The HTML code in this example shares a static piece of content from an Email Studio email to Facebook. The first commented part
of the pasted HTML names the content area Shared content Region 1, and the second commented part of the pasted HTML contains
the creates the Social Markup link using the GetSocialPublishURLByName() AMPscript function.
Email Sharing with Paste HTML Templates and Social Markup
The HTML code in this example creates an email in Email Studio with three separate content areas, each one defined by the
@@ContentArea lines. The first commented part of the HTML email names the email Shared content Region 1, and the second
commented part of the pasted HTML contains the creates the Social Markup link using the GetSocialPublishURLByName() AMPscript
function. In this case, the Social Markup link refers to the aggregator ShareThis.
57
ContentEmail in Marketing Cloud Engagement
Email Sharing with Paste HTML and Social Markup
The HTML code in this example shares the content of an email from Email Studio to Facebook. The first commented part of the
pasted HTML names the email Shared content Region 1, and the second commented part of the pasted HTML contains the Social
Markup link using the GetSocialPublishURLByName() AMPscript function. In this case, the Social Markup link refers to the aggregator
ShareThis.
Share a Content Area using the HTML Only View
Follow these steps to share a content area via Social Forward in Email Studio using the HTML Only view.
Track Social Forward Activities
Clicks from an email in Email Studio to either a social network or an aggregator like ShareThis display with the standard tracking
information. Use an Automation Studio query activity to view the raw data of how shared content is viewed and forwarded once
that content is already on a social network.
Paste HTML Email Share
Social Forward in Email Studio can share an entire email instead of sharing select content areas from a message. This functionality
uses a Paste HTML email in Email Studio.
Supported Social Networks
This list contains all social networks supported by Social Forward in Email Studio.
Social Content Slot Sharing via AMPscript in a Paste HTML Email
Creating an email in Email Studio by pasting HTML code into an email allows you a great deal of control over how your email appears
to your subscribers. That same control makes sharing social content slots via pasted HTML an effective tool in getting your content
onto social networks.
Social Content Slot Sharing in a Paste HTML Email
Creating an email in Email Studio by pasting HTML code into an email allows you a great deal of control over how your email appears
to your subscribers. That same control makes sharing social content slots via pasted HTML an effective tool in getting your content
onto social networks. You can create and place your shared social content slots and icons with great precision using the directions
provided below. You can also easily create multiple shared social content slots in one document. If your normal workflow included
using pasted HTML to create your emails, adding Social Forward markup should integrate easily into your process.
Content Areas and Social Forward Tags
Email Studio Social Forward tags wrap content areas to allow sharing via social networks.
Use Standard and Custom Icons to Share Content
Social Forward uses a default set of icons to represent the social networks supported within Email Studio. You can alter the appearence
of icons to call attention to a section, such as changing the size or color of the icon. You can also alter the icon to better fit the design
of your email. These steps allow you to change the icons used in Social Forward in a specific message without alterting the default
icons.
Create a Content Area for Each Social Network
Follow these steps to create a content area distributed via Social Forward in Email Studio for each social network.
Set Up the Dynamic Content Area
Follow these steps to set up the dynamic content area for sharing to different social networks in Email Studio.
Share Content to Different Social Networks Dynamically
Use preferences from a data extension or subscriber list to determine which social network icons appear in the email for use with
Social Forward in Email Studio. Using dynamic content in conjunction with Social Forward allows you to determine which subscribers
receive certain content and where they can share that content.
Change Default Social Network Icons
Follow these steps to change the default social network icons for Social Forward in Email Studio.
58
ContentEmail in Marketing Cloud Engagement
Apply a CSS File from Portfolio to Shared Content
When IDs receive multiple attributes from different style sheets or instances in the same style sheet, the resulting landing page may
not appear as you expected. For best results, create a dedicated style sheet that provides the CSS for the landing page. This step
prevents problems with cascading attributes from multiple style sheets.
CSS Files and Shared Content in Social Forward
Assigning a CSS file to your shared content allows you to better dictate how your content will appear on social networks. You can
specify how certain elements in your message will appear when shared using CSS, and storing the file in your Email Studio Portfolio
gives you a central location for managing the appearance of your content.
Sample Tracking Queries for Social Forward
These queries allow you to obtain tracking information, such as content impressions and shared content slots, regarding the
information you shared through the Social Forward function. Use these sample tracking queries below in your Automation Studio
query activities to obtain the specified information. View the information in the resulting data extension.
Social Forward Tags
Email Studio wraps shared content in tags that indicate which sections of the email are shared to social networks. Tags also designate
the link used to share the content to those social networks.
Share a Content Area using the Editor
Follow these steps to share a content area using Social Forward in Email Studio via the Editor.
1. Create your email content and choose the section or sections you want to share. You can paste in HTML, use AMPscript, or share
the contents of an entire email message.
2. Click Modify Content.
3. Click Edit and choose Social Properties.
4. In the Content Area Properties window that appears, choose the Allow Content To Be Shared checkbox and enter the information
for the Shared Content Slot, Title, and Description text fields. The Shared Content Slot field contains the ID and name for the shared
content.
5. Choose the CSS file to use in conjunction with the published content. This file applies to the content after it has been published to
a social network. You can use CSS to modify these elements:
•
Font families, and sizes
•
Headers, footers, and sidebars
•
Simple text injection (non-HTML)
•
Show, and hide DIV tags
•
Conditional logic
•
Inserting rich content or content from Portfolio
•
Adding links to the page
6. Click OK to close out the Content Area Properties window.
7. Click the Insert menu then ch oose Social Forward.
8. In the Insert Social Forward window that appears, choose the checkboxes next to the links for the social networks to include in your
email content area. You can also choose the checkbox at the top of the screen to add all social networks displayed in the window.
59
ContentEmail in Marketing Cloud Engagement

9. If the social network requires additional information or parameters, click that network and add the information in the text field directly
below the social networks list. For example, you can enter the ShareThis Account ID by clicking the ShareThis entry and adding the
ID number in the ShareThis Account ID text field that appears in the window.
10. Select the content area to associate with these networks from the Associate with Shared Content Slot dropdown menu. You may
also manually type in the name of a shared content slot to create later.
11. Click OK to close the Insert Social Forward window and insert the appropriate icons into the content area.
12. Click a social network icon to bring up the Image Properties window. In Link Properties, you can alter the following properties for
the social networking link:
•
The location of the link by type and URL
•
Whether or not the link is a conversion tracking link
•
The link tooltip
•
The link's tracking alias
13. Click OK to accept your changes and close the Image Properties window.
Content Area Sharing using Paste HTML, AMPscript, and Social Markup
The HTML code in this example shares a dynamic piece of content from an Email Studio email to Facebook. The first commented part
of the pasted HTML names the content area Shared content Region 1, and the second commented part of the pasted HTML contains
the Social Markup link using the GetSocialPublishURLByName() AMPscript function.
Example: The AMPscript inside of the table refers to a data extension called Offers, and it pulls the content for each subscriber
based on the subscriber key contained in the CustomerID column of the Offers data extensions. The content shared by the subscriber
remains the static content and doesn't change, no matter who opens the shared content.
<!-- RegionStart[ socialslot:"Shared content region 1",
title:"First shared email content",
description:"This is the first test of ExactTarget's social forwarding",
csskey:"portfolio css 1"] -->
<table width="100%" bgcolor="#FFFFFF" border="0" bordercolor="" cellpadding="5"
cellspacing="0">
<tr>
<td style="font-family:Arial; font-size:13px">
%%[ var @row, @rows, @cnt
set @rows = LookupRows("Offers","CustomerID",_subscriberkey)
for (var @cnt = 0 to RowCount(@rows)) do
]%%
%%=Field("Description",Row(@rows,@cnt))=%%
<br /></p>
%%[ next @cnt ]%%
<!-- Creates a link to share this content with Facebook -->
<a href="%%=GetSocialPublishURLByName('Facebook','US','Shared content region
1')=%%"
alias="Social Forward to Facebook"
title="Publish to Facebook">
<img
src="http://image.exct.net/lib/ffcf14/m/1/social_default_facebook_icon.jpg"
alt="Facebook"
title="Facebook"
border="0">
60
ContentEmail in Marketing Cloud Engagement

</a>
</td>
</tr>
</table>
<!-- RegionEnd[ socialslot:"Shared content region 1"]-->
Content Area Sharing using Paste HTML and Social Markup
The HTML code in this example shares a static piece of content from an Email Studio email to Facebook. The first commented part of
the pasted HTML names the content area Shared content Region 1, and the second commented part of the pasted HTML contains the
creates the Social Markup link using the GetSocialPublishURLByName() AMPscript function.
Example:
<!-- RegionStart[ socialslot:"Shared content region 1",
title:"First shared email content",
description:"This is an example of shared content",
csskey:"portfolio css 1"] -->
<table width="100%" bgcolor="#FFFFFF" border="0" bordercolor="" cellpadding="5"
cellspacing="0">
<tr>
<td style="font-family:Arial; font-size:13px">
<img src="https://example.com/images/logo.jpg"
title="logo" align="left" border="0" />
<p id="text-placeholder" style="margin-top: 0px; margin-bottom: 0px;">
This is an example of a shared content area! Please feel free to
pass on this information!<br />
<br /></p>
<!-- Creates a link to share this content with Facebook -->
<a href="%%=GetSocialPublishURLByName('Facebook', 'US', 'Shared content region
1')=%%"
alias="Social Forward to Facebook"
title="Publish to Facebook">
<img
src="http://image.exct.net/lib/ffcf14/m/1/social_default_facebook_icon.jpg"
alt="Facebook"
title="Facebook"
border="0">
</a>
</td>
</tr>
</table>
<!-- RegionEnd[ socialslot:"Shared content region 1"] -->
61
ContentEmail in Marketing Cloud Engagement

Email Sharing with Paste HTML Templates and Social Markup
The HTML code in this example creates an email in Email Studio with three separate content areas, each one defined by the @@ContentArea
lines. The first commented part of the HTML email names the email Shared content Region 1, and the second commented part of the
pasted HTML contains the creates the Social Markup link using the GetSocialPublishURLByName() AMPscript function. In this case, the
Social Markup link refers to the aggregator ShareThis.
Example:
<html>
<head>
<title></title>
</head>
<body>
<table>
<tr>
<td>
To view this email as a web page, click <a href=
"%%view_email_url%%">here.</a>
<!-- RegionStart[ socialslot:"Shared content region 1",
title:"email",
description:"The monthly hot offers newsletter for Company
X.",
csskey:"companyx"] -->
<table width="100%">
<tr>
<td>This is a great newsletter!!!<br />
<!-- Creates a link to share this content with ShareThis -->
<a href="%%=GetSocialPublishURLByName('Facebook','US','Shared content
region 1','_stid','publisherID')=%%"
alias="Social Forward to ShareThis - email"
title="Publish to ShareThis">
<img
src="http://image.exct.net/lib/ffcf14/m/1/social_default_facebook_icon.jpg"
alt="ShareThis"
title="ShareThis" border="0" /> ShareThis</a> using Facebook, email and
more.
</td>
</tr>
</table>
<!-- RegionEnd[ socialslot:"Shared content region 1"] -->
<table cellpadding="2" cellspacing="0" width="600" id="Table5" border=
"0">
<tr>
<td><font face="verdana" size="1" color="#444444">This email was
sent to: %%emailaddr%%<br />
<br />
<b>Email Sent By:</b> %%Member_Busname%%<br />
%%Member_Addr%% %%Member_City%%, %%Member_State%%,
%%Member_PostalCode%%, %%Member_Country%%<br />
<br /></font></td>
</tr>
62
ContentEmail in Marketing Cloud Engagement

</table>
</td>
</tr>
</table>
</body>
</html>
Email Sharing with Paste HTML and Social Markup
The HTML code in this example shares the content of an email from Email Studio to Facebook. The first commented part of the pasted
HTML names the email Shared content Region 1, and the second commented part of the pasted HTML contains the Social Markup link
using the GetSocialPublishURLByName() AMPscript function. In this case, the Social Markup link refers to the aggregator ShareThis.
Example:
<html>
<head>
<title></title>
</head>
<body>
<table>
<tr>
<td>
To view this email as a web page, click <a href=
"%%view_email_url%%">here.</a>
<!-- RegionStart[ socialslot:"Shared content region 1",
title:"email",
description:"The monthly hot offers newsletter for Company
X.",
csskey:"companyx"] -->
<table width="100%">
<tr>
<td>This is a great newsletter!!!<br />
<!-- Creates a link to share this content with ShareThis -->
<a href="%%=GetSocialPublishURLByName('Facebook','US','Shared content
region 1','_stid','publisherID')=%%"
alias="Social Forward to ShareThis - email"
title="Publish to ShareThis">
<img
src="http://image.exct.net/lib/ffcf14/m/1/social_default_facebook_icon.jpg"
alt="ShareThis"
title="ShareThis" border="0" /> ShareThis</a> using Facebook, email and
more.
</td>
</tr>
</table>
<!-- RegionEnd[ socialslot:"Shared content region 1"] -->
<table cellpadding="2" cellspacing="0" width="600" id="Table5" border=
"0">
<tr>
63
ContentEmail in Marketing Cloud Engagement

<td><font face="verdana" size="1" color="#444444">This email was
sent to: %%emailaddr%%<br />
<br />
<b>Email Sent By:</b> %%Member_Busname%%<br />
%%Member_Addr%% %%Member_City%%, %%Member_State%%,
%%Member_PostalCode%%, %%Member_Country%%<br />
<br /></font></td>
</tr>
</table>
</td>
</tr>
</table>
</body>
</html>
Share a Content Area using the HTML Only View
Follow these steps to share a content area via Social Forward in Email Studio using the HTML Only view.
1. Create your email content in the HTML view of Email Studio.
2. Click Insert on the menu bar and choose Social Forward Area.
3. In the Content Area Properties window that appears, choose the Allow Content To Be Shared checkbox and enter the information
for the Shared Content Slot, Title, and Description text fields. The Shared Content Slot field contains the ID for the shared content,
and you can use whatever name you wish.
4. Choose the CSS file to use in conjunction with the published content. This file applies to the content after it has been published to
a social network.
5. Click OK. Email Studio adds HTML tags to the content area that you can use to mark your shared content area.
6. Click Insert on the menu bar and choose Social Forward Links.
7. In the Insert Social Forward window that appears, choose the checkboxes next to the links for the social networks to include in your
email content area. You can also choose a checkbox to add all social networks displayed in the window.
8. If the social network requires additional information or parameters, click that network and add the information in the text field directly
below the social networks list. For example, you can enter the ShareThis Account ID by choosing the ShareThis entry and adding
the ID number in the ShareThis Account ID text field that appears in the window.
9. Click OK to insert the social network links you selected.
Track Social Forward Activities
Clicks from an email in Email Studio to either a social network or an aggregator like ShareThis display with the standard tracking information.
Use an Automation Studio query activity to view the raw data of how shared content is viewed and forwarded once that content is
already on a social network.
Paste HTML Email Share
Social Forward in Email Studio can share an entire email instead of sharing select content areas from a message. This functionality uses
a Paste HTML email in Email Studio.
64
ContentEmail in Marketing Cloud Engagement

Shared Content Definition
HTML in the email message requires comment tags to share the content:
<!-- RegionStart[ socialslot:"SharePasteHTML", title:"Sharing an entire Paste HTML
email", description:"Sharing an entire email to Facebook and LinkedIn"] -->
The entire Paste HTML email code follows the RegionStart tag.
<!-- RegionEnd[ socialslot:"SharePasteHTML"] -->
The RegionStart statement belongs after the table which contains the link for viewing the email as a webpage and before the HTML for
the footer information at the bottom of the email.
Social Networks Definition
This example displays sample code for sharing to Facebook and LinkedIn:
<a href="%%=GetSocialPublishURLByName('Facebook','US','SharePasteHTML')=%%" alias="Social
Forward to Facebook - SharePasteHTML" title="Publish to
Facebook"><imgsrc="http://image.preview.exacttarget.com/lib/ffcf14/m/1/social_default_facebook_icon.jpg"
border="0" alt="Facebook" title="Facebook"></a>
<a href="%%=GetSocialPublishURLByName('LinkedIn','US','SharePasteHTML')=%%" alias="Social
Forward to LinkedIn - SharePasteHTML" title="Publish to
LinkedIn"><imgsrc="http://image.preview.exacttarget.com/lib/ffcf14/m/1/social_default_linkedin_icon.jpg"
border="0" alt="LinkedIn" title="LinkedIn"></a>
For both the Facebook and LinkedIn links, the hrefattribute calls the AMPscript function GetSocialPublishURLByName to share the defined
region SharePasteHTML. The second argument of the function must match the defined title in the RegionTitle tags. The first argument
of GetSocialPublishURLByName defines the social network with which to share the email. In this example, the links identify Facebook
and LinkedIn.
Example: This example shows the HTML for the entire email message, including the unshared view as a webpage link at the top
and footer and the bottom.
<!DOCTYPE HTML PUBLIC "-//W3C//DTD HTML 4.01//EN"
"http://www.w3.org/TR/html4/strict.dtd">
<html>
<head>
<meta http-equiv="Content-Type" content="text/html; charset=iso-8859-1" />
<title>Thank you for your interest in Email.</title>
<style type="text/css">
html body { margin: 0; padding: 0; font: 0.76em normal Arial, Verdana,
Helvetica, sans-serif; color: #554; }
#cntr { width: 600px; }
#cntr .cnt { margin: 1.0em }
#cntr .cnt span { font-size: 1.5em; color: #000; }
#cntr .cnt strong { font-size: 1.0em }
</style>
</head>
<body bottommargin="0" leftmargin="0" rightmargin="0" marginheight="0"
marginwidth="0" topmargin="0">
<table width="600" cellpadding="0" cellspacing="0" border="0" align="center">
<tr>
<td valign="top" align="left"><font face="verdana" size="1"
color="#444444"><p>To view this email as a web page, go <a href="%%view_email_url%%"
65
ContentEmail in Marketing Cloud Engagement

alias="View as a Web Page"> here.</a></p></font></td>
</tr>
</table>
<!-- RegionStart[ socialslot:"SharePasteHTML", title:"Sharing an entire Paste
HTML email", description:"Sharing an entire email to Facebook and LinkedIn"] -->
<div align="center" style="background-color: _fckstyle="background-color:
_fckstyle="background-color: _fckstyle="background-color: _fckstyle="background-color:
_fckstyle="background-color: _fckstyle="background-color: _fckstyle="background-color:
_fckstyle="background-color: _fckstyle="background-color: _fckstyle="background-color:
_fckstyle="background-color: _fckstyle="background-color: _fckstyle="background-color:
#333;">
<div id="cntr" align="left" style="background-color: _fckstyle="background-color:
_fckstyle="background-color: _fckstyle="background-color: _fckstyle="background-color:
_fckstyle="background-color: _fckstyle="background-color: _fckstyle="background-color:
_fckstyle="background-color: _fckstyle="background-color: _fckstyle="background-color:
_fckstyle="background-color: _fckstyle="background-color: _fckstyle="background-color:
#FFF;"></div>
<div class="nav" style="height: _fckstyle="height: _fckstyle="height:
_fckstyle="height: _fckstyle="height: _fckstyle="height: _fckstyle="height:
_fckstyle="height: _fckstyle="height: _fckstyle="height: _fckstyle="height:
_fckstyle="height: _fckstyle="height: _fckstyle="height: 50px; width: 600px; background:
#222 url('http://image.exct.net/8c953a0c-d.jpg');">
<table width="100%" cellpadding="0" cellspacing="4" border="0">
<tr>
<td valign="left">Thanks for your interest in Social Forward!</td>
</tr>
</table></div>
<div class="cnt" style="border-bottom: _fckstyle="border-bottom:
_fckstyle="border-bottom: _fckstyle="border-bottom: _fckstyle="border-bottom:
_fckstyle="border-bottom: _fckstyle="border-bottom: _fckstyle="border-bottom:
_fckstyle="border-bottom: _fckstyle="border-bottom: _fckstyle="border-bottom:
_fckstyle="border-bottom: _fckstyle="border-bottom: _fckstyle="border-bottom: 1px solid
#CCC; margin: 1.0em">
<p>At the bottom of the email, you can see Facebook and LinkedIn icons.
Click them to share your content to the appropriate social network.</p>
<p>You can share this entire email via Social Forward!</p>
<p>
<a
href="%%=GetSocialPublishURLByName('Facebook','US','SharePasteHTML')=%%" alias="Social
Forward to Facebook - YahooPasteHTML" title="Publish to Facebook"><img
src="http://image.preview.exacttarget.com/lib/ffcf14/m/1/social_default_facebook_icon.jpg"
border="0" alt="Facebook" title="Facebook"></a>
<a
href="%%=GetSocialPublishURLByName('LinkedIn','US','SharePasteHTML')=%%" alias="Social
Forward to LinkedIn - YahooPasteHTML" title="Publish to LinkedIn"><img
src="http://image.preview.exacttarget.com/lib/ffcf14/m/1/social_default_linkedin_icon.jpg"
border="0" alt="LinkedIn" title="LinkedIn"></a>
</p>
</div>
</div>
</div>
<!-- RegionEnd[ socialslot:"SharePasteHTML"] -->
<table cellpadding="2" cellspacing="0" width="600" border="0" align="center">
66
ContentEmail in Marketing Cloud Engagement

<tr>
<td valign="top" align="left" style="line-height: _fckstyle="line-height:
_fckstyle="line-height: _fckstyle="line-height: _fckstyle="line-height:
_fckstyle="line-height: _fckstyle="line-height: _fckstyle="line-height:
_fckstyle="line-height: _fckstyle="line-height: _fckstyle="line-height:
_fckstyle="line-height: _fckstyle="line-height: _fckstyle="line-height: 16px;">
<p><font face="verdana" size="1" color="#777777">This email was
sent to: <b>%%emailaddr%%</b><br />
<a href="%%subscription_center_url%%" alias="Manage
Subscriptions">Manage Subscriptions</a> |
<a href="%%profile_center_url%%" alias="Update Profile">Update
Profile</a> |
<a href="%%unsub_center_url%%" alias="Unsubscribe">One-Click
Unsubscribe</a></p>
<p>This email was sent by: <b>%%Member_Busname%%</b><br
/>%%Member_Addr%% %%Member_City%%, %%Member_State%% %%Member_PostalCode%%
%%Member_Country%%</p>
<p>We respect your right to privacy - <a
href="http://email.exacttarget.com/ETWeb/company.aspx?id=80" alias="View Privacy Policy"
style="color: _fckstyle="color: _fckstyle="color: _fckstyle="color: _fckstyle="color:
_fckstyle="color: _fckstyle="color: _fckstyle="color: _fckstyle="color:
_fckstyle="color: _fckstyle="color: _fckstyle="color: _fckstyle="color: _fckstyle="color:
#0000ff">view our policy</a></p>
</font>
</td>
<td width="145" align="right" valign="center"><a
href="http://www.marketingcloud.com" title="This email is Powered By Salesforce Marketing
Cloud Engagement" alias="Powered By"><img
src="http://email.exacttarget.com/images/Powered_By_1206.jpg" width="124" height="55"
alt="This email is Powered By Salesforce Marketing Cloud Engagement" border="0"
/></a></td>
</tr>
</table>
</body>
<custom name="opencounter" type="tracking">
</html>
Supported Social Networks
This list contains all social networks supported by Social Forward in Email Studio.
Facebook
Delicious
Digg
MySpace
StumbleUpon
Google
Yahoo
67
ContentEmail in Marketing Cloud Engagement

LinkedIn
ShareThis
Twitter
Facebook Like
Google+
Viadeo
Xing
Social Content Slot Sharing via AMPscript in a Paste HTML Email
Creating an email in Email Studio by pasting HTML code into an email allows you a great deal of control over how your email appears
to your subscribers. That same control makes sharing social content slots via pasted HTML an effective tool in getting your content onto
social networks.
You can create and place your shared social content slots and icons with great precision. You can also easily create multiple shared social
content slots in one document. If your normal workflow included using pasted HTML to create your emails, adding Social Forward
markup integrates into your process.
Additionally, you can use AMPscript to determine which content is shown to your subscribers and their friends on social networks.
AMPscript allows you to better personalize your messages and make them apply to your target audience.
Paste HTML Email
Create your Paste HTML email in Email Studio and identify the sections of the email to share. The example on this page shares a social
content slot to Facebook, but you can choose from several different social networks when sharing content using Social Forward.
Social Content Slots When Viewed as a Webpage
Use AMPscript to determine whether the email is being displayed as a webpage. If a webpage is used to display the content, this
AMPscript displays the text contained in the code block:
%%[ if _MessageContext == "VAWP" then ]%% You're reading this text because you're
viewing this email as a webpage! %%[ endif ]%%
This Paste HTML code includes the AMPscript. You can use this code to share a social content slot:
<!-- RegionStart[ socialslot:"FacebookCustomIcon", title:"Facebook with Custom Icon",
description:"Facebook with Custom Icon"] -->
<p>Custom Facebook Icon</p>
<p><table cellspacing="0" cellpadding="0" align="left">
<tbody>
<tr>
<td align="right">Hi! </td>
</tr>
</tbody>
</table>
<strong>This content represents the second shared social content slot.
%%[ if _MessageContext == "VAWP" then ]%%
You're reading this text because you're viewing this email as a webpage!
68
ContentEmail in Marketing Cloud Engagement

%%[ endif ]%%
</strong></p>
<p><a href="%%=GetSocialPublishURLByName('Facebook','US','FacebookCustomIcon')=%%"
alias="Social Forward to Facebook - FacebookCustomIcon" title="Publish to Facebook"><img
src="http://image.preview.exacttarget.com/lib/ff66157875/m/1/facebook-alt.png" border="0"
alt="Facebook" title="Facebook"></a></p>
<!-- RegionEnd[ socialslot:"FacebookCustomIcon"] -->
Social Content Slots When Viewed as a Webpage or Shared
Use this code to share the longer webpage version of the content instead of the shorter email version:
%%[ if _MessageContext == "VAWP" or _MessageContext == "Social" then ]%% You're reading
this text because you're viewing this email as a webpage! %%[ endif ]%%
If the message is viewed as a webpage or shared, the AMPscript displays the longer text included in the code block. You can separate
the _MessageContext checks into two different If statements to change how each context displays your content.
Example: This email uses AMPscript to change the displayed content depending on whether the email is being displayed in an
inbox or as a webpage. The content shared is always the content from the email view.
<!DOCTYPE HTML PUBLIC "-//W3C//DTD HTML 4.01//EN"
"http://www.w3.org/TR/html4/strict.dtd">
<html>
<head>
<meta http-equiv="Content-Type" content="text/html; charset=iso-8859-1" />
<title>Thank you for your interest in ExactTarget Email.</title>
<style type="text/css">
html body { margin: 0; padding: 0; font: 0.76em normal Arial, Verdana, Helvetica,
sans-serif; color: #554; }
#cntr { width: 600px; }
#cntr .cnt { margin: 1.0em }
#cntr .cnt span { font-size: 1.5em; color: #000; }
#cntr .cnt strong { font-size: 1.0em }
</style>
</head>
<body bottommargin="0" leftmargin="0" rightmargin="0" marginheight="0" marginwidth="0"
topmargin="0">
<table width="600" cellpadding="0" cellspacing="0" border="0" align="center">
<tr>
<td valign="top" align="left"><font face="verdana" size="1" color="#444444"><p>To
view this email as a web page, go <a href="%%view_email_url%%" alias="View as a Web
Page"> here.</a></p></font></td>
</tr>
</table>
<div align="center" style="background-color: #333;">
<div id="cntr" align="left" style="background-color: #FFF;">
<div class="nav" style="height: 50px; width: 600px; background: #222
url('http://image.exct.net/8c953a0c-d.jpg');">
<table width="100%" cellpadding="0" cellspacing="4" border="0">
<tr>
<td valign="left"><strong>This email uses the new Social Forward feature!</strong></td>
</tr>
</table></div>
69
ContentEmail in Marketing Cloud Engagement

<div class="cnt" style="border-bottom: 1px solid #CCC; margin: 1.0em">
<!-- RegionStart[ socialslot:"FacebookStandardIcon", title:"Facebook Standard Icon",
description:"Share to Facebook with Standard Icon"] -->
<p>Standard Facebook Icon</p>
<p><table cellspacing="0" cellpadding="0" align="left"><tbody><tr><td
align="right">Hi! </td></tr></tbody></table><strong>This content represents the
first shared social content slot.</strong></p>
<p><a href="%%=GetSocialPublishURLByName('Facebook','US','FacebookStandardIcon')=%%"
alias="Social Forward to Facebook - standard icon" title="Publish to Facebook"><img
src="http://image.preview.exacttarget.com/lib/ffcf14/m/1/social_default_facebook_icon.jpg"
border="0" alt="Facebook" title="Facebook"></a></p>
<!-- RegionEnd[ socialslot:"FacebookStandardIcon"] -->
<!-- RegionStart[ socialslot:"FacebookCustomIcon", title:"Facebook with Custom Icon",
description:"Facebook with Custom Icon"] -->
<p>Custom Facebook Icon</p>
<p><table cellspacing="0" cellpadding="0" align="left"><tbody><tr><td
align="right">Hi! </td></tr></tbody></table><strong>This content represents the
second shared social content slot.
%%[ if _MessageContext == "VAWP" then ]%%
You're reading this text because you're viewing this email as a webpage!
%%[ endif ]%%
</strong></p>
<p><a href="%%=GetSocialPublishURLByName('Facebook','US','FacebookCustomIcon')=%%"
alias="Social Forward to Facebook - FacebookCustomIcon" title="Publish to Facebook"><img
src="http://image.preview.exacttarget.com/lib/ff66157875/m/1/facebook-alt.png"
border="0" alt="Facebook" title="Facebook"></a></p>
<!-- RegionEnd[ socialslot:"FacebookCustomIcon"] -->
</div>
</div>
</div>
<table cellpadding="2" cellspacing="0" width="600" border="0" align="center">
<tr>
<td valign="top" align="left" style="line-height: 16px;">
<p><font face="verdana" size="1" color="#777777">This email was sent to:
<b>%%emailaddr%%</b><br />
<a href="%%subscription_center_url%%" alias="Manage Subscriptions">Manage
Subscriptions</a> |
<a href="%%profile_center_url%%" alias="Update Profile">Update Profile</a> |
<a href="%%unsub_center_url%%" alias="Unsubscribe">One-Click Unsubscribe</a></p>
<p>This email was sent by: <b>%%Member_Busname%%</b><br />%%Member_Addr%%
%%Member_City%%, %%Member_State%% %%Member_PostalCode%% %%Member_Country%%</p>
<p>We respect your right to privacy - <a
href="http://email.exacttarget.com/ETWeb/company.aspx?id=80" alias="View Privacy Policy"
style="color: #0000ff">view our policy</a></p>
</font>
</td>
<td width="145" align="right" valign="center"><a href="http://www.exacttarget.com"
title="This email is Powered By ExactTarget" alias="Powered By"><img
src="http://email.exacttarget.com/images/Powered_By_1206.jpg" width="124" height="55"
alt="This email is Powered By ExactTarget" border="0" /></a></td>
</tr>
</table>
</body>
70
ContentEmail in Marketing Cloud Engagement

<custom name="opencounter" type="tracking">
</html>
Social Content Slot Sharing in a Paste HTML Email
Creating an email in Email Studio by pasting HTML code into an email allows you a great deal of control over how your email appears
to your subscribers. That same control makes sharing social content slots via pasted HTML an effective tool in getting your content onto
social networks. You can create and place your shared social content slots and icons with great precision using the directions provided
below. You can also easily create multiple shared social content slots in one document. If your normal workflow included using pasted
HTML to create your emails, adding Social Forward markup should integrate easily into your process.
This reference uses a Paste HTML email in Email Studio and identifies the sections of the email to share. The example shares a social
content slot to Facebook, but you can choose from several different social networks when sharing content using Social Forward.
Standard Facebook Icon Content Area Sharing
The HTML comment tags surround the information to be shared in the social content slot. The tag below starts the social content slot
and assigns it a name.
<!-- RegionStart[ socialslot:"FacebookStandardIcon", title:"Facebook Standard Icon",
description:"Share to Facebook with Standard Icon", csskey:"CSS file"] -->
The csskey parameter allows a CSS file to be associated to the social content area and controls the styling of that shared content.
The tag below ends the social content slot with the same name listed in the beginning tag.
<!-- RegionEnd[ socialslot:"FacebookStandardIcon"] -->
The shared content itself, including the text and image, appears between these two comment tags.
The shared social content slot includes an hyperlinked image that leads to the shared content.
This code creates the button users can click to share the shared content slot:
<a href="%%=GetSocialPublishURLByName('Facebook','US','FacebookStandardIcon')=%%"
alias="Social Forward to Facebook - standard icon" title="Publish to Facebook"><img
src="http://image.preview.exacttarget.com/lib/ffcf14/m/1/social_default_facebook_icon.jpg"
border="0" alt="Facebook" title="Facebook"></a>
You can use AMPscript to specify the destination URL in the href attribute of the link tag:
%%=GetSocialPublishURLByName('Facebook','US','FacebookStandardIcon')=%%
You can change the AMPScript function to share different slots to different social networks by simply changing the arguments passed.
The first argument passed to GetSocialPublishURLByName indicates the social network with which Social Forward will share the content.
Use the name of the region to share in the second argument. In this case, you are sharing the region FacebookPasteStandardIcon.
Note: Be sure that the social slot name of the region matches the title you put in the HTML comments when defining the sharable
region.
The image within the link tags shares the region, as shown in the code below:
<img
src="http://image.preview.exacttarget.com/lib/ffcf14/m/1/social_default_facebook_icon.jpg"
border="0" alt="Facebook" title="Facebook">
The source tag specifies the default image used for Facebook.
71
ContentEmail in Marketing Cloud Engagement

The final code block used by Social Forward to share a social content slot looks like this example:
<!-- RegionStart[ socialslot:"FacebookStandardIcon", title:"Facebook Standard Icon",
description:"Share to Facebook with Standard Icon"] -->
<p>Standard Facebook Icon</p>
<p><table cellspacing="0" cellpadding="0" align="left"><tbody><tr><td
align="right">Hi! </td></tr></tbody></table><strong>This content represents the first
shared social content slot.</strong></p>
<p><a href="%%=GetSocialPublishURLByName('Facebook','US','FacebookStandardIcon')=%%"
alias="Social Forward to Facebook - standard icon" title="Publish to Facebook"><img
src="http://image.preview.exacttarget.com/lib/ffcf14/m/1/social_default_facebook_icon.jpg"
border="0" alt="Facebook" title="Facebook"></a></p>
<!-- RegionEnd[ socialslot:"FacebookStandardIcon"] -->
Custom Facebook Icon Content Area Sharing
Sharing the Custom Facebook Icon slot using a custom icon is very similar to using the standard icon, with a few differences:
•
The HTML comments defining the region to share have the title FacebookPasteCustomIcon.
•
The AMPScript function within the sharing link references the area FacebookPasteCustomIcon.
•
The image contained within the HTML link tags specifies a custom icon source in the Portfolio.
This code shares the custom icon region:
<!-- RegionStart[ socialslot:"FacebookCustomIcon", title:"Facebook with Custom Icon",
description:"Facebook with Custom Icon"] -->
<p>Custom Facebook Icon</p>
<p><table cellspacing="0" cellpadding="0" align="left"><tbody><tr><td
align="right">Hi! </td></tr></tbody></table><strong>This content represents the second
shared social content slot.</strong></p>
<p><a href="%%=GetSocialPublishURLByName('Facebook','US','FacebookCustomIcon')=%%"
alias="Social Forward to Facebook - FacebookCustomIcon" title="Publish to Facebook"><img
src="http://image.preview.exacttarget.com/lib/ff66157875/m/1/facebook-alt.png" border="0"
alt="Facebook" title="Facebook"></a></p>
<!-- RegionEnd[ socialslot:"FacebookCustomIcon"] -->
Example: This example shows the HTML for the email:
<!DOCTYPE HTML PUBLIC "-//W3C//DTD HTML 4.01//EN"
"http://www.w3.org/TR/html4/strict.dtd">
<html>
<head>
<meta http-equiv="Content-Type" content="text/html; charset=iso-8859-1" />
<title>Thank you for your interest in ExactTarget Email.</title>
<style type="text/css">
html body { margin: 0; padding: 0; font: 0.76em normal Arial, Verdana,
Helvetica, sans-serif; color: #554; }
#cntr { width: 600px; }
#cntr .cnt { margin: 1.0em }
#cntr .cnt span { font-size: 1.5em; color: #000; }
#cntr .cnt strong { font-size: 1.0em }
</style>
</head>
<body bottommargin="0" leftmargin="0" rightmargin="0" marginheight="0"
marginwidth="0" topmargin="0">
72
ContentEmail in Marketing Cloud Engagement

<table width="600" cellpadding="0" cellspacing="0" border="0" align="center">
<tr>
<td valign="top" align="left"><font face="verdana" size="1"
color="#444444"><p>To view this email as a web page, go <a href="%%view_email_url%%"
alias="View as a Web Page"> here.</a></p></font></td>
</tr>
</table>
<div align="center" style="background-color: _fckstyle="background-color:
_fckstyle="background-color: _fckstyle="background-color: _fckstyle="background-color:
_fckstyle="background-color: _fckstyle="background-color: _fckstyle="background-color:
_fckstyle="background-color: _fckstyle="background-color: _fckstyle="background-color:
_fckstyle="background-color: _fckstyle="background-color: _fckstyle="background-color:
_fckstyle="background-color: _fckstyle="background-color: _fckstyle="background-color:
_fckstyle="background-color: _fckstyle="background-color: _fckstyle="background-color:
_fckstyle="background-color: _fckstyle="background-color: _fckstyle="background-color:
_fckstyle="background-color: _fckstyle="background-color: _fckstyle="background-color:
_fckstyle="background-color: _fckstyle="background-color: _fckstyle="background-color:
_fckstyle="background-color: _fckstyle="background-color: #333;">
<div id="cntr" align="left" style="background-color: _fckstyle="background-color:
_fckstyle="background-color: _fckstyle="background-color: _fckstyle="background-color:
_fckstyle="background-color: _fckstyle="background-color: _fckstyle="background-color:
_fckstyle="background-color: _fckstyle="background-color: _fckstyle="background-color:
_fckstyle="background-color: _fckstyle="background-color: _fckstyle="background-color:
_fckstyle="background-color: _fckstyle="background-color: _fckstyle="background-color:
_fckstyle="background-color: _fckstyle="background-color: _fckstyle="background-color:
_fckstyle="background-color: _fckstyle="background-color: _fckstyle="background-color:
_fckstyle="background-color: _fckstyle="background-color: _fckstyle="background-color:
_fckstyle="background-color: _fckstyle="background-color: _fckstyle="background-color:
_fckstyle="background-color: _fckstyle="background-color: #FFF;">
<div class="nav" style="height: _fckstyle="height: _fckstyle="height:
_fckstyle="height: _fckstyle="height: _fckstyle="height: _fckstyle="height:
_fckstyle="height: _fckstyle="height: _fckstyle="height: _fckstyle="height:
_fckstyle="height: _fckstyle="height: _fckstyle="height: _fckstyle="height:
_fckstyle="height: _fckstyle="height: _fckstyle="height: _fckstyle="height:
_fckstyle="height: _fckstyle="height: _fckstyle="height: _fckstyle="height:
_fckstyle="height: _fckstyle="height: _fckstyle="height: _fckstyle="height:
_fckstyle="height: _fckstyle="height: _fckstyle="height: _fckstyle="height: 50px;
width: 600px; background: #222 url('http://image.exct.net/8c953a0c-d.jpg');">
<table width="100%" cellpadding="0" cellspacing="4" border="0">
<tr>
<td valign="left"><strong>This email uses the new Social Forward
feature!</strong></td>
</tr>
</table></div>
<div class="cnt" style="border-bottom: _fckstyle="border-bottom:
_fckstyle="border-bottom: _fckstyle="border-bottom: _fckstyle="border-bottom:
_fckstyle="border-bottom: _fckstyle="border-bottom: _fckstyle="border-bottom:
_fckstyle="border-bottom: _fckstyle="border-bottom: _fckstyle="border-bottom:
_fckstyle="border-bottom: _fckstyle="border-bottom: _fckstyle="border-bottom:
_fckstyle="border-bottom: _fckstyle="border-bottom: _fckstyle="border-bottom:
_fckstyle="border-bottom: _fckstyle="border-bottom: _fckstyle="border-bottom:
_fckstyle="border-bottom: _fckstyle="border-bottom: _fckstyle="border-bottom:
_fckstyle="border-bottom: _fckstyle="border-bottom: _fckstyle="border-bottom:
73
ContentEmail in Marketing Cloud Engagement

_fckstyle="border-bottom: _fckstyle="border-bottom: _fckstyle="border-bottom:
_fckstyle="border-bottom: _fckstyle="border-bottom: 1px solid #CCC; margin: 1.0em">
<!-- RegionStart[ socialslot:"FacebookStandardIcon", title:"Facebook Standard
Icon", description:"Share to Facebook with Standard Icon"] -->
<p>Standard Facebook Icon</p>
<p><table cellspacing="0" cellpadding="0" align="left"><tbody><tr><td
align="right">Hi! </td></tr></tbody></table><strong>This content represents the
first shared social content slot.</strong></p>
<p><a
href="%%=GetSocialPublishURLByName('Facebook','US','FacebookStandardIcon')=%%"
alias="Social Forward to Facebook - standard icon" title="Publish to Facebook"><img
src="http://image.preview.exacttarget.com/lib/ffcf14/m/1/social_default_facebook_icon.jpg"
border="0" alt="Facebook" title="Facebook"></a></p>
<!-- RegionEnd[ socialslot:"FacebookStandardIcon"] -->
<!-- RegionStart[ socialslot:"FacebookCustomIcon", title:"Facebook with Custom
Icon", description:"Facebook with Custom Icon"] -->
<p>Custom Facebook Icon</p>
<p><table cellspacing="0" cellpadding="0" align="left"><tbody><tr><td
align="right">Hi! </td></tr></tbody></table><strong>This content represents the
second shared social content slot.</strong></p>
<p><a
href="%%=GetSocialPublishURLByName('Facebook','US','FacebookCustomIcon')=%%"
alias="Social Forward to Facebook - FacebookCustomIcon" title="Publish to Facebook"><img
src="http://image.preview.exacttarget.com/lib/ff66157875/m/1/facebook-alt.png"
border="0" alt="Facebook" title="Facebook"></a></p>
<!-- RegionEnd[ socialslot:"FacebookCustomIcon"] -->
</div>
</div>
</div>
<table cellpadding="2" cellspacing="0" width="600" border="0" align="center">
<tr>
<td valign="top" align="left" style="line-height: _fckstyle="line-height:
_fckstyle="line-height: _fckstyle="line-height: _fckstyle="line-height:
_fckstyle="line-height: _fckstyle="line-height: _fckstyle="line-height:
_fckstyle="line-height: _fckstyle="line-height: _fckstyle="line-height:
_fckstyle="line-height: _fckstyle="line-height: _fckstyle="line-height:
_fckstyle="line-height: _fckstyle="line-height: _fckstyle="line-height:
_fckstyle="line-height: _fckstyle="line-height: _fckstyle="line-height:
_fckstyle="line-height: _fckstyle="line-height: _fckstyle="line-height:
_fckstyle="line-height: _fckstyle="line-height: _fckstyle="line-height:
_fckstyle="line-height: _fckstyle="line-height: _fckstyle="line-height:
_fckstyle="line-height: _fckstyle="line-height: 16px;">
<p><font face="verdana" size="1" color="#777777">This email was
sent to: <b>%%emailaddr%%</b><br />
<a href="%%subscription_center_url%%" alias="Manage
Subscriptions">Manage Subscriptions</a> |
<a href="%%profile_center_url%%" alias="Update Profile">Update
Profile</a> |
<a href="%%unsub_center_url%%" alias="Unsubscribe">One-Click
Unsubscribe</a></p>
<p>This email was sent by: <b>%%Member_Busname%%</b><br
/>%%Member_Addr%% %%Member_City%%, %%Member_State%% %%Member_PostalCode%%
%%Member_Country%%</p>
74
ContentEmail in Marketing Cloud Engagement

<p>We respect your right to privacy - <a
href="http://email.exacttarget.com/ETWeb/company.aspx?id=80" alias="View Privacy Policy"
style="color: _fckstyle="color: _fckstyle="color: _fckstyle="color: _fckstyle="color:
_fckstyle="color: _fckstyle="color: _fckstyle="color: _fckstyle="color:
_fckstyle="color: _fckstyle="color: _fckstyle="color: _fckstyle="color: _fckstyle="color:
_fckstyle="color: _fckstyle="color: _fckstyle="color: _fckstyle="color:
_fckstyle="color: _fckstyle="color: _fckstyle="color: _fckstyle="color: _fckstyle="color:
_fckstyle="color: _fckstyle="color: _fckstyle="color: _fckstyle="color:
_fckstyle="color: _fckstyle="color: _fckstyle="color: _fckstyle="color: #0000ff">view
our policy</a></p>
</font>
</td>
<td width="145" align="right" valign="center"><a
href="http://www.exacttarget.com" title="This email is Powered By ExactTarget"
alias="Powered By"><img src="http://email.exacttarget.com/images/Powered_By_1206.jpg"
width="124" height="55" alt="This email is Powered By ExactTarget" border="0"
/></a></td>
</tr>
</table>
</body>
<custom name="opencounter" type="tracking">
</html>
Content Areas and Social Forward Tags
Email Studio Social Forward tags wrap content areas to allow sharing via social networks.
Content Area Wrapping
Use these tags used to wrap social content:
<!-- RegionStart[ socialslot:"Shared content region 1",
title:"First shared email content",
description:"This is an example of shared content",
csskey:"portfolio css 1"] -->
The first line begins the tag and names the social slot. This name is designates the content area for sharing. The second line creates a
title for social networks to use when identifying the shared content. The third line creates a short description that will be included in the
item posted to the social network. The fourth line identifies any CSS style sheet to use for the item when it is shared to the social network.
This tag identifies the end of the shared social content region:
<!-- RegionEnd[ socialslot:"Shared content region 1"] -->
The name in this tag must use the same value as the beginning tag.
Content Area Sharing
The application uses this AMPscript to create the link using the numeric indicator for Facebook:
<a href="%%=GetSocialPublishURL('1','Shared content region 1')=%%" alias="Social Forward
to ShareThis - SharePasteHTML" title="Publish to ShareThis"><img src="Go to your
75
ContentEmail in Marketing Cloud Engagement

Portfolio/Social Forward Folder and copy URL for the Social Forward Icon" alt="ShareThis"
border="0" title="Insert Title Here"></a>
In this example, replace the phrase Social Network with the number of the social network you wish to use and Shared content region 1
with the name of your shared social content region. You can also change the alias, alt, and titles to whatever is most appropriate for your
content. Finally, place the URL for the image you want to use in the link in the img src tag.
Use Standard and Custom Icons to Share Content
Social Forward uses a default set of icons to represent the social networks supported within Email Studio. You can alter the appearence
of icons to call attention to a section, such as changing the size or color of the icon. You can also alter the icon to better fit the design
of your email. These steps allow you to change the icons used in Social Forward in a specific message without alterting the default icons.
This task require familiarity with HTML and AMPscript to make full use of the Social Forward section.
1. Begin your email in Email Studio using a template or by revising an existing email.
2. Click a content box and select Create Content.
3. Choose an HTML content box and click Next.
4. Click the Insert menu and select the Social Forward Area... option.
5. Enter the Shared Content Slot name, Title, and Description. Choose a CSS stylesheet if you wish. Click OKwhen you're finished.
6. Paste either the Standard Icon or the Custom Icon Base HTML Mark-up inside the two HTML region tags. You can find that code in
the appropriate section below.
7. Paste the Social Specific HTML Mark-up wherever you want the icon to be located. We recommend placing it as close to the content
to be shared as possible for best results, but you can locate the code anywhere in the email. Make sure the content slot name matches
in the region tags and the code.
Example: This example shows a standard email using content boxes to share content with a standard Facebook icon:
The Base HTML Mark-Up contains the general content in the box:
<p>Standard Facebook Icon</p>
<table cellspacing="0" cellpadding="0" align="left">
<tbody>
<tr>
<td align="right"><a href="https://example.com" conversion="false" title=""
alias="">Share this link using the Facebook icon!</a></td>
</tr>
</tbody>
</table>
<p>This link takes you to Example.com.</p>
The Social Specific HTML Mark-Up contains the content specific to sharing the content in the box. Make sure the content slot name
in the GetSocialPublishURL() function matches the name you gave your content slot in the Create Your Email steps.
<p><a href="%%=GetSocialPublishURL('1','StandardFacebookShare')=%%" alias="Social
Forward to Facebook" title="Publish to Facebook"><img
src="http://image.preview.exacttarget.com/lib/ffcf14/m/1/social_default_facebook_icon.jpg"
border="0" alt="Facebook" title="Facebook"></a></p>
This example shows a standard email using content boxes to share content with a custom Facebook icon.
76
ContentEmail in Marketing Cloud Engagement

The Base HTML Mark-Up contains the general content in the box.
<p>Custom Facebook Icon</p>
<table cellspacing="0" cellpadding="0" align="left">
<tbody>
<tr>
<td align="right"><a href="https://example.com" conversion="false"
title="" alias="">Share this link using the Facebook icon!</a></td>
</tr>
</tbody>
</table>
<p>This link takes you to Example.com.</p>
The Social Specific HTML Mark-Up contains the content specific to sharing the content in the box. The difference between this
Mark-Up and the Standard Icon Social Specific Mark-Up is the URL specified in the img src="" tag. Make sure the content slot name
in the GetSocialPublishURL() function matches the name you gave your content slot in the Create Your Email steps.
<p><a href="%%=GetSocialPublishURL('1','CustomFacebookShare')=%%" alias="Social
Forward to Facebook" title="Publish to Facebook"><img
src="http://image.preview.exacttarget.com/lib/ff66157875/m/1/facebook-alt.png"
border="0" alt="Facebook" title="Facebook"></a></p>
Create a Content Area for Each Social Network
Follow these steps to create a content area distributed via Social Forward in Email Studio for each social network.
1. Click Content.
2. Click my contents, then click Create Content.
3. Enter the name of your content box, choose the location of your content, then click Next.
4. Choose the content box of your choice, select the type of content you wish to enter, then enter your content.
5. Click the Edit menu and select Social Properties. Choose the Allow Content To Be Shared checkbox.
6. Enter the name of the shared content slot and the title and description of the web page to be shared. You can also select a CSS
stylesheet to modify the appearance of the shared web page.
7. Click OK.
8. Click the Insert menu and choose Social Forward.
9. Select the social network with which you want to share the social content slot and choose the appropriate content slot in the
dropdown menu. Click OK when you finish.
10. Click Save.
11. Repeat these steps for each social network or combination of social networks with which you want to share content.
Be sure to create a default content section in case a subscriber doesn't have a social network preference or has listed a preference
for which you haven't created content.
Set Up the Dynamic Content Area
Follow these steps to set up the dynamic content area for sharing to different social networks in Email Studio.
1. In your email, click the content area you want to hold the dynamic content, then choose Create Dynamic Content.
77
ContentEmail in Marketing Cloud Engagement
2. In the drop-down menu in the Dynamic Content window, choose the subscriber list or sendable data extension that contains the
SocialNetwork attribute.
3. In the Default Content section, click Browse and select the content displayed if there are no matches for a subscriber's preferred
social network.
4. For the dynamic content rules, click the first drop-down menu and choose Social Network.
5. In the second drop-down menu, select Is Equal To.
6. In the third drop-down menu, select the social network for the created content area.
7. Click Browse under the rule and select the content that corresponds to the social network you chose.
8. Click Add Rule and add another rule for each social network for which you have content.
9. When you have covered all of your social networks, click OK. The dynamic content area will display the default content you have
specified.
The email displays the correct dynamic content area based on the subscriber's preference from the subscriber list or sendable data
extension.
Share Content to Different Social Networks Dynamically
Use preferences from a data extension or subscriber list to determine which social network icons appear in the email for use with Social
Forward in Email Studio. Using dynamic content in conjunction with Social Forward allows you to determine which subscribers receive
certain content and where they can share that content.
This example assumes that you have an attribute in a subscriber list or sendable data extension named SocialNetwork. The information
contained in that attribute for each subscriber determines which social network icon that subscriber views. You should also be familiar
with creating and using dynamic content.
Depending on your subscribers' preferences, they may prefer to use only certain social networks to share content. Subscribers may also
maintain accounts on only certain social networks and will not use additional icons included in their emails. You can share different
content areas with users depending on their SocialNetwork attribute value
Change Default Social Network Icons
Follow these steps to change the default social network icons for Social Forward in Email Studio.
1. Create your custom icon and save it as a .jpg file. All icons require .jpg files except for ShareThis, which uses a .gif file.
2. In the Social folder of Portfolio, right-click on the image to change and save the image to your computer. Keep this image as a backup
in case you want to reuse it later.
3. Delete the image in the Social folder.
4. Click Single Upload, choose the new image file, and enter the name and external key for your image. Make sure this information
matches the information for the previous image exactly.
5. Click OK when done.
Apply a CSS File from Portfolio to Shared Content
When IDs receive multiple attributes from different style sheets or instances in the same style sheet, the resulting landing page may not
appear as you expected. For best results, create a dedicated style sheet that provides the CSS for the landing page. This step prevents
problems with cascading attributes from multiple style sheets.
Be sure to test your landing page in multiple browsers to make sure the page appears according to your specifications. This step helps
you avoid problems later when your subscribers view the pages in an environment different than the one you used for creating.
78
ContentEmail in Marketing Cloud Engagement

1. Create your email content.
2. Click Edit and choose Social Properties.
3. Choose the Allow Content To Be Shared checkbox and enter the information in each field.
4. For the Stylesheet (CSS) field, locate the style sheet to apply to the shared content slot after it has been published to a social network.
5. Click OK.
6. Click Insert, then choose Social Forward.
7. Choose the checkboxes next to the links for the social networks to include in your email content area.
8. Select the content area to associated with these networks from the Associate with Shared Content Slot dropdown menu.
CSS Files and Shared Content in Social Forward
Assigning a CSS file to your shared content allows you to better dictate how your content will appear on social networks. You can specify
how certain elements in your message will appear when shared using CSS, and storing the file in your Email Studio Portfolio gives you
a central location for managing the appearance of your content.
Be familiar with Shared Content, HTML, CSS, and AMPscript in order to use the information in this example. The CSS style sheet specified
by Social Forward affects how that content is displayed after the content has been shared. You must upload your desired style sheet to
the Social folder on your Portfolio.
CSS and Social Forward
Social Forward allows you to attach a CSS style sheet to shared social content slots in your email. This style sheet does not affect the look
of the email itself, but it changes the appearance of the content once that content has been shared on a social network:
•
Font families and sizes
•
Headers and footers
•
Simple injection of text, but not HTML
•
Show or hide DIV tags
Social Forward does not permit CSS to use or perform these actions:
•
Conditional logic
•
Inserting rich content or content from your Portfolio
•
Placing additional links in your content
Location/DescriptionID
The ID hdr refers to the header of the landing page. It contains
hdrLogo on the left and hdrText to the right of the logo.
#hdr
The ID hdrLogo is inside hdr and determines the logo displayed in
the header.
#hdrLogo
The ID hdrText is inside the ID hdr and to the right of the ID
hdrLogo. Enter the text for the header in the Title field of the
#hdrText
Content Area Properties window. You can open that window in
Email Studio by clicking Edit>Social Properties while modifying
a content area.
79
ContentEmail in Marketing Cloud Engagement

The ID cntnr container includes the container with ID contentCntnr
and the ID ftr below that. The ID contentCntnr includes the ID text
#cntnr and #contentCntnr
with both a header (h1) with the description and a paragraph (p)
with the shared content.
The ID #text defaults to a 600px wide div with both a header (h1)
with the description and a paragraph (p) with the shared content.
#text
The ID #text h1 inside of the ID text refers to the heading in the
whitespace underneath the header bar. Enter the text for the
#text h1
header in the Description field of the Content Area Properties
window. You can open that window in Email Studio by clicking
Edit>Social Properties while modifying a content area.
The ID #text p refers to the content in the whitespace under the
ID #text h1 but above the footer (which is shown as a line with
#text p
Privacy Policy below the line, in this case). This text is taken from
the shared social content slot.
The ID ftr refers to the footer div of the landing page. It is contained
within the ID cntnr. This example customizes the logo on the page
#ftr
with the published shared content, along with other changes to
the look and feel
Example: In this example, the CSS performs this styling:
•
Creates, sets, and aligns a background for the header (#hdr)
•
Sets and aligns a logo for the header (#hdr #hdrLogo)
•
Modifies the format of the title text (#hdrText) contained within the header
•
Changes the text style in the social slot description (#cntrn #text h1)
•
Modifies the style of the social slot shared content (#cntnr #text p)
•
Changes the style of the footer (#ftr) and footer Privacy Policy link (#ftr a)
#hdr {
background: #9ccdcf
url('http://image.preview.exacttarget.com/lib/ff66157875/m/1/BxTgtBckGnd.gif') repeat-x;
background-position: bottom left;
border-bottom: 7px solid #dad6d3;
}
#hdr #logo {
display:block;
background-image:
url('http://image.exct.net/lib/fef51d73776c00/m/1/thumb/png/CSSLogo.jpg');
width: 100px;
height: 50px;
background-repeat: no-repeat;
background-position: top left;
}
#hdr #hdrText {
80
ContentEmail in Marketing Cloud Engagement

font-size: 25px;
color: #FFF;
padding: 35px 7px;
}
#cntnr #text h1 {
font-size: 18px;
color: #56999D;
line-height: 23px;
}
#cntnr #text p {
font-size: 14px;
line-height: 18px;
}
#ftr {
padding: 15px 15px 15px 0;
border-top: 1px solid #AAA; margin: 15px 0 0 0;
}
#ftr a {
color: #8bb6b8;
font-weight: bold;
padding: 7px;
text-decoration: none;
}
#ftr a[class=rnd]
{ -moz-border-radius: 7px;
border-radius: 7px;
-webkit-border-radius: 7px;
}
#ftr a:Hover
{ background-color: #EEE;
color: #444;
}
.clr { clear: both; }
Sample Tracking Queries for Social Forward
These queries allow you to obtain tracking information, such as content impressions and shared content slots, regarding the information
you shared through the Social Forward function. Use these sample tracking queries below in your Automation Studio query activities
to obtain the specified information. View the information in the resulting data extension.
Count All Shared Content Impressions
This query provides a count of page views of the shared content grouped by Job ID. Create an Automation Studio query activity with
this string:
81
ContentEmail in Marketing Cloud Engagement
SELECT s.JobID, s.SocialSharingSiteID, s.SiteName, COUNT(s.JobID) AS TotalImpressions
FROM _SocialNetworkImpressions s GROUP BY s.JobID, s.SocialSharingSiteID, s.SiteName
Get All Shared Content Impressions
This query provides information on each page view of the shared content. Create an Automation Studio query activity with this string:
SELECT s.JobID, s.SocialSharingSiteID, s.SiteName, s.TransactionTime AS EventDate FROM
_SocialNetworkImpressions s
Get All Shared Content Slots
This query provides information on the content which has been shared, along with who shared the content. Create an Automation
Studio query activity with this string:
SELECT s.JobID, s.SubscriberID, s.SocialSharingSiteID, s.SiteName FROM _SocialNetworkTracking s
Email Attachments
Use Email Studio to send email attachments that aren’t included in the main body of an email. The recipient can open and save the
attachment independently of the email message.
You can send a file as an attachment to your email jobs, but keep in mind that attaching certain file types or extremely large files can
cause deliverability problems and reduce the effectiveness of your message. Email Studio can include images in email content. Therefore,
you don’t need to attach an image to an email to have it appear. Use email attachments for files intended for use outside of the email,
such as documents that you want the subscriber to review or download.
Prerequisites
Contact your account executive to enable this feature for your account. You must be familiar with AMPscript to send emails with
attachments. Your account executive can also adjust the threshold of errors that cause the send job to stop prematurely. Adjusting the
threshold can prevent a single error from stopping the entire job.
Where to Store Your Email Attachments
You can attach files to your emails from three different locations.
•
Content Builder
•
Your Marketing Cloud Engagement FTP location
•
A separate website
To attach a file from a separate website, include the full URL of the site in the AttachFile AMPscript function. For a Marketing Cloud FTP
attachment, enter the name of the file located in the Import section of your FTP site. If the files aren’t available at send time, you receive
an error.
Deciding Which File Types to Send
Although you can attach ZIP and RAR files, many email systems either strip these files from the message or block the message for security
purposes. Compressed files have been used to send viruses, worms, and other malware.
To ensure that a compressed file reaches your subscribers, place the file on a separate web server and include a link to the file in your
email.
82
ContentEmail in Marketing Cloud Engagement
Mailbox Size Limits
Many email systems apply quotas on email account storage space. Files greater than 1 MB can strain limits and prevent messages from
reaching a subscriber. To avoid problems with mailbox size limits, security issues, and send speeds, attach the smallest possible file.
Attaching several small files affects emails the same way as a single large file. As the total size of an email increases, it takes more time
to send. Email systems evaluate the message as a whole, so keep the number of attachments to a minimum to ensure better deliverability.
Security Issues
Files attached from your FTP site or an external URL aren’t scanned for viruses, so make sure that the file is free of security issues.
Tracking Email Attachments
Marketing Cloud tracks email with attachments the same as regular email messages for opens, clicks, bounces, and similar information.
However, Marketing Cloud can’t track whether the subscriber opened the attachment or clicked links inside the document. Tracking
information pertains to the actual email message and not the attachment.
Classic Content Retirement
Email Studio Classic Content was retired during the Marketing Cloud Engagement Spring ’23 release. To create and edit emails and
templates, use Content Builder, which includes functionality not available in Classic Content. Content Builder tools are also more secure
and flexible.
Use these resources to learn about Content Builder features.
•
Salesforce Help: Content Builder
•
Salesforce Help: Get Started with Content Builder
•
Salesforce Help: Content Builder Editor Best Practices and Tips
•
Salesforce video: Email Studio and Content Builder Marketing Cloud Basics
•
Recorded webinar: Marketing Cloud New Email Studio for Admins
•
Recorded webinar: Marketing Cloud New Email Studio for All Users
For more information, see Marketing Cloud - Classic Content Retirement.
Subscribers
A subscriber is a person who has opted to receive communications from your organization. You must have a valid email address for each
subscriber who receives emails. For each subscriber who receives SMS messages, you must have a valid phone number. You can track
additional information about subscribers using profile and preference attributes. Use the subscriber key to identify your subscribers in
Marketing Cloud Engagement. Create lists or data extensions to store your subscribers. Store email subscriber information in lists or data
extensions, and store SMS subscriber information in data extensions only. To segment your subscribers, create as many lists and data
extensions as you need. You populate the information in the lists and data extensions when you add or import subscribers.
There are several different ways to add subscribers:
•
Use the subscriber import wizard.
•
Use the Automation Studio import activity.
•
Create a subscriber manually.
•
Capture subscriber information through a Smart Capture form.
83
SubscribersEmail in Marketing Cloud Engagement
Use groups and data filters to further segment subscribers. When you send a message, you select the list, data extension, or groups to
receive the message.
Get Access to Enhanced Segmentation and Subscriber Features
Get access to enhanced segmentation and subscriber features in Email Studio.
Enhanced Subscribers in Email Studio
Subscribers functionality with the enhanced subscriber features enabled in Email Studio.
Classic Subscribers in Email Studio
Learn more about subscribers functionality when the enhanced subscriber features enabled in Email Studio for Marketing Cloud
Engagement.
Send Logging in Email Studio
Use send logging in Email Studio to obtain run-time information about email send attributes for use in reports and data extracts.
You can also use information in your send log to provide information for highly available clicks. Send logging gives you access to
data not available via standard tracking functions. You can specify how long that information remains available depending on your
data retention needs.
Email Studio Web Collect
Web Collect is Email Studio's sign-up form functionality that allows your subscribers to subscribe, provide attribute information, or
unsubscribe from your communications on your website.
List Detective
List Detective is a tool that maintains information on email addresses and domains that could cause deliverability problems for your
email sends. This includes email addresses that are known spam traps (inactive addresses used by domains to identify spammers)
and domains that no longer provide email services.
Email Studio Welcome Emails
Welcome emails are the most opened emails among subscribers and often the first impression of your company's email marketing.
Send an Email Studio welcome email when a subscriber is added or joins a list. The Welcome Email feature doesn’t support imports,
manually created subscribers, Smart Capture, or API.
Email Studio List vs. Email Studio Data Extension
Learn about when to use a list versus a data extension in Email Studio.
Unsubscribes
Learn about unsubscribes in Email Studio and Marketing Cloud Engagement.
How a Subscriber Opts Out
Learn how a subscriber opts out in Email Studio.
Bounce Mail Management in Email Studio
Learn about bounce mail management in Marketing Cloud’s Email Studio.
Forward to a Friend
Forward to a Friend is an image you add to emails you send to your subscribers. When subscribers want to share the information in
your email with friends, they click the image and fill out the form.
Get Access to Enhanced Segmentation and Subscriber Features
Get access to enhanced segmentation and subscriber features in Email Studio.
1. In Email Studio, click either Lists, Groups, Data Extensions, or Data Filters under Subscribers.
2. Click Learn More on the banner.
84
SubscribersEmail in Marketing Cloud Engagement

3. Read through the content then click Get It Now.
Note: If you don’t see Get It Now, contact your account administrator.
Enhanced Segmentation and Subscriber Features FAQ
Read about frequently asked questions with drag-and-drop segmentation and enhanced subscriber features in Email Studio.
Enhanced Segmentation and Subscriber Features FAQ
Read about frequently asked questions with drag-and-drop segmentation and enhanced subscriber features in Email Studio.
What is enhanced segmentation?
Enhanced segmentation provides a simple way to filter your subscriber base to send targeted and relevant messages to your subscribers.
Is there a cost associated with enhanced segmentation?
No, there is no cost associated. It is available for all Email Studio users.
How can I get access?
Account administrators are able to opt in to enhanced segmentation and all users within the account also get access to the enhanced
features. Once you opt in to enhanced segmentation, you can’t return to previous segmentation methods.
How does access work for Enterprise and Agency accounts?
At the top level, an account administrator enables access for all child accounts (business units, lock and publish accounts, and agency
clients). If the administrator does not want all child accounts to have access, they would log in to each child account(s) and opt in to for
the enhanced features for that specific account(s).
85
SubscribersEmail in Marketing Cloud Engagement
How does access work for new clients?
New accounts are automatically enabled for enhanced segmentation.
When I opt in for access, do I need to do anything else to get these enhancements?
Once the account administrator opts in for access to enhanced segmentation, the administrator logs out and log back in to see the
changes applied.
Is this tool available in all Email Studio editions?
Yes, enhanced segmentation is available in all Email Studio editions.
Do I have to use enhanced segmentation, or can I still use the current methods for segmenting subscribers?
If an administrator opts in for access, all users must use the enhanced segmentation. You can’t return to previous methods.
When I opt in for access, what is different?
From a user's experience, the screens provide a much more consistent look and feel to Marketing Cloud Engagement. You gain access
to enhanced segmentation and improved lists, data extensions and data filters view, and updated list, data extension, and data filter
details pages.
Are there any existing features not available with enhanced segmentation?
You can no longer create a random group based on a constant interval. You can continue to create a random group.
Enterprise 2.0 accounts and business units don’t automatically have group rules created as data filters. Instead, specify which groups
you want saved as data filters and edit the group directly rather than editing the data filter.
What happens to existing groups and data filters previously created?
Refresh and use existing groups and data filters in sending and automations. Edit existing groups and data filters using the enhanced
segmentation.
What are the different types of data extensions a user can create?
•
Standard Data Extension: Create custom fields to store data using a standard data extension.
•
Filtered Data Extension: Filter fields, measures, and filters for sendable data extensions from a source data extension to generate a
filtered data extension.
•
Random Data Extension: Randomly select subscribers from a source data extension using a random data extension.
Can I create a filtered data extension from another filtered data extension?
No. Create, a filtered data extension from a standard data extension. Use one of these alternative solutions to accomplish the same result
as creating a filtered data extension from another filtered data extension:
•
Create a filtered data extension from a saved or existing data filter. For example, if specific filter rules are used frequently, save the
rule as a data filter and continually use this saved data filter as a starting point for filtered data extensions.
•
Copy an existing data filter. Use the copied data filter as a starting point for a new data filter. Edit the new data filter and add rules.
Filtered data extensions created before enhanced segmentation, from other filtered data extensions, are supported and can be modified.
86
SubscribersEmail in Marketing Cloud Engagement
Are previously created data filters still accessible?
Yes, previously created data filters are accessible. Edit existing data filters using the enhanced segmentation and used them to create
new filtered data extensions. Data filters previously created from filtered data extensions are supported, but creating a new data filter
from a filtered data extension isn’t supported with the enhanced segmentation functionality. See previous question and answer for the
new method.
How can I build a filtered data extension on an existing data filter?
Navigate to your existing Data Filter and click the name to open it. Click Create Data Extension. Follow the steps to enter a name and
description, and choose the location for your filtered data extension. Click Save to create your new filtered data extension.
Why can I no longer make changes to filtered data extensions, such as edit the data extensions field names,
add new field names, and change a filtered non-sendable data extension to filtered sendable data extension
or vice versa?
In addition to profile and preference attributes, you can drag existing data filters to create groups. Create a new data filter using the
existing data filter tool or save a group's rules as a data filter.
•
The new interface provides a better view of the relationship between the original data extension (source) and the filtered data
extension (results of a filter). With the previous interface you could edit field names and add new field names to the filtered data
extension, but when the filter activity ran again, the filtered data extension reverted back to the original data extension configurations.
•
The filtered data extension adopts the same characteristics as the source data extension, in the new, simplified drag and drop
interface. To make a filtered data extension sendable, change the source data extension to sendable. To make a filtered data extension
non-sendable, change the source data extension to non-sendable.
How can I build a group based on an existing data filter?
In addition to profile and preference attributes, drag existing data filters to create groups. Create a new data filter using the existing data
filter tool or save a group's rules as a data filter.
Are previously created data filters still accessible?
Yes, previously created data filters are accessible.
Where are all data extension types saved?
Filtered, random, and standard data extensions are saved in the same location within the data extensions folder.
Are automations affected by using enhanced segmentation?
No, automations aren’t affected.
Are query activities affected by using enhanced segmentation?
No, query activity functionality isn’t changed.
What happens when new subscribers are added to your original list? (Do I need to refresh Groups?)
The same functionality for groups still applies. (Yes, new subscribers are only added after a refresh).
87
SubscribersEmail in Marketing Cloud Engagement
Can I use mixed operators with groups?
Yes, you can use mixed operators with groups using enhanced segmentation.
Can I use data filters with different source lists?
Yes, use data filters with different source lists.
Can I segment for blank values or non-blank values?
Rather than using our existing work-around of creating a group with the operator exists in or not exists in followed by ,””, you can
select the operator is empty or is not empty. Your existing groups that use the work-around are converted to the new operators.
Enhanced Subscribers in Email Studio
Subscribers functionality with the enhanced subscriber features enabled in Email Studio.
1. Subscribers with Enhanced Subscriber Features
Include the subscriber's email status when exporting individual subscriber data or when exporting an entire subscriber list in Email
Studio for Marketing Cloud Engagement. You can also filter subscriber searches by status from the all subscribers list and the lists
subscriber tab.
2. Lists with Enhanced Subscriber Features
Learn about enhanced subscriber lists in Email Studio for Marketing Cloud Engagement.
3. Groups with Enhanced Subscriber Features in Marketing Cloud Engagement
The information in this document applies to accounts with the enhanced subscriber features. Refer to Groups with Classic Subscriber
Features if your account doesn’t have enhanced subscriber features enabled in Email Studio.
4. Data Extensions with Enhanced Subscriber Features in Marketing Cloud Engagement
Use data extensions with Email Studio to satisfy the need for flexible data storage. Using data extensions requires an understanding
of relational database structures and other technical expertise.
5. Data Filters with Enhanced Subscriber Features in Marketing Cloud Engagement
A data filter is a group of criteria that segments a subscriber list or data extension. You can segment a subscriber list or data extension
using data filters and use the segments during an automation. Data Filters can be used with accounts that have enhanced subscriber
features turned on in Email Studio.
6. All Subscribers List in Email Studio
The All Subscribers list is considered the main list of records for the Email Studio account. Every subscriber in your account appears
in the All Subscribers list. Subscribers added to a subscriber list join the All Subscribers list at the same time. Subscribers stored on
data extensions join the All Subscribers list when you send your first message to that subscriber. If a subscriber is unsubscribed in
the All Subscribers list, the subscriber is unsubscribed from all lists and groups. When a subscriber is set back to active on the All
Subscribers list, the subscriber must also opt in for any other list and group separately. A subscriber can be unsubscribed on lists and
groups and be active on the All Subscribers lists.
7. Exclusion Lists in Marketing Cloud Engagement
An exclusion list is any list, group, or data extension you create in the application that at the time of send you select to exclude from
the send. If your Email Studio account has subscriber key enabled, the system excludes using the subscriber key value. If your account
does not have subscriber key enabled, the system excludes using email address.
88
SubscribersEmail in Marketing Cloud Engagement

8. Publication Lists in Email Studio
Use publication and suppression lists to manage opt-ins for your email account in Email Studio. Use either publication lists or
suppression lists to control how subscribers receive your sends. Choose a publication list when sending email messages and SMS
messages to a sendable data extension.
9. Suppression Lists in Email Studio
You can use suppression and publication lists to manage opt-ins in Email Studio for Marketing Cloud Engagement. Use publication
lists when you send email and SMS messages to a sendable data extension. Use suppression lists with guided, user-initiated, and
triggered email sends.
10. Profile and Preference Attributes in Email Studio
Email Studio uses profile and preference attributes to store information about subscribers. The profile attribute contains information
to characterize a subscriber profile. For example, each subscriber is asked to provide their birth date and email address. By default,
every account has three profile attributes: Full Name, Email, and UserDefined, which is intended as a generic attribute that you can
use as needed. By default, every account also receives an HTML Email preference attribute that is set to Yes. You can’t modify these
attributes.
11. Subscriber Key in Marketing Cloud Engagement
A subscriber key is a text field that contains a value that uniquely identifies a subscriber in Marketing Cloud Engagement. A subscriber
key is limited to 254 English characters. Avoid using email addresses as subscriber keys.
12. Profile Center for Marketing Cloud Engagement
The Profile Center is a web page where subscribers enter and maintain the personal information that you keep about them. When
you import a list in Email Studio, you can import attribute values for your subscribers. Subscribers can see this information in the
Profile Center and update and add to it. Every email that you send through Email Studio contains a link to the Profile Center for
subscribers to use.
13. Preview the Subscription Center
You can view the Subscription Center through Email Studio Profile Center in Marketing Cloud Engagement.
14. Send to a List in Email Studio
Send to a subscriber list with enhanced features in Email Studio for Marketing Cloud Engagement.
Subscribers with Enhanced Subscriber Features
Include the subscriber's email status when exporting individual subscriber data or when exporting an entire subscriber list in Email Studio
for Marketing Cloud Engagement. You can also filter subscriber searches by status from the all subscribers list and the lists subscriber
tab.
Note: This information applies to accounts with the enhanced subscriber features enabled.
You must have a valid email address for each subscriber you plan to send an email to. A valid email address:
•
is less than 100 characters long
•
has no leading or trailing spaces
•
contains only supported ASCII characters
89
SubscribersEmail in Marketing Cloud Engagement

ExplanationStatusColor Code
A subscriber who meets either of these
criteria is considered active.
ActiveGreen
•
No activities have occurred to make the
subscriber's status bounced,
undeliverable, unsubscribed, or deleted.
•
A subscriber whose status was bounced
or undeliverable is recorded as having
opened or clicked through a received
email. In this case, the system changes
the subscriber's status back to active.
A subscriber who meets the following
criteria is considered bounced.
Bounced (Returned)Yellow
•
One or two soft bounces are received
for the subscriber.
•
One hard bounce is received for the
subscriber.
A subscriber who meets the following
criteria is considered held (undeliverable).
Held (Undeliverable)Gray
•
Three hard bounces or three soft
bounces are received for the subscriber
and at least 15 days have passed since
the first bounce.
If the bounce was from a trusted
domain, only one hard bounce is
required. For the most current list of
trusted domains, contact
A subscriber who meets any of the following
criteria is considered unsubscribed:
UnsubscribedRed
•
The subscriber has requested to be
removed from a single list, multiple lists,
or all lists. The subscriber's status is
changed to unsubscribed for the
selected lists or at the all subscribers
level.
•
An Engagement user manually
unsubscribes a subscriber on a list, thus
changing the status to unsubscribed for
that list.
90
SubscribersEmail in Marketing Cloud Engagement

ExplanationStatusColor Code
•
The subscriber submitted an AOL spam
complaint. In this case, the subscriber's
status is changed to unsubscribed at
the all subscribers level.
A subscriber who meets either of the
following criteria is considered deleted:
Deleted
•
An Engagement user deleted a
subscriber from a list other than the all
subscribers list. In this case, the
subscriber's status for that list only is
deleted.
•
An Engagement user has deleted a
subscriber from the all subscribers list.
In this case, the subscriber's global
status is deleted.
Note: We do not recommend
deleting subscribers. To prevent
sending to a subscriber in a future
send, update the subscriber's status
to unsubscribed.
Add a Subscriber Manually
Create Subscriber steps you through defining an individual subscriber in Email Studio. When you add one subscriber, you have the
option of creating another individual subscriber with the same attribute selections. This information applies to accounts with the
enhanced subscriber features enabled. If your account doesn’t have this feature enabled, refer to Subscribers without Enhanced
Subscriber Features.
Imports
Import data into Email Studio to build subscriber lists.
Search for a Subscriber
Search for a subscriber using enhanced subscriber features in Email Studio for Marketing Cloud Engagement.
Access Subscriber Properties in Marketing Cloud Engagement
Learn how to access subscriber properties in Email Studio.
Modify Subscriber Data in Marketing Cloud Engagement
View subscriber data and modify subscribers from subscriber properties in Email Studio. Regardless of where you access subscriber
properties, changes you make take effect throughout the application.
Export Email Studio Subscribers by Status
You can export subscribers based on subscriber status in Email Studio. This information applies to accounts with the enhanced
subscriber features enabled. To export subscribers, account admin role or permission to access lists is required.
Update Subscriber Status
Although it is possible to update a subscriber status in Marketing Cloud Engagement, it is discouraged.
91
SubscribersEmail in Marketing Cloud Engagement

Delete a Subscriber from Marketing Cloud Engagement
Use Delete Subscriber to delete a subscriber in Email Studio.
Import File Requirements for Email Studio
To ensure compatibility with Email Studio in Marketing Cloud Engagement, import files have some detailed requirements.
SEE ALSO:
Subscribers without Enhanced Subscriber Features
Add a Subscriber Manually
Create Subscriber steps you through defining an individual subscriber in Email Studio. When you add one subscriber, you have the
option of creating another individual subscriber with the same attribute selections. This information applies to accounts with the enhanced
subscriber features enabled. If your account doesn’t have this feature enabled, refer to Subscribers without Enhanced Subscriber Features.
Note: If you're using a reseller or enterprise account and have enabled unsubscribe management, you can’t add email addresses
that appear on the Marketing Cloud Engagement global unsubscribe list or your account-level unsubscribe list.
1. Click Subscribers.
2. Click Lists.
3. Click the name of a list you’re adding the subscriber to.
4. Click Create.
5. Click Next in the wizard's introductory dialog box.
6. Complete the subscriber identity fields.
•
Enter the full email address of the subscriber.
•
Click one of the profile attributes defined in your account to activate its data entry field.
–
If the attribute is set to accept specific values only, the data entry field is a drop-down list from which you select the desired
value. Otherwise, the data entry field is a text box.
–
If a default value is defined for the attribute, that value is displayed in the data entry field.
–
Profile attributes displayed in red are required fields. Continue with the Create Subscriber wizard once these fields are
completed.
•
Select or deselect one of the corresponding preference attributes as appropriate for this subscriber.
Note: For Enterprise Accounts, Channel Name is a required attribute field for all subscribers in your Enterprise administrator
account. Associate each subscriber with an On Your Behalf account.
7. Click Next.
8. Expand the My Lists folder to view the lists defined in your account.
Note: If the email address you entered exists in your account, a prompt appears with the option for you to view the existing
subscriber's properties. To continue, enter a different email address for your new subscriber.
9. To add the subscriber to lists, select each list. If you opened the wizard from a particular list, that list is already selected. Deselect it
if desired.
Note: Every subscriber is added to your main All Subscriber list. Leave all other lists deselected if you don’t want to add the
subscriber to any of your accounts' lists.
92
SubscribersEmail in Marketing Cloud Engagement

10. Click Finish when done choosing lists.
11. Create another individual subscriber if needed.
a. To start with a copy of the profile and preference attributes you defined for the previous subscriber, select Use attribute values
from previous subscriber, and click Create.
b. To start from scratch, click Create.
12. When you’re done creating subscribers, click Finish.
Your new subscriber exists in your All Subscribers list and in any lists you selected in the wizard.
Note: The subscriber isn’t automatically added to groups. If the subscriber's profile or preference attributes would make the
subscriber eligible for a filtered group, refresh the group to add the subscriber.
SEE ALSO:
Profile and Preference Attributes in Email Studio
Imports
Import data into Email Studio to build subscriber lists.
When importing subscribers, the system logs the following results for you to review.
•
Filename of your import file.
•
ID of the list into which the subscribers were imported.
•
Number of subscribers imported.
•
Number of existing subscribers updated with new data.
•
Number of records in your import file that were not imported.
•
Data fields for each subscriber record that could not be imported, along with the reason the import was unsuccessful.
If you chose to be emailed upon completion of the import, the email includes a log file in the same format as your import file, .txt or .csv,
with information about the skipped records. The body of the email itself summarizes the import results.
If you don’t choose to be emailed upon completion of the import, the final dialog box of the Import Subscriber Wizard provides a
summary of results and offers the option of downloading a detailed log file in the same format as your import file, .txt or .csv.
Note: Review the log file to see why certain records were skipped.
Here are some examples of why the application is unable to import a record:
•
The email address is unrecognizable. For example, the @ symbol is missing or the period after the domain name is missing (domaincom
versus domain.com).
•
The data mapped to an attribute with restricted values doesn’t match any of the possible values defined for the attribute.
•
The data mapped to an attribute isn’t the same data type as the attribute. For example, the import file contains $1000 for an attribute
defined as numeric, which accepts numbers only and no symbols.
Import Subscribers from a File
You can import email subscribers to Email Studio in Marketing Cloud Engagement by uploading a CSV file.
Import File Requirements for Marketing Cloud
Add subscribers by placing the data using specific columns before importing. Ensure that the file meets the proper requirements
to successfully import the subscriber data into Email Studio.
93
SubscribersEmail in Marketing Cloud Engagement

Import Microsoft Outlook Contacts
You can use Marketing Cloud Engagement to send emails to the contacts you keep in Microsoft Outlook. In Outlook, prepare and
export the contacts who have given you permission to send marketing messages. Then, import the contact data into Email Studio.
Import Subscribers from a File
You can import email subscribers to Email Studio in Marketing Cloud Engagement by uploading a CSV file.
Note: When you're using a Reseller or Enterprise account enabled with the limited-release Unsubscribe Management feature,
email addresses appearing on the global unsubscribe list or your account-level unsubscribe list aren’t imported.
•
Create a subscriber list.
•
Review the recommendations for configuring and correctly formatting the import file.
1. Choose Subscribers.
2. Open the My Lists folder. If you've created a list subfolder under My Lists in which you want to import the new subscribers, choose
that subfolder.
3. Double-click the desired list or select the list, then choose Open List.
4. Choose Import, which opens the Import Subscriber wizard.
5. Choose Next in the wizard's introductory dialog box.
6. Read the content of the Opt-in Certification dialog box that appears next.
a. If you’ve verified that every subscriber in your import file has agreed to receive emails from you, choose I agree, then Next.
7. Complete the Identify Source File dialog box:
•
Upload Source - The import wizard shows you 2 upload options: Your Computer and FTP. To use a file that you've uploaded to
the FTP site, type the file name in the FTP field. See the Enhanced FTP Guide for details on using the FTP option. If the file you
want to import is on your hard drive, click the Browse button and locate the import file on your computer. Only files on a locally
mapped drive are supported. You can’t upload a file from a UNC path, such as \\ abcfiles\.
•
Data Format - Select either CSV, Tab-Delimited, or Other Delimited. With the Other Delimited option, enter a 1-character
delimiter in the field.
•
File is encrypted- If the advanced feature for encrypted imports is enabled in your account, choose File is encrypted if the
import file you're using has been encrypted.
•
Updated Options - You can add new subscribers and update existing subscribers, add new subscribers but leave existing
subscribers alone, or update existing subscribers without adding new subscribers.
8. Choose Next button in the Import Subscriber Wizard dialog box. The application reads the import file and performs a check for
malware. The amount of time this check takes depends on the amount of data in the file.
9. Complete the 2 sections of the Map Attributes dialog box:
•
Source - The Source section lists the data found in the first row of your import file. Labels that are unavailable have been mapped
to attribute fields by default; labels shown in black font haven’t been mapped. If the first row of your import file is a header row,
you see the column labels from your import file shown in the Source section. Choose First row is header so that the application
doesn’t attempt to import that row as subscriber data. You can view all the data in your import file by the buttons below the
Source section. To go to the next row or back to the row that was displayed, choose Next or choose Previous.
•
Destination - The Destination section lists the profile and preference attributes currently defined in your account, separated into
attributes that have been set up as required and those that haven’t. If the header row in your import file contains labels that
exactly match attribute names, the application has mapped those labels to the attributes for you. The Mapped From column in
the Destination section shows the label from your import file that's been mapped to the attribute shown in the Attribute column.
94
SubscribersEmail in Marketing Cloud Engagement

Use Previous and Next to scroll through the rows of data in your import file. The Destination section updates to show how the
data is mapped to the attribute fields.
10. If a field from your import file hasn’t been mapped for you to an attribute, map it as follows:
a. Click the field in the Source section. (Whether you're viewing the header row labels or a row of actual subscriber data in the
Source section when you click the source field is unimportant. In either case, you're mapping all data from that column of your
import file to the attribute.)
b. Click the corresponding attribute in the Destination section.
c. Choose Map.
The column of data is mapped to the attribute. The value is unavailable in the Source section and the Mapped From value in
the Destination section.
To remove a single mapping, click the attribute row in the Destination section and then choose Unmap.
To remove all current mappings (that is, all values from the Mapped From column in the Destination section), choose Clear
Map.
To undo all changes you've made and return to the original mapping, choose Default Map. The default mappings were in place
when you first opened the Map dialog box. Any fields still displayed in black font rather than gray in the Source section represent
data that isn't imported.
11. When you’re satisfied with your mapping, choose Next. Map any required attributes to fields in your import file before continuing
with the wizard. Use the Confirm Mappings dialog box to view your selected mappings and the number of columns, or fields, and
records, subscribers, in your file that the Email Studio attempts to import.
12. If you want to be notified when the import is complete, choose Email me upon import completion and enter your email address.
Your email notification also includes a log of any subscriber records that couldn’t be imported.
13. Choose Begin. The application begins the process of importing your data. The amount of time that the import takes depends on
the size of the import file.
If the import produces a result file that is 5 MB or larger, the system delivers the file to your enhanced FTP account. This action occurs
even if you chose to receive an email when the import is complete. If you don’t have an enhanced FTP account, you instead see a
message asking you to call Global Support for additional assistance.
If you didn’t choose to be emailed when the import is complete, a dialog box appears when the import is complete. The dialog box
includes the results of the import, and it includes a button that lets you download the results. You can also open the list that you
imported the subscribers into.
Import File Requirements for Marketing Cloud
Add subscribers by placing the data using specific columns before importing. Ensure that the file meets the proper requirements to
successfully import the subscriber data into Email Studio.
Review your import file to ensure that you meet these requirements:
Example: The columns and data shown are a sample of how these columns and data are populated for correct importing of
subscriber data:
95
SubscribersEmail in Marketing Cloud Engagement

File Requirements
Follow these guidelines for the import file:
•
Format: When you create the file of subscriber data to be imported into the application, save it as a tab-delimited .txt file or a
comma-delimited .csv file. Many applications, such as Excel, offer these formats.
•
File location: Save the import file on a locally mapped drive. Browse to this file from within the application. Only files on a locally
mapped drive are supported. You cannot upload a file from a UNC path, such as \\ abcfiles\.
•
We recommend a header row for mapping purposes. If the labels in the header row exactly match the names of the attributes in
your account, the application maps the data for you by default. For example, if you're importing a group of Unsubscribed subscribers,
you need a column labeled "Subscriber Status" with "Unsubscribed" in each row.
•
Attribute data type: If you're importing subscriber attributes, ensure that the data in the import file is the same data type as the
attribute field used. The data type can be text, date, or numeric.
Note: If you're importing an attribute that exists in the application, you receive a warning.
•
Use correct values for subscriber preference data: If you're importing subscriber preference data, use one of the following value pairs:
–
Yes or No
–
Y or N
–
True or False
–
1 or 0
•
Delete any columns in the file that are not used in the import. Limiting the import file to only the data that is imported ensures that
the system processes the file as efficiently as possible, saving time.
•
Make the email address the last column in the file. Email address is a required field and every row in your file must contain an email
address. Making the email address the last column in the file ensures that the last column of every row contains data. The system
can process the file more efficiently when the last column of the row contains data. The system can then recognize how many
columns each row has.
•
If in doubt, save the file in the tab-delimited format rather than the comma-delimited format. If any of the values in your file contain
a comma (as part of the value), use the tab-delimited format rather than the comma-delimited format.
•
Save the file in Microsoft Excel. The application is designed to handle files created in Microsoft Excel. If you didn't create your import
file in Excel, avoid most errors by opening the file in Excel and resaving it.
•
Paste into a new spreadsheet: If you have trouble importing a file and can't figure out why, copy all the cells containing data into a
new spreadsheet. When you paste the data into the new spreadsheet, use the Paste Special option and choose to paste just the
values in Excel. Use the supported date formats: Download a list of supported date formats. Use a supported date format when you
upload into a date-type field in a subscriber attribute or data extension.
Note: When you import dates into lists or a data extension, the date must be in the same format as is indicated on your
account. If your user date format is different from the account, you must still use the format of the account.
•
Map the columns in your import file to the attribute names in Email Studio: To map attributes, match the columns in your import
file to the attributes names you created. In other words, map the import column to the attribute. For example, if you have an attribute
in Email Studio called First Name, have a column called First Name. When you import, any value in the First Name column exists in
the First Name attribute.
Import Microsoft Outlook Contacts
You can use Marketing Cloud Engagement to send emails to the contacts you keep in Microsoft Outlook. In Outlook, prepare and export
the contacts who have given you permission to send marketing messages. Then, import the contact data into Email Studio.
96
SubscribersEmail in Marketing Cloud Engagement

Before you import the contact data, make sure that your Outlook contacts’ attributes match the fields that are set up in Email Studio.
•
The CSV import file must include values for every profile and preference attribute that’s marked as required. To simplify field mapping,
change the column headers of your import file to match the attribute field names in Email Studio.
•
All fields with restricted values, such as from a dropdown list, must exactly match an accepted value.
•
In the import file, remove the fields that aren’t needed in Email Studio.
1. Export your Microsoft Outlook contacts into a CSV file.
If you’re asked to install an Outlook translator feature, click Yes.
2. Review the CSV file, and make any necessary changes.
3. Import the CSV file into Email Studio on page 94.
Troubleshoot Microsoft Outlook Contacts Imports
Use these tips to troubleshoot importing Microsoft Outlook contacts in Email Studio for Marketing Cloud Engagement.
SEE ALSO:
Marketing Cloud SFTP Guide
Troubleshoot Microsoft Outlook Contacts Imports
Use these tips to troubleshoot importing Microsoft Outlook contacts in Email Studio for Marketing Cloud Engagement.
Errors Importing the Contact File Data
Resolve the most common causes for import errors by saving the export file in Microsoft Excel or by deleting all unneeded columns in
Excel.
Marketing Cloud is designed to handle files created in Microsoft Excel. If you choose an export file format type other than Microsoft Excel
(.xls), follow these steps to avoid errors.
•
Open Microsoft Excel and browse to the CSV or TXT file that Outlook created.
•
In the Open dialog box, choose to view files of all types: *.*
Note: For .txt files, Excel prompts you with the Text Import Wizard. Accept all defaults in this wizard, and Excel opens the file.
•
Save the file in Excel.
•
When Excel warns you that the file may contain features not compatible with its original format, choose to keep the new format,
which leaves out any incompatible features.
•
When you close Excel, you are prompted to save changes. Click No.
Field-Mapping Issues
•
Custom contact fields: Custom contact fields that you create in Outlook are not available in the Outlook import or export wizard.
•
Individual name and address fields: When you enter contact names and addresses in Outlook, Outlook automatically parses the data.
In other words, it splits a contact's name into a title, first name, middle name or initial, last name, and suffix fields. Likewise, Outlook
splits an address field.
•
Full name and address fields: Although Outlook's automatic parsing offers greater granularity to export the pieces of a name or
address separately, this parsing also makes it difficult to map a full name or a full address as a single field.
•
Full name: The full name is not automatically mapped. It is not included by default in the Field list.. To include the full name in the
mapping, drag the full name from the Value box into the Field box.
97
SubscribersEmail in Marketing Cloud Engagement

Note: Outlook uses the format Last Name First Name for full names.
•
Spaces in full address and name: The full name and full address contain no spaces between the elements. For example, the address
would appear as 20 N Meridian StIndianapolis, IN, with no space between "St" and "Indianapolis." To map over the full address rather
than the pieces of the address, open each contact's record in Outlook and add a space at the end of each address line before including
the address in the mapping.
Search for a Subscriber
Search for a subscriber using enhanced subscriber features in Email Studio for Marketing Cloud Engagement.
1. Hover over Subscribers.
2. Click All Subscribers and Search.
3. To choose from the supported search fields, click Search where.
4. In the Is equal to field, enter the subscriber's data for the selected search field.
•
Email Address: Enter the subscriber's full email address that matches the email address in the subscriber's record. This field is
not case sensitive.
•
Domain: Enter only the domain portion of the subscriber's email address. For example, yahoo.com.
•
HTML Email preference: Choose Yes or No from the Is equal to field.
•
Subscriber Status: Choose a subscriber status from the Is equal to field.
Note: Returned is the same as Bounced, and Undeliverable is the same as Held.
5. Click Find Now.
6. Select the subscriber in the search results and choose one of the options.
•
View Properties: Open the Subscriber Properties modal for this subscriber.
•
Export: Open the Export to a File wizard to exports this subscriber's data to a file.
•
Delete Subscriber: Deletes the subscriber.
•
Copy: Open the Copy Subscriber modal to add the subscriber to another list.
7. Exit the Search Subscribers modal.
SEE ALSO:
Export a List
Access Subscriber Properties in Marketing Cloud Engagement
Learn how to access subscriber properties in Email Studio.
Access InstructionsSubscriber Properties
Click the list in the workspace to see all subscribers in the list.A list that contains the subscriber
Click the group in the workspace to see all subscribers in the group.A group the subscriber belongs to
The All Subscribers list is the main list of records for the account.
Unsubscribing from All Subscribers removes the subscriber from
All Subscribers list
98
SubscribersEmail in Marketing Cloud Engagement

Access InstructionsSubscriber Properties
all lists and groups. Reactivated subscribers must be added to each
group and list following reactivation. A subscriber can be
unsubscribed on lists and groups and be active in the All
Subscribers list.
Find subscribers in the All Subscribers workspace by searching or
sorting.
Modify Subscriber Data in Marketing Cloud Engagement
View subscriber data and modify subscribers from subscriber properties in Email Studio. Regardless of where you access subscriber
properties, changes you make take effect throughout the application.
InstructionsField
Update the subscriber's email address on the General tab of the
modal.
Email address
This field shows a list of every action the subscriber has taken with
emails received from you in the past 90 days. If the activity is a
Email history
survey response, view that activity’s details to see the subscriber's
survey responses. The General tab shows how many times an email
to this subscriber has bounced.
To remove a subscriber from all lists and prevent any emails from
being sent, click Unsubscribe from all and enter a description.
The subscriber is placed on your account's master unsubscribe list.
Unsubscribe
Note: This process is the same as when a subscriber
chooses to unsubscribe from all your publications in the
Subscription Center.
Activate a subscriber using Subscriber Properties. This activation
re-enables the subscriber to be added to other lists and groups.
Activate
This field shows a subscriber's data for each profile and preference
attribute. Enter or modify attribute data here.
Attributes
Note: If required, attributes without default values are
added to your account since a subscriber was last modified.
Specify values for these attributes
Note: To see a reactivated subscriber’s membership, refresh
each group that subscriber is added to.
This field show the lists a subscriber belongs to.Lists
•
Details shows when the subscriber was added to or
unsubscribed from this list. If the subscriber has been
99
SubscribersEmail in Marketing Cloud Engagement

InstructionsField
unsubscribed from the list, you can reactivate the subscriber's
membership here.
•
Expand the list folders to add the subscriber to one or more
lists.
This field shows groups this subscriber belongs to. Click Activate
to add a subscriber back to this group.
Groups
Export Email Studio Subscribers by Status
You can export subscribers based on subscriber status in Email Studio. This information applies to accounts with the enhanced subscriber
features enabled. To export subscribers, account admin role or permission to access lists is required.
1. Hover over Subscribers.
2. Click All Subscribers or Lists and select the name of the list.
3. Click Search.
4. Select Subscriber Status under Search where.
5. Select the subscriber status to export under Is equal to.
6. Click Find Now.
7. Click Export.
8. Click Next.
9. Complete the File and Delivery fields.
•
Export a file of type: Select your supported export file type.
•
Compression: To zip the export file before delivery, click Yes.
Note: Compress files for large lists, especially if you choose the email delivery option.
•
Delivery: Choose how the export file is delivered to you.
–
Via FTP after the export process completes: The export file is delivered to the Export folder in your enhanced FTP account.
–
As an attachment to an email when the export process completes: The export file is emailed to the address that you
enter in the email address text box.
Note: If the export file is over 5 MB, the system delivers it to your enhanced FTP account regardless of what you select. If
you do not have an enhanced FTP account, open a ticket in the Help and Training portal.
10. Click Next.
11. Choose the data to export by moving the desired attributes from the box on the left to the box on the right.
Note: Choose up to approximately 150 data fields per export file. You can’t export the following system field attributes.
•
Add Method
•
Added By
•
Bounce Count
•
Modified Date
100
SubscribersEmail in Marketing Cloud Engagement

12. Click Export.
Note: How long the export takes depends on the amount of data exported.
13. Click Finish.
SEE ALSO:
Subscribers without Enhanced Subscriber Features
Marketing Cloud SFTP Guide
Update Subscriber Status
Although it is possible to update a subscriber status in Marketing Cloud Engagement, it is discouraged.
1. Export the subscribers and include the email address field and all required fields.
2. Add a column named Status to your import file. Populate this field with the word Unsubscribed or Active for each
subscriber.
3. Import the file to your All subscribers list.
4. Select an update option.
5. Map the email address field, status field, and all required fields.
6. Complete the import process.
7. Ensure that subscribers imported as unsubscribed have been unsubscribed appropriately. Set subscribers imported with an active
status to active on each list that they’ve requested to be resubscribed to.
Warning: Subscribers in an undeliverable status previously bounced an email sent from your account. Changing subscribers
from undeliverable to active can result in high bounce counts in future sends.
Subscribers in an unsubscribed status previously unsubscribed from emails sent from your account. Changing subscribers from
unsubscribed to active can result in high spam complaints in future sends.
When active subscribers are reimported with an active status, their bounce count is set to zero regardless of their original bounce
count.
Delete a Subscriber from Marketing Cloud Engagement
Use Delete Subscriber to delete a subscriber in Email Studio.
To delete a subscriber from Engagement, use Contact Deletion in Contact Builder.
Note: Tracking data for deleted subscribers and contacts are retained in anonymized format and can’t be linked to a specific
record. Tracking and reports show clicks from [email protected] and an IP address of 0.0.0.0 for deleted records.
Warning: To prevent future sends to a subscriber, update the subscriber’s status to Unsubscribed.
1. Hover over Subscribers.
2. Click Subscribers.
3. Click the name of the list that contains the subscriber to delete.
4. Click Search.
5. To choose from the supported search fields, click Search where.
101
SubscribersEmail in Marketing Cloud Engagement

6. In the Is equal to field, enter the subscriber's data for the selected search field.
•
Email Address: Enter the subscriber's full email address.
Note: What you enter here must match the email address in the subscriber's record. This field isn’t case-sensitive.
•
Domain: Enter just the domain portion of the subscriber's email address.
Note: For example, yahoo.com.
•
HTML Email preference: The Is equal to field becomes a dropdown list with two options to choose from, Yes or No.
•
Subscriber Status: The Is equal to field becomes a dropdown with the following options to choose from, Active, Returned,
Undeliverable, or Unsubscribed.
Note: Returned is the same as Bounced and Undeliverable is the same as Held.
7. Click Find Now. The application scans your subscribers for one or more matches and displays the results.
8. Select the desired subscriber in the search results.
9. Click Delete Subscriber.
10. To delete the subscriber from the All Subscribers list, check Delete from all lists.
11. Click OK.
12. To exit the Search Subscribers box, click Close.
Note: If you import a list that includes this subscriber or if you manually add the subscriber, the subscriber reappears on your
lists. To ensure that you don’t send any emails to this subscriber in the future, use the Unsubscribe feature instead of deleting
the subscriber. Unsubscribe prevents the subscriber from being imported into the system accidentally.
Import File Requirements for Email Studio
To ensure compatibility with Email Studio in Marketing Cloud Engagement, import files have some detailed requirements.
DescriptionRequirement
When creating the file of subscriber data to be imported into the
application, save it as a tab-delimited .txt file or a comma-delimited
.csv file. Many applications, such as Excel, offer these formats.
Format
Save the import file on a locally mapped drive. Browse to this file
from within the application. Only files on a locally mapped drive
File location
are supported. You cannot upload a file from a UNC path, such as
\\ abcfiles\.
A header row is recommended for mapping purposes. If the labels
in the header row exactly match the names of the attributes in
Header row
your account, the application maps the data by default. For
example, if importing a group of unsubscribed subscribers, you
need a column labeled "Subscriber Status" with "Unsubscribed" in
each row.
102
SubscribersEmail in Marketing Cloud Engagement

DescriptionRequirement
If you're importing subscriber attributes, the data in the import file
must be of the same data type, that is, text, date, or numeric, as
the attribute field in the application.
Attribute data type
Note: If you're importing an attribute that exists in the
application, you receive a warning.
If importing subscriber data into attribute fields that restrict the
possible values, the import data must exactly match one of the
values defined as allowable for that attribute.
Attributes with restricted values
If you're importing subscriber preference data, use one of the
following value pairs:
Use correct values for subscriber preference data
•
Yes or No
•
Y or N
•
True or False
•
1 or 0
Limiting the import file to only the data that is imported ensures
that the system processes the file as efficiently as possible, saving
time.
Delete any columns in the file that are not used in the import
Email address is a required field and every row in your file must
contain an email address, making it the last column in the file
Make the email address the last column in the file
ensures that the last column of every row contains data. The system
can process the file more efficiently when the last column of the
row contains data because the system can then recognize how
many columns each row has.
If any of the values in your file contain a comma (as part of the
value), you must use the tab-delimited format rather than the
comma-delimited format.
If in doubt, save the file in the tab-delimited format rather than the
comma-delimited format
The application is designed to handle files created in Microsoft
Excel. If you didn't create the import file in Excel, avoid most errors
by opening the file in Excel and resaving it.
Save the file in Microsoft Excel
If you have trouble importing a file and can't figure out why, copy
all the cells containing data into a new spreadsheet. When you
Paste into a new spreadsheet
paste the data into the new spreadsheet, use the Paste Special
option and choose to paste just the values in Excel.
Download a list of supported date formats. Use a supported date
format when you upload into a date-type field in a subscriber
attribute or data extension.
Use the supported date formats
Note: When you import dates into lists or a data extension,
enter the date in the same format as is indicated on your
account. If the userdate format is different from the account,
use the format of the account.
103
SubscribersEmail in Marketing Cloud Engagement

DescriptionRequirement
To map attributes, match the columns in your import file to the
attributes names you created. In other words, map the import
Map the columns in your import file to the attribute names in Email
Studio
column to the attribute. For example, if you have an attribute in
Email Studio called First Name, the import file should contain a
column called First Name. When you import, any value in the First
Name column lives in the First Name attribute.
Lists with Enhanced Subscriber Features
Learn about enhanced subscriber lists in Email Studio for Marketing Cloud Engagement.
A list is a collection of subscribers that receive your communications. All your subscribers belong to the All Subscribers list in your account.
You create as many lists as you need to segment your subscribers so that you can target your email communications. For example, you
can create a list for your monthly newsletter, your weekly coupon offer, and a special announcements list. Once you create a list, you
can send emails using your list or you can create a group from a list to target a more specific segment of subscribers.
When you create a list, you decide whether to make it public. If you make a list public, then a subscriber sees the name of the list in the
Subscription Center and has the option to opt in or -out of the list.
Note: If a subscriber uses the forward button in their email client instead of the Forward to a Friend feature to forward your email,
the subscription center link will still point to the original subscriber's subscription center. For example, if Lee forwards your email
to Ali, and Ali clicks the Subscription Center link in the footer of the email, Ali sees Lee's subscriptions.
You must first create a list, then you can add subscribers to lists in one of two ways:
•
Individually
•
Import a file containing subscriber data
Becoming an effective email marketer requires constant list cleansing and hygiene. In addition, ISPs sometimes use old email addresses
as spam traps aimed at catching commercial e-mailers with old lists. The size of your list is not nearly as important as the quality of the
list, how it was captured, how often it is cleaned, and how well the subscribers respond to messaging. For optimization of email marketing,
it is imperative that lists consist only of opt-in subscribers - those who are anticipating and are interested in your email correspondence.
Subscribers showing no activity, opens, or clicks, for six months or more are very unlikely to respond and are more likely to complain,
causing the potential for ISP blocking. Maintaining your lists is an important part of sending emails.
You can grow your subscriber lists in many different ways. Marketing Cloud Engagement prohibits importing or adding subscribers from
purchased lists, email-appended lists, and email address data obtained by methods other than a direct opt-in. Using these prohibited
list types increases the likelihood of blocked sends due to spamming.
Using Lists in Marketing Cloud Engagement
Review an example of using a list in Email Studio.
Create a List
Create a list of subscribers who match the attributes you select in Email Studio.
List Properties
View statistics and change the basic properties of a list in Email Studio.
Copy and Move Subscribers
Copy one or more subscribers from one list to another list while retaining them on the original list, or you can move subscribers off
one list to another. Subscribers are always included in All Subscribers in Email Studio. You can copy subscribers from All Subscribers
to another list, but you cannot remove them from All Subscribers.
104
SubscribersEmail in Marketing Cloud Engagement

Import into a List
Import enhanced subscriber data into a list in Email Studio.
Export a List
Export a subscriber list from Email Studio.
Delete a List
Delete an enhanced subscriber list from Email Studio.
Using Lists in Marketing Cloud Engagement
Review an example of using a list in Email Studio.
Northern Trail Outfitters has a spreadsheet of subscribers who have requested the monthly newsletter. They want to import the information
into a new list in their account. They click Create in the My Lists folder. Northern Trail Outfitters enters a name and a description for the
list and select the public checkbox so that subscribers can manage their membership in the list using the subscription center. They click
Select a Campaign to associate the list to a campaign they already created. They click Next.
They select Send welcome Email to welcome subscribers added via the Subscription Center or Web Collect. They click Save.
Northern Trail Outfitters click Import from actions since they have a .csv file of subscribers.
Northern Trail Outfitters can now use this list in an email send or to create a group.
Create a List
Create a list of subscribers who match the attributes you select in Email Studio.
Before you create a list, decide:
•
Whether you're going to require subscribers to confirm their email address after they subscribe. If so, create the email message
before creating the list, or create a text-only message when you create the list.
•
Whether you're going to attach a welcome email to this list. A welcome email is what subscribers receive when they subscribe to
your list. You can assign a welcome email to this list during list creation, which requires you to create an email before creating the
list, or you can assign the welcome email later by using Manage Welcome Email.
Note: Adding a Welcome Email to a list is no longer supported starting in the second half of 2020. Use Journey Builder to
create personalized, automated multi-channel campaigns.
Note: Lists that you create in your Enterprise administrator account are accessible to your On Your Behalf channel members. On
Your Behalf channel members can’t create lists, but can add subscribers to them.
1. In Email Studio, on the Subscribers tab, select Lists.
2. Click Create.
3. Complete the Define Name & Location section.
•
Name: This name identifies the list when sending. If you make this list public, this name appears in the Subscription Center. Your
list name can’t contain the # symbol or be longer than 50 characters.
•
Public: Selecting the public option results in this list being displayed in the Subscription Center. A subscriber can opt in or opt
out of any public list.
•
External Key: Enter a unique identifier that developers can use in their API calls to access objects programmatically.
•
Description: This description appears in the list workspace.
•
Location: Select the list folder location.
•
Campaign Association: Associate the list to a campaign. To start a new campaign, click Create Campaign.
105
SubscribersEmail in Marketing Cloud Engagement

4. Click Next.
5. Optionally, complete the Set Double Opt-in section.
a. If you want subscribers to provide confirmation of their email address when they subscribe to your list, select the Require
subscribers to provide confirmation of valid email address checkbox.
b. Select the Confirmation Email. The email must contain the double opt-in link URL. The substitution string to insert the link in
your email is %%double_opt_in_url%%.
c. Optionally, complete the Landing Page section by selecting an opt-in landing page to display to subscribers when the double
opt-in link URL is clicked in your email.
6. Click Next.
7. Optionally, complete the Select Welcome Email section.
a. If you want to welcome subscribers to this list, select Send welcome email.
b. Select the Welcome Email.
c. Select whether to associate a Send Classification to the welcome email send. This option may not be enabled in your account.
8. Click Finish.
Configure a List for a Welcome Email
You can configure a subscriber list for Welcome Email messages in Email Studio.
Set a List to Public
Selecting the Public option in Email Studio will result in this list being displayed in the Subscription Center. A subscriber can opt-in
or opt-out of any public list.
Configure a List for a Welcome Email
You can configure a subscriber list for Welcome Email messages in Email Studio.
Note: Adding a Welcome Email to a list is no longer supported starting in the second half of 2020. Use Journey Builder to create
personalized, automated multi-channel campaigns.
Before you can assign a welcome email to a list, you must first create the email. You can change which email is assigned to a list at any
time. This feature may not be enabled in your account, contact your representative.
1. Hover over Subscribers.
2. Click Lists.
3. Click the name of the list to assign a welcome email to.
4. Click Properties.
5. Click Select.
6. Select the email to send as a welcome email.
7. Click OK.
The welcome email is now assigned to your list and sends when subscribers join via the Subscription Center or Web Collect.
Set a List to Public
Selecting the Public option in Email Studio will result in this list being displayed in the Subscription Center. A subscriber can opt-in or
opt-out of any public list.
106
SubscribersEmail in Marketing Cloud Engagement

1. Hover over Subscribers.
2. Click Lists.
3. Select the name of the list to set to public.
4. Click Properties.
5. Select the checkbox for Public.
List Properties
View statistics and change the basic properties of a list in Email Studio.
OptionsDescriptionField
To change the name of the lists or the lists
description, make your modifications to the
text box at the top of the Properties tab.
The list name displays in the list workspace
and in sends.
List name and description
Select the plus button, select the radio
button for the appropriate campaign, and
To associate the list with a campaign.Campaign Association
select OK. Or click Create Campaign to
create a campaign.
To change the external key of the list, make
your modifications to the text box and click
Done.
The external key is a unique identifier for the
list. This value is used by developers in their
API calls to access the list programmatically.
External Key
The unique identifier created by the
application.
List ID
These dates are recorded.Date on which this list was created and the
date when it was last modified.
Created and Last Modified
To relocate the list, click the Change button,
which opens Select Location showing your
List folder in which this list is located.Location
list folder structure. Click the desired folder
and click OK.
Type is set by the application.All lists are standard lists.Type
Click the checkbox to set the list to public.The public option results in this list being
displayed in the Subscription Center. A
Public
subscriber can opt in or opt out of any
public list.
To add subscribers right from the properties
tab, click Add Subscribers and select
Number of subscribers who currently
belong to this list.
Size
Import or Manually. To view more details
about the lists membership, click the
Subscriber tab. The Tracking tab shows list
composition, provides access to reports, and
recent sends.
107
SubscribersEmail in Marketing Cloud Engagement

OptionsDescriptionField
Click Edit, select the Require subscribers to
provide confirmation of valid email address
Double opt-in requires your subscribers to
confirm their email address.
Double Opt-in Behavior
checkbox, and choose the email that
contains the double opt-in link. Optional,
select a Marketing Cloud Engagement or
external opt-in landing page to display to
subscribers when the double opt-in link URL
is clicked in your email.
Click Edit, select the Send Welcome Email
checkbox, and select the welcome email to
send to subscribers.
A welcome email is the email a new
subscriber receives after joining the list.
Welcome Email
Adding a Welcome Email to a list is no
longer supported starting in the second half
of 2020. Use Journey Builder to create
personalized, automated multichannel
campaigns.
Copy and Move Subscribers
Copy one or more subscribers from one list to another list while retaining them on the original list, or you can move subscribers off one
list to another. Subscribers are always included in All Subscribers in Email Studio. You can copy subscribers from All Subscribers to another
list, but you cannot remove them from All Subscribers.
1. Hover over Subscribers.
2. Click Lists.
3. Select the name of the list.
4. Select the checkbox next to the subscribers who you want to add to another list.
To select the entire list, select Email Address and then click Copy.
5. Select the list to add these subscribers to.
6. Check the appropriate boxes.
•
Maintain subscriber status from the originating list when you move/copy the subscriber to the destination list. If you do not
check this list, the subscribers are added to the destination list with a status of Active.
•
If you want to add all the subscribers on the list, select the Move/copy each subscriber on the source list checkbox.
7. Click the appropriate button:
•
Move: Choose Move if you want to remove the subscribers from the current list and add them to the selected list.
•
Copy: Choose Copy if you want the subscribers to exist on both the current list and on the selected list.
8. Click OK.
Import into a List
Import enhanced subscriber data into a list in Email Studio.
108
SubscribersEmail in Marketing Cloud Engagement

1. Hover over Subscribers.
2. Click Lists.
3. Under Actions click Import for the list to import into.
4. Click Next in the wizard's introductory dialog box.
5. Read the content of the Opt-in Certification dialog box that appears next. If you have verified that every subscriber in your import
file has agreed to receive emails from you, select the I agree checkbox, and click Next.
6. Complete the Identify Source File dialog box.
DescriptionField
The import wizard shows you two upload options: Your Computer and FTP. To use a file that
you've uploaded to the FTP site, type the filename in the FTP field. If the file you want to
Upload Source
import is on your hard drive, click the Browse button and locate the import file on your
computer. Only files on a locally mapped drive are supported ( C:\, D:\, etc.). You cannot
upload a file from a UNC path (such as \\ abcfiles\).
Select one of the following: The CSV radio button The Tab Delimited radio button The Other
Delimited radio button. If you select this value, you must enter a 1-character delimiter in the
field.
Data Format
If the advanced feature for encrypted imports is enabled in your account, you'll see this check
box. Select the check box if the import file you're using has been encrypted.
File is encrypted
Add new subscribers and update subscribers that exist Add new subscribers but do not
update subscribers that exist Update existing subscribers but do not add subscribers that do
not exist
Updated Options
You can select a date format from the drop-down menu in this section to use as part of the
import. Choose the date format that most closely matches the region from which you are
conducting the import.
Date Format
Select the type of file encoding you want to use. If no type is selected, the system defaults
to UTF-8.
File Encoding
7. Click the Next button in the Import Subscriber Wizard dialog box. The application reads the import file, which may take several
moments depending on the size of the file. The application will then perform a check for malware and prevent uploading of infected
files.
Note: The data in the import file is not yet brought into your account.
8. The Map Attributes dialog box appears next. This dialog box consists of two sections:
Source
The Source section lists the data found in the first row of your import file. Labels that are grayed out have been mapped to
attribute fields by default; labels shown in black font have not been mapped. If the first row of your import file is a header row,
you'll see the column labels from your import file shown in the Source section. In this case, make sure that the First row is header
check box is selected so that the application does not attempt to import that row as subscriber data. You can view all the data
in your import file by the buttons below the Source section. Click the Next button below the Source section to view the next
row of data in your file. Click Previous to go back to the row that was displayed.
109
SubscribersEmail in Marketing Cloud Engagement

Destination
The Destination section lists the profile and preference attributes currently defined in your account, separated into those that
have been set up as required and those that have not. If the header row in your import file contains labels that exactly match
attribute names, the application has mapped those labels to the attributes for you. The Mapped From column in the Destination
section shows the label from your import file that's been mapped to the attribute shown in the Attribute column. As you scroll
through the rows of data in your import file by using the Previous and Next buttons, the Destination section updates to show
how the data is mapped to the attribute fields.
9. If a field from your import file has not been mapped for you to an attribute, map it as follows:
•
Click the field in the Source section. (Whether you're viewing the header row labels or a row of actual subscriber data in the
Source section when you click the source field is unimportant. In either case, you're mapping all data from that row of your
import file to the attribute.)
•
Click the corresponding attribute in the Destination section.
•
Click the Map button.
Note: The column of data is now mapped to the attribute, as indicated by the grayed-out value in the Source section
and the Mapped From value in the Destination section.
You also have these additional options:
–
Remove a single mapping: To unmap an attribute from the import file field to which it's currently mapped, click the attribute
row in the Destination section and then click the Unmap button.
–
Remove all current mappings: If you want to remove all the current mappings (that is, delete all values from the Mapped
From column in the Destination section), click the Clear Map button.
–
Return to the original mappings: If you want to undo all changes you've made to the default mappings (the mappings that
were in place when you first opened this dialog box), click the Default Map button.
Any fields still displayed in black font rather than gray in the Source section represent data that isn't imported.
10. When satisfied with your mappings, click the Next button at the bottom of the dialog box.
Note: Any attributes that have been defined as required must be mapped to fields in your import file. You can't continue
with the wizard until these fields are mapped.
11. The Confirm Mappings dialog box appears next, summarizing your selected mappings and the number of columns (fields) and
records (subscribers) in your file that the application attempts to import. If you want to be notified when the import is complete,
select the Email me upon import completion check box and enter your email address in the Email address field. Your
email notification also includes a log of any subscriber records that could not be imported.
12. Click the Begin button. The application begins the process of importing your data. How long the import takes depends on the size
of your import file.
13. The final dialog box of the wizard appears.
•
If you chose to be emailed upon completion, this dialog box appears immediately and confirms that the import has begun. Click
Finish to exit the wizard. After the import is completed, you'll receive an email with the results of the import (if the file does not
exceed 5MB in size. If the export file is over 5 MB in size, the system delivers it to your enhanced FTP account regardless of what you
select here. If you do not have an enhanced FTP account, the system returns a message saying that you should call global support.)
•
If you did not request an email upon completion, the dialog box appears after the import process has been completed. The text of
the dialog box shows you the results of the import and includes a Download report button for you to view the details behind the
records that could not be imported. Click Download report to open the log file showing the results. You also have the option of
opening the list into which you imported the new subscribers. Select the Take me to my list check box, and the list opens when you
click Finish.
110
SubscribersEmail in Marketing Cloud Engagement

Note: If you imported using an Enterprise account, the email address appears on the global unsubscribe list or on your account-level
unsubscribe list.
Export a List
Export a subscriber list from Email Studio.
When exporting a list, note which system fields are exportable and which are not.
You can export the following fields:
•
Subscriber key, if enabled in your account
•
Email Address
•
Created Date
•
Unsubscribe Reason
•
Unsubscribe Date
•
HTML Email
You cannot export the following fields:
•
Add Method
•
Added By
•
Bounce Count
•
Modified Date
1. Click Subscribers.
2. Select the checkbox next to the list.
3. Click Export.
4. Click Next.
5. Complete the File and Delivery dialog box.
Note: Use FTP for lists greater that 850 subscribers.
6. Click Next.
7. Choose the data to export by moving the desired attributes from the box on the left to the box on the right. You can choose up to
a limit of approximately 150 data fields per export file. Click the right double-arrow button if you want to move all the attributes into
the box on the right. Or click a single attribute on the left and then click the right single-arrow button to move it into the box on the
right. The other two arrow buttons allow you to deselect attributes.
8. Click Export. The application begins the process of exporting the data into a file. How long the export takes depends on the amount
of data to be exported.
9. Click Finish.
•
If you chose to be emailed upon completion: This dialog box appears immediately and confirms that the export process has
begun. Click Finish. After the export file is built, you'll receive an email with the file in the format you chose.
•
If you chose the HTTP (browser download option: The dialog box appears after the export process has been completed. Click
Download File to open the file in your browser. Click Finish.
111
SubscribersEmail in Marketing Cloud Engagement
Delete a List
Delete an enhanced subscriber list from Email Studio.
From the parent Enterprise account level, you can delete the list and delete all the subscribers from the account. If you chose to delete
the subscribers; the subscribers are removed from the All Subscribers lists and all other lists, and the email application no longer tracks
email activity for the subscribers. If you didn’t choose to delete the subscribers; the subscribers are still in your All Subscribers list and all
other lists, and the email application continues to track email activity for the subscribers.
1. Hover over Subscribers.
2. Click Lists.
3. Select the checkbox next to the name of the list to delete.
4. Click Delete.
When working in the parent account, if you want to also delete the subscribers that belong to the list, click Delete Subscribers in
"LIST NAME". If you want to keep the subscribers in your account, don’t select this check box.
5. Click Delete.
Groups with Enhanced Subscriber Features in Marketing Cloud Engagement
The information in this document applies to accounts with the enhanced subscriber features. Refer to Groups with Classic Subscriber
Features if your account doesn’t have enhanced subscriber features enabled in Email Studio.
A group is a subset of subscribers. There are two types of groups:
•
Filtered Group
•
Random Group
Filtered groups are segments of lists. You create a filtered group by filtering on profile attributes, preference attributes, filters, and
measures. To refresh the group, you can use a group refresh activity or refresh the group manually. Subscribers who opt-out of sends
from a group are retained in refreshed group as unsubscribed even if they no longer match the rules for the group.
Random groups are segments of lists or filtered groups or other random groups. You create a random group by splitting a subscriber
list or filtered group. Only 12 random groups can be created from a list or filtered group.
Use a group to create a targeted list of subscribers. For example, if you want to send an email to all the males in a list, you can create a
group of just the males.
You can also use a group to create a random sample of subscribers. For example, if you want to see how subscribers react to a new email
template, you can generate a random sample of subscribers to send to and track the results.
Create a Filtered Group in Marketing Cloud Engagement
Create a filtered group by filtering subscribers by profile attributes, preference attributes, filters, and measures in Email Studio.
Groups Scenario for Marketing Cloud Engagement
See an example of groups used in Email Studio.
Create a Group of Randomly Selected Subscribers
Split up subscribers from a selected list and place the subscribers into random groups in Email Studio. Create as many as 12 groups
at a time.
Refresh a Filtered Group
In Marketing Cloud Engagement, Email Studio doesn’t update groups for newly added or modified subscribers. If the subscriber's
profile or preference attributes makes the subscriber eligible for a filtered group, refresh the group to add the subscriber.
112
SubscribersEmail in Marketing Cloud Engagement

Modify a Group in Marketing Cloud Engagement
Modify a subscriber group in Email Studio. The Group Details section is where you can view statistics about the group and change
properties of the group. You can even redefine the attribute settings with which a filtered group was defined.
Copy Marketing Cloud Engagement Subscribers from a Group to a List
Copy Email Studio subscribers, without enhanced subscriber features, from a group to a list while keeping them on the group.
Delete a Group from Marketing Cloud Engagement
Delete an Enhanced Subscriber Features group in Email Studio without deleting any of the subscribers who belong to the group.
Export a Group from Marketing Cloud Engagement
Export selected Email Studio subscriber data from a group to a file and export a single subscriber's data, from the Search Subscribers
feature.
Send to Groups in Email Studio
Send Subscribers to Groups with enhanced subscriber features in Email Studio for Marketing Cloud Engagement.
Create a Filtered Group in Marketing Cloud Engagement
Create a filtered group by filtering subscribers by profile attributes, preference attributes, filters, and measures in Email Studio.
1. Hover over Subscribers.
2. Click Groups.
3. Click Create.
4. Select Filtered Group.
5. Click Ok.
6. Select a source list of subscribers to filter.
7. Click Ok.
8. Drag and drop Profile & Preference Attributes, Filters, and/or Measure from the left column to the Create Filter canvas. Only 20 rules
can be used to create the filter. Use the profile and preference attribute tables as a reference to building out your filter.
Note: Be sure to choose an operator that makes sense with the type of attribute you chose. For example, do not use the less
than the operator with a text attribute. For attributes with type equal to date, only the following operators are supported: is
equal to, is not equal to, is greater than and is less than.
9. Select an AND or OR operator. You can group your criteria by hovering over the grouping operator so that it turns a darker blue and
then click to change the operator.
Note: If you choose AND, the subscriber must meet all criteria to be included in the group. If you choose OR, the subscriber
must meet one of the criteria, but not all criteria, in order to be included in the group.
10. Click Save & Build.
11. Enter a Name for the group.
12. Enter a Description for the group.
13. Select a folder in which to store the group. You can select New Folder to create a folder to store the group.
14. Click Save.
113
SubscribersEmail in Marketing Cloud Engagement

Filter Group Reference for Marketing Cloud Engagement
Use profile and preference attributes in a filtered group by filtering subscribers by profile attributes, preference attributes, filters, and
measures in Email Studio.
Filter Group Reference for Marketing Cloud Engagement
Use profile and preference attributes in a filtered group by filtering subscribers by profile attributes, preference attributes, filters, and
measures in Email Studio.
Profile Attributes
DescriptionFunction
Subscribers with an attribute definition that exactly matches the
value are included in the group. You can choose 1 value only.
is equal to
Subscribers with an attribute definition that does not match the
value are included in the group. You can choose 1 value only.
is not equal to
Use this operator when the attribute is a numeric value. Subscribers
with an attribute definition greater than, greater than or equal to
the value are included in the group.
is greater than, is greater than equal to
Use this operator when the attribute is a numeric value. Subscribers
with an attribute definition less than, less than or equal to the value
are included in the group.
is less than, is less than equal to
The application looks for attribute values that begin with the exact
sequence of characters that you enter as the comparison value.
Commas are treated as characters and not as delimiters.
begins with
The application looks for attribute values that include or exclude
the exact sequence of characters that you enter as the comparison
value. Commas are treated as characters and not as delimiters.
contains, does not contain
The application looks for attribute values that end with the exact
sequence of characters that you enter as the comparison value.
Commas are treated as characters and not as delimiters.
ends with
Subscribers with an attribute definition that matches one of the
values you define in a comma delimited string of values are
exists in
included in the group. The exists in operator looks for a partial
match of the entire value. For example, if your match criteria is
north, the exists in operator returns subscribers with north,
northwest, and northeast attribute values, but not subscribers with
south, southwest, and southeast attribute values.
Subscribers with an attribute definition that do not match any of
the values you define in a comma delimited string of values are
does not exist in
included in the group. This operator is not applicable when
choosing an attribute with restricted values, as you can select only
one of the restricted values as the comparison value.
114
SubscribersEmail in Marketing Cloud Engagement

DescriptionFunction
To filter for a blank value select is empty or is not empty.is empty, is not empty
Preference Attributes
DescriptionFunction
The application looks for of either a true or false value. Your only
options are True and False.
is
Groups Scenario for Marketing Cloud Engagement
See an example of groups used in Email Studio.
Example: Northern Trail Outfitters created several lists of subscribers, and would now like create a group to send an email to all
the males in the list. They open the Create Subscriber Group wizard and choose Filtered Group because they want to target a
specific gender.
After clicking Ok, the Select a Source page appears. Northern Trail Outfitters selects the Indiana Subscribers list.
Next they drag the Gender attribute to the Create Filter canvas and click Save & Build.
They enter a name and description that reminds them of the group's purpose and click Save.
They can now send targeted emails to the group.
Create a Group of Randomly Selected Subscribers
Split up subscribers from a selected list and place the subscribers into random groups in Email Studio. Create as many as 12 groups at
a time.
1. In Email Studio, on the Subscribers tab, click Groups.
2. Click Create.
115
SubscribersEmail in Marketing Cloud Engagement

3. Select Random Group.
4. Click Ok.
5. Select a source list of subscribers to split.
6. Click Ok.
7. Click Add Group.
a. Enter a name for the group.
b. In the Group Size field, enter a percentage or the number of subscribers in the list to randomly add to this group.
c. To change the location the group is saved to, click Change Location and select a folder in which to store the group.
8. Repeat step 7 to create up to 12 additional splits.
9. To create a group from the remaining subscribers, click Add Remainder..
10. Click Save & Build.
Refresh a Filtered Group
In Marketing Cloud Engagement, Email Studio doesn’t update groups for newly added or modified subscribers. If the subscriber's profile
or preference attributes makes the subscriber eligible for a filtered group, refresh the group to add the subscriber.
Use the Automation Studio group refresh activity or refresh the manually.
1. Select the checkbox next to the filtered group to refresh.
2. Click Refresh under Actions.
3. Click OK in the confirmation dialog box that appears. The application scans all subscriber data and rebuilds the group. View the
subscriber count displayed in the group workspace to see how many subscribers now belong to the group.
Note: Group refreshes will fail if the group is based on a data type attribute that has a date earlier than January 1, 1900 or
greater than December 21, 2079. Subscribers who opt-out of sends from a group are retained in refreshed group as unsubscribed
even if they no longer match the rules for the group.
Modify a Group in Marketing Cloud Engagement
Modify a subscriber group in Email Studio. The Group Details section is where you can view statistics about the group and change
properties of the group. You can even redefine the attribute settings with which a filtered group was defined.
1. Hover over Subscribers.
2. Click Groups.
3. Select the group name in the group workspace.
4. Click Properties.
Group Properties Tab Fields for Marketing Cloud Engagement
The group properties tab within Email Studio contains fields to provide group details.
Group Properties Tab Fields for Marketing Cloud Engagement
The group properties tab within Email Studio contains fields to provide group details.
The group properties tab contains these fields:
116
SubscribersEmail in Marketing Cloud Engagement

OptionsDescriptionField
To change the name of the group or the
group description, make your modifications
The group name displays in the group
workspace and in the Email Send wizard.
Group name and description
to the text box at the top of the Properties
tab. When you click Done, your change
takes effect.
To change the external key of the group,
make your modifications to the text box and
click Done.
The external key is a unique identifier for the
group. This value is used by developers in
their API calls to access the group
programmatically.
External Key
These dates are recorded.Date on which this group was created and
the date when it was modified or refreshed.
Created and Last Modified
To relocate the group, click Change, which
opens Select Location showing your group
Group folder in which this group is located.Location
folder structure. Click the desired folder and
click Ok. If you want to create a folder for
this group, click New in the Move Group
dialog box to open the Create New Folder
dialog box. When you return to the Move
Group dialog box, the group folder structure
displayed refreshes to show your new folder.
The two types are: Filtered or Random.The type of group that was created.Type
For Filtered groups, click edit to modify the
filter. For Random groups, splits cannot be
edited and this option does not display.
Use to edit this group's filter.Edit
To view more details about the group
membership, click the Subscriber tab. The
Number of subscribers who currently
belong to this group.
Size
Tracking tab display subscriber status,
including how many have unsubscribed,
under group composition. You also have
access to reports, and recent sends from the
Tracking tab.
Copy Marketing Cloud Engagement Subscribers from a Group to a List
Copy Email Studio subscribers, without enhanced subscriber features, from a group to a list while keeping them on the group.
1. Hover over Subscribers.
2. Click Groups.
3. Select the name of the group.
4. Select the subscriber or subscribers to add to a list and click Copy.
5. Select a list to add the subscribers to.
6. Check the appropriate boxes.
117
SubscribersEmail in Marketing Cloud Engagement

Note: Maintain subscriber status from the originating list when you move or copy the subscriber to the destination list. If you
don’t check this list, the moved or copied subscribers are added to the destination list with a status of Active.
If you want to add all of the subscribers on the list from which you opened this dialog box, select Copy all subscriber on the source
list.
7. Click Copy.
8. Click OK in the confirmation dialog box that appears after the copy is complete.
Delete a Group from Marketing Cloud Engagement
Delete an Enhanced Subscriber Features group in Email Studio without deleting any of the subscribers who belong to the group.
You can delete a group which doesn’t delete any of the subscribers who belong to the group.
1. Hover over Subscribers.
2. Click Groups.
3. Select the group to delete.
4. Click Delete.
5. Click the checkbox to confirm you would like to delete the group from your account.
6. Click Delete.
Export a Group from Marketing Cloud Engagement
Export selected Email Studio subscriber data from a group to a file and export a single subscriber's data, from the Search Subscribers
feature.
You can export selected subscriber data from a group to a comma-separated CSV file, tab-delimited TXT file, or XML file. You can also
export a single subscriber's data, from the Search Subscribers feature.
1. Hover over Subscribers.
2. Click Groups.
3. Click Export under Actions next to the group to export.
4. Click Next.
5. Complete these fields of the File and Delivery dialog:
•
Export a file of type - Select one of the supported export file types.
•
Compression - If you want the resulting export file to be zipped prior to delivery, click Yes. Compressing the file is recommended
for large groups, especially if you choose the email delivery option.
•
Delivery - Choose how you want the export file to be delivered to you:
•
Via FTP after the export process completes: The export file is delivered to the Export folder in your enhanced FTP account.
•
As an attachment to an email when the export process completes: The export file is emailed to the address that you enter in the
email address text box.
Note: If the export file is over 5 MB, the system delivers it to your enhanced FTP account regardless of what you select here.
If you do not have an enhanced FTP account, the system returns a message saying that you should call global support.
6. Click Next.
7. Choose the data to export by moving the desired attributes from the left pane to the right pane. You can choose up to approximately
150 data fields per export file. Click the right double-arrow button if you want to move all the attributes into the box on the right.
118
SubscribersEmail in Marketing Cloud Engagement

You can also click a single attribute on the left pane and then click the right single-arrow button to move it to the right pane. The
other two arrow buttons allow you to deselect attributes or move attributes from the right pane to the left pane.
8. Click Export.
The application begins the process of exporting the data into a file. How long the export takes depends on the amount of data to
be exported.
9. The final dialog box of the wizard appears.
•
If you chose to be emailed upon completion: This dialog box appears immediately and confirms that the export process has
begun. Click Finish to exit the wizard. After the export file has been built, you'll receive an email with the file in the format you
chose.
•
If you chose the HTTP browser download option: The dialog box appears after the export process has been completed. Click
Download File in the dialog box to open the file in your browser. Click Finish after downloading the file to exit the wizard.
When exporting a group, note which fields are exportable and which are not.
Table 2: System Fields
You cannot exportYou can export:
Add MethodSubscriber key (if enabled in your account)
Added ByEmail Address
Bounce CountCreated Date
Modified DateUnsubscribe Reason
Unsubscribe Date
HTML Email
Send to Groups in Email Studio
Send Subscribers to Groups with enhanced subscriber features in Email Studio for Marketing Cloud Engagement.
1. Hover over Subscribers.
2. Click Groups.
3. You can click Send from:
a. Select each list to send to and click Send.
b. Under Actions click Send.
c. Click the name of a group and click Send.
Data Extensions with Enhanced Subscriber Features in Marketing Cloud Engagement
Use data extensions with Email Studio to satisfy the need for flexible data storage. Using data extensions requires an understanding of
relational database structures and other technical expertise.
A standard data extension is a table within the application database that contains your data. Usually, the data you keep in a data extension
relates to a subscriber but doesn’t fit in the subscriber profile and preference attributes for one of the following reasons: Filtered data
extensions are segments of standard data extensions. You create a filtered data extension by filtering on fields, filters, and measures.
119
SubscribersEmail in Marketing Cloud Engagement

Random data extensions are segments of standard data extensions. You create a random data extension by splitting standard data
extensions, a filtered data extension, or a random data extension. Only 12 random data extensions can be created at one time.
•
A subscriber can have varying numbers of values. For example, a subscriber's first name fits as a subscriber attribute because you
probably refer to a subscriber by only one first name. Or a list of the subscriber's transactions in the last month doesn’t fit well because
it’s difficult to predict how many transactions a subscriber has completed in the last month.
•
The information is related to the subscriber through a third piece of information. For example, you maintain the subscriber's preferred
airport code as a subscriber attribute, but maintain the name of the airport in a data extension.
Why Use a Data Extension
Use a data extension to contain your data that relates to subscribers but that doesn't fit into the subscriber attributes. With data extensions,
you can:
•
Import information from other systems into Email Studio.
•
Send a message to subscribers in a data extension.
•
Exclude subscribers in a data extension from a message send.
•
Include customer-specific information from a data extension in a message.
•
Collect the subscriber information of people who trigger a triggered send.
•
Create dynamic content in an email content area.
Create a Data Extension in Email Studio (Enhanced)
Create a data extension in Email Studio.
Create a Data Extension from an Existing Data Extension in Marketing Cloud Engagement
Create a data extension from an existing data extension in Email Studio. Creating a data extension from an existing data extension
allows you to copy the fields and their configurations but doesn’t copy the data stored in the data extension itself.
120
SubscribersEmail in Marketing Cloud Engagement
Create a Data Extension from a Template
Create a data extension with a data extension template. A few data extension templates are provided with Email Studio to enable
specific use cases, such as data extensions used in coupon-based solutions.
Create a Filtered Data Extension
Create a filtered data extension in Email Studio. A filtered data extension is generated by filtering fields, filters, and measures. Filtered
data extension takes on the same characteristics as the source data extension. To update a filtered data extension to sendable or
non-sendable, change the source data extension to sendable or non-sendable. To remove data from a filtered data extension, remove
the data from the source data extension and then refresh the filtered data extension.
Refresh a Filtered Data Extension
Newly added or modified records are not automatically added to filtered data extensions. To add new records to a data extension,
refresh the filtered data extension in Marketing Cloud Engagement.
Create a Data Extension That Contains Randomly Selected Subscribers
A random data extension splits up subscribers from a selected standard data extension and places the subscribers into new data
extensions in Email Studio. You can create as many as 12 data extensions at a time.
Data Extension Properties for Marketing Cloud Engagement
View statistics about the data extension and change properties of the data extension in the data extension details section of Email
Studio. To access data extension properties, select the data extension name.
Set Enterprise 2.0 Shared Data Extension Permissions
Data Extension Permissions is a Marketing Cloud Engagement tool that controls business unit access to shared data extensions in
Email Studio. By checking the box next to a permission, you can enable or disable that permission.
Import into a Data Extension
Import subscriber data into a data extension in Email Studio.
View Data Extension Records
View data extension records in Email Studio for Marketing Cloud Engagement.
Export a Data Extension
Export subscribers from Email studio to a Marketing Cloud Engagement data extension.
Send to Subscribers in a Data Extension
You can use Email Studio in Marketing Cloud Engagement to send a message to subscribers in a data extension.
View Tracking for Data Extensions
View tracking for data extensions in Email Studio for Marketing Cloud Engagement.
Data Relationships
A data relationship in Email Studio specifies that a column in one data extension contains the same kind of information as a column
in another data extension or in a subscriber attribute. Use a data relationship to relate two data extensions based on a common
column contained in both data extensions. You can then apply a filter to the two data extensions and create a new segment of data.
Data Extension Error Messages
Use this information to resolve errors involving data extensions in Email Studio.
Data Extensions Data Types in Email Studio
You can select a data type from these choices when you create a column in an Email Studio data extension.
Operators
Review this list of operators for use with profile and preference attributes in data extensions for Email Studio.
121
SubscribersEmail in Marketing Cloud Engagement

Create a Data Extension in Email Studio (Enhanced)
Create a data extension in Email Studio.
Important: You can’t include the following characters in the name and field name of a data extension: ! @ # $ % ’ ^ * ( ) = { } [ ]
\ . < > / " : ? | , &
1. Hover over Subscribers.
2. Click Data Extensions.
3. Click the Create button. You have three options:
•
Standard Data Extension: A standard data extension allows you to create custom fields to store data.
•
Filtered Data Extension: A filtered data extension is generated by filtering fields, measures, and filters for sendable data extensions
from a source data extension.
•
Random Data Extension: A random data extension allows you to randomly select subscribers from a source data extension.
4. Click Standard Data Extension.
5. Click OK.
6. Complete the information in the Properties section:
•
Creation Method - The method used to create the data extension. Select Create from New.
•
Name - The name of the data extension. Use this name to identify the data extension in Email Studio.
•
External Key - A unique value that identifies the data extension. Use this value to identify the data extension with an API call.
•
Description - A description of the data extension, optional. Use this description to further help identify the data extension within
Email Studio.
•
Location - To store the data extension in a different folder location, optional, select Change Location.
•
Is Sendable - Indicates whether you intend this data extension to have messages sent to it. This checkbox determines whether
the data extension is available to use as part of sends.
•
Is Testable - If you select Is Sendable, this field indicates whether you intend this data extension to have test messages sent to
it.
•
Campaign Association- To associate a data extension used for sending with a Campaign, select the radio button for the appropriate
Campaign, optional.
7. Click Next.
8. Optionally, turn on Retention Settings. If you have this feature enabled, the data admin user for your account can enable or change
the data retention policy for new data extensions. Contact your account administrator to activate the data retention policy feature.
By default, the data extension retention policy deletes unused data extensions after 6 months. The deletion process runs nightly.
Set these options when creating the data extension. You can’t modify the delete settings for an existing data extension. You can
modify the deletion period for existing data extension.
Data Retention Options:
•
Retention Setting - Select On to ensure that the application deletes all records in the data extension at the same time.
–
Delete:
•
Individual Records - When this option is selected, the data extension is retained but the individual records inside the
data extension are deleted.
•
All Records - When this option is selected, the data extension is retained but the records inside the data extension are
deleted.
122
SubscribersEmail in Marketing Cloud Engagement
•
All Records and Data Extension - When this option is selected, the entire data extension and the records inside the data
extension are deleted.
–
Period:
•
After: Enter the number of days after the data extension was created to wait before deleting.
•
Reset period on import: To extend the retention date following a new import.
•
On: Select a specific date to delete.
9. Click Next.
10. Include a field with the Email Address data type for email sends or a Phone data type for SMS sends in sendable data extensions
with no other information that relates to an existing subscriber. If the Email Address or Phone data types aren’t present, the subscriber
receives no messages sent using the data extension.
•
Primary Key - Determines whether the system considers this field to be the primary key of the table. If you select this checkbox,
the system requires a unique value in this field so it can use this field to uniquely identify a row. If you select this checkbox for
more than one column, then the combination of the values in the columns must be unique. If you don’t select this checkbox,
the system doesn’t require the value in this field to be unique. When a Primary Key field is configured with a default value, the
default value isn’t applied during imports. After a primary key has been created within a Data Extension, it can’t be modified. To
modify an existing primary key, create another data extension. New primary keys can still be added to existing dat extensions.
•
Name - The name of the column in the data extension.
•
Data Type - The data type of the contents of the field. Data type can’t be changed after the data extension is created. Valid values
include:
–
Text - A combination of letters, numbers, and spaces.
–
Number - An integer. Decimal values aren’t supported.
–
Date - A system date. You can use an AMPscript function to format this value when you present it in a message. All time is
stored in Central Standard Time and dates are stored in the format MM/DD/YYYY.
–
Boolean - A 0 or 1 value.
–
EmailAddress - A field of this type must exist in order for you to send an email to a data extension. The system doesn’t verify
that the value in this field is a valid email address when importing data.
–
Phone - This data type accepts any string with 10 or 11 digits in it and strips out non-digit characters.
–
Decimal - A number with a decimal point.
•
Length - Maximum number of characters, including spaces, you can import into this column. Don’t use empty lengths for Text
data types unless necessary. If you select the Decimal data type, you specify both the total maximum number of characters and
how many of the total appear after the decimal point. For example, if you define a decimal field with a length of 18.2, the two
characters that appear after the decimal point are included in the 18 character total limit. Up to 10 characters are allowed for
the Decimal Data type when creating a Data Filters from a Data Extension.
•
Nullable - Determines whether this column can be empty.
•
Default Value - If you specify a default value for this field, this value is used for all records who don’t have a value entered for the
field.
11. Click Create.
123
SubscribersEmail in Marketing Cloud Engagement
Manage Policies for an Email Studio Data Extension
If you have this feature enabled in Email Studio, the admin user for your account can allow or disallow users to delete a data extension,
modify existing fields in a data extension, or add more fields to a data extension. Even if a user’s permission allows them to delete
or update data extensions, the change control policy takes precedence over their permissions. If all users permissions for the account
are set to deny for deleting data extension and deny for updating a data extension, the change control policy doesn’t need to be
configured. Contact your account administrator if you would like to activate this feature.
Manage Policies for an Email Studio Data Extension
If you have this feature enabled in Email Studio, the admin user for your account can allow or disallow users to delete a data extension,
modify existing fields in a data extension, or add more fields to a data extension. Even if a user’s permission allows them to delete or
update data extensions, the change control policy takes precedence over their permissions. If all users permissions for the account are
set to deny for deleting data extension and deny for updating a data extension, the change control policy doesn’t need to be configured.
Contact your account administrator if you would like to activate this feature.
The change control policy provides more change control for specific data extension. By default, the change control policy is set to allow
users to delete, modify, and add more fields as long as their user permissions allows them to make those actions. When Allow users to
delete this Data Extension is unchecked, users with data extension delete permission set to allow can’t delete the data extension. When
Allow users to modify existing fields in this Data Extension is unchecked, users with data extension update permission set to allow can’t
modify the data extension. When Allow users to add more fields to this Data is unchecked, users with data extension update permission
set to allow can’t modify the data extension.
Delete Data Extension Permissions: Fields Permissions:
•
By checking Allow users to delete this Data Extension, users with delete permission can delete this data extension.
•
By unchecking this box, no users are able to delete this data extension.
•
By checking Allow users to modify existing fields in this Data Extension, users with update permissions can modify existing fields in
this data extension. By unchecking this box, no users can modify existing fields in this data extension.
•
By checking Allow users to add additional fields to this Data Extension, users with update permissions can add existing fields in this
data extension. By unchecking this box, no users can add existing fields in this data extension.
If you have this feature enabled, the admin user for your account can enable or change the data retention policy for new data extensions.
Contact your account administrator if you would like to activate the data retention policy feature. By default, the data extension retention
policy deletes unused data extensions after 6 months. The deletion process runs most nights. If the process doesn’t complete in one
run, the deletion will start where it left off on the next run. Retention settings must be enabled when creating a data extension. You can
modify the data retention policy for existing data extension where retention settings were enabled at creation.
Data Retention Options:
•
Retention Setting - Select On to ensure that the application deletes all records in the data extension at the same time.
–
Delete:
•
Individual Records - When this option is selected, the data extension is retained but the individual records inside the data
extension are deleted.
•
All Records - When this option is selected, the data extension is retained but the records inside the data extension are deleted.
•
All Records and Data Extension - When this option is selected, the entire data extension and the records inside the data
extension are deleted.
–
Period:
•
After - Enter the number of days after the data extension was created to wait before deleting.
•
Reset period on import - Check this box to extend the retention date following a new import to the data extension.
•
On - Select a specific date to delete.
124
SubscribersEmail in Marketing Cloud Engagement

This table shows how data retention settings for existing data extensions map to the new data retention policy settings when an account
opts into enhanced subscriber features:
Field after opting into enhanced subscriber featuresField before opting into enhanced subscriber feature
Retention SettingsUse Data Retention
Existing data extensions that have this field checked with one of
the following selected: All Records and Data Extension.
Existing data extensions that don’t have this field checked has the
following selected: Individual Records.
Use Object Based Retention
Existing data extensions that have this field checked and Use Object
Based Retention checked have the following selected: All Records
and Data Extensions.
Existing data extensions that don’t have this field checked and Use
Object Based Retention checked have the following selected: All
Records.
Delete Only Data At End Of Retention Period
After and the number enteredRetention Period
On and the selected fixed dateUse Fixed Date
Reset period on importReset Retention Period On Import
Retention Policy Support with Triggered Sends
If you use a TriggeredSendDataExtension in Email Studio with a triggered send, the data extension supports automatic data retention
policies. When defining a triggered send with a data extension source, you specify how long to retain the data.
Retention Policy Support with Triggered Sends
If you use a TriggeredSendDataExtension in Email Studio with a triggered send, the data extension supports automatic data retention
policies. When defining a triggered send with a data extension source, you specify how long to retain the data.
The default is 6 months. You may select a retention period ranging from one day to forever. The system deletes the data at the end of
the retention period. Subscriber data is not removed by the data retention policy; only the data extension data is removed.
You may delete data from the data extension, and import the data back in using AMPscript
Create a Data Extension from an Existing Data Extension in Marketing Cloud Engagement
Create a data extension from an existing data extension in Email Studio. Creating a data extension from an existing data extension allows
you to copy the fields and their configurations but doesn’t copy the data stored in the data extension itself.
1. Click Subscribers > Data Extensions > Create > Standard Data Extension > Create from Existing.
2. Select the existing data extension.
3. Complete the information in the Properties section.
4. Click Next.
5. Complete the information in the Fields section for each field you want to add.
6. Click Create.
125
SubscribersEmail in Marketing Cloud Engagement
Create a Data Extension from a Template
Create a data extension with a data extension template. A few data extension templates are provided with Email Studio to enable specific
use cases, such as data extensions used in coupon-based solutions.
1. Hover over Subscribers.
2. Click Data Extensions.
3. Click Create, and then choose a data extension type.
•
Standard Data Extension: Use a standard data extension to create custom fields to store data.
•
Filtered Data Extension: A filtered data extension is generated by filtering fields, measures, and filters for sendable data extensions
from a source data extension.
•
Random Data Extension: Use a random data extension to randomly select subscribers from a source data extension.
4. Click Standard Data Extension.
5. Complete the information in the Properties section.
DescriptionOption
Click Create from Template, select a data extension template, and click Continue.Creation Method
Name of the data extension. Use this name to identify the data extension in Email Studio.Name
A unique value that identifies the data extension. Use this value to identify the data extension
with an API call.
External Key
Description of data extension. Use this description to further help identify the data extension
within Email Studio.
Description
Select Change Location to store the data extension in a different folder location.Location
Indicates whether you can send messages to subscribers whose information is in the data
extension.
Used for Sending
Indicates whether you can send test messages to the contacts in the data extension. To select
this option, you must also select Used for Sending.
Used for Testing
To associate a data extension used for sending with a Campaign, select the radio button for
the appropriate Campaign.
Campaign
6. Complete the information in the Fields section for each field you want to add in addition to the fields that are required for the
template. To create a new field in the data extension, click Add.
•
Name: The name of the column
•
Data Type: The data type of the contents of the field. Valid values include:
–
Text: A combination of letters, numbers, and spaces.
–
Number: An integer. Decimal values aren’t supported.
–
Date: A system date. You can use an AMPscript function to format this value when you present it in a message.
–
Boolean: A 0 or 1 value.
–
Email Address: An email address. A field of this type must exist in order for you to send an email to a data extension. The
system doesn’t verify that the value in this field is a valid email address when importing data.
–
Phone: A phone number.
–
Decimal: A number with a decimal point.
126
SubscribersEmail in Marketing Cloud Engagement

–
Length: Maximum number of characters, including spaces, you can import into this column. If you select the Decimal data
type, you specify both the total maximum number of characters and how many of the total appear after the decimal point.
Enter the maximum number of digits allowed in the field in the Precision box, and enter the quantity of numbers
located to the right of the decimal point in the Scale box. For example, a price field with the value 5 in the Precision box
and the value 2 in the Scale box can display a price like 123.45.
–
Primary Key: Determines whether the system considers the field to be the primary key of the table. If you select this checkbox,
the system requires that the value in this field is unique so it can use this field to uniquely identify a row. If you select this
checkbox for more than one column, then the combination of the values in the columns must be unique. If you don’t select
this checkbox, the system doesn’t require the value in this field to be unique.
–
Nullable: Determines whether this column can be empty. If you select this checkbox, you can import a NULL, empty, value
for this column. If you don’t select this checkbox and try to import a NULL value for this column, the system responds as you
specify in the Skip Rows with Bad Data field on the import definition.
7. Save your changes.
Create a Filtered Data Extension
Create a filtered data extension in Email Studio. A filtered data extension is generated by filtering fields, filters, and measures. Filtered
data extension takes on the same characteristics as the source data extension. To update a filtered data extension to sendable or
non-sendable, change the source data extension to sendable or non-sendable. To remove data from a filtered data extension, remove
the data from the source data extension and then refresh the filtered data extension.
1. Hover over Subscribers.
2. Click Data Extensions > Create > Filtered Data Extension > OK.
3. Select a standard data extension to filter as the source data extension. If the selected data extension has data retention enabled, you
must have the Manage Data Retention permission.
4. Click OK.
5. Drag Fields, Filters, or Measure from the left column to the Create Filter canvas.
Note: Choose an operator that aligns with the type of field you chose. For example, don’t use the less than operator with a
text field. For date attributes, only the following operators are supported: is equal to, is not equal to, is greater than, and is less
than.
6. Select an AND or OR operator. To group your criteria, hover over the grouping operator so that it turns a darker blue, and click to
change the operator. If you choose AND, the record must meet all criteria to be included in the group. If you choose OR, the record
must meet one of the criteria, not necessarily all criteria, to be included in the group.
7. Click Save & Build.
8. Enter a name and description for the filtered data extension.
9. Select a folder in which to store the filtered data extension, or select New Folder to create a folder.
10. Save the data extension.
Filtered Data Extensions
Use a filtered data extension to target a more specific set of subscribers. You can filter a data extension by fields or measures or apply
existing data filters.
127
SubscribersEmail in Marketing Cloud Engagement
Filtered Data Extensions
Use a filtered data extension to target a more specific set of subscribers. You can filter a data extension by fields or measures or apply
existing data filters.
You can create a filtered data extension from a saved or existing data filter. To use a data filter as a starting point, copy it and edit it.
However, you can’t apply a data filter created from a filter data extension when dragging and dropping segments.
Refresh a Filtered Data Extension
Newly added or modified records are not automatically added to filtered data extensions. To add new records to a data extension, refresh
the filtered data extension in Marketing Cloud Engagement.
You can also refresh a data extension by clicking the name of the data extension and then click refresh.
1. Select the checkbox next to the filtered data extension to refresh.
2. Click Refresh under Actions.
3. Click OK in the confirmation dialog box that appears.
The application scans all records data and rebuilds the filtered data extension.
Create a Data Extension That Contains Randomly Selected Subscribers
A random data extension splits up subscribers from a selected standard data extension and places the subscribers into new data extensions
in Email Studio. You can create as many as 12 data extensions at a time.
1. In Email Studio, on the Subscribers tab, click Data Extensions.
2. Click Create.
3. Select Random Data Extension.
4. Click OK.
5. Select a source data extension of records to split.
6. Click OK.
7. Click Add Data Extension.
a. Enter a name for the data extension.
b. In the Data Extension Size field, enter either a percentage or a number that represents how many of the records in the selected
data extension are randomly added to this data extension.
c. To change the location the data extension is saved, click Change Location and select a folder in which to store the data extension.
8. Repeat the Add Data Extension step to create more splits. You can create up to 12 splits.
9. If you want to create a data extension from the remaining subscribers, click Add Remainder.
10. Click Save & Build.
Data Extension Properties for Marketing Cloud Engagement
View statistics about the data extension and change properties of the data extension in the data extension details section of Email Studio.
To access data extension properties, select the data extension name.
128
SubscribersEmail in Marketing Cloud Engagement

OptionsDescriptionField
To change the name or the description,
make your modifications to the text box at
The name displays in the data extension
workspace and in the Send wizard.
Name and Description
the top of the Properties tab. When you click
Done, your change takes effect.
To create a campaign, click Create
Campaign.
Click the plus sign to associate a data
extension used for sending with a
Campaign. Select the radio button for the
appropriate Campaign, optional.
Campaign
To change the external key, make your
modifications to the text box and click
Done.
The external key is a unique identifier. This
value is used by developers in their API calls
to access the data extension
programmatically.
External Key
These dates are recorded.Date on which this data extension was
created and the date when it was last
modified.
Created and Last Modified
To relocate, click the Change button, which
opens Select Location showing the folder
Folder in which this data extension is
located.
Location
structure. Click the desired folder and click
OK.
This is set by the application.There are 3 types of data extension:
standard, filtered, or random.
Type
Click the checkbox to use this data extension
as part of sends. Select a data extension field
Indicates whether you intend for this data
extension to have messages sent to it. This
Used For Sending
in the first box and a field on the subscriberscheckbox determines whether the data
table field in the second box. For example,extension is available to use as part of sends.
EmailAddress relates to Subscribers onRelates to subscribers on - If you select the
SubscriberKey. Only Text, Email Address,Used for Sending checkbox, this field
or Phone can be related to the subscriber
key.
determines the field in the data extension
that relates to the Subscriber table.
Click the checkbox to use this data extension
as part of test sends.
If you select the Used for Sending checkbox,
this field indicates whether you intend this
data extension to have test messages sent
to it.
Used For Testing
Click the Records tab to review record data
and to import records. The Tracking tab
Number of records who currently belong to
this data extension.
Size
shows Data Extension composition, provides
access to reports, and recent sends.
Click Edit Fields to add, remove, or modify
fields.
The fields that have been added to the data
extension to contain your external data.
Fields
129
SubscribersEmail in Marketing Cloud Engagement
Set Enterprise 2.0 Shared Data Extension Permissions
Data Extension Permissions is a Marketing Cloud Engagement tool that controls business unit access to shared data extensions in Email
Studio. By checking the box next to a permission, you can enable or disable that permission.
1. Click Subscribers.
2. Click Shared Data Extension.
3. Select the data extension name.
4. Click Permissions.
5. Select the checkbox next to the names of the business unit to set or change permissions for. When multiple business units are
selected, existing permissions do not display. To review a specific business unit's permissions, only select the checkbox next that
business unit.
6. Click Edit.
7. Set to allow or deny actions the business unit can take on the data extension.
8. Optionally, set a Start Sharing and End Sharing date.
9. Click Save.
Import into a Data Extension
Import subscriber data into a data extension in Email Studio.
Your account must be configured to use enhanced FTP to use the Data Extension import wizard. Before you can import a file, you must
create a data extension and create the import file. Your import file must contain a header row and at least one row of data. Your import
file must be a comma-delimiter, tab-delimiter, or other delimited file. The file size can’t exceed 20 MB when using the import wizard.
For files 20 MB or larger use an Automation Studio import activity. You can use an import activity or the import wizard to populate your
data extension.
After you have imported into a data extension, you can include the data in your messages with AMPscript functions. For example, you
could summarize the customer's transactions for the month in an email.
You can view the data in a data extension, and a count of the records. From the data extension workspace, select the name of the data
extension and click the Records tab.
1. Hover over Subscribers.
2. Click Data Extensions.
3. Under Actions click Import for the data extension to import into.
4. Complete the Import Into Data Extension dialog box:
•
File Location and File:
–
My computer—If the file you want to import is on your hard drive, click the Browse button and locate the imported file on
your computer. If the file size exceeds 20 MB, you must use the FTP option. The file name must be 99 characters or less.
–
FTP—To use a file that you've uploaded to the enhanced FTP site, type the filename in the File name field. File names are
case-sensitive. See the Enhanced FTP Guide for details on using the FTP option.
•
Compressed—Determines whether the system uncompresses the file when the activity runs. If you select this checkbox, the
value you enter in the File Naming field must have a .zip extension.
•
Encrypted—Determines whether the system decrypts the file when the activity runs. If you select this checkbox and don’t select
the File is compressed checkbox, then the value that you enter in the File Naming field must have a .pgp or .gpg extension.
•
Delimiter:
130
SubscribersEmail in Marketing Cloud Engagement

Comma—If you choose this file type, the value that you enter in the File Naming field must have a .csv extension.
–
–
Tab—If you choose this file type, the value that you enter in the File Naming field must have a .txt extension.
–
Other—If you choose this file type, you must enter a 1-character delimiter in the Other Delimiter field.
•
Data Format—You can select a date format from the dropdown menu in this section to use as part of the import. Choose the
date format that most closely matches the region from which you’re conducting the import.
•
Import Type:
–
Add and update—If the import file contains records with a primary key or email address that doesn’t exist in the data
extension, the import creates a record for that information. If the import file contains records with a primary key (or email
address) that does exist in the data extension, the import updates the record to match what is in the import file.
–
Add only—The import creates records for primary keys that don’t exist in the data extension and ignores records whose
primary keys exist.
–
Update Only—If the import file contains records with a primary key or email address that does exist in the data extension,
the import updates the record to match what is in the import file.
–
Overwrite—The import overwrites all records.
Note: When a Primary Key field is configured with a default value, the default value isn’t applied during imports.
•
Import Options:
–
Skip rows with bad data.
–
Respect double quotes as a text qualifier—If you select the checkbox, the system treats double quotes as a text delimiter.
If you don’t select this checkbox, the system ignores double quotes in your import file.
•
File Encoding—Select the type of file encoding you want to use. If no type is selected, the system defaults to UTF-8.
5. Click Next.
6. Complete the Configure Mapping dialog box that appears.
•
Map by Header Row—The import updates the columns in the data extension with the information in the import file by matching
the column headings.
•
Map by Ordinal—The import updates the first column in the data extension with the first column in the import file, the second
column with the second column, and so on. When Import File has column headers is checked, the header value in the import
file is displayed in italics.
•
Map Manually—The import file columns that directly match a data extension column are mapped automatically. To manually
map an import file column, select the column name in the dropdown next to the data extension column. An import file column
can only be mapped to 1 data extension column.
7. Click Next.
8. Review the Review & Import dialog box that appears.
9. Enter an email address to receive an email when the import completes. You receive a list of errors. By default your Notification Email
Address is populated.
10. Click Import.
SEE ALSO:
Add Marketing Cloud SFTP Accounts
File Locations
131
SubscribersEmail in Marketing Cloud Engagement
View Data Extension Records
View data extension records in Email Studio for Marketing Cloud Engagement.
1. Click Subscribers.
2. Click Data Extension.
3. Select the data extension name.
4. Click Records.
From here you can review records, export records, import records, and clear data.
Export a Data Extension
Export subscribers from Email studio to a Marketing Cloud Engagement data extension.
1. Click Subscribers.
2. Click Data Extensions.
3. Under actions click Export for the data extension to export.
4. Complete the dialog box:
•
Data Extension - The name of the data extension selected to export. If file size exceeds 20MB, you must use the FTP option.
•
Filename - Enter a name for the export filename.
•
File type - Supported export file types:
–
Comma-separated values - If you choose this file type, the export file exports as a CSV file.
–
Tab-separated values - If you choose this file type, the export file exports as a TXT file.
–
Other - If you choose this file type, you must enter a 1-character delimiter.
•
Export options - Optional export options:
–
Include column headers - Export the data extension field names as column headers.
–
Compress file - The system compresses the file when the export runs. The filename exports with a .ZIP extension.
–
Encrypt file - The system encrypt the file when the export runs. Only available when using the FTP delivery option. If you
select this checkbox, you must select PGP or GPG and a Key.
•
Delivery location -
–
Browser download - To export to your computer. If file size exceeds 20MB, you must use the FTP option.
–
FTP - To export to your enhanced FTP location. Enter an email address to receive an email when the export completes. You
will also receive a list of errors. By default your Notification Email Address is populated.
•
File Encoding - Select the type of file encoding you want to use. If no type is selected, the system defaults to UTF-8.
5. Click Export.
Send to Subscribers in a Data Extension
You can use Email Studio in Marketing Cloud Engagement to send a message to subscribers in a data extension.
If you use the Subscriber Key to identify your subscribers, the application deduplicates your data extension list based on the Subscriber
Key value instead of the email address.
If you can send to a data extension, you can also use the send preview feature with the data extension. The send preview lets you see
what the personalization and dynamic content looks like for an individual message recipient.
132
SubscribersEmail in Marketing Cloud Engagement
When you send an email to a data extension, the system uses the List Detective tool to scan the email addresses in the data extension.
The List Detective protects your deliverability by preventing the sending of email to problematic addresses. The email addresses identified
by the List Detective aren’t sent to, so the sends don’t appear in your tracking. The email addresses in the data extension aren’t removed
or changed by List Detective.
1. Click Subscribers.
2. Click Data Extensions.
3. Under Actions click Send. The send option only displays for sendable data extension. To determine if a data extension is sendable,
check the Sendable column on the data extension grid or check the Used For Sending field on the data extension properties.
4. Click Next.
5. Select the email to send.
6. Click Next.
7. Choose Recipients Dialog Box - the lists previously selected will already be checked. Optional, you can add or remove groups and
lists in this step.
•
Select the target recipients you wish to send the email to. Can you send to lists or group, or data extensions with an associated
publication list, or an Audience with an associated publication list, or a Data Filter with an associated publication list. Depending
on the features enabled you may see different options. We recommend sending to a maximum of 50 lists. If you exceed that
number you may have trouble viewing tracking for that send. When sending to data extensions or an audience check,
De-duplicate subscribers by email address you don’t want subscribers to receive multiple emails.
8. Click Next.
9. Choose Excludes and Suppressions Dialog Box This box allows you to refine your recipients and is an optional step depending on
your business needs. This option is only used when some subscribers are selected as recipients but you don’t want to send to them.
Any recipient that is listed as a target audience and listed on an exclude or suppression list won’t get the email. Select the subscribers
to exclude or suppression from this send.
•
This box allows you to refine your recipients and is an optional step depending on your business needs. This option is only used
when some subscribers are selected as recipients but you don’t want to send to them. Any recipient that is listed as a target
audience and listed on an exclude or suppression list won’t get the email.
•
Select the subscribers to exclude or suppression from this send.
10. Click Next.
11. Send Options Dialog Box
•
Subject - Select the Insert Dynamic Content icon next to the subject line to send a dynamic subject email. Select the Insert
Personalization icon to add personalization to the subject line.
•
Preheader - Preheader is text displayed after the subject line when an email is previewed. The preheader can be modified in
email properties.
•
From Options:
–
If to choose a specific email address from which you want to send the email message, click the top radio button next to Use
the following from name and address. Select the from name and address in the dropdown menu.
–
If to use a send classification, click the radio button next to Select a send classification and select the send classification from
the dropdown menu.
–
Override sender profile with: - Determines whether the interaction uses a different sender profile than what is specified
on the send classification. If you select this checkbox, you must select a sender profile to use.
133
SubscribersEmail in Marketing Cloud Engagement

–
Override delivery profile with: - Determines whether the interaction uses a different delivery profile than what is specified
on the send classification. If you select this checkbox, you must select a delivery profile to use. If these options aren’t available
in your account contact your account executive to have it enabled.
•
Send Options:
–
Allows you to select Send as Multipart MIME. The system sends both the HTML and Text version of the email, including
the text version you’ve created, and whichever version is accepted by the subscriber's email client is delivered. If Multipart
MIME isn’t enabled in your account contact your account executive to have it enabled.
–
Allows you to select Track all links found within this email. If you select this checkbox, the system collects tracking on
the links.
–
Allows you to select to Suppress this send from reports. If you select this checkbox, the email is sent to the designated
list without the job appearing in reports. The job is automatically added to the Test Send Emails folder.
–
Allows you to select Enable send logging to a data extension. If Send Logging isn’t enabled in your account executive
to have it enabled.
–
Allows you to select the Tracking Destination folder. If you select a predefined folder, the job will automatically be placed
in that folder at the time of send.
•
Testing Options - If this feature is enabled in your account, the Email Send Wizard includes an option labeled Send All Emails
to. An email is generated for each subscriber and delivered to a single test address that you specify. The key benefit of this option
is that you’re able to see exactly how each email looks to each subscriber. If you used personalization strings or dynamic content
in the email, each email contains the data specific to the targeted subscriber. Emails that you send to a test list or via the Email
Send Wizard's test option are charged to your account in the same way as any emails that you send to your subscribers. Keep
in mind that the test email address receives as many email messages as there are subscribers on the list or group selected. If the
lists and groups you select contain many subscribers, using this feature may not be a feasible option contact your account
executive to have it enabled.
12. Click Next.
13. Schedule Send Dialog Box
•
Send Email - This box allows you to select whether to send your email Immediately or Later. If you choose Later, you can select
the date and time of the send.
•
Send Throttling - Send Throttling allows you to select a range of hours during which you want to send your email. A Start and
End time required. You can also specify how many emails you want to send per hour during that time.
The system sends emails during the hours you specify every day (starting the day you send the email) until all the emails are sent.
When using Send Throttling, you should not schedule the email in the upper half of the dialog box. Send throttling overrides
scheduling, but scheduling the email can corrupt the send throttle process. It's imperative that you either schedule the email to
send in the future or select the Send Throttle checkbox.
The system begins processing the email send job at the start time you specify. The send isn’t spread evenly between the start and
end times. The system continues sending during the specified time range until the send is complete or the end time you specified
is reached, whichever comes first. If the end time is reached before the send is complete, the system will continue the send the next
day at the same start time. This process continues until the send is complete.
You can use Send Throttling for the following reasons:
134
SubscribersEmail in Marketing Cloud Engagement

•
To control inbound traffic to a website, meaning, the interest generated by email may result in server crashes due to too many
people visiting.
•
To limit the number of emails sent to a particular domain each hour.
14. Click Next.
15. Confirm Send Dialog Box
This box allows you to review the summary of your email's information before sending. If there are validation errors, you see the
Validations errors dialog box.
16. After verifying all the information is correct, select the This information is correct check box and click Send.
View Tracking for Data Extensions
View tracking for data extensions in Email Studio for Marketing Cloud Engagement.
1. Click Subscribers.
2. Click Data Extension.
3. Select the data extension name.
4. Click Tracking.
From here you can review sends for the last 30 days and access reporting.
Data Relationships
A data relationship in Email Studio specifies that a column in one data extension contains the same kind of information as a column in
another data extension or in a subscriber attribute. Use a data relationship to relate two data extensions based on a common column
contained in both data extensions. You can then apply a filter to the two data extensions and create a new segment of data.
Usually, the column is the primary key of one of the data extensions. For example, if you store an airport code as a subscriber attribute
and create a data extension that contains airport names related to the airport codes, you would create a data relationship to declare
that the airport code on the subscriber contains the same kind of information as the airport code in the data extension. This process
allows the relationship to find the airport name by looking up the row in the data extension that contains the same airport code as the
subscriber attribute.
You can relate multiple columns from each table to use multiple values to identify the correct row in the related table.
Before you create a data relationship, you must create the data extensions that are involved in the relationship. After you create a data
relationship, you can include information from the data extension in messages to subscribers via a data filter.
135
SubscribersEmail in Marketing Cloud Engagement
Create a Data Relationship in Marketing Cloud Engagement
Create a data relationship between data extensions in Email Studio.
Troubleshoot Marketing Cloud Engagement Data Relationships
Review this information to troubleshoot your data relationships for data extensions in Email Studio.
Create a Data Relationship in Marketing Cloud Engagement
Create a data relationship between data extensions in Email Studio.
Before you start this procedure, you must create the data extensions that are involved in the relationship. After you complete this
procedure and populate the data extensions with data, you can include information from a data extension in a message to subscribers.
1. Click Subscribers > Data Relationships > Create.
2. In the Properties section, provide a name, description, and external key for the data relationship. The external key identifies the data
relationship in API calls.
3. In the Fields section, use the <select object> list boxes to identify the data extensions involved in the data relationship, and use the
<select field> list boxes to identify the data extension fields involved in the relationship.
4. If more than one column in each data extension is involved, click Add to display another set of <select field> list boxes.
5. Save your changes.
SEE ALSO:
Subscriber Key in Marketing Cloud Engagement
Data Relationships
Troubleshoot Marketing Cloud Engagement Data Relationships
Review this information to troubleshoot your data relationships for data extensions in Email Studio.
The External Key Cannot Exceed 36 Characters.
The external key cannot be longer than 36 characters.
This error occurs when you try to save the data relationship and the length of the value in the External Key field exceeds 36 characters.
Correct the error by reducing the number of characters in the external key value to 36 or fewer.
External Key Already Exists
An object with external key <external key> already exists.
This error occurs when you try to save the data relationship and the value in the External Key field for the data extension is the same as
the external key for a data relationship that already exists. Correct this error by changing the name and external key values.
Relationship Already Exists
A relationship already exists for the left and right side of the relationship.
This error occur when you try to save a data relationship where the combination of the left and right side objects already appears in
another data relationship. Solve this error with one of these actions:
•
Change the left-side object.
•
Change the right-side object.
•
Remove the data relationship.
136
SubscribersEmail in Marketing Cloud Engagement

Data Relationship Name Cannot Exceed 64 Characters
The relationship name cannot be longer than 64 characters.
This error occurs when you try to save the data relationship and the length of the value in the Name field is greater than 64 characters,
including spaces. Correct this error by reducing the number of characters in the Name value to 64 or fewer.
Data Relationship Name Cannot Be Blank
The relationship name cannot be blank.
This error occurs when you try to save the data relationship without a value in the Name field. Correct this error by entering a name for
the data relationship.
Relationship Must Have Both Left and Right Columns
There must be a left and right field when defining a relationship.
This error occurs when you try to save the data relationship with a right or left column. Correct this error by including both columns in
your data relationship.
Same Column Cannot Exist on Both Sides of a Relationship
The same field cannot be selected when mapping data relationship fields.
This error occurs when you try to save the data relationship with both the left and right column using the same column in the same
object. Correct this error by selecting a different column for either the left or right side of the relationship.
Data Extension Error Messages
Use this information to resolve errors involving data extensions in Email Studio.
DescriptionError
Specify a name
This error occurs when you try to save the data extension when
the Name field for the data extension is NULL. Correct this error by
entering a value in the Name field for the data extension.
Specify a Name
An object named <object name> already
exists.
This error occurs when you try to save a data extension (new or
modified) with a value in the Name field that matches the name
Object Name Already Exists
of a data extension that already exists. Correct this error by using
a different data extension name.
An object with external key <external key>
already exists.
This error occurs when try to save the data extension when the
value in the External Key field for the data extension is the same
External Key Already Exists
as the External Key for a data extension that already exists. Correct
this error by using a different external key value.
137
SubscribersEmail in Marketing Cloud Engagement

DescriptionError
Field name cannot be blank.
This error occurs when you try to save the data extension when
the Name field for one of the columns is NULL. Correct this error
Field Name Cannot Be Blank
by entering a name for the field or deleting the column from the
data extension.
A field named <column name> already exists
on object <object name>.
This error occurs when you create a column in a data extension
with the same name as a column that already exists. Correct this
error by changing the field name.
Field Name Already Exists
A text field with no length specified
cannot be used as primary key.
This error occurs when you select the Primary Key checkbox for
a column whose Data type is Text and whose Length field is NULL.
Correct this error by taking one of these steps:
Text Field with No Length Cannot Be Primary Key
•
Specify a maximum length for the Data Type field in the primary
key.
•
Clear the Primary Key checkbox for the text field.
•
Change the Data type of the text field to a different value.
A primary key field cannot be nullable.
This error occurs when you try to save the data extension when
both the Primary Key checkbox and the Nullable checkbox are
Primary Key Cannot Be Nullable
selected for a column. Correct this error by taking one of these
actions:
•
Clear the Primary Key checkbox for the column.
•
Clear the Nullable checkbox for the column.
•
Clear both the Primary Key checkbox and the Nullable
checkbox for the column.
Cannot contain illegal characters:
This error occurs when you try to save the data extension and the
name contains one of these characters:
Cannot Contain Illegal Characters
•
!
•
@
•
#
•
$
•
%
•
^
•
*
138
SubscribersEmail in Marketing Cloud Engagement

DescriptionError
•
(
•
)
•
_
•
=
•
{
•
}
•
[
•
]
•
\
•
.
•
<
•
>
•
?
•
/
•
'
Correct this error by removing the illegal character.
The external key cannot be longer than 36
characters.
This error occurs when you try to save the data extension and the
length of the value in the External Key field is greater than 36
External Key Cannot Exceed 36 Characters
characters. Correct this error by reducing the number of characters
in the External Key value to 36 or fewer.
The data extension name cannot be longer
than 128 characters.
This error occurs when you try to save the data extension when
the length of the value in the Name field is greater than 128
Data Extension Name Cannot Exceed 128 Characters
characters. Correct this error by reducing the number of characters
in the Name field to 128 or fewer.
The data extension name cannot be blank.
This error occurs when you try to save the data extension when
the Name field is NULL. Correct this error by entering a name value
in the Name field.
Data Extension Name Cannot Be Blank
The data extension name cannot begin with
an underscore.
This error occurs when you try to save the data extension when
the first character in the value in the Name field is _. Correct this
Data Extension Name Cannot Begin with an Underscore
error by entering a number or letter as the first character in the
name.
139
SubscribersEmail in Marketing Cloud Engagement

DescriptionError
The data extension name cannot consist
entirely of numbers.
This error occurs when you try to save the data extension when
the value in the Name field includes only numbers. Correct this
error by entering a letter in the value.
Data Extension Name Cannot Consist Entirely of Numbers
Field name cannot be blank.
This error occurs when you try to save the data extension when
the Name field for the column is NULL. Correct this error by entering
a value in the Name field for the column.
Field Name Cannot Be Blank
Field name cannot begin with an underscore.
This error occurs when you try to save the data extension when
the first character in the value for the field name is _. Correct this
Field Name Cannot Begin with Underscore
error by entering a number or letter as the first character in the
name.
Field name cannot consist entirely of
numbers.
This error occurs when you try to save the data extension when
the value in the Name field includes only numbers. Correct this
error by entering a letter in the value.
Field Name Cannot Consist Entirely of Numbers
Field name cannot be longer than 128
characters.
This error occurs when you try to save the data extension when
the length of the field name value is greater than 128 characters.
Field Name Cannot Be Longer Than 128 Characters
Correct this error by reducing the number of characters in the
Name field to 128 or fewer.
The length of an existing Text field cannot
be decreased.
This error occurs when you try to modify a previously saved data
extension by reducing the character length of a text-type field. This
Length of an Existing Text Field Cannot Be Decreased
change could result in the loss of data. Correct this error by entering
a character length for the field that is the same or greater than it
was at the time the data extension was previously saved.
This error occurs when you try to import into a data extension and
your default file location is modified.
The default settings are:
File Location Cannot be Blank
•
Name: ExactTarget Enhanced FTP Import
•
External Key: ExactTarget Enhanced FTP Import
•
Description: Enhanced FTP Import Directory
140
SubscribersEmail in Marketing Cloud Engagement

DescriptionError
•
Location Type: Enhanced FTP Site Import Directory
This error occurs when you try to save the data extension when
the Name field for the data extension has a space before or after
Error Updating Filter
the first or last letter in the field. Correct this error by removing
extra spaces from the Name field.
This error can occur when you attempt to rename or delete a data
extension. Correct the error by enabling the Allow users to delete
this Data Extension option in Manage Data Extension Policies.
The deletion of the Object is not currently allowed, therefore the
Object cannot be renamed
Data Extensions Data Types in Email Studio
You can select a data type from these choices when you create a column in an Email Studio data extension.
NotesAccepted InputData Type
A combination of letters, numbers, and
spaces, up to 4,000 characters
Text
•
You can increase the length of a text
field, but you can’t decrease it.
An integer, between -2,147,483,648 and
2,147,483,648
Number
•
You can’t import decimal values into a
column with the Number data type. To
import a decimal value, use the Decimal
data type.
A system date, from 01/01/1753 to
12/31/9999
Date
•
Various formats are accepted, such as
1/1/2005 or January 1, 2005.
•
Use an AMPscript function to format.
•
All dates are stored as MM/DD/YYYY,
and dates entered in a different format
are updated when stored.
•
Date values generated by Marketing
Cloud use Central Standard Time unless
documented otherwise.
•
You can add an HH:MM time value after
the date value, such as 12/12/2012
12:12 PM.
—
True values—1, Y, Yes, true
Boolean
False values—0, N, No, false
An email addressEmail
•
This field is required to send an email to
a data extension.
•
The username part can be up to 100
characters long. In total, the email
141
SubscribersEmail in Marketing Cloud Engagement

NotesAccepted InputData Type
address, including the domain name,
can be up to 254 characters long.
•
During an import or API insertion, the
email address syntax is checked but not
whether the email address is valid. If the
syntax is incorrect, an error is shown.
A phone numberPhone
•
The Phone data type accepts 15-digit
strings. During an import or API
insertion, non-digit characters are
removed. These examples are
acceptable:
–
555-555-5555
–
1-555-555-5555
–
1-(555)-555-5555
–
(555)-555-5555
–
11555555555
–
111555555555
A number with a decimal pointDecimal
•
When you define a decimal field, the
total number of digits is called precision,
and the number of digits after the
decimal point is called scale. The first
field is precision, and the second field
is scale.
The precision can’t exceed 29 digits, and
the scale can’t exceed 8 digits. For
example, you define a decimal field with
a length of 8.2. The maximum number
of digits the field can hold is 8, with 2
digits after the decimal point and up to
6 digits before the decimal. If your
import doesn’t declare the scale, the
decimals are always filled with 0s, in this
example 2 digits.
•
Examples of acceptable numbers for a
length of 8.2 include:
–
123456.78 (imported as 123456.78)
–
123456 (imported as 123456.00)
–
12.34 (imported as 12.34)
–
1234 (imported as 1234.00)
–
0.12 (imported as 0.12)
142
SubscribersEmail in Marketing Cloud Engagement
NotesAccepted InputData Type
–
12 (imported as 12.00)
An ISO language and country codeLocale
•
Requires a minimum of two characters
to define the country of the subscriber
with a maximum of five characters to
accommodate a language. For example,
a resident of the United States who
speaks English receives the EN-US
Locale value.
Operators
Review this list of operators for use with profile and preference attributes in data extensions for Email Studio.
Use these options with profile attributes:
DescriptionFunction
Subscribers with an attribute definition that exactly matches the
value are included in the group. Choose only one value.
is equal to
Subscribers with an attribute definition that doesn’t match the
value are included in the group. Choose only one value.
is not equal to
Use this operator when the attribute is a numeric value. Subscribers
with an attribute definition greater than or less than or equal to
the value are included in the group.
•
is greater than
•
greater than
•
equal to
Use this operator when the attribute is a numeric value. Subscribers
with an attribute definition less than (or less than or equal to) the
value are included in the group.
•
is less than
•
less than
•
equal to
The application looks for attribute values that begin with the exact
sequence of characters that you enter as the comparison value.
begins with
Commas are treated as characters and not as delimiters. Search
strings aren’t case-sensitive.
The application looks for attribute values that include or exclude
the exact sequence of characters that you enter as the comparison
•
contains
•
does not contain
value. Commas are treated as characters and not as delimiters.
Search strings aren’t case-sensitive.
The application looks for attribute values that end with the exact
sequence of characters that you enter as the comparison value.
ends with
Commas are treated as characters and not as delimiters. Search
strings aren’t case-sensitive.
143
SubscribersEmail in Marketing Cloud Engagement
Subscribers with an attribute definition that matches one of the
values you define in a comma-delimited string of values are
exists in
included in the group. The exists in operator looks for a partial
match of the entire value. For example, if your match criteria is
north, the exists in operator returns subscribers with north,
northwest, and northeast attribute values, but not subscribers with
south, southwest, and southeast attribute values.
The exists in whole word operator looks for a full match of the
entire value. For example, if your match criteria is 2326,5308,
exists in whole word
this operator returns only subscribers with 2326 or 5308
attribute values.
Subscribers with an attribute definition that don’t match any of
the values you define in a comma-delimited string of values are
does not exist in
included in the group. This operator isn’t applicable when choosing
an attribute with restricted values, as you can select only one of
the restricted values as the comparison value. Search strings aren’t
case-sensitive.
To filter for a blank value select is empty or isn’t empty.
•
is empty
•
is not empty
Use this option for preference attributes:
DescriptionFunction
The application looks for of either a true or false value. Your only
options are True and False.
is
Data Filters with Enhanced Subscriber Features in Marketing Cloud Engagement
A data filter is a group of criteria that segments a subscriber list or data extension. You can segment a subscriber list or data extension
using data filters and use the segments during an automation. Data Filters can be used with accounts that have enhanced subscriber
features turned on in Email Studio.
Refer to Data Filter if your account doesn’t have enhanced subscribers features enabled.
A data filter is a group of criteria that segments a subscriber list or data extension. Use a data filter to apply complex segmentation rules
to your subscriber lists or data extensions. Complex segmentation makes it easier for you to precisely target your message to the specific
subscriber.
The item in the list being filtered must satisfy the criteria to be included in the segment.
Example: You could use a data filter to get all the subscribers on a list who own a car OR a motorcycle AND live in the state of
Indiana OR Ohio. Using the data filter feature requires the understanding of AND and OR logical operators.
When you create a standalone filter definition and don’t associate it with a subscriber list or data extension, you can reuse the same filter
definition with many lists or data extension. You can create different groups or different filter activities that use the same data filter. You
can select only one list or data extension per group or Automation Studio filter activity.
144
SubscribersEmail in Marketing Cloud Engagement

Create a Marketing Cloud Engagement Data Filter from Profile Attributes
Follow these steps to create a data filter from profile attributes for subscribers in Email Studio.
Create a Data Filter from a Data Extension
Follow these steps to create a data filter from a data extension in Email Studio.
Modify an Existing Data Filter
Follow these steps to modify an existing data filter in Email Studio.
Copy a Marketing Cloud Engagement Data Filter
Follow these steps to copy an existing data filter in Email Studio. This process creates a new data filter when copying a data extension.
Save a Data Extension Filter
You can create and save a data filter based on the filter settings of a data extension in Marketing Cloud Engagement. You can include
more filtered data extensions using the filter as a starting point in Email Studio.
Delete Data Filters in Marketing Cloud Engagement
Follow these steps to delete one or more data filters in Email Studio.
Data Filter Scenario in Marketing Cloud Engagement
You can use the data filter feature in Email Studio to segment a subscriber list with the filter activity.
Enhanced Subscriber Feature Data Filter Operators
You can set profile and preference attributes for data filters using the enhanced subscriber feature in Email Studio.
145
SubscribersEmail in Marketing Cloud Engagement

Data Filter Definition for Marketing Cloud Engagement
You can create a data filter definition on the Subscribers tab in Email Studio. Choose whether to create a filter that segments a
subscriber list or a data extension.
Filter Activity in Marketing Cloud Engagement
If you use interactions in Email Studio, you can use data filters to segment subscriber lists or data extensions. Select the data filter
when you create a filter activity.
Data Filters in a Marketing Cloud Engagement Group
You can use data filters to segment subscriber lists by selecting the data filter when you create a group, regardless of whether you
use interactions in Email Studio.
SEE ALSO:
Data Filters without Enhanced Subscriber Features in Marketing Cloud Engagement
Create a Marketing Cloud Engagement Data Filter from Profile Attributes
Follow these steps to create a data filter from profile attributes for subscribers in Email Studio.
Create the data filters that include the data filter definition.
1. Choose Subscribers > Data Filters.
2. Click Create.
3. Choose Profile Attribute to create a filter based on profiles attributes or preferences attributes from a list. Choose Data Extension
to filter records from a data extension.
4. Click OK.
5. Drag Profile & Preference Attributes, Filters, Measure, or saved Filters to the Create Filter canvas.
For date fields, select Account Time Zone to use the time zone for the account. Leave Account Time Zone unchecked to use Central
Standard Time.
6. Choose an AND or an OR operator and save. To group your criteria, hover over the grouping operator so that it turns a darker blue,
and then click to change the operator.
If you choose AND, the subscriber must meet all criteria to be included in the group.
If you choose OR, the subscriber must meet at least one of the criteria to be included in the group.
Note: Choose an operator that aligns with the type of attribute you chose. For example, don’t use the less than operator with
a text attribute. For date attributes, only the ‘is equal to,’ ‘is not equal to,’ ‘is greater than’ and ‘is less than’ operators are
supported.
7. Enter a name and description.
8. Choose a folder location and save.
Include the filter definition when you create a group filter or a filter activity.
Create a Data Filter from a Data Extension
Follow these steps to create a data filter from a data extension in Email Studio.
Create the measures that include the data filter definition.
1. Choose Subscribers > Data Filters.
146
SubscribersEmail in Marketing Cloud Engagement

2. Click Create.
3. To filter records from a data extension, choose Data Extension. To create a filter based on profiles attributes from a list, choose
Profile Attribute.
4. Click OK.
5. Choose a source data extension to filter.
6. Click OK.
7. Drag Fields, Measure, or saved filters to the Create Filter canvas.
Note: For date fields, choose Account Time Zone to use the time zone for the account. Leave Account Time Zone unchecked
to use Central Standard Time. Up to 10 characters are allowed for the Decimal Data type when creating a Data Filters from a
Data Extension.
8. Choose an AND or an OR operator and save. You can group your criteria by hovering over the grouping operator so that it turns a
darker blue, then click to change the operator.
•
If you choose AND, the subscriber must meet all criteria to be included in the filter.
•
If you choose OR, the subscriber must meet at least one of the criteria to be included in the filter.
Note: Choose an operator that makes sense with the type of attribute you chose. For example, don’t use the less than operator
with a text attribute. For date attributes, only the ‘is equal to,’ ‘is not equal to,’ ‘is greater than’ and ‘is less than’ operators are
supported.
9. Enter a name and description.
10. Select a folder location and save.
Include the filter definition when you create a group filter or a filter activity.
Modify an Existing Data Filter
Follow these steps to modify an existing data filter in Email Studio.
1. Click Subscribers > Data Filter.
2. Choose the data filter.
3. Review and update the data filter’s properties, then click Save.
Copy a Marketing Cloud Engagement Data Filter
Follow these steps to copy an existing data filter in Email Studio. This process creates a new data filter when copying a data extension.
1. Click Subscribers > Data Filter.
2. Select the data filter to copy.
3. Choose Copy and the folder location.
4. Enter a Name, Description, and External Key.
5. Click Copy.
Save a Data Extension Filter
You can create and save a data filter based on the filter settings of a data extension in Marketing Cloud Engagement. You can include
more filtered data extensions using the filter as a starting point in Email Studio.
147
SubscribersEmail in Marketing Cloud Engagement
Create the filter.
1. Click Subscribers > Data Extension.
2. Choose the data extension and click Properties.
3. Click Save As Filter.
4. Enter a Name, Description, and External Key.
5. Select a folder location and save the filter.
You can either click Open New Filter or Close.
Delete Data Filters in Marketing Cloud Engagement
Follow these steps to delete one or more data filters in Email Studio.
1. Click Subscribers > Data Filters.
2. Select the data filters to delete.
3. Click Delete.
Data Filter Scenario in Marketing Cloud Engagement
You can use the data filter feature in Email Studio to segment a subscriber list with the filter activity.
A marketer at Northern Trail Outfitters wants to send a message about traveling in the Midwest to newsletter subscribers. The marketer
only wants to send it to subscribers who own a car or motorcycle and who live in Indiana or Ohio. The marketer creates a filter definition
that uses the subscriber attributes to select only subscribers who own at least one car or at least one motorcycle. The attributes are
further refined to subscribers who live in Indiana or Ohio.
The marketer clicks the names of the inner groupings to give them more descriptive names.
148
SubscribersEmail in Marketing Cloud Engagement

The marketer creates a filter activity to associate the filter definition with the Newsletter list. The filter activity also specifies the name of
the group to contain the segment of subscribers that satisfy the filter definition.
149
SubscribersEmail in Marketing Cloud Engagement

The marketer applies the filter, creates the group, and starts the filter activity.
When the marketer looks at the groups in the account, the Midwest Vehicle Owners from Newsletter List group appears in the list. The
marketer didn’t manually create this group; the application created it when the marketer saved the filter activity.
150
SubscribersEmail in Marketing Cloud Engagement

This group now behaves like any other group in the account. It can be sent to or refreshed at any time.
Enhanced Subscriber Feature Data Filter Operators
You can set profile and preference attributes for data filters using the enhanced subscriber feature in Email Studio.
Profile Attributes
You have the following options:
DescriptionFunction
Subscribers with an attribute definition that exactly matches the
value are included in the group. You can choose 1 value only.
is equal to
Subscribers with an attribute definition that does not match the
value are included in the group. You can choose 1 value only.
is not equal to
Use this operator when the attribute is a numeric value. Subscribers
with an attribute definition greater than or less than or equal to
the value are included in the group.
is greater than
greater than equal to
Use this operator when the attribute is a numeric value. Subscribers
with an attribute definition less than, less than, or equal to the
value are included in the group.
is less than
less than
equal to
The application looks for attribute values that begin with the exact
sequence of characters that you enter as the comparison value.
begins with
Commas are treated as characters and not as delimiters. Search
strings are not case-sensitive.
The application looks for attribute values that include or exclude
the exact sequence of characters that you enter as the comparison
contains
does not contain
value. Commas are treated as characters and not as delimiters.
Search strings are not case-sensitive.
The application looks for attribute values that end with the exact
sequence of characters that you enter as the comparison value.
ends with
Commas are treated as characters and not as delimiters. Search
strings are not case-sensitive.
Subscribers with an attribute definition that matches one of the
values you define in a comma delimited string of values are
exists in
151
SubscribersEmail in Marketing Cloud Engagement

DescriptionFunction
included in the group. The exists in operator looks for a partial
match of the entire value.
Example: If your match criteria is north, the ‘exists in’ operator
returns subscribers with north, northwest, and northeast attribute
values. Subscribers with south, southwest, and southeast attribute
values are not returned.
Subscribers with an attribute definition that do not match any of
the values you define in a comma delimited string of values are
does not exist in
included in the group. This operator is not applicable when
choosing an attribute with restricted values, as you can select only
one of the restricted values as the comparison value. Search strings
are not case-sensitive.
To filter for a blank value select is empty or is not empty.
is empty
is not empty
Preference Attributes
You have the following options:
DescriptionFunction
The application looks for of either a true or false value. Your only
options are True and False.
is
Data Filter Definition for Marketing Cloud Engagement
You can create a data filter definition on the Subscribers tab in Email Studio. Choose whether to create a filter that segments a subscriber
list or a data extension.
If you choose to create a data filter to segment a subscriber list, use any combination of the following types of information. The chosen
types determine whether the subscriber satisfies these conditions:
•
Profile attributes
•
Preference attributes, except the HTML email preference
•
Measures you create and predefined measures
You don’t have to specify a subscriber list in the filter definition. You can associate the same data filter to multiple different lists using
different filter activities or groups.
If you choose to create a data filter to segment a data extension, you use the field columns in the data extension. Those field columns
determine whether the record satisfies the conditions. Because different data extensions can have different field columns, specify the
data extension to segment when you create the data filter.
When you create a filter, you create conditions that the system evaluates against for each subscriber or data extension row. The conditions
determine whether it qualifies for the segment. You can select one of these parameters for each condition:
•
The profile attribute, field column, or measure to evaluate
152
SubscribersEmail in Marketing Cloud Engagement

•
The operator to use to compare the values
•
The value to compare against
Example: You can create a condition where:
•
The profile attribute is AGE
•
The operator is IS GREATER THAN
•
The value is 17
When you segment a subscriber list against this condition, only subscribers whose age is 18 or older satisfies the condition. It’s added
to the segment. You can put multiple conditions together in a grouping using an AND or OR operator.
You can also put multiple groupings together into an outer grouping that uses an AND or OR operator. When you use the OR operator,
a subscriber or row that meets one or more of the conditions satisfies the grouping. When you use the AND operator, a subscriber or
row must meet all the conditions to satisfy the grouping.
The data filter creation interface provides graphical tools for creating the conditions and groupings. The SQL created using the graphical
tools appears on the screen in the Filter Text section for your reference.
Filter Activity in Marketing Cloud Engagement
If you use interactions in Email Studio, you can use data filters to segment subscriber lists or data extensions. Select the data filter when
you create a filter activity.
Create filter activities on the Filter Activity screen on the Interactions tab. If you filter a subscriber list, select the list to segment with the
filter. Provide a name for the group to contain the resulting segment. If you filter a data extension, select the data filter and provide a
name for the data extension to contain the resulting segment.
After you create a filter activity, start it. When you start the data filter activity or refresh the group, the system applies the logic you created
in the data filter.
The subscriber list and filter definition must exist before you can select them on the filter activity. Enter the name of the resultant group
or data extension that the system creates when you save the filter activity.
Filter activities provide more robust API support than subscriber groups.
Data Filters in a Marketing Cloud Engagement Group
You can use data filters to segment subscriber lists by selecting the data filter when you create a group, regardless of whether you use
interactions in Email Studio.
The Create Subscriber Group wizard allows you to drag a Data Filter onto the canvas. When you create or refresh the group, the system
applies the logic. This logic you created in the data filter to the list you selected to populate the group. The subscriber list and filter
definition must exist before you can select them in the group creation wizard.
All Subscribers List in Email Studio
The All Subscribers list is considered the main list of records for the Email Studio account. Every subscriber in your account appears in
the All Subscribers list. Subscribers added to a subscriber list join the All Subscribers list at the same time. Subscribers stored on data
extensions join the All Subscribers list when you send your first message to that subscriber. If a subscriber is unsubscribed in the All
Subscribers list, the subscriber is unsubscribed from all lists and groups. When a subscriber is set back to active on the All Subscribers
list, the subscriber must also opt in for any other list and group separately. A subscriber can be unsubscribed on lists and groups and be
active on the All Subscribers lists.
Click All Subscribers in the navigation pane and then find the subscriber in the All Subscribers workspace in one of the following ways.
153
SubscribersEmail in Marketing Cloud Engagement

•
Sort: You can sort by clicking the column heading of any column with an arrow to the right of the column name. For example, to
sort alphabetically by email address, click Email Address. To reverse the sort, click the heading again. A small arrow in the column
heading indicates the direction of the sort. The columns you can sort by vary by feature.
•
Search: Use the Search feature to search by specific search criteria. Click View Properties that accompanies the search results to
view the subscriber's properties.
Note: The maximum number of subscribers that All Subscribers can store is 2,147,483,647.
SEE ALSO:
Subscriber Filters in Marketing Cloud
Enhanced Subscribers in Email Studio
Unsubscribe Settings
Exclusion Lists in Marketing Cloud Engagement
An exclusion list is any list, group, or data extension you create in the application that at the time of send you select to exclude from the
send. If your Email Studio account has subscriber key enabled, the system excludes using the subscriber key value. If your account does
not have subscriber key enabled, the system excludes using email address.
Example: A common case for exclusion lists is as follows: You send a newsletter to List A but later realize you want to send it to
List B. Some of the subscribers on List A also exist on List B and you don't want to send them the same email twice. When you
send to List B, you select List A as an exclusion list.
SEE ALSO:
Lists with Enhanced Subscriber Features
Groups with Enhanced Subscriber Features in Marketing Cloud Engagement
Publication Lists in Email Studio
Use publication and suppression lists to manage opt-ins for your email account in Email Studio. Use either publication lists or suppression
lists to control how subscribers receive your sends. Choose a publication list when sending email messages and SMS messages to a
sendable data extension.
Prerequisites
This document is intended for email users who are responsible for sending and managing email and SMS message sending. An
understanding of data extensions and the Web Service API may be required when working with publication lists.
Publication Lists
A publication list helps you manage how subscribers receive several different categories of emails or SMS messages. For example, send
newsletters, advertisements, and alerts. Each of these is a different category, so create a separate publication list for each category. When
you send a newsletter, associate the send with the newsletter publication list to identify to the system what kind of content is inside the
publication.
154
SubscribersEmail in Marketing Cloud Engagement

Publication lists help you manage subscribers' unsubscribe or opt-out actions. Having a separate publication list for each communication
type enables you to honor an opt-out request from one publication type without unsubscribing that person from all previously
subscribed-to publications. If you use only one publication list for all of a subscriber's communications and if that person opts out of
one publication, that subscriber will be opted out automatically from all publications. Additionally:
•
Use a publication list to filter the audience of an email send, which ensures your publications are sent to the subscribers who want
to see them.
•
Use a publication list to show and adhere to regulatory compliance to CAN-SPAM laws.
•
Use a publication list for each communication type, such as newsletter, weather alerts, and coupons.
•
Use a publication list to control who receives particular communications from a company. In Enterprise 2.0, publication lists can be
shared between parent and child business units.
Publication Lists in Email Studio
Send an email or SMS messages using Email Studio in Marketing Cloud Engagement.
Create a Publication List in Marketing Cloud Engagement
Create a publication list in Email Studio.
155
SubscribersEmail in Marketing Cloud Engagement

Apply a Publication List to a Marketing Cloud Engagement Send
Apply publication lists to guided sends, and user-initiated emails in Email Studio.
SEE ALSO:
Suppression Lists in Email Studio
Enterprise 2.0 Overview
Subscriber Filter Unsubscribe Settings
Publication Lists in Email Studio
Send an email or SMS messages using Email Studio in Marketing Cloud Engagement.
When you send an email message or SMS message to a data extension, select a publication list. Publication lists are required to allow
subscribers to opt out of sends to data extensions. Publication lists make it possible for subscribers to opt out of a category of sends
without opting out of all messages from your organization.
For user-initiated email messages, the system uses the publication list exclusively to prevent sending to subscribers who have opted
out. For MT SMS communications, the system adds opted-in subscribers to the list of people to receive the SMS message and also
prevents sending to subscribers who have opted out.
Create a Publication List in Marketing Cloud Engagement
Create a publication list in Email Studio.
When you create a publication list, give it a name and description to identify the publication list within the system. The name you enter
when you create the publication list is the name you choose when you’re selecting a publication list for a message send. If you make
the publication list public, subscribers see the publication list as an option on their subscription center. For SMS sends, subscribers can
opt in or opt out of a publication list, similar to an email list on the subscription center. For email sends, subscribers can only opt out of
a publication list. When subscribers opt in to an email publication from the subscription center, they only receive the email if they’re
also on the data extension being sent to.
1. Click Subscribers.
2. Click My Subscribers.
3. Click Publication Lists.
4. Click Create.
5. Provide a name and description for the publication list. The name and description appear in the Available Publications section of
the subscription center.
Note: If the list is used for SMS, name your publication list with no spaces. Add information to the description that identifies
this publication list is used for SMS.
6. Select Public to display the publication list in the subscription center.
7. Click Save.
8. If you’re sharing the publication list, select the checkbox next to the publication list and click Move.
9. Select the Shared Publication Lists folder, and click OK.
10. To set roles and permissions for the publication list, select the checkbox next to the publication list and click Permissions.
156
SubscribersEmail in Marketing Cloud Engagement

Apply a Publication List to a Marketing Cloud Engagement Send
Apply publication lists to guided sends, and user-initiated emails in Email Studio.
1. Follow the steps for the sending method you’re using to send the email.
2. Select the publications to opt-out of this email on the select audience step.
Suppression Lists in Email Studio
You can use suppression and publication lists to manage opt-ins in Email Studio for Marketing Cloud Engagement. Use publication lists
when you send email and SMS messages to a sendable data extension. Use suppression lists with guided, user-initiated, and triggered
email sends.
A suppression list is a list of subscribers that you don't want to receive your communications. Suppression lists filter out subscriber keys
and prevent those keys from receiving your messages. Suppression lists serve as a “do not contact” list for your email sends.
Example: Suppression lists include these subscriber key types:
•
Keys with a history of spam complaints
•
Unsubscribe lists from previous providers or advertisers
•
Keys of your competitors
•
Canceled customers
Suppression lists help you manage the unsubscribe or opt-out actions of your subscribers. A single public suppression list affects the
subscription center.
Use suppression lists to:
•
Ensure that your messages are only sent to the subscribers who want to see them.
•
Demonstrate your compliance with anti-spam laws and regulations.
•
Control who receives particular communications from your company. In Enterprise 2.0, you can share suppression lists between
parent and child business units.
Suppression lists contain fields for Email Address, Subscriber Key, Unsubscribe Date, and Unsubscribe Reason. You can’t add to or remove
fields from a suppression list.
Using a Suppression List
A suppression list is a list of subscribers in Email Studio that you don't want to receive your communications. Suppression lists filter
out subscriber keys and prevent those keys from receiving your messages.
Subscribers on a Suppression List
Marketing Cloud Engagement lets you add subscribers to a suppression list in Email Studio via an Automation Studio import activity,
SOAP Web Services API, or the import wizard in Email Studio Suppression List. The subscriber must be imported without a status
column. Subscribers can also add themselves to public suppression lists via their subscriber center. When a subscriber uses a one-click
unsubscribe, the subscriber is added to the suppression list. The subscriber remains on the list, data extension, or publication list
with a status of Unsubscribed.
Create a Suppression List in Marketing Cloud Engagement
To prevent your users from receiving your messages, create a suppression list. You can also let users control whether they receive
messages by making the suppression list public in the subscription center.
157
SubscribersEmail in Marketing Cloud Engagement

Apply a Suppression List to a Marketing Cloud Engagement Send
Apply suppression lists to guided sends, user-initiated, and triggered emails in Email Studio.
SEE ALSO:
Auto-Suppression Lists
Using a Suppression List
A suppression list is a list of subscribers in Email Studio that you don't want to receive your communications. Suppression lists filter out
subscriber keys and prevent those keys from receiving your messages.
Suppression lists serve as a do-not-contact list for your email sends.
Review these examples of subscriber key types included on a suppression list:
•
Keys with a history of spam complaints
•
Unsubscribe lists from previous providers or advertisers
•
Keys of your competitors
•
Canceled customers
Suppression lists differ from exclusion lists, although the filtering logic at send time is the same. Exclusion lists are subscribers who have
a status of active, bounced, held, or unsubscribed and who want to continue receiving messages. You select an exclusion list at the time
of send. For example, you send a newsletter to List A but later realize you want to send it to List B. Some of the subscribers on List A also
exist on List B and you don't want to send them the same email twice. When you send to List B, you select List A as an exclusion list.
SEE ALSO:
Enterprise 2.0 Shared Suppression Lists
Auto-Suppression Lists
Auto-Suppression Lists
Subscribers on a Suppression List
Marketing Cloud Engagement lets you add subscribers to a suppression list in Email Studio via an Automation Studio import activity,
SOAP Web Services API, or the import wizard in Email Studio Suppression List. The subscriber must be imported without a status column.
Subscribers can also add themselves to public suppression lists via their subscriber center. When a subscriber uses a one-click unsubscribe,
the subscriber is added to the suppression list. The subscriber remains on the list, data extension, or publication list with a status of
Unsubscribed.
Note: If a subscriber is imported into a suppression list with the status of Unsubscribed, this action results in an inactive record
being added to a suppression list. If the subscriber being imported exists in an active status, they’re no longer visible in the
suppression list and are deactivated from the list.
Create a Suppression List in Marketing Cloud Engagement
To prevent your users from receiving your messages, create a suppression list. You can also let users control whether they receive
messages by making the suppression list public in the subscription center.
1. In Marketing Cloud Engagement, go to the Subscribers tab.
2. Click Suppression List.
3. Click Create, and enter the list details.
158
SubscribersEmail in Marketing Cloud Engagement

4. To make the suppression list available in the subscription center, select Public.
5. Save the list.
6. To share the suppression list with other Email Studio users, select Permissions and set roles and permissions for the suppression
list.
Apply a Suppression List to a Marketing Cloud Engagement Send
Apply suppression lists to guided sends, user-initiated, and triggered emails in Email Studio.
1. Follow the steps for the sending method you’re using to send the email.
2. Select the suppression to opt-out of this email on the select audience step.
Profile and Preference Attributes in Email Studio
Email Studio uses profile and preference attributes to store information about subscribers. The profile attribute contains information to
characterize a subscriber profile. For example, each subscriber is asked to provide their birth date and email address. By default, every
account has three profile attributes: Full Name, Email, and UserDefined, which is intended as a generic attribute that you can use as
needed. By default, every account also receives an HTML Email preference attribute that is set to Yes. You can’t modify these attributes.
A preference attribute characterizes how a subscriber prefers to receive email. These attributes are specified as yes or no choices to a
declarative statement. For example: The subscriber prefers to receive email as HTML.
In addition to basic alphanumeric characters, certain special characters can be used in the values that you enter as a subscriber value
for an attribute. The special characters represented by the ASCII decimal codes 32 through 254 are supported.
Note: As some facets of account performance can be impacted by exceeding 200 profile attributes, the profile attribute limit is
200. If you approach this limit, delete existing attributes to avoid performance issues. If you require more than 200 profile attributes,
use data extensions to send instead of profile attributes.
Create a profile or preference attribute in your account so there’s a place for the system to store subscriber data. You also specify whether
an attribute is required information for every subscriber and whether subscribers can see and edit their own attributes in the Profile
Center. You can specify profile attributes when you import a subscriber list.
Note: If a subscriber uses the forward button in their email client instead of the Forward to a Friend feature to forward your email,
the profile center link points to the original subscriber's profile center. For example, if Lee forwards your email to Ali, and Ali clicks
the Profile Center link in the footer of the email, Ali sees Lee's information. To protect your subscribers' privacy, don’t include
sensitive attributes in the Profile Center.
The information is populated in profile and preference attributes when you import subscribers using the import subscriber wizard or
Automation Studio import activity, create a subscriber in the user interface, or otherwise add subscribers to your account, such as through
a Smart Capture form. The system processes the information and adds it to your account according to the parameters that you set up.
After you've defined your attributes, you can use them to create groups and drive dynamic content.
Profile and preference management is an advanced feature; if it isn’t enabled, you can’t see the Profile Management and Preference
Management sections in your navigation pane, and can’t preview the Profile Center and Subscription Center.
Scenario: Profile Attributes
See an example of portfolio attribute setting in Email Studio for Marketing Cloud Engagement.
Scenario: Preference Properties Dialog Box
See this example of the Email Studio preference properties dialog box in use.
159
SubscribersEmail in Marketing Cloud Engagement

Create Profile and Preference Attributes in Marketing Cloud Engagement
If the subscriber attribute is a yes or no value, create a preference attribute in Email Studio. If the attribute requires more complexity,
create a profile attribute. Create several attributes, up to the limit specified in your account contract. For Enterprise 2.0 accounts,
create the attribute in the top-level account.
Attribute Properties in Marketing Cloud
Use this topic as reference as you configure subscriber attributes in Email Studio.
Delete an Attribute in Marketing Cloud Engagement
In Email Studio, delete subscriber attributes you no longer want to track. Enterprise 2.0 accounts, delete the attribute in the top-level
account.
Modify an Attribute in Marketing Cloud Engagement
Modify subscriber attributes in Email Studio.
Scenario: Profile Attributes
See an example of portfolio attribute setting in Email Studio for Marketing Cloud Engagement.
Example: Northern Trails wants to create a profile attribute for several of their subscribers. They navigate to Profile Management.
Starting on the General tab, Northern Trails fills in the information of the
attribute.
On the Data tab, they select Text for the Data Type since they will enter text only data.
160
SubscribersEmail in Marketing Cloud Engagement

Northern Trails clicks the Values tab and adds Male and Female as values for the Gender attribute.
161
SubscribersEmail in Marketing Cloud Engagement

The values are entered, but Northern Trails wants Female to appear first. They highlight the Female value and click Move Up.
They click OK and the attribute is added to the attribute list.
Scenario: Preference Properties Dialog Box
See this example of the Email Studio preference properties dialog box in use.
Northern Trails wants to create a preference that allows subscribers to opt in or out of receiving a monthly newsletter. They navigate to
Preference Management. They enter the information for their preference.
162
SubscribersEmail in Marketing Cloud Engagement

They click OK and the preference appears in the preference list.
Create Profile and Preference Attributes in Marketing Cloud Engagement
If the subscriber attribute is a yes or no value, create a preference attribute in Email Studio. If the attribute requires more complexity,
create a profile attribute. Create several attributes, up to the limit specified in your account contract. For Enterprise 2.0 accounts, create
the attribute in the top-level account.
1. On the Subscribers tab, select Profile Management or Preference Management.
2. Click Create.
3. Define the properties for this attribute.
4. Click OK.
This attribute is now available for use in defining groups, dynamic content, and personalized substitution strings.
Note: If you marked the new attribute as a required field, all subscriber imports now must include this field. Set up a default value
so that records can be saved even if a value isn't provided.
Attribute Properties in Marketing Cloud
Use this topic as reference as you configure subscriber attributes in Email Studio.
163
SubscribersEmail in Marketing Cloud Engagement

Table 3: General Tab
Enter the external name for this attribute. The name is what see
when you choose attributes for personalization in emails and for
Name
group creation. Unless the attribute is defined as hidden,
subscribers will also see this name in the Profile Center.
When you import subscribers, you are able to map subscriber data
fields to attribute fields manually. If the data field name in your
subscriber data exactly matches the profile name you enter here,
the application is able to default the mapping of those fields to
each other.
The first character of an attribute name must be alphabetic. Do
not begin an attribute name with a number or any other kind of
nonalphabetic character.
Enter an internal description of the attribute. This description is
displayed in the profile management workspace only and is not
exposed to subscribers.
Description
Descriptions are limited to 200 characters.
The Display Order field reflects this attribute's placement among
the profile attributes when displayed to subscribers in the Profile
Display Order
Center and also when displayed within the application in attribute
drop-down lists, for personalization in emails and for group
creation.
In the navigation pane of the application, the attributes are always
displayed in alphabetical order; not in the customizable display
order.
To change this attribute's placement in the list of attributes, click
the Change button beside the Display Order field. The Profile
Display Order dialog box that appears shows all the profile
attributes in display order. Use the Move Up or Move Down buttons
to move this attribute up or down in the list.
You can change only a single attribute's placement at a time. To
change another attribute's placement, you need to edit that
attribute's properties.
The Created and Modified fields automatically record when the
attribute was created and when it was last modified.
Created or Modified
You define whether the attribute is required and whether
subscribers can see and edit it.
Attributes
Required: When you create or import subscribers, this attribute is
a required field. Once an attribute is set up as required or not
required, the configuration cannot be changed after creation.
164
SubscribersEmail in Marketing Cloud Engagement

Hidden: If you select this check box, the attribute will not be
displayed in the Profile Center. Subscribers will not be able to view
or edit this attribute.
Read-only: If you select this check box, the attribute is displayed
but will not be editable in the Profile Center. Subscribers are able
to see their value for this attribute but will not be able to change
it.
Attributes that are both required and hidden must include a default
value before a subscriber is added to the list using Forward To a
Friend in an email send.
Do not update subscriber values with send time values. If the
subscriber who exists in your system triggers a triggered send, this
checkbox determines whether the system updates the attribute
with the attribute values provided with the triggered send trigger.
Table 4: Data Tab
You have the following options for the type of data that this
attribute will accept as values:
Data Type
•
Text: Attributes of a text type accepts all alphanumeric
characters and common symbols. The Text type is appropriate
for strings of numbers that would not be involved in
calculations. Use the Text type for zip codes, phone numbers,
and credit cards.
•
Numeric: Use this data type only if your attribute values contain
nothing but numbers. You will not be able to enter a dollar
sign, a dash, or any other symbol or alphabetic character into
a numeric field. For best results, do not use Numeric for such
data as zip codes, phone numbers, and credit cards. Restrict
use of the Numeric type to values on which you may want to
perform calculations. Integers are supported in numeric fields.
Scientific numbers and floating decimal points are not
supported.
•
Date: Attributes of a date type will accept dates in various
formats, such as 1/1/2005 or January 1, 2005. All dates are
stored in the format MM/DD/YYYY, and if a date is entered in
a different format, the system converts it to the proper format
when storing it.
If you specify a default value for this attribute, this value is used for
all subscribers who do not have a value entered for the attribute.
Default Value
•
If you're defining a set of possible values for this attribute, you
must include the default value that you enter here in that list
on the Values tab.
165
SubscribersEmail in Marketing Cloud Engagement

•
If you save the attribute with a default value that is then applied
to all your existing subscribers, and you later delete the default
value, that value will be deleted from all the subscriber records
to which it was automatically applied.
•
Attributes that are both required and hidden must include a
default value before a subscriber is added to the list using
Forward To a Friend in an email send.
For text and date attributes, you can dictate the minimum number
of characters that are accepted when a value is entered for this
attribute.
Minimum Length/Value and Maximum Length/Value
For numeric attributes, you can dictate the minimum value that is
accepted.
Likewise, you can control the maximum length or value as well. If
no maximum is set, the application only allows 50 characters for
Ent 2.0 accounts and 2,000 characters for all other accounts;
however, if the attribute is set up as a triggered send send-time
attribute, there is no character limit.
Minimum/maximum value refers to the amount, not the number
of digits in the number. If you want to control the number of digits
in the entry, then the data type of the attribute should be Text
rather than Numeric. For example, a zip code, phone number, or
credit card number is a case where you would want to specify the
number of digits in the number, not the "value" of the number; in
these cases, the attribute should be marked as Text, not Numeric.
To specify a minimum and/or maximum, click the appropriate
radio button and then enter the minimum or maximum in the
corresponding text box.
For example, if the attribute is Year Born and you want to ensure
that only four-digit years are entered, you would enter 4 as both
the minimum length and the maximum length. To specify the
number of characters that can be entered, the attribute data type
must be text.
Table 5: Values Tab
To limit this attribute to a specific set of possible values, enter those
values on the Values tab.
Add Value
•
Once you define a value for this attribute, users and subscribers
will no longer be able to type in their own value; they will only
be able to select a value from the drop-down list of the values
specified on the Values tab.
•
If you are defining possible values for an existing attribute that
did not previously have value limitations, any values currently
166
SubscribersEmail in Marketing Cloud Engagement

entered in subscriber records are retained, even if those values
are not included in the list of possible values you've defined.
•
If you entered a default value on the Data tab, you must include
that value in the list of possible values on the Values tab.
On the Values tab, follow these steps to define the possible values
for this attribute:
1. Click the Add button to generate a new blank value.
2. Type in the value.
3. Repeat Steps 1 and 2 to add more values.
If you want to change the order in which these values appear in
the drop-down list, click a value and then click the Move Up or
Move Down button.
Reorder Values
To remove a value from the list, click the value and then click the
Remove button.
Remove Values
If any existing subscriber record contains the value you're removing
from the list, the subscriber will not be affected. That value remains
in the subscriber's record.
Table 6: Salesforce Tab
Select the field you'd like to link to in Salesforce.Map to Salesforce Lead Field
Select the field you'd like to link to in Salesforce.Map to Salesforce Contact/Account Field
Checking this box displays the information in the Salesforce Profile
Center.
Display on Salesforce Profile Center for Leads
Checking this box displays the information in the Salesforce Profile
Center.
Display on Salesforce Profile Center for Contacts
Important Information About the Values Tab and Default Values
If you specify a default value on the Data tab and then, on the Values tab, define a set of possible values that does not include the default
value you entered, the application changes the default value on the Data tab to be the first value from the Values tab.
If this attribute had existed with the original default value, then all subscribers to whom the default value was automatically applied is
adjusted to have the new default value. Subscribers for whom a value had been entered manually by a user or by an import will not be
affected.
Delete an Attribute in Marketing Cloud Engagement
In Email Studio, delete subscriber attributes you no longer want to track. Enterprise 2.0 accounts, delete the attribute in the top-level
account.
Note: Emails using the deleted attribute in personalized substitution strings or dynamic content, you must edit the email to
remove the reference to the attribute. Any groups that were based on the deleted attribute are unaffected by the deletion. The
167
SubscribersEmail in Marketing Cloud Engagement

subscribers in the groups are still members of the groups even though they no longer possess the attribute value that enabled
their group membership.
1. Click the attribute in the toolbar.
2. Click Delete.
The attribute no longer appears in any attribute listing, and all values entered in subscriber records for this attribute are lost.
Modify an Attribute in Marketing Cloud Engagement
Modify subscriber attributes in Email Studio.
1. Click Subscribers.
2. Click either Profile Management or Preference Management.
3. Click the attribute to modify.
4. Edit the properties as desired.
5. Click OK.
Subscriber Key in Marketing Cloud Engagement
A subscriber key is a text field that contains a value that uniquely identifies a subscriber in Marketing Cloud Engagement. A subscriber
key is limited to 254 English characters. Avoid using email addresses as subscriber keys.
When you use a subscriber key, the system uses this value to determine:
•
Whether a subscriber you import or create exists in the system.
•
Whether a subscriber appears multiple times on a list, group, or data extension to be sent a message. The subscriber key allows an
email address to be included multiple times related to different subscriber key values.
•
Which subscriber record to update when a subscriber accesses their profile center or subscription center.
•
Which subscriber record to unsubscribe when a subscriber clicks the unsubscribe link in an email.
A subscriber key gives you the ability to identify subscribers with a value that you choose and have an email address appear multiple
times related to different subscriber keys. Use a subscriber key to:
•
Maintain multiple sets of subscriber attributes for a single email address. For example, if a family shares an email address, you can
use a subscriber key to uniquely identify each member of the family.
•
Include a single email address multiple times on a list. For example, send a separate message for each car a subscriber owns in a
single send.
The Web Service SOAP API support functionality around subscribers identified with a subscriber key.
Note: Though the subscriber key is the unique identifier, you must also provide an email address for each subscriber. Spam
complaints are still tied to the email address.
For example, you could identify subscribers by an ID created by an external business system.
Note: A subscriber key can contain different kinds of identifying information. Different subscribers with different kinds of keys
could have the same information by coincidence. For example, if you import a subscriber keyed on phone number 3175551234
and a different subscriber keyed on external business system identifier 3175551234, the Marketing Cloud system interprets the
subscriber key as the same subscriber.
168
SubscribersEmail in Marketing Cloud Engagement
Subscriber Key and Data Obscurity
When you use the data obscurity feature to protect your subscribers' personally identifiable data, the subscriber key is the only field in
your data extension that isn’t encrypted.
Searching for Subscribers
You can perform a subscriber search based on the subscriber key value, email address, domain, status, and HTML email preference.
Exporting Subscribers
You can identify the subscribers to export using the subscriber key value. Regardless of the search criteria you use, the subscriber key
value appears in the output file when you export subscribers.
Exporting Tracking Data
Exported tracking data is based on the subscriber key value. You can then import the tracking data into another business system and
connect the tracking data with the subscribers as you identify them in that system. For example, you can use the identifier from your
CRM system as the subscriber key. When you import the tracking data to your CRM system, the data is already connected to your contacts
via the contact identifier.
The All Subscribers list shows only the most recent email address for each subscriber key. For example, you send an email to subscriber
key “subkey1” using [email protected]. Then later, you send an email to the same subscriber key using [email protected]. The
All Subscribers list shows only [email protected].
Subscriber key values can’t contain these characters.
•
~
•
!
•
@
•
#
•
$
•
%
•
^
•
&
•
*
•
(
•
)
•
+
•
}
•
{
•
/
•
\
Subscriber Key Scenario in Marketing Cloud
Review a scenario on using a subscriber key in Marketing Cloud Email Studio.
169
SubscribersEmail in Marketing Cloud Engagement
Identify Unique Subscribers Using Keys in Marketing Cloud Engagement
Identify unique subscribers by a value that isn’t an email address by enabling subscriber keys. Changing your implementation to use
subscriber keys takes careful planning to avoid losing data during the process. To learn the best way to prepare and migrate your
data, work with your account executive.
Subscriber Key Scenario in Marketing Cloud
Review a scenario on using a subscriber key in Marketing Cloud Email Studio.
The Northern Trail Outfitters loyalty program allows families to opt-in together with a single email address. The marketer responsible for
the loyalty program wants to send birthday discount coupons for each member in the family. The marketer uses a subscriber key using
the loyalty card ID. Subscriber key allows each member of the family to share the email address but have separate subscriber attributes.
Subscriber key also allows the email address to appear on the birthday list multiple times if multiple members of the family have the
same birthday. The Cruz family opts into the loyalty program with the same email address, and their twin daughters have the same
birthday.
When the marketer refreshes the birthday group on the twins' birthday, the system collects each unique subscriber key with a DOB value
equal to the current date. Even though Lisa and Jill share an email address, each appears separately in the group.
When the birthday email goes out to the Loyalty Birthday List, Lisa and Jill each receive a separate email to their family's shared address.
170
SubscribersEmail in Marketing Cloud Engagement

Identify Unique Subscribers Using Keys in Marketing Cloud Engagement
Identify unique subscribers by a value that isn’t an email address by enabling subscriber keys. Changing your implementation to use
subscriber keys takes careful planning to avoid losing data during the process. To learn the best way to prepare and migrate your data,
work with your account executive.
When organizing your migration data, make sure that every subscriber record contains a unique value for the subscriber key. The migration
process can take up to one week during which your account can’t send messages or process imports.
1. Contact your account executive regarding your data structure and planning the migration.
2. Choose an identifier for your subscriber key, and apply those values to every subscriber.
171
SubscribersEmail in Marketing Cloud Engagement
3. If you use SOAP API, modify your code to include the SubscriberKey property for all Subscriber and Retrieve calls.
Profile Center for Marketing Cloud Engagement
The Profile Center is a web page where subscribers enter and maintain the personal information that you keep about them. When you
import a list in Email Studio, you can import attribute values for your subscribers. Subscribers can see this information in the Profile Center
and update and add to it. Every email that you send through Email Studio contains a link to the Profile Center for subscribers to use.
The link to the Profile Center is included by default in emails based on the standard templates. To disable the default link, in Setup, go
to Email > Feature Settings > Email Studio > Optional Features. For HTML emails, you're prompted to include the link when
building the email. Subscribers see all the attributes defined in your account that you don't mark as hidden. If the attribute is read-only,
subscribers can see the value but can’t change it.
The Profile Center includes a global opt-out option. The Profile Center also works closely with the Subscription Center.
What Goes in the Profile Center
The Email application uses the information in the Profile Center to personalize emails sent to your subscribers. The links in each email
send connect your subscribers directly to their Profile Center page, and subscribers can access their Profile Center page to view and
change this information.
To help protect the privacy of your subscribers, be sure that the information you enter in the Profile Center doesn’t include sensitive or
personal information. Include only the information necessary to manage the profile. If an email is forwarded to another person via an
email client instead of Forward To A Friend, the link in the email leads to the original subscriber’s Profile Center, Subscription Center, or
Unsubscribe page.
To change the Profile Center’s color and logo, see BrandBuilder on page 15.
Preview the Profile Center
Preview the subscriber profile center in Email Studio.
Preview the Profile Center
Preview the subscriber profile center in Email Studio.
•
Attributes shown with a red asterisk are those that are defined in your account as required.
•
Attributes that are defined in your account as hidden are not displayed.
•
Attributes that are defined in your account as read-only are not editable.
1. Click Subscribers tab.
2. Click Profile Management or Preference Management.
3. In the profile/preference management toolbar, click Preview Profile Center, which opens the web page that subscribers see.
Preview the Subscription Center
You can view the Subscription Center through Email Studio Profile Center in Marketing Cloud Engagement.
1. Click Subscribers.
2. Click Profile Management.
3. Click Preview Profile Center.
4. Click the Subscription Center link that you see on the left side of the Profile Center web page.
Note the following about the Subscription Center:
172
SubscribersEmail in Marketing Cloud Engagement
•
The Available Publications section displays all lists that are defined in your account as public. The subscriber can choose to
subscribe to or unsubscribe from any of them.
•
The Unsubscribe from All option allows the subscriber to remove himself or herself from all your publications.
Add a Link to the Subscription Center in an Email
Add a link to your subscription center to an email created in Email Studio.
Add a Link to the Subscription Center in an Email
Add a link to your subscription center to an email created in Email Studio.
If you're creating an email based on a standard template, a link to the Subscription Center is included by default in the email footer.
However, there may be times you want to include a link in the body of your email. For example, you might want to encourage your
readers to subscribe to other lists you have. In that case, you could say something like, "Visit our Subscription Center to sign up and
receive our Monthly Newsletter."
1. Type or highlight the text in your content area to link. Example: Visit our Subscription Center.
2. Click Insert Link.
3. In Link URL, enter the Subscription Center personalization string: %%subscription_center_url%%
4. Select Other in the Link To field.
5. Click OK.
6. Click Save to save the content.
SEE ALSO:
Headers and Footers
Send to a List in Email Studio
Send to a subscriber list with enhanced features in Email Studio for Marketing Cloud Engagement.
1. Hover over Subscribers.
2. Click Lists.
3. From here there are multiple locations to send from:
•
Click the checkboxes next to each list to send to and click Send.
•
Under Actions click Send.
•
Click the name of a list and click Send.
4. Click Next.
5. Select the email to send.
6. Click Next.
7. Choose the email to send to the lists.
8. Choose Recipients Dialog Box - the lists previously selected are checked. Optional, you can add or remove groups and lists in this
step.
Select the target recipients to send the email to. Can you send to lists and groups, or data extensions with an associated publication
list, or an Audience with an associated publication list, or a Data Filter with an associated publication list. Depending on the features
173
SubscribersEmail in Marketing Cloud Engagement
enabled you see different options. We recommend sending to a maximum of 50 lists. If you exceed 50 lists, you can have trouble
viewing tracking for that send. When sending to data extensions or an audience check De-duplicate subscribers by email address
if you do not want subscribers to receive multiple emails.
9. Click Next.
10. Choose Excludes and Suppressions Dialog Box
This box allows you to refine your recipients and is an optional step depending on your business needs. This option is only used
when some subscribers are selected as recipients but you do not want to send to them. Any recipient that is listed as a target audience
and listed on an exclude or suppression list will not get the email.
•
Select the subscribers you wish to exclude or suppression from this send.
11. Click Next.
12. Send Options Dialog Box
•
Subject - Select the Insert Dynamic Content icon next to the subject line to send a dynamic subject email. Select the Insert
Personalization icon to add personalization to the subject line.
•
Preheader - Preheader is text displayed after the subject line when an email is previewed. The preheader can be modified in
email properties.
•
From Options:
–
If you wish to choose a specific email address from which you want to send the email message, click the top radio button
next to Use the following from name and address. Select the from name and address in the dropdown menu.
–
If you wish to use a send classification, click the radio button next to Select a send classification and select the send
classification from the dropdown menu.
•
Override sender profile with: - Determines whether the interaction uses a different sender profile than what is specified
on the send classification. If you select this checkbox, you must select a sender profile to use.
•
Override delivery profile with: - Determines whether the interaction uses a different delivery profile than what is specified
on the send classification. If you select this checkbox, you must select a delivery profile to use. Contact Global Support
or your account representative if these options are not available and you are interested in having then enabled.
•
Send Options:
–
Allows you to select Send as Multipart MIME. The system sends both the HTML and Text version of the email (including
the text version you have created) and whichever version is accepted by the subscriber's email client is delivered. If Multipart
MIME is not enabled in your account contact global support to have it enabled.
–
Allows you select Track all links found within this email. If you select this checkbox, the system collects tracking on the
links.
–
Allows you to select to Suppress this send from reports. If you select this checkbox, the email is sent to the designated
list without the job appearing in the Performance Reports. The job is automatically added to the Test Send Emails folder.
–
Allows you to select Enable send logging to a data extension. If Send Logging is not enabled in your account contact
global support to have it enabled.
–
Allows you to select the Tracking Destination folder. If you select a predefined folder, the job will automatically be placed
in that folder at the time of send.
•
Testing Options - If this feature is enabled in your account, the Email Send Wizard includes an option labeled Send All Emails
to. An email is generated for each subscriber and delivered to a single test address that you specify. The key benefit of this option
is that you are able to see exactly how each email looks to each subscriber. If you used personalization strings and/or dynamic
content in the email, each email contains the data specific to the targeted subscriber. Emails that you send to a test list or via
the Email Send Wizard's test option are charged to your account in the same way as any emails that you send to your subscribers.
174
SubscribersEmail in Marketing Cloud Engagement

Keep in mind that the test email address receives as many email messages as there are subscribers on the list or group selected.
If the lists and groups you select contain many subscribers, using this feature may not be a feasible option contact global support
to have it enabled.
13. Click Next.
14. Schedule Send Dialog Box
•
Send Email - This box allows you to select whether to send your email Immediately or Later. If you choose Later, you can select
the date and time of the send.
•
Send Throttling - Send Throttling allows you to select a range of hours during which you want to send your email. A Start and
End time required. You can also specify how many emails you want to send per hour during that time.
The system sends emails during the hours you specify every day (starting the day you send the email) until all the emails are sent.
When using Send Throttling, you should not schedule the email in the upper half of the dialog box. Send throttling overrides
scheduling, but scheduling the email can corrupt the send throttle process. It's imperative that you either schedule the email to
send in the future or select the Send Throttle checkbox.
The system begins processing the email send job at the start time you specify. The send is not spread evenly between the start and
end times. The system continues sending during the specified time range until the send is complete or the end time you specified
is reached, whichever comes first. If the end time is reached before the send is complete, the system will continue the send the next
day at the same start time. This process continues until the send is complete.
You can use Send Throttling for the following reasons:
•
To control inbound traffic to a website, meaning, the interest generated by email may result in server crashes due to too many
people visiting.
•
To limit the number of emails sent to a particular domain each hour.
15. Click Next.
16. Confirm Send Dialog Box
This box allows you to review the summary of your email's information before sending. If there are validation errors, you see the
Validations errors dialog box.
17. After verifying all the information is correct, select the This information is correct check box and click Send.
Classic Subscribers in Email Studio
Learn more about subscribers functionality when the enhanced subscriber features enabled in Email Studio for Marketing Cloud
Engagement.
1. Subscribers without Enhanced Subscriber Features
Some details change based on whether you enable enhanced subscriber features for Email Studio in Marketing Cloud Engagement.
Review requirements for when these features aren't enabled.
175
SubscribersEmail in Marketing Cloud Engagement

2. Lists without Enhanced Subscriber Features
A list is a collection of subscribers that receive your communications. All your subscribers belong to the All Subscribers list in your
Email Studio account. You create as many lists as you need to segment your subscribers so that you can target your email
communications. For example, you can create a list for your monthly newsletter, your weekly coupon offer, and a special
announcements list. After you create a list, you can send emails using your list or you can create a group from a list to target a more
specific segment of subscribers.
3. Groups without Enhanced Subscriber Features in Marketing Cloud Engagement
This information applies to accounts that don’t have the enhanced subscriber features turned on in Email Studio. Refer to Groups
with Enhanced Subscriber Features if your Email Studio account has enhanced subscriber enabled.
4. Data Extensions and Data Relationships without Enhanced Subscriber Features in Marketing Cloud Engagement
A data extension in Email Studio is a table within the application database that contains your data. You can import data into data
extensions with the application interface. You can create, update, and delete rows in a data extension by using the Marketing Cloud
Engagement SOAP API.
5. Data Filters without Enhanced Subscriber Features in Marketing Cloud Engagement
This information applies to Marketing Cloud Engagement accounts that use classic subscriber features and not enhanced subscriber
features in Email Studio. Understand AND and OR logical operators when using the data filter feature. A data filter is a group of criteria
that segments a subscriber list or data extension.
6. Measures
A measure is a unit of subscriber behavior that you define in Email Studio. After you create a measure, you can include the measure
as criteria in a data filter to segment a subscriber list using the measure.
Subscribers without Enhanced Subscriber Features
Some details change based on whether you enable enhanced subscriber features for Email Studio in Marketing Cloud Engagement.
Review requirements for when these features aren't enabled.
Email Message Requirements
A valid email address for each subscriber is fewer than 100 characters long, has no leading or trailing spaces, and contains only supported
ASCII characters
Status
When exporting individual subscriber data or when exporting an entire subscriber list, include the subscriber's email status. You can
also filter subscriber searches by status. Your subscriber workspace uses color-coded icons to indicate subscriber status.
ExplanationStatusColor Code
A subscriber who meets either of these
criteria is considered active.
Active
Green
•
No activities have occurred to make the
subscriber's status bounced,
undeliverable, unsubscribed, or deleted.
•
A subscriber whose status was bounced
or undeliverable is recorded as having
opened or clicked through a received
176
SubscribersEmail in Marketing Cloud Engagement

ExplanationStatusColor Code
email. In this case, the system changes
the subscriber's status back to active.
A subscriber who meets the following
criteria is considered bounced.
Bounced
(Returned)
Yellow
•
One or 2 soft bounces are received for
the subscriber.
•
One hard bounce is received for the
subscriber.
A subscriber who meets the following
criteria is considered held (undeliverable).
Held
(Undeliverable)
Gray
Three hard bounces or three soft bounces
are received for the subscriber and at least
15 days have passed since the first bounce.
If the bounce was from a trusted domain,
only one hard bounce is required. For the
most current list of trusted domains, contact
A subscriber who meets any of the following
criteria is considered unsubscribed:
Unsubscribed
Red
•
The subscriber has requested to be
removed from a single list, multiple lists,
or all lists. The subscriber's status is
changed to ‘unsubscribed’ for one or
more selected lists or at the all
subscribers level.
•
An Engagement user manually
unsubscribes a subscriber on a list, thus
changing the status to ‘unsubscribed’
for that list.
•
The subscriber submitted an AOL spam
complaint. In this case, the subscriber's
status is changed to ‘unsubscribed’ at
the all subscribers level.
A subscriber who meets either of the
following criteria is considered deleted:
DeletedNone
•
An Engagement deleted a subscriber
from a list other than the all subscribers
list. In this case, the subscriber's status
for that list only is deleted.
177
SubscribersEmail in Marketing Cloud Engagement

ExplanationStatusColor Code
•
An Engagement user has deleted a
subscriber from the all subscribers list.
In this case, the subscriber's global
status is deleted.
We don’t recommend deleting subscribers.
To prevent sending to a subscriber in a
future send, update the subscriber's status
to unsubscribed.
Add a Subscriber Manually
You can define an individual subscriber in Email Studio. When you add one subscriber, you have the option of creating another
individual subscriber with the same attribute selections.
Search for a Subscriber
You can search for a subscriber in Email Studio by using the supported search fields. You can further filter the search by specifying
text for email address, domain, HTML email preference, and subscriber status. You can view properties or export the found subscribers.
Subscriber Properties Access Locations
Access a subscriber record, using the Subscriber Properties dialog box, in Email Studio from any of these locations.
Export Subscribers by Status
Any user in Email Studio with access lists permission can export subscribers.
Remove Subscribers with Hard Bounces
A hard bounce occurs when an email server rejects an email due to permanent conditions, such as unknown user or domain errors.
Delete a Subscriber
You can delete a subscriber from all your lists in Email Studio.
Subscriber Data
View subscriber data and modify subscribers from Subscriber Properties. The changes you make take effect throughout Email Studio.
SEE ALSO:
Get Access to Enhanced Segmentation and Subscriber Features
Add a Subscriber Manually
You can define an individual subscriber in Email Studio. When you add one subscriber, you have the option of creating another individual
subscriber with the same attribute selections.
If you're using a reseller or enterprise account and have enabled unsubscribe management, you can’t add email addresses that appear
on the global unsubscribe list or your account-level unsubscribe list.
1. Choose Subscribers > My Lists and select a list.
2. Choose Create > Next.
3. Complete the subscriber identity fields.
a. Enter the full email address of the subscriber. This field is required.
b. To activate its data entry field, choose one of the profiles attributes defined in your account.
178
SubscribersEmail in Marketing Cloud Engagement

•
If the attribute has been defined to accept specific values only, the data entry field is a dropdown list from which you select
the desired value. Otherwise, the data entry field is a text box.
•
If a default value has been defined for the attribute, that value is displayed in the data entry field. Profile attributes displayed
in red are required fields.
c. Select or deselect one of the corresponding preference attributes as appropriate for this subscriber.
Note: For Enterprise Accounts, Channel Name is a required attribute field for all subscribers in your Enterprise administrator
account. Each subscriber must be associated with an On Your Behalf account.
4. Choose Next.
Note: If the email address you entered exists in your account, a prompt appears with the option for you to view the existing
subscriber's properties. To continue, enter a different email address for your new subscriber.
5. Select each list to which you want to add this subscriber. If you started from a particular list, that list is selected already and can be
deselected if desired.
Note: Every subscriber is added to your main All Subscriber list. Leave all other lists deselected if you don’t want to add the
subscriber to any of your accounts' lists.
6. Choose Finish. You can create another individual subscriber.
7. To start with a copy of the profile and preference attributes you defined for the previous subscriber, select Use attribute values
from previous subscriber and choose Create.
8. To start from scratch, choose Create.
9. When you’re done creating subscribers, choose Finish.
Your new subscriber now exists in your All Subscribers list and in any lists you selected in the wizard. The subscriber isn’t automatically
added to groups. If the subscriber's profile or preference attributes would make the subscriber eligible for a rule-based group, refresh
the group to add the subscriber.
Search for a Subscriber
You can search for a subscriber in Email Studio by using the supported search fields. You can further filter the search by specifying text
for email address, domain, HTML email preference, and subscriber status. You can view properties or export the found subscribers.
1. Choose All Subscribers > Search.
2. To choose from the supported search fields, choose Search where.
3. Enter the subscriber's data for the selected search field in the Is equal to field.
•
Email Address: Enter the subscriber's full email address that matches the email address in the subscriber's record. This field is
not case-sensitive.
•
Domain: Enter only the domain portion of the subscriber's email address. For example, yahoo.com. HTML Email preference:
Choose Yes or No from the Is equal to field.
•
Subscriber Status: Choose a subscriber status from the Is equal to field.
Note: Returned is the same as Bounced, and Undeliverable is the same as Held.
4. Click Find Now.
5. Select the subscriber in the search results and choose one of the options.
•
To view the subscriber’s properties, open the Subscriber Properties modal for this subscriber.
179
SubscribersEmail in Marketing Cloud Engagement

•
To export the subscriber, open the Export to a File wizard to export this subscriber's data to a file.
6. Exit the Search Subscribers modal.
Subscriber Properties Access Locations
Access a subscriber record, using the Subscriber Properties dialog box, in Email Studio from any of these locations.
Once you've located the subscriber in the list or group workspace, select the subscriber and choose View Properties.
Access instructionsSubscriber Properties
Double-click the list in the workspace to see all subscribers on the
list.
A list that contains the subscriber
Double-click the group in the workspace to see all subscribers in
the group.
A group the subscriber belongs to
The All Subscribers list is the master list of records for the account.
Unsubscribing from All Subs removes the subscriber from all lists
All Subscribers list
and groups. Reactivated subscribers must be added to each group
and list following reactivation. A subscriber can be unsubscribed
on lists and groups and be active the All Subscribers list.
Find subscribers in the All Subscribers workspace by searching or
sorting.
Export Subscribers by Status
Any user in Email Studio with access lists permission can export subscribers.
1. Choose Subscribers.
2. Choose All Subscribers or my lists and open the list you want to export from.
3. Choose Search.
4. Choose Subscriber Status.
5. Select the subscriber status you want to export under Is equal to.
6. Choose Find Now. The system generates your search results.
7. Choose Export and follow the export wizard.
Remove Subscribers with Hard Bounces
A hard bounce occurs when an email server rejects an email due to permanent conditions, such as unknown user or domain errors.
1. To eliminate the known invalid email addresses that hard-bounced from future email sends, update your internal database.
2. Upload these addresses into your All Subscribers list in Unsubscribed status.
Create List of Hard Bounced Email Addresses
You can create a list in Email Studio of hard-bounced email addresses.
180
SubscribersEmail in Marketing Cloud Engagement

Update Hard Bounced Subscribers
Update your hard-bounced subscribers in your spreadsheet program, outside of Email Studio.
SEE ALSO:
Bounce Mail Management in Email Studio
Create List of Hard Bounced Email Addresses
You can create a list in Email Studio of hard-bounced email addresses.
1. Choose Tracking.
2. Click the job you want to view.
3. Choose the link next to Hard Bounce to open a list of the hard-bounced subscribers from your chosen campaign.
4. Choose Export.
a. Choose comma-separated value (.csv) for Export Type.
b. Choose your preferred delivery method.
5. Choose Finish.
The system outputs a .csv file that you reimport.
Update Hard Bounced Subscribers
Update your hard-bounced subscribers in your spreadsheet program, outside of Email Studio.
Note: This procedure begins outside Email Studio and in your spreadsheet application.
1. Add a column named Status to your hard-bounce file.
2. Populate this field with the word Unsubscribed for each subscriber.
3. Import the hard-bounce file to your All Subscribers list. Upload to your All Subscribers list to avoid future list creation with invalid
addresses.
4. Check the Update Subscriber Records checkbox in the Import Wizard.
5. Map the Email Address and Status fields.
6. Import your file.
7. Spot check to ensure that subscribers have been unsubscribed appropriately.
SEE ALSO:
Import Activity in Email Studio
Delete a Subscriber
You can delete a subscriber from all your lists in Email Studio.
Note: To fully delete all contact information from Marketing Cloud Engagement, delete the contact record in Contact Builder
using Contact Deletion.
Note: Tracking data for deleted subscribers and contacts are retained in anonymized format and can’t be linked to a specific
record. Tracking and reports show clicks from [email protected] and an IP address of 0.0.0.0 for deleted records.
181
SubscribersEmail in Marketing Cloud Engagement

Warning: To prevent future sends to a subscriber, update the subscriber’s status to Unsubscribed
1. Hover over Subscribers.
2. Click Subscribers.
3. Click the name of the list that contains the subscriber to delete.
4. Click Search.
5. To choose from the supported search fields, click Search where.
6. In the Is equal to field, enter the subscriber's data for the selected search field.
•
Email Address: Enter the subscriber's full email address.
Note: What you enter here must match the email address in the subscriber's record. This field isn’t case-sensitive.
•
Domain: Enter just the domain portion of the subscriber's email address.
Note: For example, yahoo.com.
•
HTML Email preference: The Is equal to field becomes a dropdown list with two options to choose from, Yes or No.
•
Subscriber Status: The Is equal to field becomes a dropdown with the following options to choose from, Active, Returned,
Undeliverable, or Unsubscribed.
Note: Returned is the same as Bounced and Undeliverable is the same as Held.
7. Click Find Now. The application scans your subscribers for one or more matches and displays the results.
8. Select the desired subscriber in the search results.
9. Click Delete Subscriber.
10. Click OK.
11. To exit the Search Subscribers box, click Close.
Note: After a subscriber is deleted, they no longer appear on any of your lists in Email Studio, including the All Subscribers
list. If you import a list that includes this subscriber or if you manually add the subscriber, the subscriber reappears on your
lists. To ensure you don’t send any emails to this subscriber in the future, use the Unsubscribe feature instead of deleting the
subscriber. Unsubscribe prevents the subscriber from being imported into the system accidentally.
Subscriber Data
View subscriber data and modify subscribers from Subscriber Properties. The changes you make take effect throughout Email Studio.
InstructionsField
Update the subscriber's email address on the General tab of the
modal.
Email address
History shows a list of every action the subscriber has taken with
emails received from you in the past 90 days. If the activity is a
Email history
survey response, view that activity’s details to see the subscriber's
survey responses. The General tab shows how many times an email
to this subscriber has bounced.
182
SubscribersEmail in Marketing Cloud Engagement

InstructionsField
To remove a subscriber from all lists and prevent any emails from
being sent, choose Unsubscriber from all and enter a description.
Unsubscribe
The unsubscribe field places the subscriber on your account's
master unsubscribe list.
Note: This process is the same as when a subscriber
chooses to unsubscribe from all your publications in the
Subscription Center.
Activate a subscriber using Subscriber Properties. Activate
re-enables the subscriber to be added to other lists and groups.
Activate
Attributes show a subscriber's data for each profile and preference
attribute. Enter or modify attribute data here.
Attributes
Note: If necessary attributes without default values are
added to your account since a subscriber was last modified,
specify values for these attributes. Refresh each group a
reactivated subscriber is added to see that subscriber’s
membership.
Lists show lists a subscriber belongs to.
Lists
•
Details show when the subscriber was added to or
unsubscribed from this list. If the subscriber has been
unsubscribed from the list, you can reactivate the subscriber's
membership here.
•
Expand the list folders to add the subscriber to one or more
lists.
Groups show groups this subscriber belongs to. To add a subscriber
back to this group, choose Activate.
Groups
Lists without Enhanced Subscriber Features
A list is a collection of subscribers that receive your communications. All your subscribers belong to the All Subscribers list in your Email
Studio account. You create as many lists as you need to segment your subscribers so that you can target your email communications.
For example, you can create a list for your monthly newsletter, your weekly coupon offer, and a special announcements list. After you
create a list, you can send emails using your list or you can create a group from a list to target a more specific segment of subscribers.
When you create a list, you decide whether to make it public. If you make a list public, then a subscriber sees the name of the list in the
Subscription Center and has the option to opt in or -out of the list.
Note: If a subscriber uses the forward button in their email client instead of the Forward to a Friend feature to forward your email,
the subscription center link still points to the original subscriber's subscription center. For example, if Lee forwards your email to
Ali, and Ali clicks the Subscription Center link in the footer of the email, Ali sees Lee's subscriptions.
You must first create a list, then you can add subscribers to lists in one of two ways:
•
Individually
183
SubscribersEmail in Marketing Cloud Engagement
•
Import a file containing subscriber data
Becoming an effective email marketer requires constant list cleansing and hygiene. In addition, ISPs sometimes use old email addresses
as spam traps aimed at catching commercial e-mailers with old lists. The size of your list is not nearly as important as the quality of the
list, how it was captured, how often it is cleaned, and how well the subscribers respond to messaging. For optimization of email marketing,
it is imperative that lists consist only of opt-in subscribers - those who are anticipating and are interested in your email correspondence.
Subscribers showing no activity, opens, or clicks, for six months or more are very unlikely to respond and are more likely to complain,
causing the potential for ISP blocking. Maintaining your lists is an important part of sending emails.
You can grow your subscriber lists in many different ways. Marketing Cloud Engagement prohibits importing or adding subscribers from
purchased lists, email-appended lists, and email address data obtained by methods other than a direct opt-in. Using these prohibited
list types increases the likelihood of blocked sends due to spamming.
Configure Double Opt-In for a Classic List in Marketing Cloud
Creating a double opt-in campaign requires your subscribers to confirm their email address by clicking a link in an email they receive
after subscribing. Double opt-in ensures that the subscribers on your list want to be there, minimizes the number of invalid email
addresses on your list.
Export a List from Marketing Cloud Engagement
Export selected subscriber data from a list to a comma-separated CSV file, tab-delimited TXT file, or XML file.
Copy and Move Subscribers Between Lists in Marketing Cloud Engagement
Add subscribers from one list to another list while retaining them on the original list, or move subscribers from one list to another
in Email Studio. You can also change an individual subscriber’s list membership from the subscriber's Subscriber Properties dialog
box.
Delete a List from Marketing Cloud Engagement
In Email Studio, you can remove the list and all subscribers who belong to the list or remove just the list and retain the subscribers.
List Properties for Marketing Cloud Engagement
To view statistics about a subscriber list and change other details, open its Properties in Email Studio.
Import Subscribers into Marketing Cloud
When you import subscribers, Email Studio logs results for review. Data such as import file name, imported subscribers list ID, number
of subscribers imported, number of existing subscribers updated with new data, number of records in the import file not imported
and the data fields for each subscriber record not imported, along with the reason for the unsuccessful import are in the log.
Configure Double Opt-In for a Classic List in Marketing Cloud
Creating a double opt-in campaign requires your subscribers to confirm their email address by clicking a link in an email they receive
after subscribing. Double opt-in ensures that the subscribers on your list want to be there, minimizes the number of invalid email
addresses on your list.
To enable the double opt-in feature:
1. Go to Setup.
2. Click to expand Feature Settings.
3. Click to expand Email Studio.
4. Click Email Optional Features.
5. Toggle on Double Opt-In.
184
SubscribersEmail in Marketing Cloud Engagement
Before you can define a double opt-in status for a list, you must create the email that you send when someone subscribes. Include the
substitution string to insert the link in your email: %%double_opt_in_url%%. For example, add <a
href="%%double_opt_in_url%%">Confirm Subscription</a> in the HTML of your email where the confirmation link is to render.
Subscribers who receive the confirmation email but haven't yet clicked the confirmation link are added to your list with a status of
Unsubscribed. When they click the confirmation link, their status changes to Active and receives any emails you send.
1. Click Subscribers.
2. Click my lists.
3. Select the checkbox next to the list for which to define a double opt-in status.
4. Click Properties.
5. Select the Require subscribers to provide confirmation of valid email address (double opt-in) checkbox.
6. Click Select and choose the email to send as the double opt-in send. The substitution string to insert the link in your email is
%%double_opt_in_url%%.
7. Click Save.
SEE ALSO:
Enable Email Optional Features
Export a List from Marketing Cloud Engagement
Export selected subscriber data from a list to a comma-separated CSV file, tab-delimited TXT file, or XML file.
When exporting a list, please note which fields are exportable and which are not.
You can export the following fields:
•
Subscriber key (if enabled in your account)
•
Email Address
•
Created Date
•
Unsubscribe Reason
•
Unsubscribe Date
•
HTML Email
You cannot export the following fields:
•
Add Method
•
Added By
•
Bounce Count
•
Modified Date
1. Hover over Subscribers.
2. Click Lists.
3. Click Export under Actions next to the list to export.
4. Click Next in the wizard's introductory dialog box.
5. Complete the File and Delivery dialog box, as follows:
185
SubscribersEmail in Marketing Cloud Engagement

DescriptionField
This box shows the supported export file types. Click the desired type to select it.Export a file of type
If you want the resulting export file to be zipped prior to delivery, click Yes. Compressing the
file is recommended for large lists, especially if you choose the email delivery option.
Compression
Choose how you want the export file to be delivered to you:Delivery
•
Via FTP after the export process completes: If you choose this option, the export file is
delivered to the Export folder in your enhanced FTP account.
•
As an attachment to an email when the export process completes: If you choose this
option, the export file is emailed to the address that you enter in the email address text
box.
Note: If the export file is over 5 MB, the system delivers it to your enhanced FTP
account regardless of what you select here. If you do not have an enhanced FTP
account, the system returns a message saying that you should call global support.
Select the type of file encoding you want to use. If no type is selected, the system defaults
to UTF-8.
File Encoding
6. Click Next.
7. Choose the data to export by moving the desired attributes from the box on the left to the box on the right. You can choose up to
a limit of approximately 150 data fields per export file. Click the right double-arrow button if you want to move all the attributes into
the box on the right. Or click a single attribute on the left and then click the right single-arrow button to move it into the box on the
right. The other two arrow buttons allow you to deselect attributes (move attributes from the box on the right into the box on the
left).
8. Click Export. The application begins the process of exporting the data into a file. How long the export takes depends on the amount
of data to be exported.
9. Click Finish.
•
If you chose to be emailed upon completion, this dialog box appears immediately and confirms that the export process has begun.
Click Finish to exit the wizard. After the export file has been built, you'll receive an email with the file in the format you chose.
•
If you chose the HTTP browser download option, the dialog box appears after the export process has been completed. Click the
Download File button in the dialog box to open the file in your browser. Click the Finish button after downloading the file, to exit
the wizard.
Copy and Move Subscribers Between Lists in Marketing Cloud Engagement
Add subscribers from one list to another list while retaining them on the original list, or move subscribers from one list to another in
Email Studio. You can also change an individual subscriber’s list membership from the subscriber's Subscriber Properties dialog box.
Note: All subscribers are always included in All Subscribers. You can copy subscribers from All Subscribers to another list, but you
can’t move them from All Subscribers.
1. Click the list that contains the subscriber you want to move or copy.
2. Select the subscriber who you want to add to another list. To select multiple subscribers, click one subscriber and then Ctrl+click
each subsequent subscriber. If you want to select the entire list, click the Move/Copy from the menu without selecting any subscriber.
186
SubscribersEmail in Marketing Cloud Engagement

3. Click Move/Copy. If you’re in the All Subscribers workspace, the button is labeled Copy because you can’t move subscribers from
this list.
4. Select the list you want to add these subscribers to.
5. Check the appropriate boxes.
Maintain subscriber status from the originating list when you move or copy the subscriber to the destination list. If you don’t check
this list, the subscribers are added to the destination list with a status of Active.
If you want to add all the subscribers, select the Move/copy each subscriber on the source list check box.
6. Click the appropriate option:
Move: Choose move to remove the subscribers from the current list and add them to the selected list.
Copy: Choose copy if you want the subscribers to exist on both the current list and the selected list.
7. Click OK in the confirmation dialog box that appears after the move or copy is complete.
Delete a List from Marketing Cloud Engagement
In Email Studio, you can remove the list and all subscribers who belong to the list or remove just the list and retain the subscribers.
Use Contact Delete to delete contact information for data compliance regulations. Contact Delete applies only to contact information
contained in these sources.
•
Email Studio All Subscribers List
•
MobileConnect
•
MobilePush
•
Contact Builder
Tip: To prevent sending to a subscriber in a future send, updating the subscriber's status to Unsubscribed.
Note: Deleting a list doesn’t remove the email's tracking details that have been delivered to that list. The application continues
to track email activities for the subscribers who belonged to the list that received the email, even after the list has been deleted,
if you choose to retain the subscribers when you delete the list.
1. Click Subscribers.
2. Click my lists.
3. Select the list to delete.
4. Click Delete in the list workspace toolbar.
For Enterprise 2.0 parent accounts, click Delete all subscribers in "LIST NAME" from the application to delete the subscribers
that belong to the list. If you want to retain the subscribers in your All Subscribers list and any other lists to which they may belong,
don’t select this check box.
5. Click OK.
List Properties for Marketing Cloud Engagement
To view statistics about a subscriber list and change other details, open its Properties in Email Studio.
187
SubscribersEmail in Marketing Cloud Engagement

OptionsDescriptionField
To change the name of the list, make your
modifications to the text box at the top of
Name of the list as it's displayed in the list
workspace and in sends.
Last Name
the List Properties dialog box. When you
click OK in the dialog box, your name
change takes effect
The ID can’t be changed.Identification number generated for the list
when the list was created. The list ID is
displayed in various places.
External Key
To change the description, make your
modifications in the Description field of the
Description of the list as it's displayed in the
list workspace.
Description
dialog box. When you click OK in the dialog
box, your change takes effect.
You can change the list attributes by
selecting the appropriate checkboxes.
Specifies whether the list is Public.List Attributes
To relocate the list, click the Select button,
which opens the Move List dialog box
Folder in which this list is located.List Location
showing your list folder structure. Click the
desired folder. If you want to create a folder
for this list, click the New button in the
Select Folder dialog box to open the Create
New Folder dialog box. When you return to
the Select Folder dialog box, the list folder
structure refreshes to show your new folder.
After selecting the desired folder, click OK.
To require your subscribers to confirm their
email address, select the checkbox and
Specifies whether the subscribers in this list
will have to confirm their email address after
they opt in or not.
Opt-in Behavior
select the email that is sent. Leave the
checkbox blank if you don't wish to require
your subscribers to confirm their email
address.
You can choose to use a default landing
page, to redirect a subscriber to an external
Specifies what the subscriber sees after
confirmed to join the list.
Opt-in Landing Page
site, or redirect to an internal landing page.
Select the appropriate radio button
You can choose to send a welcome email
or not.
Specifies whether you’re welcoming new
subscribers as they’re added to a list.
Welcome Email
Adding a Welcome Email to a list is no
longer supported starting in the second half
of 2020. Use Journey Builder to create
personalized, automated multichannel
campaigns.
188
SubscribersEmail in Marketing Cloud Engagement

The List Properties area contains the following information on the Tracking Data tab:
DescriptionField
The domains that your list is made up ofList Composition
The total number of subscribers on the list.Total List Size
The Date, Email Name, Subject, and Tracking Report for every email
sent to this list in the last 30 days.
Email Activity: Last 30 Days
Reports that you can view for this list. If this feature isn’t enabled,
contact your account executive.
Other Resources
Import Subscribers into Marketing Cloud
When you import subscribers, Email Studio logs results for review. Data such as import file name, imported subscribers list ID, number
of subscribers imported, number of existing subscribers updated with new data, number of records in the import file not imported and
the data fields for each subscriber record not imported, along with the reason for the unsuccessful import are in the log.
If you chose to be emailed upon import completion, the email includes a log file in the same format with information about the skipped
records in .txt, or .csv format. The body of the email itself summarizes the import results.
If you did not choose to be emailed upon import completion, the final Import Subscriber Wizard dialog box provides a summary of
results. You can also select the option of downloading a detailed log file in the same format as your import file, such as .txt, or .csv.
Note: Review the log file to see why certain records were skipped.
Example: Possible reasons why records are not imported:
•
The email address was unrecognizable. For example, the @ symbol is missing, or the period after the domain name is missing,
such as examplecom versus example.com).
•
The data mapped to an attribute with restricted values did not match any of the possible values defined for the attribute.
•
The data mapped to an attribute was not the same data type as the attribute. For example, the import file contains $1000 for
an attribute defined as numeric, which accepts numbers only and not symbols.
Groups without Enhanced Subscriber Features in Marketing Cloud Engagement
This information applies to accounts that don’t have the enhanced subscriber features turned on in Email Studio. Refer to Groups with
Enhanced Subscriber Features if your Email Studio account has enhanced subscriber enabled.
A group is a subset of subscribers from a list and the subscribers don’t have enhanced subscriber features.
You can create a group using several methods:
•
Build a rule based on profiles and preferences from a subscriber list
•
Pick a random group from a subscriber list
•
Choose subscribers at a constant interval from a subscriber list
•
Build a group based on a Data Filter
In the course of creating a group, you can choose to create a new group subfolder in which to store the group.
Groups are derived from lists or other groups. Only 12 random groups can be created from a list or another group. You can rename
groups, move a group from one folder to another, refresh a rule-based group's membership to reflect subscriber changes, redefine a
rule-based group, and delete groups. You can also use the Automation Studio group refresh activity. A group refresh is an activity to
189
SubscribersEmail in Marketing Cloud Engagement
reapply the rules in a group definition to create a subset of subscribers in a list. Subscribers who opt-out of sends from a group are
retained in refreshed group as unsubscribed even if they no longer match the rules for the group.
Use a group to create a targeted list of subscribers. For example, if you want to send an email to all the males in a list, you can create a
group of just the males. Or use a group to create a random sample of subscribers. For example, if you want to see how subscribers react
to a new email template, you can generate a random sample of subscribers to send to and track the results. You can also use a group
based on a data filter.
Access Marketing Cloud Engagement Groups
Subscriber groups are managed from the group workspace in Email Studio.
Create a Subscriber Group
Create a group from the group workspace or from a list workspace of subscribers in Email Studio.
Delete a Group from Marketing Cloud Engagement
Delete a group in Email Studio that doesn’t delete any of the subscribers who belong to the group.
Export Email Studio Subscribers to a Group
Export subscribers to a group in Email Studio.
Manage Groups in Marketing Cloud Engagement
The Group Properties dialog box is where you can view statistics about the group and change properties of the group. Select a group
in the group workspace. Click View Properties in the group workspace toolbar. You can even redefine the attribute settings with
which a rule-based group was defined.
Modify a Rule-Based Group in Marketing Cloud Engagement
Adjust the attribute settings on which a group is based in Email Studio.
Refresh Membership of a Rule Based Group
Newly added or modified subscribers are not automatically added to groups. If the subscriber's profile or preference attributes would
make the subscriber eligible for a rule-based group, you'll need to refresh the group so that the subscriber can be added. You can
also use the group refresh activity in Automation Studio which reapplies the rules in a group definition to create a subset of subscribers
in a list.
Rule Based Profile Attributes Operators for Marketing Cloud
These are operators available to build rule based profile attributes in Email Studio.
Scenario: Groups with Classic Subscriber Features
See an example of groups with classic subscriber features used in Email Studio for Marketing Cloud Engagement.
Access Marketing Cloud Engagement Groups
Subscriber groups are managed from the group workspace in Email Studio.
1. Click Subscribers in your navigation pane.
2. Click my groups in the navigation pane.
3. If the group you want is in a group subfolder, click the subfolder in either the navigation pane or in the My Groups workspace.
The groups in the selected group folder and any subfolders under that folder are shown in the workspace.
Create a Subscriber Group
Create a group from the group workspace or from a list workspace of subscribers in Email Studio.
1. In Email Studio, on the Subscribers tab, select Groups.
190
SubscribersEmail in Marketing Cloud Engagement

2. Select a folder to add the group to.
3. Click Create.
4. Choose the method you want to use to create this group.
•
Build a rule based on profiles and preferences from a subscriber list
•
Pick a random group from a subscriber list
•
Choose subscribers at a constant interval from a subscriber list
•
Build a group based on a Data Filter
Note: You can create as many as 12 groups at a time, but only 12 groups can be made from one list or another group.
Create a Group Based on a Data Filter
Create a data filter and then select Build a group based on a Data Filter in the Create Subscriber Group wizard to create a group
based on a data filter in Email Studio.
Create an Interval Constant Group in Marketing Cloud Engagement
Select choose subscribers at a constant interval from a subscriber list option to create a new interval group in Email Studio.
Create a Random Group
Create a random group from a subscriber list option in Email Studio.
Build a Rule-Based Group
In Email Studio for Marketing Cloud Engagemetn, you can choose to build a simple rule based on a single attribute, or a complex
rule, which is a set of rules based on as many attributes as you like.
Create a Group Based on a Data Filter
Create a data filter and then select Build a group based on a Data Filter in the Create Subscriber Group wizard to create a group based
on a data filter in Email Studio.
1. Click Browse and choose the subscriber list from which this group is created.
You can choose All Subscribers if you don’t want to limit the group to a single list. If you don’t have access to All Subscribers, contact
your Marketing Cloud representative for more information about enabling this feature.
2. Click the Using Data Filter dropdown, select the data filter you want to use and click OK.
3. Enter the name of your group in the Group Name field.
4. Click New and select the parent folder to select the new group location.
5. Enter the new folder name.
6. Click Create.
7. Click Create and Email Studio scans your subscriber data to build the new group.
8. Select View your newly created group checkbox to view your group.
9. Click Finish to exit the wizard.
You can access this group from the groups area of the navigation pane and can select it when sending emails.
Create an Interval Constant Group in Marketing Cloud Engagement
Select choose subscribers at a constant interval from a subscriber list option to create a new interval group in Email Studio.
191
SubscribersEmail in Marketing Cloud Engagement

1. Click Browse and choose the list from which this group is created.
You can choose All Subscribers if you do not want to limit the group to a single list. If you do not have access to All Subscribers,
contact your account executive for more information about enabling this feature.
2. Enter a name and description for the group.
The name identifies the group in the Email Send wizard and the description appears in the group workspace.
3. Enter the maximum number of subscribers for the group in Group Size and the Interval Size.
Email Studio starts with the first subscriber in the selected list and pulls every nth subscriber, n is equal to the interval size until it
reaches the group size you specified. For example, if you specify a group size of 5 and an interval of 3, the application pulls the 1st,
4th, 7th, 10th, and 13th subscribers from the list.
Note: If your list does not contain enough subscribers to create a group of this size using the interval you specify, you are
prompted to adjust your numbers.
4. Click the group folder in which to store your group. Click New to create a new folder, select the parent folder, and enter the name
of the new folder.
5. Click Create.
Email Studio reads through your subscriber data to build the new group.
6. If you want to see the created group, select View your newly created group checkbox.
7. Click Finish to exit the wizard.
You can access the group from the groups area and select it when selecting emails.
Create a Random Group
Create a random group from a subscriber list option in Email Studio.
1. Select Pick a random group from a subscriber list among the Create Subscriber options.
2. Click Browse and select the list to create the group from.
3. Add the first group.
Note: If you create multiple groups at once, ensure that there is no overlap in subscribers belonging to various groups.
a. Click Add.
b. Enter a name in Group Name. The name appears in the Email Send Wizard.
c. Enter a percentage or a number of subscribers in a selected list in Group Size that is randomly added to the group. This format
is used for the rest of the groups created in this random sampling.
Note: If you use a percentage, ensure that you select percent in the dropdown. If you enter a number, ensure that you
select count in the dropdown.
d. Click the group folder to set the group's location. If you want a new group folder, click New, select the parent folder, and enter
the name.
e. Click OK.
You see your first group and how much of the list you have left for creating more groups. For example, if you defined your first group
as 25% of the list, the Define Random Group dialog box displays 75% remaining.
4. Repeat to add up to 11 more groups for a total of 12.
192
SubscribersEmail in Marketing Cloud Engagement

Note: Your random groups do not need to add up to 100% of the subscriber list; you can create a set of random groups
whose sum is less than that of the list.
5. Click Create.
Email Studio reads through your subscriber data to build the new groups.
6. If you want to see the last random group that was created, select View your newly created group check box.
7. Click Finish to exit the wizard.
You can access your groups from the groups area and use them to send emails.
Build a Rule-Based Group
In Email Studio for Marketing Cloud Engagemetn, you can choose to build a simple rule based on a single attribute, or a complex rule,
which is a set of rules based on as many attributes as you like.
1. Choose the subscriber list. Click Browse and choose the list from which this group is created.
If you are creating a simple rule, go to Step 2.
If you are creating a complex rule, skip to Step 5.
2. For a simple rule - Choose the profile or preference attribute. Click Field and choose from the profile attributes or preference attributes
defined in your account. Click the desired attribute.
3. Click the drop-down and choose the operator that best describes the relationship between the attribute and the value in this rule.
4. Choose the comparison value.
Note: Be sure to choose an operator that makes sense with the type of attribute you chose. For example, don't use the less
than operator with a text attribute. For attributes with type equal to date, only the following operators are supported: is equal
to, is not equal to, is greater than and is less than. For preference attributes, you do not select an operator. (The operator can
only be is.)
•
Click the drop-down list associated with the field labeled the word(s). Your options in this field depend on the attribute and
operator you selected.
•
For preference attributes, your only options are Yes and No.
•
If the attribute has defined values, the dialog box features a drop-down list consisting of those defined values. You can only
select 1 value from the drop-down.
•
For date attributes, the comparison value can be a specific date or a relative date. The baseline date for evaluation is in Central
Standard Time.
–
To look for a specific date, select Date from the drop-down and enter the desired date in the text field to the right of the
drop-down.
–
To look for a relative date, select Today, Today Plus or Today Minus. For Today Plus and Today Minus, designate how many
Days, Weeks, Months, or Years you want to look in the past or to the future.
–
Choose whether to include the year in the evaluation by selecting or deselecting the Include Year check box.
•
If the attribute is a free-form field (with no defined values) or a preference attribute, you see a text box in which you type the
value. You'll need to type it exactly as it's been entered in subscriber records.
–
If you chose exists in or not exists in as the operator, enter all the possible values in the text box separated by commas (no
spaces between values). The maximum number of characters that you can enter in the text box is 2,000.
If you are creating a simple rule, skip to Step 12.
If you are creating a complex rule, go to Step 5.
193
SubscribersEmail in Marketing Cloud Engagement
5. For complex rules, click Advanced.
6. Choose the profile or preference attribute. Click Field and choose from the profile attributes or preference attributes defined in your
account.
7. Click Condition and choose the operator that best describes the relationship between the attribute and the value that you define
in this rule. For preference attributes, you do not select an operator.
8. Click Word(s) drop-down and your options in this field depend on the attribute and operator you selected. You can select either
Yes or No for the preference attributes.
9. Click Add to List and the rule you just created is entered into the rule-building box in the middle of the dialog box.
10. Choose whether the two rules are connected by AND or OR before you add the next rule. If you choose AND from the Operator
drop-down list in the middle of the dialog box, the subscriber must meet both the preceding requirement (rule) and the next
requirement that you're about to add in order for that subscriber to belong to this group. If you choose OR, the subscriber must
meet one of the requirements, not necessarily both, to belong to the group.
11. You can add as many rules as needed by repeating the above steps. Note: For the most predictable results, you should use only AND
or OR (not a mixture of both) to connect all your rules. Remember that you cannot group rule into parentheses, which is necessary
when mixing AND and OR statements.
12. When using simple or complex rules and when done building the rule or rules, click Next for the Identify Group dialog box appears
next.
13. Enter the name and description of the group and specify the location where it is stored. Enter a name in Group Name to identifies
the group in the Email Send wizard. In the Group Description field, enter a brief description of the group. This description appears
in the group workspace. Choose the group folder in which to store the group. If you want to create a new group folder, click the
New button, which opens a dialog box in which you can select the parent folder for the new folder and then type in the name of
the new folder.
14. Click Create in the Identify Group dialog box. Email Studio reads through your subscriber data to build the new group.
15. If you want to see the group that was created, select View your newly created group check box.
16. Click Finish to exit the wizard. Your group is now accessible from the groups area of the navigation pane and is ready for selection
when sending emails.
Delete a Group from Marketing Cloud Engagement
Delete a group in Email Studio that doesn’t delete any of the subscribers who belong to the group.
1. Select a group in the group workspace.
2. Click Delete in the group workspace toolbar.
3. Click OK in the confirmation dialog box.
The group is now deleted.
Export Email Studio Subscribers to a Group
Export subscribers to a group in Email Studio.
To export subscribers, you must be an account admin or a user with permission to access lists.
1. Click the Subscribers tab.
2. Click my groups and open the group you wish to export from.
3. Click Export, and follow the export wizard.
194
SubscribersEmail in Marketing Cloud Engagement

Manage Groups in Marketing Cloud Engagement
The Group Properties dialog box is where you can view statistics about the group and change properties of the group. Select a group
in the group workspace. Click View Properties in the group workspace toolbar. You can even redefine the attribute settings with which
a rule-based group was defined.
The Group Properties screen contains these fields:
OptionsDescriptionField
To change the name of the group, make
your modifications to the text box at the top
Name of the group as it's displayed in the
group workspace and in the Email Send
wizard.
Group name
of the Group Properties dialog box. When
you click OK in the dialog box, your name
change takes effect.
To relocate the group, click the Move
button, which opens the Move Group dialog
Group folder in which this group is located.Location
box showing your group folder structure.
Click the desired folder. If you want to create
a folder for this group, click the New button
in the Move Group dialog box to open the
Create New Folder dialog box. When you
return to the Move Group dialog box, the
group folder structure displayed refreshes
to show your new folder. After selecting the
desired folder, click OK.
To view more details about the group
membership, click the More Info button.
Number of subscribers who currently
belong to this group.
Size
The More Info dialog box that appears
shows how many emails sent to this group
have bounced or were undeliverable and
how many subscribers that belong to the
list from which this group was pulled have
unsubscribed from the list.
These dates are recorded.Date on which this group was created and
the date when it was last refreshed to
update its membership.
Created and Last Refresh
This date is recorded.Date when this group was last selected for
an email delivery.
Last Sent To
Modify a Rule-Based Group in Marketing Cloud Engagement
Adjust the attribute settings on which a group is based in Email Studio.
Note: If you're using an Enterprise 2.0 account, you cannot modify a rule-based group. Enterprise 2.0 users must either create a
new group or go into the data filter that the group was created from and make the edit there.
1. Select the rule-based group in the group workspace.
2. Click View Properties in the group workspace toolbar.
195
SubscribersEmail in Marketing Cloud Engagement
3. In the Group Properties dialog box, click the Rules tab.
4. Modify the attribute settings as desired.
5. Click OK in the dialog box.
The application refreshes the group membership to account for the change in rules.
Refresh Membership of a Rule Based Group
Newly added or modified subscribers are not automatically added to groups. If the subscriber's profile or preference attributes would
make the subscriber eligible for a rule-based group, you'll need to refresh the group so that the subscriber can be added. You can also
use the group refresh activity in Automation Studio which reapplies the rules in a group definition to create a subset of subscribers in a
list.
You cannot refresh groups based on a random sampling or constant intervals.
1. Select a rule-based group in the group workspace.
2. Click Refresh Group in the group workspace toolbar.
3. Click OK in the confirmation dialog box that appears.
The application scans all subscriber data and rebuilds the group. View the subscriber count displayed in the group workspace to see
how many subscribers now belong to the group.
Note: Group refreshes will fail if the group is based on a data type attribute that has a date earlier than January 1, 1900 or
greater than December 21, 2079.
Rule Based Profile Attributes Operators for Marketing Cloud
These are operators available to build rule based profile attributes in Email Studio.
DescriptionOperator
Subscribers with an attribute definition that exactly matches the
value are included in the group Segment. A subset of a list that
is equal to
has been separated based on either profile information or via
various sampling techniques. Choose only one value.
Subscribers with an attribute definition that does not match the
value are included in the group. Choose one value only.
is not equal to
Use this operator when the attribute is a numeric value. Subscribers
with an attribute definition greater than (or less than or equal to)
the value is included in the group.
is greater than or greater than or equal to
Use this operator when the attribute is a numeric value. Subscribers
with an attribute definition less than (or less than or equal to) the
value is included in the group.
is less than or less than or equal to
The application looks for attribute values that begin with the exact
sequence of characters that you enter as the comparison value.
Commas are treated as characters and not as delimiters.
begins with
196
SubscribersEmail in Marketing Cloud Engagement

DescriptionOperator
The application looks for attribute values that include or exclude
the exact sequence of characters that you enter as the comparison
value. Commas are treated as characters and not as delimiters.
contains or does not contain
The application looks for attribute values that end with the exact
sequence of characters that you enter as the comparison value.
Commas are treated as characters and not as delimiters.
ends with
Subscribers with an attribute definition that matches one of the
values you define in a comma delimited string of values are
exists in
included in the group. Like partial text searches, such as begins
with and ends with, the exists in operator looks for a partial match
of the entire value. For example, if your match criteria is north, the
exists in operator returns subscribers with north, northwest, and
northeast attribute values, but not subscribers with south,
southwest, and southeast attribute values. To search for a blank
attribute value, create a rule where the operator is 'exist in' with a
value of comma (,) and two double quotation marks (""). The value
will look the following: ,"" Please note that this operator is not
applicable when choosing an attribute with restricted values, as
you can select only one of the restricted values as the comparison
value
Subscribers with an attribute definition that do not match any of
the values you define in a comma delimited string of values are
does not exist in
included in the group. Like partial text searches (such as begins
with and ends with), the does not exist in operator looks for a partial
match of the entire value. For example, if your match criteria is
north, the does not exist in operator returns subscribers with south,
southwest, and southeast attribute values, but not subscribers with
north, northwest, and northeast attribute values. This operator is
not applicable when choosing an attribute with restricted values,
you can select only one of the restricted values as the comparison
value.
Scenario: Groups with Classic Subscriber Features
See an example of groups with classic subscriber features used in Email Studio for Marketing Cloud Engagement.
197
SubscribersEmail in Marketing Cloud Engagement

Example: Northern Trail Outfitters created several lists of subscribers, and would now like create a group to send an email to all
the males in the list. They open the Create Subscriber Group wizard and navigate to the Target Group
page.
They choose Build a rule based on profiles and preferences because they want to target a specific gender. After clicking Next,
the Build Rule page appears. Northern Trail Outfitters populates the fields with the correct information.
198
SubscribersEmail in Marketing Cloud Engagement

The next page of the wizard prompts them to name their group. They choose a name and description that reminds them of the
group's purpose.
199
SubscribersEmail in Marketing Cloud Engagement

Northern Trail Outfitters clicks create, and the group appears in the my groups folder. They can now use that group to send emails.
Data Extensions and Data Relationships without Enhanced Subscriber Features in Marketing Cloud
Engagement
A data extension in Email Studio is a table within the application database that contains your data. You can import data into data
extensions with the application interface. You can create, update, and delete rows in a data extension by using the Marketing Cloud
Engagement SOAP API.
The information in this document applies to accounts that don’t have enhanced subscriber features turned on. If your account has
enhanced subscriber features turned on, see Data Extensions with Enhanced Subscriber Features on page 119.
Using data extensions can require an understanding of relational database structures and other technical expertise. Data that you store
in a data extension is related to a subscriber, but doesn’t fit in the subscriber profile for one of these reasons:
•
Subscriber attributes have only one value. For example, a subscriber’s first name is a subscriber attribute because you probably refer
to a subscriber by only one first name. A list of the subscriber’s transactions in the last month isn’t a subscriber attribute, because it
changes from month to month. Also, it’s difficult to know how many transactions a customer will have for a month that hasn’t
occurred yet.
200
SubscribersEmail in Marketing Cloud Engagement

•
The information is related to the subscriber through a third piece of information. For example, you maintain the subscriber’s preferred
airport code as a subscriber attribute, but maintain the name of the airport in a data extension.
After you create a data extension to contain your external data, you create data relationships to relate your data extensions to each other
and to your subscribers. Data extensions must relate to subscribers, either directly or through another data extension, to be useful to
include in messages.
Copy a Data Extension in Classic Subscribers in Marketing Cloud Engagement
Follow these steps to copy an existing Email Studio data extension. This process copies the data extension fields and configurations
but not the data stored in the data extension itself.
Clear Data from an Email Studio Data Extension
Follow these steps to clear data from a data extension in Email Studio.
Create a Data Relationship
Follow these steps to create a data relationship between two data extensions in Email Studio.
Import Data into a Data Extension
Follow these steps to import data into a data extension in Email Studio.
Export Marketing Cloud Engagement Data Extension Data
You can export data from a data extension in Email Studio.
Delete a Data Extension in Marketing Cloud Engagement
You can’t delete a data extension if it has a data relationship in Contact Builder. Before deleting a data extension, remove or edit the
relationship in Contact Builder. When you delete a data extension, the information in the data extension is also deleted.
Restricted Characters for Name and Field Name in Marketing Cloud Engagement Data Extensions
You can’t include these characters in the Name and Field Name fields of an Email Studio data extension:
201
SubscribersEmail in Marketing Cloud Engagement
Copy a Data Extension in Classic Subscribers in Marketing Cloud Engagement
Follow these steps to copy an existing Email Studio data extension. This process copies the data extension fields and configurations but
not the data stored in the data extension itself.
1. Click Subscribers.
2. Click Data Extensions.
3. Choose the checkbox next to the data extension to copy.
4. Click Copy.
5. Rename the new data extension.
6. Click Save.
Clear Data from an Email Studio Data Extension
Follow these steps to clear data from a data extension in Email Studio.
By default, Marketing Cloud Engagement turns off this functionality except for Enterprise 2.0 account admins. To enable this feature, an
admin must enable clear data permissions.
1. Click Subscribers.
2. Click Data Extensions.
3. Choose the checkbox next to the data extension to clear.
4. Click Clear Data.
5. Read the confirmation message and click OK.
Create a Data Relationship
Follow these steps to create a data relationship between two data extensions in Email Studio.
Create the data extensions involved in the relationship. After you complete this procedure and populate the data extensions with data,
you can include information from a data extension in a message to subscribers.
1. Click Subscribers > my data relationships > Create.
2. In the Properties section, provide a name, description, and external key for the data relationship. The external key identifies the data
relationship in API calls.
3. In the Fields section, use the <select object> list boxes to identify the data extensions involved in the data relationship, and use the
<select field> list boxes to identify the data extension fields involved in the relationship.
4. If more than one column in each data extension is involved, click Add to display another set of <select field> list boxes.
5. Save your changes.
Import Data into a Data Extension
Follow these steps to import data into a data extension in Email Studio.
Your account must use enhanced FTP to import data. Before you can import a file, you must create a data extension and create the
import file. Your import file must contain a header row and at least one row of data. Your import file must be a comma-delimited,
tab-delimited, or other delimited file. You can use the Automation Studio Import File Activity or the import wizard to populate your data
extension.
1. Click Subscribers.
202
SubscribersEmail in Marketing Cloud Engagement
2. Click Data Extensions and then click the desired data extension. Select only one data extension for import.
3. Click Import.
4. Complete the fields in the Upload File section:
•
File Location and File - If the file you want to import is on your hard drive, click Browse and locate the import file. If the file size
exceeds 20 MB, you must use the FTP option. The file name must be 99 characters or less. To use a file that you've uploaded to
the enhanced FTP site, type the filename in the File name field. File names are case-sensitive.
•
File is compressed checkbox - Determines whether the system uncompresses the file when the activity runs. If you select this
checkbox, the value you enter in the File Naming field must have a .ZIP extension.
•
File is encrypted checkbox - Determines whether the system unencrypts the file when the activity runs. If you select this
checkbox and don’t select the File is compressed checkbox, then the value that you enter in the File Naming field must have a
.PGP or .GPG extension.
•
Delimiter:
–
Comma - If you choose Comma, the value that you enter in the File Naming field must have a .CSV extension.
–
Tab - If you choose Tab, the value that you enter in the File Naming field must have a .TXT extension.
–
Other - If you choose Other, you must enter a 1-character delimiter in the Other Delimiter field.
•
Date Format - You can select a date format from the dropdown menu in this section to use as part of the import. Choose the
date format that most closely matches the region from which you’re conducting the import.
•
Import Type:
–
Add and update - If the import file contains records with a primary key or email address that don’t exist in the data extension,
the import creates a record for that information. If the import file contains records with a primary key (or email address) that
already exists in the data extension, the import updates the record to match what is in the import file.
–
Add only - The import creates records for primary keys that don’t already exist in the data extension and ignores records
whose primary keys already exist.
–
Overwrite - The import overwrites all records.
•
Import Options - If you select Respect double quotes as a text qualifier, the system treats data contained within double quotes
as text and doesn’t process any delimiter contained within those quotes. If you don’t select this checkbox, the system ignores
double quotes in your import file.
5. Click Next. The application checks for malware and prevent uploading of infected files.
6. Complete the fields in the Configure Mapping section:
•
Map by Header Row - The import updates the columns in the data extension with the information in the import file by matching
the column headings.
•
Map by Ordinal - The import updates the first column in the data extension with the first column in the import file, the second
column with the second column, and so on. When Import File has column headers is checked, the header value in the import
file is displayed in italics.
•
Map Manually - The import file column that directly matches a data extension column maps automatically. To manually map
an import file column, select the column name in the dropdown next to the data extension column. An import file column can
only be mapped to a single data extension column.
7. Click Next.
8. Review the Review & Import section that appears.
9. To receive an email when the import is done, enter an email address. You receive a list of errors if applicable.
10. Click Import.
203
SubscribersEmail in Marketing Cloud Engagement

Export Marketing Cloud Engagement Data Extension Data
You can export data from a data extension in Email Studio.
If Export Email Allowlist is enabled for your Marketing Cloud Engagement tenant, your account must be included on the allowlist.
1. In Email Studio click Subscribers.
2. Click Data Extensions.
3.
Select the data extension that you want to export, and click the icon.
You can export only one data extension at a time.
4. Click Export.
5. Complete the fields in the next section:
•
Data Extension - The name of the data extension selected to export. If the file size exceeds 20 MB, you must use the FTP option.
•
Filename - Enter a name for the export filename.
•
File type:
–
Comma-separated values - If you choose this file type, the file exports as a .csv file.
–
Tab-separated values - If you choose this file type, the file exports as a .txt file.
–
Other - If you choose this file type, you must enter a 1-character delimiter in the field.
•
Export options:
–
Include column headers - Export the data extension field names as column headers.
–
Compress file - The system compresses the file when the export runs. The filename export with a .ZIP extension.
–
Encrypt file - The system encrypt the file when the export runs. Only available when using the FTP delivery option. If you
select this checkbox, you must select PGP or GPG and a Key.
•
Delivery location:
–
Browser download - To export to your computer. If the file size exceeds 20 MB, you must use the FTP option.
–
FTP - To export to your enhanced FTP location
6. Click Export.
Delete a Data Extension in Marketing Cloud Engagement
You can’t delete a data extension if it has a data relationship in Contact Builder. Before deleting a data extension, remove or edit the
relationship in Contact Builder. When you delete a data extension, the information in the data extension is also deleted.
1. In Email Studio, click Subscribers.
2. Click Data Extensions.
3. Select the checkbox next to the name or names of the data extensions to delete.
4. Click Delete.
The data extension is moved to the Contact Builder Recycle Bin. You can restore a data extension in the Recycle Bin up to 30 days
after deletion.
Restricted Characters for Name and Field Name in Marketing Cloud Engagement Data Extensions
You can’t include these characters in the Name and Field Name fields of an Email Studio data extension:
204
SubscribersEmail in Marketing Cloud Engagement

Field NameName
•
!
•
!
•
@
•
@
•
#
•
#
•
$
•
$
•
%
•
%
•
’
•
’
•
^
•
^
•
*
•
*
•
(
•
(
•
)
•
)
•
=
•
=
•
{
•
{
•
}
•
}
•
[
•
[
•
]
•
]
•
\
•
\
•
.
•
.
•
<
•
<
•
>
•
>
•
/
•
/
•
"
•
"
•
:
•
:
•
?
•
?
•
|
•
|
•
,
•
,
• •
_+
•
&
•
+
Data Filters without Enhanced Subscriber Features in Marketing Cloud Engagement
This information applies to Marketing Cloud Engagement accounts that use classic subscriber features and not enhanced subscriber
features in Email Studio. Understand AND and OR logical operators when using the data filter feature. A data filter is a group of criteria
that segments a subscriber list or data extension.
Use a data filter to apply complex segmentation rules to your subscriber lists or data extensions. Complex segmentation makes it easier
for you to precisely target your message to the specific subscriber.
The item in the list being filtered must satisfy the criteria to be included in the segment.
205
SubscribersEmail in Marketing Cloud Engagement

Example: You could use a data filter to get all the subscribers on a list matching these criteria:
•
Own a car OR a motorcycle AND
•
Live either in the state of Indiana OR Ohio
You can reuse the same filter definition with many lists or data extension. The reuse is by creating different groups or different filter
activities in Automation Studio that use the same data filter. You can reuse even if you create a standalone filter definition and don’t
associate it with a subscriber list or data extension.
Create a Data Filter-Based Group
Follow these steps to create a group in Email Studio based on a data filter.
Multijoin Filters in Marketing Cloud Engagement
You can use a multijoin filter, which is a data filter, to get information from more than one data extension in Email Studio.
Using MultiJoin Filters in Marketing Cloud Engagement
This scenario demonstrates how to use multijoin filters in Email Studio.
Create a Data Filter-Based Group
Follow these steps to create a group in Email Studio based on a data filter.
1. Click Subscribers > my groups.
2. Click Create.
3. Click Next.
4. Choose Build a group based on a Data Filter and then Next.
5. Complete the required fields.
•
Look for: The name of what to include in the group. Currently, this field must contain Subscribers.
•
In: The list to segment with the data filter. To select a list, click Browse.
•
Using Data Filter: The data filter to use to segment the list.
•
Group Name: The name of the group to create.
•
Store the group in the folder: The folder to contain the group you’re creating. To create a folder, click New.
6. Click Create.
Multijoin Filters in Marketing Cloud Engagement
You can use a multijoin filter, which is a data filter, to get information from more than one data extension in Email Studio.
Note: You can create up to 3 multijoin relationships. More multijoined relationships equal more data points queried, and the
larger amount of filtered data can slow performance. Contact your representative if you would like to create more than 3 multijoin
relationships.
Data Extensions
For a relationship to be used inside a data filter, both related items must be data extensions. One of the data extensions must have a
defined primary key, and the other must have the primary key fields mapped to the other item. Only sendable data extensions can use
relationships.
206
SubscribersEmail in Marketing Cloud Engagement

Data Relationships
Under My Data Relationships, there is a help box which instructs you how to create relationships that can be used in a data filter. This
functionality tries to enforce a many-to-one or one-to-one relationship between tables. The field mappings from the Many table must
map to the primary keys of the One table. The tree controls allow for navigation into data extensions, and support folders and subfolders.
There is also a help box which is checked when the relationship you choose can be used in a filter. The Many-to-One relationship is met
between the 2 tables. The check box toggles as you build the relationship, and is unchecked if the relationship is broken.
When the data relationship tables are initially selected, an attempt is made to automatically map the keys for the many-to-one relationship.
The attempt is made using the key information and the column names. If the foreign key field names in the Many sided table map to
the primary keys in the one sided table, the mapping work is complete. If the names do not match, manual changes must be made to
one or more data extensions.
Data Filters
When making the filter, you see the relationships that you created as child folders under the data extension. In order for your relationships
to appear you must pick a primary data extension that is sendable. The folder name is the data extension name.
•
Key fields are disabled, and are not filterable. You can use this field by selecting the field in the parent relationship rather than at
they key level. Since the fields are joined, they represent the same attribute.
207
SubscribersEmail in Marketing Cloud Engagement

•
Subrelationships (leg-joins) where A=B and B=C appear as children under the parent relationship.
•
If the primary relationship has more than 1 relationship tied to it, you can have relationships at the same level.
Note: While you are limited by default to three relationships in a multijoin filter, you see as many relationships in the tree as you
have created. But only those relationships that meet the Can use in a filter rule appears.
Using MultiJoin Filters in Marketing Cloud Engagement
This scenario demonstrates how to use multijoin filters in Email Studio.
Northern Trail Outfitters wants to find all male subscribers who live in the north region of the US. They can send them coupons on ski
equipment. This data is on three separate tables so they cannot run a filter on one data extension. The 3 data extension tables are:
Subscriber DE, City DE, and State DE.
The filter needs two data relationships, one between Subscriber DE and City DE, and another between City DE and State DE. The diagram
explains the relationships between the data extensions that they have already created.
Note: The Many-to-One pattern is reflected from Subscriber DE to City DE, and from City DE to State DE.
208
SubscribersEmail in Marketing Cloud Engagement

Northern Trail Outfitters now creates a filter to pull their data.
From the Subscriber Tab, they select Data Filters and click Create Filter. Under Description, they name their filter and under Data Source
they select Data Extensions from the drop-down.
They click the plus sign on Data Extensions that appears from the Data Extensions tree window. They select their sendable data extension,
in this case Subscriber DE.
The grouping tree appears and shows the different levels of relationships among the data extensions: City DE is a subrelationship of
Subscriber DE, and State DE is a subrelationship of City DE. In the Outer Grouping window that appears, they can expand the tree
accordingly to see their data relationships.
They set their filter logic. They need 2 separate filter rules. From the primary data extension, they select Gender and set this attribute to
be equal to "M" for male. They click Add Condition and from State DE they select Region and set it equal to "North". Their filter logic
matches the image:
They click Save. Northern Trail Outfitters has created a multijoin filter that pulls data from multiple data extensions.
Measures
A measure is a unit of subscriber behavior that you define in Email Studio. After you create a measure, you can include the measure as
criteria in a data filter to segment a subscriber list using the measure.
Here are some examples of measures.
•
Total opens in last 30 days
209
SubscribersEmail in Marketing Cloud Engagement
•
Total click-throughs in last 30 days
•
Hard bounces in the last month
•
Unique unsubscribes in the last 30 days
Understanding of relational data structures and SQL is helpful when using measures. If your account is integrated with another customer
relationship management system (CRM), measures cannot act on the data in your CRM account. You can export behavioral data from
your CRM system and import it into a data extension so that measures can act on the data.
Email Studio Measures Best Practices and Tips
Review best practices and tips for using Measures in Email Studio.
Conditions in Email Studio
After you choose a behavioral data file to be the event source for a measure, you create conditions that the system uses to evaluate
if each tracking event qualifies for the measure in Email Studio.
Measures for Events That Don’t Occur in Marketing Cloud Engagement
In Email Studio, measures calculate a total value for subscribers, where the value is greater than zero. If the value is zero, meaning
there are no statistics, the value is not calculated for a subscriber. In other words, each open for a subscriber is counted. If a subscriber
does not perform any Opens, they can’t be counted.
Defined Measures in Email Studio
When you enable Measures for Email Studio in Marketing Cloud Engagement, you can select the system-defined measures as criteria
in your data filters.
Create a Measure in Marketing Cloud Engagement
Create a measure to use as criteria in a data filter to segment a subscriber list in Email Studio.
Scenario: Send Email to Subscribers Who Clicked a Link
This scenario tracks the subscriber clicks link in an email during a period of time using Measures and Email Studio in Marketing Cloud
Engagement. You can use that information to send those subscribers links to a related item by including the measure in a filter for
an automation that sends triggered emails.
No Opens Over a Period of Time
This use case involves using a series of measures in Email Studio to determine when the most emails remain unopened.
Fewest Clicks Over a Period of Time in Marketing Cloud Engagement
This use case uses measures in Email Studio to track which email sends have the least amount of clicks over time and take action on
that information.
Email Studio Measures Best Practices and Tips
Review best practices and tips for using Measures in Email Studio.
Best Practices and Tips
To return the most specific data and to protect performance, provide as much information as possible to narrow the scope of your
measure:
•
Give your measures a specific time range. By default, you can select records from the last 180.
•
Use job-specific criteria for further narrowing. For example, select records where Sender Profile is X or Email Name is Y or Subject
Line is Z.
•
To narrow the scope for the measure, enabling more indexing and more performance, add job criteria.
210
SubscribersEmail in Marketing Cloud Engagement

•
When qualifying a measure, ask yourself why "Clicks in the last 60 days" is valuable unless it is qualified. Click on what? A link that
starts with? A particular email? Qualify to narrow the scope of exactly what it is--an Unsubscribe click is also a Click if unqualified.
•
You cannot easily find the statistics by From address. With Measures you can define a statistic given the conditions of the job ID and
the From address.
•
Monitor the process of your segmentation by using a data filter in an Automation Studio filter activity and tying that activity to an
automation. You can see status, running or completed, and display notices when running a massive segmentation.
•
Measures cannot create a list of subscribers who have never clicked or never opened an email. Use the Subscriber Engagement
Report to view your subscribers' activities and gather the required information from that source.
Conditions in Email Studio
After you choose a behavioral data file to be the event source for a measure, you create conditions that the system uses to evaluate if
each tracking event qualifies for the measure in Email Studio.
For each condition, you select:
•
The behavioral data attribute column to evaluate
•
The operator to use to compare the values
•
The value to compare against
For example, create a condition where:
•
The behavioral data attribute is EVENT DATE
•
The operator is IS GREATER THAN
•
The value is 1/1/2024
Only events that occurred after January 1, 2008 qualify for this measure.
You can put multiple conditions together in a grouping using an AND or OR operator. You can also put multiple groupings together
into an outer grouping that uses an AND or OR operator. When you use the OR operator, a row that meets one or more of the conditions
satisfies the grouping. When you use the AND operator, a row must meet all of the conditions to satisfy the grouping. Measures only
evaluate the past six months of event data.
Measures for Events That Don’t Occur in Marketing Cloud Engagement
In Email Studio, measures calculate a total value for subscribers, where the value is greater than zero. If the value is zero, meaning there
are no statistics, the value is not calculated for a subscriber. In other words, each open for a subscriber is counted. If a subscriber does
not perform any Opens, they can’t be counted.
Instead, use the Not Opened (or Not Clicked) event to segment on unengaged subscriber. These events count the opposite of opens
and clicks. In the example of Job 1234 above, the Not Open event would have one record returned in the measure result set. When using
Not Opened or Not Clicked, make sure to specify in your data filter where 0 means "give me subscribers where the Not Opened count
is greater than 0."
Example: Suppose that you send an email to five people using Job 1234. Of those five people, four people open your email at
least once, and two people click through your email.
Tracking for Job 1234
Opens in TrackingSubscriber
2A
1B
211
SubscribersEmail in Marketing Cloud Engagement

Opens in TrackingSubscriber
0C
3D
1E
If you create a measure to count total opens for Job 1234, the measure query behind the scenes returns data for four people, not
five.
Opens in TrackingSubscriber
2A
1B
3D
1E
Defined Measures in Email Studio
When you enable Measures for Email Studio in Marketing Cloud Engagement, you can select the system-defined measures as criteria
in your data filters.
System-Defined Measures
•
_Total Unique Opens Last 30 Days
•
_Total Unique Clicks Last 30 Days
•
_Total Marketing Sends Last 30 Days
•
_Total Transactional Sends Last 30 Days
•
_Total Hard Bounces Last 30 Days
•
_Total Unsubscribes for Marketing Sends Last 30 Days
•
_Total Emails Not Opened Last 30 Days
•
_Total Emails Not Clicked on Last 30 Days
Create a Measure in Marketing Cloud Engagement
Create a measure to use as criteria in a data filter to segment a subscriber list in Email Studio.
You can click the words Inner Grouping and Outer Grouping to make the names editable and enter a more readable name for the
grouping. Use the following steps to create a measure.
1. In the navigation bar, click Subscribers.
2. Click Measures.
3. From the toolbar, click Create.
When you create a measure, the system defaults the outer grouping to contain one condition as a starting point for your filter.
212
SubscribersEmail in Marketing Cloud Engagement

4. Complete the information in the Properties section.
•
Name: The name of the data filter. You use this name to identify the data filter in the application. This value isn’t visible to your
subscribers.
•
External Key: The unique identifier of the data filter. This value isn’t visible to your subscribers.
•
Description: The description of the data filter. You use this description to identify the filter in the application. This value isn’t
visible to your subscribers.
5. Create the filter conditions in the Expression section.
•
Event Source: The behavioral data file that is the basis for the measure
•
Attribute: The attribute to evaluate. Valid values in this field are determined by the value you select in the Event Source field.
•
Operator: The operator to use to evaluate the attribute value against the criteria value. Valid values for this field are determined
by how you set up your attributes.
•
Criteria Value: The value against which the attribute value is compared to determine whether it satisfies the condition.
a.
To move a condition or grouping to a different location in the data filter, click .
b.
To delete a condition or grouping, click .
c. Use Add Condition to add a condition to a grouping of conditions to be evaluated together.
d. Use Add Grouping to add a grouping to contain conditions to be evaluated together.
e. Use And and Or when you add more than one condition to a grouping or more than one inner grouping to an outer grouping.
You can specify how the filter evaluates the grouping by clicking the blue operator button on the left side of the grouping. The
button toggles between AND and OR.
6. Click Save.
Scenario: Send Email to Subscribers Who Clicked a Link
This scenario tracks the subscriber clicks link in an email during a period of time using Measures and Email Studio in Marketing Cloud
Engagement. You can use that information to send those subscribers links to a related item by including the measure in a filter for an
automation that sends triggered emails.
1. Create a measure that tracks clicks a link from a particular job. Include the following information in your measure:
a. Name: Enter the name of your measure.
b. External Key: Enter an external key for your measure if you plan to access it using API calls.
c. Description: Enter a description for your measure.
d. Event Source: Set the dropdown to Click.
e. JobID: Fill out these fields.
•
In the first field, set the dropdown for the first condition to JobID.
•
Set the second dropdown to Is Equal To.
•
Enter the job ID in the third field.
f. Link Name: Fill out the fields as shown:
•
In the first field, set the dropdown for the first condition to Link Name.
•
Set the second dropdown to Is Equal To.
•
Enter the link's name in the third field.
213
SubscribersEmail in Marketing Cloud Engagement
2. Create a filter that includes the results of your measure. Include the following information in your filter:
a. Name: Enter the name of your filter.
b. External Key: Enter an external key for your filter if you plan to access it using API calls. Description: Enter a description for your
filter.
c. Data Source: Choose Profile Attributes or Data Extension from the dropdown. If you select Data Extension, choose the Data
Extension in the next dropdown.
d. Measure: Fill out the fields as shown:
•
In the first field, select the measure in the first dropdown.
•
Enter Is Greater Than Or Equal To in the second field.
•
Enter 1 in the third field. Create a filter activity with the filter from Step 2 and start it.
3. Create a user-initiated email message that sends an email to the group.
No Opens Over a Period of Time
This use case involves using a series of measures in Email Studio to determine when the most emails remain unopened.
1. Create and send a series of email messages each day of the week.
2. Create a measure that tracks the number of email non-opens from a particular job. Include the following information in your measure:
a. Name: Enter the name of your measure.
b. External Key: Enter an external key for your measure if you plan to access it using API calls.
c. Description: Enter a description for your measure.
d. Event Source: Set the dropdown menu to Not Opened.
e. Send Date: Fill out the fields as shown:
•
Set the first dropdown menu to Send Date
•
Set the second dropdown menu to Is Equal To.
•
Enter the date of one of your sends in the Date field
f. Click Add Condition and create another Outer Grouping field.
g. Job ID: Fill out the fields as shown: Set the dropdown menu for the first condition to JobID. Set the dropdown menu for the
second condition to Is Equal To. Enter the job ID in the third field.
•
Set the dropdown menu for the first condition to JobID.
•
Set the dropdown menu for the second condition to Is Equal To.
•
Enter the job ID in the third field.
3. Repeat previous steps for each day of the week you wish to measure.
4. Create a filter that includes the results of your measures. Include the following information in your filter:
a. Name: Enter the name of your filter.
b. External Key: Enter an external key for your filter if you plan to access it using API calls.
c. Description: Enter a description for your filter.
d. Data Source: Choose Profile Attributes or Data Extension from the dropdown menu. If you select Data Extension, choose the
Data Extension in the next dropdown menu.
214
SubscribersEmail in Marketing Cloud Engagement
e. Measure: Fill out the fields as shown: In the first field, select the measure in the first dropdown menu. Select Is Greater Than for
the second dropdown menu. Select 0 for the third field.
•
In the first field, select the measure in the first dropdown menu.
•
Select Is Greater Than for the second dropdown menu.
•
Select 0 for the third field.
f. Click Add Condition and create another Outer Grouping field.
•
Set the first dropdown menu to your not clicked measure.
•
Select Is Greater Than for the second dropdown menu.
•
Select 0 for the third field.
5. Create an Automation Studio filter activity and run it to populate the group with the information to view.
6. Review the information from these measures see which days have the most unopened email messages and refrain from sending
emails on those days.
Fewest Clicks Over a Period of Time in Marketing Cloud Engagement
This use case uses measures in Email Studio to track which email sends have the least amount of clicks over time and take action on that
information.
1. Create a measure that tracks the number of email opens from a particular job. Include the following information in your measure:
a. Name: Enter the name of your measure.
b. External Key: Enter an external key for your measure if you plan to access it using API calls.
c. Description: Enter a description for your measure.
d. Event Source: Set the dropdown menu to Open.
e. Open Date: Fill out the fields as shown:
•
In the first field, set the dropdown menu for the first condition to Open Date.
•
Set the second dropdown menu to Is Before.
•
Enter today's date in the Date dropdown menus.
f. Job ID: Fill out the fields as shown:
•
In the first field, set the dropdown menu for the first condition to JobID.
•
Set the second dropdown menu to Is Equal To.
•
Enter the job ID in the third field.
2. Create a measure that tracks lack of clicks from a particular job. Include the following information in your measure:
a. Name: Enter the name of your measure.
b. External Key: Enter an external key for your measure if you plan to access it using API calls.
c. Description: Enter a description for your measure.
d. Event Source: Set the dropdown menu to Not Clicked.
e. Job ID: Fill out the fields as shown: I
•
In the first field, set the dropdown menus for the first condition to JobID.
•
Set the second dropdown menu to Is Equal To.
215
SubscribersEmail in Marketing Cloud Engagement

•
Enter the job ID in the third field.
3. Create a filter that includes the results of your measures. Include the following information in your filter:
a. Name: Enter the name of your filter.
b. External Key: Enter an external key for your filter if you plan to access it using API calls.
c. Description: Enter a description for your filter.
d. Data Source: Choose Profile Attributes or Data Extension from the dropdown menu. If you select Data Extension, choose the
Data Extension in the next dropdown menu.
e. Measure: Fill out the fields as shown:
•
In the first field, select the opens measure in the first dropdown menu.
•
Select Is Greater Than for the second dropdown menu. Select 0 for the third field. Click Add Condition and create another
Outer Grouping field. Set the first field to your not clicked measure.
•
Select Is Greater Than for the second dropdown menu.
•
Select 0 for the third field.
4. Create a filter activity using the filters from steps 2 and 3 and run it to populate the group with the information you wish to view.
5. To see how you should react, review the information from the filter. You may want to send better offers or discontinue sends of this
information.
Send Logging in Email Studio
Use send logging in Email Studio to obtain run-time information about email send attributes for use in reports and data extracts. You
can also use information in your send log to provide information for highly available clicks. Send logging gives you access to data not
available via standard tracking functions. You can specify how long that information remains available depending on your data retention
needs.
To use send logging, create a data extension using the send logging template. Each account can use one template and data extension
for email messages and one template and data extension for SMS messages. Each data extension includes required fields with values
used to identify the send, subscriber, and other information. To keep additional information in the send logging data extension, create
a column in the data extension to contain it. The column names in the send logging data extension must match the attributes or field
names in the sendable data extensions to log values.
Run a query activity in Automation Studio on the send logging data extension to return report data on the information contained in
that data extension.
Use AMPscript to determine the context for displayed content and pull information from a send logging data extension related to that
context. For example, you can display different content depending on whether that content displays in an email or a web page. Specify
a context to use values obtained via send logging. The send log data extension only logs information from user-initiated sends, triggered
sends, and A/B test sends.
Your account must use the send logging and data extension features. Contact your relationship manager for more information about
enabling these features.
Note: To record Content Builder test sends, contact your relationship manager to enable this functionality.
Important: Create all Send Log Data Extensions with Data Retention enabled and with the option to delete Individual Records
selected. For more information, see Manage Policies for an Email Studio Data Extension on page 124.
216
SubscribersEmail in Marketing Cloud Engagement
Create an SMS Send Logging Data Extension
Create a data extension in Email Studio to store SMS send log data.
Create a Push Notification Send Logging Data Extension
The send log stores data about each of your sends in a data extension. Only push notifications and inbox messages are included in
the MobilePush (in Marketing Cloud Engagement) send log. You can use send log data in reports and other data extracts.
Create an Email Send Logging Data Extension
Create a data extension in Email Studio to store email send log data.
Enable Send Logging for a User-Initiated or Triggered Send
Enable send logging in Marketing Cloud Emails Studio to track user-initiated and triggered send data in a data extension.
Send Logging Best Practices and Tips
Here’s a list of best practices for send logging in Marketing Cloud Engagement. Follow all general data extension best practices for
send logging data extensions as well.
Create an SMS Send Logging Data Extension
Create a data extension in Email Studio to store SMS send log data.
1. Click Subscribers.
2. Click Data Extensions.
3. Click Create From Template.
4. Select the checkbox for SmsSendLog template.
5. Click Select.
6. Enter the name, external key, and description for this data extension.
7. Leave the checkbox next to Used for Sending unchecked.
8. Create more fields for list attributes or data extension fields you would like to record in the send logging data extension.
9. Select the Use Data Retention feature if desired.
10. Click Save.
SEE ALSO:
Send Logging Best Practices and Tips
Trailhead: Marketing Cloud Engagement Send Logging
Create a Push Notification Send Logging Data Extension
The send log stores data about each of your sends in a data extension. Only push notifications and inbox messages are included in the
MobilePush (in Marketing Cloud Engagement) send log. You can use send log data in reports and other data extracts.
Ask your account representative to enable send logging for your account. After send logging is enabled for your account, create a data
extension in Contact Builder with the PushSendLog template. Don’t make the data extension sendable.
1. In Contact Builder, on the Data Extensions tab, click Create.
2. For Creation Method, select Create from Template.
3. Select the PushSendLog template and click Done.
4. Name your data extension.
217
SubscribersEmail in Marketing Cloud Engagement
5. Leave the Sendable and Testable checkboxes unchecked.
6. Click Next.
7. Select your Data Retention setting and click Next.
8. The send log includes a standard set of fields. You can create more fields. If the attributes name matches the source, attributes from
the Contact record or data extension are written to the SendLog.
•
PushJobID: The ID of the job, or bundle of sends, that included the push notification
•
PushTriggeredSendRequest: TokenID that is returned from the API call. When you use list and data extension sends, is the same
as the PushJobID
•
PushBatchID: The ID of the batch, or bundle of jobs, for batched sends
•
SubID: The ID of the subscriber to whom the message was sent
•
DeviceID: The ID of the device that received the push notification
•
AppID: The ID of the app that received the push notification
•
LogDate: The date that this data was written to the send log
9. Click Complete.
In Automation Studio, run a query activity on the send logging data extension to return report data on the information contained in that
data extension.
Create an Email Send Logging Data Extension
Create a data extension in Email Studio to store email send log data.
1. Click Subscribers.
2. Click Data Extensions.
3. Click Create.
4. Click Standard Data Extension.
5. Select Create from Template in the Creation Method dropdown list.
6. Select SendLog.
7. Click OK.
8. Enter the name, external key, and description for this data extension.
9. Leave the checkbox next to Is Sendable unchecked.
10. Click Next.
11. Select the Use Data Retention feature if desired.
12. Create additional fields you would like to record in the send logging data extension.
13. Click Create.
SEE ALSO:
Sends
Create a Data Extension in Contact Builder
Data Extensions in Contact Builder
218
SubscribersEmail in Marketing Cloud Engagement
Enable Send Logging for a User-Initiated or Triggered Send
Enable send logging in Marketing Cloud Emails Studio to track user-initiated and triggered send data in a data extension.
1. Click Interactions.
2. Under Messages, navigate to the user-initiated or triggered email to modify.
3. Ensure that the checkbox is checked for Enable send logging to a data extension.
4. Click Save.
Send Logging Best Practices and Tips
Here’s a list of best practices for send logging in Marketing Cloud Engagement. Follow all general data extension best practices for send
logging data extensions as well.
•
Use send logging to retain information that can change after a send occurs and can affect reporting. Send logging captures send-time
values for reports, extracts, and tracking data.
•
Use data retention to limit the amount of data stored. Limit data storage to 10 days.
•
Add 10 or fewer custom fields to the send log.
•
Minimize the size of the fields used in a send log to the size required for the expected data.
•
Limit the number of activities concurrently using a data extension. For example, schedule a query activity or report that is reading
from the send log to run at a different time than a send that uses the Send Log. You can also use a query activity to move data from
an active send log to an archive data extension, as necessary.
•
Dates added are in UTC-6.
•
Data is rendered correctly if you use the default settings for the data extension send logs. The send log can fail if you add custom
fields for the data extension send logs.
•
To record the new send log, ensure that you pause, republish, and restart triggered sends and Journey Builder triggered sends.
Consider creating a Journey Builder send depending on the number of email or mobile sends activities and journeys.
•
The send log can contain duplicate records of a single message due to sending issues. Design your queries to address these potential
duplicate records when you use a send log data extension.
SEE ALSO:
Create an SMS Send Logging Data Extension
Trailhead: Marketing Cloud Engagement Send Logging
Email Studio Web Collect
Web Collect is Email Studio's sign-up form functionality that allows your subscribers to subscribe, provide attribute information, or
unsubscribe from your communications on your website.
By inserting the code into your web page, you’re able to:
•
Allow your website visitors to subscribe to your email publications and thus be added to the appropriate subscriber lists in your
account.
•
Allow your existing subscribers to unsubscribe from your email publications and thus be removed from the appropriate subscriber
lists in your account.
•
Allow your existing subscribers to update the profile data that you maintain for them in your account.
•
Ensure that all data entered by your website visitors into the Web Collect form is valid when saved to your account.
•
Capture errors encountered by your website visitors in this process and display friendly messages to your visitors.
219
SubscribersEmail in Marketing Cloud Engagement

You can use a Welcome Email to send an email to subscribers who add themselves to lists using Web Collect.
Note: Adding a Welcome Email to a list is no longer supported starting in the second half of 2020. Use Journey Builder to create
personalized, automated multichannel campaigns.
Before you set up the Web Collect form, you need the following information:
•
The list ID (LID) for the lists
•
Your account's member ID (MID)
To build your Web Collect page, you need the list ID of each exposed subscriber list. Also, you must pass your member ID (account ID)
in your form. These requirements, along with the supporting pages needed, are described in the following sections.
You can use Web Collect to add names to publication, suppression, and subscriber lists. However, remember that you can only send
messages to subscriber lists. Email Studio uses publication lists and suppression lists to control data extensions unsubscribes. Messages
aren’t directly to the subscribers on the publication or suppression list.
For server-side requests, you must include a Content-Type header of "application/x-www-form-urlencoded" in your form. The server
doesn’t add this header by default.
List Requirements
For each list that you want to expose to your website visitors for subscribing to or unsubscribing from, you must obtain the list ID. You
can find the list ID under the properties of the list. That list ID must be included in any opt-in links for triggered email sends. For example,
replace lid with the list ID number and include it in your transactional send to a subscriber to add them to your subscriber list. When
referring to WebCollect URLs on a secure page, change the web collect URL to https.
WebCollect URL: http://cl.exct.net/subscribe.aspx?lst="lid"_HTML&eml=%%EmailAddr_%%&mid=%%MemberID%%
This example is for the S1 instance. For other instances, replace s# with the instance you are on for "cl.s#.exct.net".
Member ID
Your Web Collect submission form must include your member ID (MID) as a hidden input field. Find your member ID in your account
drop-down menu in the app. In the following sample, the member ID is 1079707.
For this example, the MID would be passed as follows:
<input type="hidden" name="MID" value="1079707" />
Supporting Pages
Set up the following supporting pages on the website containing your Web Collect form. Your Web Collect code links to these pages.
•
Error page: This page displays when a website visitor experiences an error. To display a friendly error description corresponding to
the error code returned to you via the URL, build an error page.
•
Thank You page: This page displays after a website visitor is added to a list or modify their profile.
•
Unsubscribe Confirmation page: This page displays when a subscriber has successfully removed themselves from a list.
These examples are for the S1 instance. For other instances, replace s# with the instance you are on for "cl.s#.exct.net".
Flash Support
Marketing Cloud Engagement no longer supports or allows data to be sent into the application directly from Flash or Silverlight.
220
SubscribersEmail in Marketing Cloud Engagement
Web Collect Code Samples
Use these code samples to get started building your Email Studio Web Collect forms.
Code Samples for Exposing Profile Data in Web Collect
Update subscriber profile and preference attributes in Email Studio using Web Collect.
Options to Subscribe, Unsubscribe, or Update Profile
Offer your website visitors the option of subscribing to a single list or multiple lists. Offer current subscribers the option of updating
their profile data or unsubscribing. To provide a method for subscribers to globally unsubscribe, they options to unsubscribe from
the All Subscriber list must be provided.
Web Collect Error Codes
The Email Studio errors described here are passed in the QueryString of the error page URL. ErrorCode contains the numeric error
code. ErrorControl contains the name of the field that triggered the error.
Web Collect Troubleshooting
Review helpful hints to troubleshoot issues when using Web Collect in Email Studio.
DEManager
You can use DEManager to add information via a web form to a data extension instead of a subscriber list. The functionality acts
similarly to the Web Collect form, but the sample code uses different tags to place information in the data extension.
Twitter Lead Generation Cards
This topic helps you understand how to use Twitter Lead Generation Cards with Marketing Cloud Engagement.
Web Collect Code Samples
Use these code samples to get started building your Email Studio Web Collect forms.
These samples illustrate the code for an account with the default attributes:
•
Full Name, which is displayed on the web page as Name.
•
User Defined, which is displayed as Company Name.
•
Email Address, which is displayed as Email.
•
The preference attribute Email Type, which offers the subscriber HTML and Text options.
Download code samples from: https://resources.docs.salesforce.com/rel1/doc/en-us/static/misc/WebCollectCodeSamples1.zip.
This code sample is for the S1 instance. For other instances, replace s# with your instance for "cl.s#.exct.net".
Code Samples for Exposing Profile Data in Web Collect
Update subscriber profile and preference attributes in Email Studio using Web Collect.
Make sure that the attribute field names and types in your submission form exactly match what's defined in your account. To check the
data type and other properties of an attribute, go to the attribute's Properties dialog box, which you access from the Subscribers>Profile
Managementarea of the application.
For an example of the attribute fields that to include on your Web Collect form, see the Profile Center that displays when a subscriber
clicks the modify profile link in the emails you send. To see what the Profile Center looks like, go to the Subscribers>Profile Management
and choose Preview Profile Center. The Profile Center displays attributes that are not defined as hidden in your account.
The number of attributes you can have in your account and whether you can create new attributes are determined by your account
configuration. Contact your account executive if you have questions.
If you're using your website to allow new subscribers to sign up, you must pass data for all required profile and preference attributes,
including those that are defined as hidden, for the new subscriber.
221
SubscribersEmail in Marketing Cloud Engagement

Handling Restricted-Value Attributes
If the attribute is defined as having restricted values, present each value exactly as it's defined in the application. These values are
case-sensitive. In the example, the attribute name is Industry, and it's defined as having six possible values. The following code prompts
user to select an industry from the options given.
<p><b>Industry: </b>
<select name="Industry">
<option name = "Industry" value="">Please select an industry.</option>
<option name = "Industry" value="Automotive">Automotive</option>
<option name = "Industry" value="Banking">Banking</option>
<option name = "Industry" value="Call Center">Call Center</option>
<option name = "Industry" value="Consultant">Consultant</option>
<option name = "Industry" value="Education">Education</option>
<option name = "Industry" value="Government">Government</option>
</select></p>
If the restricted-value attribute is required and you do not want to expose it to your website visitors, do not pass the value and the system
sets the attribute to the default value.
On Your Behalf Accounts
To set up Web Collect for an On Your Behalf accounts, the member ID of the account (the channel member ID) is a required input field
on your submission form.
<INPUT TYPE="HIDDEN" name="ChannelMemberID" VALUE="OYB account number" />
Options to Subscribe, Unsubscribe, or Update Profile
Offer your website visitors the option of subscribing to a single list or multiple lists. Offer current subscribers the option of updating their
profile data or unsubscribing. To provide a method for subscribers to globally unsubscribe, they options to unsubscribe from the All
Subscriber list must be provided.
Use the SubAction type appropriate to your needs:
Description and ExampleSubaction
Allow the visitor to be added to a list only.For example, to add the
visitor as a subscriber to a list without updating any profile data,
use the following form element:
<input type="radio" name="SubAction"
value="sub" checked="checked" />
sub
<font face="Verdana"
size="2">Subscribe</font>
Allow the visitor to be added to a list or, if the visitor already
belongs to the list, allow the visitor to update his or her profile data.
sub_add_update
222
SubscribersEmail in Marketing Cloud Engagement

Description and ExampleSubaction
For example, to add a visitor as a subscriber to a list or to allow
existing subscribers to update their profile data, use the following
form element:
<input type="radio" name="SubAction"
value="sub_add_update" checked="checked" />
<font face="Verdana"
size="2">Subscribe</font>
Allow the visitor to unsubscribe from a list.unsub
Web Collect Error Codes
The Email Studio errors described here are passed in the QueryString of the error page URL. ErrorCode contains the numeric error code.
ErrorControl contains the name of the field that triggered the error.
Error Code 1
ErrorControl: Blank
Error Description: An error has occurred while attempting to save your subscriber information.
Possible resolutions:
•
Check that your Web Collect form is requiring all attributes that are defined as required in Email Studio. Whether or not the application
requires an attribute is controlled by tthe attribute's Properties.
•
The problems with restricted-value attributes described for error code 4 can also cause error code 1.
•
The curly-quote problem described for "Page cannot be displayed" errors can also cause error code 1
.
Error Code 2
ErrorControl: Blank
Error Description: The list provided does not exist.
Possible resolutions:
•
Check your list ID against the list ID in the application. This error usually means there's an invalid input in your list ID.
Error Code 3
ErrorControl: The name of the required field that the subscriber did not complete.
Error Description: Information was not provided for a mandatory field.
Possible resolution:
•
Input the list ID correctly
.
223
SubscribersEmail in Marketing Cloud Engagement
Error Code 4
ErrorControl: The name of the field in which the subscriber entered invalid data.
Error Description: Invalid information was provided
Possible resolutions:
•
If the error is occurring for a restricted-value attribute, remember that you must pass values for the attribute in the manner described
in the Handling Restricted-Value Attributes section.
•
If the error is occurring for a restricted-value attribute, check that you've entered the possible attribute values in your code exactly
as they're defined in the application, including case (lowercase and uppercase).
•
If the error is occurring for a phone number or social security number field (or a similar field that mixes numbers with other characters),
check that the attribute field is set up in Email Studio with the Text data type rather than the Numeric data type. Dashes, parentheses,
or any other non-numeric character are not allowed in numeric fields.
•
Check the minimum length defined for the attribute in the attribute's Properties. Did your website user skip a field that's defined to
have a minimum length greater than zero? To resolve this issue, make the field required or remove the attribute’s minimum length
property.
•
Check the maximum length defined for the attribute in the attribute's Properties. Did your website user's entry for this field exceed
the field's maximum length? This error commonly occurs when a phone number field is set to a maximum of 10 characters, but the
website user enters 10 numbers plus parentheses and dashes. To resolve this issue, increase the maximum length value in the
attribute's properties.
Error Code 8
ErrorControl: The list ID of the list to which the subscriber already belongs.
Error Description: Subscriber already exists.
Possible resolution:
•
This error notifies you that the subscriber already exists on at list one of your lists. If the subscriber does not exist on all lists to which
they're subscribing, they are added.
Error Code 10
Error Description: An error has occurred while attempting to save subscriber information.
Possible resolutions:
•
Check that your Web Collect form requires all attributes that are defined as required in Email Studio. Whether or not the application
requires an attribute is controlled by the attribute's Properties.
•
The problems with restricted-value attributes described for error code 4 can also cause error code 10.
•
The curly-quote problem described for "Page cannot be displayed" errors can also cause error code 10.
Error Code 12
ErrorControl: The list ID of the unsubscribe list.
Error Description: The subscriber you are attempting to insert is on the master unsubscribe list or the global unsubscribe list.
Possible resolution:
•
No resolution necessary. The subscriber has previously unsubscribed.
224
SubscribersEmail in Marketing Cloud Engagement

Error Code 13
ErrorControl: Check that the list ID or MID specified in your code is correct.
Error Description: Check that the list ID or MID specified in your code is correct.
Possible resolutions:
•
Check that the list ID specified in your code is correct.
•
Check that the member ID specified in your code is correct.
Error Code 14
ErrorControl: The name of the field.
Error Description: Subscriber key is not enabled.
Possible resolutions:
•
Enable Subscriber Key functionality in your account.
Web Collect Troubleshooting
Review helpful hints to troubleshoot issues when using Web Collect in Email Studio.
Hard Line Breaks In Data
Issue: The data that you're passing contains hard line breaks (hard returns).
Resolution: Web Collect does not support hard line breaks in submitted data. To use a text area element so subscribers can submit
extensive information, remove the hard line breaks, which you can do with an onSubmit function. Here's an example of this function:
function fReplace(){
var str = document.myForm.myTextArea.value;
str = str.replace(/(\r\n)/g,'');
document.myForm.myTextArea.value = str;
return false;
}
</script>
Subscriber Not Being Added to List
Issue: The Web Collect form on your site is not adding subscribers to your list.
Possible resolutions:
•
Check that the list ID specified in your code is correct.
•
Check the URL that appears in the browser address bar after the data is submitted. If an error is occurring, the errorControl field in
the URL indicates which attribute is causing the error.
Page Cannot Be Displayed
Issue: The Web Collect form on your web page is producing "Page cannot be displayed" errors.
Possible resolutions:
•
Check the URLs specified in your code for your Thank You, Error, and Unsubscribe Confirmation pages to ensure that they are correct.
225
SubscribersEmail in Marketing Cloud Engagement

•
Ensure that the quotation marks around the thx, err, and unsub values in your code are straight quotes. Replace curly quotes, also
known as high ASCII quotes, with straight quotes.
DEManager
You can use DEManager to add information via a web form to a data extension instead of a subscriber list. The functionality acts similarly
to the Web Collect form, but the sample code uses different tags to place information in the data extension.
•
_clientID - your account number
•
_deExternalKey - the external key for the data extension to receive the subscriber information
•
_successURL and _errorURL - the pages shown to the subscriber after they complete the form
You can then set up the fields to capture in the data extension. Use the Name field value of those fields as defined in the data extension
for the web form. The sample code demonstrates how to capture a subscriber's email address, and first and last name. When referencing
WebCollect URLs on a secure page, change the web collect URL to https. This example is for the S1 instance. For other instances, replace
s# with the instance you are on for "cl.s#.exct.net".
<html>
<body>
<form action="http://cl.exct.net/DEManager.aspx" name="subscribeForm" method="post">
<input type="hidden" name="_clientID" value="12345" />
<input type="hidden" name="_deExternalKey" value="WebCollectSubs" />
<input type="hidden" name="_action" value="add" />
<input type="hidden" name="_returnXML" value="0" />
<input type="hidden" name="_successURL" value="https://example.com/Success"
/>
<input type="hidden" name="_errorURL" value="https://example.com/Failed" />
Email: <input type="text" name="Email"><br />
First Name: <input type="text" name="FirstName"><br />
Last Name: <input type="text" name="LastName"><br />
<input type="submit" value="Submit">
</form>
</body>
You must still use a publication list to conduct sends from a data extension.
Twitter Lead Generation Cards
This topic helps you understand how to use Twitter Lead Generation Cards with Marketing Cloud Engagement.
Twitter Lead Generation Cards are used to collect leads, build email subscription lists, and support existing marketing campaigns.
226
SubscribersEmail in Marketing Cloud Engagement

The Twitter Lead Generation Card lets users express interest in your brand through a one-click response to a promoted Tweet. After
expanding your Tweet, users see a description of the offer and the call to action. The Twitter Card automatically populates the user's
name, Twitter handle, and email address when the user clicks a button, then sends their information directly and securely to your list or
data extension. This feature is available now to Twitter managed ad clients, and Twitter plans to expand this capability to more advertisers
in the future.
Twitter Lead Generation Cards are also available in Marketing Cloud Account Engagement.
Prerequisites
Gather this account information before creating a Twitter Lead Generation Card:
1. In your Marketing Cloud Engagement account, find the list to submit info to.
Note: You need the list ID (lid), which is found in the list's properties.
2. Find your Web Collect URL.
Strip your Web Collect URL of variables. Variables can be added again later using the Twitter Ads interface. Match the http://
prefix to https:// -- Twitter accepts only the bare web Collect URL using the https:// prefix. This example shows the web
Collect URL for server instance S4:
Correct: https://cl.s4.exct.net/subscribe.aspx
Incorrect: http://cl.s4.exct.net/subscribe.aspx?
lst="lid"_HTML&eml=%%EmailAddr_%%&mid=%%MemberID%%
3. Take note your Member ID (MID).
4. Create a profile attribute to store the Twitter user's handle. Name this new attributeTwitterHandle and define its field type as
Text.
227
SubscribersEmail in Marketing Cloud Engagement

Optional Prerequisites
If you use Data Extensions for sending emails, configure your DEManager.
Use Twitter Lead Generation Cards
Lead Generation Cards support Web Collect, which means you can capture email addresses in any list. Currently, Twitter allows the
capture of an email address, the real name of the Twitter user, and the Twitter screen name, such as @salesforce. These standard values
can be mapped to attributes or fields in Marketing Cloud Engagement.
To implement more complex scenarios, use Twitter Lead Generation Cards with Landing Pages to provide advanced scripting and
Triggered Send options.
Link to Twitter Ads
Configure Lead Generation Cards to work with Marketing Cloud Engagement.
1. Name your card.
2. Upload an image for your promotion, and then give it a description and call to action.
3. Enter your brand's online privacy statement URL in the Privacy policy URL field. If your organization uses the default Salesforce Privacy
Policy, use: http://www.salesforce.com/company/privacy
4. In the Card Details (Fallback) URL field, enter a URL for prospective subscribers to visit when they view the tweet through software
that does not support Cards. Establishing a landing page containing an opt-in form is recommended, especially when running the
Lead Generation Card with a specific campaign.
5. In your Twitter Ads account, In the Technical Settings section, enter your Web Collect URL into the Submit URL field. Ensure that the
dropdown menu value remains POST.
6. In the User Information To Be Received section, enter:
•
Name – Enter the profile attribute that is used to hold the subscriber’s name. Usually, the profile attribute is either First Name or
Full Name, unless it is customized within your system.
•
Email – Enter Email Address. Entering an alternative naming convention could result in the subscriber failing to be captured.
•
Screen name – Enter TwitterHandle or the name of the profile attribute which you set up in the Prerequisites section.
228
SubscribersEmail in Marketing Cloud Engagement

7. In the Custom Hidden Data Values section, define the first field as your Engagement member ID. Enter the MID in the corresponding
field.
8. Click the Add another hidden field.
9. In the Custom Hidden Data field, enter LID into the left field, and your list ID into the corresponding field on the right.
Note: You can add subscribers to one list at a time.
10. If this Lead Generation Card is associated with a specific campaign, add a field called CampaignID to associate captured data to the
campaign in question.
11. Click Update Card.
SEE ALSO:
Web Collect
List Detective
List Detective is a tool that maintains information on email addresses and domains that could cause deliverability problems for your
email sends. This includes email addresses that are known spam traps (inactive addresses used by domains to identify spammers) and
domains that no longer provide email services.
List Detective automatically runs to help maintain deliverability for all clients. This app checks the following activities against List Detective
and prevents the activity from executing if it includes problematic email addresses or domains:
•
Import a subscriber list
•
Send to a data extension
•
Send a triggered email
•
Web Collect
Note: Configure your Web Collect supporting page to display a friendly error description corresponding to error code 4.
Note: You can customize the List Detective settings for your account to exclude addresses or domains that you believe are active
subscribers who have opted in to receive your communications. When a customize list detective is enabled and a rule is implemented
229
SubscribersEmail in Marketing Cloud Engagement
that would exclude subscribers, existing subscribers in the All Subscribers list aren’t excluded from sends. Unsubscribe subscribers
from the All Subscribers list before sending messages. Contact your account representative to request this customization.
SEE ALSO:
Web Collect Code Samples
Email Studio Welcome Emails
Welcome emails are the most opened emails among subscribers and often the first impression of your company's email marketing.
Send an Email Studio welcome email when a subscriber is added or joins a list. The Welcome Email feature doesn’t support imports,
manually created subscribers, Smart Capture, or API.
For example, automatically send a welcome email when a subscriber joins a list. You can either create the email and assign it to the list
or assign the welcome email later by using Manage Welcome Email. Welcome email sends use the Default Transactional send classification.
You can also attach a general welcome email to your All Subscribers list. Then, if someone subscribes to a list that doesn’t have an
assigned welcome email, the All Subscribers email is sent instead. Make sure that the All Subscribers welcome email can be sent to any
subscriber on any list.
The welcome email is sent via a triggered send, which is created, activated, and published when the list is created. The triggered send
is in the Welcome Email Triggers folder under Triggered Sends.
We recommend including this information in the email:
•
Topic of the list
•
How often you intend to email the subscriber
•
Reminder that they opted in
Email Studio List vs. Email Studio Data Extension
Learn about when to use a list versus a data extension in Email Studio.
What Is a List?
A list is a collection of subscribers that receive your communications. You can create as many lists as you want to segment your subscribers.
By creating more targeted lists, you can send more personal and effective messages.
What Is a Data Extension?
A data extension is a table in Marketing Cloud Engagement database that contains your data. You could use a data extension to store
subscriber data (including lists) or to store relational data.
Best Practices
These guidelines can help you determine which data model to use. Use these criteria to help evaluate your current situation and decide
which model best fits your situation:
List-Based Data Model
Use lists when:
•
Your lists contain 500,000 subscribers or fewer.
230
SubscribersEmail in Marketing Cloud Engagement

•
You prefer simplicity over performance.
•
You don’t require fast import speed.
•
You plan to use a limited number of subscriber attributes.
Data Extension-Based Data Model
Use data extensions when:
•
Your lists contain more than 500,000 subscribers, or you plan to grow your lists beyond 500,000 subscribers in the future.
•
You support multiple subscriber datasets, with separate definitions.
•
You send global messages.
•
You require fast import speeds.
•
You use triggered sends.
•
You use the SOAP or REST APIs.
•
You prefer a flexible subscription model.
Table 7: List Versus Data Extension
Data ExtensionListFunction
Creating a data extension takes more steps
than creating a list. First, you give it a name,
To create a list, define a list name, determine
if you want to the list to be public, and
Creating the data model
and then you create all the fields that youdetermine whether to display it in the
subscription center. want to store data in. You can choose if you
want the data extension to be sendable.
You can change these settings at any time.
You can only manually add records to a data
extension by using the API.
You can manually create one record at a
time from within a list.
Adding single members
Subscribers are added when you send to a
data extension.
Subscribers are automatically added on
import.
All subscribers
Overwrite, Add and Update, Update only,
Add only.
Add and Update, Update only, Add only.Create and update options
Scrubbing begins when you send a message
to the data extension.
Scrubbing begins when you import the list.List Detective scrub
A publication list is used to manage
subscriber-level opt-ins and opt-outs for
Not applicable.Publication list
data extension sends. These act like a list
when sending to a data extension, keeping
unsubscribes at the publication list or data
extension level. You can also import to a
publication list to add unsubscribes only.
Around one million rows in 10 minutes.Around 500,000 rows an hour. Enterprise
2.0 accounts typically import records faster.
Import speed
Not supported.Supported.Web Collect
231
SubscribersEmail in Marketing Cloud Engagement

Data ExtensionListFunction
Not applicable.You create profile and preference attributes
in the user interface. If you have an
Profile and Preference attributes
enterprise account, you can share attributes
among all the business units. The values
stored in these attributes are global. When
you update an attribute in one account, it
appears in all accounts.
Not applicable.Text, Numeric, Date, BooleanProfile and Preference attribute data types
Subscriber data field values are stored at the
data extension level, making them list-level
attributes
Not applicable.Data Extension fields
Test, Numeric, Date, Boolean, Email, Phone,
Decimal, Locale.
Not applicable.Data Extension field types
Configurable; can be zero, one, or many.In Enterprise 2.0, primary keys are supported.
Otherwise, the email address is used.
Requires a primary key
YesNoUse as secondary storage of relational data
YesNoData retention
Data extensions can be shared between all
accounts in the enterprise structure.
Lists can't be shared.Sharing (Enterprise 2.0)
NoYesQuick data export
Supported.Not supported.Automate data export
NoYesQuickly search for a record
You can create a copy of a data extension.Group created based on the list.Segmenting based on a Data Filters result
YesFor Enterprise 2.0 accounts, you can perform
this query by joining the list and attribute
tables.
Query on subscriber attribute or field values
Not supported.Supported.Profile Center page
Not supported.Supported.Subscription Center page
Supported. You have to manually type in
personalization strings for now.
Supported. When building content, use a
dropdown to insert profile attribute
personalization strings.
Insert personalization strings into content
areas via the editor
Supported, but if the subscriber record is
removed from the data extension after the
SupportedView as a Webpage
send occurs, the View as a Webpage won’t
show subscriber data, as it pulls the data live
at the time the page renders.
Guided SendSupportedSimple Send, Guided Send, Test Send
232
SubscribersEmail in Marketing Cloud Engagement

Data ExtensionListFunction
Data extensions can’t use standard reports
that were designed specifically for lists.
All standard reporting supports the use of
lists.
Standard reporting
Jobs show the publication list that you used
for the send. The data extension you used
isn’t directly called out in tracking.
Tracking lists all the sends you execute from
your account.
Tracking jobs
Unsubscribes
Learn about unsubscribes in Email Studio and Marketing Cloud Engagement.
This guide explains how unsubscribes are handled and what happens to your lists when a subscriber chooses not to receive your
publications. Users can’t control when subscribers unsubscribe, but they can understand how to identify an unsubscribed subscriber
and how to respect their wishes with future sends.
Note: This guide describes the typical unsubscribe scenario, but depending on your account type, you can’t experience what is
described here. For example, Enterprise 1.0 accounts experience a different unsubscribe process. For a customized description of
what occurs within your account, contact your representative.
Unsubscribes
Unsubscribed is a status in Email Studio that signifies a subscriber has unsubscribed from your communication or you unsubscribed
them. When a subscriber clicks the unsubscribe link in an email, their status is set to unsubscribed.
Note: An unsubscribed status only affects sends with a commercial type send definition.
Explanation
An unsubscribe link appears at the bottom of every email you send.
A subscriber can choose to click the Manage Subscriptions link, which provides unsubscribe options. Or they can click One-Click
Unsubscribe, which unsubscribes the subscriber from the list the send originated from. To unsubscribe from every list, the subscriber
must click Manage Subscriptions and unsubscribe from every list.
Note: When a subscriber unsubscribes, they aren’t removed from a list or account. Their status is changed to Unsubscribed and
a red icon appears next to their name on the list.
A subscriber can unsubscribe in four different ways:
•
List Unsubscribe
•
Universal Unsubscribe
•
Global Unsubscribe
•
One-Click Header Unsubscribe
Subscriber Filter Unsubscribe Settings
Processing unsubscribes for Enterprise 2.0 business units in Marketing Cloud are set using subscriber filters.
Global Unsubscribe
A global unsubscribe occurs when a subscriber chooses to unsubscribe from every email that anyone sends from Marketing Cloud
Engagement.
233
SubscribersEmail in Marketing Cloud Engagement
List Unsubscribe
Learn about list unsubscribes in Email Studio.
List-Unsubscribe Header Unsubscribe
A List-Unsubscribe header is included with all commercial sends and supports the one-click unsubscribe method. An email client
uses the header and DKIM signature included with authenticated domains to display a uniform unsubscribe link in its interface. The
header helps subscribers easily unsubscribe from unwanted emails. Internet Service Providers (ISPs) choose if, where, and how the
unsubscribe link appears.
Universal Unsubscribe
A universal unsubscribe occurs when a subscriber unsubscribes from every email your company sends. When a subscriber uses the
universal unsubscribe option, their status is set to Unsubscribed on all your lists and your universal list.
Subscriber Filter Unsubscribe Settings
Processing unsubscribes for Enterprise 2.0 business units in Marketing Cloud are set using subscriber filters.
Enterprise 2.0 administrators can manage how business unit level unsubscribes are handled. Two options are available under the
properties settings of a business unit:
•
Subscribers are unsubscribed from all business units in the Enterprise.
•
Subscribers are unsubscribed from this business unit only.
Subscribers are unsubscribed from all business units in the Enterprise:
•
Unsubscribing the subscriber in All Subscribers at business unit level via an Automation Studio import activity unsubscribes the
same subscriber in the All Subscriber list at the enterprise level.
•
Only activating the subscriber in All Subscribers list at business unit level via an Automation Studio import activity does not activate
the subscriber. They are not activate because they are unsubscribed in the All Subscriber list at the enterprise level (universal
unsubscribed).
•
Activating the subscriber in the All Subscribers at the enterprise level via an Automation Studio import activity does not activate the
subscriber at the business unit level. They are not activated because they are unsubscribed in the All Subscriber list at the business
unit level. Activate the subscriber at the business unit level manually or via an import activity after activating at the enterprise level.
Subscribers are unsubscribed from this business unit only.
•
Unsubscribing a subscriber in All Subscribers at business unit level via an Automation Studio import activity does not unsubscribe
the subscriber in the All Subscriber list at the enterprise level.
•
Activating the subscriber in the All Subscribers list via an Automation Studio import activity at the business unit level activates the
subscriber at the business unit level.
Global Unsubscribe
A global unsubscribe occurs when a subscriber chooses to unsubscribe from every email that anyone sends from Marketing Cloud
Engagement.
Engagement manages a Global Unsubscribe list of those subscribers who opt out of all email coming from our platform. When someone
opts out globally, they’re suppressed from every list created by an Engagement user. The former subscribers are marked with a red icon,
and the Activate button in their properties panel is disabled.
You can't reactivate a subscriber from your Engagement account. Find out how a subscriber can request reactivation.
234
SubscribersEmail in Marketing Cloud Engagement

Enterprise users can work with their account executive to enable access to the global unsubscribe list.
List Unsubscribe
Learn about list unsubscribes in Email Studio.
A list unsubscribe occurs when a user unsubscribes from a list only. For example, if a user unsubscribes from your Monthly Newsletter,
they remain on any other email lists under which they exist. There are several ways a user can unsubscribe from a list.
Import
To unsubscribe a subscriber from a list via subscriber List imports, include an Unsubscribed status in the import file.
API
To unsubscribe a subscriber from a list via the API Subscriber Update call, pass in the appropriate ListID and Subscriber Status of
unsubscribed.
Subscriber Properties
To unsubscribe a subscriber from a list in the application via Subscriber Properties, complete these steps.
1. Click the Subscribers tab.
2. Click my lists
235
SubscribersEmail in Marketing Cloud Engagement

3. Select the subscriber you want to unsubscribe.
4. Click View Properties.
5. Click the Lists tab.
6. Select the list from which you want to unsubscribe the subscriber.
7. Click Details. The subscriber details for the highlighted list are displayed.
8. Click Unsubscribe.
The Unsubscribe window appears where you can enter an unsubscribe reason if appropriate. After it’s unsubscribed, the list has an
Unsubscribed date on the Lists tab and the user has a red icon, indicating unsubscribed.
Unsubscribe Center
Subscribers can unsubscribe from a list via the Unsubscription Center. Subscribers can reach the Unsubscription Center by clicking the
Manage Subscriptions link, Unsubscribe link, or One-Click Unsubscribe link at the bottom of the email. The unsubscribe links can be
customized in your account and appear differently than what’s listed here.
A confirmation page displays after the subscriber successfully unsubscribes from a list.
Subscription Center
Subscribers can also unsubscribe from a list via the Subscription Center. Subscribers can reach the Subscription Center by clicking the
Manage Subscription link at the bottom of the email.
The list unsubscribe occurs in the Available Publications section of the Subscription Center. For a list to be included in this section, mark
the list as Public when the list is created. If the checkbox next to the list name is selected, a subscriber is subscribed to that list. To
unsubscribe from a list, the subscriber clears the appropriate checkbox and clicks the Update button.
List-Unsubscribe Header Unsubscribe
A List-Unsubscribe header is included with all commercial sends and supports the one-click unsubscribe method. An email client uses
the header and DKIM signature included with authenticated domains to display a uniform unsubscribe link in its interface. The header
helps subscribers easily unsubscribe from unwanted emails. Internet Service Providers (ISPs) choose if, where, and how the unsubscribe
link appears.
Email client unsubscribe requests are processed in one of two ways:
236
SubscribersEmail in Marketing Cloud Engagement

•
Mail To: The Mail To method sends an email to the mail-to address included in the List-Unsubscribe header. Marketing Cloud
Engagement receives these emails and unsubscribes the subscriber from the associated list in the same way that Reply Mail
Management processes unsubscribe requests from links in the body of an email.
•
One-Click Post: The one-click method performs the List Unsubscribe action for the subscriber as if the user clicked the Publication
List Update button on the Subscription Center page. This action returns the email client’s default confirmation page to the subscriber
instead of the Engagement confirmation page.
Note: Because Request for Comments (RFC) 8058 regulations for one-click unsubscribe require acceptance of POST requests,
our List-Unsubscribe headers can’t be disabled or altered. Directing one-click unsubscribes to landing pages deviates from
RFC 8058 regulations and isn’t supported.
Note: If you track unsubscribe events using Data Views or Data Extracts, you can’t differentiate unsubscribes from email clients
and unsubscribe requests made by subscribers on the Subscription page.
Universal Unsubscribe
A universal unsubscribe occurs when a subscriber unsubscribes from every email your company sends. When a subscriber uses the
universal unsubscribe option, their status is set to Unsubscribed on all your lists and your universal list.
For example, if a subscriber is on three of your lists and uses the universal unsubscribe option to unsubscribe from one of your emails,
they appear as Unsubscribed on all your lists.
A subscriber can unsubscribe from the universal list in various ways:
Import
You can unsubscribe a subscriber from the universal list via subscriber List imports by including an Unsubscribed status in the import
file and importing into the All Subscribers list.
API
You can unsubscribe a subscriber from a list via the API's Subscriber Update call by passing in the All Subscribers ListID and Subscriber
Status of unsubscribed.
Subscriber Properties
Follow this procedure to perform an unsubscribe from the universal list on a user within the application:
•
Click the Subscribers tab.
•
Click my lists on the folder containing the subscriber.
•
Select the subscriber you want to unsubscribe.
•
Click View Properties
237
SubscribersEmail in Marketing Cloud Engagement

•
Click Unsubscribe from all...
The Unsubscribe window appears where you can enter a reason if applicable and unsubscribe from the universal list. When you
return to the General tab, the Unsubscribed field is populated with the unsubscribe date and the icon in the upper left corner is red.
The subscriber has a red icon when viewing the All Subscribers list.
Unsubscribe Center
Subscribers can unsubscribe from the universal list in the Unsubscribe Center. Subscribers can reach the Unsubscribe Center by clicking
the Manage Subscriptions link at the bottom of the email. Next, they click the Unsubscribe From All button that appears at the bottom
of the window.
Subscription Center
Subscribers can unsubscribe from the universal list in the Subscription Center. Subscribers can reach the Subscription Center by clicking
the Manage Subscription link at the bottom of the email.
To unsubscribe from the universal list, select the I no longer wish to receive any future publications checkbox and click the Update button
at the bottom of the section.
238
SubscribersEmail in Marketing Cloud Engagement

Profile Center
Subscribers can also unsubscribe from the universal list in the Profile Center. Subscribers can reach the Profile Center by clicking the
Update Profile link at the bottom of the email.
To unsubscribe from the universal list, select the I no longer wish to receive any future publications checkbox and click the Update
button.
Reply Mail Management
If the account uses Reply Mail Management, the subscriber can unsubscribe from the universal list by replying to the email and typing
an appropriate request in either the subject line or body.
How a Subscriber Opts Out
Learn how a subscriber opts out in Email Studio.
Marketing Cloud Engagement uses the subscriber status to capture whether a subscriber has opted out (unsubscribed) from your
publications.
An unsubscribed subscriber appears with a red icon in the application interface. You can also retrieve subscriber status information using
the web service API.
Every time you send a commercial email, the system checks the statuses of the subscribers to be sent to and excludes any whose status
is Unsubscribed.
A subscriber can unsubscribe from emails at three different levels:
•
List-Level Unsubscribe - A subscriber who unsubscribes at the list level doesn’t receive any emails that are sent to that list or publication
list. For example, a person could unsubscribe from your Sale Announcements list but still receive emails that you send to your Weekly
Newsletter list. Unsubscribing at the list level is different from removing the subscriber from the list. If you remove a subscriber from
a list, the system allows you to add the subscriber again in a future import. If you unsubscribe the subscriber, the system maintains
the subscriber status of Unsubscribed even if you import the subscriber again.
•
Account-Level Unsubscribe or Universal Unsubscribe - A subscriber who unsubscribes at the account level has an unsubscribed
status on your All Subscribers list. All current and future lists in your account inherit the All Subscriber list.
239
SubscribersEmail in Marketing Cloud Engagement

•
Global Unsubscribe - A subscriber unsubscribed at the global level is suppressed from all current and future lists in all Marketing
Cloud Engagement accounts.
One-Click Unsubscribe
The application requires that your commercial emails contain an unsubscribe link in the body of the email, usually in the footer. The URL
of the link is a system-generated string that contains embedded information to identify the subscriber who clicked the link and the email
in which the subscriber clicked it.
When the subscriber clicks the link, the system looks up which list the email was sent to and sets the subscriber's status to "Unsubscribed"
for that list. If the email was sent to multiple lists the subscriber is on, the system unsubscribes the subscriber from all lists.
Meanwhile, the subscriber's browser displays a message that the unsubscribe action was successful and gives the subscriber options to
resubscribe or manage other subscriptions.
Profile and Subscription
Center
The application requires that your commercial emails contain a link to the profile center. The URL of the link is a system-generated string
that takes the subscriber to a customized page that shows all public attributes you store about the subscriber.
From the profile center, the subscriber can update their personal information in your system, as well as click another link to the subscription
center. The subscription center is a page that shows all lists and publication lists in your account that you’ve marked as public.
240
SubscribersEmail in Marketing Cloud Engagement

The subscriber's personal subscription center shows whether the subscriber is subscribed to each of the public lists and publication lists.
If the subscriber unsubscribes from lists they’re subscribed to from this page, the system changes the subscriber's status to unsubscribe
for that list.
From either the profile center or the subscription center the subscriber can choose to unsubscribe from all publications. If the subscriber
selects this option, the system changes the subscriber's status to unsubscribe for the account.
Reply Mail
If you have the reply mail management feature configured and a subscriber replies with one of the unsubscribe keywords in the subject
line or body, the system automatically unsubscribes the subscriber at the account-level.
If you don’t have reply mail management configured for your account, you must manually process leave requests that you receive.
Manual Processing
If a subscriber requests to be unsubscribed through email or any other communication channel, CAN-SPAM requires you to process this
request in a timely fashion.
241
SubscribersEmail in Marketing Cloud Engagement
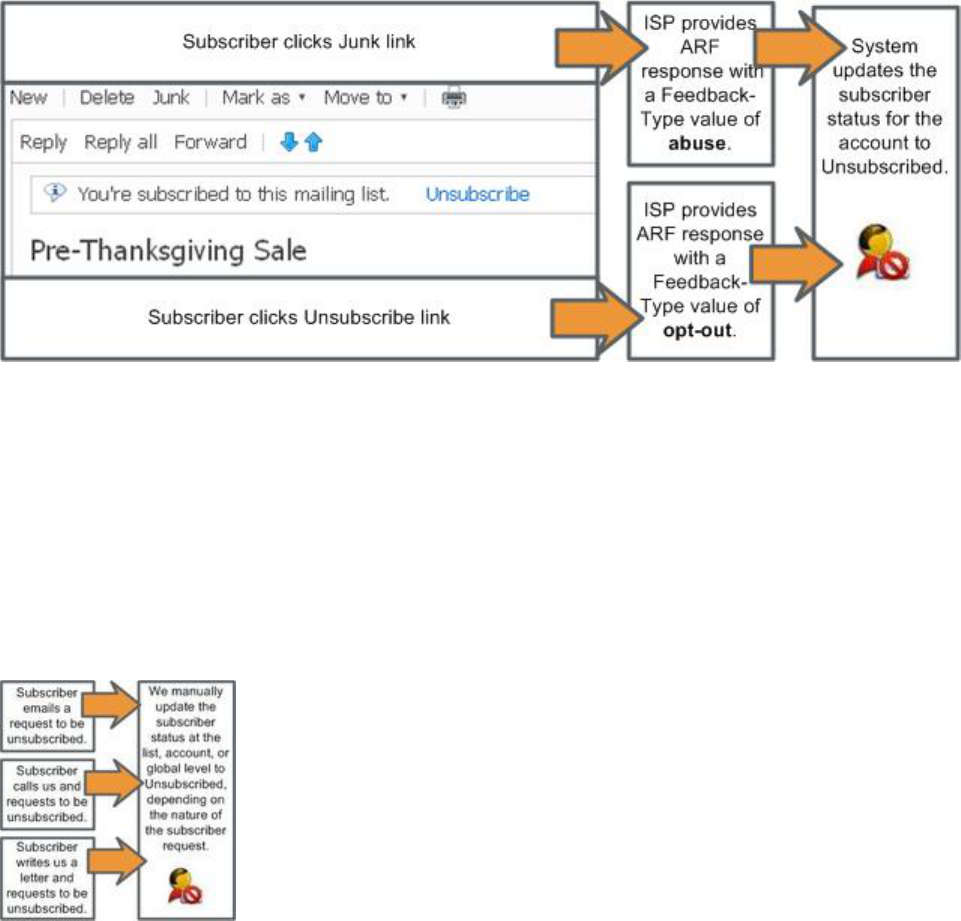
You can unsubscribe a subscriber at the account-level by accessing the subscriber properties and clicking Unsubscribe from All.
Feedback Loop
A feedback loop is when Internet service provider (ISP) forwards spam complaints and opt outs from its users to the senders of the
messages being complained about. When ISPs use the feedback loop to forward complaints, the subscriber who complained is
automatically unsubscribed at the account level.
Some email clients offer tools to subscribers to unsubscribe from mailing lists by clicking Leave or Unsubscribe in the email client interface.
When the subscriber clicks this button, the email client sends an Abuse Reporting Format (ARF) reply email with a FeedbackType value
of opt-out. The subscriber status changes to Unsubscribed for that Engagement account.
Most email clients also offer a tool to report an email as spam or junk. When the subscriber clicks this button, the email client sends an
ARF reply email with a FeedbackType value of abuse. The subscriber status changes to Unsubscribed for that Engagement account.
Contacting Marketing Cloud Engagement
Subscribers can email, call, or write to request to be unsubscribed. Salesforce personnel manually process these requests and set the
subscriber status to Unsubscribed at the appropriate level, depending on the subscriber request.
SEE ALSO:
Unsubscribes
Bounce Mail Management in Email Studio
Learn about bounce mail management in Marketing Cloud’s Email Studio.
242
SubscribersEmail in Marketing Cloud Engagement

Note: Where possible, we changed noninclusive terms to align with our company value of Equality. We maintained certain terms
to avoid any effect on customer implementations.
As a user, you can’t control bounces, but you can understand how a subscriber acquires a bounced status and the consequences of
having too many bounces.
Note: This topic describes a typical bounce scenario. Depending on your domain type and account configurations, your experience
differs than what is described here. For a customized description of what occurs with your domain, contact your Marketing Cloud
relationship manager.
Definition
Bounces are messages that ISPs send back to Marketing Cloud to explain why they can’t deliver your email. When an email can’t be
successfully delivered, the application labels the subscriber as Bounced.
Types of Bounces
The subscriber's email server either accepts or bounces an email when it's sent. If the email server accepts the email, the subscriber's
status remains Active in Marketing Cloud. If the email server rejects the email, the subscriber's status changes to Bounced.
Note: If a subscriber bounces on an email send and a BCC address interacts with the email, it’s possible for a false bounce to be
marked for the subscriber.
Soft Bounce
A soft bounce occurs when the email server rejects the email due to a seemingly temporary condition, such as a full inbox. When that
happens, the system retries sending the email to the subscriber every 15 minutes for 72 hours, for up to 288 tries. Only after the system
stops attempting to retry does a subscriber appear in your tracking as Bounced. When a bounce appears in tracking, it’s official and
doesn’t change.
The 288 retries don’t count as bounces. Instead, the full count of unsuccessful retries equates to one soft bounce. If the system attempts
delivery 288 times and the message bounces each time, the subscriber's status is set to Bounced. If the email is delivered during the 288
attempts and the subscriber opens the email, the subscriber's status is set to Active. Also, a bounced subscriber can find an old email
from you in their inbox and open it, which returns their status to Active.
Not every message to a soft-bouncing recipient is retried 288 times. Some bounces can happen immediately and be permanent as it
relates to that particular message, but we consider them soft bounces for tracking purposes. Examples of this type of soft bounce that
show up faster include these types of ISP responses:
•
The mailbox exceeds the maximum allowed storage
•
The user account is over its quota
•
The mailbox is full
•
The mailbox is disabled
•
The mailbox is temporarily disabled
•
The mailbox is disabled and not accepting messages
After Marketing Cloud receives the third soft bounce for a subscriber, their status is set to Held.
This table describes the causes of a soft bounce.
243
SubscribersEmail in Marketing Cloud Engagement

Possible Cautions and ResolutionsDefinitionCause
The subscriber's email account is
temporarily inactive or disabled. Mailboxes
The address is temporarily unavailable as
the recipient's mailbox is inactive or
temporarily disabled
Inactive Account
can be disabled for several reasons,
including infrequent use, change of address,
delinquency, or dispute. These errors could
be temporary or permanent. We
recommend sending messages to these
subscribers in the short term to monitor
acceptance, and then contacting the
subscriber through other methods to
confirm the address.
Your recipient's mailbox is full or it has
exceeded its storage allocation. A full
Recipient's mailbox is full or has exceeded
storage allocation
Mailbox Full
mailbox is usually from infrequent use, a
temporary change in email checking habits,
or an address change. Mailbox full errors are
a warning sign. Consider contacting the
subscriber through alternative means to
confirm that you’re mailing to a valid and
frequently checked address.
The subscriber's mailbox isn’t currently
accepting messages. Resolve this temporary
Temporary failure at the receiving domainTemporary Domain Failure
issue before future sends. Continue to
monitor deliverability for this subscriber.
Consider contacting this subscriber through
alternative means if these deliverability
issues persist.
The subscriber's mailbox isn’t currently
accepting messages. Resolve this temporary
Mailbox temporarily unavailable or
indecipherable bounce message received
Other
issue before future sends. Continue to
monitor deliverability for this subscriber.
Consider contacting this subscriber through
alternative means if these deliverability
issues persist.
Block Bounce
A block bounce occurs when the email server rejects the email because of a lack of authentication, or if the domain or IP address appears
on a blocklist. A subscriber who receives a block bounce is retried in the next email send.
This table describes the causes of a block bounce.
DefinitionCause
Your email is blocked due to complaintsComplaint
244
SubscribersEmail in Marketing Cloud Engagement
DefinitionCause
The IP address is on a blocklistBlacklist
The message was filtered due to contentContent
Any emails containing your URLs are blockedURL Block
The message lacks required authenticationAuthentication
Technical Bounce
A technical bounce occurs when the email server rejects the email due to technical errors, such as a data format or network error. When
a subscriber experiences a technical bounce, they’re retried in the next email send.
This table describes the causes of a technical bounce.
DefinitionCause
Receiving email server is temporarily overwhelmed with delivery
attempts from you and other senders
Server Too Busy
Email is rejected due to formatting or line length errorsData Format Error
Connection lost or timed out during delivery line length errorsNetwork Error
Hard Bounce
A hard bounce occurs when the email server rejects the email due to permanent conditions. This bounce typically results when user
unknown or domain not found errors occur. What happens next depends on the subscriber's status. If the subscriber's status was already
Active, their status now changes to Bounced. No more attempts are made to send this email campaign to this subscriber, and the
subscriber is retried in your next email campaign. Every email send is considered an email campaign regarding bounce handling.
If the subscriber's status was already Bounced, which indicates they had experienced a bounce previously, the application treats the
bounce differently. If the subscriber bounces in the first or second email campaign, they retain the Bounced status and are retried in
your next email campaign. No further attempts are made for this current email campaign.
If this email campaign is the third campaign in which the subscriber bounced, the application checks when the first bounce message
was received for this subscriber. If fewer than 15 days have passed since the first bounce message was received, the subscriber retains
the Bounced status and is retried in your next campaign. No further attempts are made for this current email campaign. If the bounce
occurred more than 15 days before the first bounce message, the subscriber status changes to Undeliverable unless the bounce is from
a trusted domain. A trusted domain is one in which Marketing Cloud trusts the ISP or receiver's bounce feedback implicitly. For example,
if hotmail.com is a trusted domain and Hotmail's feedback is that an address is bad, the status automatically changes to Undeliverable.
They system doesn’t wait for the address to bounce three times over 15 days. If the bounce comes from any other domain, a subscriber
receives three bounces to acquire an Undeliverable status. The application doesn’t attempt delivery to this subscriber in any future
campaigns.
Current trusted domains are Gmail.com, Hotmail.com (including all active Hotmail country domains like Hotmail.fr), and all active Road
Runner domains like nyc.rr.com. Check back here periodically as we update trusted domains as needed from time to time.
Note: While this model suits most cases, certain ISPs change from time to time based on how they handle spam and various
other deliverability items.
This table describes the causes of a hard bounce.
245
SubscribersEmail in Marketing Cloud Engagement

Possible Cautions and ResolutionsDefinitionCause
Sending to unknown domains is a result of
poor data capture methods, old data, or
The domain is bad or non-existentDomain Unknown
questionable data sources. Sending to old
lists can also increase the likelihood of
mailing to dead domains, as domains that
are no longer active are represented on old
lists. To avoid receiving a high number of
"Domain Unknown" errors, we recommend
sending a test send to 10% of your regular
mailing volume. You can assess the results
from the test send without exceeding the
acceptable bounce and complain rates and
make a reasonable risk assessment before
proceeding with a larger send.
Industry statistics indicate that up to 33%
of email addresses become invalid over 12
Address is invalid or failure is permanent per
bounce message
User Unknown
months. Receiving the User Unknown error
indicates that the address is no longer active
or has never been an active email address.
Because of the high turnover rate of email
addresses, sending to subscribers regularly
decreases the possibility of a sudden spike
on a specific campaign. If mailing to an old
subscriber list, we recommend sending a
random 10% test to avoid a sudden increase
in bounces. This error could also be the
result of poor data capture methods. If so,
we recommend requiring subscribers to
enter their email address twice
The email contains incorrect syntax. For
example, you left out the "@" symbol or
Email address invalidBad Address Syntax
didn't include a domain name (like
"examplecom" instead of "example.com").
Check your email address syntax and correct
any errors you see.
The subscriber's ISP has flagged your IP
address for sending too many messages
Email is blocked due to the high quantity or
percentage of unknown or inactive
addresses on your list
High Unknown Address Percentage
that got blocked. The ISP sees that you sent
emails to people that didn't accept them.
To make improvements, see the section on
Best Practices.
Address is invalid or failure is permanent per
bounce message
Other
246
SubscribersEmail in Marketing Cloud Engagement

If you have subscribers in a list who continually receive hard bounces, you can remove them from your list.
Unknown Bounce
An unknown bounce occurs when the email server rejects the email and doesn’t provide an identifying error code. An unknown bounce
is treated like a soft bounce.
Reactivating Bounced Subscribers
If a subscriber address is in a bounced status but renders images in an email, or if the subscriber clicks a link in an email, their status
changes to Active. The bounce count for that subscriber address is set to zero. Imports that specify an Active status automatically resets
the bounce count to 0 for any subscriber that is included in the import with an active status.
Bounce Tracking
Marketing Cloud tracks your bounces in the tracking area of the email message.
SMTP Bounce Codes
If you run a Bounce Event Extract File, there’s an SMTP Code column that lists a code related to each bounce. View valid values for SMTP
reply codes (GreenEnd).
Bounces for Integrated Solutions
Bounces for Marketing Cloud integrated products are handled the same way as they are in Marketing Cloud. The same rules apply, but
sometimes, only the record of a bounce is passed back to the integrated solution. It doesn’t include whether it’s a hard or soft bounce.
The system only records the date and time of the event.
Unsubscribed Status
Although unsubscribed subscribers got that status not because of a bounce, in the context of Bounce Mail Management, a subscriber
acquires a status of Unsubscribed in these ways:
•
The subscriber clicks an unsubscribe link in an email or chooses to be unsubscribed in a profile center
•
The subscriber reports an email as spam to an ISP with which Marketing Cloud has a feedback loop (AOL, Hotmail, Comcast, and
others)
•
The subscriber's address is manually changed to Unsubscribed by a Salesforce Marketing Cloud user
247
SubscribersEmail in Marketing Cloud Engagement

Subscriber Status
A subscriber's email status is one of the fields that you can include when you export individual subscriber data or export an entire
subscriber list. You can use the status field to filter your subscriber searches. Your subscriber workspace uses color-coded icons to indicate
subscriber status.
Each subscriber has one of these statuses:
ExplanationStatusColor Code
A subscriber who meets either of these
criteria has a status of Active:
Active
(green)
•
No activities have occurred to make the
subscriber's status Bounced,
Undeliverable, Unsubscribed, or
Deleted.
•
A subscriber whose status was Bounced
or Undeliverable is recorded as having
opened or clicked through a received
email. In this case, the system changes
the subscriber's status back to Active.
A subscriber who meets these criteria has a
status of Bounced:
Bounced (Returned)
(yellow)
•
one or more bounces, soft, or hard, are
received for the subscriber
A subscriber who meets these criteria has a
status of Held (Undeliverable):
Held (Undeliverable)
(gray)
•
Three or more bounces, soft or hard, are
received for the subscriber and more
than 15 days have passed since the first
bounce. If the bounce was from a
trusted domain, only one hard bounce
is required.
•
The status is reset to Active when a
subscriber engages with the email.
A subscriber who meets any of these criteria
has a status of Unsubscribed:
Unsubscribed
(red)
•
The subscriber has requested to be
removed from a single list, multiple lists,
or all lists. In these cases, the subscriber's
status is changed to Unsubscribed for
the selected lists or at the All Subscribers
level.
248
SubscribersEmail in Marketing Cloud Engagement

ExplanationStatusColor Code
•
A user manually unsubscribes a
subscriber, thus changing the status to
Unsubscribed for the list at which the
action was taken.
•
The subscriber has submitted a spam
complaint in the user interface of any
ISP or webmail service that provides a
feedback loop (FBL) to ET. In this case,
the subscriber's status is changed to
Unsubscribed at the All Subscribers
level. When the Sender Authentication
Package is applied, ISPs that offer
feedback loops include:
–
BlueTie
–
Comcast
–
Fastmail
–
Gandi
–
Italia Online (Libero and Virgilio)
–
La Poste
–
Liberty Global (Chello, UPC, Unity
Media)
–
Locaweb
–
Mail.Ru
–
Microsoft Junk Mail Reporting
Program (including Hotmail and
Outlook)
–
OpenSRS
–
Rackspace
–
SEZNM
–
SFR
–
SilverSky
–
Swisscom
–
Synacor
–
Telecom Italia
–
Telenet
–
Telenor
–
Telstra
–
Terra
–
UOL
–
Virgin Media
–
Ziggo
249
SubscribersEmail in Marketing Cloud Engagement

ExplanationStatusColor Code
We set up Yahoo FBL when using
private domain and Sender
Authentication Package (SAP).
A subscriber who meets either of these
criteria has a status of Deleted:
Deleted
•
A user has deleted a subscriber from a
list other than the All Subscribers list. In
this case, the subscriber's status for that
list only is Deleted.
•
A user has deleted a subscriber from the
All Subscribers list. In this case, the
subscriber's global status is Deleted.
Diagram
The diagram illustrates the bounce process, showing how a subscriber address status changes from active, to bounce, to undeliverable.
250
SubscribersEmail in Marketing Cloud Engagement
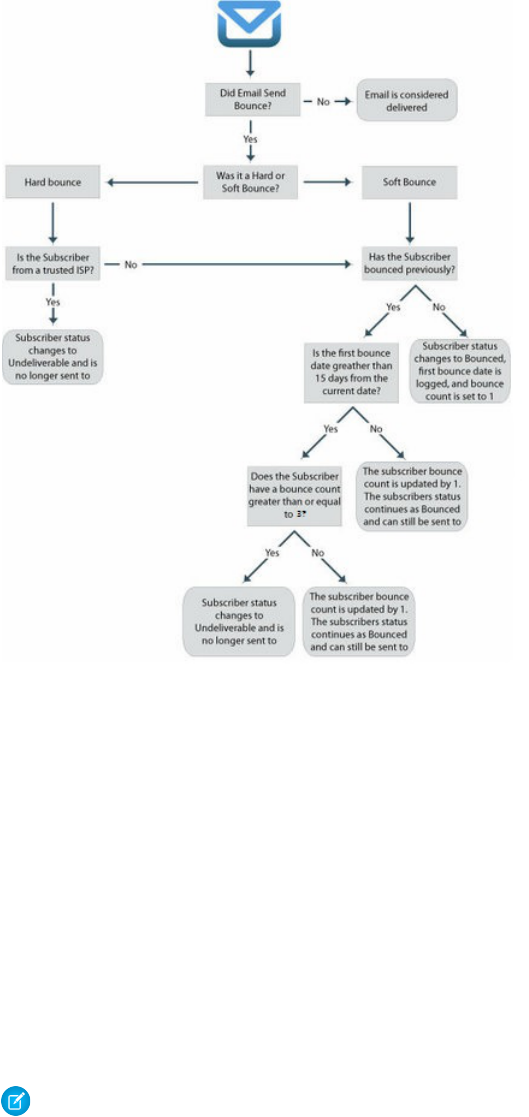
SEE ALSO:
Bounces
Forward to a Friend
Forward to a Friend is an image you add to emails you send to your subscribers. When subscribers want to share the information in your
email with friends, they click the image and fill out the form.
When a subscriber clicks Forward to a Friend, a form appears where the subscriber can enter a personal comment to the recipient, which
precedes a standard message inviting the recipient to subscribe. A single subscriber can only submit 10 forward requests per email send.
The default FTAF form has 8 submissions, so that's anywhere from 10 to 80 addresses forwarded to total. Additionally, you’re able to
track how many times your emails are forwarded using this feature and how many new subscribers you've gained as a result. The Forward
to a Friend feature also protects the privacy of the subscriber by removing the link to Manage Subscription, Update Profile, and One-Click
Unsubscribe from the email.
Note: If a subscriber uses the forward feature in their email client instead of Forward To A Friend, the links contained in the email
leads to the original subscriber's Profile Center, Subscription Center, and Unsubscribe links. To protect your subscribers' privacy
and the quality of your data, you shouldn’t include sensitive information in the profile center or other landing pages.
Add Forward to a Friend to an Email
Follow these steps to add Forward to a Friend to an email message in Email Studio.
251
SubscribersEmail in Marketing Cloud Engagement

Add Forward to a Friend to an Email
Follow these steps to add Forward to a Friend to an email message in Email Studio.
1. Click Content.
2. Click my emails.
3. Click the email to add Forward to a Friend to.
4. Click Create Content or Modify Content in the content block to add the image to.
5. To create content, select Content and choose a layout that includes an image in the Select Orientation dialog box. If modifying
existing content, choose to modify the image in the Modify Content dialog box. When creating content, the wizard walks you through
the creation process. Follow the next step when you arrive at the Select Image dialog box.
6. Navigate to the Forward to a Friend image subfolder. All of the Forward to a Friend designs display in your account are shown in
the dialog box. Only one size option is available for these images.
7. Select the applicable Forward to a Friend design.
8. To create content, continue with the rest of the wizard's dialog boxes to define your content box.
9. When you save and exit the wizard, the content box shows your inserted Forward to a Friend button. You can also insert the Forward
to a Friend button into an HTML paste email in the same way that you insert other images.
To insert Forward to a Friend in an HTML Paste email, use the personalization string %%ftaf_url%% to insert the Forward to a Friend
image in the email.
Interactions
Email Studio Interactions contain the communications and data processes that build and support your relationship with customers.
Activities
An activity is a discrete unit of work in the application.
Messages
A message is a communication sent to an individual subscriber or a collection of individuals, such as a list, group, or data extension.
In Marketing Cloud Engagement, you can send emails and SMS messages.
Activities
An activity is a discrete unit of work in the application.
Note: The API can’t act upon activities, but you can specify an external key to uniquely identify the activity for future API use.
Import Activity in Email Studio
Each import activity uses information from an outside file to update a subscriber list or data extension.
Report Activity
A report activity defines the parameters for a report for use every time the report runs using the activity. You can also run reports
outside of activities.
Server-Side JavaScript Activity
Use server-side JavaScript activities to host and run resources for landing pages. Server-side JavaScript allows you to customize and
run these activities flexibly with Marketing Cloud Engagement.
252
InteractionsEmail in Marketing Cloud Engagement
Start an Activity
Starting an activity in Email Studio executes the commands in the activity.
Import Activity in Email Studio
Each import activity uses information from an outside file to update a subscriber list or data extension.
If your account is integrated with a Salesforce account, use an import activity to create and populate a data extension with the data from
a Salesforce object or report.
Considerations
•
When you import to a list using the import activity, the system uses List Detective to prevent bad email addresses from being
imported.
•
If the file you import is encrypted or compressed, create a file transfer activity to prepare the file for import.
•
When defining an import activity, provide information the activity uses each time it runs. The information gives the specifics of the
file to import and guides the import activity's behavior while running the import.
•
Depending on account configuration, select whether multiple records with the same primary key can appear in an import file. Or
retain only the last instance of the record to be saved.
•
Specify character encoding to use with imports. Your Marketing Cloud Engagement admin can enable this specification.
•
If importing to a data extension without a primary key, only the overwrite update type option is supported.
•
The default file source location is your FTP account's import folder.
•
If your account uses Automation Studio, you can import data into a publication list. Subscriber attributes aren’t supported for
publication list imports.
•
When saving an import definition that imports a Salesforce object or report, the data extension is created automatically according
to the object or report schema. After the data extension is created, you can’t change the data source.
•
By default, the import activity skips any rows with bad data and imports the rest of the file.
•
Importing data using the Overwrite or Add Only update options is typically fastest.
•
Using the Add and Update updated option when there are primary key constraints sometimes cause processing to take longer.
•
To add multiple addresses to the import activity email notification field, separate each address with a comma.
Supported Date Formats
Check out Supported Date Formats for Import in Marketing Cloud Engagement for a list of Date formats supported when uploading a
date format into a date-type field. When importing dates into lists or a data extension, ensure that the date format in the file matches
the date format your ImportDefinition uses.
Create an Import Activity
Import a file using an import activity in Email Studio. If the file that you want to import is encrypted or compressed, create a
corresponding file transfer activity. You can import to an existing subscriber list or data extension.
View Imported File History
See a history of files imported or attempted by the import activity in Email Studio.
File-Naming Patterns
Review these examples to understand how file-naming patterns are created in Email Studio.
253
InteractionsEmail in Marketing Cloud Engagement
Create an Import Activity
Import a file using an import activity in Email Studio. If the file that you want to import is encrypted or compressed, create a corresponding
file transfer activity. You can import to an existing subscriber list or data extension.
1. Click Interactions.
2. Click Import.
3. Click Create.
4. Enter the Properties information.
The name and description identify the activity in the application. Subscribers can’t see the name or description. The key uniquely
identifies the activity when using the API.
5. In the Source section, select the file location and complete the file naming patter. If you select Salesforce Objects & Reports,
complete these steps.
a. For Salesforce Data Source Type, select either Object or Report and choose the object or report to use.
b. Choose whether to import all data or only data modified after the date entered.
c. Select the type of file for your import.
d. Choose whether to import the information into a subscriber list or a data extension. You can opt to skip rows with bad data or
interpret double quotes as a text delimiter.
By default, the import activity skips rows with bad data and imports the rest of the file.
6. Select your update type.
The Add and update option creates a record for each new primary key value and updates the existing primary key values with new
information. The Add only option only creates records and ignores existing records. The Update only option updates existing records
based on the primary key and ignores new records.
7. Choose a data format that matches the region where you conduct the import.
8. Select whether to skip the import if the last import occurred within a specified time span.
9. Select whether to fail an import if the file is older than a specified time.
The system examines the modified date of the file as reported by the FTP server in the File Transfer Location. If the difference in hours
between the modified date and current system time is greater than the specified hours, the import doesn’t occur. You can specify
a system buffer to help determine this value. The specified value of hours is added to the previously specified hour limit.
10. Identify the destination for each column in the import file. You can specify column headings or ordinal, or you can map each value
manually using a sample file.
When importing dates into lists or a data extension, the date format in the file must be the same as indicated on the import definition.
If the formats are different, validation fails.
11. Enter the Import Completion Settings information.
The Delivery Location field determines where to deliver the file with the completion information and exceptions, if applicable. Has
Column Header indicates whether the system interprets the first row of the import file as a header row or as a data row. To receive
the notification when the import is complete, enter an email address in the Send notification email field.
12. Save the activity.
Date Validation Example
In Email Studio, invalid date format can cause validation to fail. The import uses the rules in a date format list to validate dates in the
file.
254
InteractionsEmail in Marketing Cloud Engagement

System Buffer Example
In Email Studio, by specifying a buffer and a file age, the activity tolerates situations where the file’s modified date is hours earlier
than the Import Activity’s execution time.
UTC Setting Example
Email Studio assumes that the FTP server in the selected file transfer location reports time in UTC. If the remote FTP server doesn’t
use UTC, adjust the specified hour limit to account for the variance.
File Transfer System Buffer Example
System buffer settings affect the File Transfer Activity when combined with the Import Activity in Email Studio.
Date Validation Example
In Email Studio, invalid date format can cause validation to fail. The import uses the rules in a date format list to validate dates in the file.
Example: If English (United Kingdom) is selected and a date field in the file contains 01/22/2010, the row fails validation. For
English (United Kingdom), represent January 22, 2010 as 22/01/2010. The import uses the rules in a date format list to validate
dates in the file.
System Buffer Example
In Email Studio, by specifying a buffer and a file age, the activity tolerates situations where the file’s modified date is hours earlier than
the Import Activity’s execution time.
UTC Setting Example
Email Studio assumes that the FTP server in the selected file transfer location reports time in UTC. If the remote FTP server doesn’t use
UTC, adjust the specified hour limit to account for the variance.
Example: Import Activity is configured to “Fail if file is older than [6] hours.” In this case, the activity executes at 12:00 PM on May
10. If the modified date returned by the FTP Server hosting the target file is May 10 6:00 AM or less, the import activity proceeds.
If the modified date is May 10 5:59 AM or earlier, the import results in an error. Marketing Cloud Engagement assumes that the
FTP server in the selected file transfer location reports time in UTC. If the remote FTP server doesn’t use UTC, adjust the specified
hour limit to account for the variance. Using the buffer setting is also an option.
File Transfer System Buffer Example
System buffer settings affect the File Transfer Activity when combined with the Import Activity in Email Studio.
View Imported File History
See a history of files imported or attempted by the import activity in Email Studio.
1. Click Interactions.
2. Click Import.
3. Select an import.
4. Click File History.
This information shows for each instance:
•
Start date
•
File name
255
InteractionsEmail in Marketing Cloud Engagement

•
Status
•
Description
File-Naming Patterns
Review these examples to understand how file-naming patterns are created in Email Studio.
ExampleSystem Looks ForFile-Naming Pattern
subscribers.csvA file named subscribers.csvsubscribers.csv
subscriber12.csvA file name with the last two characters as
a two-digit month
subscribers%%Month%%.csv
subscriber20101206.csvA file name with the format four-digit year,
two-digit month, and two-digit day
subscribers%%Year%%%%Month%%%%Day%%.csv
Personalization Strings
To prevent activity errors, use the minute and second personalization strings only if they’re required to distinguish between files generated
by different automation runs. For more information, see Import and File Transfer Activities Fail with “File Not Found.”
The personalization strings available for file naming are:
%%Year%%
%%Month%%
%%Day%%
%%Hour%%
%%Minute%%
%%Second%%
Report Activity
A report activity defines the parameters for a report for use every time the report runs using the activity. You can also run reports outside
of activities.
You can create a report activity to run every standard report available in the application, and custom reports in your account.
Properties
When you create the report activity, provide the name, external key, and description. These elements identify and describe the report
in the application and API calls. You also select the report this activity runs.
Parameters
The report parameters that appear when you create a report activity depend on the report that you select in the Properties section. The
activity uses the values that you select in this section each time the activity runs the report.
Report Results Delivery
When you create a report activity, specify how you receive the report:
256
InteractionsEmail in Marketing Cloud Engagement

•
Save Report for FTP - This option saves the report to your organization's reports folder or imports folder on the enhanced
FTP server. If you reimport the report later, such as part of a remarketing program, save the report in your imports folder. Specify the
name of the file so you can retrieve the report when it is complete.
•
Email the Report results - This option attaches the report to an email message. Specify the email address that receives
the report, the subject line of the email, and a comment that appears in the body of the email.
Note: The Email Address field limits email addresses to 100 characters. Separate emails with a comma or semi-colon.
Note: Some email servers block large attachments. Select FTP delivery if the process creates a large report. Your account must
use enhanced FTP to use reporting, regardless of whether you select the FTP option here.
Results File Format
When you create the report activity, select a file type that the system uses for your report. The available file formats depend on the report:
•
Data File (.csv)
•
Excel spreadsheet (.xls)
•
TIFF Image (.tif)
•
Adobe (.pdf)
•
XML (.xml)
•
Web Archive (.mht)
Create a Report Activity
Build a report in Email Studio with parameters and delivery settings you set.
Create a Report Activity
Build a report in Email Studio with parameters and delivery settings you set.
1. Click Interactions.
2. Click Report.
3. Click Create.
4. Complete the Properties section:
•
Name - Use this name to identify the activity. Subscribers cannot see the name.
•
External Key - Use this value to identify the activity when using the API.
•
Description - Use this description to further identify the activity. Subscribers cannot see the description.
•
Report Name - The value you select determines the fields that appear in Parameters.
5. Complete the Parameters section. The values in this section vary depending on the report you select.
6. Complete the Report Results Delivery section.
7. Complete the Results File Format section.
8. Complete the Process Flow section.
9. Save the activity.
257
InteractionsEmail in Marketing Cloud Engagement

Server-Side JavaScript Activity
Use server-side JavaScript activities to host and run resources for landing pages. Server-side JavaScript allows you to customize and run
these activities flexibly with Marketing Cloud Engagement.
Create a Server-Side JavaScript Activity
Task information for creating a server-side JavaScript activity in Email Studio
SEE ALSO:
Server-Side JavaScript
Create a Server-Side JavaScript Activity
Task information for creating a server-side JavaScript activity in Email Studio
Before beginning this procedure, create data extensions, portfolios, or other assets to use as part of your server-side JavaScript scripts.
1. Click Interactions.
2. Expand the Activities tree.
3. Select the Scripts folder.
4. In the workspace, click Create.
5. Complete the information in the Properties section of the workspace:
•
Name - Enter the name of your server-side JavaScript activity.
•
External Key - Enter the external key of your server-side JavaScript activity. Use this key to refer to the server-side JavaScript
activity as part of an API call.
•
Description - Enter the description of your server-side JavaScript activity.
6. Enter your server-side JavaScript in the Server-Side JavaScript section.
7. To verify the syntax of your server-side JavaScript, click Check Syntax. .
8. Save after entering and verifying your server-side JavaScript.
Start an Activity
Starting an activity in Email Studio executes the commands in the activity.
1. Click Interactions
2. ClickActivities
3. Choose the type of activity.
4. Choose the activity.
5. Start the activity.
Messages
A message is a communication sent to an individual subscriber or a collection of individuals, such as a list, group, or data extension. In
Marketing Cloud Engagement, you can send emails and SMS messages.
Note: Understanding the Web Service API is required to implement most instances of triggered email messages and SMS messages.
258
InteractionsEmail in Marketing Cloud Engagement

A message has two components: content and interaction. Content controls what appears in the message. An interaction defines
information necessary to send the message.
With Automation Studio, messages can perform many recurring processes automatically. A message send can be user-initiated or
triggered.
•
A user-initiated message send goes to subscribers you identify at a specified time. For example, you can send a monthly newsletter
to a list of newsletter subscribers. You can manage the entire process of a user-initiated email message through the application
interface. You can associate one or more user-initiated messages sends with activities to make an automation.
•
A triggered send responds to a subscriber action. For example, you can send a confirmation message after a customer makes a
purchase. After you define the content and interaction for a triggered email message, you can send Welcome email triggered sends
and Triggered Sends via Smart Capture pages.
All other events that trigger an interaction are defined using API calls.
Note: If your account is integrated with Salesforce and your application user is mapped to a Salesforce user, you can select a
Salesforce campaign or report as the audience of your email message interaction.
Triggered Emails in Email Studio
Use triggered emails in Email Studio to respond to email replies and to send email list opt-in confirmation messages. To use triggered
emails for other needs, you must implement the Email Studio app and SOAP API. This guide covers the tools in the application
interface.
Email Messages
Use Email Studio email message interactions, also referred to as send definitions, to determine how an email send occurs.
Triggered Emails in Email Studio
Use triggered emails in Email Studio to respond to email replies and to send email list opt-in confirmation messages. To use triggered
emails for other needs, you must implement the Email Studio app and SOAP API. This guide covers the tools in the application interface.
Note: This documentation only applies to triggered sends managed in Email Studio. Read about how to trigger emails via the
API in the Triggered Emails Scenario Guide for Developers. For transactional messaging via REST API, review Transactional Messaging
API.
Note: You can create up to 500 total email triggered send definitions plus email transactional send definitions in a 7-day period
for one business unit. This limit applies to send definitions created Marketing Cloud Engagement and its API. It doesn’t apply to
the Journey Builder email activity triggered send definition.
Overview
A triggered email is a message that's sent to an individual subscriber in response to a subscriber action. For example, sending a confirmation
message after a customer makes a purchase is a triggered email.
A triggered email has two components: content and interaction. The triggered email interaction controls when the triggered email is
sent. Pause the interaction to cause triggered messages to queue while you change the email content. Publish the interaction to begin
sending emails again. When you define a triggered email interaction, you provide information about the message and its behavior that
the interaction uses each time it’s triggered.
The definition of what triggers the interaction to send the email content is maintained outside of the application using API calls. The API
uses the information created in the interface when an email is triggered. If events on your website trigger the email, those events must
be defined using API calls outside of the application.
259
InteractionsEmail in Marketing Cloud Engagement

Use triggered emails to provide automated, personalized responses to your customers' activities on your website. Emails are trackable,
targeted, and sent in real time.
•
Define and send a message triggered by an event within the system or by an event outside of the system.
•
Track opens, clicks, and emails.
•
Capture subscribers to give the option to opt in to mailing lists.
•
Target the content of emails using personalization, dynamic content, and AMPscript.
•
Achieve high deliverability and scalability.
•
Change content over time.
•
Use auto-forward and auto-reply with messages processed by Reply Mail Management.
Send Classifications
When you define a triggered email interaction, you select a send classification. A send classification lets you define parameters for an
email job in a central location and reuse those parameters for multiple email send definitions. For example, an administrator creates a
send classification to use each time a catalog is sent because the parameters are the same each time.
Destination Management
You can select a subscriber list for the triggered send when you create the triggered email interaction. When a subscriber who isn’t
already on the selected list triggers the interaction, you can add the subscriber to the list. When a subscriber who is already on the
selected list triggers the interaction, you can update subscriber information.
If you use data extensions, you can select a data extension for the triggered send instead of a subscriber list. The data extension behaves
the same way as the list, except that the required subscriber fields are based on the data extension instead of subscriber attributes.
Send Options
When you create a triggered email interaction, choose whether to track links in the email or suppress triggered send activity from reports.
Use these options to prevent test triggered sends from affecting tracking.
You can choose to send the message as multipart MIME. Multipart MIME format delivers an HTML email message to subscribers whose
email clients support HTML and a text email message to all other email clients. Use multipart MIME format for international sending
because it allows character sets other than US-ASCII.
List Detective
When a subscriber triggers an email, List Detective scans the email address. List Detective protects deliverability by identifying bad or
flagged email addresses. If an email address is identified as bad, the system doesn’t send the email message, so the send doesn’t appear
in your tracking. If you collect the triggering email addresses in a data extension, List Detective prevents bad email addresses from being
collected.
Priority
Choose the priority of triggered sends. Set this option for a triggered send definition and all emails sent using that triggered send
definition receive the assigned priority.
Table 8: Triggered Sends Priority
MeaningPriority
Queued immediatelyHigh
260
InteractionsEmail in Marketing Cloud Engagement
MeaningPriority
Queued up to 3 minutes by default. It then takes up to 1 minute
to send the email.
Medium
Queued every 5 minutes. It then takes up to 5 minutes to send the
email.
Low
Note: To enable this function in your account, contact your account executive.
Retention Policy Support for Triggered Sends
When using data extensions as triggered send sources, build them using a Triggered Send Source data extension template. When a
triggering API call is made, a row is added to the data extension for each recipient contained in the call. The triggering API call must
include all required fields of the data extension that don't have a default value. Depending on configuration, the triggering API call must
include all attributes that update the subscriber data.
The data extension used as a triggered send source supports automatic data retention policies. When defining a triggered send with a
data extension source, specify how long to retain the data. Select a retention period ranging from 1 day to forever. The default is 6
months. The system deletes the data at the end of the retention period. The data retention policy doesn’t remove subscriber data. Only
the data extension data is removed.
Each customer can delete data from the data extension and reimport data using AMPscript.
Note: To enable this function for your account, contact your account executive.
Obscuring Data for Triggered Sends
This feature obscures any information permanently stored in your account (other than subscriber key) that personally identifies a
subscriber, including email address and subscriber name. The system one-way hashes the information that comes into our system, and
Marketing Cloud Engagement has the only hash key. The system encrypts and decrypts data. For future data reconciliation purposes,
keep a copy of all subscriber records.
Note: To enable this function for your account, contact your account executive.
Create a Triggered Email Message Interaction
Create a triggered email interaction in Email Studio to respond to a subscriber action with an email message. Create your email
content before creating the interaction. After completing this procedure, start the interaction.
Triggered Emails Example
Review this example to learn how to send a thank you email to any subscriber who makes a purchase on your website. Create a
triggered email interaction from start to finish in Email Studio.
Triggered Sends Queue Options
Use the triggered sends queue in Email Studio to view, export, clear, and delete specific subscribers that were added to a paused
triggered send. The queue is useful for testing new triggered sends, troubleshooting triggered sends, or for using journey builder
email activity triggered sends that paused after exceeding the error threshold.
Edit a Triggered Email
Understand the process of editing a triggered email in Email Studio after you start the interaction.
261
InteractionsEmail in Marketing Cloud Engagement

Email Send Error Codes
Review error codes generated in Email Studio triggered emails.
Start a Message Interaction
Start an Email Studio interaction to send messages when customers trigger it.
Pause a Message Interaction
Stop triggered send interactions from sending messages while you update email content in Email Studio. Subscribers who trigger
the message interaction are queued to receive the message after you publish changes.
Delete a Message Interaction
Delete triggered send message interactions and reuse the values for new triggered sends. You can still view tracking information
for a deleted message interaction.
Archive a Message Interaction
Stop Email Studio from sending a triggered send permanently. You can still view tracking information for a message after archiving
the message interaction.
Messages Example
A marketer at Northern Trail Outfitters sends a welcome email message to subscribers who opt in to the newsletter mailing list
through their web page. The marketer creates a triggered email message interaction in Email Studio to automate the process.
SEE ALSO:
Reply Mail Management for Marketing Cloud Email
Create a Triggered Email Message Interaction
Create a triggered email interaction in Email Studio to respond to a subscriber action with an email message. Create your email content
before creating the interaction. After completing this procedure, start the interaction.
When an event triggers an email in Marketing Cloud Engagement, it creates a copy of the email. The copy includes content blocks called
from AMPscript functions such as ContentBlockByID, ContentBlockByKey, and ContentBlockByName. To change the email, pause the
trigger interaction, edit the email, and restart the interaction. Triggers that occur during the paused state queue until you restart the
interaction.
Note: You can create up to 500 email triggered send definitions plus email transactional send definitions in a 7-day period for
one business unit. This limit applies to send definitions created in the Engagement application and via API. It doesn’t apply to the
Journey Builder email activity triggered send definition.
1. In Email Studio, on the Interactions tab, select Triggered Emails.
2. Click Create.
3. Complete the fields in the Properties section.
Table 9: Properties
DescriptionProperty
Name or title of this email message interaction. Use this name
to identify the message in the application. Subscribers can’t see
the name.
Name
Unique identifier for the message. Use this value to identify the
message when using the API.
External Key
262
InteractionsEmail in Marketing Cloud Engagement

DescriptionProperty
A brief explanation of the email’s content and purpose.Description
Sets a send classification to use for this interaction.Send Classification
Determines whether the interaction uses a different sender profile
than indicated in the send classification. If selected, select an
override sender profile to use.
Override Sender Profile
Determines whether the interaction uses a different delivery
profile than indicated in the send classification. If selected, select
an override delivery profile to use.
Override Delivery Profile
4. Complete Content.
Table 10: Content
DescriptionProperty
The message content sent by this interaction. Select a Content
Builder email to use.
Email
Subject or title of the email message. The subject line is
automatically generated based on the email you choose.
Subject Line
5. Complete Subscriber Management.
Table 11: Subscriber Management
DescriptionProperty
List that holds Subscriber data, including status, for Subscribers
who trigger this email interaction. If you don’t select a list, the
List
Triggered Send Managed List, a hidden system-defined list that
doesn’t support all triggered send functionality, is used.
The data extension to update with data from requests to trigger
this email interaction. Select a value in this field if you use a data
Triggered Send Data Extension
extension created using the TriggeredSendDataExtension
template. You can’t remove the data extension after a send
occurs.
Determines whether the list accepts new subscriber information
of subscribers who trigger this email interaction. This setting only
Add subscribers to this list
applies to the selected list and isn’t related to the selected data
extension.
If you pass in new data for a preexisting subscriber attribute via
the API call, it updates that subscriber’s attributes. This setting
Update Subscribers
applies to the selected list and isn’t related to the selected data
extension.
263
InteractionsEmail in Marketing Cloud Engagement

6. To include a suppression list that prevents certain addresses from receiving triggered email messages, select that list.
7. To use a data extension or exclusion script to prevent email from going to selected domains, select the data extension or enter the
AMPscript.
For multiple AMPscript lines, separate the lines with an OR. For example: ROWCOUNT(LOOKUPROWS("Case_16733436",
"SubscriberKey", _subscriberKey)) > 0 OR ROWCOUNT(LOOKUPROWS("Case_15537702",
"SubscriberKey", _subscriberKey)) > 0
8. Complete optional Send Options.
Table 12: Send Options
DescriptionProperty
More email addresses you want to receive a copy of this email.
These addresses are visible to email recipients. You can also use
CC Email Address
the Lookup() function in AMPscript to retrieve email address
information.
More email addresses you want to receive a copy of this email.
These addresses aren’t visible to email recipients.
BCC Email Address
Determines whether the system collects tracking information
on the links in this email.
Track all links found within this email
Determines whether you send the message as multipart MIME
to provide a text version of the email to subscribers whose email
Send as Multipart MIME
client doesn’t support HTML email. Use multipart MIME format
for international sending because it allows character sets other
than US-ASCII.
When selected, reports exclude sends from this interaction. Use
this option to prevent test sends from appearing in reports.
Suppress the send from Reports
Determines how quickly a triggered email is sent.Priority
• –
High: Queued immediately.
–
Medium: Queued up to 3 minutes by default. It then
takes up to 1 minute to send the email.
–
Low: Queued every 5 minutes. It then takes up to 5
minutes to send the email.
Categorizes the interaction. If you enter a value in this field, that
value is available to API calls.
Keyword
Log the send in the SendLog data extension.Send Logging
Set a threshold of errors before API calls are disabled and the
send process is stopped.
By default, the send process stops when an error occurs while
building an email for a subscriber. These errors can occur for
Disable API calls to the triggered send when an email build error
threshold is reached
several reasons, including an API call passing in bad data or an
AMPscript runtime error. However, the system continues to
accept API calls even after an error occurs. If you want to use a
264
InteractionsEmail in Marketing Cloud Engagement

DescriptionProperty
back-up system when the threshold is reached, this option allows
visibility at the API layer to the error.
Use Disable API calls to this triggered send when an email
build error threshold is reached if your account uses the
asynchronous API.
Note: The default error threshold is 10. The first error stops sends, but the system continues to accept API calls. To change
the error threshold, contact your Engagement account representative. When that number changes, the system disables API
calls after reaching the threshold.
9. Save your changes.
SEE ALSO:
Auto-Suppression Lists
Triggered Emails Example
Review this example to learn how to send a thank you email to any subscriber who makes a purchase on your website. Create a triggered
email interaction from start to finish in Email Studio.
A marketer at Northern Trail Outfitters sends a thank you email to any subscriber who makes a purchase on their website. The marketer
creates a triggered email message interaction to automate the email send.
1. Create the email message content. As with any email message, you can use advanced features, such as dynamic content,
personalization, and international character encoding.
265
InteractionsEmail in Marketing Cloud Engagement

2. Create the send classification, which contains the CAN-SPAM classification, sender profile, and delivery profile used for this triggered
email interaction.
266
InteractionsEmail in Marketing Cloud Engagement
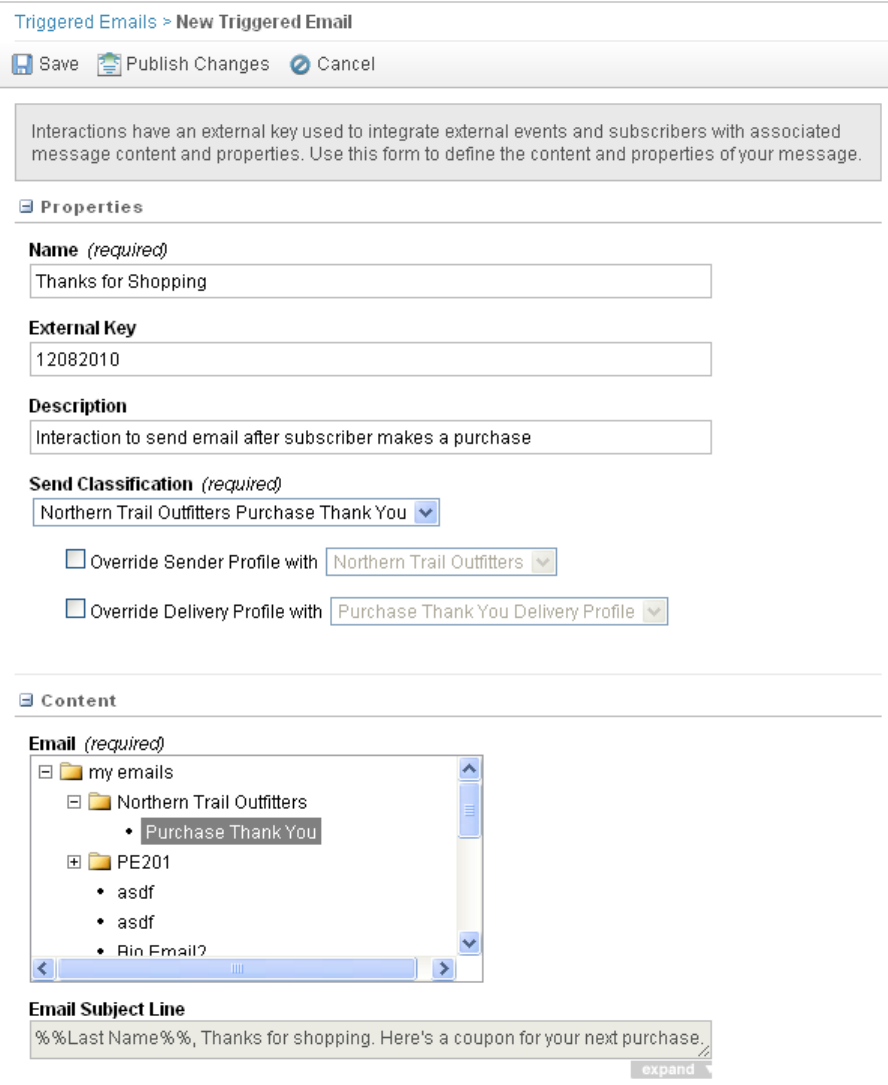
3. Bring email message content and send classification together into the triggered email interaction.
4. Associate a send classification with the interaction. You can override the sender profile or delivery profile.
5. Choose the email to send when this interaction is triggered.
6. Optionally, update a list or a data extension for the subscriber who triggers this interaction.
267
InteractionsEmail in Marketing Cloud Engagement

7. Start the email interaction, making it available for trigger by customer activity.
Note: The events that trigger this interaction are determined using the API to create code outside of the application interface.
To create API components so the triggered email interaction works as intended, coordinate with your IT department.
The interaction is available to send the email message when triggered. Any customer who makes a purchase on the Northern Trail
Outfitters website receives the thank you message.
Triggered Sends Queue Options
Use the triggered sends queue in Email Studio to view, export, clear, and delete specific subscribers that were added to a paused triggered
send. The queue is useful for testing new triggered sends, troubleshooting triggered sends, or for using journey builder email activity
triggered sends that paused after exceeding the error threshold.
Note: Enabling Auto-Suppression Lists republishes all triggered sends in the account. Clear your triggered send queues before
enabling Auto-Suppression Lists. Subscribers in a triggered send queue when this feature is enabled aren’t auto-suppressed. The
auto-suppression isn’t applied to the send already in the queue.
Allowed Actions
The triggered sends queue allows these actions. View queue is enabled when a paused triggered send is selected. It remains disabled
if multiple triggered sends are selected unless they're all paused.
Table 13: Allowed Actions
NotesMeaningAction
When the triggered send is started, cleared
subscribers don’t receive an email.
Clears the entire queue of subscribers that
were added to a paused triggered send
created in Email Studio.
Clear Queue
Exports the contents of the queue.Export Data
268
InteractionsEmail in Marketing Cloud Engagement

NotesMeaningAction
Removes only the selected subscribers.Delete Individual
Updates the queue grid to show latest
content.
Refresh
Note: The triggered sends queue requires the View Subscribers permission, which is automatically assigned to the Administrator
role. Ensure that you haven’t created custom roles that deny this permission.
Administrator Options
Administrators can use the Clear Queue permission to control which account users can view queue. Users without this permission can’t
clear the queue or delete subscribers from it. The Clear Queue permission is available for these Marketing Cloud Engagement roles:
Administrator, Viewer, Editor, Publisher, Channel Manager, Security Administrator.
Queue Export Columns
Export the triggered send queue to a .csv file via FTP, which includes these columns.
•
Job ID
•
Triggered Send Subscriber ID
•
Triggered Send Subscriber Request ID
•
Created Date
•
Member ID
•
List ID
•
Full Name
•
Email Address
•
Subscriber Key
•
Request Data
Note: Users must have Export Subscribers permission to perform an export.
Note: If a subscriber is part of the queue for more than 14 days, their subscription automatically expires and they’re removed
from the triggered send queue.
Edit a Triggered Email
Understand the process of editing a triggered email in Email Studio after you start the interaction.
Note: If you revised the email that's used in a triggered send, you must pause the trigger interaction, edit the email, and restart
the interaction. Any triggers that occur during the paused state queue until you restart the interaction. Once the triggered send
is resumed, the send will not send expired messages and proceed with logging an error 138.
1. Pause the interaction. While the interaction is paused, messages that subscribers trigger are queued until you restart the interaction.
2. Edit the email's content under Content.
3. Under Interactions, publish the triggered send with your content changes.
4. Restart the interaction.
269
InteractionsEmail in Marketing Cloud Engagement

Email Send Error Codes
Review error codes generated in Email Studio triggered emails.
Note: Where possible, we changed noninclusive terms to align with our company value of Equality. We maintained certain terms
to avoid any effect on customer implementations.
Note: Some error codes don’t display in the Send Log. You can find some of the error codes in the Not Sent report.
DescriptionNameError Code
Subscriber’s status is unsubscribed.Unsubscribed1
Subscriber’s status is held.Held2
Subscriber’s status in the partner system is
unsubscribed.
Partner Unsubscribed3
Subscriber doesn’t have an email address.Missing Email Address4
Subscriber’s email address isn’t valid.Invalid Email Address5
Subscriber’s email address matches another
subscriber’s.
Duplicate Email6
Invalid subscriber ID.Invalid Subscriber ID Provided7
Missing the subscriber key and subscriber
ID.
Missing Subscriber ID8
Missing the ID for the child client account
in this enterprise account.
Missing Owner ID9
Missing required attributes for the
subscriber.
Missing Required Attributes10
Subscriber isn’t on the AllSubscribers list for
the account.
No AllSubscribers List Entry11
Child client account isn’t a member of the
enterprise account.
Invalid Owner ID Provided12
The stored subscriber key doesn’t match the
subscriber key provided. Check the
Subscriber Key Mismatch13
subscriber key you provided against the one
in Marketing Cloud Engagement and try
again.
The stored email address doesn’t match the
email address provided. Check the email
Email Address Mismatch14
address you provided against the one in
Marketing Cloud Engagement and try again.
Subscriber didn’t pass validation. Contact
your account executive.
Unspecified Error15
270
InteractionsEmail in Marketing Cloud Engagement

DescriptionNameError Code
Subscriber attribute value doesn’t match
the attribute type.
Invalid Attribute Value16
Subscriber attribute is too long for the given
attribute size limit.
Attribute Value Max Length Err17
Number of subscriber attributes doesn’t
match the expected count.
Invalid Attribute Value Count18
Missing required data extension fields for
the subscriber.
Missing Required Fields19
Data extension field value doesn’t match
the field type.
Invalid Field Value20
You can’t insert a duplicate row into the
triggered send data extension.
Duplicate Data Extension Row21
Failed to insert a row into the triggered send
data extension.
Data Extension Insert Failed22
Subscriber excluded by a domain exclusion
list.
Domain Exclusion23
Subscriber excluded by List Detective.List Detective Exclusion24
Subscriber is blocked out. The triggered
send will be rescheduled.
Subscriber Blacked Out25
An error occurred when attempting to build
an email for the subscriber.
Build Email Error26
Subscriber excluded by a suppression list.Suppression List Exclusion27
Subscriber excluded by an opt-out list.Opt Out List Exclusion28
Subscriber key value is null or empty.Missing Subscriber Key Value29
Subscriber key value is too long. Enter a key
that is 255 or fewer characters.
Subscriber Key Too Long30
Subscriber opted out of the list.List Level Opt Out31
Missing required SendGroupID for the
subscriber.
Missing SendGroupID32
Subscriber is globally unsubscribed at the
account, enterprise, or business unit level.
Account Level Opt Out33
Missing SMTP subscriber message file name.Missing Message File Name34
Missing or invalid EmailAddressID for the
subscriber supporting data privacy.
Invalid EmailAddressID35
271
InteractionsEmail in Marketing Cloud Engagement

DescriptionNameError Code
Subscriber isn’t a member of the enterprise
business unit and is excluded by the
business unit filter.
Invalid Business Unit36
Message’s queued transaction is deleted.Queued Transaction Deleted37
Invalid SalesforceID for the subscriber key.
Don’t use case-sensitive SFID values because
SalesforceIDs aren’t case-sensitive.
Invalid SalesforceID38
Queued unsent subscribers are cleared from
the queue.
Subscriber Queue Cleared39
Subscriber or contact is deleted and can’t
be added to Engagement.
Subscriber Deleted40
Subscriber is a duplicate of a recent send.Duplicate Subscriber41
Subscriber or contact is restricted for
processing.
Restricted For Processing42
Expired triggered send request to the
subscriber or contact.
Subscriber Request Expired43
Subscriber's mobile number has an
unprovisioned country code.
Unprovisioned Country44
Subscriber's mobile number isn’t valid.Invalid Mobile Number45
Subscriber's message didn’t render properly.Message Render Failure46
Subscriber's mobile address not found.Address Not Found47
Message to the Subscriber failed to send.Send Failure48
Message has expired and can’t be sent at
the current time.
Message Expired49
Request has invalid send time data and can’t
be sent.
Invalid Send Time Data50
Message is too long and can’t be sent.Message Too Long51
Message is too short and can’t be sent.Message Too Short52
Message contains characters that are invalid
for the specified encoding.
Invalid Character for Encoding53
There’s a validation error when evaluating
the message.
Validation Error54
Message is configured such that it could
result in a feedback sending loop and won’t
be sent.
Feedback Loop55
272
InteractionsEmail in Marketing Cloud Engagement

DescriptionNameError Code
Request to resolve a token to a destination
address failed.
Token Resolution Failure56
Attempt to decrypt a field failed.Decryption Failure57
An error occurred when building the email
for the subscriber.
Error100
Failed to send email to the subscriber.Failure101
Excluded by the send-time filter.Excluded102
An error occurred when building the
subscriber message.
Message Build Error103
A submitted script contains a self-reference
that can lead to an infinite recursion.
Recursive Script Error104
Invalid send-time data XML.Invalid Send Time Data Error105
Missing source row for the subscriber in the
data extension send source.
Missing Send Data Extension Source Row
Error
106
Missing members_ source row.Missing Subscriber Data Error107
Missing tblListSub source row.Missing List Subscriber Data Error108
Missing subscriber key.Missing Subscriber Key Error109
Invalid subscriber email address.Invalid Email Address Error110
Subscriber is excluded by a RaiseError
function call.
Script RaiseError111
An HTTPGet request for the subscriber
returned an empty result.
Empty HTTPGet Return Error112
An HTTPGet function request for the
subscriber returned an empty result.
Empty HTTPGet Function Return Error113
Missing subscriber’s Salesforce ID.Missing SFID Error114
Missing subscriber’s Salesforce data.Missing SF Data Error115
Missing subscriber’s SF Subscriber row.Missing SF Subscriber Data Error116
The account is configured for secure email
addresses, but the secure email address
Could Not Resolve Secure Email Token117
token for the subscriber couldn’t be
resolved.
Email address is on the Global Unsub list.Global Unsub118
Email address is on the Partner Unsub list.Partner Unsub119
Email address was excluded by List
Detective.
List Detective Exclusion120
273
InteractionsEmail in Marketing Cloud Engagement

DescriptionNameError Code
The alternate job in the highly available job
pair processed the subscriber.
Processed By Paired Member121
Can’t find file containing the subscriber’s
SMTP message.
SMTP File Not Found122
Can’t read file containing the subscriber’s
SMTP message.
SMTP File IO Error123
Invalid format for the file containing the
subscriber’s SMTP message. Use a valid
format.
SMTP File Format Error124
Can’t decrypt an encrypted field on the
sendable data extension.
Decryption Failed125
Exceeded account email volume limit. Can’t
process subscriber.
Message Volume Limit Exceeded126
The resolved email subject for the subscriber
is empty.
Empty Subject127
The resolved email body for the subscriber
is too short.
Resolved Email Body Too Short128
Phone number failed validation at send
time.
Phone Number Validation Failed129
Payload is too large.Payload Exceeds Maximum130
Compressed job subscriber link data is too
large. Link database storage capacity is
256,000.
Link Data Exceeds Maximum Size131
Invalid resolved CC email address for the
subscriber.
Invalid CC Email Address Error132
Invalid resolved BCC email address for the
subscriber.
Invalid BCC Email Address Error133
Can’t send because subscriber or contact is
being processed for deletion.
Subscriber Deleted134
Can’t send because subscriber or contact is
restricted for processing.
Restricted For Processing135
Subscriber key or contact key doesn’t match
the send data extension subscriber key.
Subscriber Key Mismatch136
Subscriber ID or contact ID doesn’t match
the send data extension subscriber ID.
Subscriber ID Mismatch137
Expired triggered send request to the
subscriber or contact.
Exceeded Expiration Policy138
274
InteractionsEmail in Marketing Cloud Engagement

DescriptionNameError Code
Triggered send request to the subscriber or
contact has timed out while waiting in the
queue.
Timedout In Queue139
Unverified From email address.Unverified From Email Address140
Subscriber deleted by the
CLEAR_TS_QUEUE slot worker.
V2 Triggered Send Deleted From Queue141
Subscriber excluded from the send because
subscriber is unsubscribed from the list.
Unsubscribed List1000
Subscriber excluded from the send because
subscriber is unsubscribed from the client
All Subscribers list.
Unsubscribed Master1010
Subscriber excluded from the send because
subscriber is globally unsubscribed from
Marketing Cloud Engagement.
Unsubscribed Global1020
Subscriber excluded from send because
subscriber is in held status.
Held1030
Subscriber excluded from send because
subscriber is deleted.
Deleted1040
Start a Message Interaction
Start an Email Studio interaction to send messages when customers trigger it.
Before beginning, create a triggered send interaction.
1. Click Interactions.
2. Click Triggered Emails.
3. Select the message interaction to start.
4. Click Start/Restart.
The message interaction status changes to Running.
Pause a Message Interaction
Stop triggered send interactions from sending messages while you update email content in Email Studio. Subscribers who trigger the
message interaction are queued to receive the message after you publish changes.
Before beginning, you must start the message interaction.
1. Click Interactions.
2. Click Triggered Emails.
3. Select the message interaction to pause.
4. Click Pause.
The message interaction status changes to Paused.
After pausing, publish changes to your message content or archive the message interaction as needed.
275
InteractionsEmail in Marketing Cloud Engagement
Delete a Message Interaction
Delete triggered send message interactions and reuse the values for new triggered sends. You can still view tracking information for a
deleted message interaction.
Before beginning, pause the message interaction.
1. Click Interactions.
2. Click Triggered Emails.
3. Select the message interaction to delete.
4. Click Delete.
•
API calls that act on deleted message interactions fail.
•
You can view tracking information for a message after you delete it. You can’t perform other actions.
•
Queued triggered send requests that are deleted remain queued and aren’t processed.
•
The external key and name is changed allowing you to reuse the values for new triggered sends.
Archive a Message Interaction
Stop Email Studio from sending a triggered send permanently. You can still view tracking information for a message after archiving the
message interaction.
Before beginning, pause the message interaction.
1. Click Interactions.
2. Click Triggered Emails.
3. Select the message interaction to archive.
4. Click Archive.
The message interaction status changes to Archived.
•
API calls that act on archived message interactions fail.
•
You can view tracking information for a message after you archive it. You can’t perform other actions on the interaction.
•
Queued triggered send requests that are archived remain queued and aren’t processed.
Messages Example
A marketer at Northern Trail Outfitters sends a welcome email message to subscribers who opt in to the newsletter mailing list through
their web page. The marketer creates a triggered email message interaction in Email Studio to automate the process.
1. The marketer creates email message content using the send wizard.
2. The marketer creates a send classification. The send classification contains the CAN-SPAM classification, sender profile, and delivery
profile used for this triggered email interaction.
3. The marketer associates a send classification with the interaction. The marketer can still override the sender profile or delivery profile
for this triggered email interaction.
4. The marketer also chooses the email to send when this interaction is triggered. The marketer can update a mailing list with subscribers
who trigger this interaction and throttle sends through this interaction.
5. The marketer starts the email interaction to make it available to be triggered by customer activity.
6. The events that trigger this interaction are determined using the API. The marketer coordinates with their IT department to put the
necessary API components into place for the triggered email interaction to work correctly.
276
InteractionsEmail in Marketing Cloud Engagement
Now the interaction is available to send the email message when triggered. When a customer subscribes to Northern Trail Outfitters
monthly newsletter via the website, they receive the welcome email.
Email Messages
Use Email Studio email message interactions, also referred to as send definitions, to determine how an email send occurs.
A user-defined email message interaction occurs when you manually start the send, while a triggered message interaction occurs in
response to an action or API call. When you define an email message interaction, specify the name, external key, and description of the
message interaction to identify and describe the message in the application and in API calls. The email message interaction allows you
to specify whether to send the message in Multi-part MIME format.
Send Classifications
Send classifications allow users to save the details of an email send and use them for multiple sends. Create a send classification before
including it in the interaction. Then, specify the send classification to use when you create an email message interaction. You can override
the sender profile and the delivery profile for the send classification that you choose.
Send Logging
If you use data extensions, you can enable send logging when you create the email message interaction. Send logging captures email
variable values for each send in a data extension. That data extension retains this data for a specific for a specified definition. In addition
to selecting Send Logging in the interaction, create a send logging data extension and update the data extension with AMPscript in the
email message content.
Audience
Indicate the audience that receives your message when you create an email message interaction:
•
Any number of lists or groups. An audience that contains lists and groups cannot contain data extensions, filters, or Salesforce items.
•
Exactly one data extension
•
Exactly one filter
•
Any number of Salesforce reports or Salesforce campaigns, if you integrate your account with another Salesforce Cloud.
Select subscribers to exclude from the audience. If your audience contains lists, groups, data extensions, or filters, your exclusion can
contain any number of lists, groups, and data extensions. The exclusion can also include a domain exclusion list, which is a data extension
that contains a list of email domains. By selecting your domain exclusion list, the system excludes any email addresses that use that
domain.
If your audience contains Salesforce reports or campaigns, then your exclusions can contain only Salesforce reports or campaigns.
You can exclude subscribers using a script. Create criteria to exclude subscribers in your audience who meet that criteria from the send.
Triggered email interactions and user-initiated email message interactions sent to data extensions use the List Detective feature to
prevent sending to email addresses that can damage your deliverability.
You can choose to deduplicate the send by email address. If you select this option, the message interaction sends only one email to an
email address, regardless of how many times that address appears in your audience. If you do not select this option, the interaction
sends to all email addresses in the audience, even if they appear more than once.
Test Audience
Use the same tools available in the Audience section in the Test Audience section. The test audience includes the test list that receives
the message when you click Test Send. This feature lets you test message interactions without editing them.
277
InteractionsEmail in Marketing Cloud Engagement

Message Properties
Specify CC email addresses and BCC email addresses for the email.
•
Email addresses you enter as CC email addresses are visible to all recipients of the email.
•
Email addresses that you enter as BCC email addresses are invisible to recipients of the email.
User Tracking
When you create the email message interaction, decide whether to track the email links and whether to suppress the send from reports.
Create a User-Initiated Email Interaction
In Email Studio, create a user-initiated email message interaction to send to a user-initiated subscriber list or data extension.
Send a User Initiated Email Interaction
Send to the specified recipients included in the Email Studio user-initiated email.
Send a User Initiated Email Interaction Via Test Send
Learn to send a user initiated email interaction via test send in Email Studio.
Create a User-Initiated Email Interaction
In Email Studio, create a user-initiated email message interaction to send to a user-initiated subscriber list or data extension.
Before you begin, create the email message content and the send classification first.
1. Click Interactions.
2. Click User-Initiated Emails.
3. Click Create.
4. Complete Properties.
NotesDescriptionProperty
Use this name to identify the message in
the application. Subscribers can’t see the
name.
Name or title of this email message
interaction
Name
Use this value to identify the message
when using the API.
Name or title of this email message
interaction
External Key
Use this description to further identify the
message within the application.
Subscribers can’t see the description.
A brief explanation of the email's content
or purpose
Description
Classic emails, Content Builder emails, and
shared Content Builder emails can be used
in User-Initiated Email Interactions.
Email sent by this interactionMessage
Subject line of the email message sent by
this interaction
Subject
•
To select a personalization string, click
Insert.
•
To view a larger subject text field when
adding large amounts of AMPscript to
If personalization is used, brackets [ ] are
removed from the Subject Prefix.
278
InteractionsEmail in Marketing Cloud Engagement

NotesDescriptionProperty
create a dynamic subject line, click
Expand.
To view a larger subject text field when
adding large amounts of AMPscript to
Text displayed after the subject line when
an email is previewed
Preheader
create a dynamic subject line, click
Expand.
5. If you have Inbox Tools, you see Seed Lists. To run Inbox Detective on your user-initiated send, select Send to Deliverability Seed
List. You can send to a seed list with every user-initiated send or choose the interval you want to send to a seed list.
6. Complete Send Management.
NotesDescriptionProperty
Sets a send classification to use for this
interaction
Send Classification
If selected, select an override sender profile
to use.
Determines whether the interaction uses
a different sender profile than indicated in
the send classification.
Override Sender Profile
If selected, select an override delivery
profile to use.
Determines whether the interaction uses
a different delivery profile than indicated
in the send classification.
Override Delivery Profile
7. Click Edit Recipients.
NotesDescriptionProperty
If your account is integrated with
Salesforce, you can also choose a
The lists, groups, data extensions, or filter
to receive the email message sent with
this interaction.
Select Recipients
Salesforce report or campaign. For
Salesforce campaigns, you can filter based
on member status.
If you chose a Salesforce object as the
target for your send, don’t choose a
suppression list for your send. Instead, use
a Salesforce object as an exclusion object.
Your user must be mapped to a Salesforce
user to use this functionality.
Select lists, groups, audience, data
extensions, or data filter and add them to
the targeted list.
279
InteractionsEmail in Marketing Cloud Engagement

NotesDescriptionProperty
Subscribers that appear in both the Target
Audience field and the Excluded Audience
field are EXCLUDED from the send.
The lists, groups, or data extensions that
are excluded from the send.
Exclusion Script
To display this option, click +.Determines whether the interaction
prevents multiple messages from this
De-Duplicate by Email Address
interaction from being sent to the same
email address.
If selected, provide the exclusion
AMPscript.
Determines whether subscribers are
excluded from the send based on script
logic.
Audience Exclusion Script
8. Click Edit Test Audience.
NotesDescriptionProperty
If your account is integrated with
Salesforce, you can also choose a Sales
The lists, groups, data extensions, or filter
to receive the email message sent with
this interaction.
Select Recipients
Cloud report or campaign. For Salesforce
campaigns, you can filter based on
member status.
If you chose a Salesforce object as the
target for your send, don’t choose a
suppression list for your send. Instead, use
a Salesforce object as an exclusion object.
Your user must be mapped to a Salesforce
user to use this functionality.
Select lists, groups, audience, data
extensions, or data filter and add them to
the targeted list.
Subscribers that appear in both the Target
Audience field and the Excluded Audience
field are excluded from the send
The lists, groups, or data extensions that
are excluded from the send.
Exclusion Script
To display this option, click +.
Determines whether the interaction
prevents multiple messages from this
De-Duplicate by Email Address
If your account has SubscriberKey
functionality enabled, this option
interaction from being sent to the same
email address.
de-duplicates by SubscriberKey instead of
email address.
If selected, you must provide the exclusion
AMPscript.
Determines whether subscribers are
excluded from the send based on script
logic.
Audience Exclusion Script
280
InteractionsEmail in Marketing Cloud Engagement

9. Complete Message Properties.
NotesDescriptionProperty
Email addresses in this field are visible to
all recipients of the email.
Sends a copy of the email to the addresses
entered in this field.
CC Email Addresses
Email addresses in this field aren’t visible
to recipients of the email.
Sends a copy of the email to the addresses
entered in this field.
BCC Email Addresses
Multi-part MIME provides an HTML version
of the message content to inboxes that
Determines whether the system sends the
message using multi-part MIME.
Multi-part MIME
can display it and a text-only version to
inboxes that can’t render HTML.
10. Complete the information in the User Tracking section.
NotesDescriptionProperty
If selected, the system collects tracking on
all links.
Determines whether the system collects
tracking information on links in this email.
Track all links found within this email
If selected, sends from this interaction are
excluded from reports.
Determines whether sends with this
interaction are included in reports.
Suppress this Send from Reports
If you select a predefined folder, the job is
shown in that folder at the time of send.
Select the Tracking Destination folder.Tracking Destination
11. Save the message.
SEE ALSO:
Data Extension: RowCount
Send a User Initiated Email Interaction
Send to the specified recipients included in the Email Studio user-initiated email.
Note: Contact your account executive to enable this function for your account.
1. Click Interactions.
2. Click Messages.
3. Click Email.
4. Click User-Initiated.
5. Select the user-initiated email to send.
6. Click Send.
7. Select when to send the email:
281
InteractionsEmail in Marketing Cloud Engagement

•
Start immediately, run one time
•
Start on the following date and time, run one time. Choose the date and time to schedule the send.
8. Review the additional information about the send. The user-initiated send contains this information, so edit the user-initiated email
itself to modify it. If your account includes the Inbox Tools package, a Seed Lists section appears. To run Inbox Detective on a
user-initiated send, select Send to Deliverability Seed List.
9. Click Send.
Note: Sends using the same email and recipients as a previous send prompt a duplicate send warning unless the user-initiated
email send occurs via API call.
SEE ALSO:
Time Zone User Preferences
Send a User Initiated Email Interaction Via Test Send
Learn to send a user initiated email interaction via test send in Email Studio.
1. Click Interactions.
2. Click Messages.
3. Click Email.
4. Click User-Initiated.
5. Select a user-initiated email to send.
6. Click Test Send.
7. Enter the email address you want to receive all test sends in the Test Email Address field. You receive a single email per recipient
selected for that user-initiated email send. For example, the test email addresses receive 50 emails when the test send includes 50
subscribers.
8. Enter any prefix you want to append to the subject line of the send in the Subject Prefix field. Include AMPscript in this field if
necessary.
9. Click Test Send.
Note: Test Send is removed from send definitions updated in Automation Studio.
A/B Testing in Email Studio
A/B Testing is a market testing method in which you send two versions of your Email Studio communication to two test audiences from
your subscriber list. Track which version receives the highest unique open rate or highest click-through rate and send that version to all
remaining subscribers.
Continually testing these variables over time allows you to optimize your email campaigns to deliver more targeted and relevant messages
to your subscribers. Through automating the testing process, you can save valuable time and resources. You can test the following
elements:
DescriptionTest Type
Create 2 different subject lines and track which performs better.
Each subject line has a 256 character limit.
Subject Line
282
A/B Testing in Email StudioEmail in Marketing Cloud Engagement

DescriptionTest Type
Select 2 different emails and track which email send performs
better.
Email
Select an email that contains at least two different content areas
and track which content area performs better.
Content Area
Create 2 different from names and track which email send performs
better. You can select an existing from name in your account, or
From Name
manually enter a From name to use. To add more from name
options to your account, create an additional user.
Select 2 different dates and times to send and track which time
performs better.
Send Time
Create 2 different preheaders and track which preheader performs
better.
Preheaders
Note: You can run an A/B test on an email that contains dynamic content, a dynamic subject line, or AMPscript. The exception
is a dynamic subject line when you’re running a subject line A/B test and testing two emails. When testing two emails that contain
a dynamic subject line, the default subject line is always used. Use AMPscript in the subject line instead of dynamic content. If you
experience issues, contact Global Support.
The system randomly selects which subscribers receive test and remainder, allowing you to use the same set of subscribers for A/B tests
in the future Send the winning version to the remainder of your subscribers automatically when the winner is determined or to come
back and manually perform the send.
Note: While A/B testing is a part of the test process, you’re sending to real subscribers, so ensure that you send a polished, final
product. Use A/B testing before you execute your final send but after you have reviewed and performed test sends.
A/B Test Overview
Use standard A/B Testing to determine which version of your Marketing Cloud Engagement email receives the highest click-through
rate or highest unique open rate. After reviewing, send the best performing version to your remaining subscribers.
Cancel A/B Test
You can cancel an A/B Test in Email Studio before completion. However, the current stage of the process completes.
Configure A/B Test in Email Studio
Create A/B Tests to send two versions of your message to two test audiences from your subscriber list in Marketing Cloud Engagement.
A/B Test Duplicate
Create an A/B Test in Email Studio by copying the conditions from an existing test. If you set up an A/B test to test the Subject Line
and determine the winner by the highest open rate, you can create the same test again without reconfiguring those settings.
Edit A/B Test
You can edit A/B tests in Email Studio.
Track A/B Test
You can view near real-time results for A/B Test sends in Email Studio.
283
A/B Testing in Email StudioEmail in Marketing Cloud Engagement

A/B Test Overview
Use standard A/B Testing to determine which version of your Marketing Cloud Engagement email receives the highest click-through
rate or highest unique open rate. After reviewing, send the best performing version to your remaining subscribers.
Test Distribution
Before the system sends your emails, it must generate the A/B split. When the A/B test starts, the system chooses the subscribers, assigns
Condition A or Condition B to those subscribers, and then sends the emails. For large lists and at times when several send jobs are in
process, splitting the A/B test can take longer.
Note: If you have a large list, we recommend accounting for the split process in your send.
To prepare, schedule deployment before you want it to send. You can define your test audience size by entering a percent or value in
the Test Distribution section or adjusting the slider. The A/B Split slider displays the number of subscribers the system sends to for each
test condition. These numbers dynamically change as you select recipients, suppression lists, and exclusion lists.
This number is approximately the number of subscribers you’re sending to. The exact number can be more or less depending on these
factors:
•
The number of unsubscribed subscribers in your lists
•
The number of subscribers on a suppression list that are also on a list you selected in the Recipients area
•
The number of subscribers on an exclusion list that are also on a list you selected in the Recipients area
•
The number of subscribers that subscribe or you add between when you set up the A/B test and the time of send
These numbers don’t reconcile until the time of send. For example, if you select 500,000 recipients, and you select an exclusion list
containing 5,000 of those 500,000 subscribers, that number may not reflect in the Test Distribution field immediately. If the total is an
odd number, the system attributes the extra subscriber to Condition B. For example, if your recipients equal 300,001 and you split your
A/B Test by 10%, Condition B receives 15,001 while Condition A receives 15,000. That has little to no effect on your test results. Tracking
results can differ from the test you set up from this page. The number suppressed and excluded are processed at send time and aren’t
reflected in tracking results.
Note: If you have more than 50,000 subscribers, we recommend sending to 5% per condition. If you have less than 50,000
subscribers, we recommend using 10%. If you have a small audience (say, fewer than 500 subscribers) your results may not be
statistically significant. The results can be true for that particular test only.
Ties
If your A/B Test results in a tie, the system declares Condition A the winner. You can edit the winner criteria to see if one condition
performed better than the other using a different winner criteria.
If you ran your test by the highest open rate and your test results in a tie, you can edit the winner criteria to use highest click-through
rate.
If you ran your test by the highest open rate and Condition B had a higher click-through rate than Condition A had an open rate, you
can edit the winner criteria to send Condition B. You’re able to make this change only if you scheduled the remainder to send later.
Test Status
A/B test statuses are:
DefinitionStatus
Your A/B test is created but not scheduled to begin.Unscheduled
284
A/B Testing in Email StudioEmail in Marketing Cloud Engagement

DefinitionStatus
Your A/B test is created and set to begin at a particular time in the
future.
Scheduled
The system is splitting recipients to send Condition A, Condition
B, and remainder audiences.
Initializing
The system is sending to at least one or both test audiences,
depending on criteria set-up, or waiting on the results of your A/B
test.
Running
A user has manually chosen a winner.Overriding Winner
The system declared a winner of your A/B test or overriding winner
has completed but hasn’t sent to the remaining subscribers.
Winner Declared
The system is sending to the remaining subscribers.Sending to Remainder
The system finished sending your test to the conditions and to the
remaining subscribers
Completed
A user canceled the A/B Test.Canceled
An error occurred at some point in the testing process and the test
hasn’t completed.
Errored
Track and Declare Winner
After you perform an A/B test, you can access the tracking overview section of your test to view the results. The tracking pages always
display the current results, but the system honors the winning condition that performed the best from the time you specified to declare
a winner.
In rare cases, the tracking information can change after a winner has been declared in that the winner is no longer performing the best.
For example, you set the A/B test to declare a winner an hour after the test begins. After an hour, Condition A is declared the winner,
but after five hours, the winner is Condition B because more subscribers interacted with your message.
Save the Winning Subject Line
When running a subject line A/B test, you can have the winning subject line save back to the original email. You configure this in the
Winner stage of the test creation process.
Optional: Select Yes to save the winning subject line to the email in the My Emails folder under the Content tab.
Cancel A/B Test
You can cancel an A/B Test in Email Studio before completion. However, the current stage of the process completes.
1. Click A/B Testing.
2. Click the Name of the A/B Test to cancel.
3. Click Cancel Test. The Confirm A/B Test Cancellation dialog box appears.
4. Click Confirm.
285
A/B Testing in Email StudioEmail in Marketing Cloud Engagement

Configure A/B Test in Email Studio
Create A/B Tests to send two versions of your message to two test audiences from your subscriber list in Marketing Cloud Engagement.
A/B Test sends take more time to compile subscribers for sending than standard sends due to the presend splitting process. Use a
standard send when send speed is of concern and for sends exceeding 1 million subscribers.
1. Configure test content.
a. Click A/B Testing.
b. Click Create A/B Test.
c. Enter a name and description.
Note: Maximum 62 characters for Name and 512 for Description. Don't include the following symbols: " < > / \ | : *
d. Select a Test Type and complete the required fields. Content Builder emails and shared Content Builder emails can be sent when
using the Emails test type.
Note: If a preheader isn’t defined in the selected emails, your only option is to enter a preheader. If a preheader is defined in
one of the selected emails, your options are the preheader for the one email and to enter a preheader. Only emails containing
an A/B Test Content type content area can be used in a content area A/B test.
2. Choose test recipients.
a. Click Choose... next to the Recipients field.
b. Select subscriber lists, groups, or data filters to use. Or, choose a data extension. The approximate number of subscribers selected
is displayed. Data extension targets of an A/B test send can’t be modified after reaching the Initialized stage, when jobs are
created and initialized. Also, the time that A/B tests are initialized depends on the test type selected.
Note: Send to a minimum of 2 recipients. You can’t select a Salesforce campaign or report. Processing for A/B testing
reviews the recipients to remove unsubscribes and excluded subscribers before creating the test splits so that the final
splits are even. The review doesn’t perform when the recipient count is over 2 million.
c. Click Select.
d. Determine your test distribution by sliding the marker left or right. The number of subscribers that you’re sending to appears
below the bar. You can also manually enter the percent of subscribers or number of subscribers that you want to test.
e. Click Next.
Note: You can follow the same instructions to add suppression and exclusion lists.
3. Set the winner criteria.
a. Choose either:
•
Highest unique open rate: Version with the highest unique open rate.
•
Highest unique click-through rate (CTR): Version with the highest unique click-through rate.
a. Specify the duration after which the system declares a winner. You can measure in hours or days. When running a Date and
Time test, the test duration doesn’t begin until the system sends the Condition B email.
b. When running a subject test on a Content Builder email, paste the winning subject line back to the original email.
c. Click Next.
4. Schedule test deployment.
286
A/B Testing in Email StudioEmail in Marketing Cloud Engagement

a. Select a start time.
•
Immediately: Email sends when you click Finish and Confirm Send.
•
Scheduled: Enter a date and time when you want to start the test.
•
Schedule later: Saves the A/B test for you to configure later.
Note: To receive complete results for your A/B test, we recommend waiting at least 24 hours before declaring a winner.
Waiting gives time for your subscribers to interact with your communication.
b. Select how to send the winning email to remaining subscribers.
•
Automatically: Send the winning email to the remaining subscribers immediately after the system declares a winner or at a
time that you schedule.
•
Manually: Upon notification that a winner is selected, you send the email to the remaining subscribers.
Note: If you perform a Date and Time A/B Test, the option to send the remainder automatically is removed. Send the
email to the remaining subscribers on the day of the week and at the time that performed best. After a winner is declared,
you can return to the Overview screen, click the A/B Test that you want to view, and send to the remaining subscribers.
5. Configure send options.
a. Click Use the following from name and address and make a selection from the dropdown menu. Or click Select a send
classification and select the send classification from the dropdown menu.
b. Select a send option.
c. Click Finish.
d. Click Confirm.
Note: Updating the data source can cause the test to fail. We recommend that you keep the data static to prevent any issues
with the test.
A/B Test Duplicate
Create an A/B Test in Email Studio by copying the conditions from an existing test. If you set up an A/B test to test the Subject Line and
determine the winner by the highest open rate, you can create the same test again without reconfiguring those settings.
1. Click the A/B test name to copy.
2. Click Copy A/B Test.
3. Click Edit next to the area you wish to edit, optional. The system navigates to the page to edit.
4. Click Edit next to Next Send to send or schedule the A/B Test.
Edit A/B Test
You can edit A/B tests in Email Studio.
You can edit the following areas:
•
Determine Winner By
•
Declare Winner
•
Recipients
•
Next Send
287
A/B Testing in Email StudioEmail in Marketing Cloud Engagement

Follow these instructions to edit your A/B test:
1. Click A/B Test.
2. Click the name of the test you wish to edit. The test results page appears.
3. Click Edit next to the area you wish to edit.
4. Make your edits.
5. Click Save.
The system saves your changes. Verify your changes on the test results page.
Track A/B Test
You can view near real-time results for A/B Test sends in Email Studio.
To view high-level A/B Test results within the testing tool:
1. Click A/B Test.
2. To view tracking, click the Name of the A/B test.
Test Status provides you with both a general status of the test and next steps in the testing process. Refer to Tracking Workspace on
page 306 for details about the reading the results.
Tracking in Email Studio
Tracking is an aggregated collection of data that allows you to view critical elements such as email opens, clicks, undeliverable messages,
and other metrics online. You can also capture how many emails are forwarded and how many new subscribers each forward generates.
You can create a subscriber list from tracking data to monitor subscriber and list performance. Marketing Cloud stores your tracking data
for the life of your contract.
The tracking feature uses a 1x1 pixel transparent GIF image to track information. The pixel is automatically inserted into every email
unless you use an HTML-Paste template.
Note: Tracking data for deleted subscribers and contacts is retained in anonymized format and can’t be linked to a specific record.
Tracking and reports show clicks from [email protected] and an IP address of 0.0.0.0 for deleted records.
Note: Tracking data is available through Tracking Extracts and Data View via Automation Studio for up to 6 months. Older data
can't be accessed.
Clicks and Opens Behavior
Marketing Cloud Engagement tracks details about email engagement, such as when a message was opened or when a link was
clicked. Click and open events are always related to the original subscriber in a send. Email Studio records all events that occur, as
there are no clear indicators whether opens are from a human or a bot program. So if an email is shared, opens or clicks that occur
show in tracking or reports as belonging to the original subscriber.
Compare Tracking Results
Compare high-level metrics for each message in a campaign and overall campaign numbers. The tracking results comparison feature
shows how many emails were sent, how many were delivered, how many of the subscribers unsubscribed, how many emails were
opened, and the number of click-throughs.
288
Tracking in Email StudioEmail in Marketing Cloud Engagement
Conversion Tracking
Track click-through data at a deeper level with Conversions Tracking, which allows you to track the customer traffic and revenues
generated by multiple links within your emails. By inserting the necessary tracking code into your website, you are able to test, read,
and optimize traffic rates and revenues for various campaigns.
Create a List from Tracking
You can drill down to a list of subscribers who interacted with an email. You can export the list to an Excel file.
Create a File from a Tracking Tab
A PDF file presents a visual representation of the screen or email, while the Excel file contains data on the report requested.
Delete a Tracking Job
You can delete tracking jobs you no longer need.
Export Bounce Data
You can export data for bounced email messages in Email Studio.
Export Subscriber Data from Tracking to an Excel File
Export subscriber data from tracking to an excel file.
Impression Tracking
Impression tracking allows you to track the performance of emails that contain content built by AMPscript or dynamic content in
Email Studio.
Manage Salesforce Data
Use this Email Studio feature to control the amount of storage used. For example, you may have 90 days of data stored in Salesforce
but only want to retain information from the last 30 days.
Move Tracking Data
You can choose where tracking data is stored.
Reports
You run a report asynchronously from the Tracking tab in Email Studio and have them delivered to your email inbox or FTP server.
Use the Report Status and History screen to view a list of reports that have been requested in your account. This list shows the status,
scheduled run time, delivery channel, and delivery details for scheduled reports in the workspace.
Tracking Workspace
Email Studio provides a tracking workspace where you can view real-time performance of your email sends. From there, you can
also pause, cancel, or delete send jobs.
Triggered Sends Tracking
The Overview tab for triggered sends tracking displays a graph of your triggered sends activity based on the date range you define.
Export Triggered Sends Tracking
You can export the Triggered Sends Tracking report.
Update Job Links Overview
Use the Update Job Links feature in Email Studio to edit links in a job after an email send completes. To use this feature, you must
allow click tracking. The email job status must be Completed or Canceled. Only account users with View Tracking or View History
permission can view this feature. Only the administrator or users with Create or Edit Email permissions can edit the link in the job.
You may need to refresh the email and browser for the changes to take effect.
View Tracking History
You can view tracking history for sends in Email Studio.
View Tracking Results for an Email Send
You can view tracking results for individual email sends in Email Studio.
289
Tracking in Email StudioEmail in Marketing Cloud Engagement

Link Tracking
Learn about link tracking in Marketing Cloud Email Studio.
Understand Timing and Tracking
Understand timing and tracking in Email Studio for Marketing Cloud Engagement.
Clicks and Opens Behavior
Marketing Cloud Engagement tracks details about email engagement, such as when a message was opened or when a link was clicked.
Click and open events are always related to the original subscriber in a send. Email Studio records all events that occur, as there are no
clear indicators whether opens are from a human or a bot program. So if an email is shared, opens or clicks that occur show in tracking
or reports as belonging to the original subscriber.
For recorded data, an extra parameter for a unique open and click limits the subscriber to having a single unique open and a single
unique click.
Example: Person A receives an email from Marketing Cloud Engagement, opens the email, and clicks a single link. The engagement
displays in tracking as a single open and a single click. When this subscriber forwards the email to a friend, Person B opens and
clicks within the email. Tracking shows two opens, one unique, and two clicks, one unique, in tracking for Person A's subscriber
record.
Non-Subscriber Activity
All activities, including activities initiated by processes or systems, are recorded to the original subscriber. For example, a virus scan from
an internet service provider follows each link in an email to check for security risks. The act of following these links registers as a click
event on behalf of the subscriber. These non-subscriber initiated activities count towards the tracking aggregate totals for the original
subscriber.
Email Studio reduces non-subscriber engagement tracking by ignoring opens and clicks from known security entities.
Reports sometimes show that a subscriber has no open activities but several click activities. There are three common scenarios that
cause this behavior.
•
Recipient Email Client Settings: The recipient’s email client doesn’t load images. Because open tracking depends on an image being
loaded, Email Studio doesn’t record an open activity. The recipient can still click links within the message, which results in the report
having a higher click rate than open rate.
•
Spam and Virus Scanners: A virus scan by an ISP followed links in the email before the subscriber opened it. Virus scans crawl the
message and click the links. This event doesn’t register as an open, as they often don’t load images as part of this process. This external
change can have a different scale of impact depending on the audience of the send. These changes are external in nature and out
of our control. Email Studio continues to record all opens and clicks, regardless of the initiator of the action. Identifying domains
where your messages are crawled for this behavior and segmenting those domains out of a send can protect your engagement
metrics for the campaign from being skewed.
•
Recipient Shared Message on Social Media: Recipients share links from the message on social media and other users click those links.
Sharing on social media results in skewed open and click tracking data.
Compare Tracking Results
Compare high-level metrics for each message in a campaign and overall campaign numbers. The tracking results comparison feature
shows how many emails were sent, how many were delivered, how many of the subscribers unsubscribed, how many emails were
opened, and the number of click-throughs.
To view these metrics:
290
Tracking in Email StudioEmail in Marketing Cloud Engagement
1. Click the Tracking tab.
2. Select the checkbox next to the email sends to compare.
3. Click Compare Email Sends.
4. Click Print or Export.
Conversion Tracking
Track click-through data at a deeper level with Conversions Tracking, which allows you to track the customer traffic and revenues
generated by multiple links within your emails. By inserting the necessary tracking code into your website, you are able to test, read,
and optimize traffic rates and revenues for various campaigns.
With Conversions Tracking, you set up your email to contain a link to a landing page on your website. When a subscriber goes to that
landing page via the email link, the system passes your data about the subscriber and the email so that you can track this subscriber's
activity on your website. You then can pass data about the subscriber's activity back to the application to be displayed along with the
standard email tracking data.
The system records conversion based on Subscriber ID, Job ID, and List ID.
Implement Conversion Tracking
Implement conversion tracking to track click-through data at a deeper level.
View Conversions
For user-initiated email sends, the data that your conversions page passes to the system appears in the Conversions summary of the
email sends tracking page.
Conversion Tracking Code Samples
ASP, PHP, and JavaScript landing and conversions pages samples for Email Studio are available in text files that you can download
in zipped file.
ASP Conversion Tracking Examples
Use these ASP code samples for tracking conversions in Email Studio.
PHP Conversion Tracking Examples
Use these PHP code samples for tracking conversions in Email Studio.
Javascript Conversion Tracking Examples
Use these Javascript code samples for tracking conversions in Email Studio.
Implement Conversion Tracking
Implement conversion tracking to track click-through data at a deeper level.
To implement conversion tracking:
Conversion Pages
Set up your conversion pages in Email Studio to track click-through data at a deeper level.
Landing Pages for Conversion Tracking
When you configure conversion tracking in Email Studio, the system can pass selected parameters from email links to a landing
page.
291
Tracking in Email StudioEmail in Marketing Cloud Engagement

Insert the Link in Your Email
For the system to pass parameters to your landing page, the landing page hyperlink must be designated a conversion tracking link
within Email Studio when inserted into the email.
Conversion Pages
Set up your conversion pages in Email Studio to track click-through data at a deeper level.
When a subscriber clicks through your landing page to a page where you want to capture data about the subscriber's activities (such
as purchases made), that destination page known as the conversions page must do the following:
•
Either accept the parameter values from the landing page or retrieve these values from a cookie.
•
Build an XML string with the data you want to return to the system.
•
Use an image tag to capture the conversion and return the XML string to the system. This image tag can be added to any page on
your website, to track hits from the landing page to other pages.
XML String
Use the following tags in the XML string, which your conversions page returns to the system:
DescriptionXML Tag
Required tag that must contain the value conversion.<action>
Required tag containing the triggered send batch ID, which was
passed from the system to the landing page via the jb parameter.
<BatchID>
If you’re using conversion tracking together with interactions, this
tag is required. If you’re using conversion tracking without
interaction, this tag is recommended but optional.
Required tag containing a unique numeric identifier for this
conversions page. Every conversions page that is passing data to
the system by a unique number.
<conversion_link_id>
Optional tag for passing transactional data about the subscriber's
activity on the conversions page.
This tag must contain the following options, with the values
enclosed in quotation marks:
<data>
•
Amt Numeric; the value of the transaction.
•
Unit Alphanumeric; the unit of measurement for this
transaction.
•
Accumulate Boolean (true or false); whether the amt values
are be accumulated.
Sample syntax for this tag:
<p<data amt="100" unit="Dollars"
accumulate="true"/>
Wrapper for the optional set of <data> tags.<data_set>
292
Tracking in Email StudioEmail in Marketing Cloud Engagement

DescriptionXML Tag
Required tag containing a number that represents the order in
which the conversions page is displayed in the Conversions
Tracking.
<display_order>
Required tag containing the subscriber ID that was passed from
the system to the landing page via the sub_id parameter.
<sub_id>
Required tag containing the subscriber email address that was
passed from the system to the landing page via the e parameter.
<email>
This tag can contain a blank value. If multiple subscribers in the
account have the same email address value, enter a blank value
for email address.
Required tag containing the job ID that was passed from the system
to the landing page via the j parameter.
<job_id>
Required tag containing the name to be displayed in the tracking
information for this conversions page.
Sample syntax for a conversions page that you want to identify as
Products page:
<link_alias>Products page</link_alias>
<link_alias>
Required tag containing the list ID followed by an underscore and
the type of email, HTML, or text, for this subscriber that was passed
from the system to the landing page via the l parameter.
<list>
Required tag containing the member ID that was passed from the
system to the landing page via the mid parameter.
<member_id>
Required tag containing the ID of the URL the subscriber clicked
in the email, which was passed from the system to the landing
page via the u parameter.
<original_link_id>
Required tag that must contain the value tracking.<system_name>
Here’s an example of an XML string.
Note: Be sure to eliminate any extra spaces from the XML string. Omit spaces between XML tags or between an element start
tag and end tag. See the Image Tag section for more details on how to pass this XML string to the system.
<system>
<system_name>tracking</system_name>
<action>conversion</action>
<member_id>20496</member_id>
<job_id>162951</job_id>
<email></email>
<sub_id>91428539</sub_id>
<list>84560_HTML</list>
<original_link_id>3531372</original_link_id>
<BatchID>36</BatchID>
293
Tracking in Email StudioEmail in Marketing Cloud Engagement

<conversion_link_id>1</conversion_link_id>
<link_alias>Tennis Ball Product Display Page</link_alias>
<display_order>3</display_order>
<data_set>
<data amt="100" unit="Dollars" accumulate="true"/>
</data_set>
</system>
DescriptionExamples
To track hits to your conversions page, you add the image tag to
those pages. Also, you can insert the image tag on any other page
Image Tag
you want to track as well (pages to which a user has navigated
from links in your email or on your landing pages).
Be sure to include the image tag only if the user who has navigated
to the page entered your site through the email link. Here’s the
basic syntax to use for your image tag:
<img
src='http://click.exacttarget.com/conversion.aspx?xml=[Your
XML Statement Here]' width="1" height="1">
This example is for the S1 instance. For other instances, use the
string click.s#.exacttarget.com instead of click.exacttarget.com.
Replace s# with the instance you are on for click.s#.exacttarget.com.
For example, if you are on S4 use click.s4.exacttarget.com.
Here’s an example of simply recording that a subscriber visited the
conversions page, with no additional data passed in the
<data_set> tags:
<img src =
'http://click.exacttarget.com/conversion.aspx?xml=<system><system_name>tracking</system_name><action>conversion</action><member_id>20496</member_id>
Example with No Transactional Data Included
<job_id>13919</job_id><email></email><sub_id>91428539</sub_id><list>11456_HTML</list>
<original_link_id>137476</original_link_id><BatchID>36</BatchID>
<conversion_link_id>2</conversion_link_id><link_alias>KayakPage</link_alias>
<display_order>2</display_order><data_set></data_set></system>'
width = "1" height ="1">
This example includes transactional data recorded on the
conversions page.
Example with Transactional Data
Wrap the URL in single quotes.
<img src =
'http://click.exacttarget.com/conversion.aspx?xml=<system><system_name>tracking</system_name>
<action>conversion</action><member_id>20496</member_id><job_id>13919</job_id><email></email>
<sub_id>91428539</sub_id><list>11456_HTML</list><original_link_id>137476</original_link_id><BatchID>36</BatchID><conversion_link_id>2</conversion_link_id><link_alias>KayakPage</link_alias>
<display_order>2</display_order>
<data_set><data amt="6.55" unit="Dollars"
accumulate="true"/><data amt="1.0"
unit="Number of Roses"
accumulate="true"/><data amt="1.0"
294
Tracking in Email StudioEmail in Marketing Cloud Engagement

DescriptionExamples
unit="Number of Lilacs"
accumulate="true"/></data_set></system>'
width = "1" height ="1">
Landing Pages for Conversion Tracking
When you configure conversion tracking in Email Studio, the system can pass selected parameters from email links to a landing page.
Your landing page must do the following:
•
Accept these parameter values from the system.
•
Either pass these parameter values to the conversions page that the subscriber visits next, or store the values in a cookie where the
conversions page retrieves them.
When a subscriber clicks the landing page link in the email, the system passes the following parameters to your landing page:
ValueParameter
Job ID (identifier of this emailj
Subscriber IDsfmc_sub
List IDl (lowercase L)
ID of the landing page URLu
Job batch IDjb
Your account number (member ID)mid
Example: This is an example of a link from the landing page to a conversions page in which the landing page is passing the
parameters to the conversions page: (This example illustrates the syntax only and is not a functioning URL.)
Example:
https://www.example.com/landing.asp?j=JobID&l=ListID&sfmc_sub=SubscriberID&u=LinkID&jb=BatchID&mid=MemberID
Insert the Link in Your Email
For the system to pass parameters to your landing page, the landing page hyperlink must be designated a conversion tracking link within
Email Studio when inserted into the email.
The example shows how to construct that link and what a sample link looks like:
j=%%jobid%%&sfmc_sub=%%SubscriberID%%&l=%%List_%%&u=%%JobURLID%%&mid=%%MemberID%%&jb=%%_JobSubscriberBatchID%%
https://www.example.com/?j=59959959&sfmc_sub=91428539&l=4454454_HTML&u=193635789&mid=508826jb=0
1. Select Conversion Tracking Link when inserting the landing page link in the email.
2. For an HTML paste email, add a conversion="true" attribute to the HREF link.
295
Tracking in Email StudioEmail in Marketing Cloud Engagement

Example:
<a href="http://www.northerntrail.com/productlist.asp"
conversion="true">www.northerntrail.com/productlist.asp</a>
View Conversions
For user-initiated email sends, the data that your conversions page passes to the system appears in the Conversions summary of the
email sends tracking page.
Note: Conversion tracking data is not passed down in tracking details from the Enterprise account to On Your Behalf accounts.
For triggered email sends, tracking information is available at these locations:
•
On the Interactions tab via the triggered send definition. The data that your conversions page passes to the system appears in the
Conversions Activity section.
•
On the Tracking tab in the Triggered Email Sends folder. The data appears in the Conversions summary section.
Conversion Tracking Code Samples
ASP, PHP, and JavaScript landing and conversions pages samples for Email Studio are available in text files that you can download in
zipped file.
Download ConversionTrackingCodeSamples.zip.
ASP Conversion Tracking Examples
Use these ASP code samples for tracking conversions in Email Studio.
Landing Page Sample: Capturing Parameters
<%
DIM JobID, SubscriberID, ListId, UrlID, MemberID, strXML
JobID = Request ("j")
SubscriberID = Request("sfmc_sub")
ListID = Request("l")
BatchID = Request("jb")
UrlID = Request("u")
MemberID = Request("mid")
%>
Landing Page Sample: Storing Parameters in a Cookie
<%
DIM JobID, SubscriberID, ListId, UrlID, MemberID, strXML
JobID = Request ("j")
SubscriberID = Request("sfmc_sub")
ListID = Request("l")
BatchID = Request("jb")
UrlID = Request("u")
MemberID = Request("mid")
ExpireDays = 21
296
Tracking in Email StudioEmail in Marketing Cloud Engagement

Response.Cookies("NorthernTrail")("JobId") = trim(JobID)
Response.Cookies("NorthernTrail")("SubscriberID") = trim(SubscriberID)
Response.Cookies("NorthernTrail")("ListID") = trim(ListID)
Response.Cookies("NorthernTrail")("UrlID") = trim(URLID)
Response.Cookies("NorthernTrail")("MemberID") = trim(MemberID)
Response.Cookies("NorthernTrail").Expires = Date() + ExpireDays
Response.Cookies("NorthernTrail").Domain= "www.northerntrailoutfitters.com"
%>
Landing Page Sample: Retrieving Parameters from a Cookie
<% DIM JobID, SubscriberID, ListID, URLID, MemberID, strXML
JobId = Request.Cookies("NorthernTrail")("JobId")
SubscriberID = Request.Cookies("NorthernTrail")("SubscriberID")
ListId = Request.Cookies("NorthernTrail")("ListID")
URLID = Request.Cookies("NorthernTrail")("UrlID")
Memberid = Request.Cookies("NorthernTrail")("MemberID")
%>
Conversion Page Sample: Retrieving Parameters and Passing the XML String
<%
DIM JobID, SubscriberID, ListId, BatchID, UrlID, MemberID, strXML
JobID = Request ("j")
SubscriberID = Request("sfmc_sub")
ListID = Request("l")
BatchID = Request("jb")
UrlID = Request("u")
strXML =
"<system><system_name>tracking</system_name><action>conversion</action>" _
& "<member_id>" & trim(MemberID) & "</member_id>" _
& "<job_id>" & trim(jobID) & "</job_id>"_
& "<email></email>"_
& "<sub_id>" & trim(SubscriberID) & "</sub_id>"_
& "<list>"& trim(ListID) &"</list><original_link_id>"& trim(URLId) &"</original_link_id>"_
&"<conversion_link_id>2</conversion_link_id>"_
& "<link_alias>Kayak Page</link_alias><display_order>2</display_order>"_
&"<data_set></data_set>"_
&"</system>"%>
<head>
<!-- Your HTML here -->
</head>
<body>
<!-- Your HTML here -->
<% if JobID <> "" and ListID <> "" and SubscriberID <> "" and URLid <> "" then %>
<img src = 'http://click.exacttarget.com/conversion.aspx?xml=<%=strXML%>' width = "1"
height ="1">
<% end if %>
297
Tracking in Email StudioEmail in Marketing Cloud Engagement

<!-- Your HTML here -->
</body>
PHP Conversion Tracking Examples
Use these PHP code samples for tracking conversions in Email Studio.
The following sections show PHP examples of landing and conversions page code. If you plan on tracking conversions in different
directories on the same site, you must specify the cookie applies to the root of the site. For example, you could use the code to specify
both the root of the directory and the expiration time of the cookie to ensure that all conversions return the correct tracking information:
setcookie('JobID', $JobID, time()+86400, "/", ".example.com");
setcookie('SubscriberID', $SubscriberID, time()+86400, "/", ".example.com");
setcookie('ListID', $ListID, time()+86400, "/", ".example.com");
setcookie('BatchID', $BatchID, time()+86400, "/", ".example.com");
setcookie('UrlID', $UrlID, time()+86400, "/", ".example.com");
setcookie('MemberID', $MemberID, time()+86400, "/", ".example.com");
Landing Page Sample
<?php
$JobID = $_GET['j'];
$SubscriberID = $_GET['sfmc_sub'];
$ListID = $_GET['l'];
$UrlID = $_GET['u'];
$MemberID = $_GET['mid'];
setcookie('JobID', $JobID);
setcookie('SubscriberID', $SubscriberID);
setcookie('ListID', $ListID);
setcookie('UrlID', $UrlID);
setcookie('MemberID', $MemberID);
?>
<html>
<head>
<title>Landing Page</title>
</head>
<body>
<a href="http://us3.php.net/variables.predefined">Info on predefined variables</a><br />
<a href="http://us2.php.net/setcookie">Info on setting cookies</a><br />
<a href="confirm.php">Confirm Page</a>
</body>
</html>
Conversions Page Sample
<?php
//This code should be on any confirmation page after the conversion is made.
//Refer to the Conversion Tracking Guide for customization.
$debug = 'off';
298
Tracking in Email StudioEmail in Marketing Cloud Engagement

$JobID = $_COOKIE['JobID'];
$SubscriberID = $_COOKIE['SubscriberID'];
$ListID = $_COOKIE['ListID'];
$BatchID = $_COOKIE['BatchID'];
$UrlID = $_COOKIE['UrlID'];
$MemberID = $_COOKIE['MemberID'];
//Refer to the Conversion Guide on customizing the data within this XML to display the
proper conversion
//information within {{ wiki.template('ProductName') }}
$strTP = '<img src=\'http://click.exacttarget.com/conversion.aspx?xml=';
$strTP .= '<system><system_name>tracking</system_name><action>conversion</action>';
$strTP .= '<member_id>'.$MemberID.'</member_id>';
$strTP .= '<job_id>'.$JobID.'</job_id>';
$strTP .= '<email></email>';
$strTP .= '<sub_id>'.$SubscriberID.'</sub_id>';
$strTP .= '<list>'.$ListID.'</list>';
$strTP .= '<original_link_id>'.$UrlID.'</original_link_id>';
$strTP .= '<conversion_link_id>1</conversion_link_id>';
$strTP .= '<link_alias>Alias</link_alias><display_order>1</display_order>';
$strTP .= '<data_set>';
$strTP .= '<data amt="100" unit="Dollars" accumulate="true" />';
$strTP .= '</data_set></system>\'';
$strTP .= ' width="1" height="1">';
if ($debug=='on'){
$strTP = '<textarea rows=10 cols=50>'.$strTP.'<textarea>';
}
?>
<html>
<head>
<title>Conversion Page</title>
</head>
<body>
Your Confirmation Page
<br /><? print $strTP; ?>
</body>
</html>
Javascript Conversion Tracking Examples
Use these Javascript code samples for tracking conversions in Email Studio.
Landing Page Examples
<html>
<head>
<title>Set Tracking Cookie</title>
<script language="javascript">
//Set the number of days before your cookie should expire
299
Tracking in Email StudioEmail in Marketing Cloud Engagement

var ExpireDays = 90;
//Do not change anything below this line
qstr = document.location.search;
qstr = qstr.substring(1, qstr.length);
function SetCookie(cookieName, cookieValue, nDays) {
var today = new Date();
var expire = new Date();
if (nDays == null || nDays == 0) nDays = 1;
expire.setTime(today.getTime() + 3600000 * 24 * nDays);
document.cookie = cookieName + "=" + escape(cookieValue) + "; expires=" +
expire.toGMTString() + "; path=/";
}
thevars = qstr.split("&");
for (i = 0; i < thevars.length; i++) {
cookiecase = thevars[i].split("=");
switch (cookiecase[0]) {
case "sfmc_sub":
sfmc_sub = cookiecase[1];
SetCookie("SubscriberID", sfmc_sub, ExpireDays);
break;
case "e":
e = cookiecase[1];
SetCookie("EmailAddr_", e, ExpireDays);
break;
case "j":
j = cookiecase[1];
SetCookie("JobID", j, ExpireDays);
break;
case "l":
l = cookiecase[1];
SetCookie("ListID", l, ExpireDays);
break
case "jb":
jb = cookiecase[1];
SetCookie("BatchID", jb, ExpireDays);
break;
case "u":
u = cookiecase[1];
SetCookie("UrlID", u, ExpireDays);
break;
case "mid":
mid = cookiecase[1];
SetCookie("MemberID", mid, ExpireDays);
break;
default:
break;
}
}
</script>
</head>
<body>
<a href="https://pages.exacttarget.com/ConversionsPageExample/">Conversion Page</a>
300
Tracking in Email StudioEmail in Marketing Cloud Engagement

</body>
</html>
Conversions Page Example
<html>
<head>
<title>Conversion</title>
</head>
<body>
<p>Test for conversions</p>
<!-- Put your HTML Body Here -->
<!-- ExactTarget Conversion Tracking Script Here-->
<script language="javascript">
//Set the following parameters for your conversion parameters
var convid = "1";
var displayorder = "1";
var linkalias = "My Link Name";
var dataset = "<data amt=\"1\" unit=\"Downloads\" accumulate=\"true\" />";
//For additional datasets, simply add them to the concatenation:
//dataset=dataset+"<data amt=\"500.00\" unit=\"Dollars\" accumulate=\"true\">
//Do not change anything below
function SetCookie(cookieName, cookieValue, nDays) {
var today = new Date();
var expire = new Date();
if (nDays == null || nDays == 0) nDays = 1;
expire.setTime(today.getTime() + 3600000 * 24 * nDays);
document.cookie = cookieName + "=" + escape(cookieValue) + "; expires=" +
expire.toGMTString() + "; path=/";
}
function getCookie(cookiename) {
if (document.cookie.length > 0) {
startC = document.cookie.indexOf(cookiename + "=");
if (startC != -1) {
startC += cookiename.length + 1;
endC = document.cookie.indexOf(";", startC);
if (endC == -1) endC = document.cookie.length;
return unescape(document.cookie.substring(startC, endC));
}
}
return null;
}
var jobid = getCookie("JobID");
var emailaddr = getCookie("EmailAddr_");
var subid = getCookie("SubscriberID");
var listid = getCookie("ListID");
var batchid = getCookie("BatchID");
var urlid = getCookie("UrlID");
var memberid = getCookie("MemberID");
//Debug
//document.write("<textarea rows=5 cols=80>");
document.write("<img src='");
document.write("https://click.exacttarget.com/conversion.aspx?xml=<system>
301
Tracking in Email StudioEmail in Marketing Cloud Engagement

<system_name>tracking</system_name><action>conversion</action>");
document.write("<member_id>" + memberid + "</member_id>");
document.write("<job_id>" + jobid + "</job_id>");
if (subid == undefined) {
document.write("<sub_id></sub_id>");
} else {
document.write("<sub_id>" + subid + "</sub_id>");
emailaddr = undefined;
}
if (emailaddr == undefined) {
document.write("<email></email>");
} else {
document.write("<email>" + emailaddr + "</email>");
}
document.write("<list>" + listid + "</list>");
document.write("<BatchID>" + batchid + "</BatchID>");
document.write("<original_link_id>" + urlid + "</original_link_id>");
document.write("<conversion_link_id>" + convid + "</conversion_link_id>");
document.write("<link_alias>" + linkalias + "</link_alias>");
document.write("<display_order>" + displayorder + "</display_order>");
document.write("<data_set>" + dataset + "</data_set>");
document.write("</system>'");
document.write(" width='1' height='1'>");
//Debug //document.write("</textarea>");
</script>
</body>
</html>
Create a List from Tracking
You can drill down to a list of subscribers who interacted with an email. You can export the list to an Excel file.
To create a list or add subscribers to an existing list:
1. Click the Tracking tab and navigate to the tracking subfolder.
2. Select the email to use.
3. Click the hyperlinked number.
4. Click Copy All.
5. To add the subscribers to a new list, select the New List radio button then, enter a name and description and click Copy. Or, to add
the subscribers to an existing list, select the Existing List radio button then, select the list and click Copy.
Create a File from a Tracking Tab
A PDF file presents a visual representation of the screen or email, while the Excel file contains data on the report requested.
Note: If the export file is larger than 5 MB, the system saves it to your enhanced FTP account by default. If you do not have an
enhanced FTP account contact Global Support.
To create a file:
1. Click Tracking and select my tracking.
2. Select the tab you want to export to a file.
302
Tracking in Email StudioEmail in Marketing Cloud Engagement

3. Click Export.
4. Select a file format from the available options.
5. If applicable, select the modules to include in a PDF file format.
6. Select to view the file in your browser or send as an email attachment.
7. Click Export.
8. If you choose to export the file via an email attachment, enter at least one email address. Send to multiple addresses separate each
address with a semicolon and click Send.
Delete a Tracking Job
You can delete tracking jobs you no longer need.
To delete a tracking job:
1. Select the checkbox next to a job to delete.
2. Click Delete.
A confirmation message appears stating that your tracking jobs have been successfully deleted.
Export Bounce Data
You can export data for bounced email messages in Email Studio.
To export bounced data:
1. Click the Tracking tab.
2. Click the name of the job.
3. Select Hard Bounce or Soft Bounce in the Send Performance box.
4. Click Export All.
5. Select Undelivered Reason and Undelivered Description in the Available attributes box and click add >.
6. Choose how you'd like to receive the export.
7. Click Export.
Export Subscriber Data from Tracking to an Excel File
Export subscriber data from tracking to an excel file.
Note: Subscriber data in the application shows the first link clicked. Exported data shows the click that was processed first by the
application. You will see a difference in the data shown in the application and the data exported.
To export subscriber data to an Excel file:
1. Click the Tracking tab and, if applicable, the tracking subfolder.
2. Click the hyperlinked email from which you want to create a list.
3. Click a hyperlinked number of subscribers.
4. Click Export All.
5. Select the attributes to export and click Add or click Add All.
6. Select the export file type.
303
Tracking in Email StudioEmail in Marketing Cloud Engagement

7. Click Export.
8. The file is saved to your account FTP directory by default.
Impression Tracking
Impression tracking allows you to track the performance of emails that contain content built by AMPscript or dynamic content in Email
Studio.
When an email contains AMPscript or dynamic content, you can give each region in the email a unique identifier. The system can use
the unique identifier to track, segment, and report against data for each region.
Impression Region Using AMPscript
You can configure impression tracking by region using AMPscript.
Impression Region Using Dynamic Content
Once your account has been configured with Impression Tracking, track the performance of the dynamic content block, rules, and
content by using impression tracking reports.
SEE ALSO:
Enable Email Optional Features
Impression Region Using AMPscript
You can configure impression tracking by region using AMPscript.
Create an impression region in an email by using the following AMPscript functions:
•
BeginImpressionRegion
•
EndImpressionRegion
Impression Region Using Dynamic Content
Once your account has been configured with Impression Tracking, track the performance of the dynamic content block, rules, and
content by using impression tracking reports.
The Impression Region name is automatically created with the dynamic block position, dynamic block name, rule name, and content
block name. There are double underscores that concatenate these items together in the field name. For example, the Impression Region
name can be updated to 01__Left__Biking__Image. The field has a maximum character limit of 60, so we recommend keeping the
name short.
Manage Salesforce Data
Use this Email Studio feature to control the amount of storage used. For example, you may have 90 days of data stored in Salesforce but
only want to retain information from the last 30 days.
Note: You must have administrative data management user privileges and access to a Salesforce integrated account to use this
feature.
1. Click the Tracking tab.
2. Click my tracking to view a list of email jobs.
3. Check the boxes next to the jobs you want to manage.
304
Tracking in Email StudioEmail in Marketing Cloud Engagement

4. Click Manage Salesforce Data.
5. Select the tracking information to delete.
Delete individual tracking
•
Delete Link Detail Records Only: Deletes all records with link information.
•
Delete Link Detail and Individual Email Result Records: Deletes all records with link information and any records that show
individual data rather than aggregate data.
Delete link detail records for
Choose one of the following:
•
All emails
•
Emails not clicked
•
Emails not opened
Delete email results aggregate tracking record
Deletes all records containing aggregate information.
6. Click Delete.
Move Tracking Data
You can choose where tracking data is stored.
Follow these steps to create a subfolder to store tracking data for related email sends:
1. Click the Tracking tab.
2. Right-click on my tracking and select New Folder.
3. In the tracking workspace, select the checkbox next to the email sends to include.
4. Click Move.
5. Select the intended folder in the Move Jobs dialog box.
6. Click Move.
Reports
You run a report asynchronously from the Tracking tab in Email Studio and have them delivered to your email inbox or FTP server. Use
the Report Status and History screen to view a list of reports that have been requested in your account. This list shows the status, scheduled
run time, delivery channel, and delivery details for scheduled reports in the workspace.
Note: As of May 25, 2018, email reports that reference individual subscribers no longer includes subscribers who were deleted
using the legacy Email Studio delete functionality.
Note: The available reports in Email Studio are no longer updated. The standard reports available within Email Studio are also
available within Analytics Builder, including Mobile and Content Builder reports. Continue to run your Custom Reports within Email
Studio.
If you use Automation Studio, you can run a report in an automation.
When you run a report, you specify the parameters, file format, delivery method, and when to run the report. Report parameters can
vary by report. When the report parameters include a start date and an end date, you can choose to select a relative date range instead
of a static date range when you run the report.
305
Tracking in Email StudioEmail in Marketing Cloud Engagement

For sends with reporting suppressed, the email is sent to the designated list without the job appearing in the reports. The job is
automatically added to the Test Send Emails folder in tracking.
Description or ExampleDate Range
The last Sunday-to-Saturday period that completed before the
report running. For example, if you run the report on Tuesday,
The last full week
August 12, the report will include information from Sunday, August
3, through Saturday, August 9.
The last calendar month that completed before the report running.
For example, if you run the report on Tuesday, August 12, the report
will include information from July 1 through July 31.
The last full month
The last standard quarter that completed before the report running.
For example, if you run the report on Tuesday, August 12, the report
will include information from April 1 through June 30.
The last full quarter
The last day that completed before the report running. For example,
if you run the report at 2 a.m. on Tuesday, August 12, the report
will include information from August 11.
The last full day
SEE ALSO:
Email Studio Reports in Analytics Builder
Tracking Workspace
Email Studio provides a tracking workspace where you can view real-time performance of your email sends. From there, you can also
pause, cancel, or delete send jobs.
Email sends in the tracking tool are sorted according to job ID by default. Use any column to sort the list of contents by clicking the
column heading. Click the heading a second time to reverse the sort. Click Set Grid Preferences to display more columns in the tracking
workspace. To filter email sends in the workspace, click Showing: to access the list of available filters.
The toolbar at the top of a tracking folder's workspace provides the following options:
DescriptionOptions
Enables you to save email send tracking data to a different folder.Move
Enables you to delete the selected email send tracking data.Delete
Prevents further processing and sending of email messages until
you restart the send. You cannot edit message content while
paused.
Pause Send
Enables you to restart a paused send.Resume Send
Enables you to cancel a paused or scheduled send. If you canceled
and in-progress send, it displays the number of subscribers sent
to versus the number of subscribers not sent to.
Cancel Send
Enables you to view the tracking data of a group of related emails.Compare Email Sends
306
Tracking in Email StudioEmail in Marketing Cloud Engagement

DescriptionOptions
Displays the Custom Tracking View window where you can select
a date range for which to show tracking data. Enter your parameters
Custom
and click Filter. Select the filter each time you log in to the
application.
You can view the Job Status of jobs within your account. The following table provides more details about each status.
DescriptionJob Status
The job is being created and scheduled for the schedule time.Pending
The job is scheduled to send in the future.Scheduled
The job is in progress. You can pause the job and prevent it from
sending more emails until you choose to resume the job. If a job
In Progress
is throttled, the status displays In Progress until all emails are sent.
However, emails only send within the defined delivery window.
The job status of In Progress is assigned even if the current time is
not within the delivery window.
The job completed.Complete
The job was paused and will not send more emails until you choose
to resume the job.
Paused
The job was canceled and no additional emails are sent.Canceled
The job errored and no additional emails are sent.Error
Tracking Properties
View real-time tracking information in Email Studio. The information is presented in five tabs which allow you to drill down to specific
information.
Search Tracking Data
Follow these steps to search tracking data in Email Studio.
View Tracking Properties
Follow these steps to view tracking properties in Email Studio.
Tracking Overview Tab
The tracking overview tab in Email Studio displays general details about the send for scheduled and paused jobs where no emails
have been sent. You can export these tabs to a PDF or Excel file.
Tracking Click Activity Tab
To see which links people are interacting with in an email, use the Email Overlay View or the Link View on the Activity tab in Email
Studio Tracking. Export click activity to a PDF file in Email Overlay View or to an Excel file in Link View.
Tracking Conversions Tab
The Conversions tab contains information about the conversions resulting from the email send. You can export the Conversions tab
to an Excel file.
307
Tracking in Email StudioEmail in Marketing Cloud Engagement

Tracking Custom Tab
The Tracking Custom Tab allows you create a button in your tracking screen that links to a landing page of job-level tracking
information. This enables you to pull in web analytics data, create custom reporting dashboards, and tailor summary information
for a specific tracking job.
Tracking Surveys Tab
You can view a snapshot of responses to surveys deployed through Email Studio on the Tracking Surveys Tab.
Tracking Properties
View real-time tracking information in Email Studio. The information is presented in five tabs which allow you to drill down to specific
information.
Tracking properties are organized into 5 tabs. This table provides details about the information included on each tab.
Table 14: General Tab
DescriptionField or Button
This field displays the subscriber's email address.Subscriber Email Address
Displays the subscriber key for that subscriber.Subscriber Key
Day, date, and time the subscriber created this listing (by
performing a unique action).
Created
Total bounces for all subscribers.Total Bounces
Date and time the subscriber unsubscribed (if applicable). If the
person did not unsubscribe, displays N/A.
Unsubscribed
If the person did not unsubscribe (N/A), this button appears.
Clicking Unsubscribe from all causes an Unsubscribe dialog box
Unsubscribe From All
to appear. Here, you can choose to have this email address
unsubscribed from all current and future lists. The email address
is listed, and below that, a Reason box, where you can fill in the
Reason for the Unsubscribe.
If the person did unsubscribe, an Activate button is provided. This
allows the person to subscribe to lists in the future. It only activates
Activate Button
the subscriber on the All Subscribers list-not on any specific lists.
After you click this button, it toggles back to the Unsubscribe from
all button.
Table 15: Attributes Tab
DescriptionField or Button
Lists the profile attributes and the values for each subscriber.Profile Attribute
Lists preference attributes, such as HTML Emails. The Value column
contains a checkbox to activate or deactivate that preference.
Preference Attribute
308
Tracking in Email StudioEmail in Marketing Cloud Engagement

Table 16: Lists Tab
DescriptionField or Button
Indicates which lists this subscriber belongs to.List Name
Date subscriber was added to each list.Added
Date subscriber unsubscribed from this list (if applicable).
Otherwise, indicates N/A.
Unsubscribed
Click to add the subscriber to other lists.Add Button
Click to remove a subscriber from the list.Remove Button
Select a list and click Details to get more information on the
selected list. You can also subscribe or unsubscribe a person from
the list.
Details Button
Table 17: Groups Tab
DescriptionField or Button
Indicates which group this subscriber belongs to.Group Name
Indicates the date and time the information for this group was last
updated.
Last Refresh Date
Date subscriber unsubscribed from this group (if applicable).
Otherwise, indicates N/A.
Unsubscribed
Select a group and click Details to get more information on the
selected group. You can also subscribe or unsubscribe a person
from the group.
Details Button
Table 18: History Tab (90 Days)
DescriptionField or Button
Date the activity occurredDate
Type of activityActivity
Indicates which email the activity occurred in.Email
Available when you select a survey response. Click the Survey
Details button to learn more about the survey response.
Survey Details Button
Search Tracking Data
Follow these steps to search tracking data in Email Studio.
1. Click the Tracking tab.
2. Click my tracking to view a list of email jobs.
3. Click the link for the job you want to view. The Overview tab for that job appears.
309
Tracking in Email StudioEmail in Marketing Cloud Engagement

4. Click any of the unique number links to see the list of subscribers for that link. A new toolbar appears with the Search button on it.
5. Click Search. A Search field appears with directions to search by email address or subscriber key.
6. Enter the email address or subscriber key you want to view and click Search.
View Tracking Properties
Follow these steps to view tracking properties in Email Studio.
1. Click the Tracking tab.
2. Click my tracking.
3. Click the link for the job you want to view. The Overview tab for that job appears.
4. Click any of the unique number links on the Overview tab to see the list of subscribers for that link.
5. Select the checkbox beside the subscriber you want to view. The View Properties button on the toolbar becomes available.
6. Click View Properties.
7. Click Okay.
Tracking Overview Tab
The tracking overview tab in Email Studio displays general details about the send for scheduled and paused jobs where no emails have
been sent. You can export these tabs to a PDF or Excel file.
The Summary section identifies the email that was sent.
DescriptionField
The ID number that the application automatically generated for
this email send. By default, the system sorts email sends according
to Job ID in the tracking grid.
Job ID
The name of the email content sent.Name
The subject line used for the send. If the subject line contains a
personalization string, a personalization string icon appears in this
field.
Subject
The date and time of the email send in Central Time.Date Sent
The number of email messages sent. This value is the number of
subscribers in the lists, groups, and/or data extensions targeted
for this send, minus any excluded subscribers
Total Sent
The names of the lists, groups, and data extensions targeted for
this send
Lists
The names of the lists, groups, and data extensions excluded from
this send, if applicable
Exclusion Lists
The name of data extensions targeted for this send, if applicableData Extensions
310
Tracking in Email StudioEmail in Marketing Cloud Engagement

Send Performance Tab
This tab contains information about the deliverability of the send. A pie chart shows the total number of email messages delivered, the
number of soft bounces, and the number of hard bounces. To learn more about bounces, see Bounce Mail Management.
Note: If you use different categories for bounces, you see different values in this section.
DescriptionField
Percentage of messages delivered successfullyDelivery Rate
Number of bounced messagesTotal Bounces
Number of bounced messages attributed to permanent errorsHard Bounce
Number of bounced messages attributed to non-permanent errorsSoft Bounce
Number of messages delivered successfullyDelivered
Open Performance
The Open Performance section contains information about the subscribers who open the send. A bar graph shows that the number of
total opens and unique opens compared to the number of messages delivered.
DescriptionField
Number of messages delivered successfullyDelivered
Number of times the message was opened. This value includes
multiple opens by the same subscriber
Total Opens
Number of unique message opens. This value includes one open
per subscriber
Unique Opens
Inbox Activity
The Inbox Activity section contains information about the opens, clicks, and unsubscribes related to the send. You can click the dropdown
next to viewing and select a way to activity:
•
Current Activity - displays the data in a bar graph.
•
Activity Over Time - displays tracking data for 14 days after the date of send. You can choose to include or not include certain
information such as opens, clicks, forwards, etc.
These fields display when you view Current Activity:
DescriptionField
Total and unique opens the email send receivedOpens
Total and unique clicks the email send receivedClicks
Total and unique email forwardsForwards
Total and unique clicks the email send receivedConversions
311
Tracking in Email StudioEmail in Marketing Cloud Engagement

DescriptionField
Total survey submissions received and the number of subscribers
who took the survey
Surveys
Number of subscribers who unsubscribed from the sendUnsubscribes
The percentages note the percent of subscribers on the send that relate to each field. The system calculates these percentages by dividing
the number of subscribers who performed the action by the total number of subscribers.
Unengaged Subscribers
The Unengaged Subscribers section contains information about subscribers who didn’t open the message or click information within
the email.
DescriptionField
Number of successfully delivered emailsTotal Delivered
Number of subscribers who opened the message but didn’t click
any links
Did not click
Number of subscribers who didn’t open the messageDid not open
Forward to a Friend Activity
The Forward to a Friend Activity sections contains statistical information about how many subscribers forwarded the email to a friend.
DescriptionField
Number of subscribers who clicked the Forward to a Friend linkClicked Forward
Number of subscribers who forwarded the emailForward Activity
Number of new subscribers you acquired through forward activityNew Subscribers
Tracking Click Activity Tab
To see which links people are interacting with in an email, use the Email Overlay View or the Link View on the Activity tab in Email Studio
Tracking. Export click activity to a PDF file in Email Overlay View or to an Excel file in Link View.
Email Overlay View
The Email Overlay View page shows a heat map of your email with the percentage of subscribers that clicked each link. Click a percentage
to view a summary of the click statistics. The table also lists each email link with click statistics.
DescriptionField
A link included in the body of the emailLink
312
Tracking in Email StudioEmail in Marketing Cloud Engagement

DescriptionField
Click-Through Rate: Number of unique clicks divided by the number
of emails delivered (percentage)
CTR
Number of total clicks for the specific link divided by the number
of total clicks for all links (percentage)
Total Clicks
Number of unique clicks for the specific link divided by the number
of unique clicks for all links (percentage)
Unique Clicks
Link View
The Link View page lists click information for every link in your email send.
DescriptionField
The link in the emailLink
Total number of clicks receivedTotal
Unique clicks received; click the number to view the subscribers
who clicked
Unique
Number of unique clicks divided by the number of emails deliveredNet CTRs
Tracking Conversions Tab
The Conversions tab contains information about the conversions resulting from the email send. You can export the Conversions tab to
an Excel file.
See Conversion Tracking on page 291 to learn more.
DescriptionField
Specifies the URL of the linkPath Name
Number of individual subscribers who clicked the link within the
email; click the (#) to display a list of those subscribers
Unique Conversions
Displays a list of all subscribers who had at least 1 click path
conversion.
See all click path data link
Number of unique subscribers who converted from the link.# unique conversions link
313
Tracking in Email StudioEmail in Marketing Cloud Engagement

Tracking Custom Tab
The Tracking Custom Tab allows you create a button in your tracking screen that links to a landing page of job-level tracking information.
This enables you to pull in web analytics data, create custom reporting dashboards, and tailor summary information for a specific tracking
job.
SEE ALSO:
Create a Custom Tab
Tracking Surveys Tab
You can view a snapshot of responses to surveys deployed through Email Studio on the Tracking Surveys Tab.
You can export the Surveys tab to an Excel file.
The Surveys tab lists the surveys you included in your email and the responses you received.
DescriptionField
Each survey question is listed individuallySurvey Questions module
Click and select a question to see response details for each questionSelect a question
The number of people who responded to that question(#) responses
Displays a pie graph view of the survey response rateSurvey responses module
The total number of surveys completed. Click the link for a list of
subscribers who completed the survey.
Surveys taken
The total number of emails delivered.Emails delivered
When you click a question in the Survey Questions module, you can view the following details for that question:
DescriptionField
The total number of responses to the question(#) responses
The number of subscribers who responded each specific answer(#)
The percentage of subscribers who responded with each specific
answer
Rates
Triggered Sends Tracking
The Overview tab for triggered sends tracking displays a graph of your triggered sends activity based on the date range you define.
Note: Adding a triggered send recipient to a subscriber list allows you to review tracking information in the provided tracking
data views. If you don’t add the subscriber list, you must retrieve the tracking information via the Click Tracking Extract, import
that information into a data extension, and query that data extension for additional information.
To access Triggered Sends Tracking:
1. Click the Tracking tab.
314
Tracking in Email StudioEmail in Marketing Cloud Engagement

2. Click my tracking in the Triggered Sends folder.
3. Select the triggered send to view.
4. Set the From Date and To Date and click Apply.
Tracking data returned is based on the subscriber batch sent to during the defined date range.
Note: When selecting a date range, tracking data returned is based on the subscriber batch sent to during the defined date
range.
The green triangle signifies a publish date. The blue bars show the number of sends on a specific day.
Export Triggered Sends Tracking
You can export the Triggered Sends Tracking report.
To export a triggered sends tracking report:
1. Click the Tracking tab.
2. Click the Triggered Sends folder.
3. Select the triggered send job to view.
4. Click Export.
5. Choose an export option.
6. Click Export.
Update Job Links Overview
Use the Update Job Links feature in Email Studio to edit links in a job after an email send completes. To use this feature, you must allow
click tracking. The email job status must be Completed or Canceled. Only account users with View Tracking or View History permission
can view this feature. Only the administrator or users with Create or Edit Email permissions can edit the link in the job. You may need to
refresh the email and browser for the changes to take effect.
Note: Text Only emails cannot be updated. New personalization strings and AMPscript variable references can't be added. Links
older than 90 days old may not be available to edit.
You can edit the URL base, including the protocol, hostname, and path, and the URL parameters field and value pairs for the query string.
When you edit a link after a send only the email associated with the specific job changes. The original email does not change. If the email
is associated with an automation or transactional send, you must stop the automation or pause the transactional send, change the link
in the email, then republish and restart the automation or transactional send.
Note: For dynamic or personalized emails with AMPscript that reference a different URL for certain scenarios via a variable and
the RedirectTo function, you can edit and update links. However, you can only update it to a single static URL that contains the
full anatomy of the URL (protocol, hostname, and path). The RedirectTo function cannot be used with Analytics String.
Update a Job Link
Follow these instructions to update job links in Email Studio Tracking.
Update a Job Link
Follow these instructions to update job links in Email Studio Tracking.
315
Tracking in Email StudioEmail in Marketing Cloud Engagement

Note: When Web Analytics Connector (WAC) is enabled and the link to update contains email_XtraLinkParameters data, the
redirect link update cannot be completed. These links will not resolve after being edited unless the redirect is replaced with a static
url.
To update a job link:
1. Navigate to Email Studio.
2. Select Tracking and choose Sends.
3. Click an email link in the Name column.
4. Select a Click the Job Links tab.
5. Select the URL ID to edit.
6. Enter the new full URL field.
7. Enter the URL Parameters field. You can add and remove query string parameters to the URL as needed, but you must edit each
parameter separately.
8. Optional: Click Add Parameter to add a field and value pair.
9. Click Save.
10. Click Change Link.
Example: Edit a URL Field
In the URL field, you enter the full URL path that includes https://. For example, if the link in your email is
https://cl.exct.net/?utm_medium=NorthernTrail, the URL is https://cl.exct.net/.
The system validates your link which cannot contain invalid these invalid characters /\":*|< >. It also verifies that your link contains
the full URL path with the valid protocol such as https://.
Edit URL Parameters
In the URL Parameters field, you enter the value pairs that occur after the base URL. For example, if the link in your email is
https://cl.exct.net/?utm_medium=NorthernTrail, the parameter is utm_medium=NorthernTrail. You can add and remove query
string parameters to the URL as needed, but you must edit each parameter separately.
The system checks for duplicate parameters and validates your link which cannot contain invalid these invalid characters /\":*|<
>. Also, the system automatically adds the following characters where appropriate: ?, =, &.
View Tracking History
You can view tracking history for sends in Email Studio.
To view tracking history:
1. Click the Tracking tab.
2. Click my tracking.
3. Select the job to view.
4. Click any of the unique number links on the Overview tab to see the list of subscribers for that link.
5. Select the checkbox beside the subscriber to view.
6. Click View History.
A dialog box opens in a fifth tab named History. History tab displays the selected subscriber's activities over the last 90 days including:
•
Date: the date a subscriber action occurred
316
Tracking in Email StudioEmail in Marketing Cloud Engagement

•
Activity: the type of action
•
Email: the email on which the action was taken
Select an activity and click Details to drill down to more information.
View Tracking Results for an Email Send
You can view tracking results for individual email sends in Email Studio.
Note: If an email was sent to more than 50 lists, you may have trouble viewing the tracking results. To solve this issue, deselect
half your lists, and try to view the tracking again.
Note: Once the send is complete, the sent number is recalculated to account for the subscribers that errored.
To view all tracking details for an email:
1. Click Tracking.
2. Select the folder where the email you want to view is stored.
3. Select from: Click the name of the email in the tracking workspace.
Where you see a hyperlinked number in the tracking results workspace, you can click that number to drill down to a list of the
subscribers comprising that number. You can drill down even further into the activities of individual subscribers relating to the email
whose results you're viewing.
Link Tracking
Learn about link tracking in Marketing Cloud Email Studio.
Marketing Cloud uses link redirection before sending to a destination link to provide tracking.
Features:
•
Change the link after send (mistyped URL or updated link)
•
Consumer and link tracking is available per message
•
Branded links (click.example.com)
Link Wrapping During Send
Link wrapping turns email content links into links that are unique to a subscriber, which enables Marketing Cloud to track clicks for these
links.
•
The system scans message content for link tags.
–
<a href="https://salesforce.com" alias="Salesforce Link"
conversion="true">Salesforce</a>
Link attributes such as alias and conversion are used to control how Marketing Cloud wraps the links. They’re removed so they
aren’t present in the message received.
–
<a href="https://salesforce.com">Salesforce</a>
A unique identifier is generated which Marketing Cloud associates with the Subscriber, Job, and Link to facilitate tracking.
–
Example ID: 95ee94c8e1e287fcaa41a7f714c4cf122bfac08cb6e8fcde2d8cbedee75200c4f1b1d1a48e7b54c80d4b4e2484c777ef
317
Tracking in Email StudioEmail in Marketing Cloud Engagement

•
The original URL is replaced with a new one that routes to Marketing Cloud click processors which contain the unique identifier.
–
The URLs for the Marketing Cloud click processors are either the default values such as cl.exct.net or branded domains available
through Sender Authentication Package.
•
The send service then replaces the link with one that is unique to the subscriber.
–
<a href="https://cl.exct.net/?qs=adfiodsfjoasdjfochvuasio">Salesforce</a>
Note: All links go to the root of the click domain with these exceptions:
•
Subscription Center (%%subscription_center_url%%) - /subscription_center.aspx
•
Profile Center (%%profile_center_url%%) /profile_center.aspx
•
Unsubscribe Center (%%unsub_center_url%%) /unsub_center.aspx
Subscriber Inbox Link Redirection Initiated by Subscriber
•
After a subscriber clicks a link, their browser makes an HTTP GET request to Marketing Cloud click server which contains the unique
identifier.
•
The Marketing Cloud click server retrieves the applicable user information and logs that the link has been clicked. The retrieval can
occur many times so you can see when and how many times each user opened. The click server responds to the browser with an
HTTP redirect which contains the URL for the destination URL.
–
HTTP/1.1 302 Found Cache-Control: private Content-Type: text/html; charset=utf-8
Location: https://www.example.com Date: Mon, 13 Jun 2016 18:23:40 GMT Connection:
close
Note: It’s possible to update links after send using the Update Job Links option available in Tracking.
•
The browser displays the destination URL to the subscriber.
Dynamic Links
Marketing Cloud supports specifying links which are dynamic using personalization strings or AMPscript. These links can use values from
an attribute, data extension field, or variable to provide the dynamic data.
Personalization strings with attributes can be used when the protocol and domain are included in the href value in the static message
content.
Example using personalization:
<a href="https://www.example.com/?campaign=%%CampaignCode%%%">My Link</a>
For more complex scenarios where the protocol and domain are coming from a dynamic source such as an attribute, data extension
field, or variable then the AMPscript function, RedirectTo is required so that it can be identified as a link.
Example using function:
%%[set @myvariable = concat('https://www.example.com/?campaign=', CampaignCode)]%%
<a href="%%=RedirectTo(@myvariable)=%%">My Link</a>
318
Tracking in Email StudioEmail in Marketing Cloud Engagement
Understand Timing and Tracking
Understand timing and tracking in Email Studio for Marketing Cloud Engagement.
Tracking in this context refers to sending messages to recipients and all the interactions recipients have with them. We refer to each
interaction as an event but as a fact when stored in the database. The first event that occurs in any interaction with a recipient is a Send.
Here are other interactions we recognize and store:
•
Deliveries
•
Bounces
•
Opens
•
Clicks
•
Survey Responses
•
Conversions
•
Forwards
•
Complaints
•
Unsubscribes
While it depends on many factors including some feature settings, a given send takes place over time. A send in this context is all the
individual messages sent to a target audience. Sometimes it can span hours and, in extreme cases, days. The date and time that the
system records for a send fact reflects when the send is injected into a Message Transfer Agent, a device that governs the actual
transmission of the mail to the recipient domain. This value doesn't indicate when we send a message nor when it arrives at its final
destination. Therefore, a response event, anything we track after the original send, does not predate the send itself.
A given send can occur at 12:05 PM, but does not appear on a report or data extract. The processes behind how the system stores that
data expressly for retrieval differs from that which is used to build the contents of the email. The system processes events asynchronously
to achieve the desired throughput. This process results in a delay between when an event actually occurs and when you're able to see
it.
How long can it be between when an event occurs and when it's realized? It is best described with probabilities: our measurements
indicate that 84% appear within one minute, 96% within 15 minutes, and 99% within 60 minutes. While these probabilities cannot have
a material impact relative to conclusions you draw from the data, it does when looking at any given range of data over two or more
successive examinations.
Example
You ask for a listing of sends occurring between 6/1/2009 at 12:00PM through 6/2/2009 at 12:00 PM. The first time you ask (on 6/2/2009
at 12:05PM) the result is 8,640. If you ask the same question tomorrow, that answer is 10,000. While all the work in building and injecting
emails was complete by noon, a portion (10,000 - 8,640) of those sends were not yet realized as facts within our data system at 12:05
PM when you asked the question. Date-based extracts or reports have a greater level of fallibility when the upper range of the time span
is relatively close to the present, the time at which the request is made.
Additional Information
From the time a send occurs until about three days later, your delivery rate is destined to drop sharply within 15 minutes of the send
event and more slowly for the duration. This is because of how bounces work. Most bounces (80%) occur during the process of sending
to a specific recipient. Yet behaviors vary among recipient ISPs with Yahoo.com being a prime example. Due to the extraordinarily high
volumes, Yahoo accepts everything sent to them and only later makes a determination relative to deliverability. Depending on the
timing, you could see your deliverability rate drop several percentage points within minutes.
The delivery to a recipient domain is attempted more than once. The internet could be down or a recipient ISP, most typically smaller
organizations, could be doing maintenance on their mail servers. Our MTAs are configured to keep trying for 72 hours. Intermediate
319
Tracking in Email StudioEmail in Marketing Cloud Engagement
failures are not recorded, but only the terminal failure is recorded when the retry window has expired. Expiration can result in a rash of
bounces approximately 72 hours after the first send attempt.
Opens, clicks, and remaining response events rise over time because the recipient doesn't act upon an item in their inbox the instant it
appears. We recommend not drawing definite conclusions from tracking data where the send has occurred less than seven days ago.
Our current record is an Open that occurred 14 months and 6 days after the send.
AppExchange Deliverability Partners
Marketing Cloud Engagement offers both standard deliverability features and access to a network of partners with advanced deliverability
tools whose products can be purchased via AppExchange . AppExchange deliverability partners have developed products and features
that meet various deliverability needs.
Two primary areas in which our partner products excel:
•
External data sources: For example, seed lists, blocklists, spam traps, Microsoft SNDS, Google Postmaster, other third-party tools
and dashboards. Engagement doesn’t retrieve and store data from these sources, but recognizes the insights that our partners’
investment in these data sources bring to our customers.
•
Ease of use: For example, alerts and dashboards. Our partners have developed monitoring features to help our customers.
For more information, see the knowledge article Marketing Cloud Engagement Deliverability Options.
Partner Seed Lists
With the Partner Seed Lists feature, you can see inbox results within the AppExchange Partner applications.
Seed Lists and Inbox Placement
Engagement metrics can decline unexpectedly if emails are sent to the Spam folder. Inbox service providers don’t issue standard inbox
placement results that Marketing Cloud Engagement can track. Seed Lists are interspersed throughout the audience of an email campaign
for the seed list inbox.
Seed List Administration
You can set up and maintain seed Lists in the AppExchange application. The partner AppExchange application creates and updates seed
lists in Marketing Cloud Engagement using a Partner Seed List API.
Seed List Injection UI
You can select partner Seed Lists for injection into an email send. With auto Seeding you can set a default that includes seeds without
selecting a seed list for injection. You can select seed Lists in the Email Studio Send Flow and the Automation Studio Email Activity.
Seed List Processing Rules
Seeds aren’t subscribers. Email generation and delivery take different processing paths for seeds than for subscribers. Special Seed List
processing features include:
•
Email Personalization Rendering: Dynamic email content is automatically rendered for Partner Seeds without the need to manually
create attributes for seeds.
•
Subscriber Management: Partner Seeds aren’t added to the All Subscribers list (included in Contact Counts) and aren’t susceptible
to Hard and Soft Bounce processing and unsubscribe actions.
•
Super Messages: Partner Seeds don’t count toward super message utilization.
•
Tracking: Partner Seed open and click activities aren’t included in tracking reports. Results vary depending on the open and click
behavior of the seed technology in use.
•
Batched See List Injection: Partner Seeds are broken into batches and interspersed throughout the send process to avoid all seeds
being delivered at one time.
320
AppExchange Deliverability PartnersEmail in Marketing Cloud Engagement

Email Studio
You select partner Seed Lists on the Configure Delivery step of the Email Send Flow. Partner Seed Lists aren’t required and are visible
only if you create at least one seed list. You can install more than one partner application with a mix of available seed lists.
Note: The Return Path Deliverability Seed List option appears if you’re an active Return Path Integration user. You can include
Return Path seeds and Partner Seed Lists in the same send.
Automation Studio
You can inject seed Lists into email sends through Automation Studio. Partner Seed Lists selection is configured in the Email Activity
send flow. Automation Studio Email Activity functions like the Email Send Flow, but you can limit the number of automated sends that
include seeds with varied automation times.
Auto Seed Administration
Set up Auto Seed in the Partner Application.
Auto Seeding
Replace manual seed selection by enabling Auto Seeding, which automatically includes seed lists in any Email Studio or Automation
Studio send as long as the configured audience size threshold is exceeded. Select a single seed as the source of Auto Seeded sends.
Other considerations:
•
Any manually selected injection overrides the Auto Seed settings.
•
The current Auto-Seed settings aren’t prefilled in the partner seed list section of the Send Flow or any other indicator that Auto
Seeding is in place.
•
One seed list per MID can be selected for Auto Seeing. With multiple partner seeds lists, only one partner can have a seed list selected.
Return Path Platform
Marketing Cloud Engagement offers Return Path tools to help you monitor your email deliverability and reputation, test creative renders,
learn how your subscribers are viewing your email, and more. The Return Path product integration is no longer offered. Contact your
account executive regarding interest in this product.
Note: To see support content for Return Path Platform, access the Return Path Help Center from Email Studio. Click Return Path
Platform, and then select Help Center.
Note: The maximum allocation is 15 business units for enabling Return Path reports across multiple business units.
•
Getting Started Guide—Use this guide to find everything to get started.
•
Return Path Platform - Return Path Platform is a holistic solution focused on providing you with an easy way to track your email
program’s performance. You can use the platform for daily monitoring but also to understand, troubleshoot, and resolve deliverability
and reputation issues.
–
ESP Connect Setup Guide—This tool shows bounce, open, and click data by campaign.
•
Email Client Monitor—Email Client Monitor uses pixel tracking to locate subscribers, to identity the types of subscribers, and to see
how long subscribers engage with your email messages. Gain insight into an email campaign and find out what percentage of your
male mailbox subscribers are viewing your email using a mobile device.
•
Inbox Preview—Inbox Preview helps designers identify and correct issues that could affect delivery and response rates, such as
broken HTML or non-displaying images. See how your content renders across the most popular software and web-based email
readers through tests that show email content rendering across various email clients
321
Return Path PlatformEmail in Marketing Cloud Engagement
Adding IP Addresses in Return Path Platform
Inside Return Path Platform, you see the Sender Score and Blacklist tiles, which allow you to look up reputation-related stats like
spam traps, blacklists, and complaints for your sending IP address or domain. If these sections contain no IP addresses or domains,
support can add those for you. Submit a case via Salesforce Help and request that your sending IP addresses and domains are added
to Return Path Platform.
Seed Lists in Sends for Return Path Platform
As a Marketing Cloud Engagement customer, you can add the Inbox Monitor deliverability seed list to your email sends through
auto-seeding or through the send to deliverability checklist.
Auto-Seeding Default Settings for Return Path Platform
The Marketing Cloud Engagement integration automatically manages the Return Path deliverability seed list. In Email Studio, a
deliverability test is automatically launched alongside any campaign that goes to 10,000 or more recipients. This functionality can
be enabled or disabled and the threshold of 10,000 can be changed upon request.
Triggered Sends or Automations for Return Path Platform
For clients who use Email Studio triggered sends, API calls, automations, or journeys to send most of their messages, auto-seeding
is not available. You can still monitor deliverability health for the sending IP address and domains used in your triggered messages.
Email Client Monitor Pixel for Return Path Platform
To include a field called Campaign to be tracked with your Email Client Monitor Pixel, use %%Campaign%% and your tracking pixel
would look like
this: https://pixel.app.returnpath.net/pixel.gif?r=(PIXEL)&c=%%Campaign%%&campaign=%%Campaign%%.
The content inside PIXEL is account-specific code. Select pixel setup from the Email Client Monitor section of Return Path Platform
to find the pixel for your account. The use of %%Campaign%% here implies that you have a field in your Marketing Cloud list or
data extension called Campaign.
Supported Languages for Return Path Platform
Return Path Platform in Marketing Cloud Engagement supports English, Brazilian Portuguese, and French. For help with language
settings, submit a case to support via Salesforce Help.
Training Resources and Help for Return Path Platform
Do you have questions about how Return Path Platform integrates with Email Studio? Do you need a recorded training session to
get up and running?
Adding IP Addresses in Return Path Platform
Inside Return Path Platform, you see the Sender Score and Blacklist tiles, which allow you to look up reputation-related stats like spam
traps, blacklists, and complaints for your sending IP address or domain. If these sections contain no IP addresses or domains, support
can add those for you. Submit a case via Salesforce Help and request that your sending IP addresses and domains are added to Return
Path Platform.
Include this information:
•
Your account name
•
Account number (MID)
•
IP addresses and domains
If you do not know your sending IP addresses or domains, contact support.
Seed Lists in Sends for Return Path Platform
As a Marketing Cloud Engagement customer, you can add the Inbox Monitor deliverability seed list to your email sends through
auto-seeding or through the send to deliverability checklist.
322
Return Path PlatformEmail in Marketing Cloud Engagement

Auto-Seeding
When auto-seeding is enabled in Email Studio, any campaign sent to 10,000 or more subscribers is automatically seeded, generating
an Inbox Placement deliverability test. 10,000 subscribers is the default setting, and your account executive can raise or lower the setting
as necessary. Auto-seeding can also be disabled upon request.
Manual Seeding
During the email send process, select the Send to Deliverability Seed List checkbox to include the seed list.
Warning: Never manually download or upload the deliverability seed list. Return Path automatically updates your list as seed
addresses are enabled and disabled for maintenance or improvements. If you download the list or upload your own copy, your
list will never be updated and your campaigns may not be tracked properly in Return Path Platform.
If you do most of your sending by utilizing triggered sends, automations, or journeys, reference Triggered Sends or Automations on
how to monitor deliverability for triggers and automations.
Where do you find the Send to Deliverability Seed List check box?
From Email Studio, select an email and begin the Send Email process.
When you reach the Configure Deliverability screen, select Send to Deliverability Seed List to include the seed list in your email list,
then send normally. After a short time, the email will appear in the Inbox Placement tile in Return Path Platform for monitoring results.
To access deliverability test results for this send, click Return Path Platform in Email Studio, and select the Inbox Placement tile to view
recent campaigns. It may take a few minutes before deliverability test results appear.
Auto-Seeding Default Settings for Return Path Platform
The Marketing Cloud Engagement integration automatically manages the Return Path deliverability seed list. In Email Studio, a deliverability
test is automatically launched alongside any campaign that goes to 10,000 or more recipients. This functionality can be enabled or
disabled and the threshold of 10,000 can be changed upon request.
Auto-seeding is available for accounts with the Preferred or Complete Return Path Platform package.
Never download or upload a list of seed list email addresses. The seed list is stored in a hidden list and is included in sends as designated
by selecting the Send to Deliverability Seed List checkbox during sending, or by way of auto-seeding.
Triggered Sends or Automations for Return Path Platform
For clients who use Email Studio triggered sends, API calls, automations, or journeys to send most of their messages, auto-seeding is
not available. You can still monitor deliverability health for the sending IP address and domains used in your triggered messages.
Accomplish this monitoring by performing these steps:
1. Create a user-initiated send and enable the Send to Deliverability Seed List checkbox during that setup process.
2. Create a repeating automation in Automation Studio to execute the user-initiated send periodically. Learn how to set up a repeating
automation or request additional training information via Salesforce Help.
323
Return Path PlatformEmail in Marketing Cloud Engagement
Email Client Monitor Pixel for Return Path Platform
To include a field called Campaign to be tracked with your Email Client Monitor Pixel, use %%Campaign%% and your tracking pixel
would look like
this: https://pixel.app.returnpath.net/pixel.gif?r=(PIXEL)&c=%%Campaign%%&campaign=%%Campaign%%.
The content inside PIXEL is account-specific code. Select pixel setup from the Email Client Monitor section of Return Path Platform to
find the pixel for your account. The use of %%Campaign%% here implies that you have a field in your Marketing Cloud list or data
extension called Campaign.
Whatever is populated in that field for a given subscriber is tracked in the pixel. We suggest that you put any campaign identifier in the
pixel twice: once as c= and again as campaign=. The second one is unofficial, but helps guarantee that this identifier is available to
you in all places in pixel tracking.
Supported Languages for Return Path Platform
Return Path Platform in Marketing Cloud Engagement supports English, Brazilian Portuguese, and French. For help with language settings,
submit a case to support via Salesforce Help.
Training Resources and Help for Return Path Platform
Do you have questions about how Return Path Platform integrates with Email Studio? Do you need a recorded training session to get
up and running?
Access the Return Path Platform Getting Started resources or open a case via Salesforce Help.
Email Studio Resources
View resource documentation for Email Studio and Marketing Cloud Engagement.
ASCII Characters
View information about ASCII characters in Marketing Cloud Engagement.
How Full-Text Search Works
Learn how to use full-text search in Marketing Cloud Engagement.
Importing Values into Profile Attributes
Learn about importing values into profile attributes in Marketing Cloud Engagement.
Email Encoding Settings
Learn about email encoding settings in Email Studio for Marketing Cloud Engagement.
International File Encoding
Learn about international file encoding in Email Studio for Marketing Cloud Engagement.
System Response to Process Failures
Learn about how process failures are managed in Email Studio for Marketing Cloud Engagement.
Address Book and Safe Senders List for Email Studio
Add email addresses to your address book or safe senders list to better receive Email Studio messages.
Generate Barcodes in Emails with AMPScript
Marketing Cloud Engagement users can use barcode technology to create personalized messages, such as ticket purchase confirmation
emails. Instead of using a barcode generator, use the AMPScript BarcodeURL function to automatically generate barcodes from
recipient profile information.
324
Email Studio ResourcesEmail in Marketing Cloud Engagement

Email Archiving
To selectively extract a copy of an email message sent through Email Studio and store the copy on the account’s enhanced FTP site,
archive the message. The output file format is EML and can be encrypted. To configure this feature, contact your account executive.
Email Deliverability
The likelihood of your email messages being delivered to a subscriber’s inbox is primarily determined by your sending reputation.
This reputation is based on email authentication, consent and data management, and the content you send. You can manage your
reputation with Marketing Cloud Engagement tools that help you get set up, connect with inboxes, and curate customer content.
ASCII Characters
View information about ASCII characters in Marketing Cloud Engagement.
This guide provides information about ASCII characters that Engagement supports.
ASCII characters are part of a universally standardized character set to preserve the correct presentation of the characters in HTML.
Important: These characters aren’t allowed in Windows folder names and must not appear in your folder names or filenames: \
/ : * <>@#| ? "
Why Use ASCII Characters
US-ASCII is the standard character set used in the United States, so use ASCII characters to create email content in American English.
Using ASCII characters helps maintain your text and decreases the chances of your symbols being read as an action in HTML.
ASCII Characters
This chart shows the ASCII characters supported by Engagement. The characters with an X in the Email Address column can be used in
email addresses. All characters shown can be used in attribute values.
Table 19: ASCII Characters
DescriptionHTML NameHTML NumberActual SymbolASCII DecimalEmail Address
space 32
exclamation point!!33X
double quotes"""34
number sign##35X
dollar sign$$36X
percent sign%%37X
ampersand&&&38X
single quote''39X
opening parenthesis((40
closing parenthesis))41
asterisk**42X
plus sign++43X
325
Email Studio ResourcesEmail in Marketing Cloud Engagement

DescriptionHTML NameHTML NumberActual SymbolASCII DecimalEmail Address
comma,,44X
minus sign - hyphen--45X
period..46X
slash//47X
zero0048X
one1149X
two2250X
three3351X
four4452X
five5553X
six6654X
seven7755X
eight8856X
nine9957X
colon::58
semicolon;;59
less than sign<<<60
equal sign==61X
greater than sign>>>62
question mark??63X
at symbol@@64X
AA65X
BB66X
CC67X
DD68X
EE69X
FF70X
GG71X
HH72X
II73X
326
Email Studio ResourcesEmail in Marketing Cloud Engagement

DescriptionHTML NameHTML NumberActual SymbolASCII DecimalEmail Address
JJ74X
KK75X
LL76X
MM77X
NN78X
OO79X
PP80X
QQ81X
RR82X
SS83X
TT84X
UU85X
VV86X
WW87X
XX88X
YY89X
ZZ90X
opening bracket[[91
backslash\\92
closing bracket]]93
caret - circumflex^^94X
underscore__95X
grave accent``96X
aa97X
bb98X
cc99X
dd100X
ee101X
ff102X
gg103X
327
Email Studio ResourcesEmail in Marketing Cloud Engagement

DescriptionHTML NameHTML NumberActual SymbolASCII DecimalEmail Address
hh104X
ii105X
jj106X
kk107X
ll108X
mm109X
nn110X
oo111X
pp112X
qq113X
rr114X
ss115X
tt116X
uu117X
vv118X
ww119X
xx120X
yy121X
zz122X
opening brace{{123X
vertical bar||124X
closing brace}}125X
equivalency sign -
tilde
~~126X
(not defined in HTML
4 standard)
127
(not defined in HTML
4 standard)
128
(not defined in HTML
4 standard)
129
(not defined in HTML
4 standard)
130
328
Email Studio ResourcesEmail in Marketing Cloud Engagement

DescriptionHTML NameHTML NumberActual SymbolASCII DecimalEmail Address
(not defined in HTML
4 standard)
131
(not defined in HTML
4 standard)
132
(not defined in HTML
4 standard)
133
(not defined in HTML
4 standard)
134
(not defined in HTML
4 standard)
135
(not defined in HTML
4 standard)
136
(not defined in HTML
4 standard)
137
(not defined in HTML
4 standard)
138
(not defined in HTML
4 standard)
139
(not defined in HTML
4 standard)
140
(not defined in HTML
4 standard)
141
(not defined in HTML
4 standard)
142
(not defined in HTML
4 standard)
143
(not defined in HTML
4 standard)
144
(not defined in HTML
4 standard)
145
(not defined in HTML
4 standard)
146
(not defined in HTML
4 standard)
147
(not defined in HTML
4 standard)
148
329
Email Studio ResourcesEmail in Marketing Cloud Engagement

DescriptionHTML NameHTML NumberActual SymbolASCII DecimalEmail Address
(not defined in HTML
4 standard)
149
(not defined in HTML
4 standard)
150
(not defined in HTML
4 standard)
151
(not defined in HTML
4 standard)
152
(not defined in HTML
4 standard)
153
(not defined in HTML
4 standard)
154
(not defined in HTML
4 standard)
155
(not defined in HTML
4 standard)
156
(not defined in HTML
4 standard)
157
(not defined in HTML
4 standard)
158
(not defined in HTML
4 standard)
159
non-breaking space  160
inverted exclamation
mark
¡¡¡161
cent sign¢¢¢162
pound sign£££163
currency sign¤¤¤164
yen sign¥¥¥165
broken vertical bar¦¦¦166
section sign§§§167
spacing diaeresis -
umlaut
¨¨¨168
copyright sign©©
©
169
330
Email Studio ResourcesEmail in Marketing Cloud Engagement

DescriptionHTML NameHTML NumberActual SymbolASCII DecimalEmail Address
feminine ordinal
indicator
ªªª170
left double angle
quotes
«««171
not sign¬¬¬172
soft hyphen­­173
registered trade
mark sign
®®
®
174
spacing macron -
overline
¯¯¯175
degree sign°°°176
plus-or-minus sign±±±177
superscript two -
squared
²²²178
superscript three -
cubed
³³³179
acute accent -
spacing acute
´´´180
micro signµµµ181
pilcrow sign -
paragraph sign
¶¶¶182
middle dot -
Georgian comma
···183
spacing cedilla¸¸¸184
superscript one¹¹¹185
masculine ordinal
indicator
ººº186
right double angle
quotes
»»»187
fraction one quarter¼¼¼188
fraction one half½½½189
fraction three
quarters
¾¾¾190
inverted question
mark
¿¿¿191
331
Email Studio ResourcesEmail in Marketing Cloud Engagement

DescriptionHTML NameHTML NumberActual SymbolASCII DecimalEmail Address
Latin capital letter A
with grave
ÀÀÀ192
Latin capital letter A
with acute
ÁÁÁ193
Latin capital letter A
with circumflex
ÂÂÂ194
Latin capital letter A
with tilde
ÃÃÃ195
Latin capital letter A
with diaeresis
ÄÄÄ196
Latin capital letter A
with ring above
ÅÅÅ197
Latin capital letter AEÆÆÆ198
Latin capital letter C
with cedilla
ÇÇÇ199
Latin capital letter E
with grave
ÈÈÈ200
Latin capital letter E
with acute
ÉÉÉ201
Latin capital letter E
with circumflex
ÊÊÊ202
Latin capital letter E
with diaeresis
ËËË203
Latin capital letter I
with grave
ÌÌÌ204
Latin capital letter I
with acute
ÍÍÍ205
Latin capital letter I
with circumflex
ÎÎÎ206
Latin capital letter I
with diaeresis
ÏÏÏ207
Latin capital letter
ETH
ÐÐÐ208
Latin capital letter N
with tilde
ÑÑÑ209
Latin capital letter O
with grave
ÒÒÒ210
332
Email Studio ResourcesEmail in Marketing Cloud Engagement

DescriptionHTML NameHTML NumberActual SymbolASCII DecimalEmail Address
Latin capital letter O
with acute
ÓÓÓ211
Latin capital letter O
with circumflex
ÔÔÔ212
Latin capital letter O
with tilde
ÕÕÕ213
Latin capital letter O
with diaeresis
ÖÖÖ214
multiplication sign×××215
Latin capital letter O
with slash
ØØØ216
Latin capital letter U
with grave
ÙÙÙ217
Latin capital letter U
with acute
ÚÚÚ218
Latin capital letter U
with circumflex
ÛÛÛ219
Latin capital letter U
with diaeresis
ÜÜÜ220
Latin capital letter Y
with acute
ÝÝÝ221
Latin capital letter
THORN
ÞÞÞ222
Latin small letter
sharp s - ess-zed
ßßß223
Latin small letter a
with grave
ààà224
Latin small letter a
with acute
ááá225
Latin small letter a
with circumflex
âââ226
Latin small letter a
with tilde
ããã227
Latin small letter a
with diaeresis
äää228
Latin small letter a
with ring above
ååå229
333
Email Studio ResourcesEmail in Marketing Cloud Engagement

DescriptionHTML NameHTML NumberActual SymbolASCII DecimalEmail Address
Latin small letter aeæææ230
Latin small letter c
with cedilla
ççç231
Latin small letter e
with grave
èèè232
Latin small letter e
with acute
ééé233
Latin small letter e
with circumflex
êêê234
Latin small letter e
with diaeresis
ëëë235
Latin small letter i
with grave
ììì236
Latin small letter i
with acute
ííí237
Latin small letter i
with circumflex
îîî238
Latin small letter i
with diaeresis
ïïï239
Latin small letter ethððð240
Latin small letter n
with tilde
ñññ241
Latin small letter o
with grave
òòò242
Latin small letter o
with acute
óóó243
Latin small letter o
with circumflex
ôôô244
Latin small letter o
with tilde
õõõ245
Latin small letter o
with diaeresis
ööö246
division sign÷÷÷247
Latin small letter o
with slash
øøø248
334
Email Studio ResourcesEmail in Marketing Cloud Engagement
DescriptionHTML NameHTML NumberActual SymbolASCII DecimalEmail Address
Latin small letter u
with grave
ùùù249
Latin small letter u
with acute
úúú250
Latin small letter u
with circumflex
ûûû251
Latin small letter u
with diaeresis
üüü252
Latin small letter y
with acute
ýýý253
Latin small letter
thorn
þþþ254
Latin small letter y
with diaeresis
ÿÿÿ255
How Full-Text Search Works
Learn how to use full-text search in Marketing Cloud Engagement.
Note: You cannot search for Salesforce Data Extensions in the Subscriber selector.
Full-Text search is used when searching for URLs in job links, list names, group names, data extension names, and individual subscribers
in lists and groups in Subscriber Preview.
Full-Text search is a type of search that returns every word or phrase, excluding ignored text, beginning with the search term. The search
only searches data in the searchable field. Search must contain at least three characters before you can start the search. Entering more
characters can improve the performance of the search. The search searches phrases in English and works with some Latin-based languages.
To learn more about Full-Text search, see Full-Text Search in Microsoft Developer Network.
Ignored text includes characters, numbers, and words filtered out of full-text search phrases because they add no value to a search. For
example, full-text search ignores words such as a, and, the, and my. If your search contains ignored text, your results can be limited. We
recommend using search terms that do not contain ignored text.
Your search cannot include wildcard characters, which are special characters used for unknown text. For example, you cannot use *2015
to find everything ending with 2015. Your search results would contain everything that begins with 2015. Examples of wildcard characters
include *, ?, [ ], !, and #.
Scenario 1
A Northern Trail Outfitters marketer wants to update the following URL: http://www.sample-company.com/search/full-text/?id=Jul2015.
Searching for the following words or phrases would return the specified URL:
•
http
•
www
•
sample
•
company
335
Email Studio ResourcesEmail in Marketing Cloud Engagement

•
com
•
search
•
full
•
text
•
id
•
Jul2015
You can also use the beginning portion of these words or phrases, such as sam, co, or Jul. If you searched on ample or 2015, this URL
does not return because the portions of the URL separated by punctuation do not begin with ample or 2015.
Scenario 2
A Northern Trail Outfitters marketer wants search for their January 2015 Folder. Searching for the following words or phrases would
return the specified email address:
•
January
•
Folder
Ignored Text
Note: The text .com is ignored when used right before and after the @ when search for subscribers in a list.
Table 20: Ignored Text
whothatmoreeach.comA0}<empty
space>
willthemostelseaboutB1~
!
withtheirmuchforafterC2‚
"
wouldthemmustfromallD3„
#
youthenmygetalsoE4…
$
yourthere
these
never
no
got
had
an
and
F
G
5
6
†
‡
%
&
theynowhasanotherH7‰
(
thisofhaveanyI8‹
)
thoseonheareJ9“
”
*
throughonlyherasK
+
toorhereatL•
,
toootherhimbeM–
-
underourhimselfbecauseN—
.
upouthisbeenO›
/
useoverhowbeforeP¡
:
veryreifbeingQ¦
;
wantsaidinbetweenR§
<
wassameintobothS«
336
Email Studio ResourcesEmail in Marketing Cloud Engagement

= wayseeisbutT±
> weshoulditbyU¶
? wellsinceitscameV·
@ weresojustcanW»
[ whatsomelikecomeX¿
\ whenstillmakecouldY×
] wheresuchmanydidZ÷
_^
{
which
while
take
than
me
might
do
does
|
Importing Values into Profile Attributes
Learn about importing values into profile attributes in Marketing Cloud Engagement.
This process applies to imports into profile attributes only, which occurs when you import subscribers into lists and when the import is
set to Add new subscribers and update subscribers that exist (Add and update) or Update existing subscribers but do not add subscribers
that do not exist (Update only). The description in this document cannot apply when:
•
Adding information to a subscriber list in a way other than importing, for example, by manually creating a subscriber in the application
interface or populating a list with a Smart Capture form.
•
Importing subscribers or other information into a data extension.
•
The import setting is Add new subscribers but do not update subscribers that exist (Add only).
Explanation
You create profile attributes to contain the information you import about your subscribers. You can set up rules for the profile attributes
to be required or optional, to have restricted values, and to have default values.
Part of the import process is to map the fields in your import file to the profile attributes. If you map a field that contains values that do
not follow the rules of the profile attributes, the system decides what to do with the data.
Importing into a Text Type Field with No Limit
This table describes how the system processes import data for profile attributes where:
•
Data Type is Text
•
No Minimum Length is set
•
No Maximum Length is set
Note: Imports version 6 ignores NULL values upon import and retains the original value within the system. Imports on version 1
are handled according to the proceeding documentation, overwriting the previous value with the NULL value.
337
Email Studio ResourcesEmail in Marketing Cloud Engagement

Table 21: Importing with No Limit
Imported value is not blankImported value is blank
System sets attribute to the value you
imported.
System sets attribute to default value.Attribute has a Default Value
System sets attribute to the value you
imported.
System sets attribute to blank, even if it
previously had a value.
Attribute has no Default Value
If the imported value is on the restricted
values list, the system sets attribute to the
System sets attribute to default value.Attribute has a list of Restricted Values
value you imported. If the value you
imported is not on the list, the system skips
the subscriber.
System sets attribute to the value you
imported.
System skips the subscriber.Attribute is Required
System sets attribute to the value you
imported.
System sets attribute to default value.Attribute is Required and has a Default Value
Import into a Text or Numeric Type Field with a Limit
This table describes how the system processes import data for profile attributes where:
•
Data Type is Text or Numeric
•
Minimum Length or Maximum Length is set
Table 22: Importing with a Limit
Imported value is not
within limit
Imported value is within
limit
Imported value is blank
System skips the subscriber.System sets attribute to the
value you imported.
System sets attribute to default
value.
Attribute has a Default Value
System skips the subscriber.System sets attribute to the
value you imported.
System sets attribute to blank,
even if it previously had a value.
Attribute has no Default Value
System skips the subscriber.If the imported value is on the
valid values list, the system sets
System sets attribute to default
value.
Attribute has a list of Restricted
Values
attribute to the value you
imported. If the value you
imported is not on the list, the
system skips the subscriber.
System skips the subscriber.System sets attribute to the
value you imported.
System skips the subscriber.Attribute is Required
System skips the subscriber.System sets attribute to the
value you imported.
System sets attribute to default
value.
Attribute is Required and has a
Default Value
338
Email Studio ResourcesEmail in Marketing Cloud Engagement
Email Encoding Settings
Learn about email encoding settings in Email Studio for Marketing Cloud Engagement.
Today's international marketplace calls for marketers to reach audiences around the globe. If you have subscribers in Japan, emails in
English will unlikely reach them. This raises many questions. Even if you can produce emails in German, will the German email server
allow your email to be delivered? If your Thai email is delivered, will the Thai PC know how to display your email? If your Russian email
is delivered and displays correctly, what happens when that subscriber clicks the Profile Center link? The International Sends feature
addresses these questions to help you to achieve your best possible email deliverability, readability, and functionality in non-English
markets.
It is recommended that you use the Unicode UTF-8 language encoding for all your international emails. More information on how
encoding works and how to encode your emails follows. Unicode UTF-8 formatting is by far the most widely accepted and most forgiving
encoding available outside the U.S.
However, Unicode UTF-8 encoding is not always the best encoding to use. There are large areas of world population where a local
language encoding is preferred or where Unicode UTF-8 encoding is not accepted. When you become aware of those situations in your
subscriber base, our International Sends feature allows you to choose the better encoding to give your message the best chance to be
delivered and read by your subscribers.
Change Email Encoding Settings
Change email encoding settings in Email Studio.
International Sends Best Practices
International Sends best practices for Email Studio can help you reach your subscribers as you create your international sends.
International Sends Known Challenges
View known challenges when using international sends in Email Studio.
International Sends Tests
Learn about testing your international emails in Email Studio before sending to subscribers.
International Sends Glossary
View the international sends glossary for Email Studio for Marketing Cloud Engagement.
Understand International Sends
The International Sends feature in Email Studio lets you select the specific language encoding for your email and provides translated
supporting pages for your subscribers.
Change Email Encoding Settings
Change email encoding settings in Email Studio.
1. Click the Content tab in the navigation bar.
2. Click my emails.
3. Select the checkbox next to the email to change.
4. Click Properties.
5. Select the language encoding from the Language dropdown.
6. Click OK.
International Sends Best Practices
International Sends best practices for Email Studio can help you reach your subscribers as you create your international sends.
339
Email Studio ResourcesEmail in Marketing Cloud Engagement

Know Your Subscribers
You have a better chance to connect with your subscriber when you send specific, targeted, and relevant emails. Consider how you can
build relationships with your subscriber so that you can send the "right" email.
Send Email in the Subscriber's Native Language
Your message is best communicated in the recipient's native language. In almost all situations, open rates, click rates, and conversion
rates are highest for these emails. Use your subscribers' language preferences.
Investigate your subscriber base by thinking about these questions. Where did your lists come from? Where are your subscribers located?
What can you assume about their language preferences?
It can be faster to ask the subscribers directly. Use Surveys to Learn Each Subscriber's Language Preference.
Consider sending a survey to your subscribers to discover their preferred language. Make the survey as simple as possible; we recommend
a single question with a list of radio-button language options for them to select. You can design the survey to populate their answers
into the desired attribute fields.
Segment Your Lists Based on Language Preference
After you have your subscribers' language preference as an attribute, you can segment your lists into groups based on language. You
can use these groups to send emails in the specified language to each group of subscribers. For example, send Japanese emails only to
subscribers who prefer Japanese.
Use this task to create a group based on an attribute:
•
Click the Subscribers tab from the navigation bar.
•
Click my groups.
•
To start the wizard, click Create Group from the toolbar and click Next.
•
Select Build a rule based on profiles and preferences and click Next.
•
Complete the Build Rule page and click Next.
•
Specify the name of the group and where it resides then click Create. If necessary, create a subscriber group folder by clicking New,
then click OK.
•
Click Finish.
Create and Send a Separate Email Specific to Each Encoding
Each email you create can use only one language encoding, for example, Japanese or Chinese but not both. Ensure that your emails
and groups are designed so that your emails are sent only to subscribers in geographical areas where they are likely to accept the assigned
encoding.
When you send an email, the application creates an email header. The email header contains the From information (name and email
address), To information, date the email was sent, subject line of the message, and other information relating to the send. The email
header is encoded with the same character encoding you use for the body of the email. If you can, use email header information that is
in the same language as the body of the email. Create a language-specific subject line and different sender profile for each language to
better ensure that your email header displays correctly.
Note: We do not recommend using non-ASCII characters in your From information and subject line for emails sent using the
send wizard.
340
Email Studio ResourcesEmail in Marketing Cloud Engagement

Example
Send product information to subscribers in the U.S. and Japan. The email you've designed has marketing information in English and
technical specifications in Japanese. When you test your email with Unicode encoding, your Japanese testers can't see the Japanese
characters. When you test your email with Japanese encoding, your U.S. testers have trouble reading the email because foreign encoded
emails look like spam in the U.S.
So, you redesign the email into two emails: one in English, another in Japanese. Each email is encoding uniquely and sent to the
appropriate subscribers. Everyone receives what they need and can easily read all the text.
Create Different Content Headers and Footers for Each Language
Make the content header and footer sections reflect what you know about your subscriber.
We recommend that you create language-specific content headers and footers for all your international emails. You can manage these
headers in the following ways:
•
If you create a send definition for your email sends, you can choose the content header and footer to use as part of the Delivery
Profile.
•
You can use the HTML Paste method to create your emails, which bypass automatic content headers and footers.
•
You can use space in your template to put content header and footer text directly into your templated email.
Note: Not all non-ASCII characters are supported in footers, such as double-byte characters like Japanese, Chinese, Thai, and
Russian. In these instances, choose an option which allows you to include the text within the body of the email.
Working with Non-ASCII Characters
You can find new challenges when trying to create email content in a different language. If you can’t create your content by typing in
the foreign characters, copy and paste the foreign language characters directly into the email message body.
Cutting and Pasting
You can be provided any needed non-English text from an external source, such as your marketing team. In that situation, you can simply
cut the text from your source and paste it into your email content areas.
To minimize possible character corruption, we suggest that you do not edit your foreign language text within the editor. Instead:
•
Keep a separate text copy, saving it with UTF-8 encoding.
•
Edit your copy in a text editor.
•
Save changes on your computer under a different name each time.
•
Paste the edited copy directly in the editor.
Change Keyboard Settings
When your desired language is not supported within standard ASCII character set, change your keyboard layout so you can type in
another character set. However, this technique requires more software outside what the editor can provide or support. Once you have
the required software, refer to the purchased software manuals and your computer's system manual to learn how to configure and use
these tools.
Encourage Recipients to View as a Web Page
We recommend that you encourage your subscribers to View as a Web Page. Most of the concerns and issues with email rending via
language encoding disappear when viewing the content via an Internet browser.
We recommend that you always provide the standard “Click here to view as a web page” link in your emails. We also recommend that
you include more links in the body of the email and that you actively mention and encourage use of those links. An example can be
phrased like, "If you experience any problems viewing this email, click this link to be taken to a web version."
Learn and Follow International Spam laws
341
Email Studio ResourcesEmail in Marketing Cloud Engagement
Email Studio is designed to help you comply with U.S. spam laws. We believe in our business practices and believe that they are valid
around the world. However, we cannot guarantee that our system, emails, or business practices are legal in other countries. We strongly
recommend that you seek legal counsel on a country by country basis.
International Sends Known Challenges
View known challenges when using international sends in Email Studio.
The International Sends feature offers comprehensive encoding options and specific pre-translated landing pages. However, there are
always limitations. Note these challenges:
Challenges with Using Surveys
Because of the complexities of encodings used in the transmission of survey data, surveys present unique challenges in international
sends. A large portion of email clients can’t correctly transmit non-English text data in a way we can collect and report that data for you.
Based on this and other concerns, we strongly encourage you to follow these guidelines:
•
Make survey questions as short as possible
•
Use radio button or True or False answer types only
•
Avoid the use of personalization string
•
Never request written responses via the survey
In our testing, these guidelines allow you to successfully collect information from international subscribers. As always, test any surveys
extensively before sending to live subscribers.
Challenges with Subject Lines
We always recommend using the subject line to make your emails inviting and familiar. The subject line is a great place to add
personalization to your international sends and can make a good impression when in the subscriber's native language.
While the editor accepts virtually any characters pasted or typed into the subject line of our emails, there are concerns.
•
There are large email services that ignore language encoding when rendering subject lines, such as Yahoo!
•
If your language encoding is wrong, the better email services can figure it out from text in the body of the email. But if you chose
the wrong encoding, even the best email services don’t render your subject line correctly.
•
Even if the recipient's email server accepts the encoding, the email client can’t render the subject line correctly.
Since most of the issues with subject lines are specific to the recipient's service provider or email client software, they’re difficult to track
or anticipate. We recommend that you test extensively across many servers and clients before you send an email with non-ASCII characters
in the subject line.
Non-ASCII Character Gaps
Due to the very nature of character encoding, the process only works when the characters you’re using are all anticipated and translated.
There are some characters that aren’t supported in certain places for different reasons. We encourage you to test extensively across
different situations. We also provide the following known gaps in character support:
•
Can’t use most non-ASCII characters in standard attributes, so create your lists using data extensions.
•
Can’t use any non-ASCII characters in email addresses
•
Can’t use some special business characters in Asian language sets, such as
®
,
©
, and ¢
•
Can’t use the Euro symbol in many language sets, even European (be sure to test)
342
Email Studio ResourcesEmail in Marketing Cloud Engagement
•
Can’t use some characters in certain encodings, for example, Not all Russian characters are supported in the Russian encoding KOI8-R
(be sure to test)
Inconsistencies in Email Services
Every private email server at each company, in each region, and in each city and town can all handle your emails differently. Likewise,
despite the wide use and popularity of major email services, such as Yahoo!, AOL, Gmail, Hotmail, they each handle emails differently.
Differences in handling emails can be an inconvenience to domestic emails and represents a challenge to designing and deploying
emails in non-English languages.
Consider these observations. Unfortunately, these services change constantly so verify specific behaviors independently.
•
Yahoo! and Yahoo! Japan ignore subject line encoding entirely but display correctly in the body of the email, even if you choose the
wrong encoding.
•
Gmail converts double-byte characters to their decimal equivalents in the body of emails. Subject lines can handle most characters,
but only if the email is encoded correctly.
•
Most smaller local service providers give their customers web-based email viewers. These viewers tend to be overly simplified and
typically ignore subject line encoding and can ignore all language encoding entirely.
•
While each business configures their email servers uniquely, some generalities can be observed. Most business email servers allow
and handle encoded language characters well in the body of the email, even if the wrong encoding is used. Subject lines can typically
handle most characters, but only if the email is encoded correctly.
International Sends Tests
Learn about testing your international emails in Email Studio before sending to subscribers.
It is important to test your international emails before sending to subscribers. Due to the fragile nature of language encoding, your
message can become lost or distorted at many of the points between you and your subscribers. The best way to be confident that your
email works is to perform extensive and effective live testing.
Create an Effective Testing Plan
Sending yourself your international email shows you how that email performs on your PC, but not how it performs in real situations.
Develop a testing plan that reasonably recreates the same challenges and contingencies that your live emails experience. The more
realistic your test sends, the more effective your results are.
We recommend at least these actions to test international send emails:
•
Send yourself the email to test how well it delivers and renders.
•
Send the email to carefully selected individuals who are willing to test for you.
•
Send the email to various email services such as Yahoo! and Gmail.
•
Send the email to a local tester physically in and familiar with the region, if possible.
Selecting Testers
Most people solicit help in testing emails to lessen the load. We recommend that you recruit testers to cover a broad range of email
delivery and display options. Regardless of your relationship with the tester, always be sure to communicate your expectations of them
clearly up front.
Internal Testers
Co-workers are usually a good first choice for getting help with testing your emails. Try to select people with different machines and
even different email servers and networks, if possible. Make sure that their boss is OK with the extra duties.
343
Email Studio ResourcesEmail in Marketing Cloud Engagement

Major Email Services
We recommend you test by sending your email to as many major email services as possible, such as Yahoo!, AOL, Gmail, and Hotmail.
You can usually create free accounts at these services yourself, or you can have friends or co-workers that can give you access. These
services are important because they typically represent a large portion of your subscribers and they each filter, decode, and render emails
differently.
Trusted Customers
In addition to testing internally, you can also consider asking one or more of your good customers to help you test. Asking them can be
risky, so it's not encouraged, but in some situations it works well for everyone involved. Be sure to communicate clearly up front all
expectations and choose testers wisely.
International Testers
If you have access to friends, co-workers, or trusted customers internationally, they can be especially valuable testing resources. Testing
your Italian email across Italian email servers to an Italian email address and on a PC configured to read Italian is the best testing scenario
because it is closest to real life. As with any other group, choose your international testers carefully and be sure to clearly communicate
your needs and expectations up front.
Create Testing Lists
It is recommended that you create lists specifically for testing. Many find it useful to create a test list containing just their own email
address to send single tests to themselves all throughout the process. You can find value in creating many different test lists for different
situations, such as one for internal testers, one for external testers, one for Macintosh testers, and one for large email services.
Emulate Your Subscriber's System
We recommended that you install regional language support and configure web browser language preferences on your PC so that you
can test your emails to verify that they render correctly in the language. For example, load Japanese characters support on your PC before
you send yourself an email in Japanese. This allows you to see the characters and confirm that the email is working. You can also view
the Profile Center and other landing pages in any of the supported languages simply by setting your PC to prefer that language for web
pages. You can find detailed instructions on how to do this for a PC in Appendix B and for a Macintosh in Appendix C.
Common Issues to Test Against
Always be sure that you and your testers carefully review the entire test email for any issues--from spelling errors to content ambiguities
to formatting issues. For international emails, we recommend that you pay particular attention to these sections of test emails:
•
Email subject line
•
Rendering of all non-ASCII characters
•
Business characters (ex:
®
,
©
, ¢, all money symbols but Euro symbol in particular)
•
Content headers and footers, particularly ones that include double-byte characters
•
Surveys
•
All links, particularly the required Profile Center link
International Sends Glossary
View the international sends glossary for Email Studio for Marketing Cloud Engagement.
Table 23: International Sends Glossary
DefinitionTerm
a code to represent English as plain text for computers-7 binary bits = 1 character. The first 127 ASCII
characters are interchangeable in Unicode; characters between 128-255 are High, or Extended ASCII.
(American Standard Code for Information Interchange)
ASCII
344
Email Studio ResourcesEmail in Marketing Cloud Engagement

DefinitionTerm
consists of 2 mutually exclusive, unique numbers, 0 (off) & 1 (on). ASCII code is binary, as opposed to
MIME.
binary
a unit of measurement for computer memory-1 bit = a single characterbit
a unit of measurement for computer memory-8 bits = 1 bytebyte
Chinese, Japanese, Korean (CJK) are syllabic language-each syllable = a double byte in computer
memory
double byte
each letter = a single byte in computer memory-English is an alphabetic, single-byte languagesingle byte
a unique numeric sequence that represents a unit of textual informationcharacter
a code page that relates to a specific encoding tablecharacter set
the top of the content of your message. If you use templates to create your email messages, the header
is defined in the template.
content header
email successfully reaching its destination-your subscriber. Unsuccessful email either goes to SPAM
or fails to deliver.
deliverability
the From information, To information, date the email was sent, subject line of the message, and other
information relating to the sending of the message
email header
a standard to consistently display information (in this guide, non-English text) by mail serversencoding
the ASCII-compatible language used to produce documents on browsers (Hypertext Markup Language)HTML
a virtual post office that delivers according to user-definable rulesmail server
a standard supporting text in other than ASCII & multipart messages (Multipurpose Internet Mail
Extensions)
MIME
screen garbage resulting from incorrectly encoded characters (borrowed from Japanese)mojibake
textual data in (ASCII-compatible)plain text
successful rendering of your email-it looks the same to your subscriber as that which you sent (see
Rendering).
readability
how data displays on a browser (see Readability).render
an option for an encoding standard you select to label & route your email-used to specify a region
when Unicode fails
language
a standard to represent characters-16 bits = 1 character. The first 128 ASCII characters are
Unicode-compatible.
Unicode
an 8-bit, variable-width encoding, which maximizes compatibility with ASCIIUTF-8
Understand International Sends
The International Sends feature in Email Studio lets you select the specific language encoding for your email and provides translated
supporting pages for your subscribers.
345
Email Studio ResourcesEmail in Marketing Cloud Engagement
The International Sends feature gives your emails the best chance of being received and rendering correctly, and your standard landing
pages automatically appear in your subscribers’ preferred language.
Choose the Encoding Standard for Your Email
When International Sends is enabled for your account, the language field sets the content-type value in the email header. Changing the
language option does not update the meta tag in the HTML. You can change the encoding selection for any existing emails (they default
to US-ASCII encoding). We recommend Unicode UTF-8 for most international audiences, but it can be more appropriate to select a
specific, local language encoding for all or a portion of your subscribers. Using the correct encoding is critical because it simultaneously
improves your email's chance of being delivered successfully and improves the ability of the subscriber's PC to display the characters
correctly.
Example
When reviewing your email tracking results, you see that your English emails have been successful in Europe, but have high bounce
rates and low open and click rates in China. You are not a surprised because most PCs in China are configured only for Chinese and can’t
display English well.
You decide to have your emails translated into Chinese by a localization service. Then you send the English emails (with Unicode UTF-8
encoding) to your European subscribers and the Chinese emails (with Chinese Big-5 encoding) to your Chinese subscribers.
As a result, the delivery, open, and click rates all increase for the Chinese emails. The Chinese email servers were expecting Chinese
encoding, so your Chinese-encoded email looked less like spam. The Chinese PCs could easily decode Chinese encoded text, so the
emails displayed properly.
The following language encodings are supported:
•
Big5 - Chinese (Traditional)
•
EUC-KR- Korean
•
GB2312 - Chinese (Simplified)
•
ISO-8859-1 - Western European: Danish, Dutch (partial), English, Faroese, Finnish (partial), French (partial), German, Icelandic, Irish,
Italian, Norwegian, Portuguese, Rhaeto-Romanic, Scottish Gaelic, Spanish, and Swedish. Also: Albanian, Indonesian, Afrikaans, and
Swahili.
•
ISO-8859-2 - Central European: Bosnian, Polish, Croatian, Czech, Slovak, Slovenian, and Hungarian.
•
ISO-2022-JP - Japanese
•
KOI8-R - Russian, Bulgarian
•
Shift-JIS - Japanese
•
UTF-8 (Unicode) - Most languages, gaining universal acceptance in most areas of the world
•
US-ASCII - English: United States (default for non-International emails)
Automatically Translated Landing Pages
In addition to encoding emails, the International Sends feature provides translated versions of the standard landing pages:
•
Profile Center
•
Subscription Center
•
Unsubscribe Confirmation
•
Forward to a Friend
These pages have been translated into 21 languages. The language that appears when a subscriber visits the landing pages depends
on the language preference the subscriber has set in the browser, even if that language is different than the email language.
346
Email Studio ResourcesEmail in Marketing Cloud Engagement
Translated landing pages are available in these languages.
•
Chinese
•
Czech
•
Danish
•
Dutch
•
Finnish
•
French
•
German
•
Greek
•
Hungarian
•
Italian
•
Japanese
•
Korean
•
Norwegian
•
Polish
•
Portuguese
•
Romanian
•
Russian
•
Spanish
•
Swedish
•
Thai
•
Turkish
Example
Your subscriber in France has their web browser configured to prefer French language for web pages. When they click the Profile Center
link in your email, we send the French version of their Profile Center.
The following screenshots are examples of landing pages in the subscriber's language.
The Profile Center page displayed in Spanish:
347
Email Studio ResourcesEmail in Marketing Cloud Engagement

The Subscription Center page displayed in Japanese:
Attribute names and values are not translated on the landing pages. For example, the attribute names Full Name and Email Address
appear in English. Likewise, the actual field values can only be saved as English text and appear here as English text, as well. There is
limited support for some Western European characters. We highly recommend that you extensively test this feature with your live data.
348
Email Studio ResourcesEmail in Marketing Cloud Engagement
Automatically Translated Forward-to-a-Friend Messages
When a subscriber clicks a forward-to-a-friend link in your email, a forward-to-a-friend landing page appears in the language indicated
in the subscriber's browser preferences. When the subscriber completes and submits the forward-to-a-friend form, the system forwards
the message to the email address the subscriber provided.
The message that the friend receives contains an introduction, a personal message, and the body of the message being forwarded:
•
The introduction explains who forwarded the email and contains a link to opt in to the mailing list. The introduction appears in the
same language as the forward-to-a-friend landing page it was sent from.
•
The personal message is the text that the subscriber entered when filling out the forward-to-a-friend form. The personal message
appears in the language the subscriber wrote it.
•
The body of the forwarded message is the same as the message the subscriber originally received. It appears in the original language,
even if the email is in a different language than the forward-to-a-friend landing page.
English-language email forwarded through a Spanish forward-to-a-friend page:
349
Email Studio ResourcesEmail in Marketing Cloud Engagement

International File Encoding
Learn about international file encoding in Email Studio for Marketing Cloud Engagement.
International file encoding allows you to select the type of file encoding you want to use for imports and exports. The system lets you
choose your file encoding for these import and export features:
Import
•
subscriber import wizard
•
data extension import wizard
350
Email Studio ResourcesEmail in Marketing Cloud Engagement

•
import definition
Export
•
subscriber export wizard
•
data extension export wizard
•
tracking details
•
data extracts
Note: The Automation Studio Data Extract activity does not support file encoding.
Encoding Types
If you do not choose one, Unicode - UTF is default.
•
Unicode - UTF
•
United States – US-ASII
•
Japanese – Shift-JIS
•
Korean – EUC-KR
•
Western European – iso-8859-1
•
Chinese – big5
•
Russian – koi8-r
•
Japanese – iso-2022-JP
•
ISO-8859-2 (Central European)
•
Thai ISO 8859-11)
•
Simplified Chinese
System Response to Process Failures
Learn about how process failures are managed in Email Studio for Marketing Cloud Engagement.
Message Failure Due to Technical Issues
Messages that fail to deploy due to technical issues are placed in a retry queue. The system attempts to deliver the message periodically
over a 72-hour period. If the system is unable to deliver the messages within the 72-hour window, the messages are marked as bounced.
Logs are available to identify delayed messages. An automated report could be created from these logs, and you can customize the
report to include any available data.
Real-time campaigns have the same safeguards as batch campaigns. If a disruption of service occurs, real-time campaigns also include
the ability to queue the API request . Real-time campaign API requests can also be received at a remote data center for processing.
Message Failure Due to Non-Technical Issues
An example of a non-technical issue is when an email address is not valid.
Messages that could not be delivered due to non-technical issues are logged. Automated extracts of these messages can be accomplished
using the Marketing Cloud Engagement automation engine. Custom extracts can be created that contain any data we have available.
No difference exists between real-time and batch campaigns.
351
Email Studio ResourcesEmail in Marketing Cloud Engagement

Export Failures
An example of an export failure is when you require a feed of bounces, but an issue occurs that prevents the data feed from being
exported, perhaps web service is unavailable.
Data exports can generate notifications when errors occur. Data exports support the ability to re-execute exports using the same
parameters and returning the same data as a failed run. If the failure is due to an issue on the client's side, the system retries until the
data can be delivered.
Address Book and Safe Senders List for Email Studio
Add email addresses to your address book or safe senders list to better receive Email Studio messages.
Adding email addresses to your address book or safe senders list helps ensure that the messages arrive in your inbox instead of a spam
filter.
Gmail (Current)
1. Open a message from your preferred sender.
2. Click the arrow next to Reply.
3. Select Add <Sender> to Contacts list.
Gmail notifies you that the sender is on your contacts list.
352
Email Studio ResourcesEmail in Marketing Cloud Engagement

Gmail
1. Mouse over the Settings menu icon and select Settings.
2. Click Filters and then Add.
3. Enter a Filter Name.
4. Complete one of these steps:
a. Enter the domain of the email you want to allowlist in the Sender field
b. Select Inbox as the folder to deliver the email to.
5. Click Save and then click Save again.
Hotmail
1. Open a message from your preferred sender.
2. Click the Add to Contacts link next to the sender's name.
3. Hotmail now contains the sender's email address in your address book. You can click the Edit Contact link next to the name now
to add more information.
4. Enter more contact information and click Save when you finish.
AOL
1. In your AOL account, click the Contacts button.
2. In Contacts, click New.
3. Enter the contact information and click Create.
Yahoo
1. Open a message from your preferred sender.
2. Click the icon next to the sender's email address.
3. Enter any additional information about the sender and click Add to Address Book.
Juno
1. Open a message from your preferred sender.
2. Click the Add to Contacts link next to the email address.
3. Enter any additional information about your contact and click Save.
Outlook
1. Open an email message from your preferred sender.
2. Right-click on the name of the preferred sender and select Add to Outlook Contacts.
3. Add any additional information to the contact record and click Save.
353
Email Studio ResourcesEmail in Marketing Cloud Engagement

Thunderbird
1. In Thunderbird, click Address Book.
2. Click New Contact.
3. Enter your preferred sender's information and click OK.
Mail
1. Open a message from your preferred sender.
2. Click Message and select Add Sender to Address Book.
3. You can also right-click the sender's name and select Add to Address Book.
4. Enter any additional information and click Save.
Generate Barcodes in Emails with AMPScript
Marketing Cloud Engagement users can use barcode technology to create personalized messages, such as ticket purchase confirmation
emails. Instead of using a barcode generator, use the AMPScript BarcodeURL function to automatically generate barcodes from recipient
profile information.
Create a Scannable E-Ticket Scenario
Thank You: Special thanks to Trailblazer Karol Cholewa for contributing this content.
This scenario describes how to create confirmation emails that staff can scan at a registration point directly from a participant’s mobile
phone.
As a marketer, you assign each attendee a unique ticket ID based on name and email address captured from an online registration form.
Use smart capture in a CloudPages landing page to collect the data in a data extension. If your form is not integrated with Marketing
Cloud Engagement, manually enter the information in a sendable data extension. Then, with Content Builder and code snippets, build
a personalized confirmation email with the unique ticket ID encoded in a barcode image. When the online registration is complete, the
event organizer emails the personalized barcode e-tickets to each recipient in the data extension.
Sample Data Extension Structure
Set the email data extension field to EmailAddress and the other fields to 128-character Text.
BarcodeLastNameFirstNameSubscriberKeyEmail
OKVKTZ0K9ODoeJohn[email protected][email protected]
HYW1D8XXDUSmithKim[email protected][email protected]
31FPTXMR6IClarkBen[email protected][email protected]
0OAHFSCGG4WilliamsRobert[email protected][email protected]
AMPScript Code Snippet for the Email
For e-tickets scanned on mobile phones, this example uses the common Code128Auto, which supports the alphanumeric ASCII characters
in the ticket ID. This barcode type is also narrow and high density, which encodes data with the fewest bars. This example adjusts the
354
Email Studio ResourcesEmail in Marketing Cloud Engagement

width to 300 px and height to 100 px. The barcode image is the default black and white as we recommend the highest contrast for fast
mobile screen scanning. See the AMPScript BarCodeURL function for available barcode types, parameters, and examples.
%%[
var @barcode, @ticket, @firstName, @lastName, @fullName
set @ticket = AttributeValue("Barcode")
set @fullName = Concat(@firstName," ",@lastName)
set @barcode = BarcodeURL(@ticket, "Code128Auto", 300, 100)
]%%
Barcode Sample for the Email Body
The BarcodeURL function generates a PNG image at the time of the email send. Use an image tag and set the source attribute to the
function’s value.
<p>Name: %%=v(@fullName)=%%</p>
<p>Ticket Number: %%=v(@ticket)=%%</p>
<p><img src="%%=v(@barcode)=%%"></p>
Final Result
SEE ALSO:
Create a Content Builder Email
Create a Data Extension in Contact Builder
Create a Landing Page
355
Email Studio ResourcesEmail in Marketing Cloud Engagement

Email Archiving
To selectively extract a copy of an email message sent through Email Studio and store the copy on the account’s enhanced FTP site,
archive the message. The output file format is EML and can be encrypted. To configure this feature, contact your account executive.
Highlights
•
Archiving for a particular send is enabled via a setting on the Send Classification. Archiving is available for both commercial and
transactional sends.
•
EML format is a text representation of the email that’s native to the MTA.
•
EML files from completed sends are zipped up daily and placed on your enhanced FTP.
•
A manifest is included with each zip file that contains an index of what is available in the zip file.
•
The DEFLATE compression method is used to generate the zip file.
•
Send speeds for archive emails are slower than emails that aren’t archived.
•
Email Archiving isn’t a long-term storage solution. Files are deleted after 21 days.
•
Messages sent with an attachment are archived with the attachment in the EML file.
Exclusions
•
Due to send speed impact, SLAs aren’t applicable to sends when using this option.
Considerations
•
Archived messages can contain personally identifiable information (PII). Consider not using this feature when using Tokenized
Sending, Field Level Encryption, or data privacy.
•
Archiving can be configured to convert EML files to HTML files, consider the following:
–
Message attachments aren’t available.
–
The full message header isn’t provided.
–
The text body is included as a comment.
•
An option to search archives isn’t included with this offering. Use a third-party tool to index and access files after exporting.
•
Images aren’t included in the archive file. The original image reference from the message is included.
Email Deliverability
The likelihood of your email messages being delivered to a subscriber’s inbox is primarily determined by your sending reputation. This
reputation is based on email authentication, consent and data management, and the content you send. You can manage your reputation
with Marketing Cloud Engagement tools that help you get set up, connect with inboxes, and curate customer content.
Dive into email deliverability with webinars.
•
Salesforce Learning: 20 Email Best Practices
•
Salesforce Learning: Learn how to be prepared for Gmail/Yahoo Bulk Sender Guidelines changes
•
Salesforce Learning: List hygiene best practices
356
Email Studio ResourcesEmail in Marketing Cloud Engagement

Use Trailhead to build and test your skills.
•
Trailhead: Email Deliverability Concepts
•
Trailhead: Email Deliverability Essentials
Drive successful outcomes with Salesforce resources.
•
Support: Spam Complaints in Marketing Cloud Engagement
•
Support: Bulk Sender Guidelines
•
Support: Gmail Best Practices
•
Support: Outlook Best Practices
•
Support: Shared IP Policy
•
Salesforce Blog: Email Authentication Just Got More Crucial
•
Salesforce Blog: How to Keep Subscribers Engaged for Life
Need help with Email Delivery? Deliverability Services provides protection for your email program through monitoring, analysis. These
services provide expertise on key deliverability KPIs, bounce and blocklists, inbox folder placement, and sender reputation. The reporting
format, frequency, and distribution can be customized to fit any client's size and budget. Contact your Account Executive to know more
about available packages and pricing.
Email Deliverability Setup
Make sure that your mail reaches your subscribers and represents your brand well. Authenticate your domain, manage your sending
reputation, and keep your IP unblocked.
Connect with Subscribers
Explore best practices for delivering email, and learn about relevant email deliverability legislation.
Evaluating Spam Complaints
When a subscriber marks or reports an email as spam, a complaint report is sent to Marketing Cloud Engagement. Engagement logs
the report and unsubscribes the subscriber from the related email list. You can generate a report of which subscribers have marked
your email communications as spam and use the information to improve your sending reputation. For example, you can correlate
complaints with specific opt-in methods, times, or segments.
Campaign Performance Monitoring
Monitor the performance of your campaigns, and gain insight into your sending reputation and engagement rate.
Abuse and Compliance
When you send a promotional message, you must adhere to the privacy regulations that apply to your business and region, such
as CAN-SPAM in the United States. Marketing Cloud Engagement can help you comply with these regulations and maintain your
sending reputation while reaching your customers’ inboxes.
Email Deliverability Setup
Make sure that your mail reaches your subscribers and represents your brand well. Authenticate your domain, manage your sending
reputation, and keep your IP unblocked.
357
Email Studio ResourcesEmail in Marketing Cloud Engagement
Working with the Email Sender Authentication Package
Use the Sender Authentication Package (SAP) for Marketing Cloud Engagement to customize links and images to match the branding
of the authenticated domain that you send email from. Consider using SAP if you send more than 250,000 email messages per
month and you don’t want the default Marketing Cloud Engagement branding to appear in your links or images.
Dedicated IP Addresses in Email Studio
Assign a unique IP address to your account and manage your own sending reputation in Email Studio. When your send volume is
high enough that your sending reputation is hard to control in a shared IP pool, consider using a dedicated IP address.
Sender Authentication Package Domain Features
The domain that you choose for your Sender Authentication Package (SAP) determines your platform and CloudPage pathways.
Marketing Cloud Engagement creates subdomains for hosting click, image, view, and CloudPage pathways.
Sender Policy Framework and Authentication FAQs
A Sender Policy Framework (SPF) record is a list of IP addresses that are allowed to send email from your domain. The IP list
authenticates that email from your domain is from you and helps protect your brand by reducing the chance that your email is
mistaken for spam.
Domain Delegation versus Self-Hosting
Work with your IT administrators to determine whether it’s best to set up your own domain or delegate a subdomain for email
sending. Typically, organizations that self-host email content are subject to security or branding requirements that don’t allow
domain delegation. Delegation can be simpler to implement and works for most organizations. Before making your choice, consider
your branding preferences, security requirements, and available resources for long-term support.
DMARC Forward Reply Rewrite
Subscriber replies processed and forwarded by Marketing Cloud Engagement's reply mail management (RMM) feature can be
rejected at their destination due to authentication failures if the header is left untouched. To resolve this issue, use DMARC Forward
Reply Rewrite to wrap the message in an authenticated domain.
Sender Policy Framework Glossary
View the Sender Policy Framework glossary for Marketing Cloud Engagement.
Apple Private Relay Configuration
Apple maintains a special subscriber email domain called privaterelay.appleid.com for their Private Email Relay Service. Senders use
this domain to communicate with users who opted to use an anonymous email address with Apple’s “Sign in with Apple” functionality.
Bulk Sender Guidelines for Marketing Cloud Engagement
Beginning February 2024, bulk mail senders must meet new guidelines regarding message authentication, unsubscription flows,
and spam rates. Failure to meet these guidelines can result in an IP or IP range being blocked or rejected. Anyone sending 5,000 or
more messages a day is considered a bulk sender.
Working with the Email Sender Authentication Package
Use the Sender Authentication Package (SAP) for Marketing Cloud Engagement to customize links and images to match the branding
of the authenticated domain that you send email from. Consider using SAP if you send more than 250,000 email messages per month
and you don’t want the default Marketing Cloud Engagement branding to appear in your links or images.
SAP includes several features.
•
Account Branding—View-as-a-webpage, link tracking, and image tracking addresses in your emails use your SAP domain, rather
than a shared Marketing Cloud Engagement domain. All references to Marketing Cloud Engagement are replaced with your branding.
•
Private Domain for Email sending—This domain acts as the From address for your email sends. Marketing Cloud Engagement
authenticates your email sends using the Sender Policy Framework (SPF), Sender ID, and DomainKeys Identified Mail (DKIM)
authentication.
358
Email Studio ResourcesEmail in Marketing Cloud Engagement

•
Custom Domain for CloudPages—CloudPages associated with your account are hosted on a private domain.
•
Dedicated IP Address—All email messages sent from your account are sent using a dedicated IP address.
•
Reply Mail Management—Control the replies that you receive from your subscribers. You can assign filters for out-of-office messages
and manual unsubscribe requests.
While you can purchase these features individually, the view-as-webpage link and image wrapping that brands your account only comes
with SAP. To purchase SAP, contact your account executive.
Marketing Cloud only makes DNS changes that are required for SAP setup. You're responsible for purchasing domains to use with SAP.
To change the domain used for your exist SAP or to set up SAP for use with CloudPages, contact your account executive.
Important: Accounts configured with SAP that don’t use an SSL certificate show a secure Marketing Cloud Engagement domain
on the properties of images in Content Builder. When you add the image to an email, the URL in the editor shows your custom
domain setup with SAP. The copy link on the image properties page copies the custom domain for use in emails, landing pages,
and browser. To learn more about SSL, see Marketing Cloud SSL Certificates Overview.
Considerations
To develop a good reputation with a dedicated IP address, you must send a minimum of 250,000 emails per month. If you send less
than 250,000 email messages per month, you can still benefit from authentication and request to keep using shared IP addresses or
share an IP address within your account structure. You must clearly state this option in your SAP submission. Otherwise, we assign a
dedicated IP address to the account.
A business unit supports only one SAP for branding purposes. Therefore, view-as-webpage links and images can point to only one
domain. Accounts can have multiple private domains for email sending on a single business unit to use as only from addresses. If you
send from multiple from addresses, the view-as-a-webpage links and images point back to the SAP custom domain. In some situations,
you can share SAP across multiple accounts in the same environment. Submit a case with Salesforce Support to review your use case,
and reference the MIDs involved and the original SAP configuration case number.
You can purchase additional dedicated IP addresses and use them with your SAP custom domain.
Changing an SAP domain requires purchasing a new SAP package, but you can continue using the existing dedicated IP address.
Dedicated IP Addresses in Email Studio
Assign a unique IP address to your account and manage your own sending reputation in Email Studio. When your send volume is high
enough that your sending reputation is hard to control in a shared IP pool, consider using a dedicated IP address.
Examine the impact of using a dedicated IP to decide if using one or more is the best choice.
•
To use a dedicated IP, your send volume must be great enough to maintain a positive or neutral reputation with email providers.
•
Dedicated IPs are sharable across accounts as long as the accounts are hosted in the same stack.
•
Under some conditions, clients can use more than one dedicated IP address for their account. For example, accounts with a high
send volume can separate transactional email from commercial email by using separate dedicated IP addresses for each. Only senders
that typically send more than 2.5 million emails per day need more than one dedicated IP address.
•
A dedicated IP can be wrapped with a client’s unique domain as long as the IP is part of a Sender Authentication Package.
•
You can’t transfer a non-Marketing Cloud Engagement platform IP address to use for Marketing Cloud email sends.
•
Senders must warm a dedicated IP address after it’s received so that total control of the sending reputation lies with the sender.
•
When using a dedicated IP, send a minimum of 100,000 emails per month per IP to keep the IP warm. Failing to do so can result in
suboptimal delivery and can cause problems such as deferrals, bulk folder placement, or blocking of your email messages.
•
If you’re sending more than 250,000 emails per month from a single account, use a dedicated IP address. An account that continually
sends a volume higher than this threshold using a shared IP address is subject to remediation.
359
Email Studio ResourcesEmail in Marketing Cloud Engagement

Note: Users who send 1 billion or more emails annually are advised to discuss dedicated IPs, the potential need for custom sending
SLAs, and dedicated Message Transfer Agents (MTAs) with their account executive.
Sender Authentication Package Domain Features
The domain that you choose for your Sender Authentication Package (SAP) determines your platform and CloudPage pathways. Marketing
Cloud Engagement creates subdomains for hosting click, image, view, and CloudPage pathways.
All platform pathways use HTTP and are unsecure by default. To secure pathways (HTTPS), include SSL Certificates for Account Branding
in your contract.
Host content on microsites and landing pages with CloudPages.
Sender Policy Framework and Authentication FAQs
A Sender Policy Framework (SPF) record is a list of IP addresses that are allowed to send email from your domain. The IP list authenticates
that email from your domain is from you and helps protect your brand by reducing the chance that your email is mistaken for spam.
How does SPF work?
When an ISP receives an email from [email protected] via IP address 1.2.3.4, the ISP checks the SPF or record at example.com.
If 1.2.3.4 is on the list, the email is genuine. If not, the email can be a phishing attempt or spoof and can be filtered, rejected, or discarded.
ISPs use SPF when deciding which email to reject. By publishing an SPF record, you prove that you aren’t phishing or spoofing. Large
ISPs and webmail providers, such as AOL, Gmail, and many others, look for Sender ID records as one of their measures to determine
whether an inbound email message is legitimate. Some anti-spam and security systems used in corporate networks look for an SPF
record as well.
Sender ID is a deprecated Microsoft Hotmail version of SPF. Because the specification is deprecated, Outlook.com doesn’t use Sender ID
when examining inbound mail.
What do SPF records look like?
An SPF record is a simple text (TXT) record placed in the DNS for a domain.
Example:
v=spf1 ip4:207.67.38.0/24 ip4:207.250.68.0/24 ip4:64.132.92.0/24 ip4:64.132.88.0/24
-all
How do I create an SPF record?
If you use the Sender Authentication Package and its domain is delegated to Marketing Cloud Engagement name servers, SPF is already
implemented. Otherwise, use these steps to create an SPF record.
Access the control panel for your DNS provider or domain registrar. Create a DNS entry of type TXT for the domain. Leave the hostname
or subdomain field blank. For the DNS entry field, use one of these options.
•
If you use the domain for sending mail only with Engagement, enter v=spf1 include:cust-spf.exacttarget.com -all.
•
If you use this domain for sending mail with Engagement and another service, cover any other IP addresses that send email. For
example, if you have a corporate exchange server at IP address 1.2.3.4, enter v=spf1 ip4:1.2.3.4 include:cust-spf.exacttarget.com -all.
•
If your company has a block of addresses, enter the block in CIDR notation. For example, if you have IP addresses from 192.168.92.0
through 192.168.92.255, enter v=spf1 ip4:192.168.92.0/24 include:cust-spf.exacttarget.com -all.
360
Email Studio ResourcesEmail in Marketing Cloud Engagement

When formatting your SPF record, end it with an “all” mechanism to indicate what to do with an email that fails authentication: either
soft fail (~all) all or hard fail (-all) all.
Note: Hotmail provides the strongest deliverability boost only to -all. Therefore, we recommend that SPF or Sender ID records
use -all.
Can you manage this information for me?
The Sender Authentication Package provides SPF and Sender ID, DomainKeys, DKIM authentication, and more.
Domain Delegation versus Self-Hosting
Work with your IT administrators to determine whether it’s best to set up your own domain or delegate a subdomain for email sending.
Typically, organizations that self-host email content are subject to security or branding requirements that don’t allow domain delegation.
Delegation can be simpler to implement and works for most organizations. Before making your choice, consider your branding preferences,
security requirements, and available resources for long-term support.
Regardless of the method that you choose, your domain or subdomain appears in sender email addresses and hosted content URLs.
Both domain solutions relate to how you configure your DNS entry.
Delegation
With delegation, you share access to a subdomain, or zone, with Marketing Cloud Engagement. To delegate a subdomain, you edit your
DNS entry one time. To request future changes, contact Salesforce Customer Support.
Choose domain delegation when:
•
Your DNS registrar supports zone delegation.
•
Access to in-house IT support is limited.
•
You anticipate adding sending IP addresses or subdomains in the future.
You can use any letter or word for a delegated subdomain. Choose something that’s clear, trustworthy, and long-lasting.
If you can’t find where to edit the subdomain in your DNS record, it’s possible that your registrar doesn’t support zone delegation. If
that’s the case, it can be worth considering changing your provider.
Example: Luz is delegating a domain for CompanyABC. The team wants to use the subdomain message.companyabc.com with
their emails. She configures the Name Server records to connect that subdomain with the four Engagement sending domains.
message.companyabc.com. 123456 IN NS ns1.exacttarget.com.
message.companyabc.com. 123456 IN NS ns2.exacttarget.com.
message.companyabc.com. 123456 IN NS ns3.exacttarget.com.
message.companyabc.com. 123456 IN NS ns4.exacttarget.com.
Self-Hosting
With self-hosting, you set up a new domain to use for sending email, which your business wholly owns and manages.
Choose self-hosting when:
•
Security is a top concern at your organization.
•
You have ongoing access to IT staff and your domain registrar.
A self-hosted domain is the responsibility of their owner, and Salesforce Customer Support can’t access or support the domain.
361
Email Studio ResourcesEmail in Marketing Cloud Engagement
Because organizations use a variety of domain hosts, Salesforce can’t provide step-by-step instructions for configuring your own sending
domain. Common DNS record types required to allow a domain to work properly with our platform may include:
•
CNAME
•
MX
•
TXT
•
A
DMARC Forward Reply Rewrite
Subscriber replies processed and forwarded by Marketing Cloud Engagement's reply mail management (RMM) feature can be rejected
at their destination due to authentication failures if the header is left untouched. To resolve this issue, use DMARC Forward Reply Rewrite
to wrap the message in an authenticated domain.
Reply Mail Management
Replies are routed through Engagement when a reply email leaves the email server of an email service provider and goes to the
Engagement mail server. The reply then leaves the mail server and goes to the email service providers mail server. The email has an
Engagement IP address associated with it upon delivery. The DMARC checks the IP from the domain on the sender address and verifies
it matches the IP addresses or DNS records. Since the reply email has the Engagement IP address associated with it, the email needs an
Engagement domain for the sender record to not get rejected. If the reply mail kept the original email service provider domain and the
Engagement IP address, due to the DMARC rejection practice, the email is rejected.
Engagement’s Reply Mail Management (RMM) functionality adds a dynamically generated reply-to header to outbound email messages.
This header includes a special, per-recipient unique email address that brings any replies back to Engagement for processing. The RMM
mail handling service receives the replies. Depending on the account’s configuration, the RMM service processes any unsubscribes,
deletes any spam, and then takes any other replies and forwards them to a designated address.
DMARC: Can Prevent Email Forwarding
DMARC (Domain-based Message Authentication, Reporting, and Conformance) allows email service providers to publish a policy directing
how unauthenticated mail from those domains is handled - typically requiring that they be rejected or sent to spam.
Replies forwarded by RMM preserve the original headers. Thus, a message with a From address '[email protected]' is delivered this
way by Engagement. Because Engagement doesn’t own the @example.com domain and can’t send it with SPF or DKIM authentication
features, the forwarded reply is rejected by most DMARC policies.
Allowlisting
To ensure the deliverability of RMM-forwarded replies, it’s possible to allowlist IPs used by RMM machines to forward emails. This strategy
is ideal in scenarios where preserving mail headers is preferred, such as when replies are destined for into an Email-to-Case system.
When allowlisting isn’t feasible, DMARC Forward Reply Rewrite can be used.
DMARC Forward Reply Rewrite Fixes This Issue
When DMARC Forward Reply Rewrite is enabled, RMM rewrites email headers to avoid rejection. The From Name is rewritten as <From
Name> <user> at <domain>. For example, a subscriber reply from Teresa Lee, [email protected], is rewritten as “Teresa Lee tlee at
example.com”. The From Email is rewritten as <user>.<domain>@<reply subdomain>. For example, a subscriber reply from
[email protected] with the reply subdomain email.company.com is rewritten as [email protected].
Engagement maintains an internal list of domains that publish restrictive DMARC policies. This list is referenced to determine which
email replies headers to rewrite.
362
Email Studio ResourcesEmail in Marketing Cloud Engagement

All accounts are enabled to rewrite headers, as necessary, to handle most email forwarding scenarios. If that potentially works better for
your workflow, the functionality can be disabled upon request, or it can be configured to always rewrite headers for all replies. Contact
Salesforce Customer Support for assistance.
Example: Your company uses Example Email Provider to manage corporate email communications. Your company uses
Engagement to send batch email notifications or marketing messages to customers. Emails bounce due to a DMARC issue such
as:
1. Use Engagement to send a message to a recipient at Example Email Service Provider.
2. That email recipient replies to the email message.
3. Engagement's RMM functionality processes the message.
4. Engagement's RMM functionality attempts to forward the message back to the corporate contact for the sending company.
5. That message is rejected or bounced by the corporate email server. The message is rejected because Example Email Service
Provider respects published DMARC policies and sees that the message is coming from RMM.
Sender Policy Framework Glossary
View the Sender Policy Framework glossary for Marketing Cloud Engagement.
Table 24: Sender Policy Framework Terms
DefinitionTerm
An email authentication method designed to detect email spoofing by providing a mechanism
to allow domain owners to assert that a given email message is authorized by the company
DomainKeys Identified Mail (DKIM)
responsible for that domain. When DKIM is employed, messages are signed with a cryptographic
signature allows the receiver to check that an email claimed to come from a specific domain is
indeed authorized by the owner of that domain.
A process that confirms that an email message purporting to be from a given domain name was
not forged and that it truly originated from the company or organization responsible for that
Email Authentication
domain. This process allows an ISP to identify suspected forgeries, reject known forgeries, and may
assist when attempting to block known spamming domains. ISPs can also allowlist email from
reputable domains and bypass certain types of filtering to minimize false positives.
A number that identifies a computer on the Internet. An IP address consists of four numbers (0-255)
separated by periods. An ISP can use an email server's IP address when determining whether to
Internet Protocol (IP) Address
accept the email. Sharing an email server uses a "shared" IP address; using your own IP address
uses a "private" or "dedicated" IP address.
Attempting to criminally and fraudulently acquire sensitive information, such as usernames,
passwords, and credit card details, by masquerading as a trustworthy entity in an electronic
Phishing
communication. eBay, PayPal and online banks are common targets. Phishing is typically via email
or instant messaging and directs users to enter details at a website.
A DNS-based email authentication technology that allows senders to publish a list of IP addresses
to tell ISPs that a mail message referencing a given domain is legitimate if it did indeed originate
from an IP address found in the domain’s published SPF record.
Sender Policy Framework (SPF)
Falsifying information in an email message, for example, using a fake from address.Spoofing
363
Email Studio ResourcesEmail in Marketing Cloud Engagement

Apple Private Relay Configuration
Apple maintains a special subscriber email domain called privaterelay.appleid.com for their Private Email Relay Service. Senders use this
domain to communicate with users who opted to use an anonymous email address with Apple’s “Sign in with Apple” functionality.
Before you send to this domain, you must properly register your sending domains with Apple. If you don’t register with Apple, all mail
delivery attempts to the privaterelay.appleid.com domain is rejected.
Requirements
Apple requires that email messages authenticate with Sender Policy Framework (SPF) and DomainKeys Identified Mail (DKIM). This
requirement means that you must have Sender Authentication Package (SAP) or a private domain in place. You must also send using a
from address at the SAP or private domain. If your SAP or private domain is email.domain.com, you must send using a From Name of
(something)@email.domain.com.
The bounce or return path domain must be registered with Apple. If your SAP domain is email.domain.com, then the bounce domain
or return path domain is bounce.email.domain.com. In other words, it’s the word bounce followed by a period followed by the SAP
domain. If you don’t correctly register this domain with Apple, all email delivery attempts are rejected.
How to Register
After you register the domain with Apple, email delivery attempts to the privaterelay.appleid.com domain are no longer rejected. Keep
in mind that individual users can revoke access to their individual inboxes at any time. If a subscriber does revoke access to a sender, any
future attempts to send email to that address can result in bounced messages. Some bounces can still occur. One hundred percent
email delivery (or even inbox delivery) isn’t guaranteed.
SEE ALSO:
External: Communicating Using the Private Email Relay Service
External: Configure Private Email Relay Service
External: Sign in with Apple Tutorial: Private Email Relay Service
Bulk Sender Guidelines for Marketing Cloud Engagement
Beginning February 2024, bulk mail senders must meet new guidelines regarding message authentication, unsubscription flows, and
spam rates. Failure to meet these guidelines can result in an IP or IP range being blocked or rejected. Anyone sending 5,000 or more
messages a day is considered a bulk sender.
Note: These guidelines are based on the joint statements released by Gmail and Yahoo in October 2023. They’re based on
long-standing best practices in email marketing and ensure the protection of the message recipient.
Domain Authentication
To protect end users, emails must be properly signed and authenticated. Emails must meet these authentication standards: Sender
Policy Framework (SPF), DomainKeys Identified Mail (DKIM), and Domain Message Authentication Reporting & Conformation (DMARC).
To meet this expectation:
•
Purchase and configure the Salesforce Private Domain or Sender Authentication Page (SAP) solution before February 2024.
•
Review your sending domains and ensure that they’re properly authenticated. Registered domains don’t meet authentication
requirements. To verify that your domain is properly authenticated, you can use a third-party site, such as mail-tester.com or
mailgenius.com.
364
Email Studio ResourcesEmail in Marketing Cloud Engagement
One-Click Unsubscribe
All commercial emails must offer a one-click unsubscribe workflow. Additionally, you must process all unsubscribe requests within 2
days.
All Engagement emails with a commercial classification contain a list-unsubscribe header on page 236, which provides a one-click
unsubscribe option for the recipient server.
Limited Spam Complaint Rates
As a bulk sender, keep your effective spam rate at or below 0.3%. To help meet this requirement, consider these steps.
•
Send relevant content to only engaged subscriber segments.
•
Follow opt-in best practices on page 375.
•
Remove inactive Google accounts from your subscriber list. Messaging an inactive account increases your bounce rate.
For more guidance on deliverability best practices, see Email Deliverability on page 356 and Email Deliverability Concepts (Trailhead).
SEE ALSO:
Knowledge Article: Bulk Sender Guidelines for Marketing Cloud Engagement: Addendum
Knowledge Article: Marketing Cloud - Inactive Google Account Policy Update
External: New Gmail protections for a safer, less spammy inbox
External: More Secure, Less Spam: Enforcing Email Standards for a Better Experience
External: Email Sender Guidelines (Gmail)
Connect with Subscribers
Explore best practices for delivering email, and learn about relevant email deliverability legislation.
IP Address Warming for Email Studio
When you become a Marketing Cloud Engagement customer, your assigned sending IP addresses have never been used to send
email. Mailbox Service Providers (MBPs) are suspicious of mail received from IP addresses without history. Microsoft says that 80%
of unrecognized connections attempt to deliver spam or malware. Senders are guilty until proven innocent. Therefore, MBPs and
email providers recommend that you warm or ramp up new IP addresses by building their sending reputation over time.
Email Deliverability Best Practices for Email Studio
View email deliverability best practices for Marketing Cloud Engagement.
Email Delivery in China
Learn about email deliverability in China for Email Studio.
IP Address Warming for Email Studio
When you become a Marketing Cloud Engagement customer, your assigned sending IP addresses have never been used to send email.
Mailbox Service Providers (MBPs) are suspicious of mail received from IP addresses without history. Microsoft says that 80% of unrecognized
connections attempt to deliver spam or malware. Senders are guilty until proven innocent. Therefore, MBPs and email providers
recommend that you warm or ramp up new IP addresses by building their sending reputation over time.
To warm an IP address, slowly and methodically send small volumes of email, then gradually increase your volume to the providers’
users. The goal is to build up approximately 30 days of sending history and data so that MBPs get familiar with email coming from your
365
Email Studio ResourcesEmail in Marketing Cloud Engagement

new IP address. The warming period can take longer than 30 days for some senders and a shorter time for others. Factors such as your
overall list size, list quality, and subscriber engagement can influence the amount of time it takes for your IP address to fully warm.
Warming Guidance
We recommend that you focus on sending to your most active and engaged subscribers during this critical period. The initial sends are
the basis for the MBPs to determine your sender IP address sending reputation. Therefore, the more opens and clicks that are registered,
the faster receivers can gather positive metrics to establish your sender reputation. Warming involves sending a limited number of
messages per IP per day, so it’s important to further adjust your current sending practices as part of the process.
Here are some ways that our customers have achieved the recommended volume targets:
•
Split large, non-time-sensitive sends over various days
•
Split campaigns between a new Marketing Cloud Engagement IP address and your legacy mail system
•
Migrate smaller-volume, transactional campaigns before moving larger marketing programs
•
Create non-time-sensitive campaigns, like subscriber surveys, to use specifically for warming new IP addresses
Important
Follow and adhere to our warming guidance to warm your new IP address. Otherwise, you can experience suboptimal delivery and
problems, such as deferrals, bulk folder placement, or blocking of your email messages.
Following the warming guidance mitigates but doesn’t eliminate deliverability risk.
During the first three weeks of warming, focus on new subscribers or subscribers with an open or click registered in the last 30 days. This
audience is actively engaged in your emails and is more likely to open or click, which drives positive metrics with the MBPs and receivers.
In the fourth week, expand your audience to subscribers with engagement in the last 60 days.
Around week six, add subscribers who have engaged in the last six months. We recommend that you suppress remaining subscribers
as your unengaged audience, because there’s a low chance re-engagement, and an increasing chance that your messages are treated
as spam.
Example IP Address Warming by Daily Max
Daily Max VolumeDayDaily Max VolumeDay
160,000185001–3
200,000191,0004–5
300,000201,5006
400,000212,5007
500,000224,0008
700,000237,0009
850,0002412,00010
1,000,0002518,00011
1,200,0002630,00012
1,400,0002750,00013
366
Email Studio ResourcesEmail in Marketing Cloud Engagement

Daily Max VolumeDayDaily Max VolumeDay
1,500,0002880,00014
1,700,00029100,00015
1,800,00030120,00016
2,000,00031140,00017
*More than 2M per day requires
additional IPs
*A single IP address starts to see deferrals (delays imposed by the receiving mail servers) when sending over 2M emails per day. To
accommodate your sending volume, you can purchase more Dedicated IPs from your Account Executive. Double the volumes in the
table for each additional IP in your account.
What to Expect
During IP warming it’s not uncommon to experience bulking and blocking. Most issues resolve on their own as you proceed. If problems
don’t resolve after several days of sending, review your subscriber list to ensure that you focus on your most engaged subscribers. Also,
consider scaling back to lower mail volumes at the impacted domain.
Maintaining Reputation
The goal of warming is to build reputation and establish your typical traffic patterns with the MBPs and receivers. The key to ongoing
success is to maintain that reputation and volume by consistently sending similar volumes to your subscriber base and not surprising
them with unexpected content. If you stop sending for an extended period (for example, over one week), scale back your volume, then
build back to your peak volumes. If you stop sending for three or more weeks, start your warming efforts over from day one volumes.
Permission is the Key to Success
Explicit opt-in means a customer or subscriber told you directly that they agree to and want to hear from your company or brand.
Acceptable forms of explicit consent look like:
•
Contacts who submitted a form on your website
•
Contacts who made a purchase with your brand in the last six months
•
Contacts who entered a written contract with your brand in the last six months
•
Contacts who donated to or volunteered with your company in the last six months
•
Contacts who signed up for and are active users of your service, organization, or club
•
Contacts who filled out a paper or electronic sign-up sheet specifically for your newsletter
Use a transparent and customer-driven opt-in process. Prechecking the opt-in box isn’t recommended, and can cause complaints from
subscribers and potentially register false addresses in your database.
To minimize complaints, set expectations at sign-up for how often you engage customers. You can even allow customers to set a
communication frequency preference to help drive additional sign-ups.
Use CAPTCHA to prevent bot sign-ups. Bad actors can exploit forms and use your subscriber list to harm your company’s reputation.
Consider including a hidden text field in your form. Bots scan forms and complete all available fields, but your customers don’t see hidden
fields. Then you can suppress subscribers that show hidden field values.
367
Email Studio ResourcesEmail in Marketing Cloud Engagement
Avoid Spam Traps
The most common types of spam traps are honeypots (addresses created specifically to catch spammers) and recycled spam traps
(addresses that can be reused after 6-12 months of inactivity). Successful honeypots suggest issues with your opt-in process or that your
list may contain purchased subscriber data. Successful recycled spam traps suggest list hygiene issues and that you need to scale back
your audience to subscribers with engagement in the last six months. Too many successful traps can cause blocklisting issues with
specific receivers, or even listing at Spamhaus (a third-party data provider for some MBPs) that can cause widespread blocking issues.
You can generally avoid spam traps by doing the following:
•
Don’t purchase or rent lists.
•
Actively remove hard bounces from your campaigns. We do this for you on page 242.
•
Continuously re-engage your inactive subscribers. At three months of no engagement, a subscriber is considered ‘uninterested’ and
the odds of ‘win back’ decrease greatly. Consider a highly targeted campaign designed to win back their business. If they still don’t
engage, consider dropping them before the six-month window.
•
Remove unengaged subscribers. At six months of no engagement, remove them from your mailing list.
Domain Warming
Since they have no established history, warm new domains and subdomains with the IP warming guidance. If you launched a new
domain with a new sending IP, use the warming guidance for both. If you launch a new domain only and the sending IPs have established
reputation, use the daily max table to scale back domain volumes.
Email Deliverability Best Practices for Email Studio
View email deliverability best practices for Marketing Cloud Engagement.
Marketing Cloud Engagement works with you to optimize the deliverability of your campaigns by helping with key elements of email
optimization, such as:
•
Email list capture process and recommendations on opt-in method
•
Email From address branding
•
Email subject line branding and optimization
•
Email content consulting to avoid common words and phrases targeted by spam filters
•
List hygiene
•
ISP compliance
•
Volume filter avoidance via Domain Monitoring
•
SMTP log filtering to proactively detect blocking
CAN-SPAM Act
CAN-SPAM is the popular name for the U.S. law regulating commercial email that went into effect on January 1, 2004, the Controlling
the Assault of Non-Solicited Pornography and Marketing Act of 2003.
Per CAN-SPAM legislation, all commercial emails must include a viable Internet-based opt-out mechanism, which must be active for a
minimum of 30 days after you send the email. Second, you must display your company's physical mailing address within the body of
your email. The application automatically checks for both the return email address and unsubscribe link before the system can send the
email.
In addition, per CAN-SPAM legislation, marketers can’t do the following:
•
Use a false or misleading from name
368
Email Studio ResourcesEmail in Marketing Cloud Engagement
•
Use a subject line that masks the purpose of the email
•
Harvest email addresses off the Internet
•
Launch dictionary attacks
•
Use open relays to send email
We recommend the following steps for compliance:
•
Manage unsubscribes within 10 days of a send and enforce them across your entire enterprise.
•
Always capture opt-in or affirmative consent to remove labeling requirements.
•
Ensure that subject lines aren’t deceptive or misleading.
For transactional or relationship messages, ensure that the subject line is non-promotional and that the transactional content is placed
above any commercial content.
Because of the growing awareness of CAN-SPAM legislation and the diminishing tolerance of consumers for unsolicited mail in their
inboxes, sending unsolicited email puts your brand and company at risk. Even though a recipient can open an email and not complain
the first time, that recipient still has not given permission until they’ve opted in to your correspondence. Repeated unsolicited emails
can lead to complaints, and this is the leading cause of email blocking at ISPs.
Your contract with us requires opt-in for sends through our system. If your list isn’t opt-in, send an opt-in email outside of the application.
After you complete your opt-in campaign, you can then upload those lists into the Engagement.
For information on CAN-SPAM compliance, see CAN-SPAM Compliance System Guide on page 373.
Spam Filters
Most ISPs use filters to sort the legitimate email from junk or spam for their users. More than 300 spam-filtering companies exist and
vary significantly in their filter logic. Most common spam filters attempt to filter those sending unwanted email based on sending
reputation and deliverability statistics, meaning that it’s important that your mail is easily identifiable as being wanted and not being
unsolicited. Elevated bounce rates, elevated complaint rates, or low open rates are all indicators that recipients may find your mail to be
unwanted, and ISP spam folders are more likely to consider your mail as spam as a result.
Address Book Strategy
Implementing an address book strategy helps you optimize deliverability on your email campaigns. To maximize the number of subscribers
who add you to their address book, and minimize the number of sends that end up in a bulk or spam folder, add address book instructions
to your email. The easiest way to provide these instructions is to use the Add to Address Book tool. The Add to Address Book tool is a
hyperlink to address book instructions for all of the major email providers. To use this tool, simply add the following link to your email,
along with appropriate instructions to your subscribers: Address Book and Safe Senders List on page 352.
When a subscriber clicks this link, a web page with instructions opens. The subscriber can then click the applicable View Instructions
link on the web page to see the steps necessary to add your sending address to the subscriber's address book to ensure delivery of your
future emails.
Ensure That All Subscribers on Your Lists Have Given You Permission
High complaint rates are possible if your subscribers have not given you explicit permission to send them email. All of the names on
your subscriber lists must have given you permission in order for you to send them email via the application.
Deal with Bounce Rates Greater Than 10%
Proactively remove your bounced addresses before your next send. Though the application automatically holds undeliverable emails
after the third bounce, a bounce rate over 10% can dramatically harm your deliverability and ISP reputation.
369
Email Studio ResourcesEmail in Marketing Cloud Engagement
See Remove Subscribers with Hard Bounces for instructions on removing bounces before your next send.
Subject Line Recognition
Ensure that your subscribers recognize your email is from you by adding the name of your organization to the subject line. Make sure
this is a name with which they’re familiar. Because the subscriber can easily click the "report spam" button without even opening the
email, subject line recognition is critical to reducing complaints at AOL and elsewhere.
From Name and Address
Ensure that your 'from name' and 'from email address' are recognizable by subscribers. Some email providers, for example, show only
the 'from address', not the 'from name', in the inbox, so make sure it’s a name and not a number or an indecipherable address. Also, the
'from name' is the first item that most individuals look at when determining what mail to open and which to ignore or complain about.
Talk to your relationship manager about options for optimizing your From address.
Name Capture Language
It can be a good idea to add language at the top of your emails stating how the subscriber opted in to receiving your email communications.
A reminder can help increase results and reduce complaints. You can also include an unsubscribe link at the top of your emails. If you
have an elevated unsubscribe or complaint rate, this is likely to help reduce that rate.
Purge Old or Inactive Addresses
Do you have names that you haven't mailed to in six months? How about customers that haven't opened an email or clicked a link in
that same time period? These are indications to purge these old or inactive addresses. These customers cost money to mail, reduce your
ROI, and are more likely to complain.
Run the Unengaged Subscribers for a List Report to view which subscribers haven't opened or clicked through your emails during a
certain time period.
You can also run the Subscriber Engagement Report to pull information into a third-party program, like Microsoft Access, to query emails
not clicked or opened.
Manage Frequency and Content
Are you sending your emails more often than you promised? Less often? Is the content different from what you promised? Remember
that permission communications are to be anticipated, personal, and relevant. If your users don’t anticipate your email or your content,
reevaluate why you’re sending them email in the first place
Authenticate Your Email to Avoid Bulk Folder Delivery
Sender Authentication doesn’t exist in today's standard SMTP logic for email, so spammers can try to disguise their identity and locale.
Spammers using these tactics are targeted by ISPs. Authenticating your email helps differentiate your email from spam, protects your
brand, and bolsters your ROI. Try the a Sender Authentication Package to handle authentication for your email sends.
Email authentication alone isn’t going to guarantee that your mail will never be perceived as spam, but it’s a necessary step to help
ensure that an ISP is best able to tell good senders apart from bad senders.
Email Delivery in China
Learn about email deliverability in China for Email Studio.
370
Email Studio ResourcesEmail in Marketing Cloud Engagement
What Governs Deliverability in China
•
Heavy government involvement in the form of:
–
Censorship
–
Surveillance
•
Slow sending speeds - general sending speed recommendations for all Chinese ISPs is 4k/hr/IP
•
Content filtering
–
Adult content, gambling, tobacco, illegal drugs
•
Few publicly offered feedback loops
•
DKIM used infrequently in China
•
Chinese Mailbox Providers:
–
Netease: 126.com, 163.com, yeah.net
–
Tencent: qq.com,vip.qq.com, foxmail.com
–
Sina: sina.com, sina.com.cn, vip.sina.com.cn, sina.net
–
Sohu: sohu.com, sohu.cn, sogou.com, chinaren.com, sohu.net
–
Tom.com: tom.com, vip.tom.com, 163.net, tom.com.hk
–
AliCloud: aliyun.com
•
Chinese Telco-based Email Addresses:
–
China Unicom ( ) - wo.com.cn, m165.com
–
China Mobile ( ) - 139.com
–
China Telecom ( ) - 189.cn
There are many domains based on branch company locations with different domain names specific to that region. For example,
for Zhejiang province mailzj.cn, similar to how RoadRunner structures their email domains like nyc.rr.com.
AD in the Subject Line of Commercial Emails
Chinese antispam legislation indicates that all commercial email must be labeled through the inclusion of "AD". While the Chinese
equivalent is acceptable, "AD" is preferred in the subject line.
However, ISPs and ESPs have different viewpoints:
•
This regulation was never given further clarification by any government body since the original spam regulations were issued in
2005. It's often seen written as commonly as AD (AD) or [AD] and placed at the beginning or end of the subject line.
•
Chinese ISPs view AD use differently, most don't care about it, and largely NetEase is where it matters most.
QQ.com
QQ.com is the largest and the fastest growing of the Chinese Internet service portals. QQ.com filtering methodology is:
•
Daily emailing limit - determined by average volume of last 60 days and IP reputation
•
Reputation is based on sender accuracy - read rate, delete rate, complaint rate
•
To determine daily emailing limit - sign up for QQ's SNDS-like environment at http://open.mail.qq.com/
•
QQ filters at IP level, so daily limits can often be increased by adding number of sending IPs
Feedback Loop:
371
Email Studio ResourcesEmail in Marketing Cloud Engagement

Spam Complaint Feedback System ( ) is a service that allows you to view complaints from QQ users and encourages senders to
remove these users from their email lists.
QQ.com deliverability checklist:
•
Sign Up for SNDS-like environment to determine the daily emailing limit
•
Send slowly
Note: Note: Chinese ISPs require slow sending speeds due to infrastructure limitations related to email. General send speed
recommendations for all Chinese ISPs are 4k/hr/IP.
Marketing Cloud Engagement Findings
We've found clients whose IPs are enrolled in QQ FBLs do not have as many queuing issues at QQ.com. IPs that are not enrolled tend to
be limited to lower volumes and have a shorter window for sending emails around 10am EST each day.
For properly registered IPs with good engagement rates, the amount of email allowed through per IP can be as high as 70k subscribers
per day.
For registered IPs that are still triggering frequency blocks, the per day limit seems to fall between 35k to 40k per day. This rate seems
to be heavily reputation-related.
Marketing Cloud Engagement has implemented optimized delivery rates for QQ.com across all email sending servers. External factors
such as sender reputation, engagement by subscribers with the content being sent, and registration status with the QQ.com FBL
determine the volume and speed at which the email can be delivered.
ISP email infrastructure in China is not as robust as large ISPs such as Gmail, Yahoo, Hotmail, and others. The infrastructure is similar to
AOL.com regarding ability to accept email, scale volume, and rejecting due to volume limitations. ISPs in China limit the number of
emails that can be sent and also dictate the speed at which that email is to be accepted.
It's not impossible to send emails to China. Following best practices around engagement, and limiting volume to focus only on engaged
subscribers helps with challenges to sending to China. Sign up for FBLs and monitoring to gain insight on your sending.
Evaluating Spam Complaints
When a subscriber marks or reports an email as spam, a complaint report is sent to Marketing Cloud Engagement. Engagement logs the
report and unsubscribes the subscriber from the related email list. You can generate a report of which subscribers have marked your
email communications as spam and use the information to improve your sending reputation. For example, you can correlate complaints
with specific opt-in methods, times, or segments.
Engagement automatically unsubscribes email addresses of subscribers who report a spam complaint. Don’t override this functionality
because continuing to email subscribers who have opted out can lead to reputation issues and can be illegal in some jurisdictions. You
can view the Spam Complaints Over Time report in Email Studio under Tracking Reports.
To extract data using queries and find spam complaints lodged against your client’s sends, see Data View: Complaint.
Identify Subscribers Who Marked Emails as Spam
Find out which subscribers have marked your email communications as spam. You can also learn when they unsubscribed and other
information they provide.
SEE ALSO:
ISP Feedback Loops for Marketing Cloud
372
Email Studio ResourcesEmail in Marketing Cloud Engagement
Identify Subscribers Who Marked Emails as Spam
Find out which subscribers have marked your email communications as spam. You can also learn when they unsubscribed and other
information they provide.
1. In the Marketing Cloud navigation pane, access the Subscribers tab and select All Subscribers.
To review and evaluate a specific list, open the individual list.
2. Click Search.
3. Select All Subscribers where Subscriber Status is equal to Unsubscribed.
4. Export the search results to a CSV file, and select your preferred delivery method.
5. Select and map the attributes to include in your export.
For example, you can include the email address and the date and reason for the unsubscribe.
6. In the exported file, sort the results by reason or the unsubscribed date.
Campaign Performance Monitoring
Monitor the performance of your campaigns, and gain insight into your sending reputation and engagement rate.
Mailbox providers (MBPs) use advanced inbound filtering algorithms to protect their customers from irrelevant “batch and blast” marketing.
To ensure that your brand continues to reach your subscribers’ inboxes, send relevant content only to highly engaged subscribers.
To maintain a positive sending reputation, listen to your subscribers’ feedback. Low engagement likely signals a need to change your
target audience or adjust your content. High unsubscribe rates or complaints could be caused by issues with opt-in methods or list
hygiene. A sudden drop in open or click rates might be attributed to a blocking or bulking issue at an MBP.
To monitor campaign performance, use Email Studio Reports and Data Views.
Abuse and Compliance
When you send a promotional message, you must adhere to the privacy regulations that apply to your business and region, such as
CAN-SPAM in the United States. Marketing Cloud Engagement can help you comply with these regulations and maintain your sending
reputation while reaching your customers’ inboxes.
Your assistance in maintaining your sending reputation goes a long way for deliverability. Salesforce also identifies abusive practices
that have the potential to interrupt service availability for other customers and enforces our anti-spam and acceptable use policies.
If a possible issue appears in your sending history, you receive an email from [email protected]. To avoid having your email
sending suspended, reply promptly to these emails.
CAN-SPAM Requirements
Learn about CAN-SPAM requirements for Marketing Cloud Engagement.
What Happens When You Click Send
Learn about the series of processes that take place before your email reaches your subscriber's inbox.
Opt-In Best Practices
Learn tips for gathering subscribers, avoiding bot sign-ups, and keeping your sending reputation clean.
373
Email Studio ResourcesEmail in Marketing Cloud Engagement

Confirmed Opt-In
Confirmed opt-in (COI) or double opt-in validates opt-in requests from mailing list owners and ensures that the email address isn’t
fraudulent. The subscriber must click a confirmation button to confirm their intent to opt in. COI offers several benefits to businesses.
It verifies email ownership, keeps databases clean, increases engagement rates and ROI, and helps salespeople expand their customer
base.
SEE ALSO:
Marketing Cloud Anti-Spam Policy
Acceptable Use Policy (AUP)
CAN-SPAM Requirements
Learn about CAN-SPAM requirements for Marketing Cloud Engagement.
The CAN-SPAM Act imposes stricter requirements on commercial emails than on transactional emails. Complying with these requirements
protects you from CAN-SPAM litigation and demonstrates your commitment to providing relevant customer messaging.
The CAN-SPAM act requires that commercial emails, whose primary purpose is to deliver commercial content, meet these criteria.
•
Accurately identify the sender in the header information.
•
Use a subject line that accurately represents the content of the email.
•
Identify the message as an advertisement, unless you have express consent (opt-in) from the subscriber.
•
Include your physical mailing address.
•
Provide a mechanism to opt out. You can’t require a subscriber to log in or visit more than a single page to unsubscribe.
•
Honor opt-out requests promptly. You must process an unsubscribe request within 10 days, and your unsubscribe mechanism must
be operational for at least 30 days after the mailing.
Note: Engagement has more requirements related to sending commercial email messages. For more information, review the
Anti-Spam Policy.
However, transactional messages, whose primary purpose is to communicate transactional content, are mostly exempt from all
requirements except the first one. A transactional message is one that facilitates an already agreed-upon transaction or updates a
customer about an ongoing transaction. For example, if a customer orders a product from your website, the receipt you send via email
is a transactional message.
Because transactional messages aren’t required to honor opt-out requests, when the system sends a transactional message, it doesn’t
prevent the message from being delivered to subscribers who have unsubscribed at any level.
You tell the system whether an email is commercial or transactional by associating a commercial or transactional send classification to
it. When you create a transactional send classification, you can choose to have the system honor list-level opt-outs by selecting the
honor source and publication list-level opt-outs checkbox. If you want some of your transactional messages to honor opt-outs while
others don't, you can create multiple transactional send classifications.
What Happens When You Click Send
Learn about the series of processes that take place before your email reaches your subscriber's inbox.
When you send an email, a series of processes takes place behind the scenes before your email reaches your subscriber's inbox. The
send process usually happens in a matter of seconds, but sometimes, depending on the size of the send, it can take minutes to hours.
This guide briefly describes the Outbound Mail Management (OMM) process. Though you cannot control OMM, knowing what occurs
can help you understand why your send executes immediately or takes longer than normal.
374
Email Studio ResourcesEmail in Marketing Cloud Engagement

The process described here is the typical scenario and can vary depending on the type of send you perform. The system handles thousands,
sometimes millions, of sends at any given time. This process describes the send experience for one email send.
You Click Send
You can use a guided, simple, test, or triggered send.
OMM Analyzes the Email
First, OMM recognizes a send is coming and prepares databases for the job. OMM analyzes the job by determining if the email is
template-based or HTML-paste. Then OMM determines the subscriber source (a list, group, or data extension), and whether the send
contains personalization or dynamic content. This stage does not create the email but only prepares the databases.
OMM Builds the Email Structure
OMM now builds the structure of the email. The structure usually involves a header, footer, and body. If the email is template-based, the
template is included in this step. Then OMM retrieves the subject line, the body content, any AMPscript in the email, and interprets the
AMPscript and retrieves images.
OMM Analyzes the Subscribers
At this point, the email structure is in place, but OMM runs the content against the subscriber list. If your email send contains personalization
or dynamic content, it is during this process that OMM determines the appropriate content for each subscriber. This process only serves
as a placeholder until OMM builds the email in the next step.
OMM Builds and Sends the Email
By this stage, OMM has set the plans for the entire send. It knows all the subscribers associated with the send, the content being sent,
and which subscribers are receiving which pieces of content. Now OMM begins bundling the emails in batches of 500 and sending
them to the subscribers' inboxes. This stage can take longer than a few seconds. Sends containing thousands or millions of subscribers
with complex dynamic content rules can experience delays before arriving in your subscribers' inboxes.
Opt-In Best Practices
Learn tips for gathering subscribers, avoiding bot sign-ups, and keeping your sending reputation clean.
Do You Have Explicit Opt-In?
Explicit opt-in means a customer or subscriber told you directly that they want to hear from your company or brand via email.
375
Email Studio ResourcesEmail in Marketing Cloud Engagement
These examples are acceptable forms of explicit consent:
•
Contacts who submitted a form on your website to receive emails for sales and promotions
•
Contacts who filled out a paper or electronic sign-up sheet specifically for your email newsletter
Marketing Cloud Engagement customers agree to only send emails to subscribers who have directly subscribed in compliance with the
Anti-Spam policy included in their contract.
Examples of Opt-In That Don’t Qualify
•
Contacts purchased, rented, borrowed, or otherwise obtained from a third-party list don’t qualify as explicit opt-in. Some lists advertise
themselves as having obtained opt-in consent, but the opt-in isn’t specific to your company. Contacts obtained through purchased
or rented sources are highly likely to bounce, unsubscribe, mark emails as spam, and cause blocklistings.
•
Membership or organization lists are considered third-party lists, regardless of any expectations set at the time the list was collected.
•
Personal business contacts from a previous company haven’t yet given explicit opt-in. Contacts who gave you consent for your
previous company don't transfer over to your new company.
•
Contacts who submit a form on another brand's website don’t meet the opt-in requirements.
•
Contacts from lead providers or data enrichment tools don’t qualify as explicit opt-in. You can use data enrichment tools to build
out a contact profile. However, that information can’t be used to source contact email addresses for emails sent from the marketing
email tool.
•
A past relationship with friends, families, and past colleagues doesn’t mean they consent to bulk communication from your new
brand. Ensure that they’ve provided one of the acceptable methods of consent before sending them a marketing email.
•
Contacts who approached your booth and provided their information through a badge scan, gave you their business card, or
converted on a form or sign-up sheet meet the opt-in requirements. However, a contact's info obtained from a list of attendees
provided by the event or trade show organizer doesn’t count as opt-in consent. The contact provided their email address to the
organizer, not your brand.
•
Employers can provide a list of their employees' work-based email addresses for employer-provided benefits, such as health insurance.
To decrease the risk to your email health, consider contacting employees in a one-to-one email to gain opt-in consent, and enable
double opt-in to confirm their consent.
•
Though opt-in is transferable in a brand merger or acquisition, not all contacts expect to hear from your new brand. To protect your
email health, notify customers of the brand acquisition and allow them to reconfirm their opt-in status for the new brand.
•
Direct any contacts you meet in person to an electronic or paper conversion. Verbal consent isn’t verifiable and doesn’t meet
requirements for sending marketing emails.
•
If you email an address that's associated with a company, department, or group, it's often forwarded to multiple people instead of
a specific individual. As a result, you can’t gain verifiable consent from a role-based email address.
Best Practice Tips for Sign-Up Forms
Most opt-ins for commercial mailings are driven from your website sign-up form or shopping cart purchase process.
Use a transparent and customer-driven opt-in process. Prechecking the opt-in box isn’t recommended. This process can cause complaints
from subscribers and potentially register false addresses in your database.
To minimize complaints, set expectations at sign-up for how often you engage customers. You can even allow customers to set a
communication frequency preference to help drive additional sign-ups.
Use CAPTCHA to prevent bot sign-ups. Bad actors can exploit forms and use your subscriber list to harm your company’s reputation.
Consider including a hidden text field in your form. Bots scan forms and complete all available fields, but your customers don’t see hidden
fields. Then you can suppress subscribers that show hidden field values.
376
Email Studio ResourcesEmail in Marketing Cloud Engagement

Consider using double opt-in on page 184 at time of sign-up. A double opt-in campaign requires your subscribers to confirm their email
address by clicking a link in an email they receive after subscribing. Double opt-in ensures that the subscribers on your list want to be
there and minimizes the number of invalid email addresses on your list. This method also helps keep spam complaints to a minimum.
Looking for more guidance around re-engagement or reconfirmation email campaigns? Check out this post from our partners at Inbox
Monster on the subject.
Summary
To help prevent your company from becoming an unwilling spamming accomplice, follow all of the opt-in guidance. More importantly,
these precautions help you protect your sending reputation. Here are some tips on including elements in your sign-up page that drive
conversion:
•
A headline that grabs attention
•
A subheader that explains the benefits of sign-up
•
Tease a solution to a problem
•
Social proof or a testimonial of the added value
•
A simple form to collect email addresses. Use CAPTCHA at a minimum and consider a hidden text field that catches bot sign-ups.
Confirmed Opt-In
Confirmed opt-in (COI) or double opt-in validates opt-in requests from mailing list owners and ensures that the email address isn’t
fraudulent. The subscriber must click a confirmation button to confirm their intent to opt in. COI offers several benefits to businesses. It
verifies email ownership, keeps databases clean, increases engagement rates and ROI, and helps salespeople expand their customer
base.
Tip: COI is a best practice in the email-sending community, and we recommend it to all of our customers.
To determine if a potential subscriber has finished the COI process, they must complete an online sign-up form. After they submit their
details, they’re added to the non-confirmed opt-in list and will receive an automatic email. This email will include a custom redirect link
that the subscriber must click to confirm their intention to opt in. By clicking the link, the subscriber will be removed from the non-confirmed
opt-in list and added to the confirmed opt-in list. However, if the prospect doesn’t click the link in the autoresponder, they’ll remain on
the non-confirmed opt-in list.
Reseller Account Administration
As a Reseller administrator, you control the setup of your client and demo accounts. Use the Admin section to configure and manage
users of your Reseller administrator account and the initial users of your client accounts in Email Studio.
User Security
•
Assign appropriate rights to a user.
•
Deselect all user permissions to set up a user with full rights to every non-administrative area, including emails and templates,
subscribers, tracking, and libraries.
•
To create an administrator, assign the Add Users to Account permission.
•
After adding a user or resetting a user’s password, give the temporary password to the user.
•
You can’t delete users, but you can disable them. Disabling a user retains the user security record in your account and preserves the
integrity of data in your account associated with the user.
377
Reseller Account AdministrationEmail in Marketing Cloud Engagement

Create Client Accounts
Create client accounts in Email Studio.
Edit Client Accounts
Edit general information, account settings, or user login information for a client account under Admin in Email Studio.
Disable or Re-enable Client Accounts
You can't access disabled client accounts, but you can re-enable them as necessary. A disabled client account can’t be used, but it
remains in your account to re-enable in the future.
Log In to Client Accounts
Offer support and troubleshoot issues by logging in to a client account in Email Studio. You use the same access rights as that user.
Create Client Accounts
Create client accounts in Email Studio.
1. Click Admin.
2. Click the Client Accounts folder.
3. Click Add Account.
4. Enter the account name.
5. Enter the name to display in the From line of outgoing emails.
6. Enter the reply email address.
7. To create a demo account, choose Demo Account.
8. Select the brand to apply to this account.
Note: This step requires an enabled BrandBuilder advanced feature for your account. To enable this feature, contact your
Marketing Cloud Engagement account representative.
9. Click Create Client.
10. To create login information, click Add a User.
11. Complete the login information.
12. Review the options and settings.
Edit Client Accounts
Edit general information, account settings, or user login information for a client account under Admin in Email Studio.
1. Click Admin.
2. Click the Client Accounts folder.
3. Click View Accounts.
4. Edit the client account.
5. Save your changes.
6. Edit users created for the account.
7. Save your changes.
378
Reseller Account AdministrationEmail in Marketing Cloud Engagement
Disable or Re-enable Client Accounts
You can't access disabled client accounts, but you can re-enable them as necessary. A disabled client account can’t be used, but it
remains in your account to re-enable in the future.
1. Click Admin.
2. Click the Client Accounts folder.
3. Click View Accounts.
4. Click Edit next to the client account.
5. To disable the account, select Disable Client. To re-enable the account, deselect Disable Client.
6. Save your changes.
Log In to Client Accounts
Offer support and troubleshoot issues by logging in to a client account in Email Studio. You use the same access rights as that user.
1. Click Admin.
2. Click the Client Accounts folder.
3. Click View Accounts.
4. Click the username.
5. To finish, click Return.
Enterprise 2.0 Shared Items
A shared item is an email, template, portfolio, data extension, or content area that you control access to. Users outside the business unit
can access the shared item with the appropriate role and permission settings. For example, user with view only permissions can view
but not change a shared item.
Use a shared item to share branding, content, and images for emails, landing pages, and websites. Sharing items makes it easier for you
to control your data and messaging across diverse scenarios. Contact your account executive for information on enabling this feature.
Set permissions for particular roles to allow access to users outside the business unit. For example, if you want all your business units to
access a template, create the template as a shared item. Then, set permissions for the item to allow access by all users in all business
units. When you share an item in Enterprise 2.0, you grant access to an instance of the item. Anyone with access to the item can view
and access changes made to the item.
Shared items exist in a shared items folder. You can also share folders across several different business units within the same Enterprise
2.0 account. Items that you save in shared folders are available to all users working in business units with the appropriate permissions.
You can set permissions on the shared items folder. Users working within business units inside an Enterprise 2.0 account can also create
shared items folders and set permissions on them.
An item’s creator retains ownership unless an administrator or a user with permissions to change ownership of a shared item or folder
changes it.
Use shared content as part of dynamic content and share dynamic content from a shared items folder.
Shared Data Extensions in Enterprise 2.0
Share data extensions across an Enterprise 2.0 account in Email Studio.
Enterprise 2.0 Shared Suppression Lists
Share suppression lists from parent business units to child business units in Email Studio.
379
Enterprise 2.0 Shared ItemsEmail in Marketing Cloud Engagement

View an Enterprise 2.0 Shared Item
View shared items in Email Studio.
Shared Data Extensions in Enterprise 2.0
Share data extensions across an Enterprise 2.0 account in Email Studio.
Shared data extensions must exist in the main Shared Data Extensions folder or a subfolder under Subscribers. From Shared Data
Extensions, create and set permissions similar to other shared items. Move data extensions to the Shared Data Extensions folder to share
the data extension with other accounts.
Note: When you use AMPscript or queries, use the ENT prefix to reference a shared data extension. This prefix indicates that the
data extension exists at the parent level. The child account’s permission restricts access to parent data extensions.
Enterprise 2.0 Shared Suppression Lists
Share suppression lists from parent business units to child business units in Email Studio.
Suppression lists compare subscriber lists against the master publication list, which controls opted-out subscribers. This comparison
ensures that only the subscribers who opted in for the publication receive the publication.
Note: Subscribers see a list of publications when they visit the subscription center through an email sent from a business unit.
The publication list includes both the suppression lists created by the business unit and the suppression lists shared with the
business unit.
View an Enterprise 2.0 Shared Item
View shared items in Email Studio.
1. Click Content.
2. Click the Shared Items folder.
3. To see a list of shared items, click a shared folder.
You see only items that you have permission to access.
380
Enterprise 2.0 Shared ItemsEmail in Marketing Cloud Engagement
INDEX
A
ab testing 282, 284–285, 287–288
address book safe senders 352
API 51
appexchange deliverability partners 320
ascii characters 325
Auto-Suppression Lists
Add subscribers 10
B
bounced messages 303
BrandBuilder
associate brand 18
preview brand 18
C
client accounts 378–379
code samples 296, 298–299
content 20
Content Builder
administration 354
Content Detective
new creation tools 49
run 49
trigger words 45
content syndication 49–51
conversion tracking 291, 295–296, 298–299
D
Data Extensions
classic 200
data types 141
error messages 137
troubleshooting data relationships 136
Data Filter
activity 153
scenario 148
Data Filters
delete 148
enhance subscriber feature 144
group 153
E
email data 304
email deliverability 370
email encoding 339
email link 295
email reports 296, 302, 304
email sending
send flow 26–27, 29–31
Email Sending
checklist 37
de-duplication 37
litmus 35
send preview 36
simple send 36
subscriber preview and test send 32
email studio 118, 282, 284–285, 287–288, 295–296, 298–299,
305–306, 308, 310, 313–314
Email Studio
Admin 6
edit triggered email 269
example 265
email tracking 288, 290–291, 296, 298–299, 302–306, 308–310,
313–317
Enhanced Subscriber Feature
data filters 144
export report 303
F
Forward to a Friend
add 252
G
groups 191
I
Import Activity
buffer 255
buffer example 255
date validation 255
impression tracking 304
interactions 277
international 54
international sends 339, 343
iOS Universal Link
exclude link 14
test 14
J
job link 38
381
job links 315
L
landing pages 295
link tracking 317
lists 106, 108, 111–112, 187
M
measures
best practices and tips 210
Messages 275–276
Microsites
use subscriber preview 32
P
Personalization Strings
insert 44
R
reports 290, 304–305, 309, 314–317
reseller 377
Return Path Platform
email client monitor 324
inbox monitor 323
reputation monitor 322
training 324
S
security 377
sends
past 38
pending 38
shared items
data extensions 380
suppression lists 380
Social Forward
AMPscript 60
change default icons 78
content area 60–61
content area sharing 59
content slot sharing 71
create content area 77
CSS 78–79
dynamic content area 77
dynamically 78
editor 59
paste html 62–63
paste HTML 60–61
sample tracking queries 81
Social Forward (continued)
share content 78
sharing content area 64
social content slot sharing 68
social markup 60–63
social networks 78
standard and custom icons 76
supported social networks 67
tags 59
Tags 75
tracking 64
Subscriber
data 182
import file
95
requirements 95
subscriber key 170
subscribers
add manually 92
delete 101
enahanced segmentation 84
enhanced features 92
imports 93
properties
98
access 98
publication list 157
publication lists 154
subscriber features 84
Subscribers
add manually 178
email addresses
181
hard bounced 181
hard bounced
181
update 181
hard bounces
180
remove 180
import 189
properties 180
search 179
status
180
export 180
Suppression List
send 159
382
Index
