
Adobe Acrobat Professional DOM Fund Manager’s Manual
Page 1 of 9
USING ADOBE ACROBAT PROFESSIONAL TO ASSIST
WITH HARD COPY PROPOSAL PREPARATION
Revised April 6, 2012
Note: All fund managers should have a copy of Adobe Acrobat Professional installed on their
computer. If you do not, an individual user license can be purchased through DOM IS office (x54398)
for approximately $58/ea. Please make sure to get approval from your MSO prior to purchase.
Why should I use Adobe Professional to help me with a hard copy grant submission?
1) You can easily add Headers and Footers to any document.
2) You can compile a PDF of the entire proposal packet in order to:
a. Print the agency required copies from the one file of the complete proposal.
b. Send to OCGA via an email attachment for administrative review.
c. Send to the PI via an email attachment for review/approval.
d. Keep an electronic copy for your records.
3) You can easily paginate the entire proposal packet in just a few simple steps.
4) You can easily insert or delete pages within a compiled document without worrying about
tables/figures/graphics shifting.
5) Converting to PDF ensures the formatting will not be altered, especially within the
Research Plan, and when sharing files between Macs and PCs.
6) Using Adobe Acrobat Professional will save you time!!!
A good example of a compiled PDF document using all of the steps below is the Fund Manager
Manual. Each chapter started out as a separate Word doc, that once finalized, was converted to PDF
using Cute PDF. The manual was then created by opening up the PDF version of the Title Page, and
adding the chapters one by one. Once the entire manual was compiled, it was paginated. The Table
of Contents (TOC) section was inserted initially as a place holder so that the correct page numbers
were generated. We then went back into the Word doc version of the TOC to edit the document by
adding the page numbers generated by the previous step. Once the TOC was finalized, it was then
converted to PDF once again, and the page number footers were added to the bottom of the TOC
pages. The place holder version of the TOC was deleted from the Fund Manager Manual, and the
finalized version of the TOC was reinserted.
The trick to using Adobe Acrobat Professional is to convert all Word, Excel, etc. documents to
PDF first. There are many different software programs that convert documents to PDF. Our PDF
converter of choice is CutePDF Writer. This software program is free and can be downloaded to your
computer with the assistance of DOM IS (x54398). Once installed, just choose File, Print, and then
select the CutePDF Writer printer from the drop down box to convert your files to PDF.
Adobe Acrobat Professional DOM Fund Manager’s Manual
Page 2 of 9
Reminder: Once you convert the document to PDF, the document becomes uneditable, so do not
convert until the document is complete.
ADDING HEADERS AND FOOTERS
When would I use this feature?
Examples:
1) Your PI sends you the Grants.gov version of his BioSketch with no headers or footers, but the
proposal needs to be submitted using hard copy PHS 398 forms which requires the use of NIH
PHS 398 headers and footers.
2) Your PI sends you a Letter of Support that she would like to include in the hard copy proposal,
but the Letter of Support contains no PHS 398 headers or footers.
Once you are done editing the form, convert the document to PDF. The example below is for an NIH
BioSketch, but the following steps can be used to insert any type of header/footer.
The first time you add NIH PHS 398 Headers and Footers, you will have to download the Word
version of the form from the NIH’s website in order to copy and paste the header/footer information
into the Adobe file so that it appears exactly as the NIH intended. The most current version of the NIH
PHS 398 forms can be downloaded from: http://grants.nih.gov/grants/funding/phs398/phs398.html
Open up the PDF file you would like to add headers and footers to. From the Adobe Acrobat
Professional menu, click on Document, Header & Footer, Add.
An Add Header and Footer window will pop up.

Adobe Acrobat Professional DOM Fund Manager’s Manual
Page 3 of 9
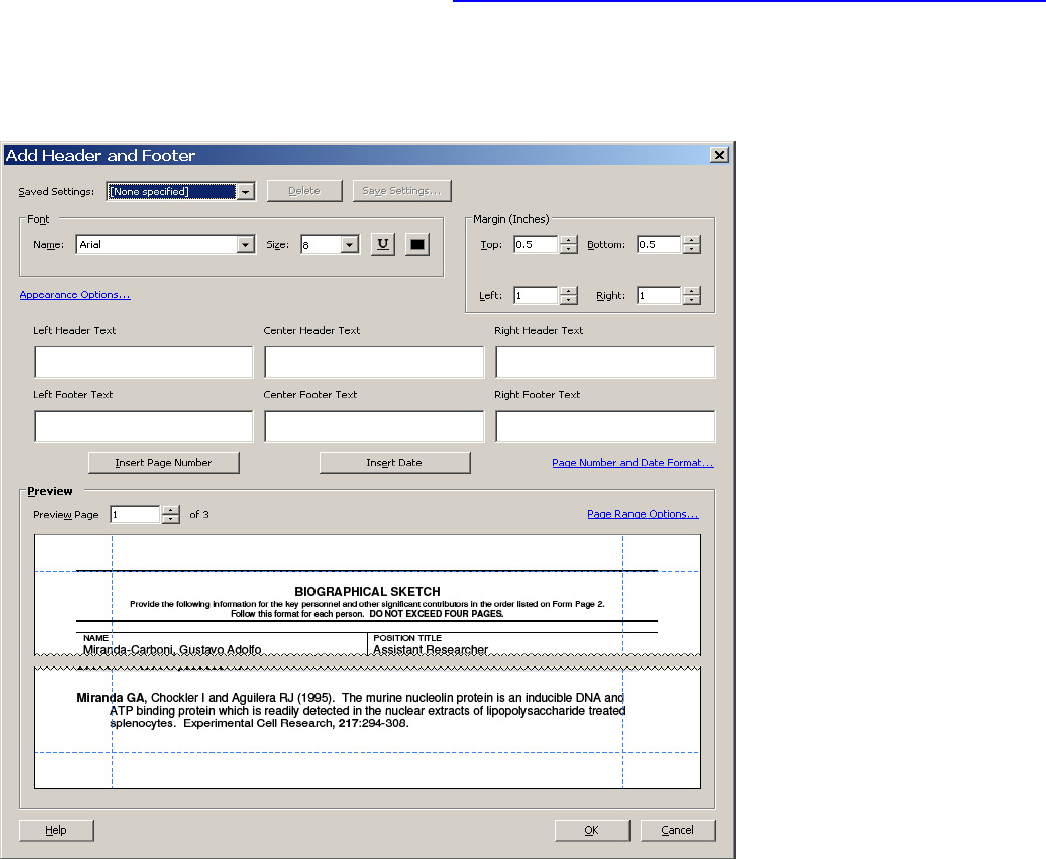
In the Add Header and Footer window, complete the following:
1) Copy and paste the header from the NIH Word doc version of the BioSketch form into the
Left Header Text section.
a. Note: Add the PI’s name into the Word doc header prior to Copying and Pasting.
2) Copy and paste the left footer (ex: PHS 398/250 (rev. 11/07)) from the NIH Word doc
version of the BioSketch form into the Left Footer Text section.
3) Copy and paste the right footer (ex: Biographical Sketch Format Page) from the NIH Word
doc version of the BioSketch form into the Right Footer Text section.
4) Change the Margin information to comply with the agencies guidelines. For NIH, change
all margins to 0.5.
5) To save this Header and Footer information as a template for future use, click on the Save
Settings button, and choose a name to Save Current Settings As.
6) Check the Preview section to make sure the Headers and Footers are in the correct
placement. If not, adjust the Margins accordingly (see #4).
Below is an example of a completed Add Header and Footer window for an NIH BioSketch:
6) Preview -
This area will
show you how
the Header &
Footer
information
will appear
within the
form
4) Adjust the
Margin
information as
necessary
1
2
3
5
7

Adobe Acrobat Professional DOM Fund Manager’s Manual
Page 4 of 9
7) Click OK, and the Biosketch form will now have the appropriate NIH PHS 398 Headers and
Footers. See below.
In the future, you can just click on Documents, Header & Footer, Add, then choose the previously
saved header and footer from the drop down menu under the Saved Settings section in order to
quickly add the header an footer to the document.
TIP: Follow the steps above to create a PHS 398 Continuation Page header and footer for each of
your PIs, so that you can quickly add headers and footers to all your documents.

Adobe Acrobat Professional DOM Fund Manager’s Manual
Page 5 of 9
COMPILE THE ENTIRE PROPOSAL INTO ONE PDF FILE
Once you have more than one form or section of the proposal completed and converted to PDF, you
can easily compile the entire proposal packet into one PDF file.
To do so, open up the PDF page you would like to start with in Adobe Acrobat Professional.
From the Adobe menu, click on Document, Insert Pages…

Adobe Acrobat Professional DOM Fund Manager’s Manual
Page 6 of 9
Find the file you would like to add, select it by clicking on it, and then hit the Select button.
Choose where you would like to insert the file, e.g. Before or After, First or Last, or Page x.
Your PDF file now contains the original page, and the added page/s.

Adobe Acrobat Professional DOM Fund Manager’s Manual
Page 7 of 9
Continue repeating these steps until all sections of the proposal have been added to the one file.
Reminder: Rename the file, so you still have the original starting page as a separate file.
You can also Delete pages easily, by clicking on Document, Delete Pages…, and then selecting the
page number/s you wish to delete.
Note: If you use the compiled PDF of the proposal to print the required agency copies for
submission, and the research section of the proposal contains color graphs and figures, please make
sure to print a test copy first for quality approval from the PI.
Note that now that the 2 page Abstract file
has been added to the Face Page file, the
document is now 3 pages.

Adobe Acrobat Professional DOM Fund Manager’s Manual
Page 8 of 9
PAGINATE THE ENTIRE PROPOSAL
Note: If you are going to use Adobe Acrobat Professional to paginate your grant proposal, you
MUST delete the page number information in the Word document PRIOR to converting the Word
document to PDF.
Paginating can be a little tricky, and you may need to play around with it before you get the hang of it.
Once you do get the hang of it, it is really easy and quick. Sometimes, though, it may be necessary
to paginate a page individually prior to inserting it into the final version of the compiled proposal.
Example: A Letter of Support (LOS) provided to you by the PI has its own footer. If you paginate it
with the rest of the proposal, the page number may appear on top of the LOS footer, thus making
both illegible. In this case, insert the LOS into the compiled proposal as a place holder, paginate the
entire document, delete the LOS page, paginate the LOS page individually so that the page number
does not interfere with the existing LOS footer, then re-insert it into the compiled proposal. This may
sound like a lot of effort, but again, once you get the hang of it, it really is quick and easy.
Or, it may be necessary to paginate sections of the proposal prior to inserting an individual page or
section. Example: The NIH Face Page should not be paginated, so you should paginate starting on
page 2 first, prior to inserting the Face Page into the compiled PDF file. Once the rest of the file has
been paginated, then insert the non-paginated Face Page into the compiled proposal.
To Paginate the PDF file:
1) From the Adobe Acrobat Professional menu, click on Document, Header & Footer, Add
2) In the Add Header and Footer window, click on the Page Number and Date Format… link
3) Click inside the Center Footer Text, and then click on the Insert Page Number button
Delete this page number
information from the Word doc
prior to converting to PDF.
Click on the drop down box to change
the Page Number F
ormat.
If you are not starting with Page 1, type
the correct starting Page Number, or
use the up and down arrows to
increase/decrease the page number.

Adobe Acrobat Professional DOM Fund Manager’s Manual
Page 9 of 9
4) Check the Preview section to make sure the Page Number appears where and how you would like
it. If not, you may need to adjust the Margin section to move the Page Number either up or down on
the page.
5) If everything looks okay, click on the OK button, and your document is now paginated!
2) Click
on this
link to
format
the Page
Number
4
3
5
