
X-Payments:Using X-Payments with Magento 2
A Magento 2 store can be connected to X-Payments web-based payment application to process payments
from customers and save their credit card data in a PCI DSS compliant way.
This section provides information on how to connect X-Payments to your Magento 2 store and how to handle
payments in your Magento 2 store using X-Payments.
Connecting Magento 2 to X-Payments
Connecting your Magento 2 store to X-Payments includes two consecutive steps:
● Configure the connection to your Magento 2 store in the X-Payments back end
● Configure the connection to X-Payments in the Magento 2 store Administrator panel
Using X-Payments with Magento 2: Customer experience
● Magento 2 checkout routine when using X-Payments
Using X-Payments with Magento 2: Administrator experience
● Reviewing payment information for X-Payments orders when using X-Payments with Magento
2
● Capturing payments when using X-Payments with Magento 2
● Issuing refunds when using X-Payments with Magento 2
● Canceling payments when using X-Payments with Magento 2
Configure the connection to your Magento 2 store in the
X-Payments back end
To begin the process of connecting to your Magento 2 store, log in to the admin back end of your X-Payments
and complete a few preliminary steps that will enable your X-Payments to connect to your Magento 2 store and
to the payment gateway through which your customers' payments will be processed.
More information on configuring X-Payments is available in the section "Configuring X-Payments" of the
X-Payments user manual.
Complete the following steps:

1. Log in to X-Payments as administrator.
2. Provide your X-Payments application with data required to connect to your chosen payment
gateway.
1. In the X-Payments back end, go to the 'Payment Configurations' page
(Settings -> Payment configurations):
2. From the New configuration drop-down box, select the payment module that
X-Payments should use to connect to the payment gateway that will process
your Magento store payment transactions.
3. Click Add new.
4. On the page that opens, enter all the required configuration parameters.
5. Click Save to save the changes. You have created a payment configuration.
6. Make sure the payment configuration you have created is enabled.
3. Provide your X-Payments application with data required to connect to your Magento 2 store:
1. In the X-Payments back end, go to the 'Online Stores' page (Settings -> Online
stores).
2. Click Add new.
3. On the page that opens, enter your Magento store name, store title and order
prefix.
4. Specify the templates that you would like to use for the payment pages in your
Magento 2 store (a template for laptop and desktop users, a template for mobile
users and a template for users who have 3-D Secure protection enabled).
5. Specify the payment configuration you would like to use for this store (Select
the payment configuration you have configured at the previous step).
6. Click Save to save the changes.
7. Make sure the online store is enabled.
You have completed configuring the connection in X-Payments.

Before you proceed to configuring the connection in your Magento 2 Administrator panel, please pay attention
to the Connection section on the right-hand side of the page with the details of your Magento 2 store in
X-Payments. Here you should be able to see the so-called configuration bundle for your Magento 2 store. The
configuration bundle provides a quick method to deploy X-Payments connection settings in your Magento 2
store. You will need this bundle when you will be configuring the connection in your Magento 2 Administrator
panel. For now, simply click the Copy button to copy the bundle to clipboard so you have it at the ready when it
is time to paste it on the end of your Magento 2 store.
Now you can configure the connection to X-Payments in the Magento 2 store Administrator panel.
Configure the connection to X-Payments in the Magento 2 store
Administrator panel
After configuring the connection to your Magento 2 store in X-Payments, log in to your Magento 2 store
Administrator panel and complete setting up the connection on the Magento 2 store end.
The following procedure assumes that your Magento store has the X-Payments connector extension installed.
Complete the following steps:
1. Log in to the Administrator panel of your Magento 2 store.
2. Go to Stores -> X-Payments Connector:
3. The Welcome page showing how to connect X-Payments with Magento 2 in three easy steps
opens:

4. Click on the link "Connect X-Payments with Magento":
5. This opens the Connection settings section:
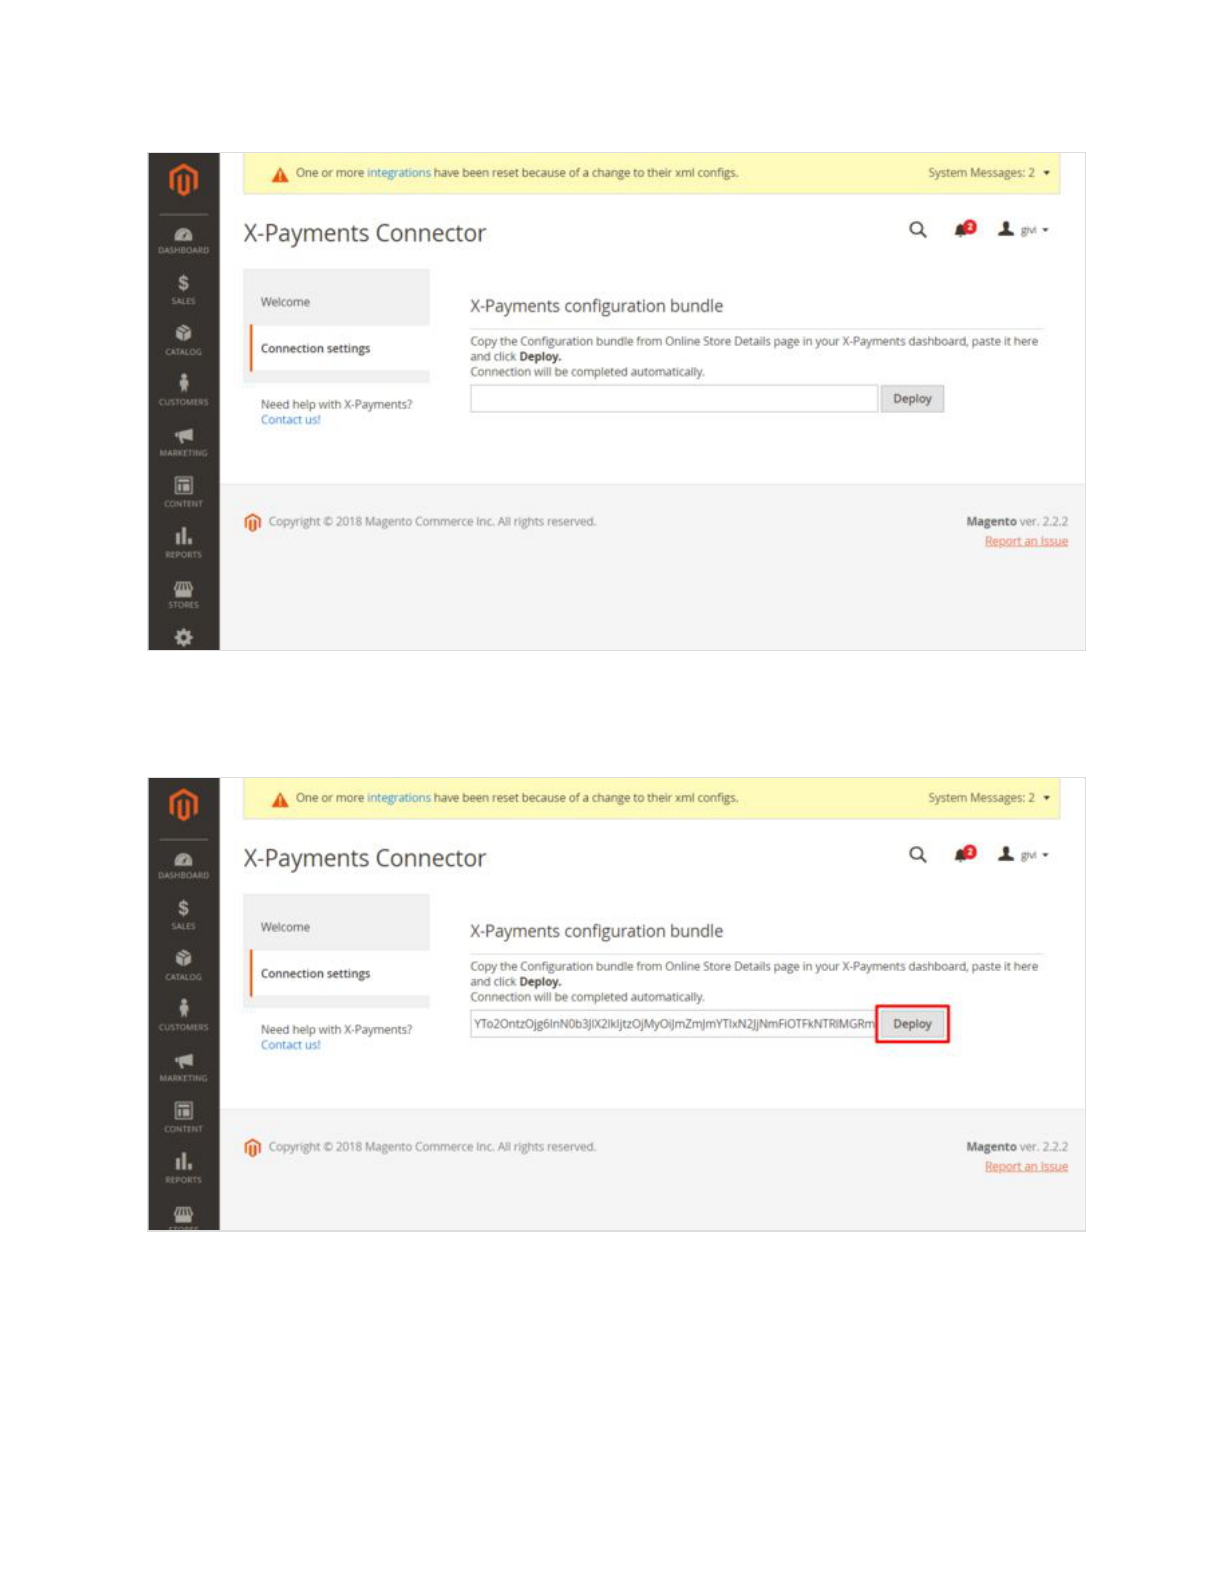
6. In the details of your Magento 2 online store in the X-Payments back end, copy your
X-Payments configuration bundle and paste it into the respective box in your Magento 2
Administrator panel.
7. Click Deploy.
8. In a couple of seconds, the configuration bundle will be deployed, and a success message will
be displayed at the top of the page:

9. Check the list of payment methods that have been imported from X-Payments. On the
screenshot below you can see that a single payment method has been imported -
"Authorize.Net":
10. If you need to import more payment methods, you will have to add them in X-Payments first
and use the Re-import payment methods button in the Magento 2 store to import them.

11. To quickly access the X-Payments page where you can add more payment methods, use the
"Add new payment method" link.
12. At the time of the writing of this article, multiple payment methods can be imported from
X-Payments into Magento 2, but only one of them can be enabled and used to accept
payments.
13. If you look at the details of the payment method "Authorize.Net" we have imported from
X-Payments, you will see that it is set to work using the currency "USD".

14. The currency is set in X-Payments, and should you want to change the currency used, you will
want to do that via the payment configuration settings on the X-Payments end, after which you
will have to re-import the payment method settings into your Magento 2 store with the
Re-import payment methods button.
15. After the deployment of the configuration bundle, none of the payment methods imported from
X-Payments are active for your Magento 2 store. (Note the unchecked radio button in the first
column on the left opposite the payment method name "Authorize.Net". Also note the option
"Disable X-Payments payment method" which is currently enabled):
16. You still need to activate the payment method you wish to use in your Magento 2 store. To
activate a payment method, select the radio button in the first column on the left opposite the
method name and click Update.

17. The selected method will be activated, and you will see a success message at the top of the
page.
18. Go back to the Connection settings section of the Magento 2 Administrator panel to complete
the connection.

19. Here you will need to adjust a few more settings.
You should see that some of the settings on this page have already have been adjusted automatically as a
result of the deployment of the X-Payments configuration bundle (like the X-Payments URL or the IP
addresses for X-Payments callbacks). The rest of the settings should be checked and adjusted manually.
The list of settings available on the Connection settings page is as follows:
● X-Payments URL: URL where X-Payments is installed. This info is received
automatically via the X-Payments configuration bundle.
● IP addresses for X-Payments callbacks: IP addresses from which X-Payments
callbacks will originate.
● Comment
: X-Payments will send callback requests to your store from specific IP
addresses. To ensure that your store accepts callback requests only from these IP
addresses, the allowed IP addresses need to be specified in this field as a
comma-separated list. For more info, see Callback from X-Payments to the store.
● Payment method title: This field can be used to set the name for the payment
method - as it should be seen by your Magento 2 store users. The name entered
into this field will replace the name imported from X-Payments.
● Action (Authorize
or Authorize and capture
): This setting determines how the
buyer's credit card is charged when they pay you via X-Payments:
● If this is set to Authorize
, a two-step process is used in which the authorization of
payment is separated from the capture of the authorized payment. At the time of
the initial transaction, you perform only an authorization on the buyer's card without
actually capturing the funds. This corresponds to the payment status "Authorized"
in X-Payments. Later you need to take additional steps to capture the funds or void
the authorization.
● If this is set to Authorize and capture
, an actual charge is made on the buyer's card
as soon as the buyer's payment information is processed by the payment gateway -

without any further interaction on your part. In X-Payments the status of such
payments appears as "Charged".
● Some payment gateways do not support two-step payments with separate
authorization and capture, so if you wish to choose the "Authorize" option, make
sure your payment gateway supports this feature.
● Please be aware that the "Action" setting in your Magento 2 store overrides the
"Initial transaction" setting in the respective payment configuration in X-Payments
(Setting the "Action" to Authorize
in Magento 2 allows you to have a two-step
payment process with separate authorization and capture - even if the payment
configuration in X-Payments is configured to use the "Auth and capture" mode for
the initial transaction.)
2. After making changes to the settings in the Connection settings section, be sure to click
Update to save them.
That's it. You have connected your Magento 2 store to X-Payments.
Magento 2 checkout routine when using X-Payments
Once the X-Payments enabled payment method has been enabled in the Administrator panel of your Magento
2 store, this method becomes available to the buyers:
When a buyer chooses to pay using the X-Payments enabled payment method, they get to enter their
payment info into a form like the following:

:
After the completion of the payment, they get an order confirmation as usual and can review the details of
their order in their account.
:
Reviewing payment information for X-Payments orders when
using X-Payments with Magento 2
You can easily find orders that were paid for via X-Payments and get all the payment related information you
require:
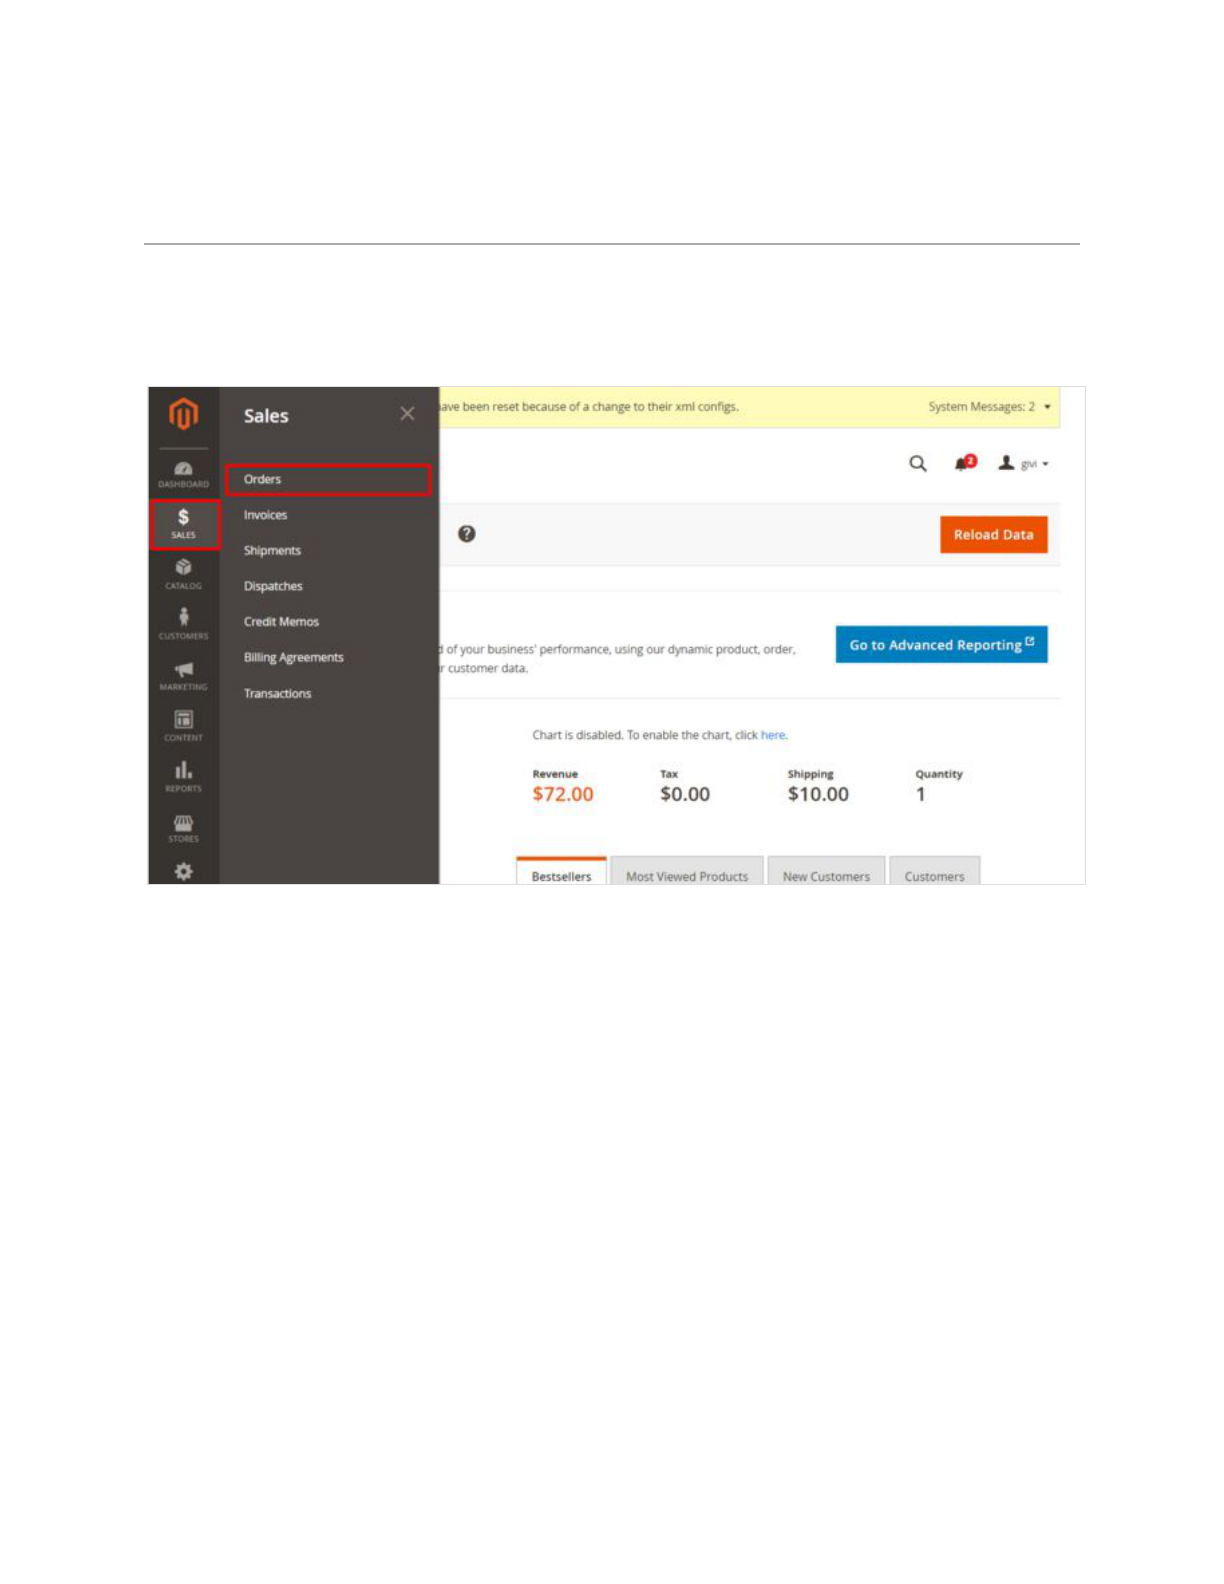
1. In the Administrator panel of your Magento 2 store, go to the Orders section (Sales->Orders):
2. Make sure the set of active columns for your Orders table includes the column "Payment
Method". If not, select Columns and put a check mark in the Payment Method checkbox.

3. Your Orders table should now have a column with information regarding the payment method
that was used for each order:
4. You can tell that an order was paid for using X-Payments if the Payment Method column for
this order shows the title of your X-Payments payment method. The X-Payments payment
method title can be adjusted in your store's X-Payments Connection settings
(Stores->X-Payments Connector).

5. Use the sorting and filtering features to locate the order for which you wish to review the
payment information. Click anywhere on the table row of that order to view the order details.
There you will find the order payment information.
For example, let's have a look at the details of Order 000000246. To review the detailed information pertaining
to this order, we click on the line of this order in the Orders table:
The Information page for Order 000000246 opens:

We see that the Order Status is currently "Processing". If we scroll down the page to the Payment & Shipping
Method section, we'll find out that the order was paid for using the payment method "Payment method (xpc1)",
which is the title of the X-Payments-enabled payment method in our store, and that the payment currency was
USD.
If we scroll further down the page, we will see more detailed information regarding all the payment related
operations for the order:

From the information provided here, we can infer that the payment was made in the "Authorize and capture"
mode, which resulted in that the order amount ($82.00) was captured online at the time of order placement.
Knowing the transaction ID (in our case, "f1a51be167d0b31d9c54bbf138e5c8c2") allows us to identify the
respective transaction in the Transactions section of the order details in the Magento 2 store Administrator
panel and in X-Payments.
For a detailed view of the order transactions, we recommend using the Transactions section:
Capturing payments when using X-Payments with Magento 2
Depending on the payment method settings, an order payment via X-Payments may be carried out in either the
"Authorize" or the "Authorize and capture" mode.
In a workflow where an order payment is performed in the "Authorize" mode ("Initial transaction = Auth" in
X-Payments and/or "Action = Authorize and capture" in Magento), it happens as a two-step process: at the time
of order creation, you obtain an authorization for the order grand total amount; later you do a manual capture of
the funds to initiate a transfer of the authorized amount from the buyer's account to your account. Note that you
are guaranteed these funds only for a limited time (Typically, you have to capture a previously authorized
amount within 30 days, but the time may vary by company, so you should check with your payment gateway).
In the "Authorize and capture" mode ("Initial transaction = Auth and capture" in the payment configuration
settings in X-Payments and
"Action = Authorize and capture" in the X-Payments connector payment method

settings in Magento), an authorization and a capture are both performed at once at the time of order creation,
so you do not need to worry about manually capturing the funds.
Below we discuss how to capture the funds for which an authorization has been obtained as a result of a buyer
making a payment in the "Authorize" mode.
The recommended method to capture a previously authorized amount is based on creating an invoice. If
required, multiple invoices can be created for a single order, each containing as many of the purchased items
as you specify.
To perform a capture:
1. In the Administrator panel, select Sales > Orders:
2. In the Orders table, locate the order for which you want to perform a capture and click to open
the order details.

3. Choose to create a new invoice by clicking the Invoice button:
4. This opens a new invoice page:
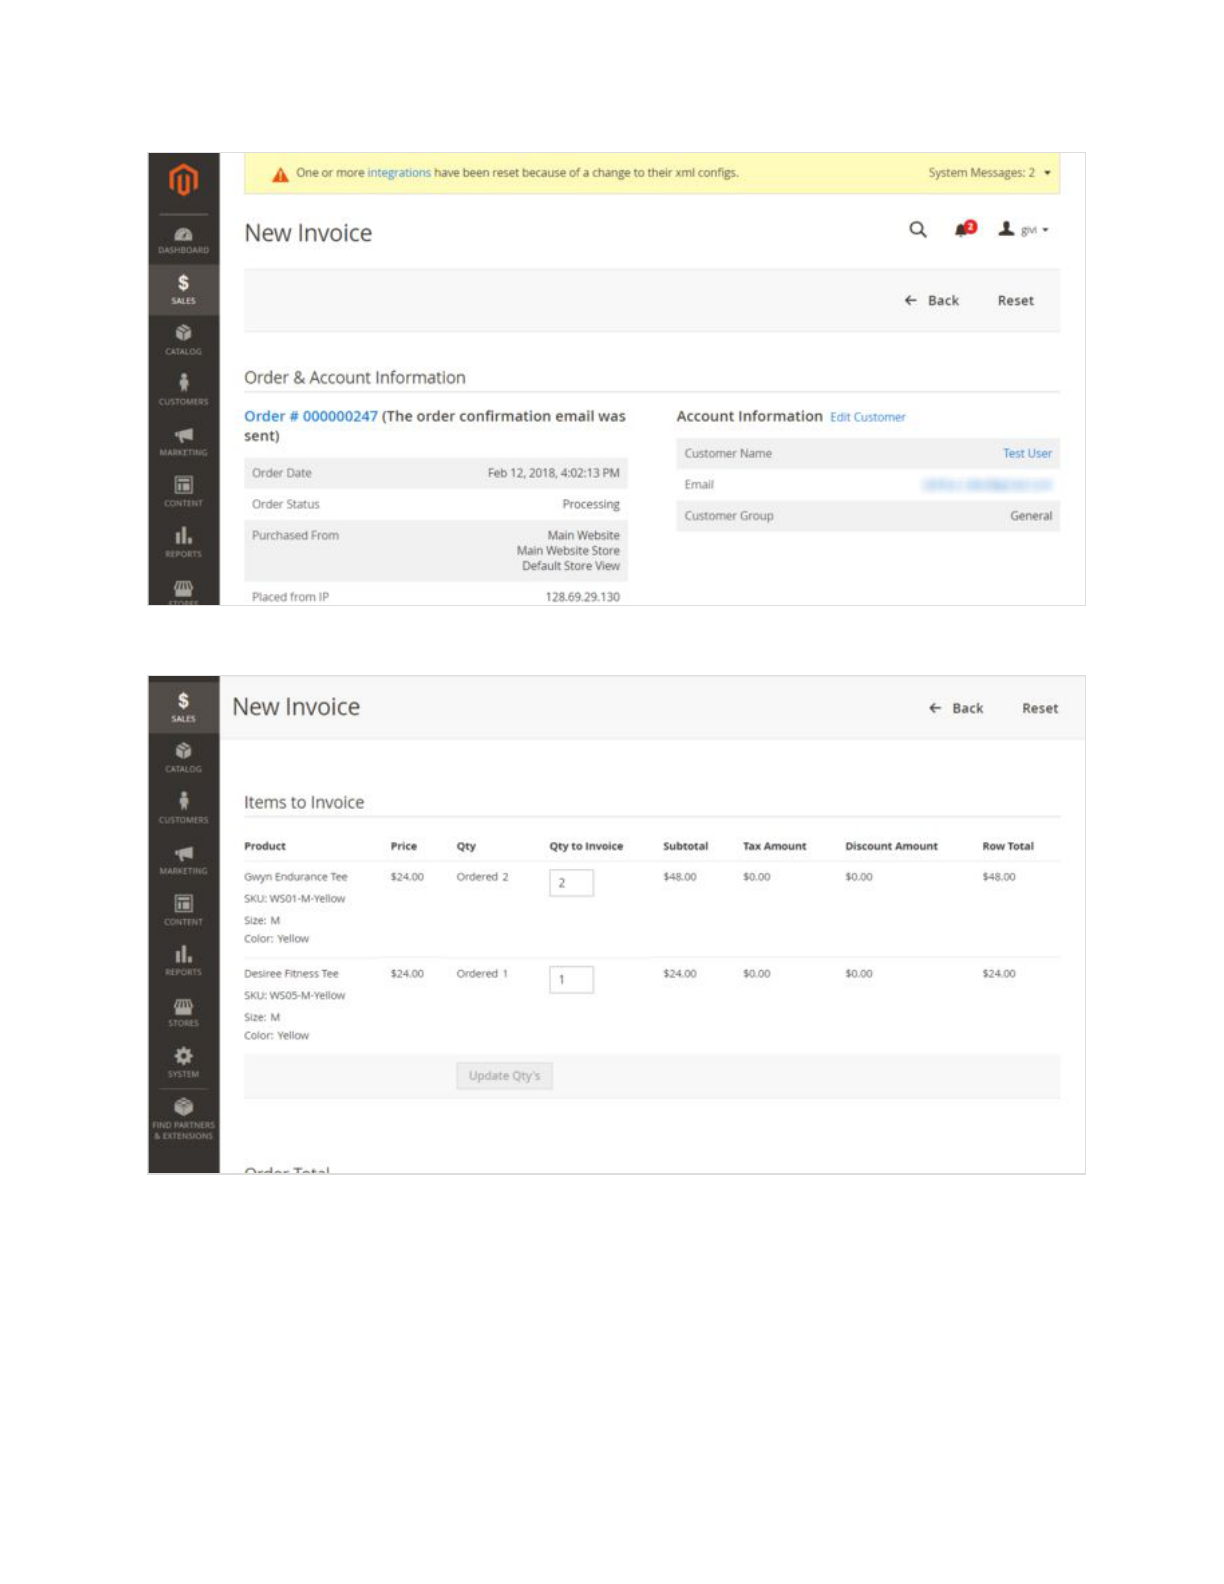
5. Scroll down to the Items to Invoice section.
6. This section provides a list of items you can invoice and their respective quantities. By default,
the invoice will be created for the entire order. If you are going to invoice only some of the items
and do a partial capture this time, update the quantities to invoice (specify the correct quantities
in the Qty to invoice column and click the Update Qty's button).

7. The invoice totals will be re-calculated.
Important: Before using partial capture, make sure your payment gateway supports this feature.
8. Work through the invoicing process as usual: add a tracking number, create a packing slip,
enter invoice comments as needed, specify whether a copy of the invoice needs to be emailed
to the customer and whether your comments need to be appended to it.
9. In the Amount field, select the payment action you require:
10.

● Capture Online
: Upon invoice submission, the invoice amount will be captured (a
request to capture the specified amount will be sent through X-Payments to the
payment gateway). After the capture, you will have the ability to create a credit
memo should you require to issue a refund.
● Capture Offline
: Upon invoice submission, the system will not capture the payment
(no request to capture the payment will be sent). This option should be selected if
the capture of funds is performed directly through the gateway or through the
X-Payments back end. Note that after using the "Capture Offline" option you will no
longer have the option to capture this payment through your Magento store. You
will have the ability to create a credit memo.
● Not Capture
: Upon invoice submission, the system will not capture the payment (no
request to capture the payment will be sent). This option assumes that you will
capture the payment at a later date. The completed invoice (you will be able to
access it through Order View > Invoices) will have a Capture button allowing you
to complete the task.
● Before the payment is captured, you will able to cancel the invoice. After capturing
you will be able to create a credit memo.
● Important: Do not select “Not Capture” unless you are certain that you are
going to capture the payment through Magento at a later date. You will not be
able to create a credit memo until the payment has been captured using the
Capture button.
11. Click the Submit Invoice button to process the invoice.

The invoice will be created. The selected payment action (Capture Online, Capture Offline or Not Capture) will
be applied.
Now if you go back to the order details and click on the Invoices tab under the Order View menu, you should
be able to see the new invoice added to the list of invoices pertaining to the order:
An invoice created with the "Capture Online" option or captured after it has been created with the "Not Capture"
option will have the status Paid
. The respective capture transaction will appear in the X-Payments back end
with the status Charged
.

An invoice created with the "Capture Offline" or "Not Capture" option will have the status Pending
; no
transaction will be reflected in X-Payments.
Issuing refunds when using X-Payments with Magento 2
After an order has been paid and invoiced, the entire order, or a portion of it, can be refunded. The basic
method to do a refund in Magento is by issuing a credit memo.
To issue a refund:
1. In the Administrator panel, select Sales > Orders:
2. In the Orders list, locate the order for which you want to issue a refund and click to open the
order details:

3. In the Order View menu on the left-hand side of the screen, select the Invoices tab. This
opens a list of invoices pertaining to the order:
4. Locate the invoice for the item(s) you need to refund and click to open it.

5. In the upper right of the Invoice page, click the Credit Memo button to start the refund process
by generating a credit memo.
6. The New Memo page opens:

7. Scroll down to the "Items to Refund" section.
8. This section provides a list of items pertaining to the invoice and their respective quantities. By
default, a refund will be issued for the entire invoice amount. If you are going to refund only
some of the items and do a partial refund this time, update the quantities to refund (specify the
correct quantities in the Qty to Refund column and click the Update Qty's button); the total
amount to be credited will be re-calculated. Select the Return to Stock checkbox for the items
that will be returned to inventory (Do not select the checkbox if the items will not be returned). If
you want to refund shipping, issue an adjustment refund or add an adjustment fee, specify the
respective amounts.
Important: Before doing a partial refund, make sure your payment gateway supports this feature.

9. Work through the process of creating a credit memo as usual: enter credit memo comments as
needed, specify whether a notification of the credit memo needs to be emailed to the customer
and whether your comments need to be appended to the notification.
10. Click Refund or Refund Offline to process the refund (Select the button based on the action
you require).
11. If you select Refund, a refund request will be submitted to the payment gateway via
X-Payments, and a refund will be given at the same time that the credit memo is issued. If you
select Refund Offline, no refund request will be sent (This option assumes that you will handle
the refund directly through the gateway or through the X-Payments back end).
Once you have completed the above steps, the credit memo should be created.

Now if you go back to the order details and select the Credit Memos tab under the Order View menu,
you should be able to see the new credit memo added to the list of credit memos pertaining to the order:
The status will be shown as Refunded
.
If you have chosen to complete the refund online, the refund transaction will appear in X-Payments with
the same status, Refunded
.
If you have chosen the "Refund Offline" option, the transaction will not be reflected in X-Payments.
Canceling payments when using X-Payments with Magento 2
In the "Authorize" workflow - as opposed to the "Authorize and capture" workflow - it is possible to cancel (void)
a payment before it has been captured. For example, if you have a payment for which an invoice was created
with the "Not Capture" payment option, you can cancel it via the invoice page.
To cancel a payment:
1. In the Admin panel, select Sales > Orders:

2. In the Orders list, locate the order for which you want to cancel a payment and click to open the
order details.
3. In the Order View menu on the left-hand side of the screen, select the Invoices tab. This
opens a list of invoices pertaining to the order. Locate the invoice you need to cancel and click
to open it.

4. In the upper right of the Invoice page, click the Cancel button.
5. The authorization to capture the invoice amount will be voided. You should see a success
message:

6. The invoice status will be updated to Canceled
.
In X-Payments, you should be able to find the respective Void transaction with the status Voided
. The status of
the payment in X-Payments should be updated to Declined by merchant
.
