

Getting Started
Whether you are a new user or a returning one, to access iThenticate select LoginLogin from the top right corner of the
iThenticate homepage, https://www.ithenticate.com. This will direct you to the login page.
New Users
First-time users can create an account by selecting Sign UpSign Up. This will direct you to the account creation form.
2

Enter your name and email in the relevant fields and select your country and time zone from the drop-downs. To create
an account you must agree to our terms and conditions, you can read these by selecting the hyperlinked text. Once you
have completed the captcha, select Sign UpSign Up to create an account.
You will receive an email from iThenticate with a username and a one-time password. You may only log in once with the
one-time password and you will need to change it the first time you log in.
Logging In
If you have an existing iThenticate account, go to https://www.ithenticate.com and navigate to the login page. Input your
email and password into the appropriate fields and select the LoginLogin button.
Resetting Your Password
If you’ve forgotten your password, it can be reset via email. To do this, select the Forgot PasswordForgot Password link over the email
field on the login page.
3

Enter your email and select the SubmitSubmit button. You'll receive a one-time temporary password to this account. You will
need to change it the first time you log in.
Main Navigation
The main navigation bar at the top of the screen has three tabs. Upon logging in, you will automatically land on the
folders page.
4

Folders
This is the main area of iThenticate. From the folders page, you will be able to upload, manage and view documents.
For more information about the folders functionality of iThenticate, go to the Folders section of this guide.
Settings
The settings page contains configuration options for the iThenticate interface. For more information about the settings of
iThenticate, go to the Settings section of this guide.
Account Info
The account information page contains the user profile and account usage. From here you can manage your own
account. For more information about the settings of iThenticate, go to the Account Information section of this guide.
5

Folders
This page contains a guide to the functionality of folders within iThenticate. Folders in iThenticate work in two levels; you
upload your documents and organize them into folders, and then your organize these folders in folders groups.
New users will be given the folder group My FoldersMy Folders and the folder My DocumentsMy Documents when they first log into their
iThenticate account.
Creating a New Folder Group
11
To create a new folder group, select New Folder GroupNew Folder Group in the New folderNew folder section to the right of the page.
22
In the Create A New Folder GroupCreate A New Folder Group screen, enter a name for the new folder group and then select CreateCreate.
6

33
Now you have an empty folder group. To add a folder to this folder group, select Create a folderCreate a folder. To delete an
empty folder group, select Remove this empty groupRemove this empty group.
Creating a New Folder
To create a new folder, select the New FolderNew Folder link from the New folder sectionNew folder section on the right of the screen.
In the Create A New FolderCreate A New Folder page, you’ll have to specify which folder group you would like to save this new folder to by
using the Folder GroupFolder Group drop-down menu. After that, enter the folder name into the Folder NameFolder Name field.
7
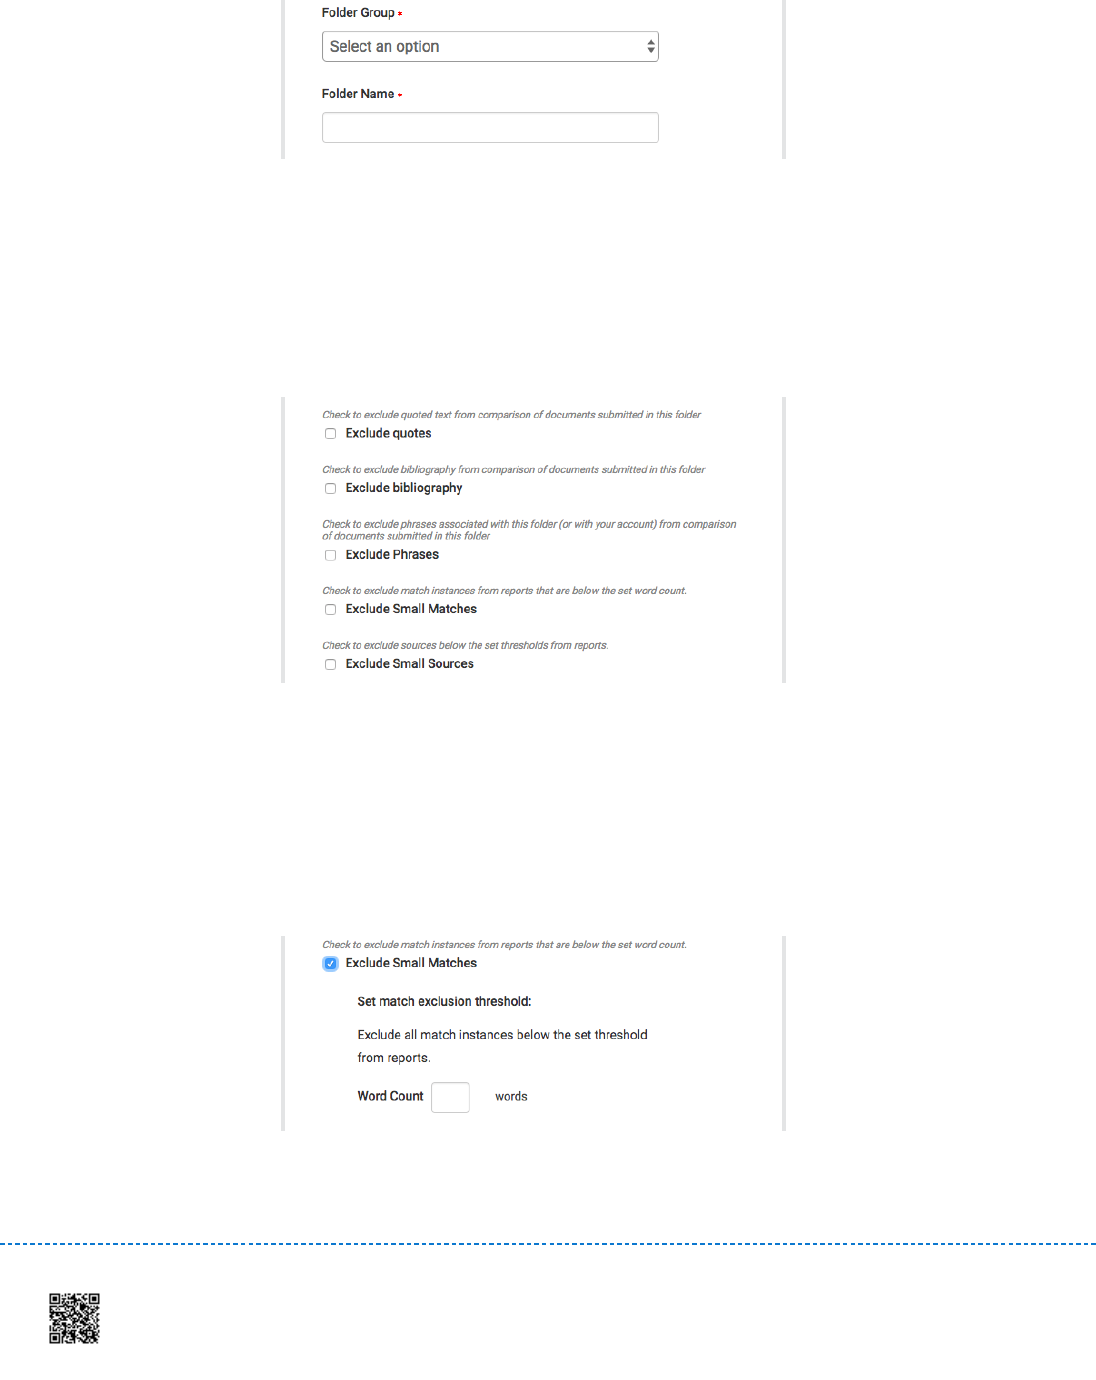
The next section of the form will allow you to exclude certain text from the Similarity Check for all documents uploaded
into this folder. By invoking the relevant tick boxes you will be able to exclude quotes, bibliography, certain phrases you
can set in the account settings, small matches and small sources.
When excluding small matches, you will be asked to set an exclusion threshold. Any match with fewer words than the
threshold will be excluded from the Similarity Check.
8

When excluding small sources, you will be asked to set either a word count or percentage exclusion threshold. Any
matches with fewer words or lower than a certain percentage matched will be excluded from the Similarity Check.
Warning:Warning: It is important to note that if large documents are going to be uploaded to a folder and matches are excluded
by a percentage threshold, even a set percentage of 1% exclusion may exclude very large matches. For example, if a
120-page document is uploaded to the system and the exclusion is set by percentage, it is possible that a full page of
unoriginal material will be excluded from a report. It is important to keep in mind the size of the documents being
submitted to a folder when using the percentage exclusion for the customize match size option.
The exclude sections options provides the ability to exclude the lengthier abstract and/ or methods and materials
sections of a document from being picked up by the Similarity Check.
Please be aware that section exclusion may not work properly if documents contain:
Watermarks
Unevenly spaced line numbering
Sub-headings that are indistinguishable from the Methods and Materials heading
Abstract or Methods and Materials section appearing in a table
Section headings and body text using the same font, font size, and font treatment
9

The next section allows you to choose which collections you would like to be included in the Similarity Check.. The
currently available search indexes are:
CrossCheckCrossCheck - research articles, books, and conference proceedings provided by the worlds scientific, technical and
medical publishers
InternetInternet - a database of archived and live publicly available internet pages containing billions of pages of existing
content and tens of thousands of new pages added daily
PublicationsPublications - third party periodical, journal, and publication content including many major professional journals,
periodicals, and business publications
NoteNote: If you would like to purchase the option to create a customizable database source with your own content to submit
to and search against, please contact [email protected].
Once you are satisfied with the form, select the CreateCreate button at the bottom of the form to create the new folder.
Organizing Folders
Folders in the folder group are organized alphabetically. You can see a folder group’s content by invoking the group
folder link from the My FoldersMy Folders section on the left of the screen.
10

The user has the option to organize the folders within a folder group by either title or date processed. To sort the folders
by title, select the TitleTitle header in the title column. A downward arrow will signify that the folders have been arranged in
alphabetical order. To order the folders in reverse alphabetical order, select the arrow again.
To sort the folders by date created, select the Date CreatedDate Created header in the date created column. A downward arrow will
signify that the folders have been arranged by most recently created in reverse chronological order. To order the folders
in chronological order, select the arrow again.
11

Moving Folders
To move folders to another folder group, select the folder group that contains the folders that you would like to move. In
that folder group, select the tick box to the left of the folder you want to move.
Use the Move selected to...Move selected to... drop-down to select the folder group that you want to move the folder to and select the MoveMove
button to the right of the drop-down.
Deleting Folders
To delete a folder from the My FoldersMy Folders side menu, select a folder group and hover the cursor over the folder that you
want to delete. A trash can will appear to the right of the folder. select this to move the folder to the TrashTrash folder group.
12

The delete multiple folders from the folder group, select that folder group and select the tick boxes for every folder you
want to delete. Select the TrashTrash button in the above menu bar to move the folders to the TrashTrash folder group.
Once a folder has been moved to the trash you have an opportunity to review it before you delete it permanently. Select
the TrashTrash folder group from the My FoldersMy Folders menu on the left.
13

In the trash, you can view all the folders you have moved here. If you don’t want to delete a folder that is in the trash,
select the tick box for that folder and then use the Move selected to…Move selected to… drop-down to move the folder back to where it
belongs.
To permanently delete a folder, select the tick box for that folder and then select the DeleteDelete button in the above menu
bar.
Warning:Warning: Once you have permanently deleted a folder from the Trash, you will not be able to get it back.
Editing Folder Settings
The SettingsSettings tab within a folder allows you to customize the folder’s settings. From within the folder settings, there are
three tabs; Folder OptionsFolder Options, Report Filters,Report Filters, and Phrase ExclusionsPhrase Exclusions.
14

Folder Options
The Folder OptionsFolder Options tab contains the options you chose in the folder creation screen. This information can be updated at
any time.
Report Filters
The Report FiltersReport Filters tab allows you to manage a list of URLs that are filtered out of the matching content search when a
report is being generated for the folder. To add a URL to be filtered place it within the URL field and select the Add URLAdd URL
button to add that URL to the report filters.
When adding a URL, the URL may be as specific or general as you wish. Here are some examples:
http://example.com/ - exclude entire site (note trailing “/”)
15

http://example.com/docs/ - exclude all sources from a specific directory
http://example.com/docs/paper.pdf - exclude specific document
To remove a URL once it has been added, select the red xx icon to the right of the URL’s name.
Phrase Exclusion
The Phrase ExclusionsPhrase Exclusions tab allows you to add and remove phrases that will be excluded from the Similarity Check for
every submission in this folder.
16

Select the Add a new phraseAdd a new phrase link to create a new phrase to be excluded from the Similarity Check. Enter the phrase you
want to exclude in the Phrase text box and select CreateCreate to add it to the list of excluded phrases.
If you do not want to create a phrase to exclude at this time select the Back to listBack to list link to return to the Phrase ExclusionsPhrase Exclusions
tabtab or Back to folderBack to folder to return to the folder view.
17

Managing your Documents
The documents tab within a folder displays all the submitted documents for that folder. Each submitted document
generates a Similarity Report after the document has been through the Similarity Check.
Only a specified amount of documents are displayed on the screen at once, if more documents are in the folder but not
displayed the pages feature will appear beneath the documents. Either select the number of the page you would like to
be displayed or select NextNext to scroll to the next page of documents.
Submitting a Document
iThenticate users can submit documents in three ways.
Upload a FileUpload a File - a single file submission
Zip File UploadZip File Upload - submit a standard zip file containing multiple documents. May contain up to 200MB or 1,000 files.
Zip file uploads of significant size may require additional time to complete
Cut & PasteCut & Paste - submission of text copied and pasted into the submission box. May be used to submit from a file
format that is not accepted. No images or non-text information can be copied and pasted - only plain text can be
accepted
18

File Types and Size
iThenticate currently accepts the following file types for document upload:
Microsoft Word® (DOC and DOCX) •
Word XML
Plain Text (TXT)
Adobe PostScript®
Portable Document Format (PDF)
HTML
Corel WordPerfect® (WPD)
Rich Text Format (RTF)
The file may not exceed 400 pages.
The file size may not exceed 100 MB. Files of larger size may be reduced in size by removal of non-text content. Files
that are password protected, encrypted, hidden, system files, or read only files cannot be uploaded or submitted to
iThenticate.
The zip file upload accepts up to 1000 files or 200MB of zipped information. A zip file to be uploaded may not exceed
either limit. Zip files should be checked to ensure only usable file formats are included in the upload.
19

NoteNote: PDF documents must contain text to be submitted. PDF files containing only images of text will be rejected
during the upload attempt. To determine if a document contains actual text, copy and paste a section or all of the
text into a plain-text editor such as Microsoft Notepad or Apple TextEdit. If no text is copied over, the selection is
not actual text.
TipTip: Users submitting scanned images of a document or an image saved as a PDF will need to use Optical
Character Recognition (OCR) software to convert the image to a text document. Manual correction of the
resulting document is highly recommended to fix any errors caused by the conversion software.
NoteNote: Some document formats can contain multiple data types. This includes text, images, embedded information
from another file, and formatting. Non-text information that is not saved directly within the document will not be
included in a file upload. This includes references to a Microsoft Excel® spreadsheet included within a Microsoft
Office Word document.
NoteNote: Users whose files are saved in a file type that is not accepted by iThenticate will need to use a word
processing program to save the file as one of the accepted types. Rich Text Format and Plain Text file types are
nearly universally available in word processing software. Neither file type will support images or non-text data
within the file. Plain text format does not support any formatting, and rich text format supports only limited
formatting options.
WarningWarning: Users who are converting to a new file format will need to save their file with a name different than the
original. Any file should be saved with a new file name when converting to plain text or rich text formats to prevent
permanent loss of the original formatting or image content of a file.
Upload a File
11
The Upload a FUpload a Fileile option allows the user to submit a single document from a variety of document types. Select
the Upload a FileUpload a File option from the Submit a document menuSubmit a document menu. This will open the Upload a fileUpload a file form.
20

22
Use the DestinationDestination FolderFolder drop-down to choose the folder you would like to upload this file to. This is where
the similarity report for the file will be found.
33
Enter the author’s first and last name in the Author First NameAuthor First Name and Author Last NameAuthor Last Name fields. Enter the
document title in the Document TitleDocument Title field. If no title is entered, the document’s filename will be used.
44
Select Choose FileChoose File to open a file browser and locate the file on your device.
21

55
The user can upload up to ten documents at once using the Upload a FileUpload a File submission option. To add another
file to upload, select the Add another fileAdd another file link.
66
Select UploadUpload to upload the selected document or documents. Select CancelCancel to cancel the upload.
Zip File Upload
iThenticate allows you to submit multiple documents from a variety of document types in a compressed zip file.
11
Select the Zip File UploadZip File Upload link from the Submit a document menuSubmit a document menu.
22

22
Use the DestinationDestination FolderFolder drop-down to choose the folder you would like to upload this file to. This is where
the similarity report for the file will be found.
33
Enter the author’s first and last name in the Author First NameAuthor First Name and Author Last NameAuthor Last Name fields. These will be
applied to all of the documents in the zip file. You can manually change these once the document is uploaded
to the folder.
23

44
Select Choose fileChoose file to open a file explorer and locate the zip file on your device.
55
Select UploadUpload to upload the zip file. Select the CancelCancel link to cancel the upload.
The title of the documents in the zip files will be the default title of each submission.
The zip file submitted to the Similarity Check may be any size up to approximately 100MB and contain up to 1000
individual files.
If the zip file exceeds either limit it will be rejected. Users uploading zip files are advised to ensure that no
unacceptable file types are contained within the zip file and to be careful of duplicate copies of the same file within
the zip file. The Similarity Check will attempt to detect duplicate or invalid files and warn the user of any duplicate or
unacceptable files
Cut & Paste
The cut and paste submission option allows users to submit information from non-supported word processors or file
types, or to only submit specific parts or areas of a document that may need a similarity report generated.
Note:Note: that only text can be submitted via the cut and paste method - any graphics, graphs, images, and formatting are
lost when pasting into the text submission box.
In the Submit a documentSubmit a document menumenu, select the Cut & PasteCut & Paste link.
24

Use the Destination FolderDestination Folder drop-down to choose the folder you would like to upload this file to. This is where the
similarity report for the file will be found.
Enter the author’s first and last name in the Author First NameAuthor First Name and Author Last NameAuthor Last Name fields. Enter the document title in
the Document TitleDocument Title field. If no title is entered, a default title of 'Pasted Document' will be given.
Copy your desired text. How to achieve this will vary depending on the device and operating system you are using.
Once you have the text copied, select the Paste your document in the area below text-boxPaste your document in the area below text-box field.
25

Select UploadUpload to upload the copied text. Select the CancelCancel link to cancel the upload.
Edit Document Information
A document’s information (that is, the title of the document and the author’s first and last name) may be edited at any
time by invoking the edit icon to the right of a document in the folder. This will take you to the Document PropertiesDocument Properties
page.
To update the document’s information within the Document PropertiesDocument Properties page, edit the fields accordingly and select
UpdateUpdate.
26

View Recent Uploads
To view recently uploaded documents, select the Recent UploadsRecent Uploads link in the
Submit a document
menu.
The recent uploads will be listed in reverse chronological order, with the most recently upload first. If you would like to
view the uploads in chronological order with the earliest first, select the Upload Date & TimeUpload Date & Time header.
27

28

The Similarity Report
The Similarity Report provides an overall similarity breakdown for each submission to the iThenticate database. This
breakdown determines the percentage of similarity between a submission and content existing in the database of the
text comparison tool, iThenticate.
Interpreting the Similarity Report
iThenticate does not check for plagiarism in a submission. It checks a submission against the content database, and if
there are instances where the submission's content is similar to, or matches against, one or more sources, it will be
flagged for review. The database includes billions of web pages (both current and archived content), a repository of work
that has been submitted to Crossref Similarity Check and Turnitin in the past, and a collection of documents, which
comprises of thousands of periodicals, journals, and publications.
It is perfectly natural for a submission to match against sources in the database. If the submission has used quotes and
has referenced correctly, there will be instances where there will be a match. The similarity score simply makes the user
aware of any problem areas in the submission; iThenticate should be used as part of a larger process, in order to
determine if the match is or is not acceptable.
Accessing the Similarity Report Through iThenticate
If you are accessing the Crossref Similarity Check through iThenticate, to view a submitted document’s Similarity Report
navigate to the folder that contains the submission.
29

The submitted document will be shown in the Documents tab of the folder. To view the Similarity Report, select the
similarity index icon for that document. This is the percentage that is shown in Report column.
This percentage is the Similarity Score. It is an accurate representation of the documents Similarity Report, offering an
immediate indication of the documents performance but it always warrants further exploration. Once selected, the report
will open in the document viewer.
The Document Viewer
Below is the document viewer screen. It will open in the viewing mode that you last had the document viewer open in.
30

The document viewer is separated into three sections.
Along the top of the screen, the document information bar shows important details about the submitted paper.
This includes the document title, the date the report was processed, the word count and the number of matching
sources found in the selected databases.
The left panel is the document text. This is the text of the submitted document.
31

The document will always be shown in full, and depending on what report mode you are viewing the report in there will
be instances of similarity highlighted in a color that corresponds to the matching source. These matching sources are
listed in the right panel, the sources panel
The layout will depend on which report mode you are viewing the report.
Report Modes
The document viewer can be viewed in four different modes. These modes allow you to view and sort the information
contained in the Similarity Report to best suit your needs. The four modes for viewing a Similarity Report are:
32

Match OverviewMatch Overview: (show highest matches together): A list of all areas of the paper which have similarity to
information in the selected search repositories. Matches are color coded and listed from highest to lowest
percentage of matching word area to the submission. Only the top or best matches are shown, all underlying
matches are visible in the Match Breakdown and All Sources modes.
All SourcesAll Sources: Allows a user to view matches between the paper and a specifically selected source in the content
repositories. Contains a full list of all matches found rather than the best matches per area of similarity. This listing
is exhaustive but will show all matches found, including any that are obscured in the Match Overview by virtue of
being in the same or similar areas as other, better matches.
Match BreakdownMatch Breakdown: Displays matches that are obscured by a top source. Allows users to compare the match
instance of an underlying source with the match instance for a top source.
Side By Side ComparisonSide By Side Comparison: An in-depth view that shows a document’s match compared side by side with the original
source content from the content repositories.
View Mode IconsView Mode Icons
The view mode icons allow users to switch between the Similarity Report viewing modes:
Match Overview
and
All
Sources
view. The default viewing mode is the
Match Overview
(the view mode icon on the left).
To change the view mode for a Similarity Report to the
All Sources
view, click on the All Sources iconAll Sources icon (the view mode
icon on the right). The sidebar will automatically update to the
All Sources
view mode.
33

Match Breakdown ModeMatch Breakdown Mode
In some cases, matches to smaller instances of similarity may be obscured by larger matches and not shown in this
view mode. To find the underlying sources, hover over the match you would like to view the underlying sources for and
select the arrow icon that appears.
In this mode, all sources that are obscured by the selected top source are listed below that source. Select a source to
highlight the matching text on the paper text.
A source box will appear on the document, revealing where in the source the text has been identified. The highlight color
for the top source match will become lighter and the matched text of the underlying source will be displayed with a
darker highlight.
To return to the Match OverviewMatch Overview mode click on the back arrow next to MatchMatch BreakdownBreakdown at the top of the sidebar.
Side by Side ComparisonSide by Side Comparison
Side by side comparison allows you to compare matching text within a document to the source of the match in the
content repositories.
In All SourcesAll Sources when you select a source from the sources panel, a source box will appear in the document text showing
the similar content highlighted within a snippet of the text from the repository source.
34

In Match OverviewMatch Overview, select the colored number at the start of the highlighted text to open this source box. The source box
provides the matching text within the context of a few outlying sentences from the repository source.
To view the entire repository source, select the Full Source ViewFull Source View link. This opens the repository source in the sources
panel and contains the full text of the source and all the matching instances.
The source’s full text will be displayed in the sidebar with each matching instance to the document highlighted in red.
Click on the source title/URL to open up the original source in a web page.
35

If there are multiple matches to this source, select the arrow icons to quickly navigate through the match instances
Select the xx icon in the top right corner of the full source text panel to close it.
Note:Note: If a source is from a restricted or membership only repository (for example, Crossref), then you will be unable to
view the full source text in a side by side comparison. You will still be able to see the source box snippet for context.
Viewing Live Web Pages for a SourceViewing Live Web Pages for a Source
If a source is available on the internet users can open that source in a new browser.
To access a source website within Match OverviewMatch Overview, select the colored number at the start of a piece of highlighted text
on the paper text. A source box will appear on the document text showing the similar content highlighted within a snippet
of the text from the repository source. The source website will be in blue above the source snippet. Select the link to
open the site in a new browser.
36

From the Match BreakdownMatch Breakdown mode, if you select the source you want to view the website for, a diagonal icon will appear
to the right of the source. Select this to open the source website in a new browser window.
The process is the same for All SourcesAll Sources mode. If you select the source you want to view the website for, a diagonal icon
will appear to the right of the source. Select this to open the source website in a new browser window.
NoteNote: Some internet sources may no longer be live.
Filters and Exclusion
To view the Filters & Settings menuFilters & Settings menu, select the filters icon at the bottom of the Document Viewer sidebar.
37

Excluding Quoted or Bibliographic MaterialExcluding Quoted or Bibliographic Material
To exclude quoted or bibliographic material, select the check-box next to the Exclude QuotesExclude Quotes and Exclude BibliographyExclude Bibliography
option.
Select the Apply ChangesApply Changes button at the bottom of the Filter & SettingsFilter & Settings sidebar to apply the changes
Excluding Small SourcesExcluding Small Sources
To exclude small sources, below the Exclude sources that are less thanExclude sources that are less than option, select the check-box of how you want to
exclude the text and then enter into either the
words
or
%
fields the numerical value for small sources that will be
excluded from this Similarity Report. To turn off excluding small sources select the check-box next to Don’t exclude byDon’t exclude by
sizesize.
38

Select the Apply ChangesApply Changes button at the bottom of the filter and settings sidebar to apply the changes
Excluding Small MatchesExcluding Small Matches
To exclude small matches, below the Exclude matches that are less thanExclude matches that are less than option select the
words
check-box and enter
the numerical value for match instances that will be excluded from this Similarity Report. Match instances below the set
threshold will be excluded from the Similarity Report. To turn off excluding small matches select the button next to Don’tDon’t
excludeexclude.
39

Select the Apply ChangesApply Changes button at the bottom of the filter and settings sidebar to apply the changes
Excluding SectionsExcluding Sections
To exclude a section, such as an abstract or a methods and materials section, below Exclude SectionsExclude Sections select the check-
box next to the sections you would like to exclude. iThenticate will exclude these by reading the document and excluding
sections that have headers with the words 'abstract', 'method and materials', 'methods', 'method', 'materials', and
'materials and methods'.
40

Excluding a MatchExcluding a Match
If you determine that the match is not needed, you can exclude the source from the Similarity Report through the MatchMatch
BreakdownBreakdown or All SourcesAll Sources viewing modes. The similarity index will be recalculated and may change the current
percentage of the Similarity Report.
To exclude matches for a top match in the Match OverviewMatch Overview
,
hover over the match you would like to view the underlying
sources for and click on the arrow icon that appears to enter Match Breakdown mode. In the Match BreakdownMatch Breakdown, select
Exclude SourcesExclude Sources to enter source exclusion mode.
41

Select the sources that you would like to remove by selecting the check-box next to each source. Once all the sources
are selected select the Exclude (#)Exclude (#) button to exclude the sources.
42

To exclude an entire source match from All SourcesAll Sources, select Exclude SourcesExclude Sources to enter source exclusion mode.
43

Select the sources that you would like to remove by selecting the check-box next to each source. Once all the sources
are selected select the Exclude (#)Exclude (#) button to exclude the sources.
44

Exclusion ListExclusion List
The excluded sources list contains each source that was excluded from the Similarity Report. To access the excluded
sources list click on the excluded sources icon at the bottom of the sidebar.
45
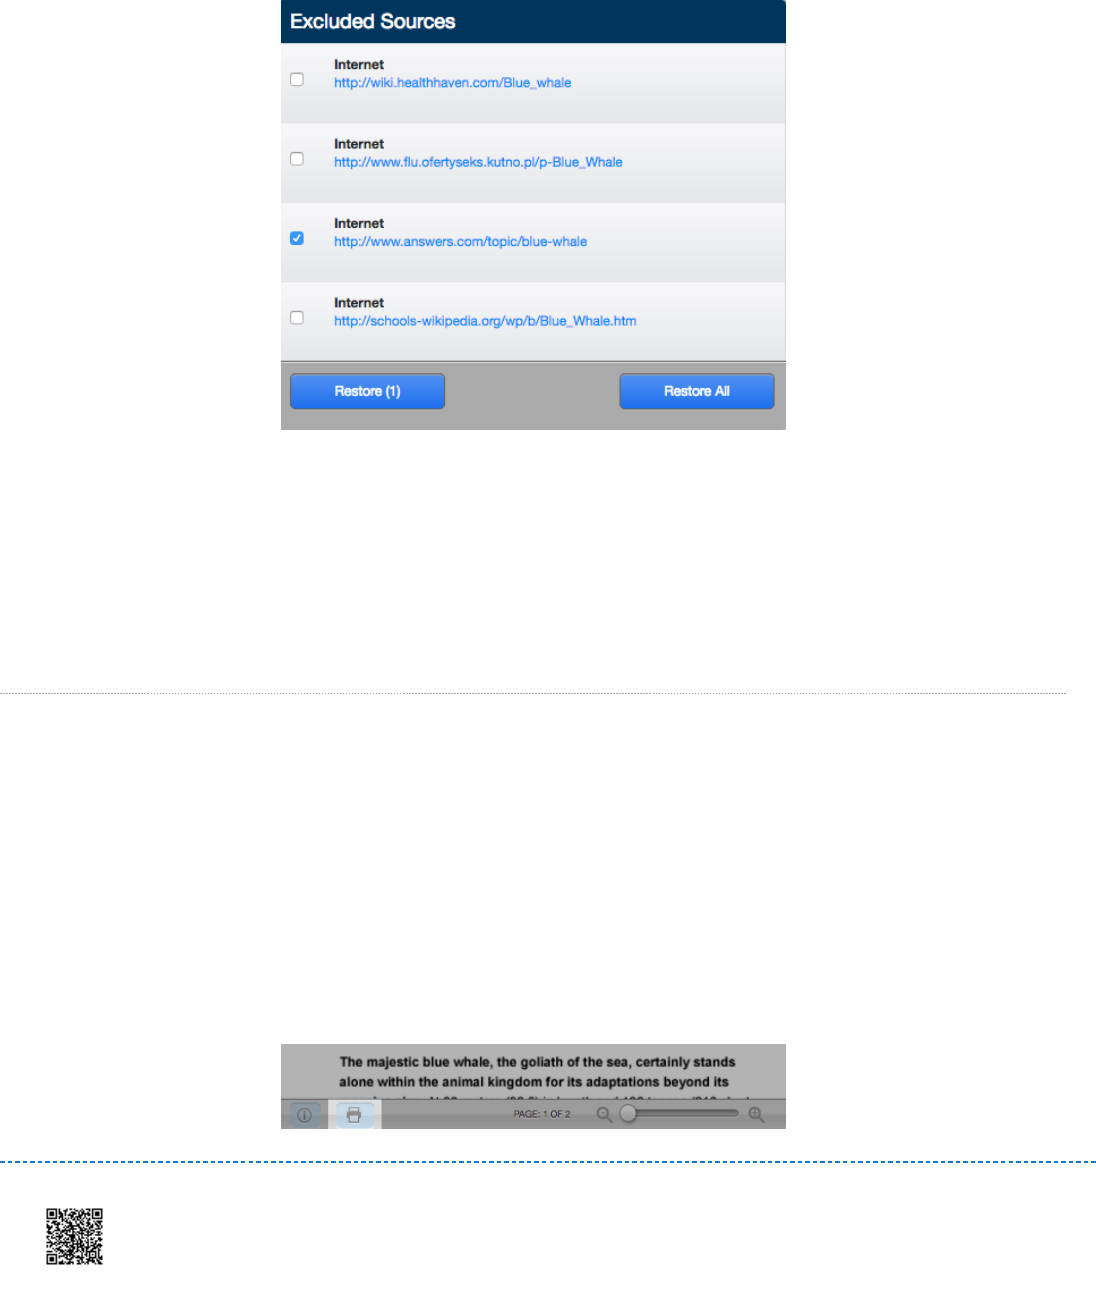
The excluded sources list shows all the sources you have selected to exclude from the report with a check-box next to
each. Select the check-box next to the source you would like to re-include in the Similarity Report.
Select the Restore (#)Restore (#) button to include the source in the Similarity Report. To restore all of the sources that were
excluded from the report select the Restore AllRestore All button
If the re-included source or sources affect the similarity score percentage then the percentage will be recalculated.
Downloading a PDF Version of a Similarity Report
The Similarity Report can be downloaded in a print-friendly PDF
To download a report, select the print icon at the bottom left of the Document Viewer. This will prepare a readable PDF
version of the report. When downloading a report, the downloaded version created is based on the current view of the
Similarity Report. For example, selecting the download icon while using the default Match Overview will create a PDF
with color-coded highlights.
46

Accessing the Text-Only Report
You can navigate to the text-only report by clicking on the Text-Only ReportText-Only Report button at the bottom right of the document
viewer.
When you switch a Similarity Report to text only, it will remain in that view mode until you switch back to the Document
Viewer mode; that is if you close a report when it is in text only then it will still be in that mode when you reopen it.
The Text Only Report
The text-only report allows you to view the Similarity Report without the document formatting. The view is separated into
three main areas in the default view.
Along the top of the screen, the document information bar shows important details about the submitted document along
with a menu bar with various options.
The information bar includes the document title, the date the report was processed, the word count, the folder the
document was submitted from, the number of matching documents found in the selected databases and the similarity
index. In the top right of the text only report there is a drop-down that allows you to switch between uploaded documents
contained in the same folder.
47

The menu bar beneath the information bar has a mode selection drop-down menu, options to exclude quotes,
bibliography, small sources, and small matches, as well as options to print and download.
Report Modes
The text-only report can be viewed in four different modes. These modes allow you to view and sort the information
contained in the Similarity Report to best suit your needs. You can select a mode using the drop-down menu on the left
of the menu bar.
Similarity ReportSimilarity Report
The default viewing mode is the Similarity ReportSimilarity Report. This mode has a similar layout to the Document Viewer. The paper
text is viewable on the left of the screen with the instances of similarity highlighted. The sources are listed on the right of
the screen, color-coded and listed from highest to lowest percentage of matching word area within the submission.
Only the top or best matches are shown, all underlying matches are visible in the Content TrackingContent Tracking viewing mode.
48

Selecting the highlighted area of the text will display the full text of the source, with the similar content highlighted. To
open this source in a new browser, select the show in web pageshow in web page link.
Content TrackingContent Tracking
Content Tracking
mode lists all the matches between the databases and the submitted document. Since the database is
updated regularly it may have many matches from the same source. These sources may be partially or completely
hidden due to the content appearing in a higher matched source. The sources that are the same will specify where they
were taken from and when.
Summary ReportSummary Report
The Summary ReportSummary Report mode offers a simple, printable list of the matches found followed by the paper with the matching
areas highlighted. It shows the sources first, with the document text below.
49

Largest MatchesLargest Matches
The
Largest Matches
mode shows the percentage of words that are a part of a matching text string (with some limited
flexibility). In some cases, strings from the same source may overlap, in which case, the longer string in the largest
match view will be displayed.
Viewing the Matching Source
The matching source can either be viewed from the database or from the online source. To view the online source
simply select the link under the percentage of similar material found in the submitted document.
To view the matching source side by side with the submitted document, use either the Similarity Report view or the
largest matches view. To view the matching source, select the highlighted text within the submitted document. Once
selected, the source material will be displayed to the right of the submitted document.
50

To exit the matched database content, select the xx button to the right of the similarity percentage to return to all the
matching sources.
Excluding Quoted or Bibliographic Material
If quoted or bibliographic material is flagged as similar or matching, this information can be excluded from the Similarity
Report. To exclude quotes and/ or bibliographic material from the report, select the relevant link in the menu bar.
When quoted or bibliographic material is excluded form a Similarity Report it may change the percentage of matching
text found within the submission. Quoted or bibliographic material can be re-included by selecting the relevant links in
the menu bar.
Excluding Phrases
When the exclude phrases setting is enabled for a folder, any submission made to that folder will exclude the phrases
specified in the folder settings. If you would like to include these phrases in the report, select the Do not ExcludeDo not Exclude
PhrasesPhrases link from the menu bar.
Once you have included the phrases, you will be able to exclude them again but select the Exclude PhrasesExclude Phrases link from
the menu bar.
51

Excluding a Match
Any source found in the database can be excluded from the Similarity Report in either the Similarity Report or highest
matches viewing modes. This allows you to find any underlying sources and if it has been determined a match is not
needed, to remove it from consideration. The similarity index will be recalculated and may change the current
percentage of the similarity index if matches are excluded.
To exclude a match, view the report in Similarity Report or highest matches mode. To the right of each source listed for
a match will be an xx icon. Select this icon to exclude the source. Any underlying source, if present, will replace the
excluded source.
Once a source has been excluded it can be re-included in the Similarity Report through the content tracking mode. The
content tracking mode lists all sources that have matching content with the submission. The excluded sources will
appear with a plus icon to the right of their name within this view mode. To re-include the source in the Similarity Report,
select the ++ icon.
Excluding Small Sources and Matches
It is possible to exclude small sources and small text matches from within the text-only viewer. To exclude a small
source or a small text match from the report, select the relevant drop-down in the menu bar.
52

Exclude Small Sources
To exclude a small source enter a value into the word count or percentage field to set an exclusion threshold. Any
source below the word court or match percentage threshold will be excluded from the record. Select the UpdateUpdate button
to set the exclusion setting.
Exclude Small Matches
To exclude a small match enter a value into the word count field to set an exclusion threshold. Any match below that
threshold will be excluded from the report. Select the UpdateUpdate button to set the exclusion setting.
53

Return to the Document Viewer
To navigate back to the Document Viewer from the text only Similarity Report select the Document ViewerDocument Viewer button in the
top left.
54

Settings
To view your account settings, select the SettingsSettings tab.
From here you will be able to make changes to the general settings of your account, and changes to document settings.
General Settings
In the general settings options, you will be able to set your home folder. This is the folder that will open by default when
you log into iThenticate. Select the folder you would like to be your home folder from the Home FolderHome Folder drop-down menu.
The Number of documents to showNumber of documents to show drop-downdrop-down allows you to choose how many uploaded documents are lists in your
folders before a new page is created.
55

You can select what is displayed after you upload a document to iThenticate. The two options available are Display theDisplay the
upload folderupload folder, which will take you to the folder you have just uploaded to, allowing you to see your uploaded document
processing. Or Upload another documenUpload another documen
t
, which will return you to the upload form. Select the checkbox next to your
choice.
You can also select the time zone and language that you would like your account to use. Changing your language will
change the language of your user interface, so please select carefully.
To update your settings, select Update SettingsUpdate Settings.
Document Settings
The documents setting tab will allow you to change the default way iThenticate sorts your uploaded documents. You can
choose to sort your documents by processed date, title, similarity score and author. Select your preferred option from
the drop-down.
56

You can also choose the what color is assigned to the similarity score based on the percentage of similarity.
All similarity scores above the percentage you set will appear in the folder in blue, all those beneath the percentage will
appear in grey.
This is a purely aesthetic option, allowing you to flag potentially troubling similarity percentages. For more information on
how to interpret this score, please see the Interpreting the Similarity Report section in this guide.
Select Update SettingsUpdate Settings to update your document settings.
57


Updating your Profile
The form will auto-fill with your current details. To update any account information, you will need to enter your current
password in the
Current Password
field at the top of the form.
Changing your NameChanging your Name
To change the name that is attributed to your account, enter the first and last name in the relevant fields. These fields
are required, you cannot leave them blank.
59

Changing Your EmailChanging Your Email
To change your email address, enter your email into the
E-Mail
field. This is the email that will be used when we send
you important account information, so please make sure it is valid. This field is required, you cannot leave it blank.
Adding a Photo to your AccountAdding a Photo to your Account
To add a photo to your account, select the Choose FileChoose File button to open a file browser. Select the photo you want to
attribute to your account from your device and select the image file you want to upload.
Changing your PasswordChanging your Password
To change your password first enter your current password in the
Current Password
field. Enter your new password and
confirm it in the
Change Password
and
Confirm Password
fields.
Updating your ProfileUpdating your Profile
Once you are happy with the changes you have made, and have ensured that all the required fields are filled, select
Update ProfileUpdate Profile to update your account information.
Account Information
The
Account Info
section displays important information about the iThenticate account. This information contains the
account name, the account ID, the user ID, and the date the iThenticate account expires.
60

URL Filters
The
URL Filters
tab will allow you to apply URL exclusion filters at the account level. Adding URLs to the exclusion list
follows the same process as when adding filters to a folder.
To add a URL to the report filters, simply place it within the field and select Add URLAdd URL.
Please make sure that you include a trailing / to your URL.
To remove a URL once it has been added to the report filters, click on the red xx icon to the right of the URL.
Phrase Exclusions
The
Phrase Exclusion
tab will allow you to apply phrase exclusion filters at the account level. Adding phrases to the
exclusion list follows the same process as when adding filters to a folder.
To add a phrase to the report filters, select the Add a new phraseAdd a new phrase.
61

Enter the phrase you would like to exclude in the
Phrase text
field.
Select CreateCreate to create a phrase and add it to the phrase exclusion list. You can add another phrase, or alternatively
return to the list or to the account home page.
You will be able to see your added phrases here. To edit a phrase, select EditEdit. To remove a phrase, select RemoveRemove.
API Access IP Addresses
If you want access to the iThenticate API, you will need to contact your iThenticate account sales representative. If your
account is enabled to allow API access, the API Access IP addresses option will appear within your
Account Info
page.
62

Within the IP addresses field, specify the IP address ranges that are allowed access to your account. You may enter the
special address 0.0.0.0 to allow access from any IP address. Addresses may be entered as a single address or in
“CIDR” format (e.g. 192.68.2.0/24). Multiple addresses may be entered by separating them with a space.
For more information on the technical reference specification for the iThenticate API, please see our iThenticate API
guide.
63
