
Summer School of LDAC
Lisboa, 18/06/2019
Node-RED Tutorial
for linked-data
Walter Terkaj, STIIMA-CNR

Walter Terkaj
Slide 2
• Node-RED is a powerful tool for building Internet of Things (IoT) applications with a focus on
simplifying the ‘wiring together’ of code blocks to carry out tasks. It uses a visual
programming approach that allows developers to connect predefined code blocks, known as
‘nodes’, together to perform a task. The connected nodes, usually a combination of input
nodes, processing nodes and output nodes, when wired together, make up ‘flows’. (Link)
• Node-RED provides a web browser- based flow editor, which can be used to create JavaScript
functions. Elements of applications can be saved or shared for re-use. The runtime is built on
Node.js. The flows created in Node-RED are stored using JSON which can be easily imported
and exported for sharing with others. By understanding Node-Red, IoT development can be
accelerated without unnecessary coding.
References
• Part of the contents in this tutorial can be found on the Node-Red website:
https://nodered.org/
• Installation instructions can be found at: https://nodered.org/docs/getting-
started/installation
• Node RED Programming Guide: http://noderedguide.com/
• Introduction to Node-RED: http://www.steves-internet-guide.com/node-red-overview/
Node-RED - About

Walter Terkaj
Slide 3
Installation
Installation of Node-RED
In order to able to work with Node-RED, you should first install node.js. It is recommended
the use of Node.js LTS 8.x or 10.x. Node-RED no longer supports Node.js 6.x or earlier. You
can download the latest version of node.js from its website choosing which operating
system you are using:
https://nodejs.org/en/download/

Walter Terkaj
Slide 4
Installation
Once installed node.js, open the terminal window and run the
following commands.
To check your version of Node.js
sudo npm install -g --unsafe-perm node-red
node –v
The easiest way to install Node-RED is to use the node package manager, npm, that
comes with Node.js.
Installing as a global module adds the command node-red to your system path:
Linux / OsX

Walter Terkaj
Slide 5
Installation
Run the downloaded MSI installer of Node.js. Local administrator rights are needed. Accept
the defaults settings when installing. After installation completes, close any open command
prompts and re-open to ensure new environment variables are picked up.
Once installed, open a command prompt and run the following command to ensure Node.js
and npm are installed correctly.
Windows
node --version && npm --version
You should receive back output that looks similar to:
v8.9.0
5.5.1
Installing Node-RED as a global module adds the command node-red to your system path.
Execute the following at the command prompt:
npm install -g --unsafe-perm node-red

Walter Terkaj
Slide 6
Running Node-RED
If you have installed Node-RED as a global npm package, you can launch node-red in the
command prompt (Windows):
C:\>node-red
or in the terminal (Linux):
$ node-red
This will output the Node-RED log to the terminal. You must keep the terminal or command
prompt open in order to keep Node-RED running. Note that running Node-RED will create a
new folder in your %HOMEPATH% folder called .node-red. This is your userDir folder, think
of it as the home folder for Node-RED configuration for the current user.
You can then open the Node-RED graphical editor by pointing your browser at
http://localhost:1880

Walter Terkaj
Slide 7
Running Node-RED
Palette
of node
types
Layout to draw flows
Panel showing contents:
• Info of selected node
• Debug
• Configuration Nodes
• Context Data
Deploy button (to push
before executing a flow)
Menu button

Walter Terkaj
Slide 8
Nodes
A Node-RED program is developed as a FLOW of messages running through a sequence of
NODES. Each node can implement an elaboration of the message.
Nodes
Nodes consist of code that runs in the Node-RED service (javascript .js file), and an HTML
file consisting of a description of the node, so that it appears in the node pane with a
category, colour, name and an icon, code to configure the node, and help text.
Nodes are added to a flow by simple drag&drop.
A node can be linked to (multiple) input and (multiple) output via its ports which enable
messages to be passed between nodes.
If a node has been change after the latest deployment, then it displays a blue circle above
it. If there are errors with its configuration, it displays a red triangle.
Some nodes include a button on either its left or right edge. These allow some interaction
with the node from within the editor. The Inject and Debug nodes are the only core nodes
that have buttons.
Inject node Debug node
port

Walter Terkaj
Slide 9
Node configuration
A node configuration can be edited by double clicking on the node, or pressing Enter when the
workspace has focus. If multiple nodes are selected, the first node in the selection will be edited.
The node edit dialog has typically three sections: Properties, Description, Appearance. The
Properties section is used to set what the node does.

Walter Terkaj
Slide 10
Wires
Wires define the connections between node input and output endpoints in a flow.
They (typically) connect the output endpoints of nodes to inputs of downstream nodes
indicating that messages generated by one node should be processed by the connected
node next.
It is possible to connect more than one node to an endpoint using wires. It is also possible
to connect downstream nodes to upstream nodes to form loops.
When multiple nodes are connected to an output endpoint, messages are sent to each
connected node in turn in the order they were wired to the output.
When more than one node output is connected to an input endpoint, messages from any of
those nodes will be processed by the connected node when they arrive.
How to create wires?
Left-click on an output node port and, while holding down the mouse button, move to the
destination input node port. Release the mouse button.
A simple flow generating a
timestamp that is received
by a debug node.

Walter Terkaj
Slide 11
Deploying flows
Flow Deployment is needed before executing the flow itself.
The Deploy button is on the top right corner and changes colour from grey to red when any
change has been made to a flow to indicate that in it needs to be deployed.
After deployment the flow can be run, e.g. clicking on the button of an Inject node.
Active button of
Inject node

Walter Terkaj
Slide 12
Manage Flows
Create a Flow: click on the ‘+’ tab
Delete a Flow: double-click on the flow tab and press the button «Delete»
Rename a Flow: double-click on the flow tab, change the name and press the button «Done»
double-click on the flow tab

Walter Terkaj
Slide 13
Manage Flows
Import a Flow: click on the main menu and select «Import», «Clipboard»
Then copy&paste the flow or select an input Json file

Walter Terkaj
Slide 14
Manage Flows
Export a Flow: click on the main menu and select «Export», «Clipboard»
Then copy the flow or download it as a Json file.

Walter Terkaj
Slide 15
Libraries
Libraries can be created to save a flow or function for reuse it in another flow .
Save a flow to a library: select the relevant nodes in the flow, then click on the main menu >
Export > Library. Assign a name to the library
Import a flow from a library: click on the main menu > Import > Library. Click on the chosen
library name and place the nodes in the flow.

Walter Terkaj
Slide 16
Subflow
A Subflow is an aggregation of nodes and wires with input and output ports.
The creation of subflows useful to reuse flows and keep the overall flow manageable.
Creat a subflow: click on the main menu > Subflows > Create Subflow. Assign a name to the
library
Subflows are available in the Palette and can be later added to another flow like a simple node.

Walter Terkaj
Slide 17
Messages
A Node-RED flow works by passing messages between nodes.
The messages are simple JavaScript objects that can have any set of properties.
The message is passed in as an object called msg. Messages usually have a payload property
(msg.payload), i.e. the default property containing the body of the message.
Node-RED also adds a property called _msgid to each message, i.e. an identifier of the message.
The value of a property can be typically any valid JavaScript type, such as:
• Boolean - true, false
• Number - e.g. 0, 123.4
• String - "hello"
• Array - [1,2,3,4]
• Object - { "a": 1, "b": 2}
• Null

Walter Terkaj
Slide 18
Messages
The structure of a message can be better understood if it is passed to a Debug node. Thus, the
contents of the message can be viewed in the Debug sidebar.
By default, the Debug node will display the msg.payload property, but it can be configured to
display any property or the whole message.

Walter Terkaj
Slide 19
Messages
When you hover over any element in Debug, a set of buttons appear on the right:
copies the path to the selected element to your clipboard.
copies the value of the element to your clipboard as a JSON string.
pins the selected element so it is always displayed. When another message is received from the
same Debug node, it is automatically expanded to show all pinned elements.

Walter Terkaj
Slide 20
Example: Hello LDAC Summer School!
Create a simple routine that prints the message 'Hello LDAC Summer School!‘
(Note: several alternative options are possible)
1. Create a new Flow and rename it

Walter Terkaj
Slide 21
Example: Hello LDAC Summer School!
2. Add Inject node (from input nodes)

Walter Terkaj
Slide 22
Example: Hello LDAC Summer School!
3. Add Change node (from function nodes)

Walter Terkaj
Slide 23
Example: Hello LDAC Summer School!
4. Add Debug node (from output nodes)

Walter Terkaj
Slide 24
Example: Hello LDAC Summer School!
5. Connect wires and deploy

Walter Terkaj
Slide 25
Example: Hello LDAC Summer School!
6. Execute: click on Inject button and check results in Debug pane
Start flow

Walter Terkaj
Slide 26
Example: Hello LDAC Summer School!
7. Export flow
[{"id":"148e3965.53767f","type":"debug","z":"283e160d.c1304a","name":"Debug
msg.payload","active":true,"tosidebar":true,"console":true,"tostatus":false,"complete":"payload","targetType":"msg","x":440,"y":200
,"wires":[]},{"id":"478a9031.b808","type":"inject","z":"283e160d.c1304a","name":"","topic":"","payload":"","payloadType":"date","re
peat":"","crontab":"","once":false,"onceDelay":0.1,"x":100,"y":80,"wires":[["112be1b8.535ec6"]]},{"id":"112be1b8.535ec6","type":"c
hange","z":"283e160d.c1304a","name":"Set message payload","rules":[{"t":"set","p":"payload","pt":"msg","to":"Hello LDAC Summer
School!","tot":"str"}],"action":"","property":"","from":"","to":"","reg":false,"x":260,"y":140,"wires":[["148e3965.53767f"]]}]

Walter Terkaj
Slide 27
Example: Hello LDAC Summer School!
Alternative flow (2): inject part of the message
[{"id":"4855565d.e62278","type":"debug","z":"85679f4e.4e529","name":"Debug
msg.payload","active":true,"tosidebar":true,"console":true,"tostatus":false,"complete":"payload","targetType":"msg","x":440,"y":200
,"wires":[]},{"id":"67c10546.ab0594","type":"inject","z":"85679f4e.4e529","name":"Inject \"Hello \"
","topic":"","payload":"Hello","payloadType":"str","repeat":"","crontab":"","once":false,"onceDelay":0.1,"x":110,"y":80,"wires":[["cea
55947.537d68"]]},{"id":"cea55947.537d68","type":"change","z":"85679f4e.4e529","name":"Add \"LDAC Summer
School\"","rules":[{"t":"set","p":"payload","pt":"msg","to":"payload & \" LDAC Summer
School\"","tot":"jsonata"}],"action":"","property":"","from":"","to":"","reg":false,"x":240,"y":140,"wires":[["4855565d.e62278"]]}]

Walter Terkaj
Slide 28
Example: Hello LDAC Summer School!
Alternative flow (3): use function node
[{"id":"1f21a9f.25f0f56","type":"debug","z":"810f777b.83fa2","name":"Debug
msg.payload","active":true,"tosidebar":true,"console":true,"tostatus":false,"complete":"payload","targetType":"msg","x":440,"y":180
,"wires":[]},{"id":"cc423328.2163a","type":"inject","z":"810f777b.83fa2","name":"Inject \"Hello\" ","topic":"","payload":"Hello
","payloadType":"str","repeat":"","crontab":"","once":false,"onceDelay":0.1,"x":110,"y":60,"wires":[["1ff89f23.5a8e11"]]},{"id":"1ff89
f23.5a8e11","type":"function","z":"810f777b.83fa2","name":"Add \"LDAC Summer School!\"","func":"msg.payload += \" LDAC
Summer School!\"\nreturn msg;","outputs":1,"noerr":0,"x":260,"y":120,"wires":[["1f21a9f.25f0f56"]]}]

Walter Terkaj
Slide 29
Default nodes

Walter Terkaj
Slide 30
Relevant nodes

Walter Terkaj
Slide 31
Nodes
Injects a message into a flow either manually or at regular intervals. The
message payload can be a variety of types, including strings, JavaScript
objects or the current time.
The Inject node can initiate a flow with a specific payload value. The
node also supports injecting timestamp , strings, numbers, booleans,
JavaScript objects, or flow/global context values.
By default, the node is triggered manually by clicking on its button within
the editor. It can also be set to inject at regular intervals or according to a
schedule.
Displays selected message properties in the debug sidebar tab and
optionally the runtime log. By default it displays msg.payload, but can be
configured to display any property, the full message or the result of a
JSONata expression.
The debug sidebar provides a structured view of the messages it is sent,
making it easier to understand their structure.
JavaScript objects and arrays can be collapsed and expanded as required.
Alongside each message, the debug sidebar includes information about
the time the message was received, the node that sent it and the type of
the message.
The button on the node can be used to enable or disable its output.

Walter Terkaj
Slide 32
Nodes
A JavaScript function block to run against the messages being received by
the node. The messages are passed in as a JavaScript object called msg.
By convention it will have a msg.payload property containing the body of
the message. The function is expected to return a message object (or
multiple message objects), but can choose to return nothing in order to
halt a flow.
The Template node can be used to generate text using a message’s
properties to fill out a template. It uses the Mustache templating language
to generate the result.
For example, a template of:
This is the payload: {{payload}} !
Will replace {{payload}} with the value of the message’s payload
property.
The Switch node allows messages to be routed to different branches of a
flow by evaluating a set of rules against each message.The node is
configured with the property to test - which can be either a message
property or a context property.
The Change node can be used to modify a message’s properties and set
context properties without having to resort to a Function node. Each node
can be configured with multiple operations that are applied in order. The
available operations are: Set, Change, Move, Delete

Walter Terkaj
Slide 33
Nodes
Sends HTTP requests and returns the response.
Key Inputs:
• url (string): url of the request.
• method (string): HTTP method of the request, i.e. one of GET, PUT,
POST, PATCH or DELETE.
• headers (object): HTTP headers of the request.
• payload: body of the request
in output, payload contains the body of the response. The node can be
configured to return the body as a string, attempt to parse it as a JSON
string or leave it as a binary buffer.
Converts between a JSON string and its JavaScript object representation,
in either direction.
Converts between an XML string and its JavaScript object representation,
in either direction.
Reads the contents of a file as either a string or binary buffer.
Writes msg.payload to a file, either adding to the end or replacing the
existing content. Alternatively, it can delete the file.

Walter Terkaj
Slide 34
Change Node
There are two main nodes for modifying a
message, the Change node and the Function
node.
The Change node provides a lot of functionality
without needing to write JavaScript code. Not
only can it modify message properties, but it can
also access flow- and global-context.
The Change node provides four basic operations:
• Set a property to a value,
• Change a String property by performing a
search and replace,
• Delete a property,
• Move a property.
More than one change can be assigned to one
node. The resulting value can be hardcoded (e.g.
string, number) or defined by elaborating another
message.

Walter Terkaj
Slide 36
Function Node
The Function node allows you to run any JavaScript code against the message. This gives
you complete flexibility in what you do with the message, but does require familiarity
with JavaScript and is unnecessary for many simple cases.
In particular, you can use function node when there is no existing node dedicated to
your task at hand.
var inputpayload = msg.payload; // get the message payload
msg.payload = newpayload; // modify the message payload
var newproperty;
msg.newproperty= newvalue; // the contents of the message can be enriched with properties
var msg1 ={ payload: msg.payload, topic:msg.topic}; // create a new message object
return msg1;
A function must return a message, otherwise the flow stops.

Walter Terkaj
Slide 37
Function Node
The Function node allows you to run any JavaScript code against the message. This gives
you complete flexibility in what you do with the message, but does require familiarity
with JavaScript and is unnecessary for many simple cases.
In particular, you can use function node when there is no existing node dedicated to
your task at hand.
var inputpayload = msg.payload; // get the message payload
msg.payload = newpayload; // modify the message payload
var newproperty;
msg.newproperty= newvalue; // the contents of the message can be enriched with properties
var msg1 ={ payload: msg.payload, topic:msg.topic}; // create a new message object
return msg1;
A function must return a message, otherwise the flow stops.

Walter Terkaj
Slide 38
Function Node
Example
Function body:
msg.payload = msg.payload.toUpperCase()
return msg;
[{"id":"c6a5d62f.46d2f","type":"tab","label":"Flow
3","disabled":false,"info":""},{"id":"ec2f106.b8260f","type":"function","z":"c6a5d62f.46d2f","name":"to upper case","func":"msg.payload =
msg.payload.toUpperCase()\nreturn
msg;","outputs":1,"noerr":0,"x":320,"y":180,"wires":[["c011ed5d.75eda"]]},{"id":"cdefe980.e69b4","type":"inject","z":"c6a5d62f.46d2f","name":"","top
ic":"","payload":"Make Function
Test","payloadType":"str","repeat":"","crontab":"","once":false,"onceDelay":0.1,"x":130,"y":120,"wires":[["ec2f106.b8260f","91e5aad8.61ea78"]]},{"id"
:"c011ed5d.75eda","type":"debug","z":"c6a5d62f.46d2f","name":"After","active":true,"tosidebar":true,"console":false,"tostatus":false,"complete":"payl
oad","targetType":"msg","x":490,"y":220,"wires":[]},{"id":"91e5aad8.61ea78","type":"debug","z":"c6a5d62f.46d2f","name":"Before","active":true,"tosi
debar":true,"console":false,"tostatus":false,"complete":"payload","targetType":"msg","x":490,"y":120,"wires":[]}]

Walter Terkaj
Slide 39
Function Node
The function node can be configured with multiple outputs. This is useful when the flow
splits into separate paths depending on a message property. To configure multiple
outputs open the function node and use the up/down arrows to adjust the number of
outputs.
To return messages to multiple outputs you need to return an array, e.g.
return[msg1,msg2];
msg1 will appear on output1 and msg2 on output2. To stop a flow you return null, e.g.
return[msg1,null];

Walter Terkaj
Slide 40
Function Node
Multiple outputs example
Function body:
var msg1 = {payload: "",topic: ""}
msg1.payload = "message n.1 "
var msg2 = {payload: "",topic: ""}
msg2.payload = "message n.2"
return [msg1,msg2];
[{"id":"439af97a.44ef38","type":"tab","label":"Flow
4","disabled":false,"info":""},{"id":"dc28df5c.459198","type":"function","z":"439af97a.44ef38","name":"multiple outputs","func":"var msg1
= {payload: \"\",topic: \"\"}\nmsg1.payload = \"message n.1\"\nvar msg2 = {payload: \"\",topic: \"\"}\nmsg2.payload = \"message
n.2\"\n\nreturn
[msg1,msg2];","outputs":2,"noerr":0,"x":280,"y":80,"wires":[["31f9f142.ac463e"],["1af074e3.f0c223"]]},{"id":"8dc40387.f59c88","type":"in
ject","z":"439af97a.44ef38","name":"","topic":"","payload":"","payloadType":"date","repeat":"","crontab":"","once":false,"onceDelay":0.1,
"x":100,"y":80,"wires":[["dc28df5c.459198"]]},{"id":"31f9f142.ac463e","type":"debug","z":"439af97a.44ef38","name":"Debug
n.1","active":true,"tosidebar":true,"console":false,"tostatus":false,"complete":"payload","targetType":"msg","x":470,"y":40,"wires":[]},{"id"
:"1af074e3.f0c223","type":"debug","z":"439af97a.44ef38","name":"Debug
n.2","active":true,"tosidebar":true,"console":false,"tostatus":false,"complete":"payload","targetType":"msg","x":460,"y":140,"wires":[]}]

Walter Terkaj
Slide 41
Function Node
Multiple outputs in array
[{"id":"439af97a.44ef38","type":"tab","label":"Flow
4","disabled":false,"info":""},{"id":"dc28df5c.459198","type":"function","z":"439af97a.44ef38","name":"multiple outputs in
array","func":"var msg1 = {payload: \"\",topic: \"\"}\nmsg1.payload = \"message n.1\"\nvar msg2 = {payload: \"\",topic:
\"\"}\nmsg2.payload = \"message n.2\"\n\nvar allmsg = []\nallmsg.push(msg1)\nallmsg.push(msg2)\nreturn
[allmsg];","outputs":1,"noerr":0,"x":290,"y":120,"wires":[["31f9f142.ac463e"]]},{"id":"8dc40387.f59c88","type":"inject","z":"439af97a.44ef
38","name":"","topic":"","payload":"","payloadType":"date","repeat":"","crontab":"","once":false,"onceDelay":0.1,"x":100,"y":80,"wires":[[
"dc28df5c.459198"]]},{"id":"31f9f142.ac463e","type":"debug","z":"439af97a.44ef38","name":"Debug","active":true,"tosidebar":true,"cons
ole":false,"tostatus":false,"complete":"true","targetType":"full","x":490,"y":160,"wires":[]}]
Function body:
var msg1 = {payload: "",topic: ""}
msg1.payload = "message n.1"
var msg2 = {payload: "",topic: ""}
msg2.payload = "message n.2"
var allmsg = []
allmsg.push(msg1)
allmsg.push(msg2)
return [allmsg];

Walter Terkaj
Slide 42
Node-RED and Semantic Web
Node-RED can be employed to create flows involving the query and update of triple stores
(RDF stores) while integrating other functionalities.
Herein we show how basic nodes can be used to make SPARQL queries/updates while
accessing an RDF Store.
SETUP
• Stardog is employed as triple store
• The examples refers to a Stardog installation available in localhost
• The examples are based on the BOT ontology (https://github.com/w3c-lbd-cg/bot) that
must loaded on Stardog database "LDAC"

Walter Terkaj
Slide 43
Setup Stardog server
Create LDAC database in Stardog Studio
Load BOT ontology by running this query in Stardog Studio:
LOAD <https://w3id.org/bot> INTO graph <https://w3id.org/bot>

Walter Terkaj
Slide 45
SPARQL query (1)
Get all classes defined
in BOT ontology
select distinct ?botclass
FROM <https://w3id.org/bot>
where {
?botclass rdf:type owl:Class .
}

Walter Terkaj
Slide 46
SPARQL query (1)
Default Inject node

Walter Terkaj
Slide 47
SPARQL query (1)
Set URL and Headers using Change node

Walter Terkaj
Slide 48
SPARQL query (1)
Define SPARQL query as payload using Template node.

Walter Terkaj
Slide 49
SPARQL query (1)
Finalize the query by adding the text "query=" in front of it.
A Change node can be used together with a JSONata expression.
Other options: use a Function node; include the missing text in the previous node (Template)

Walter Terkaj
Slide 50
SPARQL query (1)
Make a HTTP request with the http request node. Method POST is selected.
Use authentication (unless Stardog is started w/o security) and specify user and password
(default in Stardog: admin, admin). Specify that a JSON object is returned as results.
URL is already received as msg.url.

Walter Terkaj
Slide 51
SPARQL query (1)
Show the full output in the payload using a Debug node.

Walter Terkaj
Slide 52
SPARQL query (1)
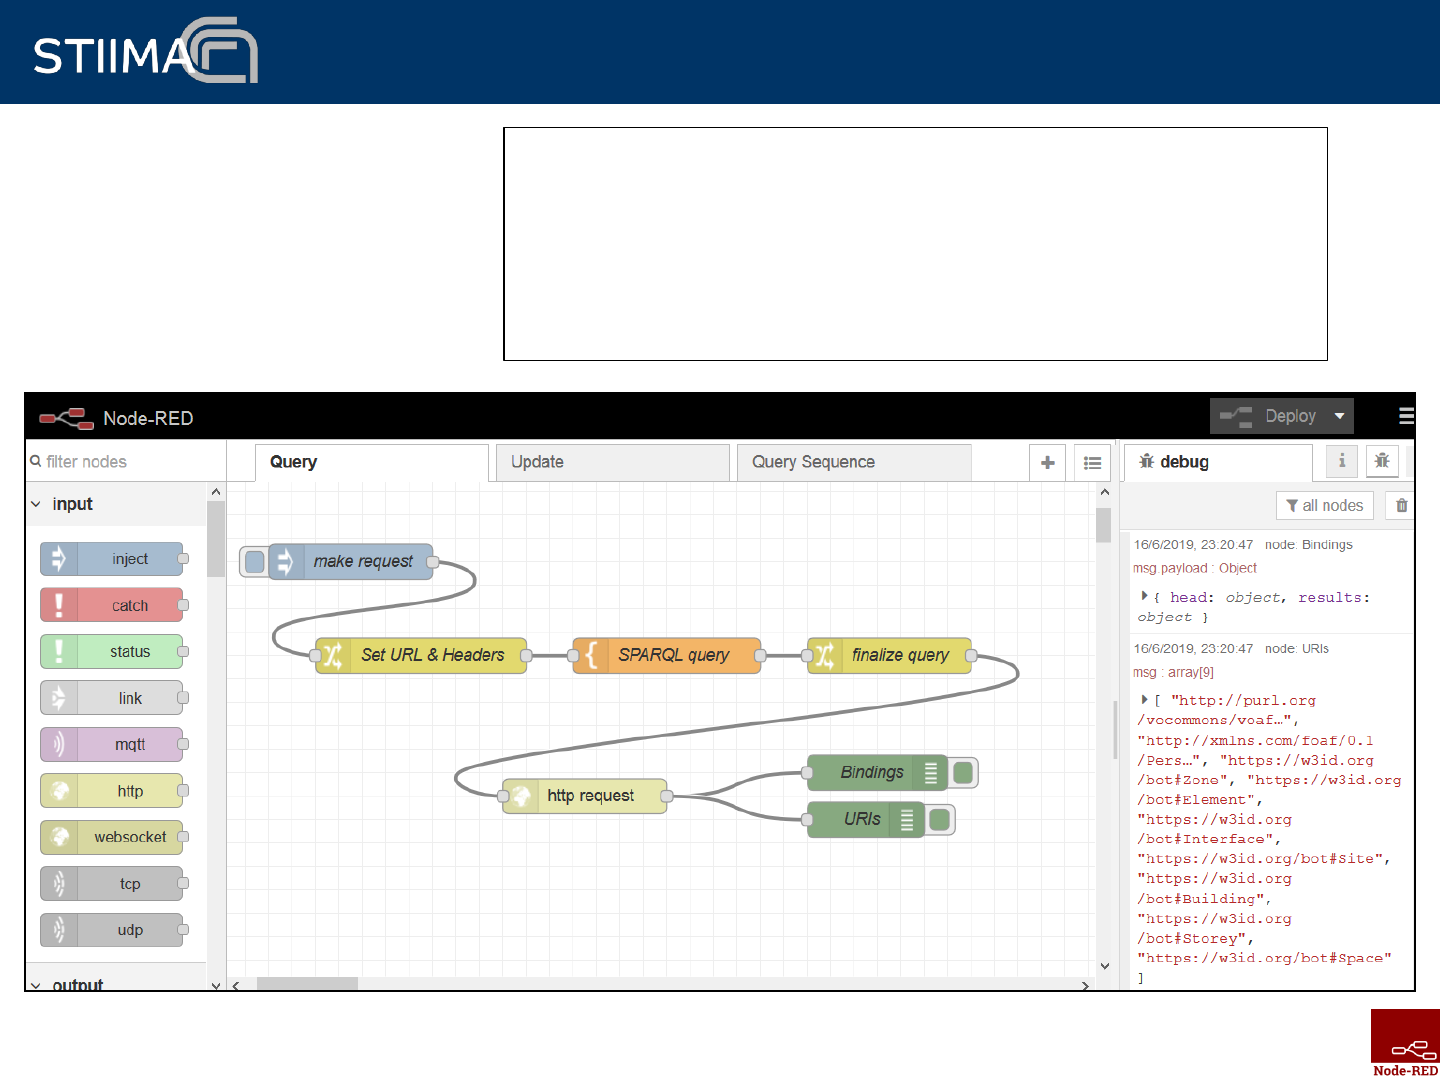
Extract only the URIs of the result using a JSONata in a Debug node.

Walter Terkaj
Slide 53
SPARQL query (1)
Query results:
array[9]
0: "http://purl.org/vocommons/voaf#Vocabulary"
1: "http://xmlns.com/foaf/0.1/Person"
2: "https://w3id.org/bot#Zone"
3: "https://w3id.org/bot#Element"
4: "https://w3id.org/bot#Interface"
5: "https://w3id.org/bot#Site"
6: "https://w3id.org/bot#Building"
7: "https://w3id.org/bot#Storey"
8: "https://w3id.org/bot#Space"

Walter Terkaj
Slide 54
SPARQL query (1)
Exported flow
[{"id":"383e0c8c.5a7d0c","type":"inject","z":"f0f1a3db.d85df","name":"make
request","topic":"","payload":"","payloadType":"date","repeat":"","crontab":"","once":false,"onceDelay":"","x":170,"y"
:140,"wires":[["bb2f0eb2.b3e71"]]},{"id":"6a30fe9c.c16a78","type":"template","z":"f0f1a3db.d85df","name":"SPARQL
query","field":"payload","fieldType":"msg","format":"text","syntax":"plain","template":"select distinct ?botclass
\nFROM <https://w3id.org/bot>\nwhere { \n ?botclass rdf:type owl:Class .
\n}","output":"str","x":440,"y":220,"wires":[["5390e2c7.0b9c2c"]]},{"id":"a50bda43.26d36","type":"http
request","z":"f0f1a3db.d85df","name":"","method":"POST","ret":"obj","paytoqs":false,"url":"","tls":"","proxy":"","auth
Type":"basic","x":370,"y":340,"wires":[["bf6562c1.d99d58","54b7c078.dcf43"]]},{"id":"bf6562c1.d99d58","type":"debu
g","z":"f0f1a3db.d85df","name":"Bindings","active":true,"tosidebar":true,"console":false,"tostatus":false,"complete":"
payload","targetType":"msg","x":620,"y":320,"wires":[]},{"id":"bb2f0eb2.b3e71","type":"change","z":"f0f1a3db.d85df",
"name":"Set URL &
Headers","rules":[{"t":"set","p":"url","pt":"msg","to":"http://localhost:5820/LDAC/query","tot":"str"},{"t":"set","p":"he
aders['content-type']","pt":"msg","to":"application/x-www-form-
urlencoded","tot":"str"},{"t":"set","p":"headers['Accept']","pt":"msg","to":"application/sparql-
results+json","tot":"str"}],"action":"","property":"","from":"","to":"","reg":false,"x":230,"y":220,"wires":[["6a30fe9c.c16
a78"]]},{"id":"54b7c078.dcf43","type":"debug","z":"f0f1a3db.d85df","name":"URIs","active":true,"tosidebar":true,"con
sole":false,"tostatus":false,"complete":"payload.results.bindings.botclass.value","targetType":"jsonata","x":610,"y":360
,"wires":[]},{"id":"5390e2c7.0b9c2c","type":"change","z":"f0f1a3db.d85df","name":"finalize
query","rules":[{"t":"set","p":"payload","pt":"msg","to":"\"query=\" &
payload","tot":"jsonata"}],"action":"","property":"","from":"","to":"","reg":false,"x":630,"y":220,"wires":[["a50bda43.2
6d36"]]}]


Walter Terkaj
Slide 56
SPARQL update (2)
Add an individual of class bot:Zone in a new graph that imports BOT ontology
PREFIX bot: https://w3id.org/bot#
PREFIX ex: https://www.example.com#
INSERT DATA {
GRAPH <https://www.example.com> {
<https://www.example.com> owl:imports <https://w3id.org/bot> .
ex:NewZone rdf:type owl:NamedIndividual , bot:Zone.
}}

Walter Terkaj
Slide 57
SPARQL update (2)
Default Inject node

Walter Terkaj
Slide 58
SPARQL update (2)
Set URL and Headers using Change node

Walter Terkaj
Slide 59
SPARQL update (2)
Define SPARQL update as payload using Template node.

Walter Terkaj
Slide 60
SPARQL update (2)
Finalize the update by adding the text "query=" in front of it.
A Change node can be used together with a JSONata expression.
Other options: use a Function node; include the missing text in the previous node (Template)

Walter Terkaj
Slide 61
SPARQL update (2)
Make a HTTP request with the http request node. Method POST is selected.
Use authentication (unless Stardog is started w/o security) and specify user and password
(default in Stardog: admin, admin). URL is already received as msg.url.

Walter Terkaj
Slide 62
SPARQL update (2)
The http request returns the status code that is shown in msg.statusCode using a Debug node.
Code 200 means the request was successful.

Walter Terkaj
Slide 63
SPARQL update (2)
Update results:
msg.statusCode : number
200
Exported flow
[{"id":"8e217d16.03ffc8","type":"inject","z":"7b9ab328.92ad0c","name":"make
request","topic":"","payload":"","payloadType":"date","repeat":"","crontab":"","once":false,"onceDelay":"","x":110,"y":60,"wire
s":[["e37b680d.98a458"]]},{"id":"389a0ae7.cfc906","type":"template","z":"7b9ab328.92ad0c","name":"SPARQL
update","field":"payload","fieldType":"msg","format":"text","syntax":"plain","template":"PREFIX bot:
<https://w3id.org/bot#>\nPREFIX ex: <https://www.example.com#>\n\nINSERT DATA { \n GRAPH <https://www.example.com>
{\n <https://www.example.com> owl:imports <https://w3id.org/bot> .\n \tex:NewZone rdf:type owl:NamedIndividual ,
bot:Zone.\n }\n}\n","output":"str","x":380,"y":140,"wires":[["482eb33b.cadd8c"]]},{"id":"6c88eba5.82a624","type":"http
request","z":"7b9ab328.92ad0c","name":"","method":"POST","ret":"txt","paytoqs":false,"url":"","tls":"","proxy":"","authType":"
basic","x":330,"y":240,"wires":[["745b9c05.eba1c4"]]},{"id":"745b9c05.eba1c4","type":"debug","z":"7b9ab328.92ad0c","name"
:"statusCode","active":true,"tosidebar":true,"console":false,"tostatus":false,"complete":"statusCode","targetType":"msg","x":53
0,"y":240,"wires":[]},{"id":"e37b680d.98a458","type":"change","z":"7b9ab328.92ad0c","name":"Set URL &
Headers","rules":[{"t":"set","p":"url","pt":"msg","to":"http://localhost:5820/LDAC/update","tot":"str"},{"t":"set","p":"headers['c
ontent-type']","pt":"msg","to":"application/x-www-form-
urlencoded","tot":"str"}],"action":"","property":"","from":"","to":"","reg":false,"x":170,"y":140,"wires":[["389a0ae7.cfc906"]]},{"
id":"482eb33b.cadd8c","type":"change","z":"7b9ab328.92ad0c","name":"finalize
query","rules":[{"t":"set","p":"payload","pt":"msg","to":"\"query=\" &
payload","tot":"jsonata"}],"action":"","property":"","from":"","to":"","reg":false,"x":570,"y":140,"wires":[["6c88eba5.82a624"]]}
]

Walter Terkaj
Slide 64
Sequential SPARQL queries (3)
Get all classes defined in BOT ontology . Then for each class get the properties where that
class is the domain.
The proposed solution splits the results of the first query, thus creating a set of sequential
messages that are used to configure the second query. Therefore the second query can be
executed several times.

Walter Terkaj
Slide 65
Sequential SPARQL queries (3)
Exported flow
[{"id":"59bfaf1b.8937e","type":"tab","label":"Query
Sequence","disabled":false,"info":""},{"id":"b8f665a5.a6725","type":"inject","z":"59bfaf1b.8937e","name":"make
request","topic":"","payload":"","payloadType":"date","repeat":"","crontab":"","once":false,"onceDelay":"","x":130,"y":40,"wires":[["845281d5.018cf"]]},{
"id":"59d3a3ee.95f184","type":"template","z":"59bfaf1b.8937e","name":"SPARQL
query","field":"payload","fieldType":"msg","format":"text","syntax":"plain","template":"query=\nselect distinct ?botclass \nFROM
<https://w3id.org/bot>\nwhere { \n ?botclass rdf:type owl:Class .
\n}","output":"str","x":420,"y":140,"wires":[["8248d7b0.962c08"]]},{"id":"8248d7b0.962c08","type":"http
request","z":"59bfaf1b.8937e","name":"","method":"POST","ret":"obj","paytoqs":false,"url":"","tls":"","proxy":"","authType":"basic","x":610,"y":140,"wir
es":[["c6e99b04.3067c","90c2c2e6.1e2ae"]]},{"id":"845281d5.018cf","type":"change","z":"59bfaf1b.8937e","name":"Set URL &
Headers","rules":[{"t":"set","p":"url","pt":"msg","to":"http://localhost:5820/LDAC/query","tot":"str"},{"t":"set","p":"headers['content-
type']","pt":"msg","to":"application/x-www-form-urlencoded","tot":"str"},{"t":"set","p":"headers['Accept']","pt":"msg","to":"application/sparql-
results+json","tot":"str"}],"action":"","property":"","from":"","to":"","reg":false,"x":190,"y":140,"wires":[["59d3a3ee.95f184"]]},{"id":"c6e99b04.3067c","t
ype":"debug","z":"59bfaf1b.8937e","name":"URIs","active":false,"tosidebar":true,"console":false,"tostatus":false,"complete":"payload.results.bindings.bo
tclass.value","targetType":"jsonata","x":810,"y":140,"wires":[]},{"id":"9f1ce207.58f23","type":"split","z":"59bfaf1b.8937e","name":"","splt":"\\n","spltTyp
e":"str","arraySplt":1,"arraySpltType":"len","stream":false,"addname":"","x":470,"y":260,"wires":[["585fc625.2b85b"]]},{"id":"90c2c2e6.1e2ae","type":"ch
ange","z":"59bfaf1b.8937e","name":"Move results to
payload","rules":[{"t":"set","p":"payload","pt":"msg","to":"payload.results.bindings.botclass.value","tot":"jsonata"}],"action":"","property":"","from":"","to
":"","reg":false,"x":250,"y":260,"wires":[["9f1ce207.58f23"]]},{"id":"eef48833.0ad108","type":"debug","z":"59bfaf1b.8937e","name":"Results","active":tru
e,"tosidebar":true,"console":false,"tostatus":false,"complete":"payload.results.bindings","targetType":"jsonata","x":800,"y":380,"wires":[]},{"id":"73ff640
4.25f12c","type":"template","z":"59bfaf1b.8937e","name":"SPARQL
query","field":"payload","fieldType":"msg","format":"handlebars","syntax":"mustache","template":"query=\nselect distinct ?botclass ?prop \nFROM
<https://w3id.org/bot>\nwhere { \n VALUES ?botclass {<{{{uri}}}>} \n ?prop rdfs:domain ?botclass
.\n}","output":"str","x":420,"y":380,"wires":[["f488988f.d24918"]]},{"id":"f488988f.d24918","type":"http
request","z":"59bfaf1b.8937e","name":"","method":"POST","ret":"obj","paytoqs":false,"url":"","tls":"","proxy":"","authType":"basic","x":610,"y":380,"wir
es":[["eef48833.0ad108"]]},{"id":"ecca5a34.e79b4","type":"change","z":"59bfaf1b.8937e","name":"Set URL &
Headers","rules":[{"t":"set","p":"url","pt":"msg","to":"http://localhost:5820/LDAC/query","tot":"str"},{"t":"set","p":"headers['content-
type']","pt":"msg","to":"application/x-www-form-urlencoded","tot":"str"},{"t":"set","p":"headers['Accept']","pt":"msg","to":"application/sparql-
results+json","tot":"str"}],"action":"","property":"","from":"","to":"","reg":false,"x":210,"y":380,"wires":[["73ff6404.25f12c"]]},{"id":"585fc625.2b85b","ty
pe":"change","z":"59bfaf1b.8937e","name":"","rules":[{"t":"set","p":"uri","pt":"msg","to":"payload","tot":"msg"}],"action":"","property":"","from":"","to":
"","reg":false,"x":650,"y":260,"wires":[["ecca5a34.e79b4"]]}]

Walter Terkaj
Slide 66
Further exercises
• implement SPARQL queries as seen during previous lectures of the LDAC Summer
School
• repeat the SPARQL query/update using another triple store, e.g. GraphDB by
Ontotext (http://graphdb.ontotext.com/documentation/standard/sparql-
compliance.html). Other options are listed in the lecture about triple stores.
Possibly only URL and headers must be updated.
• Make a flow that integrates a SPARQL query and a SPARQL update
• Make (complex) elaborations to generate a SPARQL query
• Make (complex) elaborations to consume the results of a SPARQL query
• Integrate SPARQL query/update with other data sources and IoT technologies, e.g.
• Input/Output files
• MQTT connection (e.g. in a sensor network)
• UDP connection
• A HTTP end-point (different from SPARQL end-point)
• Other HTTP requests

Walter Terkaj
Slide 67
Installing new nodes
• New nodes can be installed using the Palette
Manager
• Browse and install published nodes.
Another way of adding new nodes
is via npm. Refer to Node-RED
manual.


Walter Terkaj
Slide 69
MQTT subscribe (4)
Configure Publish section

Walter Terkaj
Slide 70
In Node-RED create a new flow and add an MQTT input node.
Set the server connection and topic (LDAC/roomsensor).
MQTT subscribe (4)

Walter Terkaj
Slide 71
Add a Debug node and Deploy.
Publish the message in HiveMQ by clicking on the “Publish” button.
MQTT subscribe (4)

Walter Terkaj
Slide 72
The subscription made in Node-RED receives the message and goes through Debug.
[{"id":"355547da.7ad858","type":"tab","label":"MQTT
subscribe","disabled":false,"info":""},{"id":"27f1b8cf.b11c2","type":"mqtt
in","z":"355547da.7ad858","name":"","topic":"LDAC/roomsensor","qos":"2","datatype":"auto","broker":
"9b10bbd9.0639e8","x":230,"y":120,"wires":[["5aad1055.c00fe8"]]},{"id":"5aad1055.c00fe8","type":"de
bug","z":"355547da.7ad858","name":"","active":true,"tosidebar":true,"console":false,"tostatus":false,"c
omplete":"false","x":470,"y":120,"wires":[]},{"id":"9b10bbd9.0639e8","type":"mqtt-
broker","z":"","name":"","broker":"broker.mqttdashboard.com","port":"1883","clientid":"","usetls":false,
"compatmode":true,"keepalive":"15","cleansession":true,"birthTopic":"","birthQos":"0","birthPayload":"
","closeTopic":"","closePayload":"","willTopic":"","willQos":"0","willPayload":""}]
MQTT subscribe (4)

Walter Terkaj
Slide 73
If the message is structured as a JSON, then further elaborations are possible
MQTT subscribe (5)
[{"id":"b4daf526.ebf55","type":"tab","label":"MQTT subscribe JSON","disabled":false,"info":""},{"id":"46639621.cd2db8","type":"mqtt
in","z":"b4daf526.ebf55","name":"","topic":"LDAC/roomsensor","qos":"2","datatype":"auto","broker":"9b10bbd9.0639e8","x":110,"y":140,
"wires":[["f689ede5.af7ae8"]]},{"id":"2d989f3c.0ea25","type":"debug","z":"b4daf526.ebf55","name":"","active":true,"tosidebar":true,"con
sole":false,"tostatus":false,"complete":"false","x":350,"y":260,"wires":[]},{"id":"f689ede5.af7ae8","type":"json","z":"b4daf526.ebf55","nam
e":"","property":"payload","action":"","pretty":false,"x":240,"y":200,"wires":[["2d989f3c.0ea25"]]},{"id":"9b10bbd9.0639e8","type":"mqtt-
broker","z":"","name":"","broker":"broker.mqttdashboard.com","port":"1883","clientid":"","usetls":false,"compatmode":true,"keepalive":"
15","cleansession":true,"birthTopic":"","birthQos":"0","birthPayload":"","closeTopic":"","closePayload":"","willTopic":"","willQos":"0","willP
ayload":""}]

Walter Terkaj
Slide 74
Connects to a MQTT broker and publishes messages.
In Node-RED create a new flow and add an MQTT output node.
Set the server connection and topic (LDAC/officesensor).
MQTT publish (6)

Walter Terkaj
Slide 75
Add an Inject node that generates the message as JSON.
MQTT publish (6)

Walter Terkaj
Slide 76
MQTT publish (6)
In HiveMQ add a New Topic Subscription

Walter Terkaj
Slide 77
MQTT publish (6)
In Node-RED click on Inject button and the message will be received in HiveMQ

Walter Terkaj
Slide 78
MQTT publish (6)
[{"id":"88732d77.c66628","type":"tab","label":"MQTT
publish","disabled":false,"info":""},{"id":"92745b13.80ea8","type":"mqtt
out","z":"88732d77.c66628","name":"","topic":"","qos":"","retain":"","broker":"ee3aa3bc.8ac2f","x
":530,"y":280,"wires":[]},{"id":"9991b19.87de85","type":"inject","z":"88732d77.c66628","name":"",
"topic":"LDAC/officesensor","payload":"{\"sensor\": \"temperature\", \"value\":
18}","payloadType":"json","repeat":"","crontab":"","once":false,"onceDelay":0.1,"x":370,"y":280,"w
ires":[["92745b13.80ea8"]]},{"id":"ee3aa3bc.8ac2f","type":"mqtt-
broker","z":"","name":"","broker":"broker.mqttdashboard.com","port":"1883","clientid":"","usetls":
false,"compatmode":true,"keepalive":"60","cleansession":true,"birthTopic":"","birthQos":"0","birth
Payload":"","closeTopic":"","closePayload":"","willTopic":"","willQos":"0","willPayload":""}]

Walter Terkaj
Slide 79
SPARQL query settings (7)
Setting to execute a SPARQL Query using GraphDB endpoint via HTTP request.
The reference example is making use of the OpenSmartHomeDataSet:
https://github.com/linkedbuildingdata/SummerSchoolOfLDAC/blob/master/N
otebooks/00-01-Check-Internet-Connection.ipynb
URL of endpoint
https://rdf.ontotext.com/4139541402/mydb/repositories/OpenSmartHomeDataSet
Headers
content-type = application/x-www-form-urlencoded
Accept = application/sparql-results+json

Walter Terkaj
Slide 80
SPARQL query (7)
Get sensor ID
PREFIX express: <http://purl.org/voc/express#>
PREFIX bot: <https://w3id.org/bot#>
PREFIX rdf: <http://www.w3.org/1999/02/22-rdf-syntax-ns#>
PREFIX dog: <http://elite.polito.it/ontologies/dogont.owl#>
PREFIX seas: <https://w3id.org/seas/>
PREFIX dcterms: <http://purl.org/dc/terms/>
PREFIX skos: <http://www.w3.org/2004/02/skos/core#>
PREFIX ifc: <http://www.buildingsmart-tech.org/ifcOWL/IFC4_ADD1#>
SELECT ?SensorIdent
WHERE{
?ifcglobID express:hasString "05i4VutGDCsQKCrT6CQvhu" .
?roomIFC ifc:globalId_IfcRoot ?ifcglobID .
?room skos:related ?roomIFC .
?room bot:containsElement ?TempSensor .
?TempSensor rdf:type dog:TemperatureSensor .
?TempSensor seas:connectsAt/dcterms:identifier ?SensorIdent .
}

Walter Terkaj
Slide 81
SPARQL query (7)
Walter Terkaj
Slide 82
SPARQL query (7)
[{"id":"a76e66b2.880158","type":"inject","z":"3aa979e2.2262ce","name":"make
request","topic":"","payload":"","payloadType":"date","repeat":"","crontab":"","once":false,"onceDelay":"","x":250,"y":100,"wir
es":[["4df97275.4a4a64"]]},{"id":"7e5915c1.716c8c","type":"template","z":"3aa979e2.2262ce","name":"SPARQL
query","field":"payload","fieldType":"msg","format":"text","syntax":"plain","template":"PREFIX express:
<http://purl.org/voc/express#>\nPREFIX bot: <https://w3id.org/bot#>\nPREFIX rdf: <http://www.w3.org/1999/02/22-rdf-syntax-
ns#>\nPREFIX dog: <http://elite.polito.it/ontologies/dogont.owl#>\nPREFIX seas: <https://w3id.org/seas/>\nPREFIX dcterms:
<http://purl.org/dc/terms/>\nPREFIX skos: <http://www.w3.org/2004/02/skos/core#>\nPREFIX ifc: <http://www.buildingsmart-
tech.org/ifcOWL/IFC4_ADD1#>\n\nSELECT ?SensorIdent\nWHERE{\n?ifcglobID express:hasString \"05i4VutGDCsQKCrT6CQvhu\"
.\n?roomIFC ifc:globalId_IfcRoot ?ifcglobID .\n?room skos:related ?roomIFC .\n?room bot:containsElement ?TempSensor
.\n?TempSensor rdf:type dog:TemperatureSensor .\n?TempSensor seas:connectsAt/dcterms:identifier ?SensorIdent
.\n}","output":"str","x":480,"y":180,"wires":[["833db6ae.64fc98"]]},{"id":"2cd033af.416474","type":"http
request","z":"3aa979e2.2262ce","name":"","method":"POST","ret":"obj","paytoqs":false,"url":"","tls":"","proxy":"","authType":
"basic","x":410,"y":300,"wires":[["90db6f97.854c2","98d08d2d.3bce"]]},{"id":"90db6f97.854c2","type":"debug","z":"3aa979e2.
2262ce","name":"Bindings","active":true,"tosidebar":true,"console":false,"tostatus":false,"complete":"payload","targetType":"
msg","x":660,"y":280,"wires":[]},{"id":"4df97275.4a4a64","type":"change","z":"3aa979e2.2262ce","name":"Set URL &
Headers","rules":[{"t":"set","p":"url","pt":"msg","to":"https://rdf.ontotext.com/4139541402/mydb/repositories/OpenSmartHo
meDataSet","tot":"str"},{"t":"set","p":"headers['content-type']","pt":"msg","to":"application/x-www-form-
urlencoded","tot":"str"},{"t":"set","p":"headers['Accept']","pt":"msg","to":"application/sparql-
results+json","tot":"str"}],"action":"","property":"","from":"","to":"","reg":false,"x":270,"y":180,"wires":[["7e5915c1.716c8c"]]},
{"id":"98d08d2d.3bce","type":"debug","z":"3aa979e2.2262ce","name":"SensorID","active":true,"tosidebar":true,"console":false
,"tostatus":false,"complete":"payload.results.bindings.SensorIdent.value","targetType":"jsonata","x":660,"y":320,"wires":[]},{"id
":"833db6ae.64fc98","type":"change","z":"3aa979e2.2262ce","name":"finalize
query","rules":[{"t":"set","p":"payload","pt":"msg","to":"\"query=\" &
payload","tot":"jsonata"}],"action":"","property":"","from":"","to":"","reg":false,"x":670,"y":180,"wires":[["2cd033af.416474"]]}]

Titolo slide
walter.terkaj@stiima.cnr.it
That’s all folks!
