
Tutorial for Downloading and Preparing
SlaveVoyages Data for Mapping
Daniel Story | Jeffrey Erbig | Greg O’Malley
Last Updated: November 2021
This tutorial explains how to download and prepare data from SlaveVoyages.org for
the purpose of creating a digital map. The steps below will show you how to search for
relevant data on SlaveVoyages.org, download it, and modify it in a spreadsheet to
make it ready to map. Many different types of maps can be created using data from the
website, so our goal here is to demonstrate some basic procedures that you can adapt
to your needs. Once you understand the basic steps, you should be ready to create
maps that feature any geography and/or time period that interest you.
In order to help explain this more general workflow, we will illustrate the process
through a concrete example, a mapping project comparing the routes enslaved people
were forced to travel to two North American colonies/states—New York and
Virginia—over the years 1701 to 1800.
Given the limitations of our chosen mapping software (the free version of ArcGIS
Online), we will have to repeat parts of the process, downloading the data in batches.
This batched approach will facilitate comparison within the map. (Some more
expensive software will allow a single download of data with more options to filter the
data at the mapping stage, but we preferred to use a freely available program.)
Likewise, since SlaveVoyages is divided into two databases (the Transatlantic and
Intra-American Slave Trade Databases), we will also repeat parts of the process to
create maps showing not only people arriving directly from Africa but also from
elsewhere in the Americas. The steps below indicate when this repetition is necessary.

FILTER AND DOWNLOAD DATA FROM SLAVEVOYAGES.ORG
1. Open www.slavevoyages.org.
First you need to decide whether to work with data from the Transatlantic Slave Trade
Database, the Intra-American Slave Trade Database, or both. The Transatlantic
database contains voyages that carried enslaved people from African ports to ports in
the Americas, whereas the Intra-American database contains voyages that moved
enslaved people from one port in the Americas to another. For some places, and some
research questions, one database might be much more relevant than the other. For
example, the overwhelming number of enslaved people who were taken to Jamaica
arrived directly from African ports. By contrast, a sizable majority of enslaved people
taken to Pennsylvania came from colonies in the Americas. For many places, enslaved
people arrived both directly from Africa and from elsewhere in the Americas at
different times—in these instances, both databases will likely be relevant to your
search.

The same steps apply regardless of which database you choose. If you need data from
both, you will simply repeat the steps for each database.
2. Navigate to the database you want to start with by selecting either
“Trans-Atlantic” or “Intra-American” at the top of the page and then choosing
“Database” from the drop-down menu. For our sample map, we’ll start with the
Trans-Atlantic database, but we’ll ultimately gather data from both.
Next you’ll likely need to filter the data in some way. Unless you plan to map the entire
slave trade to every place in the Americas across all time periods, you need to limit the
data to the particular places and times relevant to your research.
Since our sample case is aimed at creating a map using the free version of ArcGIS
Online, we’ll search for and download data one location at a time, first for Virginia,
then for New York. This will allow us to more easily compare the scale and routes of
human trafficking for these two destinations. (Similarly, if you want to compare across
time, you might want to run separate searches for your chosen time periods as well.) If
you use a different mapping software that has this kind of filtering capability built in,
you may choose instead to download all of your data at once and do the separating
later on.
Once you’ve figured out what search criteria you want to work, follow these steps to
filter and download the data. You’ll repeat these steps for additional places and/or time
periods you chose to download separately.
3. Use the “Year range” option (near the top, on the left) to filter the years you
want to include. Our sample map will focus on the eighteenth century, so we
will use 1701 and 1800 as our limits.

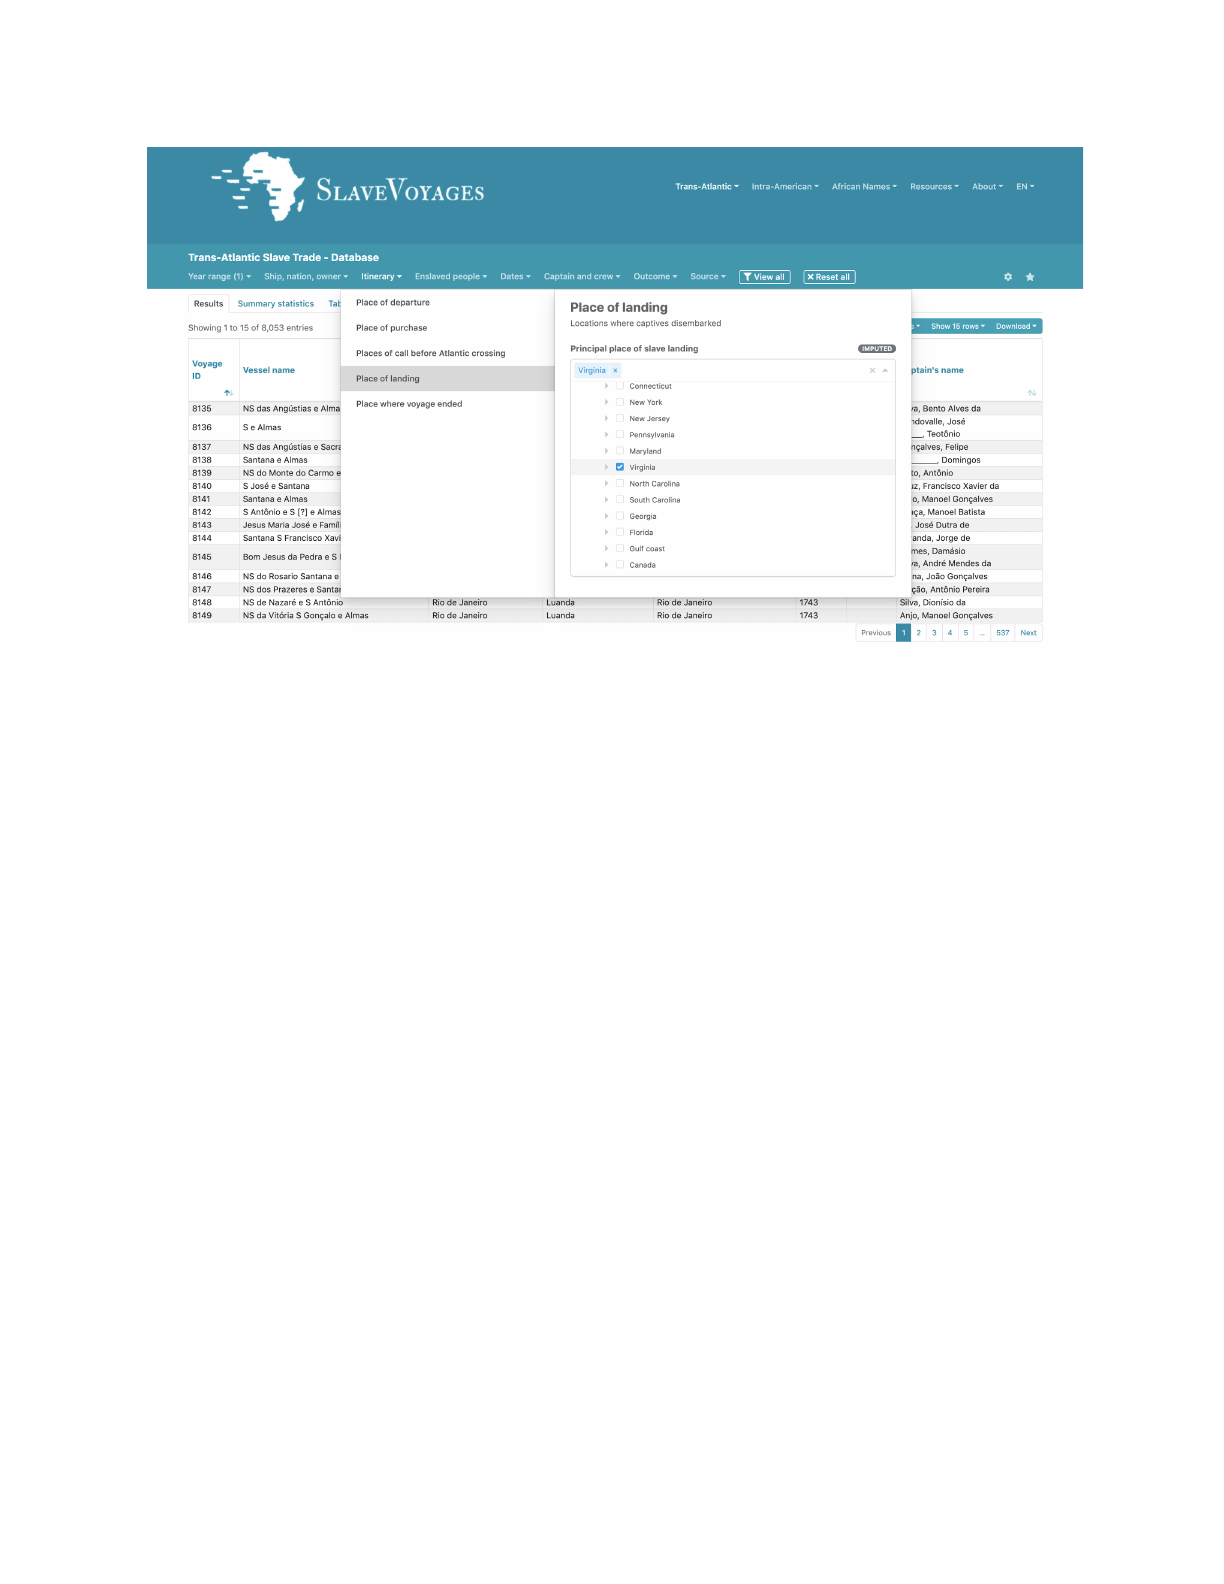
4. Under “Itinerary > Principal Place of Landing > Principal place of slave landing,”
select the destination location(s) you wish to focus on. This can be a continent, a
region, or a particular port. We’ll select, “Virginia”, which you can find under
“Mainland North America”
○ Tip: You can either search for the place you want in the drop-down
menus, or start typing the name in the field in the “Place of Landing”
pop-up window to see if it autofills.
5. After selecting the place of landing, click “Apply.”
As you apply these filters, note that the message “Showing x to x of x entries”, found
above the table, indicates the number of voyages in the database that fit your search
criteria.
Now that you have identified the voyages that match your search, the next step is to
configure the display to show the column information you want about those voyages.
For our sample case, we’ll focus just on the total number of enslaved individuals who
disembarked.
6. At the top right of the results table, click “Configure columns > Slave > Total
disembarked IMP” to add this column to the table displaying your search results
and include it in your download. A column should appear on your table labeled
“Total disembarked IMP.” NOTE: There are many additional columns you could
add depending on your research questions.

You are now ready to download the dataset.
7. Again at the top right of the results table, click “Download > Excel > Filtered
results with visible columns.”
8. The download may take a minute or two. Once it has completed, find the
downloaded file on your computer and give it a descriptive name, such as
“SlaveVoyages-[destination]-[year range],” then move it to a folder on your
computer where you can find it later.

If your project requires additional datasets, this would be a good point in the process to
repeat the above steps but with different filters. For our sample case, we would repeat
steps 3 through 8, but this time in step 4, we would choose New York instead of
Virginia.
TIP: Give each dataset you download a descriptive name so that you remember what
filters you used to create it (e.g. Transatlantic-Virginia-1701-1800.csv).
Additionally, if you’ve started with the Transatlantic database, you will need to decide
if you want gather the same set of information from the Intra-American Slave Trade
Database as well. For our sample map, we aim to include information about enslaved
people arriving from locations in the Americas in addition to those who arrived directly
from Africa, so we will repeat our two queries in the Intra-American database.
9. To switch databases, select the “Intra-American” drop-down menu at the top of
your browser window. Then select “Database.”
10.In the Intra-American Database, the search functions to filter data are exactly
the same as in the Transatlantic database, so repeat steps 3 through 8 above in
the Intra-American Database to gather parallel datasets.
11.Repeat this process for each of the geographic regions and temporal eras that
you decided to include in your map. For our sample map, this would require two
queries, each mirroring queries we already ran on the Transatlantic Database
○ Virginia, 1701-1800
○ New York, 1701-1800
By the time you finish all of your queries, you may have a number of individual
datasets. In our example, we’ll have four, two from each of the two databases. But if
you have additional criteria, you could have many more than this. You may also choose
to combine some of the files once they are downloaded—that’s what we’ll do for our
case by combining files from the two databases so that we’ll end up with two
datasets, one for New York and one for Virginia. Whatever you do, it is important to
give your files descriptive names so that you know what databases and filters they
represent.
SUMMARIZE DATA BY PORT (OPTIONAL)

The data in SlaveVoyages databases is organized by individual voyage or
shipment—each row in the data represents one movement of a single ship carrying
enslaved people. Depending on the map you’re making, you may want to summarize
the data you have by port rather than mapping each individual voyage. Doing this will
allow you to more easily visualize the total number of individuals that passed through
each port location, and you could use these totals to make the point sizes of the ports
relative to the total number of enslaved individuals that passed through each port. To
do this sort of transformation to the data, we’ll use a simple but powerful tool included
in most spreadsheet programs called a pivot table. We’ll need to perform these steps
for each of the datasets we have individually.
A pivot table allows you to select one or more columns from your spreadsheet and
total up numbers for the values in those columns. In our case, we’ll take the column
indicating the place where enslaved people boarded a ship (“Voyage itinerary imputed
principal place of slave purchase (mjbyptimp)”) and total up the numbers of people for
each unique port that is listed.
12.Open one of the spreadsheets you downloaded in Excel or Google Sheets.
13.Create a pivot table from your data. In Google Sheets, you can find this option
under “Data > Pivot table.” In Excel, it is under "Insert > PivotTable" (in
Windows) and “Data > Summarize with PivotTable” (on a Mac). If it is not
already, make sure to set the data range to the original data sheet, then select
“New sheet” (in Google Sheets) or “New Worksheet” (in Excel) for where to
insert the pivot table.

14.In the right hand menu, for “Row”, select the column “Voyage itinerary imputed
principal place of slave purchase (mjbyptimp).” [That is SlaveVoyages’ way of
identifying the place where most enslaved people boarded a particular voyage.]
In Google Sheets, used the “Add” option. In Excel, you can click and drag the
column from the main list list down to the “Rows” box.
15.For Value, select “Total disembarked.” You should now see a list of all of the
unique port names in column A of the pivot table and the total number of
individuals arriving from each port in column B.
NOTE: You can add more columns under “Value” to see more of the data summarized
by port. For instance, you could add “Slaves arrived at 1st port.” This will allow you to
compare the total imputed number of enslaved people who disembarked with the total

number actually recorded in surviving historical documents, which could provide useful
information for thinking about the decisions that researchers must make when they
encounter incomplete historical records.
16.Select all the data cells in this new table, including the header row, copy, and
then paste them into a new sheet. You might need to select “Paste values only”
(in Excel, it is the second choice under “Paste Options” if you right click on the
new sheet) in order to paste in the values without the pivot table functionality.
Give this sheet a descriptive name, like “Summarized Data.”
17. Now is also a good time to rename your column headings to something simpler
and more descriptive. For instance, you could name the columns “Port,”
“Total_Imputed,” and (if you’ve included it) “Total Recorded.”
18.Save your spreadsheet.

ADD LATITUDE AND LONGITUDE
Once you have your spreadsheets in the form you want to map, you will need to add
latitude and longitude information for each of the ports that are listed so that mapping
software can map your points. Most software can do this sort of thing automatically (a
process called geocoding), but the results are only reliable for modern location names.
Since we have historic names, we’ll need to supply the coordinate information
ourselves. Luckily, the SlaveVoyages team has created a port location spreadsheet that
covers the most commonly cited ports in the database. This is what we’ll use to fill out
our spreadsheet. Once again, we’ll be using a special function in spreadsheet software
called VLOOKUP.
19.Open the ports spreadsheet in a separate Excel or Google Sheets window.
20.Select and copy the entire ports table and paste it into a new sheet within your
data spreadsheet.
21.Name the new sheet “ports.”

22.Select the sheet with the data you want to map. In that sheet, create two new
columns on the right, one called Latitude and the other Longitude.
23.In the Latitude column paste in the following code snippet (make sure that the
“A” in “A2” corresponds to the column that contains your port locations—if it
doesn’t change it to the appropriate column letter):
=VLOOKUP(A2,ports!$A$1:$E$973,5,FALSE)
You should see a number with a decimal appear. What just happened? The code
you just pasted has used the “Port” column in that table to search the “ports”
sheet for a match and then returned the number in the latitude column.
24.In the Longitude column paste the following code snippet:
=VLOOKUP(A2,ports!$A$1:$E$973,4,FALSE)
Press enter. Again, you should see a number with a decimal appear.

25.Now hover over the bottom right corner of each of the cells where your formula
appears—your cursor should change to what looks like a plus symbol. Double
click to automatically extend the VLOOKUP code to the bottom of each of the
columns. You should see numbers with decimals appear down both lists.
Note: There may be some locations that return a “0” or “#N/A.” This is because
some ports have yet to be located by researchers, and thus won’t appear on the
map. You’ll want to keep these silences in mind when you read and present your
final map.
26.Save your spreadsheet.

EXPORT AS CSV FILE
Now you are ready to export the summarized data sheet as a CSV, or Comma
Separated Values file. This is a simple version of a spreadsheet file that will be
compatible with mapping software.
27.First, make sure your spreadsheet is saved.
28.Then, while you are in the summarized data sheet, export the sheet as a CSV
file. To do this in Excel, you’ll need to select “File > Save As,” set the file format
to CSV, and give the file a name that makes sense. In Google Sheets, you’ll
select “File > Download” and then choose CSV.
29.Either when you hit save or after the file has downloaded, be sure to give it a
descriptive name, such as “SlaveVoyages-[destination]-[year rage]-geo.”
NOTE: If you’re working in Excel, it is best to now close the file entirely since
Excel is now treating it as a CSV file, which only allows for one sheet at a time.
If you try to make changes to other sheets, there may be problems when you try
to save. Closing and reopening the Excel or CSV file generally makes this less
confusing.
You should now have a CSV file that is ready to load into your mapping software.
If you are including multiple destinations in the Americas or multiple time periods for
comparison in your map, you should have downloaded multiple datasets from
SlaveVoyages.org. You will need to repeat Steps 12-29 for creating a pivot table and
adding geographic coordinates for each downloaded dataset.
